reset NISSAN GT-R 2013 R35 Multi Function Display Owners Manual
[x] Cancel search | Manufacturer: NISSAN, Model Year: 2013, Model line: GT-R, Model: NISSAN GT-R 2013 R35Pages: 315, PDF Size: 6.96 MB
Page 17 of 315
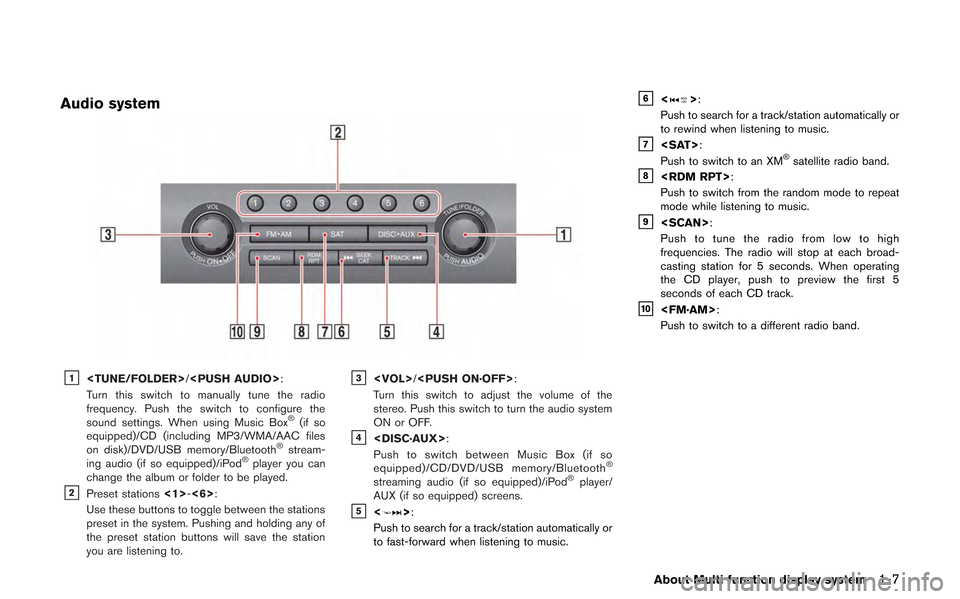
Audio system
&1
Turn this switch to manually tune the radio
frequency. Push the switch to configure the
sound settings. When using Music Box
®(if so
equipped)/CD (including MP3/WMA/AAC files
on disk)/DVD/USB memory/Bluetooth
®stream-
ing audio (if so equipped)/iPod®player you can
change the album or folder to be played.
&2Preset stations <1>-<6>:
Use these buttons to toggle between the stations
preset in the system. Pushing and holding any of
the preset station buttons will save the station
you are listening to.
&3
Turn this switch to adjust the volume of the
stereo. Push this switch to turn the audio system
ON or OFF.
&4
Push to switch between Music Box (if so
equipped)/CD/DVD/USB memory/Bluetooth
®
streaming audio (if so equipped)/iPod®player/
AUX (if so equipped) screens.
&5<>:
Push to search for a track/station automatically or
to fast-forward when listening to music.
&6<>:
Push to search for a track/station automatically or
to rewind when listening to music.
&7
Push to switch to an XM®satellite radio band.&8
Push to switch from the random mode to repeat
mode while listening to music.
&9
Push to tune the radio from low to high
frequencies. The radio will stop at each broad-
casting station for 5 seconds. When operating
the CD player, push to preview the first 5
seconds of each CD track.
&10
Push to switch to a different radio band.
About Multi function display system1-7
Page 30 of 315
Storing route...................................................................... 2-75
Storing tracked route ....................................................... 2-76
Storing avoid area ............................................................ 2-77
Editing address book ....................................................... 2-78
Deleting stored item ......................................................... 2-88
Transferring information to/from address book ......... 2-91 Navigation setting .................................................................. 2-92
Basic operation ............................................................... 2-92
Speed limit indication on map..................................... 2-93
Other navigation settings.............................................. 2-93
Delete stored items ........................................................ 2-97
Reset all navigation settings to default ..................... 2-97
Page 99 of 315
![NISSAN GT-R 2013 R35 Multi Function Display Owners Manual 1. Push<SETTING>.
2. Highlight [Navigation] and push <ENTER>.
3. Highlight [Guidance Settings] and push <ENTER>.
4. Highlight [Others] and push <ENTER>.
5. Highlight [Set Average Speeds] and push <ENT NISSAN GT-R 2013 R35 Multi Function Display Owners Manual 1. Push<SETTING>.
2. Highlight [Navigation] and push <ENTER>.
3. Highlight [Guidance Settings] and push <ENTER>.
4. Highlight [Others] and push <ENTER>.
5. Highlight [Set Average Speeds] and push <ENT](/img/5/316/w960_316-98.png)
1. Push
2. Highlight [Navigation] and push
3. Highlight [Guidance Settings] and push
4. Highlight [Others] and push
5. Highlight [Set Average Speeds] and push
6. Highlight the preferred item and push
7. Use the main directional buttons or the center dial to make an adjustment. The
speed can be increased/decreased by 5
MPH (5 km/h).
8. After finishing the setting, push
or
9. Push
screen. Push
Page 121 of 315
![NISSAN GT-R 2013 R35 Multi Function Display Owners Manual .[Map Icons]:
Set the map icons to display on the map.
“Displaying map icons” (page 2-17)
. [Guidance Settings]:
Set the various functions for the route
guidance.
“Guidance settings” (page 2-6 NISSAN GT-R 2013 R35 Multi Function Display Owners Manual .[Map Icons]:
Set the map icons to display on the map.
“Displaying map icons” (page 2-17)
. [Guidance Settings]:
Set the various functions for the route
guidance.
“Guidance settings” (page 2-6](/img/5/316/w960_316-120.png)
.[Map Icons]:
Set the map icons to display on the map.
“Displaying map icons” (page 2-17)
. [Guidance Settings]:
Set the various functions for the route
guidance.
“Guidance settings” (page 2-62)
. [Route Settings]:
Change the routing preferences.
“Detailed route settings” (page 2-66)
. [Traffic Info Settings]:
Set the various functions of the XM Nav-
Traffic
®information system.“Traffic information settings”
(page 6-11)
. [Weather Info Setting]:
Set the functions of the XM NavWeather
TM
information system.“Weather information settings”
(page 6-20)
. [Speed Limit Info]:
Display speed limit information.
“Speed limit indication on map”
(page 2-93)
. [Others]:
Display other setting items.
“Other navigation settings”
(page 2-93) .
[Delete Stored Information]:
Delete stored locations and the home
setting in the Address Book.
“Delete stored items” (page 2-97)
. [Delete All Previous Destinations]:
Delete all previous destinations.
“Delete stored items” (page 2-97)
. [Delete Previous Starting Point]:
Delete all previous starting points.
“Delete stored items” (page 2-97)
. [Reset All Navigation Settings to Default]:
Reset all of the settings to default.
“Reset all navigation settings to de-
fault” (page 2-97)
SPEED LIMIT INDICATION ON MAP
Turn the [Speed Limit Info] display on or off. The
indicator light illuminates when the speed limit
display function is set to on.
1. Highlight [Speed Limit Info] and push
2. Highlight [Speed Limit Indication on Map] totoggle the function between on and off. The
indicator light illuminates when the speed
limit display function is set to on.
OTHER NAVIGATION SETTINGS
Basic Operation
Navigation2-93
Page 125 of 315
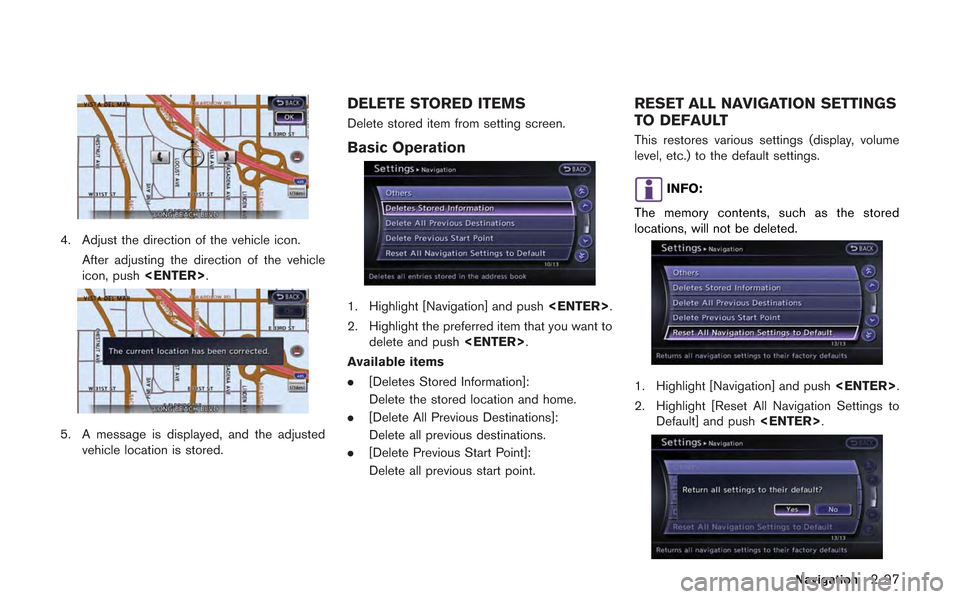
4. Adjust the direction of the vehicle icon.After adjusting the direction of the vehicle
icon, push
5. A message is displayed, and the adjusted
vehicle location is stored.
DELETE STORED ITEMS
Delete stored item from setting screen.
Basic Operation
1. Highlight [Navigation] and push
2. Highlight the preferred item that you want to delete and push
Available items
. [Deletes Stored Information]:
Delete the stored location and home.
. [Delete All Previous Destinations]:
Delete all previous destinations.
. [Delete Previous Start Point]:
Delete all previous start point.
RESET ALL NAVIGATION SETTINGS
TO DEFAULT
This restores various settings (display, volume
level, etc.) to the default settings.
INFO:
The memory contents, such as the stored
locations, will not be deleted.
1. Highlight [Navigation] and push
2. Highlight [Reset All Navigation Settings to Default] and push
Navigation2-97
Page 134 of 315
3-6Audio system
.Do not force the memory stick or USB cable
into the USB connector. This could damage
the connector.
. During cold weather or rainy days, the player
may malfunction due to humidity. If this
occurs, remove the USB device and dehu-
midify or ventilate the USB player comple-
tely.
. The USB player sometimes cannot function
when the passenger compartment tempera-
ture is extremely high. Decrease the tem-
perature before use.
. Do not leave USB memory in a place prone
to static electricity or where the air condi-
tioner blows directly. The data in the USB
memory may be damaged.
. The vehicle is not equipped with a USB
memory stick.
. A USB device cannot be formatted with this
system. To format a USB device, use a
personal computer.
. Partitioned USB devices may not be played
correctly.
. Some characters used in other languages
(Chinese, Japanese, etc.) are not displayed
properly on the vehicle center screen. Using
English language characters with a USB
device is recommended. .
Do not connect a USB device if a connector
or cable is wet. Allow the cable and/or
connectors to dry completely before con-
necting the USB device. If the connector is
exposed to fluids other than water, evapora-
tive residue may cause a short between the
connector pins.
. Large video podcast files cause slow
responses in an iPod
®. The vehicle center
display may momentarily black out, but it will
soon recover.
. If an iPod
®automatically selects large video
podcast files while in the shuffle mode, the
vehicle center display may momentarily
black out, but it will soon recover.
. Audiobooks may not play in the same order
as they appear on an iPod
®.
. An iPod nano®(1st Generation) may remain
in fast forward or rewind mode if it is
connected during a seek operation. In this
case, please manually reset the iPod
®.
. An iPod nano®(2nd Generation) will con-
tinue to fast forward or rewind if it is
disconnected during a seek operation.
. An incorrect song title may appear when the
Play Mode is changed while using the iPod
nano
®(2nd Generation)
iPod®is a trademark of Apple Inc., registered in
the U.S. and other countries.
Compressed Audio Files (MP3/
WMA/AAC/ATRAC3)
Explanation of terms:
. MP3 — MP3 is short for Moving Pictures
Experts Group Audio Layer 3. MP3 is the
most well known compressed digital audio
file format. This format allows for near “CD
quality” sound, but at a fraction of the size of
normal audio files. MP3 conversion of an
audio track can reduce the file size by
approximately a 10:1 ratio (Sampling: 44.1
kHz, Bit rate: 128 kbps) with virtually no
perceptible loss in quality. The compression
reduces certain parts of sound that seem
inaudible to most people.
. WMA — Windows Media Audio (WMA) is a
compressed audio format created by Micro-
soft as an alternative to MP3. The WMA
codec offers greater file compression than
the MP3 codec, enabling storage of more
digital audio tracks in the same amount of
space when compared to MP3s at the same
level of quality.
. AAC/M4A — Advanced Audio Coding
(AAC) is a lossy audio compression format.
Audio files that have been encoded with
AAC are generally smaller in size and deliver
a higher quality of sound than MP3.
Page 141 of 315
TUNE (Tuning):
.For AM and FM radio
Turn the radio TUNE knob for manual tuning.
. For XM Satellite Radio
Turn the radio TUNE knob to seek channels
from all of the categories when any category
is not selected.
SEEK tuning/CATEGORY (CAT):
. For AM and FM radio
Push <
>or <>to tune from low to
high or high to low frequencies and to stop
at the next broadcasting station.
. For XM Satellite Radio
Push <
>or <>to tune to the first
channel of the next or previous category.
During satellite radio reception, the following
notices will be displayed under certain condi-
tions.
. NO SIGNAL (No signal is received while the
SAT tuner is connected.)
. OFF AIR (Broadcasting signed off)
. CHECK ANTENNA (Antenna connection
error)
. LOADING (When the initial setting is
performed) .
UPDATING (When the satellite radio sub-
scription is not active)
SCAN tuning:
Push
frequencies and stop at each broadcasting
station/channel for 5 seconds. Pushing the
button again during this 5 seconds period will
stop SCAN tuning and the radio will remain
tuned to that station/channel.
If
SCAN tuning moves to the next station/channel.
*1to*6Station memory operations:
12 stations/channels can be set for the FM band
(6 each for FM1 and FM2), 18 for XM radio (6
each for XM1, XM2 and XM3) and 6 stations
can be set for the AM band.
1. Choose the radio band using the radio band select button.
2. Tune to the desired station/channel using <
>, <>,
TUNE knob.
3. Push and hold the desired station preset button
*1to*6until the radio mutes.
4. The station indicator will then come on and the sound will resume. Memorizing is now
complete. 5. Other buttons can be set in the same
manner.
If the battery cable is disconnected, or if the fuse
opens, the radio memory will be erased. In that
case, reset the desired stations/channels.
List (AM and FM radio):
When [List] on the display is selected while the
FM or AM radio is being played, the preset
station list will be displayed.
If one of the 6 preset stations listed is touched
and held, the current station will be stored as the
new preset.
Menu (XM Satellite Radio):
When [Menu] on the display is selected while
the XM Satellite Radio is being played, the menu
list will be displayed.
The following items are available.
. Preset List
Displays the preset channel list. If one of the
6 preset stations listed is touched and held,
the current station will be stored as the new
preset.
. Customize Channel List
Selects specific channels to skip while using
the TUNE, SEEK/CATEGORY or Menu-
Categories feature.
Audio system3-13
Page 182 of 315
6-4Viewing technical information
*4Displays the distance to the next intersection on
the route.
*5Displays the distance traveled from the previous
intersection on the route.
Setting by voice command
1. Push <
>located on the steering wheel.
2. After the tone sounds, speak a command.
To display the information about the vehicle
location:
“Information” “Where am I?” (Standard Mode)
“Where am I?” (Alternate Command Mode)
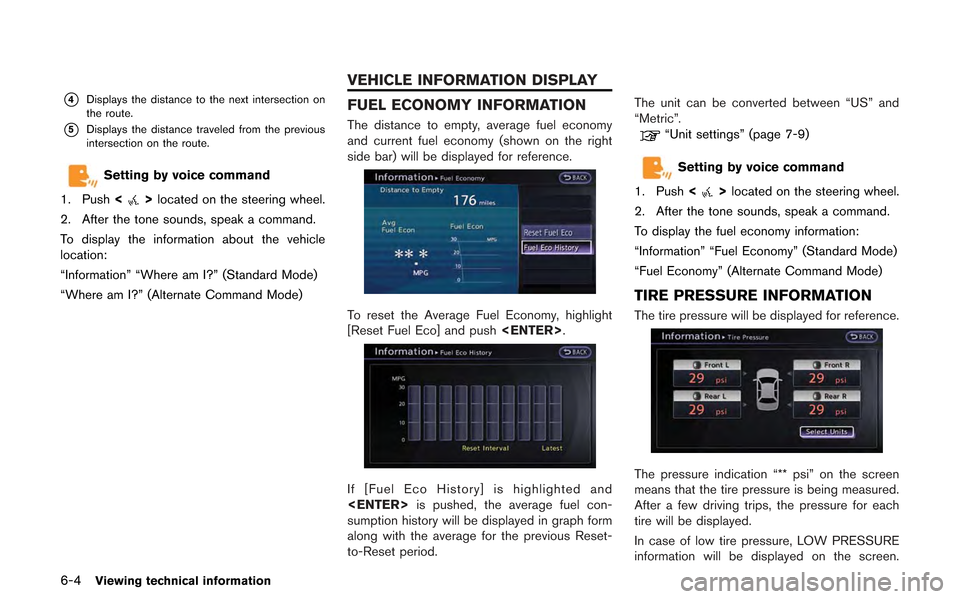
FUEL ECONOMY INFORMATION
The distance to empty, average fuel economy
and current fuel economy (shown on the right
side bar) will be displayed for reference.
To reset the Average Fuel Economy, highlight
[Reset Fuel Eco] and push
If [Fuel Eco History] is highlighted and
sumption history will be displayed in graph form
along with the average for the previous Reset-
to-Reset period. The unit can be converted between “US” and
“Metric”.
“Unit settings” (page 7-9)
Setting by voice command
1. Push <
>located on the steering wheel.
2. After the tone sounds, speak a command.
To display the fuel economy information:
“Information” “Fuel Economy” (Standard Mode)
“Fuel Economy” (Alternate Command Mode)
TIRE PRESSURE INFORMATION
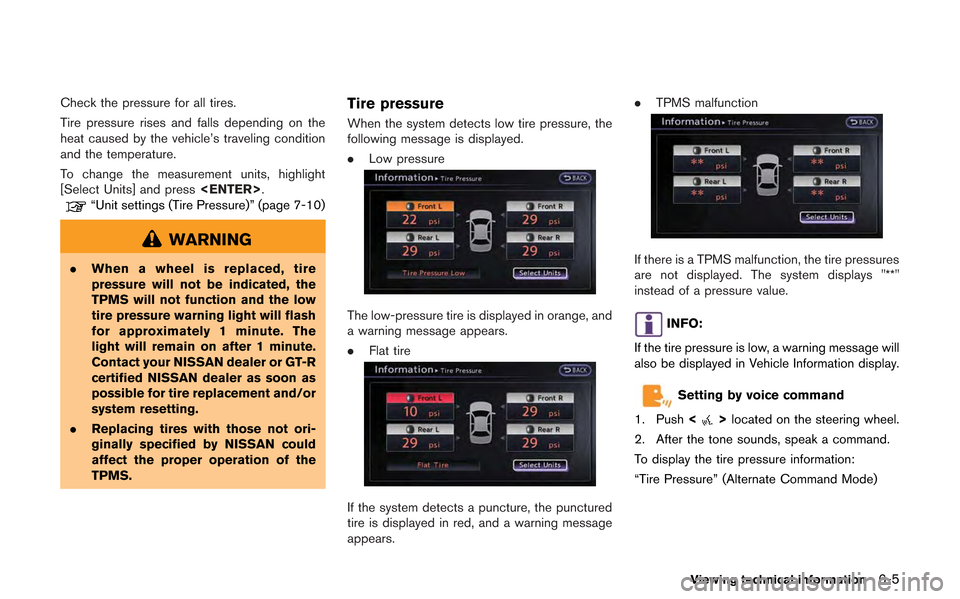
The tire pressure will be displayed for reference.
The pressure indication “** psi” on the screen
means that the tire pressure is being measured.
After a few driving trips, the pressure for each
tire will be displayed.
In case of low tire pressure, LOW PRESSURE
information will be displayed on the screen.
VEHICLE INFORMATION DISPLAY
Page 183 of 315
Check the pressure for all tires.
Tire pressure rises and falls depending on the
heat caused by the vehicle’s traveling condition
and the temperature.
To change the measurement units, highlight
[Select Units] and press
“Unit settings (Tire Pressure)” (page 7-10)
WARNING
.When a wheel is replaced, tire
pressure will not be indicated, the
TPMS will not function and the low
tire pressure warning light will flash
for approximately 1 minute. The
light will remain on after 1 minute.
Contact your NISSAN dealer or GT-R
certified NISSAN dealer as soon as
possible for tire replacement and/or
system resetting.
. Replacing tires with those not ori-
ginally specified by NISSAN could
affect the proper operation of the
TPMS.
Tire pressure
When the system detects low tire pressure, the
following message is displayed.
.Low pressure
The low-pressure tire is displayed in orange, and
a warning message appears.
.Flat tire
If the system detects a puncture, the punctured
tire is displayed in red, and a warning message
appears. .
TPMS malfunction
If there is a TPMS malfunction, the tire pressures
are not displayed. The system displays "**"
instead of a pressure value.
INFO:
If the tire pressure is low, a warning message will
also be displayed in Vehicle Information display.
Setting by voice command
1. Push <
>located on the steering wheel.
2. After the tone sounds, speak a command.
To display the tire pressure information:
“Tire Pressure” (Alternate Command Mode)
Viewing technical information6-5
Page 184 of 315
6-6Viewing technical information
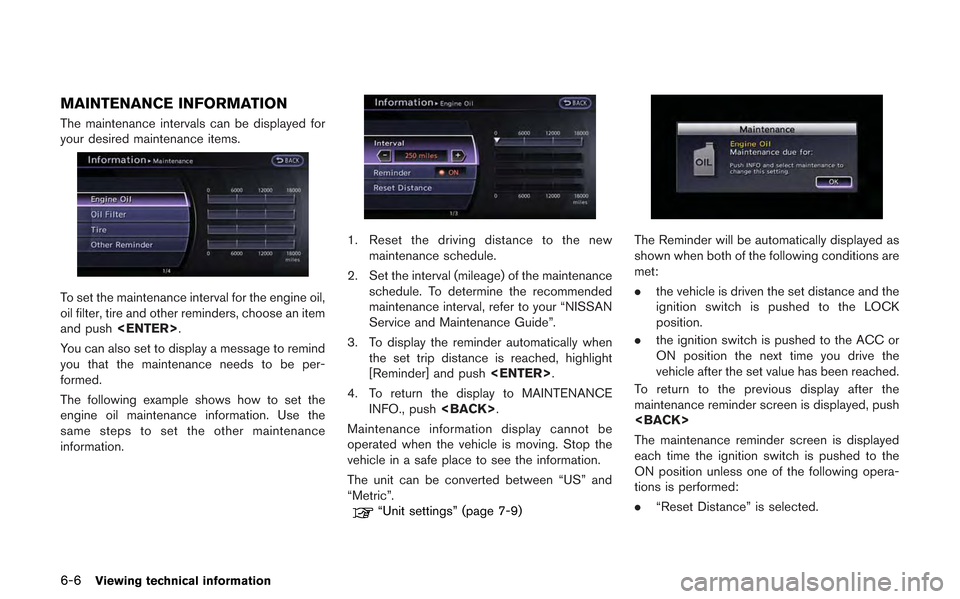
MAINTENANCE INFORMATION
The maintenance intervals can be displayed for
your desired maintenance items.
To set the maintenance interval for the engine oil,
oil filter, tire and other reminders, choose an item
and push
You can also set to display a message to remind
you that the maintenance needs to be per-
formed.
The following example shows how to set the
engine oil maintenance information. Use the
same steps to set the other maintenance
information.
1. Reset the driving distance to the new maintenance schedule.
2. Set the interval (mileage) of the maintenance schedule. To determine the recommended
maintenance interval, refer to your “NISSAN
Service and Maintenance Guide”.
3. To display the reminder automatically when the set trip distance is reached, highlight
[Reminder] and push
4. To return the display to MAINTENANCE INFO., push
Maintenance information display cannot be
operated when the vehicle is moving. Stop the
vehicle in a safe place to see the information.
The unit can be converted between “US” and
“Metric”.
“Unit settings” (page 7-9)
The Reminder will be automatically displayed as
shown when both of the following conditions are
met:
. the vehicle is driven the set distance and the
ignition switch is pushed to the LOCK
position.
. the ignition switch is pushed to the ACC or
ON position the next time you drive the
vehicle after the set value has been reached.
To return to the previous display after the
maintenance reminder screen is displayed, push
The maintenance reminder screen is displayed
each time the ignition switch is pushed to the
ON position unless one of the following opera-
tions is performed:
. “Reset Distance” is selected.