lock NISSAN GT-R 2015 R35 Multi Function Display Owners Manual
[x] Cancel search | Manufacturer: NISSAN, Model Year: 2015, Model line: GT-R, Model: NISSAN GT-R 2015 R35Pages: 298, PDF Size: 11.39 MB
Page 19 of 298
1-10About Multi function display system
MENU SCREEN AND HOW TO OP-
ERATE
Menu screens and their purposes
Push
play the corresponding menu screen.
How to select a menu item:
Example:
1. Turn the center dial clockwise or counter- clockwise. An item is highlighted accord-
ingly. 2. To select the preferred menu item, highlight
the item and push
screen is displayed.
3. Push
screen without applying any changes.
Push
Page 34 of 298
![NISSAN GT-R 2015 R35 Multi Function Display Owners Manual 3. Touch []or[] to change the direction of
the map.
: Rotates the map clockwise.
: Rotates the map counterclockwise.
INFO:
While driving, scrolling on the map is limited to a
specified distance.
CHANG NISSAN GT-R 2015 R35 Multi Function Display Owners Manual 3. Touch []or[] to change the direction of
the map.
: Rotates the map clockwise.
: Rotates the map counterclockwise.
INFO:
While driving, scrolling on the map is limited to a
specified distance.
CHANG](/img/5/423/w960_423-33.png)
3. Touch []or[] to change the direction of
the map.
: Rotates the map clockwise.
: Rotates the map counterclockwise.
INFO:
While driving, scrolling on the map is limited to a
specified distance.
CHANGING SCALE OF MAP
Operating with center dial
1. Turn the center dial when the map screen is displayed. The map scale is displayed at the
right side of the screen.
2. Use the center dial to adjust the map scale.
&1Clockwise: Zoom in&2Counterclockwise: Zoom out
INFO:
Free zoom:
Depending on the setting, using the center dial
to change the map scale may adjust the scale
normally, or it may engage the free zoom (finer
scale adjustment in smaller steps) .
“Other navigation settings” (page 2-92)
Navigation2-9
Page 124 of 298
AM radio reception:
AM signals, because of their low frequency, can
bend around objects and skip along the ground.
In addition, the signals can be bounced off the
ionosphere and bent back to earth. Because of
these characteristics. AM signals are also
subject to interference as they travel from
transmitter to receiver.
Fading: Occurs while the vehicle is passing
through freeway underpasses or in areas with
many tall buildings. It can also occur for several
seconds during ionospheric turbulence even in
areas where no obstacles exist.
Static: Caused by thunderstorms, electrical
power lines, electric signs and even traffic lights.
Satellite radio reception:
When the satellite radio is used for the first time
or the battery has been replaced, the satellite
radio may not work properly. This is not a
malfunction. Wait more than 10 minutes with the
satellite radio ON and the vehicle outside of any
metal or large building for the satellite radio to
receive all of the necessary data.
The satellite radio mode requires an active
SiriusXM Satellite Radio subscription. The sa-
tellite radio is not available in Alaska, Hawaii and
Guam.
The satellite radio performance may be affectedif cargo carried on the roof blocks the satellite
radio signal.
If possible, do not put cargo near the satellite
antenna.
A build up of ice on the satellite radio antenna
can affect satellite radio performance. Remove
the ice to restore satellite radio reception.Compact Disc (CD) player
.
Do not force a compact disc into the CD
insert slot. This could damage the CD and/
or CD changer/player.
. Trying to load a CD with the CD door closed
could damage the CD and/or CD changer.
Audio system3-3
Page 132 of 298
— Receiving a hands-free call.
— Checking the connection to the hands-free phone.
. Do not place a Bluetooth
®audio device in
an area surrounded by metal or far away
from the in-vehicle Bluetooth
®module to
prevent tone quality degradation and wire-
less connection disruption.
. While an audio device is connected through
a Bluetooth
®wireless connection, the bat-
tery power of the device may discharge
quicker than usual.
. This system supports the Bluetooth
®Audio
Distribution Profile (A2DP, AVRCP).
. Bluetooth
®is a trademark owned by Blue-
tooth SIG, Inc., and licensed to Clarion Co.,
Ltd.
ANTENNA
Window antenna
The antenna pattern is printed inside the rear
window.
CAUTION
. Do not place metalized film near the
rear window glass or attach any
metal parts to it. This may cause
poor reception or noise.
. When cleaning the inside of the rear
window, be careful not to scratch or
damage the rear window antenna.
Lightly wipe along the antenna with
a dampened soft cloth.
FM-AM-SAT RADIO WITH COM-
PACT DISC (CD) PLAYER
The satellite radio mode requires an active
SiriusXM Satellite Radio subscription. The sa-
tellite radio is not available in Alaska, Hawaii and
Guam.
It may take some time to receive the activation
signal after subscribing the SiriusXM Satellite
Radio. After receiving the activation signal, an
available channel list will be automatically
updated in the radio. Push the ignition switch
from LOCK to ACC to update the channel list.
Audio main operation
Head unit:
The auto loudness circuit enhances the low and
high frequency ranges automatically in both
radio reception and CD playback.
ON·OFF/Volume control:
Push the ignition switch to the ACC or ON
position, and then push the ON·OFF button
while the system is off to turn on the last audio
source (i.e. FM or CD) , which was playing
immediately before the system was turned off.
While the system is on, pushing the ON·OFF
button turns the system off.
Turn the VOL control knob to adjust the volume.
Audio system3-11
Page 149 of 298
4-2Bluetooth®Hands-Free Phone System
WARNING
.Use a phone after stopping your
vehicle in a safe location. If you
have to use a phone while driving,
exercise extreme caution at all
times so full attention may be given
to vehicle operation.
. If you are unable to devote full
attention to vehicle operation while
talking on the phone, pull off the
road to a safe location and stop
your vehicle.
CAUTION
To avoid draining the vehicle battery,
use a phone after starting the engine.
Your vehicle is equipped with Bluetooth
®
Hands-Free Phone System. If you are an owner
of a compatible Bluetooth®enabled cellular
phone, you can set up the wireless connection
between your cellular phone and the in-vehicle
phone module. With Bluetooth
®wireless tech-
nology, you can make or receive a telephone call
with your cellular phone in your pocket. Once a cellular phone is connected to the in-
vehicle phone module, no phone connecting
procedure is required anymore. Your phone is
automatically connected with the in-vehicle
phone module when the ignition switch is
pushed to the ON position with the registered
cellular phone turned on and carried in the
vehicle.
You can register up to 5 different Bluetooth
®
cellular phones in the in-vehicle phone module.
However, you can talk on only one cellular phone
at a time.
The NISSAN Voice Recognition system sup-
ports the phone commands, so dialing a phone
number using your voice is possible.
“8. Voice recognition”
Before using the Bluetooth®Hands-Free Phone
System, refer to the following notes.
. Set up the wireless connection between a
compatible cellular phone and the in-vehicle
phone module before using the Bluetooth
®
Hands-Free Phone System.
. Some Bluetooth®enabled cellular phones
may not be recognized by the in-vehicle
phone module. Please visit
www.nissanusa.com/bluetooth for a recom-
mended phone list. .
You will not be able to use a hands-free
phone under the following conditions:
— Your vehicle is outside of the telephone
service area.
— Your vehicle is in an area where it is difficult to receive radio waves; such as in
a tunnel, in an underground parking
garage, behind a tall building or in a
mountainous area.
— Your cellular phone is locked in order not to be dialed.
. When the radio wave condition is not ideal
or ambient sound is too loud, it may be
difficult to hear the other person’s voice
during a call.
. Immediately after the ignition switch is
pushed to the ON position, it may be
impossible to receive a call for a short
period of time.
. Do not place the cellular phone in an area
surrounded by metal or far away from the in-
vehicle phone module to prevent tone quality
degradation and wireless connection dis-
ruption.
. While a cellular phone is connected through
the Bluetooth
®wireless connection, the
battery power of the cellular phone may
discharge quicker than usual.
BLUETOOTH®HANDS-FREE PHONE
SYSTEM
Page 169 of 298
6-6Viewing technical information
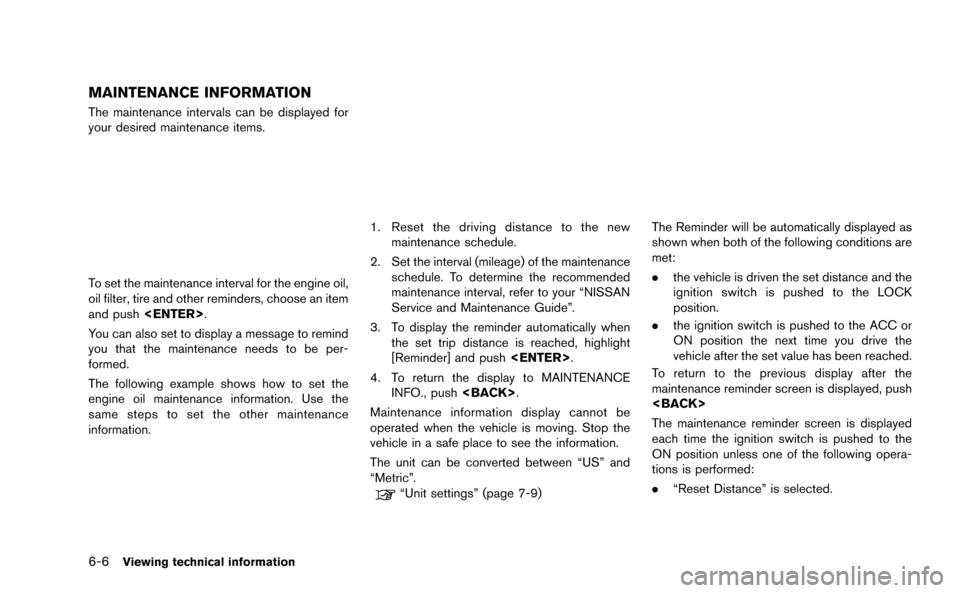
MAINTENANCE INFORMATION
The maintenance intervals can be displayed for
your desired maintenance items.
To set the maintenance interval for the engine oil,
oil filter, tire and other reminders, choose an item
and push
You can also set to display a message to remind
you that the maintenance needs to be per-
formed.
The following example shows how to set the
engine oil maintenance information. Use the
same steps to set the other maintenance
information.
1. Reset the driving distance to the new maintenance schedule.
2. Set the interval (mileage) of the maintenance schedule. To determine the recommended
maintenance interval, refer to your “NISSAN
Service and Maintenance Guide”.
3. To display the reminder automatically when the set trip distance is reached, highlight
[Reminder] and push
4. To return the display to MAINTENANCE INFO., push
Maintenance information display cannot be
operated when the vehicle is moving. Stop the
vehicle in a safe place to see the information.
The unit can be converted between “US” and
“Metric”.
“Unit settings” (page 7-9)
The Reminder will be automatically displayed as
shown when both of the following conditions are
met:
. the vehicle is driven the set distance and the
ignition switch is pushed to the LOCK
position.
. the ignition switch is pushed to the ACC or
ON position the next time you drive the
vehicle after the set value has been reached.
To return to the previous display after the
maintenance reminder screen is displayed, push
The maintenance reminder screen is displayed
each time the ignition switch is pushed to the
ON position unless one of the following opera-
tions is performed:
. “Reset Distance” is selected.
Page 188 of 298
7 Other settings
Settings screen ........................................................................\
.. 7-2Basic operation .................................................................... 7-2
Audio settings ........................................................................\
..... 7-3
Display settings ........................................................................\
.. 7-4 Basic operation .................................................................... 7-4
Display adjustment .............................................................. 7-4
Setting color theme ............................................................. 7-5
Volume adjustment .................................................................... 7-6 Basic operation .................................................................... 7-6 Clock settings ........................................................................\
.... 7-7
Basic operation .................................................................. 7-7
Comfort settings........................................................................\
7-8
Language and unit settings .................................................... 7-8 Language settings ............................................................. 7-8
Unit settings ........................................................................\
7-9
Unit settings (Tire Pressure) ........................................ 7-10
Image viewer ........................................................................\
... 7-10 Full screen display .......................................................... 7-11
Setting the image viewer .............................................. 7-11
Page 189 of 298
7-2Other settings
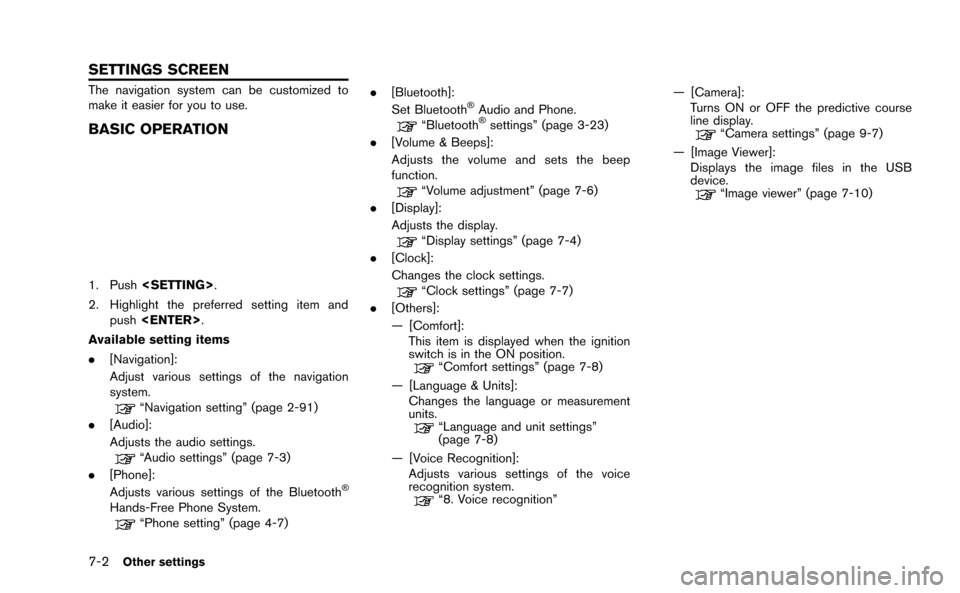
The navigation system can be customized to
make it easier for you to use.
BASIC OPERATION
1. Push
2. Highlight the preferred setting item and push
Available setting items
. [Navigation]:
Adjust various settings of the navigation
system.
“Navigation setting” (page 2-91)
. [Audio]:
Adjusts the audio settings.
“Audio settings” (page 7-3)
. [Phone]:
Adjusts various settings of the Bluetooth
®
Hands-Free Phone System.“Phone setting” (page 4-7) .
[Bluetooth]:
Set Bluetooth
®Audio and Phone.“Bluetooth®settings” (page 3-23)
. [Volume & Beeps]:
Adjusts the volume and sets the beep
function.
“Volume adjustment” (page 7-6)
. [Display]:
Adjusts the display.
“Display settings” (page 7-4)
. [Clock]:
Changes the clock settings.
“Clock settings” (page 7-7)
. [Others]:
— [Comfort]:
This item is displayed when the ignition
switch is in the ON position.
“Comfort settings” (page 7-8)
— [Language & Units]: Changes the language or measurement
units.
“Language and unit settings”
(page 7-8)
— [Voice Recognition]: Adjusts various settings of the voice
recognition system.
“8. Voice recognition” — [Camera]:
Turns ON or OFF the predictive course
line display.
“Camera settings” (page 9-7)
— [Image Viewer]: Displays the image files in the USB
device.
“Image viewer” (page 7-10)
SETTINGS SCREEN
Page 194 of 298
![NISSAN GT-R 2015 R35 Multi Function Display Owners Manual This changes the clock settings.
BASIC OPERATION
1. Push<SETTING>.
2. Highlight [Clock] and push <ENTER>.
3. Highlight the preferred adjustment item and push <ENTER>.
4. Use the center dial to adjust NISSAN GT-R 2015 R35 Multi Function Display Owners Manual This changes the clock settings.
BASIC OPERATION
1. Push<SETTING>.
2. Highlight [Clock] and push <ENTER>.
3. Highlight the preferred adjustment item and push <ENTER>.
4. Use the center dial to adjust](/img/5/423/w960_423-193.png)
This changes the clock settings.
BASIC OPERATION
1. Push
2. Highlight [Clock] and push
3. Highlight the preferred adjustment item and push
4. Use the center dial to adjust to the preferred setting. Push
5. After setting, push
to apply the setting.
6. Push
screen. Push
current location map screen.
Available setting items
. [On-screen Clock]:
Select to toggle the clock display located in
the top right corner of the display between
on and off. The indicator light illuminates when the clock display is set to on.
. [Clock Format (24h)]:
Select the clock format between 12-hour
and 24-hour times. The indicator light
illuminates when the clock is set to the 24-
hour format.
. [Offset (hour)]:
Use the center dial to adjust the offset value
(between −12 and +12).
. [Offset (min)]:
Use the center dial to adjust the offset value
(between −59 and +59).
. [Daylight Savings Time]:
Select to toggle the daylight savings time
setting between on and off. The indicator
light illuminates when the daylight savings
time setting is set to on.
. [Time Zone]:
Select an appropriate time zone from the list
that appears when this item is highlighted.
— Pacific
— Mountain
— Central
— Eastern
— Atlantic — Newfoundland
— Hawaii
— Alaska
Other settings7-7
CLOCK SETTINGS
Page 195 of 298
![NISSAN GT-R 2015 R35 Multi Function Display Owners Manual 7-8Other settings
This key does not appear on the display until the
ignition switch is pushed to the ON position.
1. Push<SETTING>.
2. Highlight [Comfort] and push <ENTER>.
3. Highlight the preferred NISSAN GT-R 2015 R35 Multi Function Display Owners Manual 7-8Other settings
This key does not appear on the display until the
ignition switch is pushed to the ON position.
1. Push<SETTING>.
2. Highlight [Comfort] and push <ENTER>.
3. Highlight the preferred](/img/5/423/w960_423-194.png)
7-8Other settings
This key does not appear on the display until the
ignition switch is pushed to the ON position.
1. Push
2. Highlight [Comfort] and push
3. Highlight the preferred setting item and push
selected item illuminates.
4. After setting, push
to apply the setting.
5. Push
screen. Push
current location map screen.
Available items
. Auto Interior Illumination:
When this item is turned to ON, the interior
lights will illuminate if any door is unlocked. .
Speed Sensing Wiper Interval:
When this item is turned to ON, the wiper
interval is adjusted automatically according
to the vehicle speed.
. Selective Door Unlock:
When this item is turned to ON, only the
driver’s door is unlocked first after the door
unlock operation. When the door handle
request switch on the driver’s or front
passenger’s side door is pushed to be
unlocked, only the corresponding door is
unlocked first. All the doors can be unlocked
if the door unlock operation is performed
again within 60 seconds.
When this item is turned to OFF, all the
doors will be unlocked after the door unlock
operation is performed once.
. Intelligent Key Lock/Unlock:
When this item is turned to ON, door lock/
unlock function by pushing the door handle
request switch will be activated.
. Return All Settings to Default:
Select this item, push
choose [YES] if you want to return all
settings to the default.
This changes the language and measurement
unit used in the system.
LANGUAGE SETTINGS
1. Push
2. Highlight [Others] and push
3. Highlight [Language & Units] and push
4. Highlight [Select Language] and push
COMFORT SETTINGS LANGUAGE AND UNIT SETTINGS