NISSAN LATIO 2009 Service Repair Manual
Manufacturer: NISSAN, Model Year: 2009, Model line: LATIO, Model: NISSAN LATIO 2009Pages: 4331, PDF Size: 58.04 MB
Page 401 of 4331
AV
N
O P
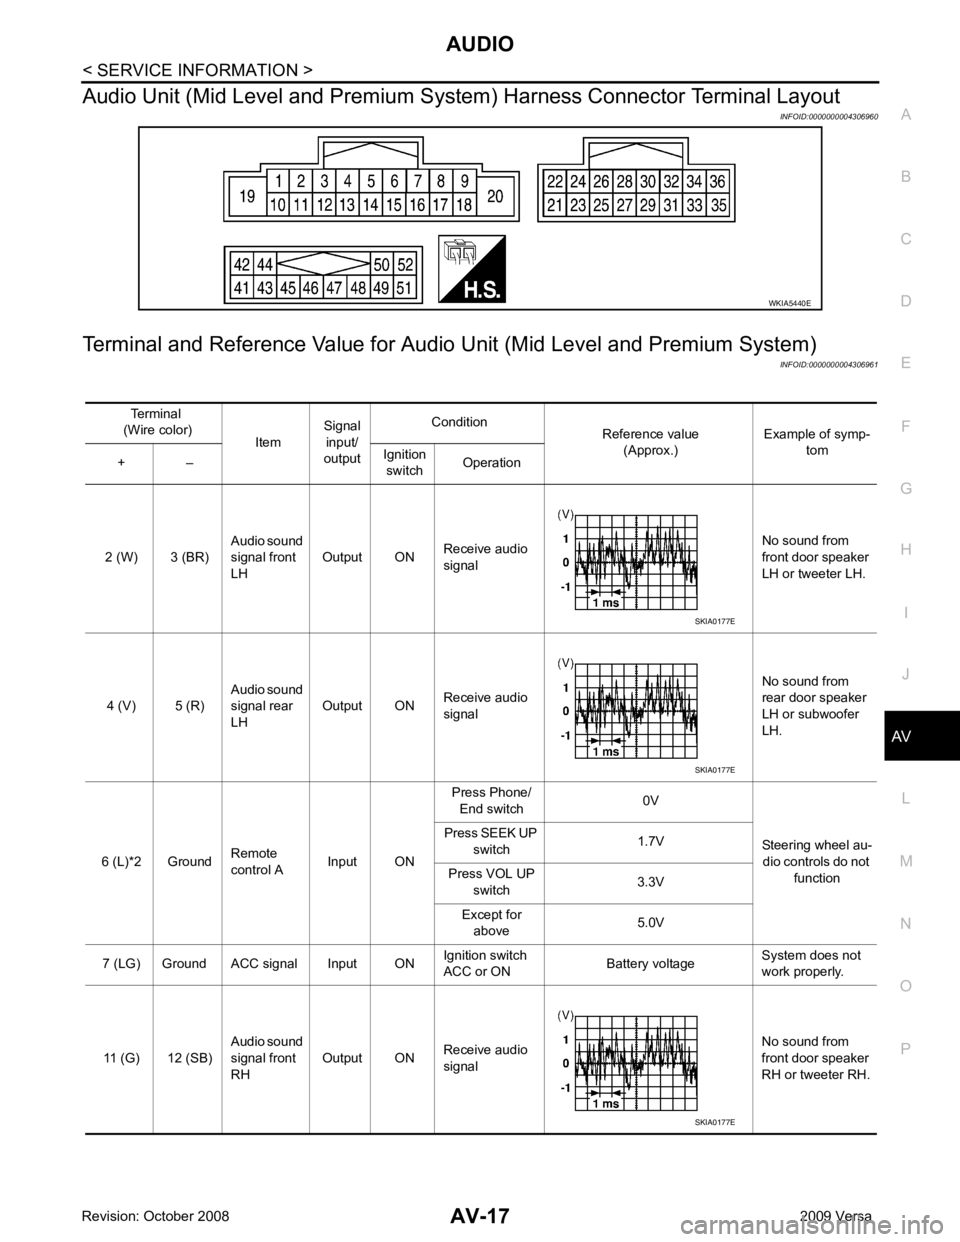
Audio Unit (Mid Level and Premium S
ystem) Harness Connector Terminal Layout
INFOID:0000000004306960
Terminal and Reference Value for Audio Unit (Mid Level and Premium System)
INFOID:0000000004306961 SKIA0177E
Page 402 of 4331
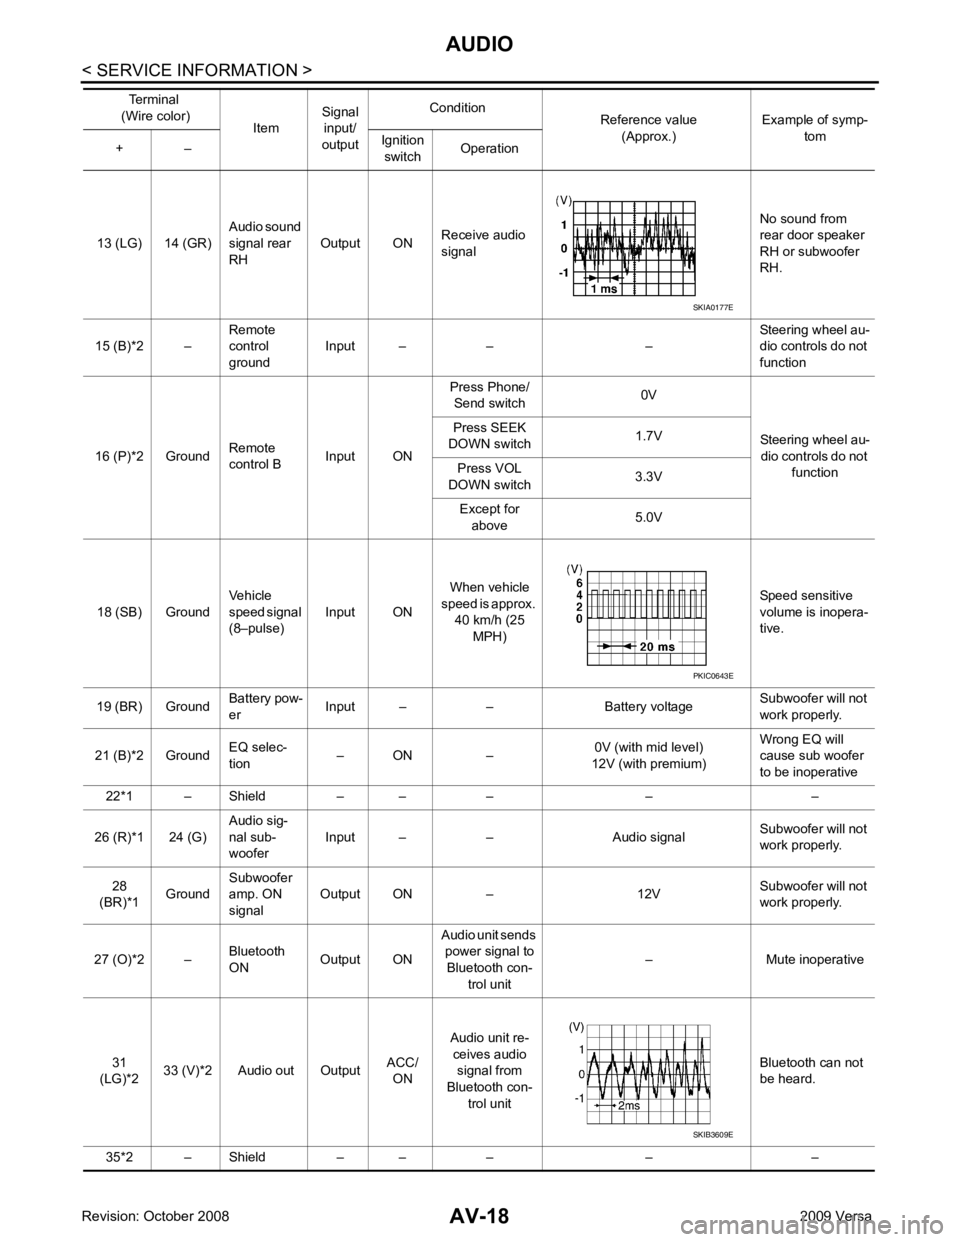
PKIC0643E
SKIB3609E
Page 403 of 4331
AUDIO
AV-19
< SERVICE INFORMATION >
C
D E
F
G H
I
J
L
M A
B AV
N
O P
*1: With premium system
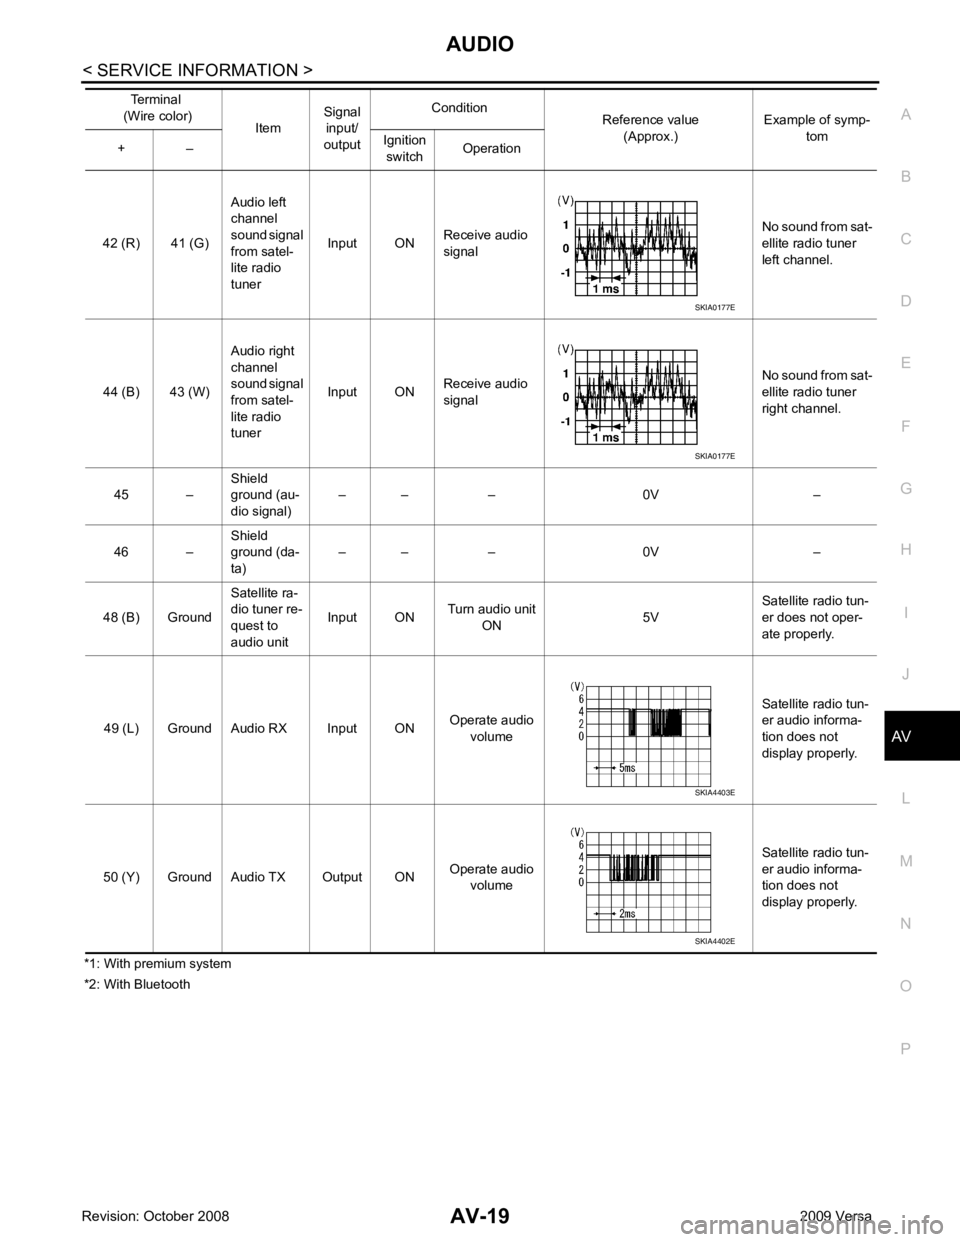
*2: With Bluetooth 42 (R) 41 (G)
Audio left
channel
sound signal
from satel-
lite radio
tuner Input ON
Receive audio
signal No sound from sat-
ellite radio tuner
left channel.
44 (B) 43 (W) Audio right
channel
sound signal
from satel-
lite radio
tuner Input ON
Receive audio
signal No sound from sat-
ellite radio tuner
right channel.
45 – Shield
ground (au-
dio signal) – – – 0V –
46 – Shield
ground (da-
ta) – – – 0V –
48 (B) Ground Satellite ra-
dio tuner re-
quest to
audio unit Input ON
Turn audio unit
ON 5VSatellite radio tun-
er does not oper-
ate properly.
49 (L) Ground Audio RX Input ON Operate audio
volume Satellite radio tun-
er audio informa-
tion does not
display properly.
50 (Y) Ground Audio TX Output ON Operate audio
volume Satellite radio tun-
er audio informa-
tion does not
display properly.
Terminal
(Wire color) ItemSignal
input/
output Condition
Reference value
(Approx.) Example of symp-
tom
+ – Ignition
switch Operation SKIA0177E
SKIA0177E
SKIA4403E
SKIA4402E
Page 404 of 4331
Page 405 of 4331
AUDIO
AV-21
< SERVICE INFORMATION >
C
D E
F
G H
I
J
L
M A
B AV
N
O P
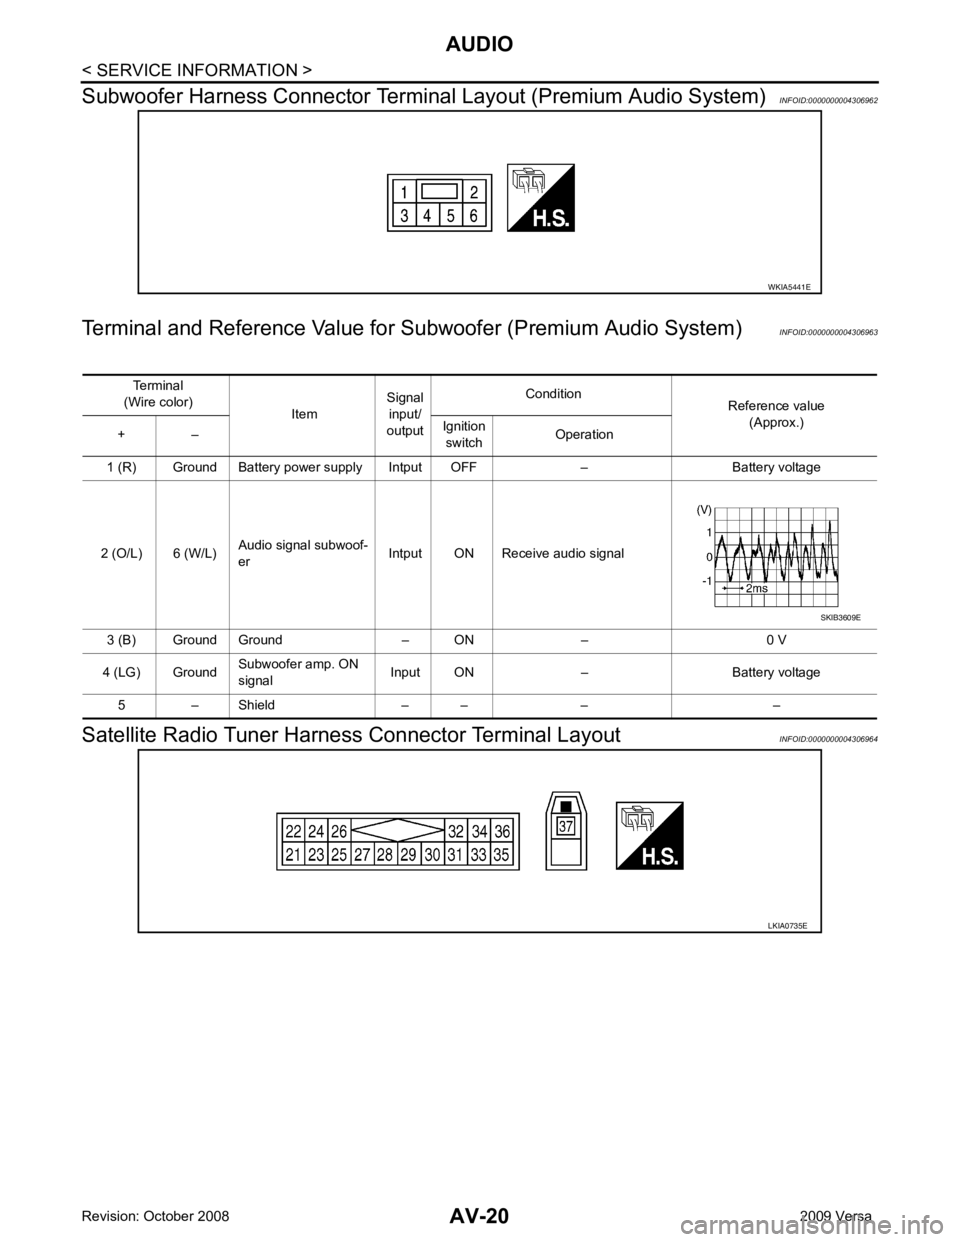
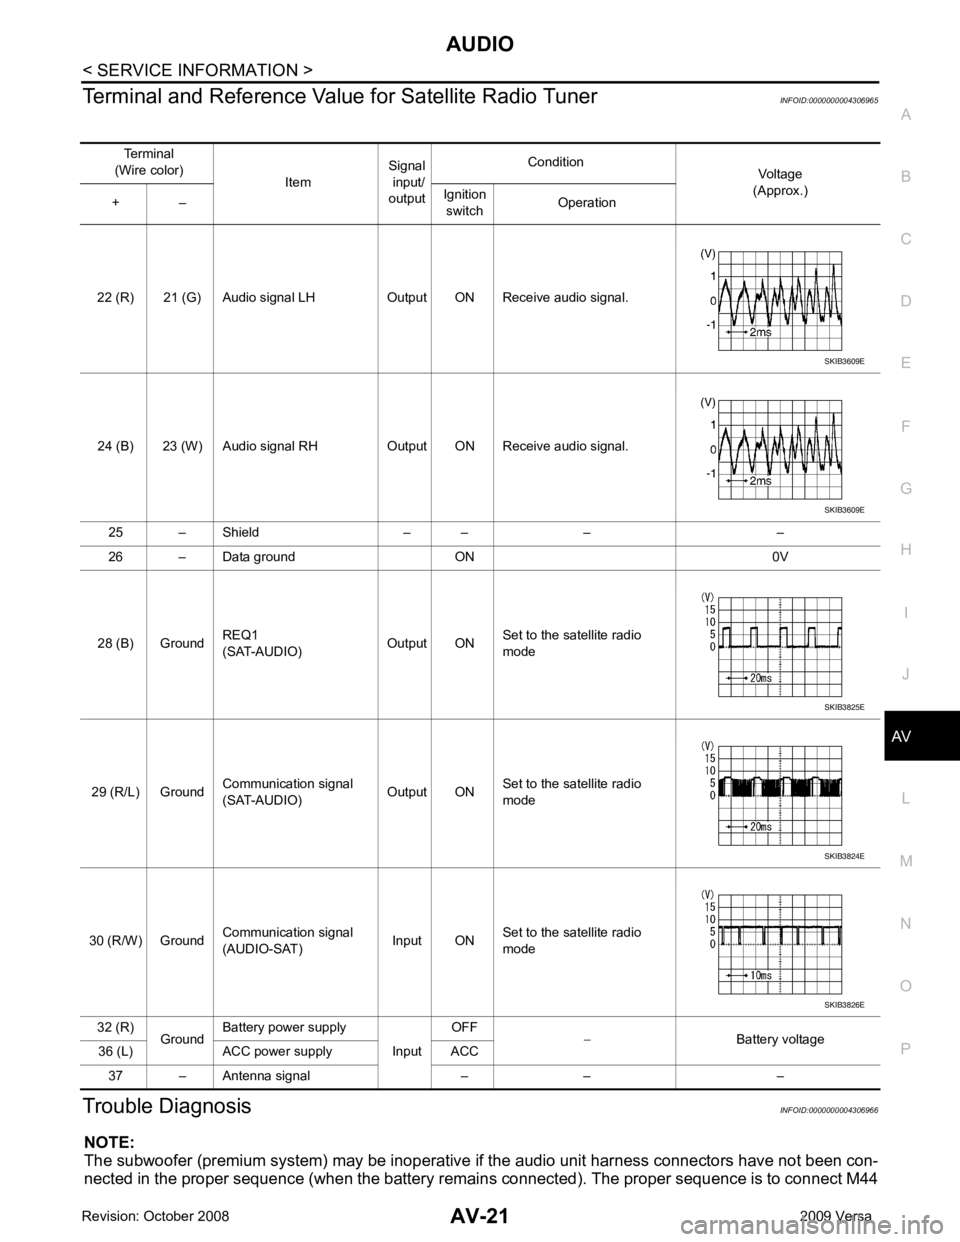
Terminal and Reference Valu
e for Satellite Radio Tuner INFOID:0000000004306965
Trouble Diagnosis INFOID:0000000004306966
NOTE:
The subwoofer (premium system) may be inoperative if the audio unit harness connectors have not been con-
nected in the proper sequence (when the battery remain s connected). The proper sequence is to connect M44
Terminal
(Wire color) ItemSignal
input/
output Condition
Voltage
(Approx.)
+ – Ignition
switch Operation
22 (R) 21 (G) Audio signal LH Output ON Receive audio signal.
24 (B) 23 (W) Audio signal RH Output ON Receive audio signal. 25 – Shield – – – –
26 – Data ground ON 0V
28 (B) Ground REQ1
(SAT-AUDIO) Output ONSet to the satellite radio
mode
29 (R/L) Ground Communication signal
(SAT-AUDIO) Output ONSet to the satellite radio
mode
30 (R/W) Ground Communication signal
(AUDIO-SAT) Input ON
Set to the satellite radio
mode
32 (R) GroundBattery power supply
InputOFF
− Battery voltage
36 (L) ACC power supply ACC
37 – Antenna signal – – – SKIB3609E
SKIB3609E
SKIB3825E
SKIB3824E
SKIB3826E
Page 406 of 4331
35, " Sound Is Not Heard from S
ubwoofer (Premium System) " .
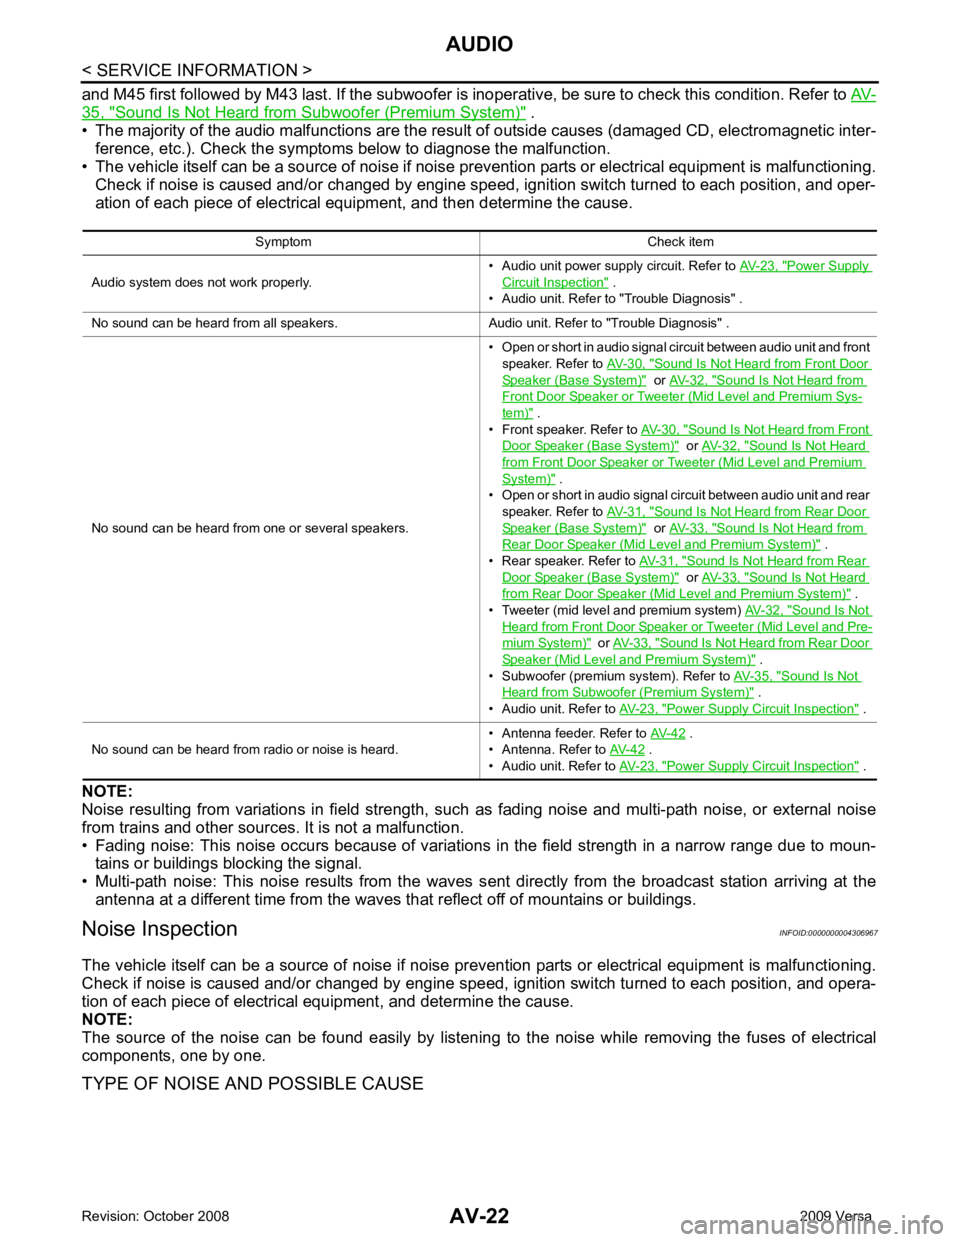
• The majority of the audio malfunctions are the result of outside causes (damaged CD, electromagnetic inter-
ference, etc.). Check the symptom s below to diagnose the malfunction.
• The vehicle itself can be a source of noise if noise prevention parts or electrical equipment is malfunctioning.
Check if noise is caused and/or changed by engine speed, ignition switch turned to each position, and oper-
ation of each piece of electrical equipment, and then determine the cause.
NOTE:
Noise resulting from variations in field strength, such as fading noise and multi-path noise, or external noise
from trains and other sources. It is not a malfunction.
• Fading noise: This noise occurs because of variations in the field strength in a narrow range due to moun- tains or buildings blocking the signal.
• Multi-path noise: This noise results from the waves s ent directly from the broadcast station arriving at the
antenna at a different time from the waves that reflect off of mountains or buildings.
Noise Inspection INFOID:0000000004306967
The vehicle itself can be a source of noise if noise prevention parts or electrical equipment is malfunctioning.
Check if noise is caused and/or changed by engine speed, ignition switch turned to each position, and opera-
tion of each piece of electrical equipment, and determine the cause.
NOTE:
The source of the noise can be found easily by listening to the noise while removing the fuses of electrical
components, one by one.
TYPE OF NOISE AND POSSIBLE CAUSE Symptom Check item
Audio system does not work properly. • Audio unit power supply circuit. Refer to
AV-23, " Power Supply
Circuit Inspection " .
• Audio unit. Refer to "Trouble Diagnosis" .
No sound can be heard from all speakers. Audio unit. Refer to "Trouble Diagnosis" .
No sound can be heard from one or several speakers. • Open or short in audio signal circuit between audio unit and front
speaker. Refer to AV-30, " Sound Is Not Heard from Front Door
Speaker (Base System) " or
AV-32, " Sound Is Not Heard from
Front Door Speaker or Tweeter (Mid Level and Premium Sys-
tem) " .
• Front speaker. Refer to AV-30, " Sound Is Not Heard from Front
Door Speaker (Base System) " or
AV-32, " Sound Is Not Heard
from Front Door Speaker or Tweeter (Mid Level and Premium
System) " .
• Open or short in audio signal circuit between audio unit and rear
speaker. Refer to AV-31, " Sound Is Not Heard from Rear Door
Speaker (Base System) " or
AV-33, " Sound Is Not Heard from
Rear Door Speaker (Mid Level and Premium System) " .
• Rear speaker. Refer to AV-31, " Sound Is Not Heard from Rear
Door Speaker (Base System) " or
AV-33, " Sound Is Not Heard
from Rear Door Speaker (Mid Level and Premium System) " .
• Tweeter (mid level and premium system) AV-32, " Sound Is Not
Heard from Front Door Speaker or Tweeter (Mid Level and Pre-
mium System) " or
AV-33, " Sound Is Not Heard from Rear Door
Speaker (Mid Level and Premium System) " .
• Subwoofer (premium system). Refer to AV-35, " Sound Is Not
Heard from Subwoofer (Premium System) " .
• Audio unit. Refer to AV-23, " Power Supply Circuit Inspection " .
No sound can be heard from radio or noise is heard. • Antenna feeder. Refer to
AV-42 .
• Antenna. Refer to AV-42 .
• Audio unit. Refer to AV-23, " Power Supply Circuit Inspection " .
Page 407 of 4331
AV
N
O P
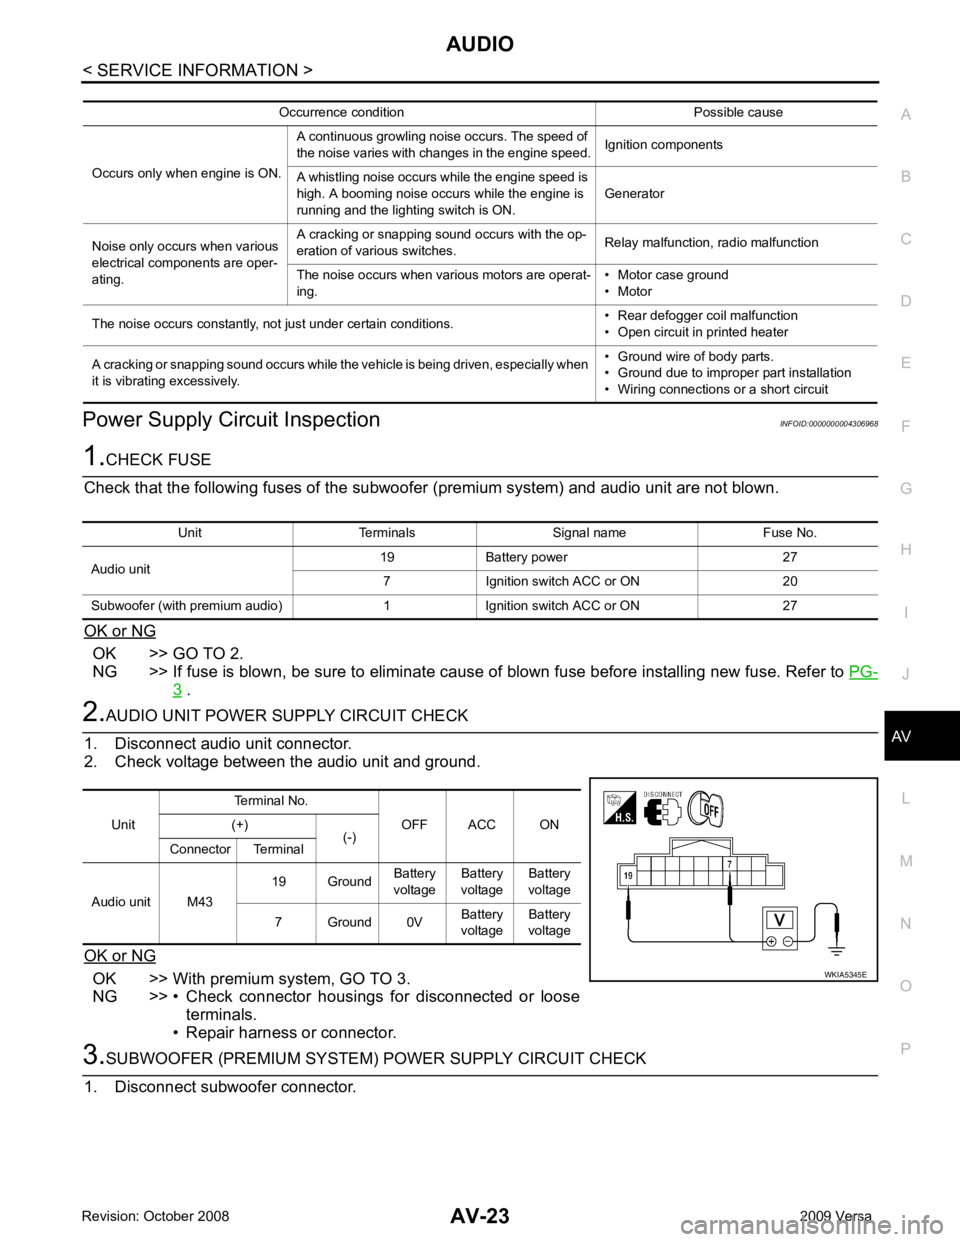
Power Supply Circuit Inspection
INFOID:0000000004306968OK >> GO TO 2.
NG >> If fuse is blown, be sure to eliminate cause of blown fuse before installing new fuse. Refer to PG-3 .
OK >> With premium system, GO TO 3.
NG >> • Check connector housings for disconnected or loose terminals.
• Repair harness or connector. Unit Terminals Signal name Fuse No.
Audio unit 19 Battery power 27
7 Ignition switch ACC or ON 20
Subwoofer (with premium audio) 1 Ignition switch ACC or ON 27 Unit
Terminal No.
OFF ACC ON
(+)
(-)
Connector Terminal
Audio unit M43 19 Ground
Battery
voltage Battery
voltage Battery
voltage
7 Ground 0V Battery
voltage Battery
voltage
Page 408 of 4331
OK >> GO TO 4.
NG >> • Check connector housings for disconnected or loose
terminals.
• Repair harness or connector. OK >> Inspection End.
NG >> • Check connector housings for disconnected or loose
terminals.
• Repair harness or connector.
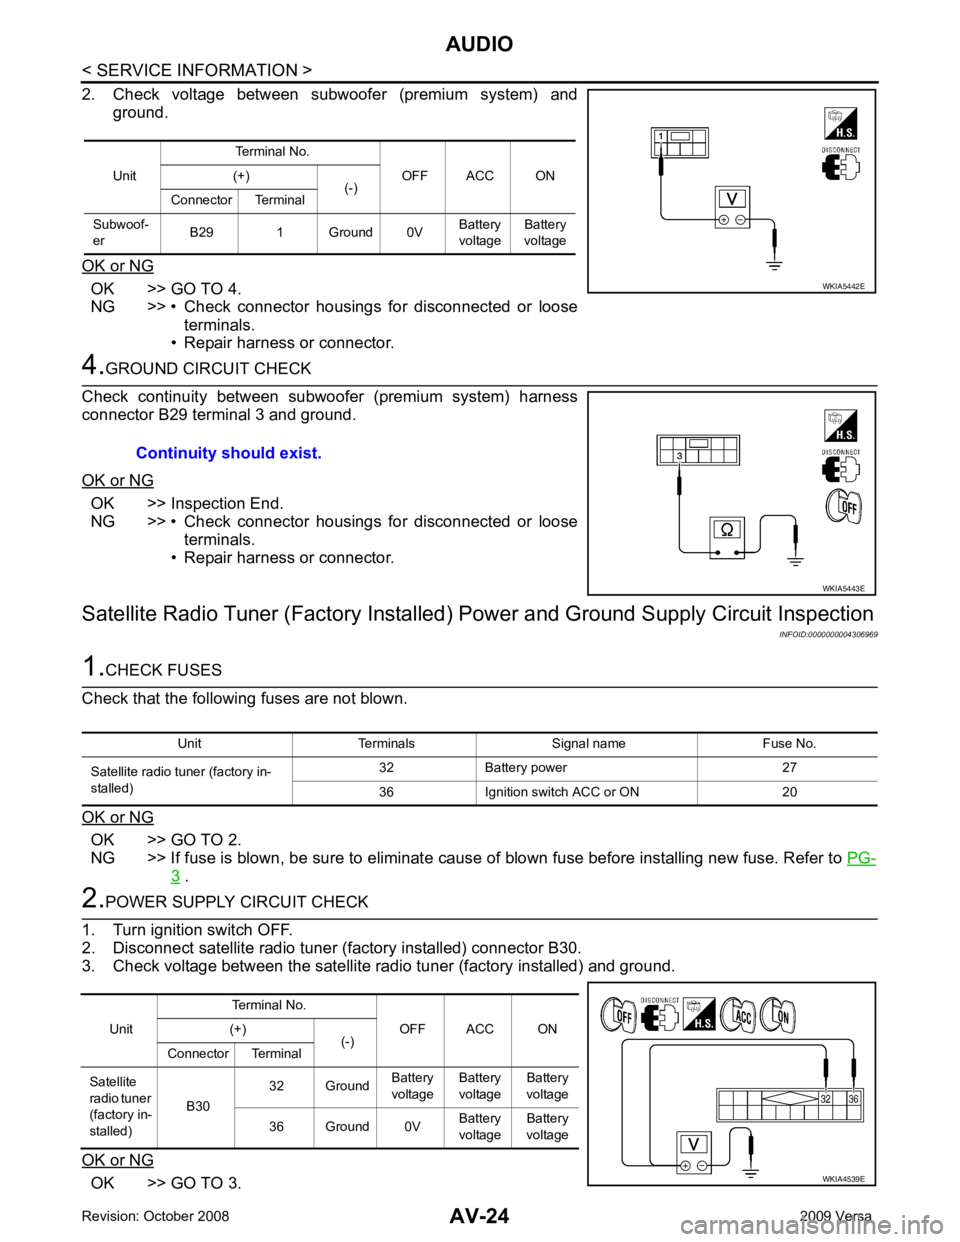
Satellite Radio Tuner (Factory Installed) Power and Ground Supply Circuit Inspection
INFOID:0000000004306969OK >> GO TO 2.
NG >> If fuse is blown, be sure to eliminate cause of blown fuse before installing new fuse. Refer to PG-3 .
OK >> GO TO 3.Unit
Terminal No.
OFF ACC ON
(+)
(-)
Connector Terminal
Subwoof-
er B29 1 Ground 0V Battery
voltage Battery
voltage Unit
Terminal No.
OFF ACC ON
(+)
(-)
Connector Terminal
Satellite
radio tuner
(factory in-
stalled) B30
32 Ground
Battery
voltage Battery
voltage Battery
voltage
36 Ground 0V Battery
voltage Battery
voltage
Page 409 of 4331
AV
N
O P
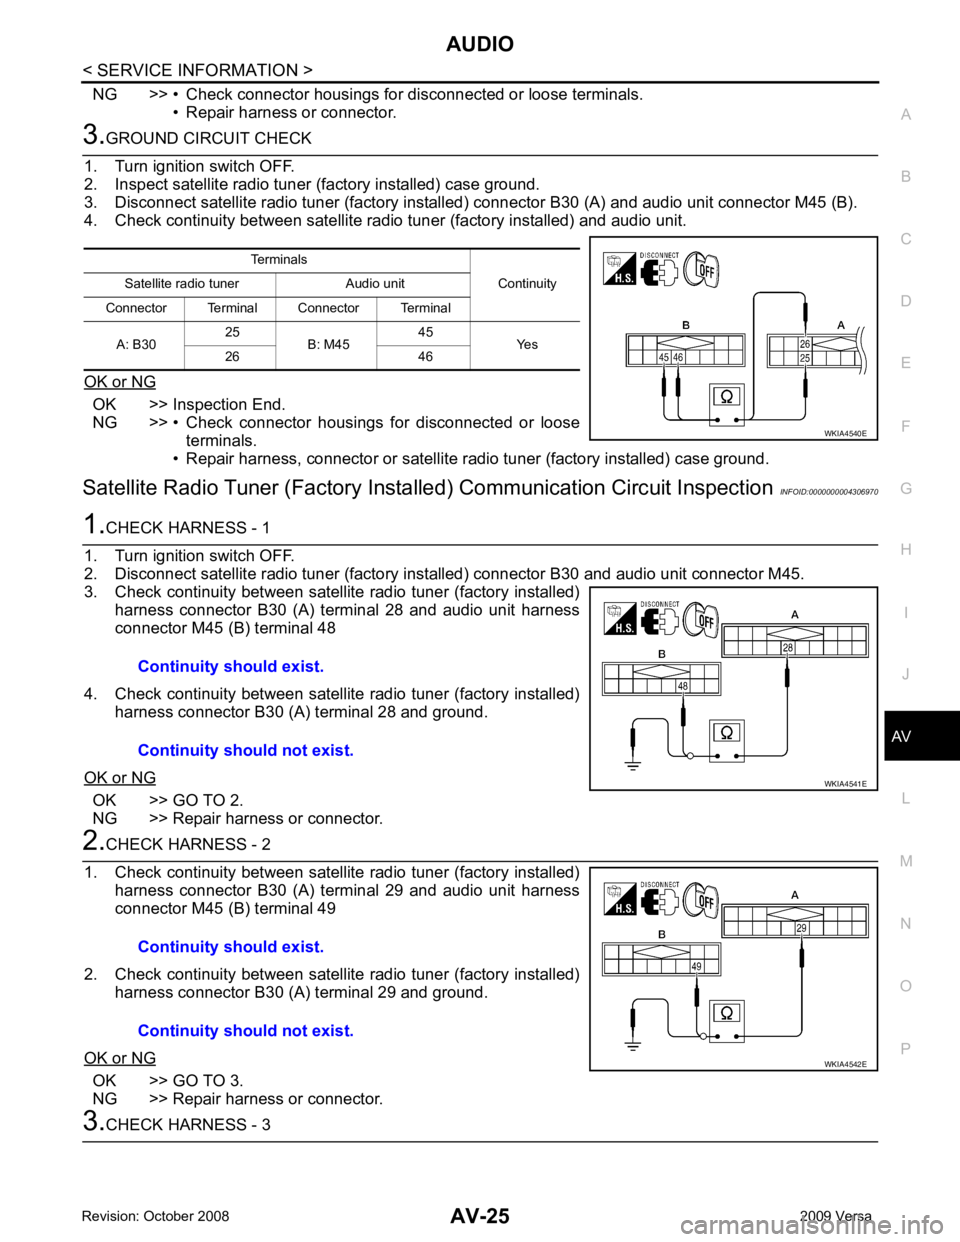
NG >> • Check connector housings for disconnected or loose terminals.
• Repair harness or connector. OK >> Inspection End.
NG >> • Check connector housings for disconnected or loose
terminals.
• Repair harness, connector or satellite radio tuner (factory installed) case ground.
Satellite Radio Tuner (Factory Insta lled) Communication Circuit Inspection INFOID:0000000004306970OK >> GO TO 2.
NG >> Repair harness or connector. OK >> GO TO 3.
NG >> Repair harness or connector.
Page 410 of 4331
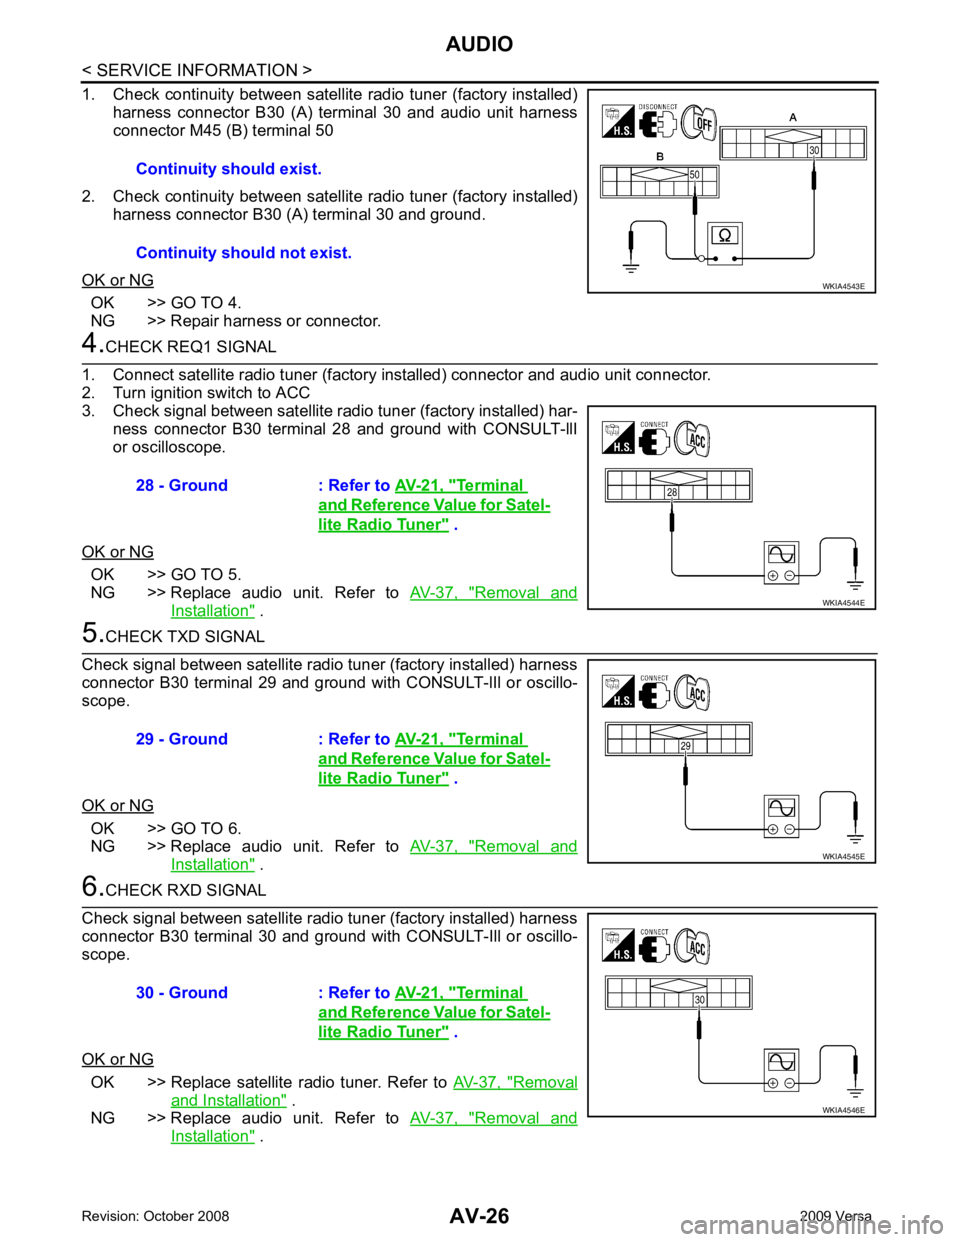
OK >> GO TO 4.
NG >> Repair harness or connector. OK >> GO TO 5.
NG >> Replace audio unit. Refer to AV-37, " Removal and
Installation " .
OK >> GO TO 6.
NG >> Replace audio unit. Refer to AV-37, " Removal and
Installation " .
OK >> Replace satellite radio tuner. Refer to
AV-37, " Removal
and Installation " .
NG >> Replace audio unit. Refer to AV-37, " Removal and
Installation " .
Continuity should exist.
Continuity should not exist. Terminal
and Reference Value for Satel-
lite Radio Tuner " .
Terminal
and Reference Value for Satel-
lite Radio Tuner " .
Terminal
and Reference Value for Satel-
lite Radio Tuner " .