display NISSAN LEAF 2013 1.G Navigation Manual
[x] Cancel search | Manufacturer: NISSAN, Model Year: 2013, Model line: LEAF, Model: NISSAN LEAF 2013 1.GPages: 275, PDF Size: 6.66 MB
Page 127 of 275
![NISSAN LEAF 2013 1.G Navigation Manual 1. PushOPEN/TILT button to open the
monitor.
2. Remove the cover to access the SD card slot. Insert an SD card into side slot on the
left side.
3. Push the MENUbutton and touch [Set-
tings].
4. Touch NISSAN LEAF 2013 1.G Navigation Manual 1. PushOPEN/TILT button to open the
monitor.
2. Remove the cover to access the SD card slot. Insert an SD card into side slot on the
left side.
3. Push the MENUbutton and touch [Set-
tings].
4. Touch](/img/5/324/w960_324-126.png)
1. PushOPEN/TILT button to open the
monitor.
2. Remove the cover to access the SD card slot. Insert an SD card into side slot on the
left side.
3. Push the MENUbutton and touch [Set-
tings].
4. Touch [Navigation].
5. Touch [Address Book].
6. Touch [Transfer Address Book].
7. Touch [Export Data] or [Import Data].
8. Touch a stored item from the list. The indicator of the selected item illuminates.
9. Touch [Download].
INFO:
. Do not remove the SD card or turn off the
power while reading or writing the data. This
may cause data corruption or data loss.
. Writing is impossible when the lock switch
of the SD card is set to the lock position.
Release the lock switch before use.
. If the SD card already has the data for a
stored address, a confirmation message is
displayed. Once overwritten, the original
data cannot be recovered.
. An SD card to transfer data to the system is
not provided with the vehicle. Use a
separately purchased SD card to transfer
data.
Navigation3-71
Page 128 of 275
3-72Navigation
.An SD card containing map data is provided
with the vehicle and is inserted in the right
hand slot of the system. To transfer the data,
always insert an SD card in the slot on the
left side.
. The data that was transferred into an SD
card cannot be used by other navigation
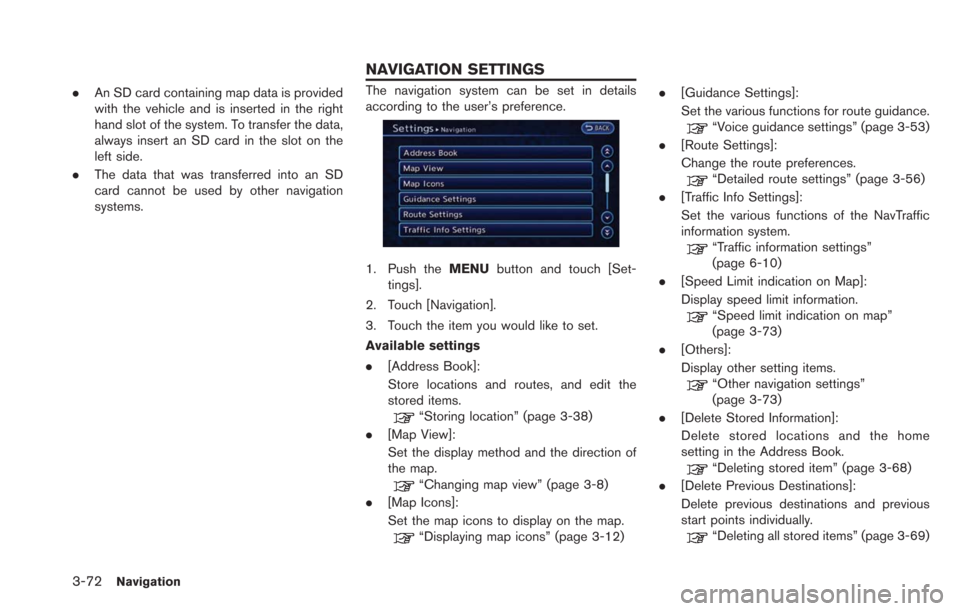
systems.The navigation system can be set in details
according to the user’s preference.
1. Push the MENUbutton and touch [Set-
tings].
2. Touch [Navigation].
3. Touch the item you would like to set.
Available settings
. [Address Book]:
Store locations and routes, and edit the
stored items.
“Storing location” (page 3-38)
. [Map View]:
Set the display method and the direction of
the map.
“Changing map view” (page 3-8)
. [Map Icons]:
Set the map icons to display on the map.
“Displaying map icons” (page 3-12) .
[Guidance Settings]:
Set the various functions for route guidance.
“Voice guidance settings” (page 3-53)
. [Route Settings]:
Change the route preferences.
“Detailed route settings” (page 3-56)
. [Traffic Info Settings]:
Set the various functions of the NavTraffic
information system.
“Traffic information settings”
(page 6-10)
. [Speed Limit indication on Map]:
Display speed limit information.
“Speed limit indication on map”
(page 3-73)
. [Others]:
Display other setting items.
“Other navigation settings”
(page 3-73)
. [Delete Stored Information]:
Delete stored locations and the home
setting in the Address Book.
“Deleting stored item” (page 3-68)
. [Delete Previous Destinations]:
Delete previous destinations and previous
start points individually.
“Deleting all stored items” (page 3-69)
NAVIGATION SETTINGS
Page 129 of 275
![NISSAN LEAF 2013 1.G Navigation Manual .[Reset All Navigation Settings to Default]:
Reset all of the settings to default.
“Resetting all navigation settings to
default” (page 3-76)
SPEED LIMIT INDICATION ON MAP
Turn the [Speed Limit In NISSAN LEAF 2013 1.G Navigation Manual .[Reset All Navigation Settings to Default]:
Reset all of the settings to default.
“Resetting all navigation settings to
default” (page 3-76)
SPEED LIMIT INDICATION ON MAP
Turn the [Speed Limit In](/img/5/324/w960_324-128.png)
.[Reset All Navigation Settings to Default]:
Reset all of the settings to default.
“Resetting all navigation settings to
default” (page 3-76)
SPEED LIMIT INDICATION ON MAP
Turn the [Speed Limit Indication on Map] display
on or off. The indicator light illuminates when the
speed limit display function is set to on.
1. Touch [Speed Limit Indication on Map] to
toggle the function between on and off. The
indicator light illuminates when the speed
limit display function is set to on.
OTHER NAVIGATION SETTINGS
1. Push the MENUbutton and touch [Set-
tings].
2. Touch [Navigation].
3. Touch [Others].
4. Touch the item you would like to set.
Available settings
. [Audio Display on Map]:
Allows the audio information to be displayed
at all times.
“Displaying audio information on map
screen” (page 3-73)
. [Map Scrolling Information]:
Sets the system so that when the map
scrolls the information about the location
aligned at the center of the cross pointer is
displayed.
“Map scrolling information”
(page 3-13) .
[Customize Nearby Places]:
Set the category of frequently visited nearby
places.
“Customizing Nearby Places”
(page 3-74)
. [Keyboard Type]:
Switches the keyboard layout for the char-
acter input screen.
“Settings keyboard layout of character
input screen” (page 3-74)
. [North Up when Zoomed Out]:
When this setting is ON, the orientation of
the map is automatically changed to North
Up when the widest map scale is selected.
The orientation is changed to North Up even
when Heading Up is set.
. [Adjust Current Location]:
Corrects the position of the current location.
“Adjusting current vehicle location”
(page 3-75)
Displaying audio information on
map screen
The operating status of audio functions can be
displayed on the map screen.
1. Touch [Others].
Navigation3-73
Page 130 of 275
![NISSAN LEAF 2013 1.G Navigation Manual 3-74Navigation
2. Touch [Audio Display on Map]. The indicatorilluminates when the item is set.
3. Push the MAPbutton to return to the
current location map screen.
4. On the bottom of the map screen, t NISSAN LEAF 2013 1.G Navigation Manual 3-74Navigation
2. Touch [Audio Display on Map]. The indicatorilluminates when the item is set.
3. Push the MAPbutton to return to the
current location map screen.
4. On the bottom of the map screen, t](/img/5/324/w960_324-129.png)
3-74Navigation
2. Touch [Audio Display on Map]. The indicatorilluminates when the item is set.
3. Push the MAPbutton to return to the
current location map screen.
4. On the bottom of the map screen, the
operating status of an audio/visual function
is displayed at all times.
Customizing Nearby Places
The categories can be customized for searching
places of interest nearby.
The modified list of points of interest can be
used for searching for a location using [Nearby
Points of Interest].
1. Touch [Others].
2. Touch [Customize Nearby Places].
3. Touch the preferred item. The main categorylist is displayed.
4. Touch a main category. The sub category listis displayed.
5. Touch a sub category. The category settingis modified.
Settings keyboard layout of charac-
ter input screen
The keyboard layout of the character input
screen can be set to either the ABC or
QWERTY layout, depending on the user’s
preference.
Example: Switching to the QWERTY layout
1. Touch [Others].
2. Touch [Keyboard Type].
Page 131 of 275
![NISSAN LEAF 2013 1.G Navigation Manual 3. Touch [QWERTY]. The indicator illuminateswhen the item is set.
QWERTY layout
ABC layout
Adjusting current vehicle location
If the vehicle icon indicating the current vehicle
location is not in the NISSAN LEAF 2013 1.G Navigation Manual 3. Touch [QWERTY]. The indicator illuminateswhen the item is set.
QWERTY layout
ABC layout
Adjusting current vehicle location
If the vehicle icon indicating the current vehicle
location is not in the](/img/5/324/w960_324-130.png)
3. Touch [QWERTY]. The indicator illuminateswhen the item is set.
QWERTY layout
ABC layout
Adjusting current vehicle location
If the vehicle icon indicating the current vehicle
location is not in the correct position, the
location of the vehicle icon on the map screen
can be adjusted.
INFO:
. Regardless of the map view setting, the map
is displayed in Plan View when adjusting the
position of the vehicle icon.
. When correcting the position of the vehicle
icon, the map is automatically displayed in
the North Up mode. After finishing the
correction, the map restores the current
orientation setting.
. The position and direction of the vehicle icon
may be misaligned depending on the
external conditions and environment.
. If the vehicle icon is misaligned, drive for a
while in a location where GPS signals can
be received. This may correct the position of
the vehicle icon.
“Vehicle icon” (page 10-10)
1. Touch [Others].
2. Touch [Adjust Current Location]. The current location map screen is displayed.
3. Adjust the position of the vehicle icon byusing touch panel operation. After adjusting
the position of the vehicle icon, touch [OK].
4. Adjust the direction of the vehicle icon bytouching []or[].
Navigation3-75
Page 132 of 275
![NISSAN LEAF 2013 1.G Navigation Manual 3-76Navigation
5. After adjusting the direction of the vehicleicon, touch [OK]. A message is displayed,
and the adjusted vehicle location is stored.
RESETTING ALL NAVIGATION SET-
TINGS TO DEFAULT
This NISSAN LEAF 2013 1.G Navigation Manual 3-76Navigation
5. After adjusting the direction of the vehicleicon, touch [OK]. A message is displayed,
and the adjusted vehicle location is stored.
RESETTING ALL NAVIGATION SET-
TINGS TO DEFAULT
This](/img/5/324/w960_324-131.png)
3-76Navigation
5. After adjusting the direction of the vehicleicon, touch [OK]. A message is displayed,
and the adjusted vehicle location is stored.
RESETTING ALL NAVIGATION SET-
TINGS TO DEFAULT
This restores various settings (display, volume
level, etc.) to the default settings.
INFO:
The memory contents, such as the stored
locations, will not be deleted.
1. Push the MENUbutton and touch [Set-
tings].
2. Touch [Navigation].
3. Touch [Reset All Navigation Settings to Default].
4. A confirmation message is displayed. Con-firm the contents of the message, then touch
[Yes].
Page 138 of 275
4-4Audio system
.During cold weather or rainy days, the player
may malfunction due to the humidity. If this
occurs, remove the CD and dehumidify or
ventilate the player completely.
. The player may skip while driving on rough
roads.
. The CD player sometimes cannot function
when the passenger compartment tempera-
ture is extremely high. Decrease the tem-
perature before use.
. Only use high quality 4.7 in (12 cm) round
discs that have the "COMPACT disc DIGI-
TAL AUDIO" logo on the disc or packaging.
. Do not expose the CD to direct sunlight.
. CDs that are of poor quality, dirty, scratched,
covered with fingerprints, or that have pin
holes may not work properly.
. The following CDs may not work properly:
— Copy control compact discs (CCCD)
— Recordable compact discs (CD-R)
— Rewritable compact discs (CD-RW)
. Do not use the following CDs as they may
cause the CD player to malfunction.
— 3.1 in (8 cm) discs
— CDs that are not round
— CDs with a paper label — CDs that are warped, scratched, or have
abnormal edges
. This audio system can only play prerecorded
CDs. It has no capabilities to record or burn
CDs.
. If the CD cannot be played, one of the
following messages will be displayed.
CHECK DISC:
— Confirm that the CD is inserted correctly
(the label side is facing up, etc.).
— Confirm that the CD is not bent or warped and it is free of scratches.
PUSH EJECT:
This is an error due to the temperature inside
the player being too high. Remove the CD
by pushing the
button, and after a short
time reinsert the CD. The CD can be played
when the temperature of the player returns
to normal.
UNPLAYABLE:
The file is unplayable in this audio system
(the system only supports CDs containing
MP3 or WMA files) .
USB (Universal Serial Bus)
WARNING
Do not connect or disconnect the USB
device while driving. Doing so can be a
distraction. If distracted you could lose
control of your vehicle and cause an
accident or serious injury.
CAUTION
. Do not force the USB device into the
USB port. Inserting the USB device
tilted or up-side-down into the port
may damage the USB device and
the port. Make sure that the USB
device is connected correctly into
the USB port.
. Do not grab the USB port cover (if
so equipped) when pulling the USB
device out of the port. This could
damage the port and the cover.
. Do not leave the USB cable in a
place where it can be pulled unin-
tentionally. Pulling the cable may
break the wire, USB device or the
port.
Page 139 of 275
.To avoid damage and loss of func-
tion when using a USB device, note
the following precautions.
— Do not bend the cable exces-
sively 1.6 in (40 mm) radius
minimum.
— Do not twist the cable exces- sively (more than 180 degrees) .
— Do not pull or drop the cable.
— Do not hit or press the USB port or USB device with hands, feet,
or objects.
— Do not store objects with sharp edges in the storage area where
the cable is stored.
— Do not leave the USB device and attached devices in the vehicle
compartment. When not in use
for extended periods of time,
store the cable and USB device
in a clean, dust free environment
at room temperature and with-
out direct sun exposure.
— Do not use the cable for any other purposes than its intended
use in the vehicle. The vehicle is not equipped with a USB device.
USB devices should be purchased separately
as necessary.
This system cannot be used to format USB
devices. To format a USB device, use a personal
computer.
In some states/area, the USB device for the
front seats plays only sound without images for
regulatory reasons, even when the vehicle is
parked.
This system supports various USB memory
devices, USB hard drives, iPhone
®and iPod®
players. Some USB devices may not be
supported by this system.
.
Partitioned USB devices may not play
correctly.
. Some characters used in other languages
(Chinese, Japanese, etc.) may not appear
properly in the display. Using English lan-
guage characters with a USB device is
recommended.
General notes for USB use:
. The USB device may not function when the
passenger compartment temperature is ex-
tremely high. Lower the temperature before
use. .
During cold weather or rainy days, the player
may malfunction due to humidity. If this
occurs, remove the USB device and dehu-
midify or ventilate the USB player comple-
tely.
. Do not connect a USB device if a connector,
cable or USB port is wet. Allow the
connector, cable, and USB port to dry
completely before connecting the USB
device. (Wait for 24 hours or more until it
is dry.) If the connector and USB port are
exposed to fluids other than water, evapora-
tive residue may cause a short circuit
between the connector pins and USB port.
In this case, replace the cable and USB port.
Otherwise damage to the USB device and a
loss of function may occur.
. If the cable is damaged (insulation cut,
connectors cracked, contamination such as
liquids, dust, dirt, etc. in the connectors) , do
not use the cable. Replace the cable with a
new one.
. Do not put a USB device in a location where
static electricity occurs, electrical noise is
generated or hot air from the air conditioner
blows directly on it. Doing so may cause the
data stored on the USB device to be
corrupted.
Audio system4-5
Page 140 of 275
4-6Audio system
Notes for iPod®use:
iPod®is a trademark of Apple Inc., registered in
the U.S. and other countries.
. Improperly plugging in the iPod
®may cause
a checkmark to be displayed on and off
(flickering) . Always make sure that the iPod
®
is connected properly.
. An iPod nano®(1st Generation) may remain
in fast forward or rewind mode if it is
connected during a seek operation. In this
case, please manually reset the iPod
®.
. An iPod nano®(2nd Generation) will con-
tinue to fast-forward or rewind if it is
disconnected during a seek operation.
. An incorrect song title may appear when the
Play Mode is changed while using an iPod
nano
®(2nd Generation)
. Audiobooks may not play in the same order
as they appear on an iPod
®.
. Large video files cause slow responses in an
iPod
®. The vehicle display may momentarily
black out, but will soon recover.
. If an iPod
®automatically selects large video
files while in the shuffle mode, the vehicle
display may momentarily black out, but will
soon recover.
iPod®PLAYER AND iPhone®
This system supports iPod®and iPhone®
models.
. A USB cable for connecting an iPod®or
iPhone®is not included with this system.
Use your own USB cable to connect an
iPod
®or iPhone®.
. Once connected to the system, operation
will not be possible from an iPod
®or
iPhone®.
. Some functions may be limited depending
on the model of iPod
®or iPhone®and/or the
version of the firmware currently installed.
. When connected to the system, the battery
of an iPod
®or iPhone®will be recharged.
. Do not use headphones or other acces-
sories when an iPod
®or iPhone®is con-
nected to the system. Doing so could
prevent the system from operating properly.
. NISSAN does not accept any responsibility
for any data that may be lost from an iPod
®
or iPhone®while it is connected to the
system.
. Please refer to the Owner’s Manual of the
iPod
®or iPhone®that is connected to the
system. .
Large video files cause slow responses in an
iPod
®. The vehicle center display may
momentarily black out, but it will soon
recover.
. If an iPod
®automatically selects large video
files while in the shuffle mode, the vehicle
center display may momentarily black out,
but it will soon recover.
. An iPod nano
®(1st Generation) may remain
in fast forward or rewind mode if it is
connected during a seek operation. In this
case, please manually reset the iPod
®.
. After the Album Shuffle setting has been set
when an iPod touch
®1G is connected, if the
USB cable is pulled out and inserted again,
or if the power switch is placed in the "ACC"
or "OFF" positions from the "ON" position,
the song that was last played will not be
saved.
. Songs that are being played back cannot be
cued using the track down operation of an
iPod touch
®1G. To use this function,
update the firmware of the iPod®that is
being used (version 2.2.1 or later) .
. After the Album Shuffle setting has been set
when an iPod touch
®2G is connected, if the
USB cable is pulled out and inserted again,
or if the power switch is placed in the "ACC"
or "OFF" positions from the "ON" position,
Page 142 of 275
4-8Audio system
kHz, Bit rate: 128 kbps) with virtually no
perceptible loss in quality. The compression
reduces certain parts of sound that seem
inaudible to most people.
. WMA — Windows Media Audio (WMA) is a
compressed audio format created by Micro-
soft as an alternative to MP3. The WMA
codec offers greater file compression than
the MP3 codec, enabling storage of more
digital audio tracks in the same amount of
space when compared to MP3s at the same
level of quality.
. Bit rate — Bit rate denotes the number of
bits per second used by a digital music file.
The size and quality of a compressed digital
audio file is determined by the bit rate used
when encoding the file.
. Sampling frequency — Sampling frequency
is the rate at which the samples of a signal
are converted from analog to digital (A/D
conversion) per second.
. Multisession — Multisession is one of the
methods for writing data to media. Writing
data once to the media is called a single
session, and writing more than once is
called a multisession.
. ID3/WMA Tag — The ID3/WMA tag is the
part of the encoded MP3 or WMA file that
contains information about the digital music file such as song title, artist, album title,
encoding bit rate, track time duration, etc.
ID3 tag information is displayed on the
Album/Artist/Track title line on the display.
* Windows
®and Windows Media®are regis-
tered trademarks or trademarks of Microsoft
Corporation in the United States of America
and/or other countries.
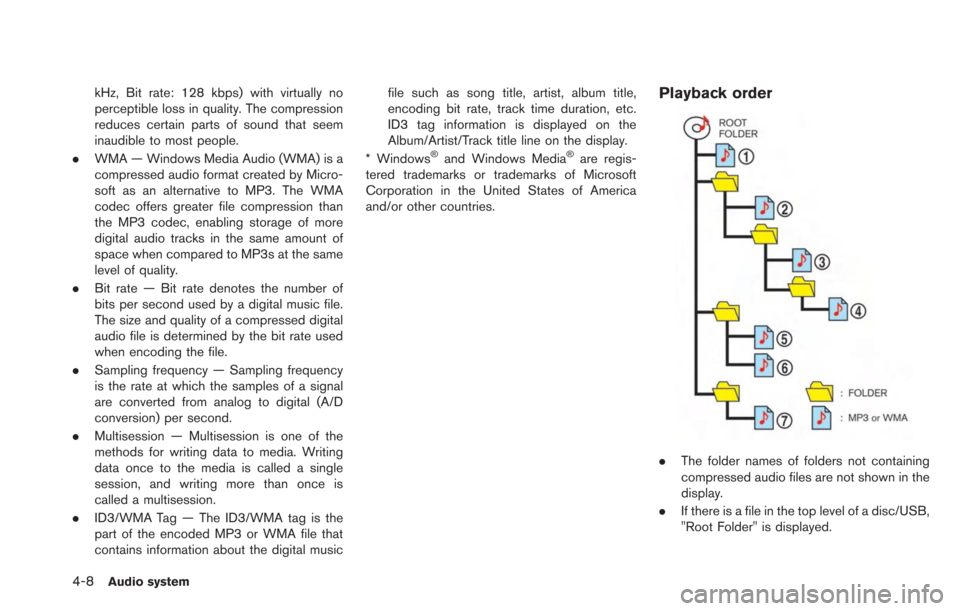
Playback order
. The folder names of folders not containing
compressed audio files are not shown in the
display.
. If there is a file in the top level of a disc/USB,
"Root Folder" is displayed.