warning NISSAN MAXIMA 2003 A33 / 5.G Owners Manual
[x] Cancel search | Manufacturer: NISSAN, Model Year: 2003, Model line: MAXIMA, Model: NISSAN MAXIMA 2003 A33 / 5.GPages: 247, PDF Size: 2.74 MB
Page 164 of 247
IThe booster battery must be rated at
12 volts. Use of an improperly rated
battery can damage your vehicle.
IWhenever working on or near a bat-
tery, always wear suitable eye protec-
tors (for example, goggles or indus-
trial safety spectacles) and remove
rings, metal bands, or any other jew-
elry. Do not lean over the battery
when jump starting.
IDo not attempt to jump start a frozen
battery. It could explode and cause
serious injury.
IYour vehicle has an automatic engine
cooling fan. It could come on at any
time. Keep hands and other objects
away from it.
WARNING
Always follow the instructions below.
Failure to do so could result in damage
to the charging system and cause per-
sonal injury.
1. If the booster battery is in another vehicle,
position the two vehicles to bring their bat-
teries into close proximity to each other.
Do not allow the two vehicles to touch.
2. Apply parking brake. Move the shift lever tothe N (Neutral) position (On automatic
transmission models, move the selector
lever to the P (Park) position). Switch off all
unnecessary electrical systems (light,
heater, air conditioner, etc.).
3. Remove vent caps on the battery (if so
equipped). Cover the battery with an old
cloth to reduce explosion hazard.
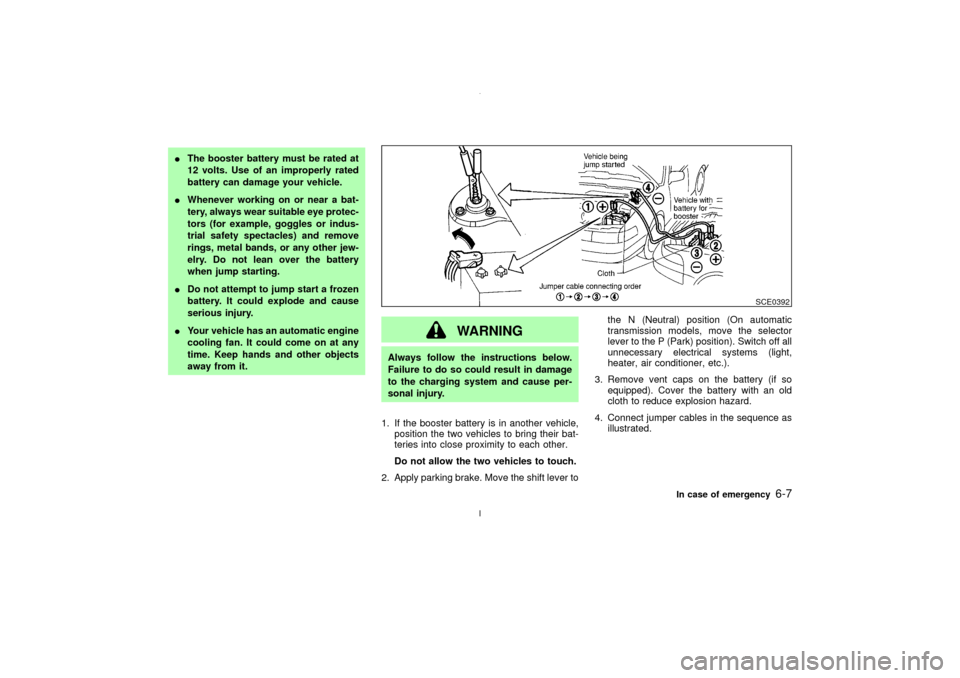
4. Connect jumper cables in the sequence as
illustrated.
SCE0392
In case of emergency
6-7
Z
02.7.12/A33-D/V5.0
X
Page 166 of 247
WARNING
IDo not continue to drive if your ve-
hicle overheats. Doing so could
cause a vehicle fire.
ITo avoid the danger of being scalded,
never remove the radiator cap while
the engine is still hot. When the radia-
tor cap is removed, pressurized hot
water will spurt out, possibly causing
serious injury.
IDo not open the hood if steam is
coming out.
If your vehicle is overheating (indicated by an
extremely high temperature gauge reading), or
if you feel a lack of engine power, detect
abnormal noise, etc., take the following steps:
1. Move the vehicle safely off the road, apply
the parking brake and move the shift lever
to the N (Neutral) position (automatic trans-
mission to the P (Park) position).
Do not stop the engine.
2. Turn off the air conditioner switch. Open all
the windows, move the heater or air condi-tioner temperature control to maximum hot
and fan control to high speed.
3. Get out of the vehicle. Look and listen for
steam or coolant escaping from the radiator
before opening the hood. Wait until no
steam or coolant can be seen before pro-
ceeding.
4. Open the engine hood.
WARNING
If steam or water is coming from the
engine, stand clear to prevent getting
burned.
5. Visually check if the cooling fan is running.
The radiator hoses and radiator should not
leak water.
If coolant is leaking or the cooling fan does
not run, stop the engine.
WARNING
IBe careful not to allow your hands,
hair, jewelry or clothing to come intocontact with, or to get caught in the
cooling fan, or drive belt.
IThe engine cooling fan can start at
any time when the coolant tempera-
ture is high.
6. After the engine cools down, check the
coolant level in the reservoir tank with the
engine running. Add coolant to the reservoir
tank if necessary. Have your vehicle re-
paired at the nearest NISSAN dealer.
IF YOUR VEHICLE OVERHEATS
In case of emergency
6-9
Z
02.7.12/A33-D/V5.0
X
Page 167 of 247
When towing your vehicle, all State (Provincial
in Canada) and local regulations for towing
must be followed. Incorrect towing equipment
could damage your vehicle. Towing instruc-
tions are available from an authorized NISSAN
dealer. Local service operators are generally
familiar with the applicable laws and proce-
dures for towing. To assure proper towing and
to prevent accidental damage to your vehicle,
NISSAN recommends having a service opera-
tor tow your vehicle. It is advisable to have the
service operator carefully read the following
precautions.
WARNING
INever ride in a vehicle that is being
towed.
INever get under your vehicle after it
has been lifted by a tow truck.
CAUTION
IWhen towing, make sure that the
transmission, axles, steering systemand powertrain are in working condi-
tion. If any unit is damaged, dollies
must be used.
IAlways attach safety chains before
towing.
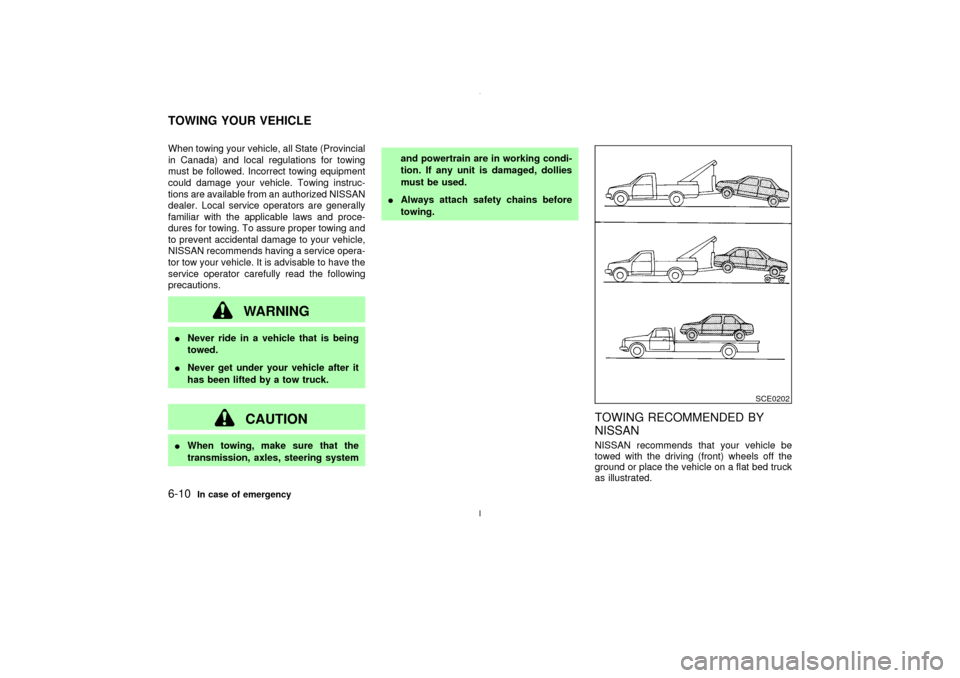
TOWING RECOMMENDED BY
NISSANNISSAN recommends that your vehicle be
towed with the driving (front) wheels off the
ground or place the vehicle on a flat bed truck
as illustrated.
SCE0202
TOWING YOUR VEHICLE6-10
In case of emergency
Z
02.7.12/A33-D/V5.0
X
Page 169 of 247
WARNING
Do not spin your tires at high speed.
This could cause them to explode and
result in serious injury. Parts of your
vehicle could also overheat and be dam-
aged.6-12
In case of emergency
Z
02.7.12/A33-D/V5.0
X
Page 174 of 247
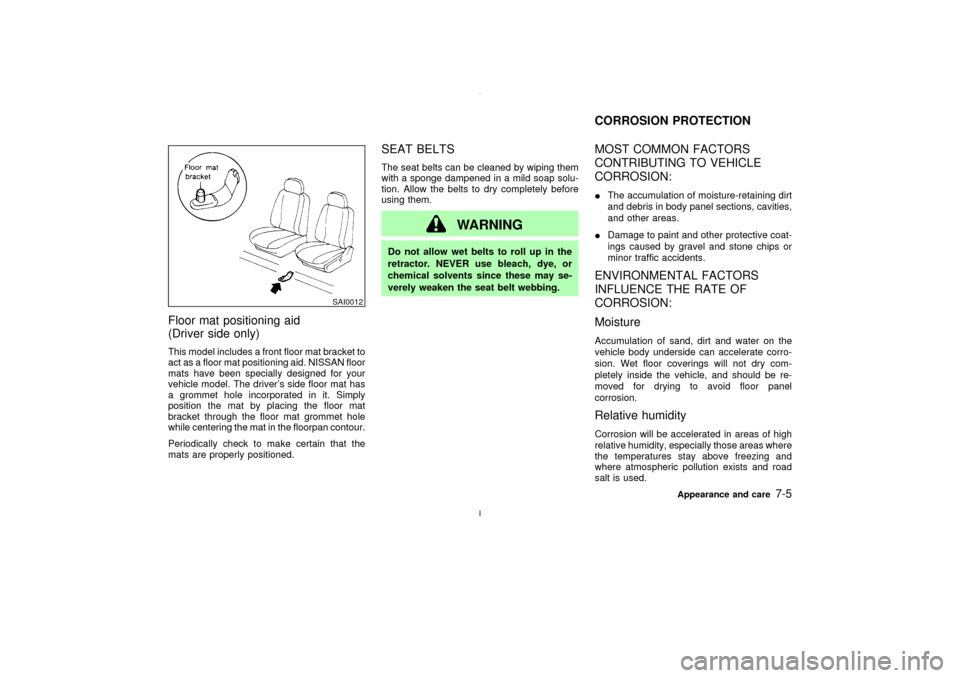
Floor mat positioning aid
(Driver side only)This model includes a front floor mat bracket to
act as a floor mat positioning aid. NISSAN floor
mats have been specially designed for your
vehicle model. The driver's side floor mat has
a grommet hole incorporated in it. Simply
position the mat by placing the floor mat
bracket through the floor mat grommet hole
while centering the mat in the floorpan contour.
Periodically check to make certain that the
mats are properly positioned.
SEAT BELTSThe seat belts can be cleaned by wiping them
with a sponge dampened in a mild soap solu-
tion. Allow the belts to dry completely before
using them.
WARNING
Do not allow wet belts to roll up in the
retractor. NEVER use bleach, dye, or
chemical solvents since these may se-
verely weaken the seat belt webbing.
MOST COMMON FACTORS
CONTRIBUTING TO VEHICLE
CORROSION:IThe accumulation of moisture-retaining dirt
and debris in body panel sections, cavities,
and other areas.
IDamage to paint and other protective coat-
ings caused by gravel and stone chips or
minor traffic accidents.ENVIRONMENTAL FACTORS
INFLUENCE THE RATE OF
CORROSION:
MoistureAccumulation of sand, dirt and water on the
vehicle body underside can accelerate corro-
sion. Wet floor coverings will not dry com-
pletely inside the vehicle, and should be re-
moved for drying to avoid floor panel
corrosion.Relative humidityCorrosion will be accelerated in areas of high
relative humidity, especially those areas where
the temperatures stay above freezing and
where atmospheric pollution exists and road
salt is used.
SAI0012
CORROSION PROTECTION
Appearance and care
7-5
Z
02.7.12/A33-D/V5.0
X
Page 178 of 247

loose nuts. Tighten if necessary.
Tire rotation*:Tires should be rotated every
7,500 miles (12,000 km).
Wheel alignment and balance:If the vehicle
pulls to either side while driving on a straight
and level road, or if you detect uneven or
abnormal tire wear, there may be a need for
wheel alignment.
If the steering wheel or seat vibrates at normal
highway speeds, wheel balancing may be
needed.
For additional information regarding tires, refer
to ªImportant Tire Safety Informationº in the
Warranty Information Booklet (US) or ªTire
Safety Informationº in the Warranty and Road-
side Assistance Information booklet (Canada).
Windshield:Clean the windshield on a regu-
lar basis. Check the windshield at least every
six months for cracks or other damage. Have a
damaged windshield repaired by a qualified
repair facility.
Windshield wiper blades*:Check for cracks
or wear if they do not wipe properly.
Doors and engine hood:Check that all doors
and the engine hood operate smoothly as well
as the trunk lid or back hatch. Also make sure
that all latches lock securely. Lubricate if nec-essary. Make sure that the secondary latch
keeps the hood from opening when the pri-
mary latch is released.
When driving in areas using road salt or other
corrosive materials, check lubrication fre-
quently.
Lights*:Clean the headlights on a regular
basis. Make sure that the headlights, stop
lights, tail lights, turn signal lights, and other
lights are all operating properly and installed
securely. Also check headlight aim.
Inside the vehicleThe maintenance items listed here should be
checked on a regular basis, such as when
performing periodic maintenance, cleaning the
vehicle, etc.
Warning lights and chimes:Make sure that
all warning lights and chimes are operating
properly.
Windshield wiper and washer*:Check that
the wipers and washer operate properly and
that the wipers do not streak.
Windshield defroster:Check that the air
comes out of the defroster outlets properly and
in good quantity when operating the heater or
air conditioner.
Steering wheel:Check for changes in thesteering conditions, such as excessive free
play, hard steering or strange noises.
Seats:Check seat position controls such as
seat adjusters, seatback recliner, etc. to en-
sure they operate smoothly and that all latches
lock securely in every position. Check that the
head restraints move up and down smoothly
and that the locks (if equipped) hold securely
in all latched positions.
Seat belts:Check that all parts of the seat belt
system (for example, buckles, anchors, adjust-
ers and retractors) operate properly and
smoothly, and are installed securely. Check
the belt webbing for cuts, fraying, wear or
damage.
Accelerator pedal:Check the pedal for
smooth operation and make sure the pedal
does not catch or require uneven effort. Keep
the floor mats away from the pedal.
Clutch pedal*:Make sure the pedal operates
smoothly and check that it has the proper free
play.
Brakes:Check that the brakes do not pull the
vehicle to one side when applied.
Brake pedal and booster*:Check the pedal
for smooth operation and make sure it has the
proper distance under it when depressed fully.
Check the brake booster function. Be sure to
Maintenance and do-it-yourself
8-3
Z
02.7.12/A33-D/V5.0
X
Page 180 of 247
When performing any inspection or mainte-
nance work on your vehicle, always take care
to prevent serious accidental injury to yourself
or damage to the vehicle. The following are
general precautions which should be closely
observed.
WARNING
IPark the vehicle on a level surface,
apply the parking brake securely and
block the wheels to prevent the ve-
hicle from moving. For a manual
transmission, move the shift lever to
N (Neutral) position. For an automatic
transmission, move the selector lever
to P (Park) position.
IBe sure the ignition key is OFF or
LOCK when performing any parts re-
placement or repairs.
IYour vehicle is equipped with an au-
tomatic engine cooling fan. It may
come on at any time without warning,
even if the ignition key is in the OFF
position and the engine is not run-
ning. To avoid injury, always discon-nect the negative battery cable before
working near the fan.
IIf you must work with the engine
running, keep your hands, clothing,
hair and tools away from moving
fans, belts and any other moving
parts.
IIt is advisable to secure or remove
any loose clothing and any jewelry,
such as rings, watches, etc. before
working on your vehicle.
IAlways wear eye protection when-
ever you work on your vehicle.
IIf you must run the engine in an
enclosed space such as a garage, be
sure there is proper ventilation for
exhaust gases to escape.
INever get under the vehicle while it is
supported only by a jack. If it is nec-
essary to work under the vehicle,
support it with safety stands.
IKeep smoking materials, flame and
sparks away from fuel and the bat-tery.
IOn gasoline engine models with the
Multiport Fuel Injection (MFI) System,
the fuel filter or fuel lines should be
serviced by a NISSAN dealer because
the fuel lines are under high pressure
even when the engine is off.
CAUTION
IDo not work under the hood while the
engine is hot. Turn off the engine and
wait until it cools down.
INever connect or disconnect either
the battery or any transistorized com-
ponent connector while the ignition
key is on.
INever leave the engine or the auto-
matic transmission related compo-
nent harness connector discon-
nected while the ignition key is on.
IAvoid direct contact with used engine
oil and coolant. Improperly disposed
MAINTENANCE PRECAUTIONS
Maintenance and do-it-yourself
8-5
Z
02.7.12/A33-D/V5.0
X
Page 183 of 247
The engine cooling system is filled at the
factory with a high-quality, year-round, anti-
freeze coolant solution. The anti-freeze solu-
tion contains rust and corrosion inhibitors,
therefore additional cooling system additives
are not necessary.
CAUTION
When adding or replacing coolant, be
sure to use only a genuine NISSAN anti-
freeze coolant or equivalent with the
proper mixture ratio of 50% anti-freeze
and 50% demineralized water/distilled
water. The use of other types of coolant
solutions may damage your engine
cooling system.Outside temperature
down to
Anti-
freezeDeminer-
alized
water/
distilled
water ÉC ÉF
þ35 þ30 50% 50%
WARNING
INever remove the radiator cap when
the engine is hot. Serious burns
could be caused by high pressure
fluid escaping from the radiator. Wait
until the engine and radiator cool
down.
ISee ªIf your vehicle overheatsº in the
ª6. In case of emergencyº section.
IThe radiator is equipped with a pres-
sure cap. To prevent engine damage,
use only a genuine NISSAN radiator
cap.
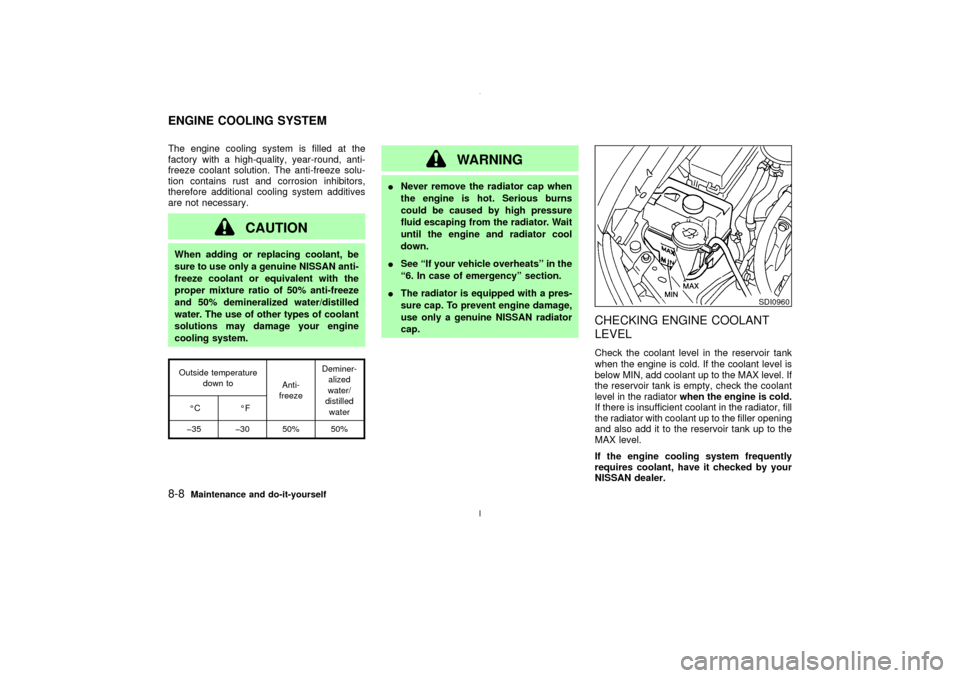
CHECKING ENGINE COOLANT
LEVELCheck the coolant level in the reservoir tank
when the engine is cold. If the coolant level is
below MIN, add coolant up to the MAX level. If
the reservoir tank is empty, check the coolant
level in the radiatorwhen the engine is cold.
If there is insufficient coolant in the radiator, fill
the radiator with coolant up to the filler opening
and also add it to the reservoir tank up to the
MAX level.
If the engine cooling system frequently
requires coolant, have it checked by your
NISSAN dealer.
SDI0960
ENGINE COOLING SYSTEM8-8
Maintenance and do-it-yourself
Z
02.7.12/A33-D/V5.0
X
Page 184 of 247
CHANGING ENGINE COOLANTIMajor cooling system repairs should be
performed by your NISSAN dealer. The
service procedures can be found in the
appropriate NISSAN Service Manual.IImproper servicing can result in reduced
heater performance and engine overheat-
ing.
WARNING
ITo avoid being scalded, never change
the coolant when the engine is hot.
INever remove the radiator cap when
the engine is hot. Serious burns
could be caused by high pressure
fluid escaping from the radiator.
IAvoid direct skin contact with used
coolant. If skin contact is made, wash
thoroughly with soap or hand cleaner
as soon as possible.
IKeep coolant out of reach of children
and pets.
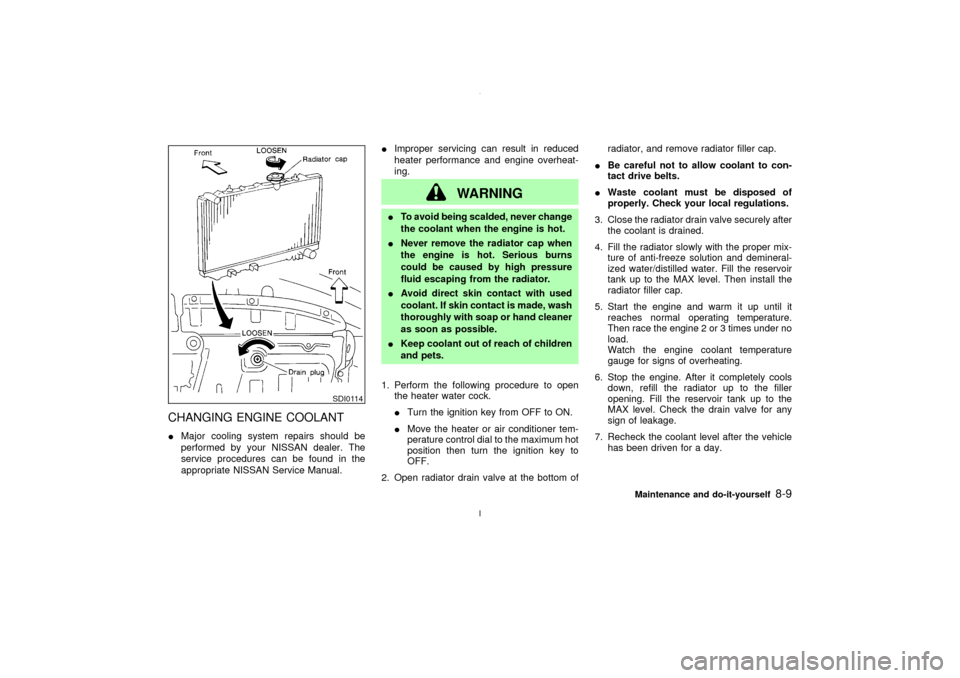
1. Perform the following procedure to open
the heater water cock.
ITurn the ignition key from OFF to ON.
IMove the heater or air conditioner tem-
perature control dial to the maximum hot
position then turn the ignition key to
OFF.
2. Open radiator drain valve at the bottom ofradiator, and remove radiator filler cap.
IBe careful not to allow coolant to con-
tact drive belts.
IWaste coolant must be disposed of
properly. Check your local regulations.
3. Close the radiator drain valve securely after
the coolant is drained.
4. Fill the radiator slowly with the proper mix-
ture of anti-freeze solution and demineral-
ized water/distilled water. Fill the reservoir
tank up to the MAX level. Then install the
radiator filler cap.
5. Start the engine and warm it up until it
reaches normal operating temperature.
Then race the engine 2 or 3 times under no
load.
Watch the engine coolant temperature
gauge for signs of overheating.
6. Stop the engine. After it completely cools
down, refill the radiator up to the filler
opening. Fill the reservoir tank up to the
MAX level. Check the drain valve for any
sign of leakage.
7. Recheck the coolant level after the vehicle
has been driven for a day.
SDI0114
Maintenance and do-it-yourself
8-9
Z
02.7.12/A33-D/V5.0
X
Page 186 of 247
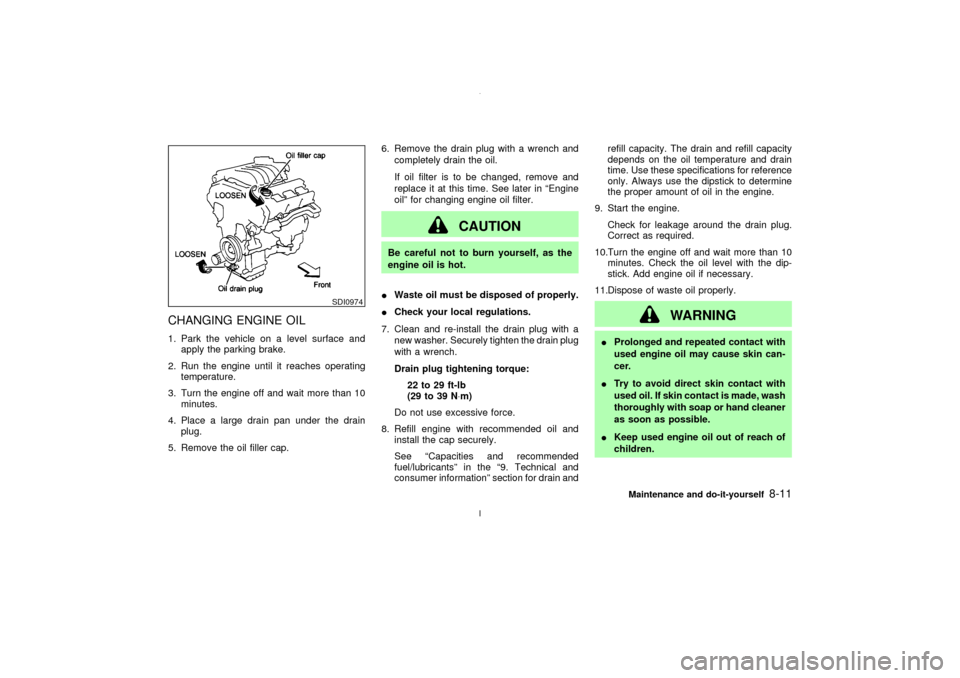
CHANGING ENGINE OIL1. Park the vehicle on a level surface and
apply the parking brake.
2. Run the engine until it reaches operating
temperature.
3. Turn the engine off and wait more than 10
minutes.
4. Place a large drain pan under the drain
plug.
5. Remove the oil filler cap.6. Remove the drain plug with a wrench and
completely drain the oil.
If oil filter is to be changed, remove and
replace it at this time. See later in ªEngine
oilº for changing engine oil filter.
CAUTION
Be careful not to burn yourself, as the
engine oil is hot.
IWaste oil must be disposed of properly.
ICheck your local regulations.
7. Clean and re-install the drain plug with a
new washer. Securely tighten the drain plug
with a wrench.
Drain plug tightening torque:
22 to 29 ft-lb
(29 to 39 N×m)
Do not use excessive force.
8. Refill engine with recommended oil and
install the cap securely.
See ªCapacities and recommended
fuel/lubricantsº in the ª9. Technical and
consumer informationº section for drain andrefill capacity. The drain and refill capacity
depends on the oil temperature and drain
time. Use these specifications for reference
only. Always use the dipstick to determine
the proper amount of oil in the engine.
9. Start the engine.
Check for leakage around the drain plug.
Correct as required.
10.Turn the engine off and wait more than 10
minutes. Check the oil level with the dip-
stick. Add engine oil if necessary.
11.Dispose of waste oil properly.
WARNING
IProlonged and repeated contact with
used engine oil may cause skin can-
cer.
ITry to avoid direct skin contact with
used oil. If skin contact is made, wash
thoroughly with soap or hand cleaner
as soon as possible.
IKeep used engine oil out of reach of
children.
SDI0974
Maintenance and do-it-yourself
8-11
Z
02.7.12/A33-D/V5.0
X