navigation system NISSAN PATHFINDER 2012 R52 / 4.G 06IT Navigation Manual
[x] Cancel search | Manufacturer: NISSAN, Model Year: 2012, Model line: PATHFINDER, Model: NISSAN PATHFINDER 2012 R52 / 4.GPages: 235, PDF Size: 5.14 MB
Page 16 of 235
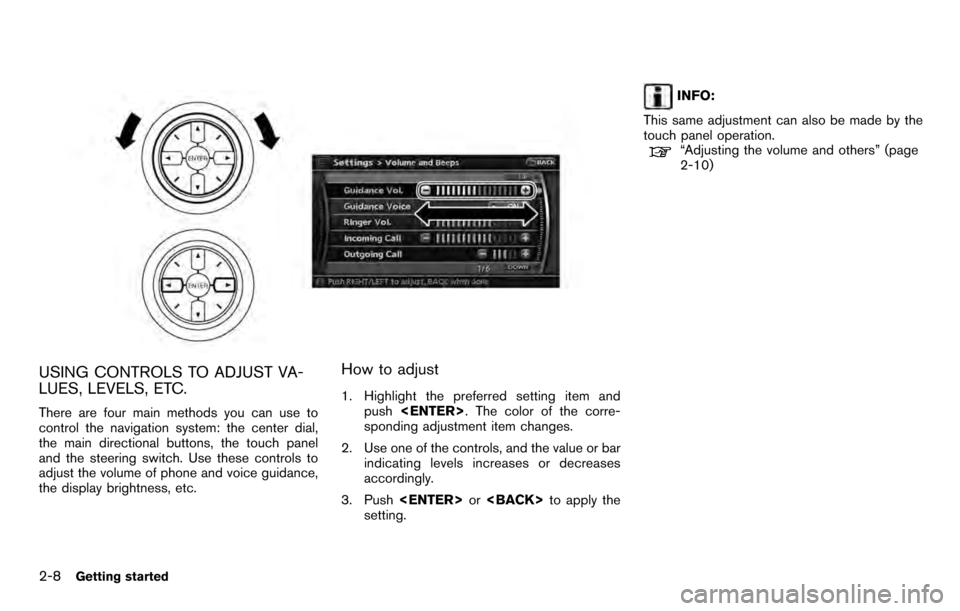
USING CONTROLS TO ADJUST VA-
LUES, LEVELS, ETC.
There are four main methods you can use to
control the navigation system: the center dial,
the main directional buttons, the touch panel
and the steering switch. Use these controls to
adjust the volume of phone and voice guidance,
the display brightness, etc.
How to adjust
1. Highlight the preferred setting item andpush
sponding adjustment item changes.
2. Use one of the controls, and the value or bar indicating levels increases or decreases
accordingly.
3. Push
setting.
INFO:
This same adjustment can also be made by the
touch panel operation.
“Adjusting the volume and others” (page
2-10)
2-8Getting started
Page 26 of 235
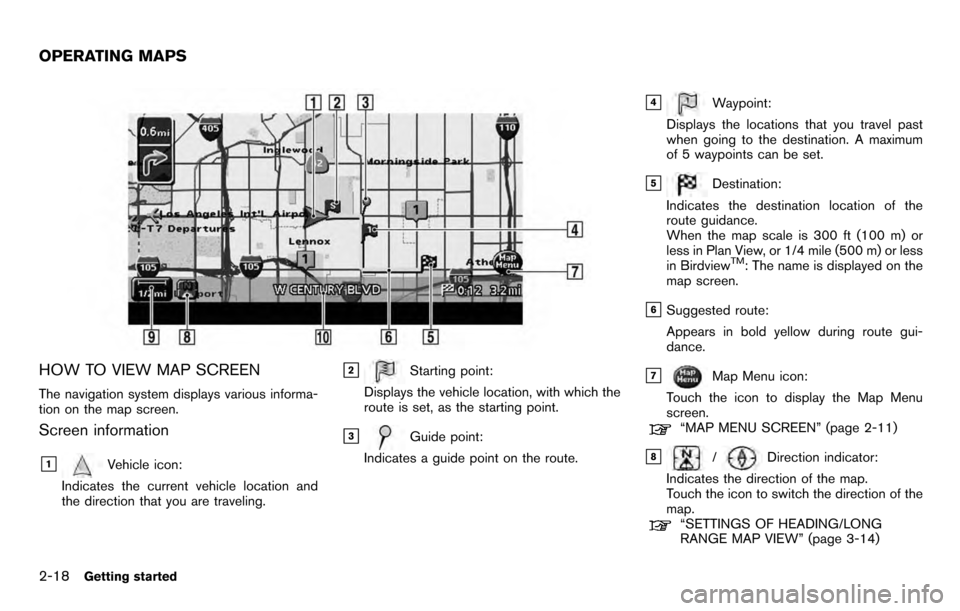
HOW TO VIEW MAP SCREEN
The navigation system displays various informa-
tion on the map screen.
Screen information
&1Vehicle icon:
Indicates the current vehicle location and
the direction that you are traveling.
&2Starting point:
Displays the vehicle location, with which the
route is set, as the starting point.
&3Guide point:
Indicates a guide point on the route.
&4Waypoint:
Displays the locations that you travel past
when going to the destination. A maximum
of 5 waypoints can be set.
&5Destination:
Indicates the destination location of the
route guidance.
When the map scale is 300 ft (100 m) or
less in Plan View, or 1/4 mile (500 m) or less
in Birdview
TM: The name is displayed on the
map screen.
&6Suggested route:
Appears in bold yellow during route gui-
dance.
&7Map Menu icon:
Touch the icon to display the Map Menu
screen.
“MAP MENU SCREEN” (page 2-11)
&8/Direction indicator:
Indicates the direction of the map.
Touch the icon to switch the direction of the
map.
“SETTINGS OF HEADING/LONG
RANGE MAP VIEW” (page 3-14)
OPERATING MAPS
2-18Getting started
Page 31 of 235
![NISSAN PATHFINDER 2012 R52 / 4.G 06IT Navigation Manual INFO:
. You can push <BACK>on the control
panel to return to the previous screen, but
only after deleting all the numbers entered.
. When you touch [BACK] on the screen, the
screen returns to the prev NISSAN PATHFINDER 2012 R52 / 4.G 06IT Navigation Manual INFO:
. You can push <BACK>on the control
panel to return to the previous screen, but
only after deleting all the numbers entered.
. When you touch [BACK] on the screen, the
screen returns to the prev](/img/5/280/w960_280-30.png)
INFO:
. You can push
panel to return to the previous screen, but
only after deleting all the numbers entered.
. When you touch [BACK] on the screen, the
screen returns to the previous screen even
when numbers have been entered.NISSAN VOICE RECOGNITION
NISSAN Voice Recognition allows hands-free
operation of the navigation system and other
systems equipped on this vehicle, in one of two
modes, Standard Mode or Alternate Command
Mode. In Standard Mode, you can operate
Phone and Information.
The commands that are available are always
shown on the display and announced by the
system. You can complete your desired opera-
tion by simply following the prompts given by the
system. In Standard Mode, hands–free opera-
tion of Audio, Climate Control and Display is not
available through Voice Recognition.
For U.S. customers, Standard Mode is selected
by default. For Canadian customers, Alternate
Command Mode is the default mode.
INFO:
. For the voice commands for the audio, air
conditioner and other systems, refer to the
Owner’s Manual of your vehicle. The follow-
ing sections refer only to the navigation,
phone, and information systems.
. When the system language is set to
“Franc¸ ais” (French) the available commands
and functions differ from those available
when using the system in English.
Using the system
Initialization:
When the ignition switch is pushed to the ON
position, NISSAN Voice Recognition is initia-
lized, which may take up to one minute. When
completed, the system is ready to accept voice
commands. If
initialization completes, the display will show the
message: “Phonetic data downloading. Please
wait.”
Before starting
To get the best recognition performance from
NISSAN Voice Recognition, observe the follow-
ing:
. The interior of the vehicle should be as quiet
as possible. Close the windows to eliminate
the surrounding noises (traffic noise and
vibration sounds, etc.) , which may prevent
the system from correctly recognizing the
voice commands.
. Wait until the tone sounds before speaking a
command.
. Speak in a natural conversational voice
without pausing between words.
. If the air conditioner is set to “Auto”, the fan
speed is automatically lowered so that your
commands can be recognized more easily.
NISSAN VOICE RECOGNITION
Getting started2-23
Page 32 of 235

Giving voice commands
1. Push
switch.
2. A list of commands appears on the screen, and the system provides the voice menu
prompt “Would you like to access Phone,
Navigation, Information or Help?”.
3. After the tone sounds and the icon on the screen changes from [
]to[], speak
a command.
4. Continue to follow the voice menu prompts and speak after the tone sounds until your
desired operation is completed.
Operating tips: . Say a command after the tone.
. Commands that are available are always
shown on the display and spoken through
voice menu prompts. Commands other than
those that are displayed are not accepted.
Please follow the prompts given by the
system.
. If the command is not recognized, the
system announces, “Please say again”.
Repeat the command in a clear voice.
. Push
previous screen.
. If you want to cancel the command, push
and hold
cancelled” will be announced.
. When you do not say a command, the
system pauses the operation. Push
. If you want to adjust the volume of the
system feedback, push the volume control
buttons [+] or [−] on the steering switch or use the audio system volume knob while the
system is making an announcement.
2-24Getting started
Page 35 of 235
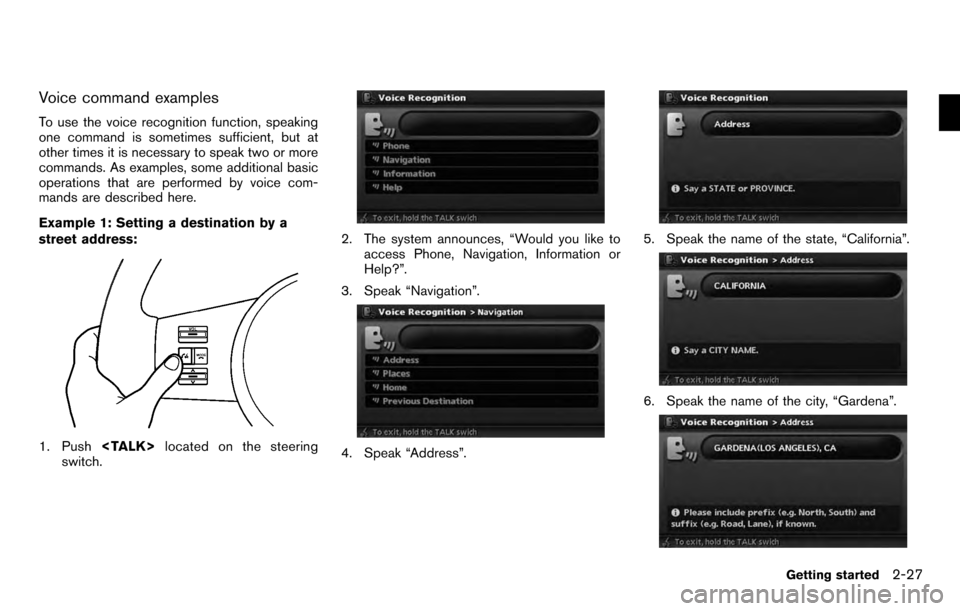
Voice command examples
To use the voice recognition function, speaking
one command is sometimes sufficient, but at
other times it is necessary to speak two or more
commands. As examples, some additional basic
operations that are performed by voice com-
mands are described here.
Example 1: Setting a destination by a
street address:
1. Push
switch.
2. The system announces, “Would you like to
access Phone, Navigation, Information or
Help?”.
3. Speak “Navigation”.
4. Speak “Address”.
5. Speak the name of the state, “California”.
6. Speak the name of the city, “Gardena”.
Getting started2-27
Page 36 of 235
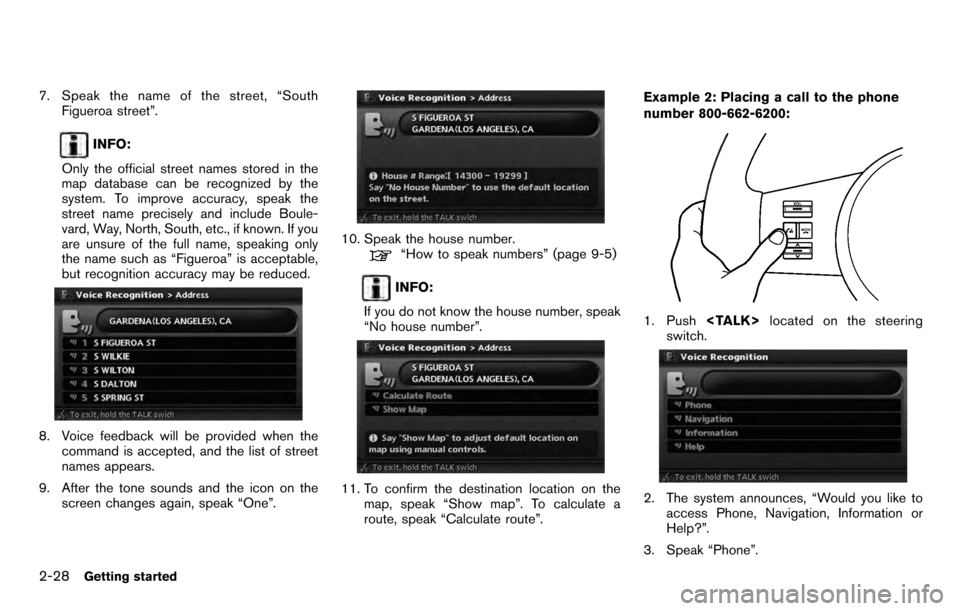
7. Speak the name of the street, “SouthFigueroa street”.
INFO:
Only the official street names stored in the
map database can be recognized by the
system. To improve accuracy, speak the
street name precisely and include Boule-
vard, Way, North, South, etc., if known. If you
are unsure of the full name, speaking only
the name such as “Figueroa” is acceptable,
but recognition accuracy may be reduced.
8. Voice feedback will be provided when the command is accepted, and the list of street
names appears.
9. After the tone sounds and the icon on the screen changes again, speak “One”.
10. Speak the house number.“How to speak numbers” (page 9-5)
INFO:
If you do not know the house number, speak
“No house number”.
11. To confirm the destination location on the map, speak “Show map”. To calculate a
route, speak “Calculate route”. Example 2: Placing a call to the phone
number 800-662-6200:
1. Push
switch.
2. The system announces, “Would you like to access Phone, Navigation, Information or
Help?”.
3. Speak “Phone”.
2-28Getting started
Page 38 of 235
the 3-3-4 format. In this case please say the
area code first and then follow the prompts.
. Do not add a “1” in front of the area code
when speaking phone numbers.
. If the system does not recognize your
command, please try repeating the com-
mand using a natural voice. Speaking too
slow or too loudly may further decrease
recognition performance.
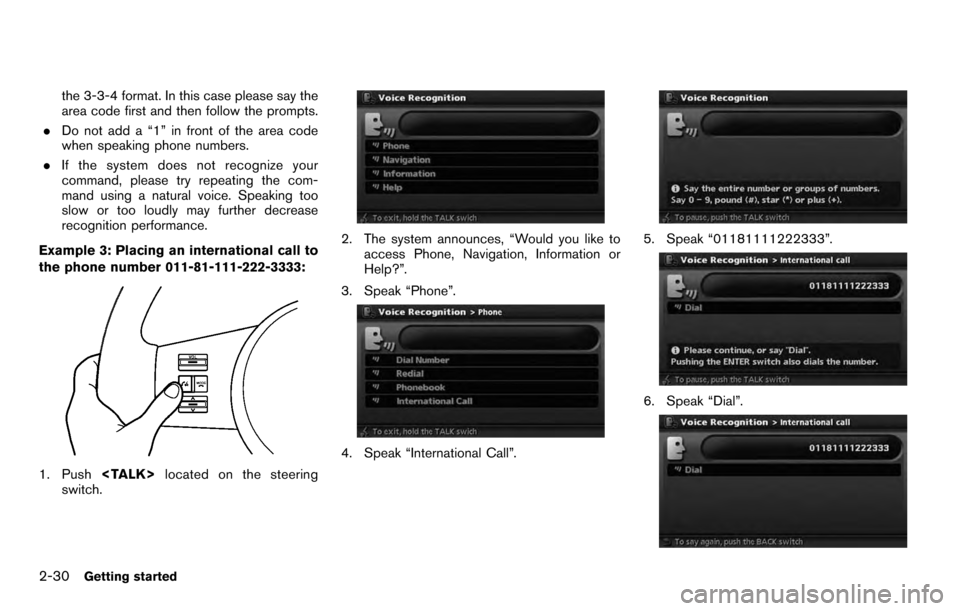
Example 3: Placing an international call to
the phone number 011-81-111-222-3333:
1. Push
switch.
2. The system announces, “Would you like to access Phone, Navigation, Information or
Help?”.
3. Speak “Phone”.
4. Speak “International Call”.
5. Speak “01181111222333”.
6. Speak “Dial”.
2-30Getting started
Page 62 of 235
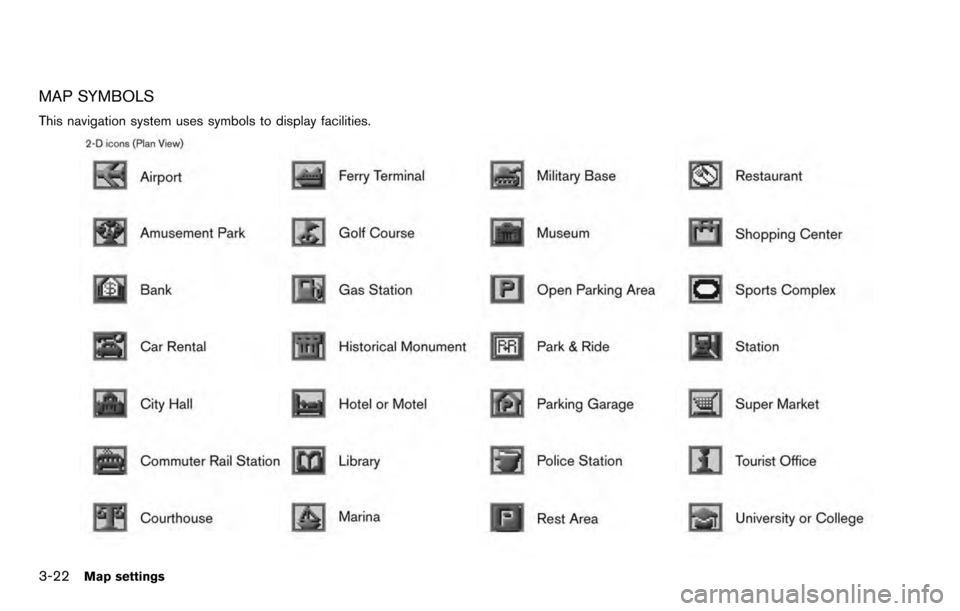
MAP SYMBOLS
This navigation system uses symbols to display facilities.
3-22Map settings
Page 69 of 235
![NISSAN PATHFINDER 2012 R52 / 4.G 06IT Navigation Manual the list screen. If this occurs, enter more
characters to further reduce the number of
matches.
6. The selected destination is displayed at thecenter of the map. Highlight [Start] after
confirming the NISSAN PATHFINDER 2012 R52 / 4.G 06IT Navigation Manual the list screen. If this occurs, enter more
characters to further reduce the number of
matches.
6. The selected destination is displayed at thecenter of the map. Highlight [Start] after
confirming the](/img/5/280/w960_280-68.png)
the list screen. If this occurs, enter more
characters to further reduce the number of
matches.
6. The selected destination is displayed at thecenter of the map. Highlight [Start] after
confirming the location of the displayed
destination, and push
system sets the destination to the selected
location and starts calculating a route.
INFO:
Even after setting a destination, you can
adjust the location of the destination, store
the route, etc.
“OPERATIONS AFTER SETTING A
DESTINATION” (page 4-24)
Voice command
1. Push
2. After the tone sounds, speak a command.
To set the destination from a street address:
“Navigation” “Address” (Standard mode)
“Address” (Alternate command mode)
INFO:
When using a voice command to set a street
name, the complete street name must be stated.
Examples:
Correct input – North Elm Street East Jefferson Boulevard
Incorrect input – Elm Street East Jefferson
SETTING A POINT OF INTEREST
This allows you to find a facility by type, and then
have the system calculate a route to that
destination. Specify the region and city of the
destination to find it more quickly.
NOTE:
Locations and business hours of facilities
are subject to change, which may not be
reflected in the map data. Double-check
this information before you go to an
emergency facility to ensure that you can
receive the proper support. Otherwise, you may not receive emergency help even
when you arrive at the destination.
A confirmation message also appears on
the navigation screen. Follow the dis-
played instructions and check the items
required.
1. Push
2. Highlight [Points of Interest] and push
3. Select whether to search by directly input-
ting the facility name, or by selecting from
Setting a destination4-5
Page 77 of 235
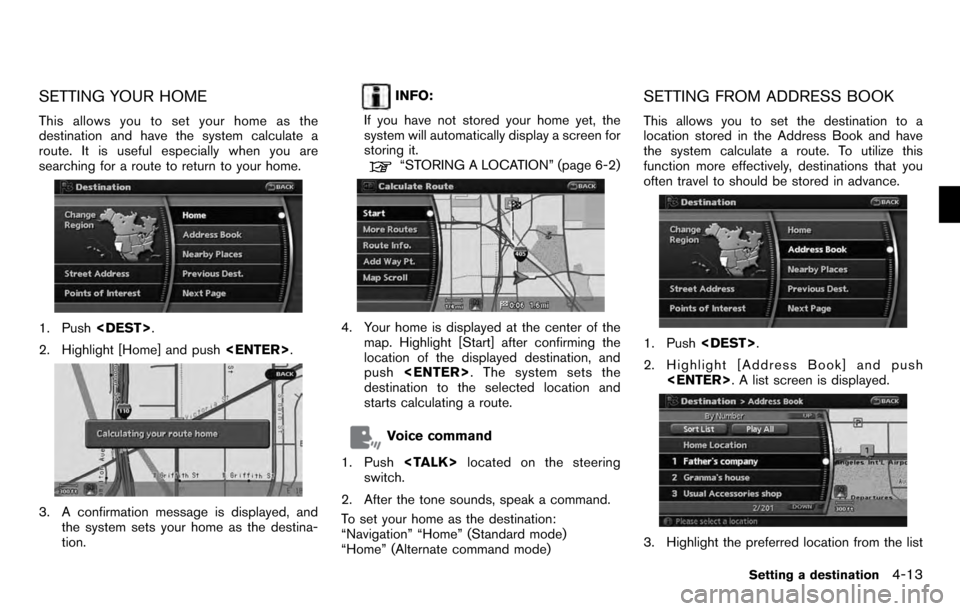
SETTING YOUR HOME
This allows you to set your home as the
destination and have the system calculate a
route. It is useful especially when you are
searching for a route to return to your home.
1. Push
2. Highlight [Home] and push
3. A confirmation message is displayed, and
the system sets your home as the destina-
tion.
INFO:
If you have not stored your home yet, the
system will automatically display a screen for
storing it.
“STORING A LOCATION” (page 6-2)
4. Your home is displayed at the center of the map. Highlight [Start] after confirming the
location of the displayed destination, and
push
destination to the selected location and
starts calculating a route.
Voice command
1. Push
switch.
2. After the tone sounds, speak a command.
To set your home as the destination:
“Navigation” “Home” (Standard mode)
“Home” (Alternate command mode)
SETTING FROM ADDRESS BOOK
This allows you to set the destination to a
location stored in the Address Book and have
the system calculate a route. To utilize this
function more effectively, destinations that you
often travel to should be stored in advance.
1. Push
2. Highlight [Address Book] and push
3. Highlight the preferred location from the list
Setting a destination4-13