navigation system NISSAN PATHFINDER 2012 R52 / 4.G 06IT Navigation Manual
[x] Cancel search | Manufacturer: NISSAN, Model Year: 2012, Model line: PATHFINDER, Model: NISSAN PATHFINDER 2012 R52 / 4.GPages: 235, PDF Size: 5.14 MB
Page 80 of 235
![NISSAN PATHFINDER 2012 R52 / 4.G 06IT Navigation Manual Other settings
You can also set the destination by pushing
<ENTER>in the current location map screen
and selecting [Nearby].
Voice command
1. Push <TALK> located on the steering
switch.
2. After the t NISSAN PATHFINDER 2012 R52 / 4.G 06IT Navigation Manual Other settings
You can also set the destination by pushing
<ENTER>in the current location map screen
and selecting [Nearby].
Voice command
1. Push <TALK> located on the steering
switch.
2. After the t](/img/5/280/w960_280-79.png)
Other settings
You can also set the destination by pushing
and selecting [Nearby].
Voice command
1. Push
switch.
2. After the tone sounds, speak a command.
To display the nearby category list and select the
destination from it:
“Navigation” “Places” (Standard mode)
“Nearby
mode)
“Nearby Places” (Alternate command mode)
SETTING A PREVIOUS DESTINATION
This allows you to set the destination to a
location that you have previously set as the destination and have the system calculate a
route. Up to 100 previous destinations will be
automatically stored.
If the number of previous destinations exceeds
100, the oldest one will be replaced by the new
one.
1. Push
2. Highlight [Previous Dest.] and push
3. Highlight the preferred destination from the
list and push
4. The selected destination is displayed at the
center of the map. Highlight [Start] after
confirming the location of the displayed
destination, and push
system sets the destination to the selected
location and starts calculating a route.
INFO:
Even after setting a destination, you can adjust
the location of the destination, store the route,
etc.
“OPERATIONS AFTER SETTING A
DESTINATION” (page 4-24)
Voice command
1. Push
switch.
2. After the tone sounds, speak a command.
4-16Setting a destination
Page 81 of 235
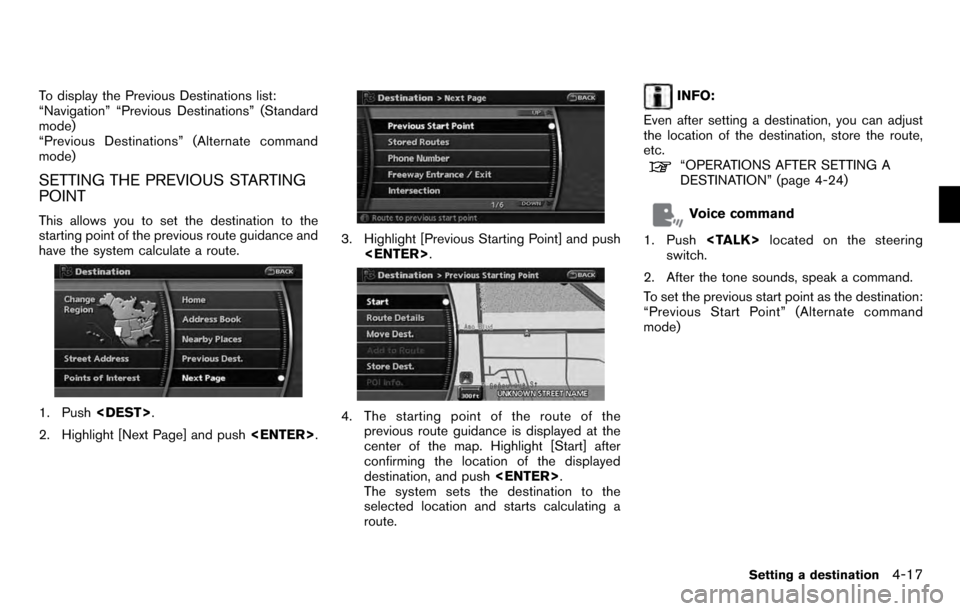
To display the Previous Destinations list:
“Navigation” “Previous Destinations” (Standard
mode)
“Previous Destinations” (Alternate command
mode)
SETTING THE PREVIOUS STARTING
POINT
This allows you to set the destination to the
starting point of the previous route guidance and
have the system calculate a route.
1. Push
2. Highlight [Next Page] and push
3. Highlight [Previous Starting Point] and push
4. The starting point of the route of the
previous route guidance is displayed at the
center of the map. Highlight [Start] after
confirming the location of the displayed
destination, and push
The system sets the destination to the
selected location and starts calculating a
route.
INFO:
Even after setting a destination, you can adjust
the location of the destination, store the route,
etc.
“OPERATIONS AFTER SETTING A
DESTINATION” (page 4-24)
Voice command
1. Push
switch.
2. After the tone sounds, speak a command.
To set the previous start point as the destination:
“Previous Start Point” (Alternate command
mode)
Setting a destination4-17
Page 115 of 235
![NISSAN PATHFINDER 2012 R52 / 4.G 06IT Navigation Manual After setting the route, select [Start] to begin
route guidance.
Throughout route guidance, the system navi-
gates you through the guide points using visual
and voice guidance.
CAUTION
.The navigation NISSAN PATHFINDER 2012 R52 / 4.G 06IT Navigation Manual After setting the route, select [Start] to begin
route guidance.
Throughout route guidance, the system navi-
gates you through the guide points using visual
and voice guidance.
CAUTION
.The navigation](/img/5/280/w960_280-114.png)
After setting the route, select [Start] to begin
route guidance.
Throughout route guidance, the system navi-
gates you through the guide points using visual
and voice guidance.
CAUTION
.The navigation system’s visual and
voice guidance is for reference
purposes only. The contents of the
guidance may be inappropriate de-
pending on the situation.
. When driving along the suggested
route, follow all traffic regulations
(e.g., one-way traffic) .
“ROUTE GUIDANCE” (page 10-9)
VOICE GUIDANCE DURING ROUTE
GUIDANCE
When approaching a guide point (intersection or
corner) , destination, etc. during route guidance,
voice guidance announces the remaining dis-
tance and/or turning direction. Push
to repeat voice guidance.
Example of voice guidance
&1“In about one quarter mile (400 meters) ,
right (left) turn.”
“Right (left) turn ahead.”
&2“In about one quarter mile (400 meters)
freeway entrance on your right onto (road
number and direction) .”
“Freeway entrance on your right onto (road
number and direction) .”
&3“In about one mile (1.6 kilometers) , exit on
your right.”
“Take the second exit on your right.”
&4“You have arrived at your destination. Ending
route guidance.”
ABOUT ROUTE GUIDANCE
Route guidance5-23
Page 125 of 235
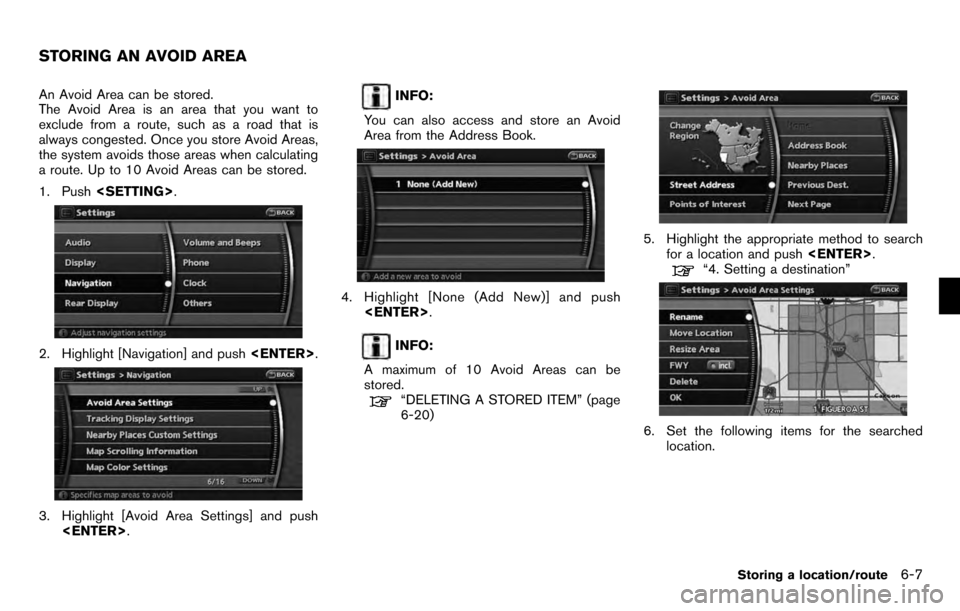
An Avoid Area can be stored.
The Avoid Area is an area that you want to
exclude from a route, such as a road that is
always congested. Once you store Avoid Areas,
the system avoids those areas when calculating
a route. Up to 10 Avoid Areas can be stored.
1. Push
2. Highlight [Navigation] and push
3. Highlight [Avoid Area Settings] and push
INFO:
You can also access and store an Avoid
Area from the Address Book.
4. Highlight [None (Add New)] and push
INFO:
A maximum of 10 Avoid Areas can be
stored.
“DELETING A STORED ITEM” (page
6-20)
5. Highlight the appropriate method to search for a location and push
“4. Setting a destination”
6. Set the following items for the searched
location.
STORING AN AVOID AREA
Storing a location/route6-7
Page 126 of 235
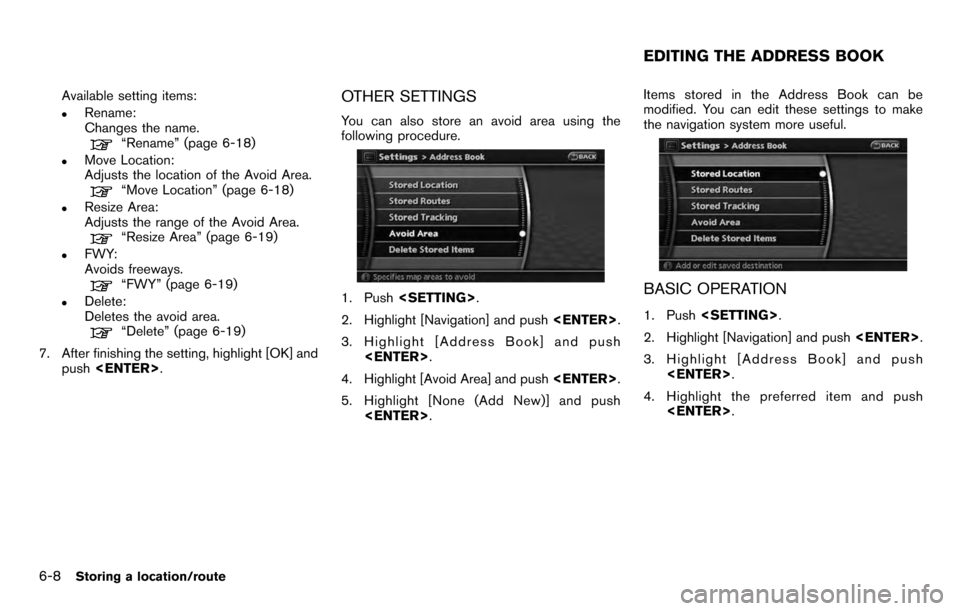
Available setting items:
.Rename:
Changes the name.
“Rename” (page 6-18)
.Move Location:
Adjusts the location of the Avoid Area.
“Move Location” (page 6-18)
.Resize Area:
Adjusts the range of the Avoid Area.
“Resize Area” (page 6-19)
.FWY:
Avoids freeways.
“FWY” (page 6-19)
.Delete:
Deletes the avoid area.
“Delete” (page 6-19)
7. After finishing the setting, highlight [OK] and push
OTHER SETTINGS
You can also store an avoid area using the
following procedure.
1. Push
2. Highlight [Navigation] and push
3. Highlight [Address Book] and push
4. Highlight [Avoid Area] and push
5. Highlight [None (Add New)] and push
modified. You can edit these settings to make
the navigation system more useful.BASIC OPERATION
1. Push
2. Highlight [Navigation] and push
3. Highlight [Address Book] and push
4. Highlight the preferred item and push
EDITING THE ADDRESS BOOK
6-8Storing a location/route
Page 143 of 235

7 Viewing technical information
Information screen.............................................. 7-2
Basic operation ............................................. 7-2
Viewing available traffic information ........................ 7-3
Basic operation ............................................. 7-3
Info on route ................................................. 7-4
Nearby traffic info. .......................................... 7-4
User locations ............................................... 7-5
Display urgent traffic information ........................ 7-6 Traffic information on map
................................ 7-6
Viewing information about current vehicle location ...... 7-9
Basic operation ............................................. 7-9
Viewing GPS current location information ................ 7-9
Basic operation ............................................. 7-9
Viewing navigation system version information .........7-10
Basic operation ........................................... 7-10
Page 144 of 235

This screen allows you to set or view various
information that is helpful for using the vehicle
safely and comfortably.
Available items include the maintenance infor-
mation, Traffic Info. setup, current location
information, GPS information, Voice recognition
list and map version.
INFO:
You must be subscribed to XM NavTraffic
®to
view Traffic Info.
BASIC OPERATION
1. Push
2. Highlight the preferred item and push
Available items
.Fuel Economy:
Refer to the vehicle Owner’s Manual. .
Tire Pressure:
Refer to the vehicle Owner’s Manual.
. Trip Computer:
Refer to the vehicle Owner’s Manual.
. Maintenance:
Refer to the vehicle Owner’s Manual.
. Traffic Info.:
Allows Traffic Info. setup.
“VIEWING AVAILABLE TRAFFIC IN-
FORMATION” (page 7-3)
. Where am I?:
Displays information regarding the current
vehicle location.
“VIEWING INFORMATION ABOUT
CURRENT VEHICLE LOCATION”
(page 7-9)
. GPS Satellite Info.:
Displays GPS information regarding the
current vehicle location.
“VIEWING GPS CURRENT LOCA-
TION INFORMATION” (page 7-9)
. Others:
— Voice Recognition:
Displays the voice recognition list.
“Voice recognition” (page 9-1)
— Navigation Version: Displays the current navigation system
version.
“VIEWING NAVIGATION SYSTEM VERSION INFORMATION” (page 7-
10)
INFORMATION SCREEN
7-2Viewing technical information
Page 145 of 235
XM NavTraffic®information is a subscription
service offered by XM®Satellite Radio.
This service provides real-time information
regarding traffic flow, accidents, road construc-
tion and other incidents, where available.
XM NavTraffic
®combines information from
commercial and public traffic data providers
including government departments of transpor-
tation, police, emergency services, road sen-
sors, cameras and aircraft reports. The traffic
information is broadcast to the vehicle by the
XM
®satellites. Available traffic information on
the route the driver selected is shown on the
navigation screen so traffic conditions between
you and the destination are known. Three types
of real-time traffic information for major road-
ways are shown on the navigation system:
* Unscheduled traffic data for example, acci-
dents and disabled vehicles.
* Scheduled traffic data, for example road
construction and road closures.
* Traffic flow information (rate of speed data) .
WARNING
XM NavTraffic®information is not a
substitute for attentive driving. Traffic
conditions change constantly and emergency situations can arise with-
out warning. Relying only on XM
NavTraffic
®information may lead to
a collision and could result in serious
personal injury.
NOTE:
Flow information is provided only for
roads equipped with traffic sensors and
is not available in all markets covered by
the service. Flow data may not be available
on portions of a road that is under
construction.
XM NavTraffic
®information is available in limited
markets. To subscribe or to check if this service
is available in your area:
call 1-800-XM-RADIO (1-800-967-2346) or
see www.xmradio.com/navtraffic
INFO:
If you do not have a contract for XM NavTraffic
®
traffic information service, a message appears,
and it will not be possible to check the
information on the traffic information system.
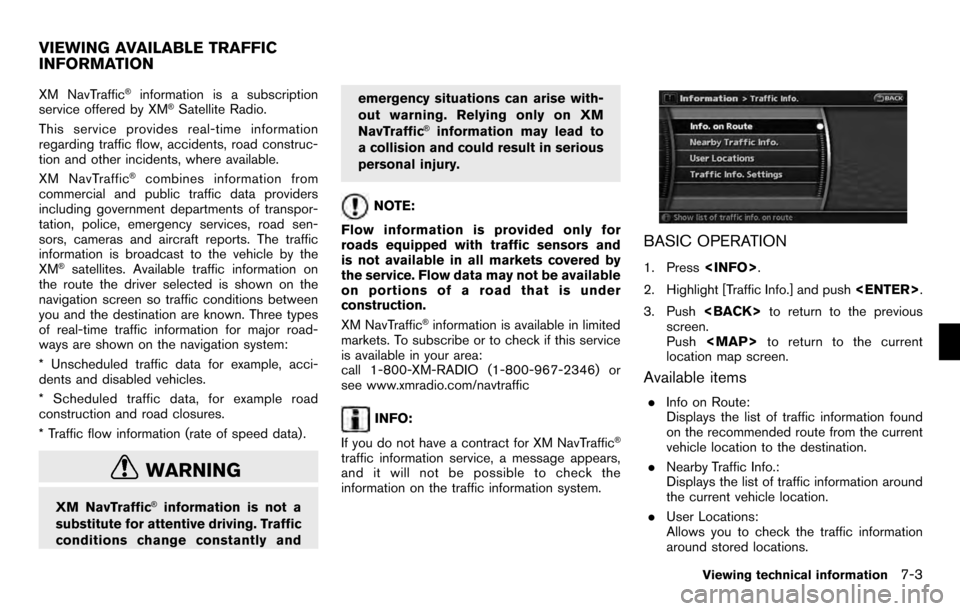
BASIC OPERATION
1. Press
2. Highlight [Traffic Info.] and push
3. Push
screen.
Push
Page 152 of 235
Contents of GPS information
&1Calculation:
Displays the GPS positioning method.
3-dimensionCalculating the latitude, longitude
and altitude by four or more satellites.
2-dimension Calculating the latitude, longitude
and altitude by three or more satel-
lites.
Out of range Cannot calculate because no GPS satellites can be located.
&2Latitude/Longitude:
Displays the latitude/longitude.
&3Approx Altitude:
Displays the approximate altitude.
&4Positioning status:
(green)It indicates that satellites are
available.
(gray)It indicates that satellites are
being searched for.
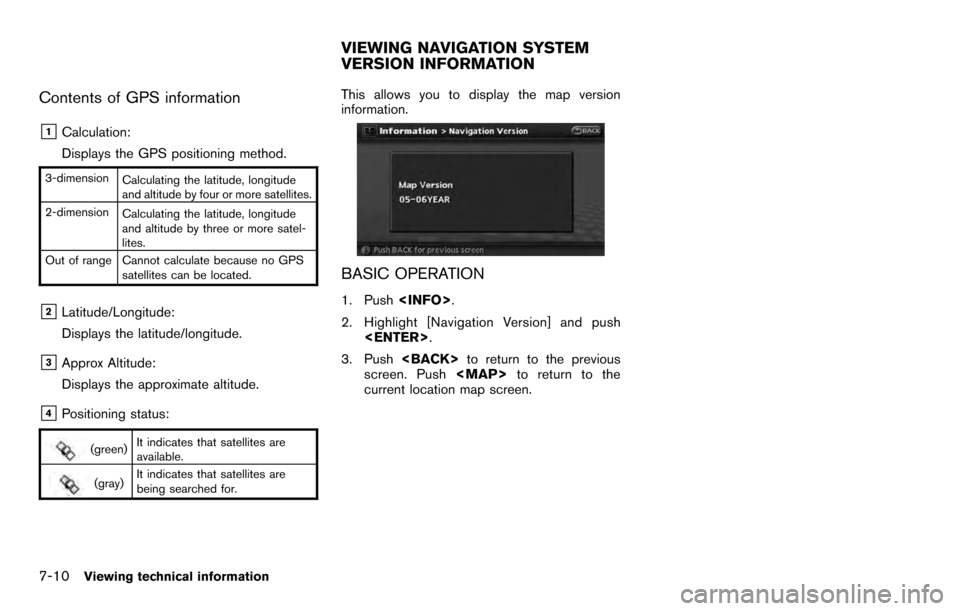
This allows you to display the map version
information.
BASIC OPERATION
1. Push
2. Highlight [Navigation Version] and push
3. Push
screen. Push
Page 154 of 235
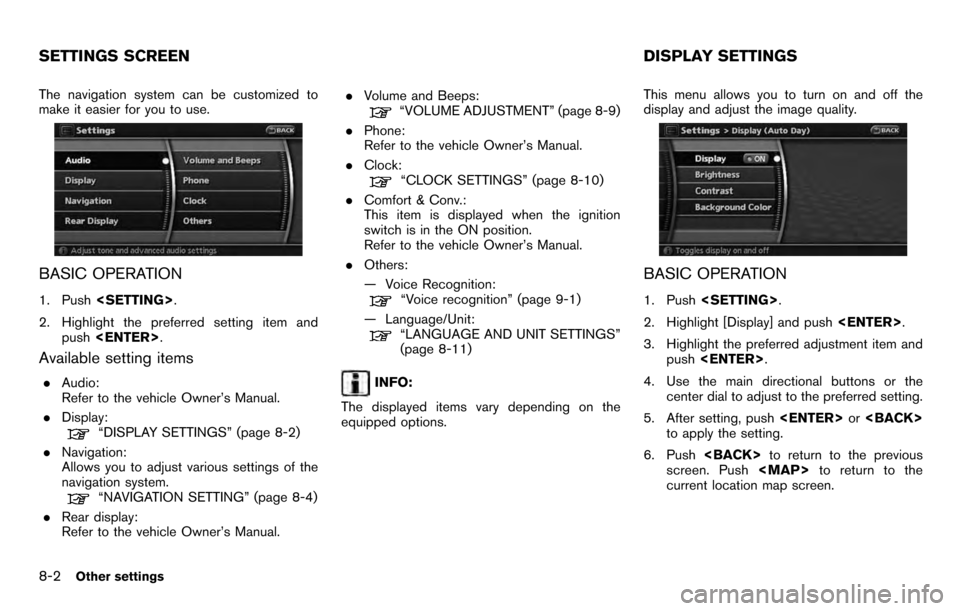
The navigation system can be customized to
make it easier for you to use.
BASIC OPERATION
1. Push
2. Highlight the preferred setting item and push
Available setting items
.Audio:
Refer to the vehicle Owner’s Manual.
. Display:
“DISPLAY SETTINGS” (page 8-2)
. Navigation:
Allows you to adjust various settings of the
navigation system.
“NAVIGATION SETTING” (page 8-4)
. Rear display:
Refer to the vehicle Owner’s Manual. .
Volume and Beeps:
“VOLUME ADJUSTMENT” (page 8-9)
. Phone:
Refer to the vehicle Owner’s Manual.
. Clock:
“CLOCK SETTINGS” (page 8-10)
. Comfort & Conv.:
This item is displayed when the ignition
switch is in the ON position.
Refer to the vehicle Owner’s Manual.
. Others:
— Voice Recognition:
“Voice recognition” (page 9-1)
— Language/Unit:
“LANGUAGE AND UNIT SETTINGS”
(page 8-11)
INFO:
The displayed items vary depending on the
equipped options. This menu allows you to turn on and off the
display and adjust the image quality.
BASIC OPERATION
1. Push
2. Highlight [Display] and push
3. Highlight the preferred adjustment item and push
4. Use the main directional buttons or the center dial to adjust to the preferred setting.
5. After setting, push
to apply the setting.
6. Push
screen. Push