display NISSAN PATHFINDER 2012 R52 / 4.G 06IT Navigation Manual
[x] Cancel search | Manufacturer: NISSAN, Model Year: 2012, Model line: PATHFINDER, Model: NISSAN PATHFINDER 2012 R52 / 4.GPages: 235, PDF Size: 5.14 MB
Page 99 of 235
![NISSAN PATHFINDER 2012 R52 / 4.G 06IT Navigation Manual 3. A confirmation message is displayed. High-light [Yes] and push <ENTER>. The route
you have deleted is reactivated.
INFO:
If you set a new route, the deleted route cannot
be reactivated.
EDITING A R NISSAN PATHFINDER 2012 R52 / 4.G 06IT Navigation Manual 3. A confirmation message is displayed. High-light [Yes] and push <ENTER>. The route
you have deleted is reactivated.
INFO:
If you set a new route, the deleted route cannot
be reactivated.
EDITING A R](/img/5/280/w960_280-98.png)
3. A confirmation message is displayed. High-light [Yes] and push
you have deleted is reactivated.
INFO:
If you set a new route, the deleted route cannot
be reactivated.
EDITING A ROUTE
1. Push
2. Highlight [Edit] and push
4. Push
screen. Push
Page 100 of 235
![NISSAN PATHFINDER 2012 R52 / 4.G 06IT Navigation Manual 1. Push<ROUTE> .
2. Highlight [Edit] and push <ENTER>.
3. Highlight [Destination] or [Waypoint] and push <ENTER> .
INFO:
If you select [Destination], the current
destination changes to a waypoint.
4. NISSAN PATHFINDER 2012 R52 / 4.G 06IT Navigation Manual 1. Push<ROUTE> .
2. Highlight [Edit] and push <ENTER>.
3. Highlight [Destination] or [Waypoint] and push <ENTER> .
INFO:
If you select [Destination], the current
destination changes to a waypoint.
4.](/img/5/280/w960_280-99.png)
1. Push
2. Highlight [Edit] and push
3. Highlight [Destination] or [Waypoint] and push
INFO:
If you select [Destination], the current
destination changes to a waypoint.
4. Set a destination or waypoint. The method of searching for a destination or waypoint is the same as the one for a destination.
“4. Setting a destination”
5. The selected location is displayed at the
center of the map. Highlight [Add to Route]
after confirming the location and push
INFO:
Even after setting a destination/waypoint,
you can adjust the destination/waypoint
location, store the route, etc.
“OPERATIONS AFTER SETTING A
DESTINATION” (page 4-24)
6. Return to the Edit Route screen. Set the route conditions as necessary.
7. Push
Page 101 of 235
![NISSAN PATHFINDER 2012 R52 / 4.G 06IT Navigation Manual 1. Push<ROUTE> .
2. Highlight [Edit] and push <ENTER>.
3. Highlight a destination or waypoint that is already set and push <ENTER>.
4. Highlight [Move Dest.] to modify the location
and push <ENTER> .
NISSAN PATHFINDER 2012 R52 / 4.G 06IT Navigation Manual 1. Push<ROUTE> .
2. Highlight [Edit] and push <ENTER>.
3. Highlight a destination or waypoint that is already set and push <ENTER>.
4. Highlight [Move Dest.] to modify the location
and push <ENTER> .](/img/5/280/w960_280-100.png)
1. Push
2. Highlight [Edit] and push
3. Highlight a destination or waypoint that is already set and push
4. Highlight [Move Dest.] to modify the location
and push
“ADJUSTING THE LOCATION OF
THE DESTINATION” (page 4-25)
5. Highlight [Delete] and push
delete the location.
6. A confirmation message is displayed. Con- firm the contents of the message, highlight
[Yes] and push
or waypoint is deleted from the route.
INFO:
. If the destination is deleted, the final
waypoint of the route becomes the destina-
tion. .
Even if you touch the map screen or operate
the directional buttons other than the up or
down button, the same map screen as when
[Move Dest.] is selected is displayed.
Changing route calculation conditions
Each section of the route between waypoints
can have different route calculation conditions.
After setting these conditions, you can recalcu-
late the entire route.
1. Push
2. Highlight [Edit] and push
3. Highlight the preferred section of the route to the destination or waypoint and push
Route guidance5-9
Page 102 of 235
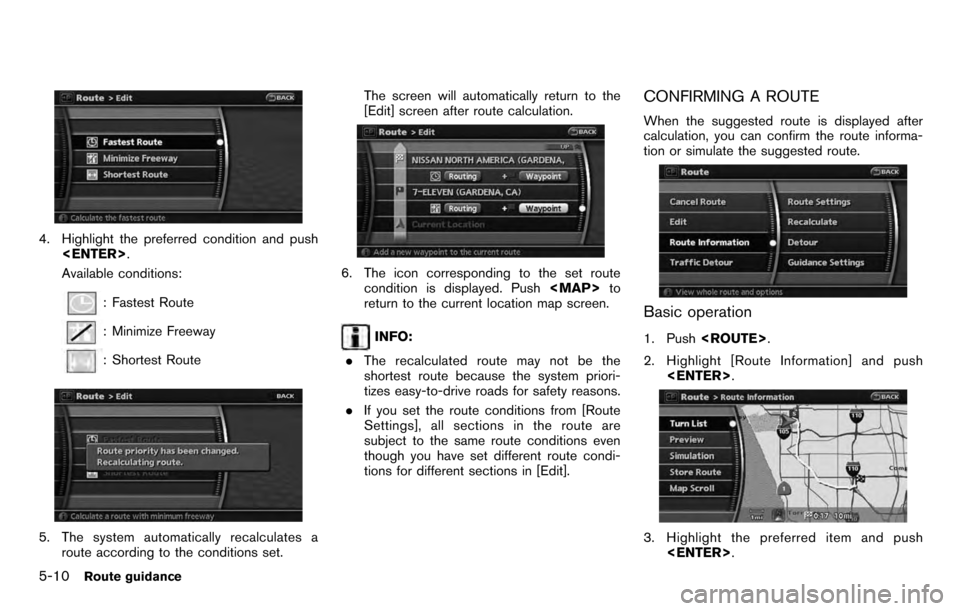
4. Highlight the preferred condition and push
Available conditions:
: Fastest Route
: Minimize Freeway
: Shortest Route
5. The system automatically recalculates a route according to the conditions set. The screen will automatically return to the
[Edit] screen after route calculation.
6. The icon corresponding to the set route
condition is displayed. Push
Page 103 of 235
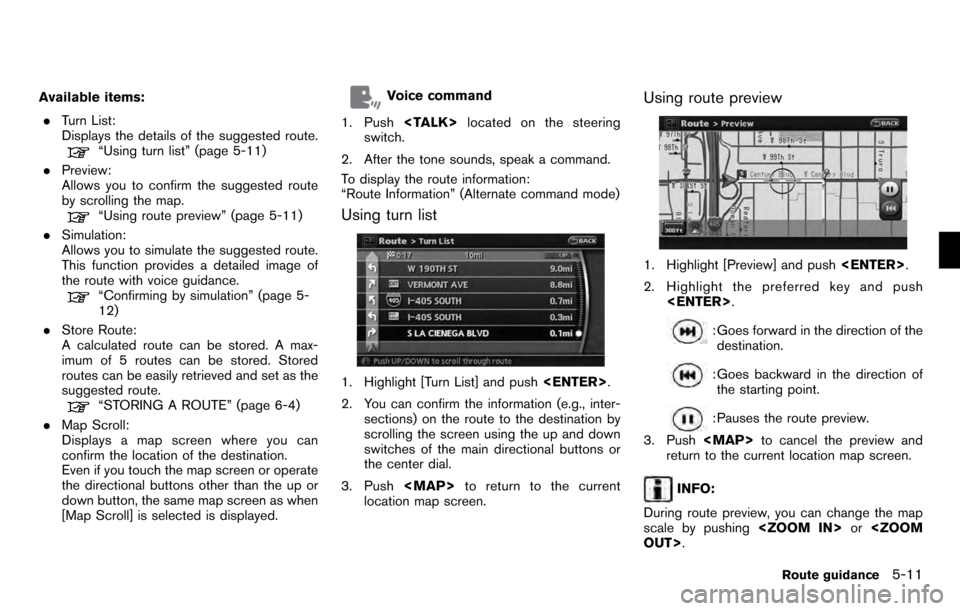
Available items:. Turn List:
Displays the details of the suggested route.
“Using turn list” (page 5-11)
. Preview:
Allows you to confirm the suggested route
by scrolling the map.
“Using route preview” (page 5-11)
. Simulation:
Allows you to simulate the suggested route.
This function provides a detailed image of
the route with voice guidance.
“Confirming by simulation” (page 5-
12)
. Store Route:
A calculated route can be stored. A max-
imum of 5 routes can be stored. Stored
routes can be easily retrieved and set as the
suggested route.
“STORING A ROUTE” (page 6-4)
. Map Scroll:
Displays a map screen where you can
confirm the location of the destination.
Even if you touch the map screen or operate
the directional buttons other than the up or
down button, the same map screen as when
[Map Scroll] is selected is displayed.
Voice command
1. Push
switch.
2. After the tone sounds, speak a command.
To display the route information:
“Route Information” (Alternate command mode)
Using turn list
1. Highlight [Turn List] and push
2. You can confirm the information (e.g., inter- sections) on the route to the destination by
scrolling the screen using the up and down
switches of the main directional buttons or
the center dial.
3. Push
Page 104 of 235
![NISSAN PATHFINDER 2012 R52 / 4.G 06IT Navigation Manual While the map scale is being changed, the route
preview is temporarily stopped.
Confirming by simulation
1. Highlight [Simulation] and press<ENTER>.
2. Highlight the preferred key and push <ENTER> .
: NISSAN PATHFINDER 2012 R52 / 4.G 06IT Navigation Manual While the map scale is being changed, the route
preview is temporarily stopped.
Confirming by simulation
1. Highlight [Simulation] and press<ENTER>.
2. Highlight the preferred key and push <ENTER> .
:](/img/5/280/w960_280-103.png)
While the map scale is being changed, the route
preview is temporarily stopped.
Confirming by simulation
1. Highlight [Simulation] and press
2. Highlight the preferred key and push
: Pauses the simulation.
: Resumes the simulation.
: Ends the simulation.
3. Push
return to the current location map screen.
INFO:
During simulation, you can change the map
scale by pushing
simulation is temporarily stopped.
SEARCHING FOR A DETOUR ROUTE
TAKING TRAFFIC INFORMATION INTO
CONSIDERATION
When a serious traffic event occurs on the route,
or if the system finds a faster route, a detour alert
will pop up automatically. If you miss the
automatic alert, you can also manually search
for a detour.
1. Push
2. Highlight [Traffic Detour] and push
3. When the detour search is successful,
detailed information about the detour route
(left screen) and the comparison screen of
the two routes (right screen) are displayed.
&1Yellow: Original route
&2Pink: Detour route
&3The change of distance and estimated
travel time to destination when the
detour route is taken.
4. If you want to accept the suggested detour route, select [Yes], and then push
INFO:
. If no route is set, or “Use Traffic for Route
Calculation” is turned off, this function
cannot be operated.
5-12Route guidance
Page 105 of 235
.If you do not select the detour route and
provide no further action, the detour route
will be automatically cancelled.
. You can try to retrieve the detour suggestion
even after the message disappears by
manually selecting “Traffic Detour”. The
system will then search for the detour again
and suggest a detour if one is available at
that time.
. If you have not subscribed to XM NavTraf-
fic
®, it will not be possible to get a traffic
detour or apply settings for traffic informa-
tion related functions. A message appears
when a related menu item is selected.
. See “NOTES ON TRAFFIC INFORMA-
TION” for further information.
Automatic detour guidance
When “Auto Reroute” and “Use Traffic for Route
Calculation” are turned on, a message will
automatically pop up when the system finds a
detour.
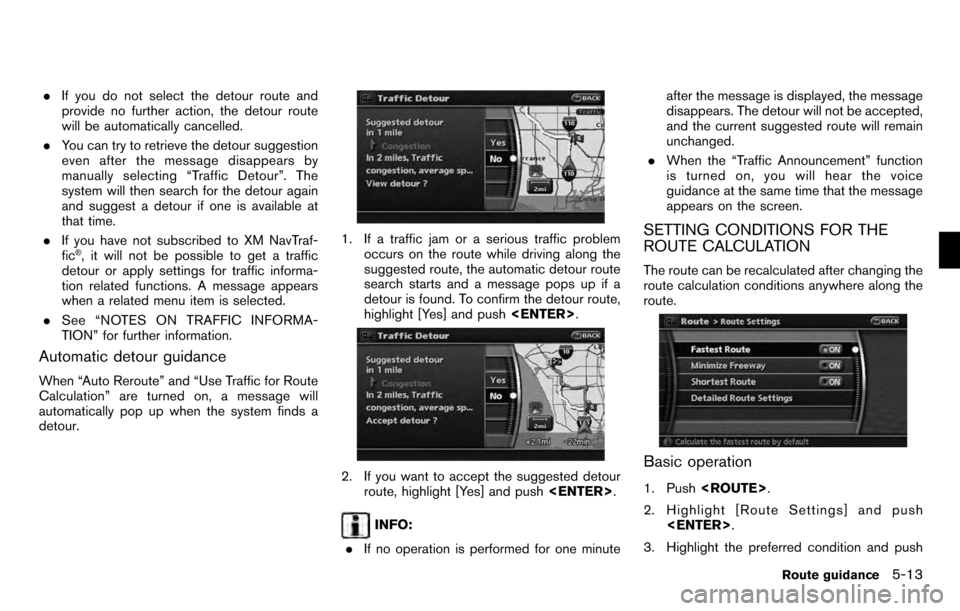
1. If a traffic jam or a serious traffic problem
occurs on the route while driving along the
suggested route, the automatic detour route
search starts and a message pops up if a
detour is found. To confirm the detour route,
highlight [Yes] and push
2. If you want to accept the suggested detour
route, highlight [Yes] and push
INFO:
. If no operation is performed for one minute after the message is displayed, the message
disappears. The detour will not be accepted,
and the current suggested route will remain
unchanged.
. When the “Traffic Announcement” function
is turned on, you will hear the voice
guidance at the same time that the message
appears on the screen.
SETTING CONDITIONS FOR THE
ROUTE CALCULATION
The route can be recalculated after changing the
route calculation conditions anywhere along the
route.
Basic operation
1. Push
2. Highlight [Route Settings] and push
3. Highlight the preferred condition and push
Route guidance5-13
Page 106 of 235
condition illuminates.
4. When the current location map screen or route setting screen is displayed, the system
recalculates a route with the set conditions.
Available conditions
.Fastest Route:
Prioritizes by the fastest time.
. Minimize Freeway:
Minimizes the use of freeways.
. Shortest Route:
Prioritizes by the shortest route.
INFO:
Only one of these conditions can be utilized at a
time.
Voice command
1. Push
switch.
2. After the tone sounds, speak a command.
To set the conditions for the route calculation
(Alternate command mode):
“Fastest Route”
“Minimize Freeway”
“Shortest Route”
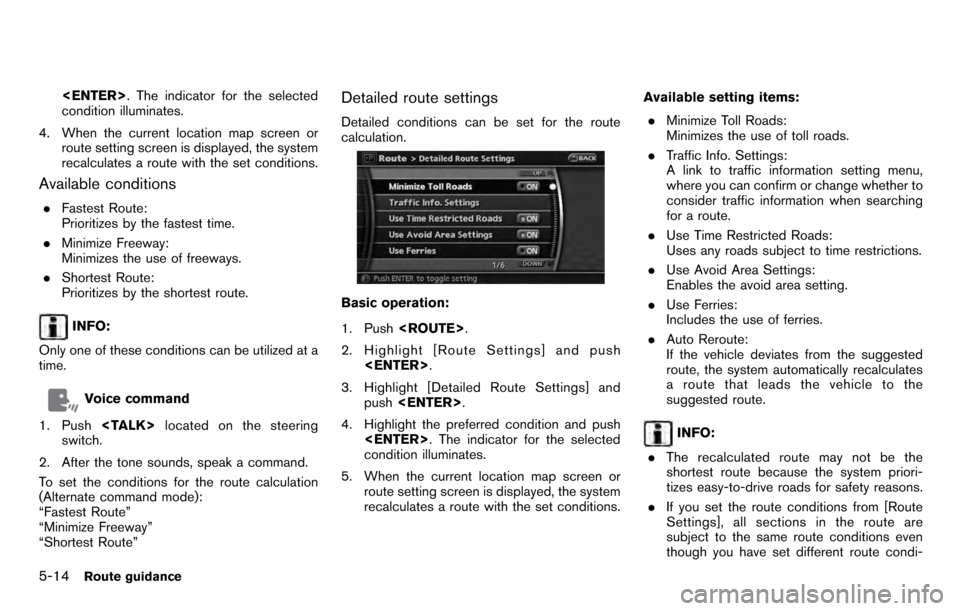
Detailed route settings
Detailed conditions can be set for the route
calculation.
Basic operation:
1. Push
2. Highlight [Route Settings] and push
3. Highlight [Detailed Route Settings] and push
4. Highlight the preferred condition and push
condition illuminates.
5. When the current location map screen or route setting screen is displayed, the system
recalculates a route with the set conditions. Available setting items:
. Minimize Toll Roads:
Minimizes the use of toll roads.
. Traffic Info. Settings:
A link to traffic information setting menu,
where you can confirm or change whether to
consider traffic information when searching
for a route.
. Use Time Restricted Roads:
Uses any roads subject to time restrictions.
. Use Avoid Area Settings:
Enables the avoid area setting.
. Use Ferries:
Includes the use of ferries.
. Auto Reroute:
If the vehicle deviates from the suggested
route, the system automatically recalculates
a route that leads the vehicle to the
suggested route.
INFO:
. The recalculated route may not be the
shortest route because the system priori-
tizes easy-to-drive roads for safety reasons.
. If you set the route conditions from [Route
Settings], all sections in the route are
subject to the same route conditions even
though you have set different route condi-
5-14Route guidance
Page 107 of 235
![NISSAN PATHFINDER 2012 R52 / 4.G 06IT Navigation Manual tions for different sections in [Edit].
. If [Use Time Restricted Roads] is deacti-
vated, the system calculates a route without
any consideration of the regulations con-
cerning the time or day of th NISSAN PATHFINDER 2012 R52 / 4.G 06IT Navigation Manual tions for different sections in [Edit].
. If [Use Time Restricted Roads] is deacti-
vated, the system calculates a route without
any consideration of the regulations con-
cerning the time or day of th](/img/5/280/w960_280-106.png)
tions for different sections in [Edit].
. If [Use Time Restricted Roads] is deacti-
vated, the system calculates a route without
any consideration of the regulations con-
cerning the time or day of the week. There-
fore, the suggested route may include a road
subject to traffic regulations concerning the
time or day of the week. When driving along
the route, always follow all traffic regulations
regardless of whether [Use Time Restricted
Roads] is ON or OFF.
. If the system cannot calculate any alternative
routes, it displays the previous route.
. If the vehicle overly deviates from the
suggested route, the system calculates a
new route.
Traffic Information Settings
Allows you to confirm or change the settings for
the traffic information related functions.
Basic operation:
1. Push
2. Highlight [Route Settings] and push
3. Highlight [Detailed Route Settings] and push
4. Highlight [Traffic Info. Settings] and push
5. Highlight the preferred condition and push
condition illuminates.
6. When the current location map screen or route setting screen is displayed, the system
recalculates a route with the set conditions.
Available setting items: . Use Traffic Info.:
Enables all traffic information related func-
tions.
. Show Traffic Flow on Map:
Displays the traffic flow with an arrow on the
map screen.
. Show Incidents on Map:
Displays the traffic incidents (e.g., accident)
on the map screen.
. Blink Red Traffic Flow:
Blinks the red traffic flow lines that represent congestions.
. Use Traffic for Travel Time:
Calculates the estimated travel time to
destination taking traffic flow into considera-
tion.
. Use Traffic for Route Calculation:
Allows you to perform the route search with
the traffic information taken into considera-
tion.
When “Auto Reroute” is set, the detour
route search can be performed automati-
cally.
. Traffic Announcements:
This can provide you with the announcement
of the traffic information event on the route.
INFO:
. An XM NavTraffic
®subscription is required
in order to receive Traffic Information.
. Even when “Show Traffic Flow On Map” and
“Show Incidents on Map” are set to off, the
list display of “Info On Route” and “Nearby
Traffic Info” will not be affected.
. Even when “Traffic Announcements” is set
to off, the route guidance will not be
affected. Also, the announcement of emer-
gency information will not be turned off.
Route guidance5-15
Page 108 of 235
Voice command
1. Push
switch.
2. After the tone sounds, speak a command.
To turn on/off the traffic information system:
“Traffic Info.” (Alternate command mode)
“Information” “Traffic Info.” (Standard mode)
RECALCULATE ROUTE
You can manually search for the route again after
changing the search condition. When the
vehicle deviates from the suggested route, the
route from the current location to the destination
is automatically searched again.
Re-searching the route manually
1. Push
2. Highlight [Recalculate] and push
3. A message is displayed, and the route is
recalculated.
4. Set the route conditions. After finishing thesetting, highlight [Start] and push
“PROCEDURES AFTER SETTING A
DESTINATION” (page 5-2)
Voice command
1. Push
switch. 2. After the tone sounds, speak a command.
To recalculate a route:
“Recalculate” (Alternate command mode)
Setting the Auto Reroute
1. Push
2. Highlight [Route Settings] and push
3. Highlight [Detailed Route Settings] and
push
5-16Route guidance