navigation NISSAN PATHFINDER 2016 R52 / 4.G 08IT Navigation Manual
[x] Cancel search | Manufacturer: NISSAN, Model Year: 2016, Model line: PATHFINDER, Model: NISSAN PATHFINDER 2016 R52 / 4.GPages: 241, PDF Size: 4.34 MB
Page 34 of 241
2-26Getting started
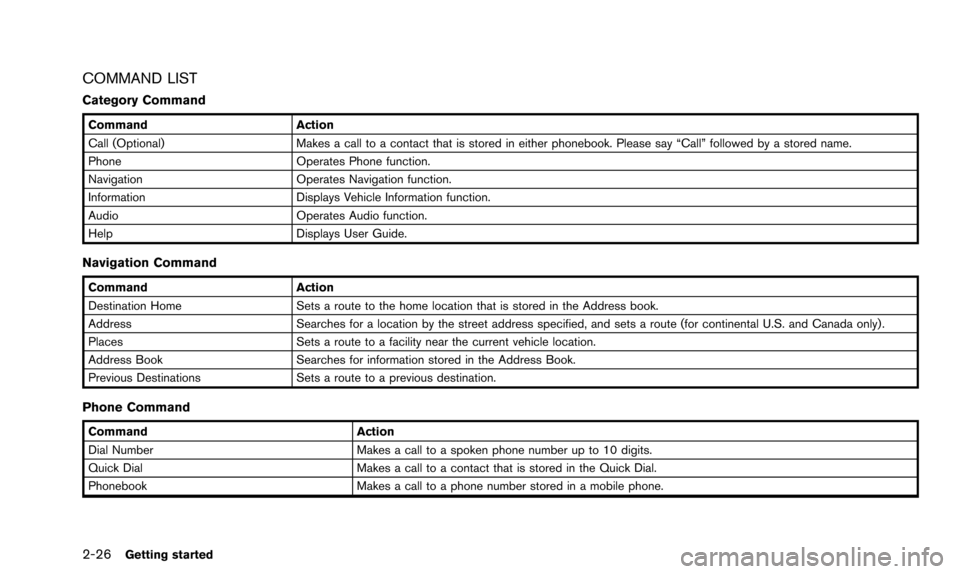
COMMAND LIST
Category Command
CommandAction
Call (Optional) Makes a call to a contact that is stored in either phonebook. Please say “Call” followed by a stored name.
Phone Operates Phone function.
Navigation Operates Navigation function.
Information Displays Vehicle Information function.
Audio Operates Audio function.
Help Displays User Guide.
Navigation Command
CommandAction
Destination Home Sets a route to the home location that is stored in the Address book.
Address Searches for a location by the street address specified, and sets a route (for continental U.S. and Canada only).
Places Sets a route to a facility near the current vehicle location.
Address Book Searches for information stored in the Address Book.
Previous Destinations Sets a route to a previous destination.
Phone Command
Command Action
Dial Number Makes a call to a spoken phone number up to 10 digits.
Quick Dial Makes a call to a contact that is stored in the Quick Dial.
Phonebook Makes a call to a phone number stored in a mobile phone.
Page 38 of 241
2-30Getting started
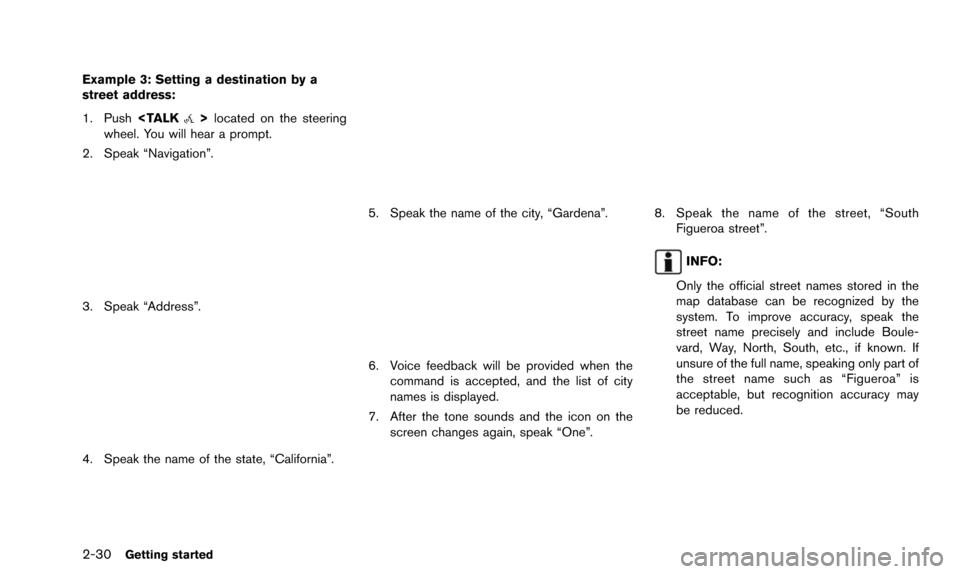
Example 3: Setting a destination by a
street address:
1. Push
wheel. You will hear a prompt.
2. Speak “Navigation”.
3. Speak “Address”.
4. Speak the name of the state, “California”.
5. Speak the name of the city, “Gardena”.
6. Voice feedback will be provided when the command is accepted, and the list of city
names is displayed.
7. After the tone sounds and the icon on the screen changes again, speak “One”.
8. Speak the name of the street, “SouthFigueroa street”.
INFO:
Only the official street names stored in the
map database can be recognized by the
system. To improve accuracy, speak the
street name precisely and include Boule-
vard, Way, North, South, etc., if known. If
unsure of the full name, speaking only part of
the street name such as “Figueroa” is
acceptable, but recognition accuracy may
be reduced.
Page 49 of 241
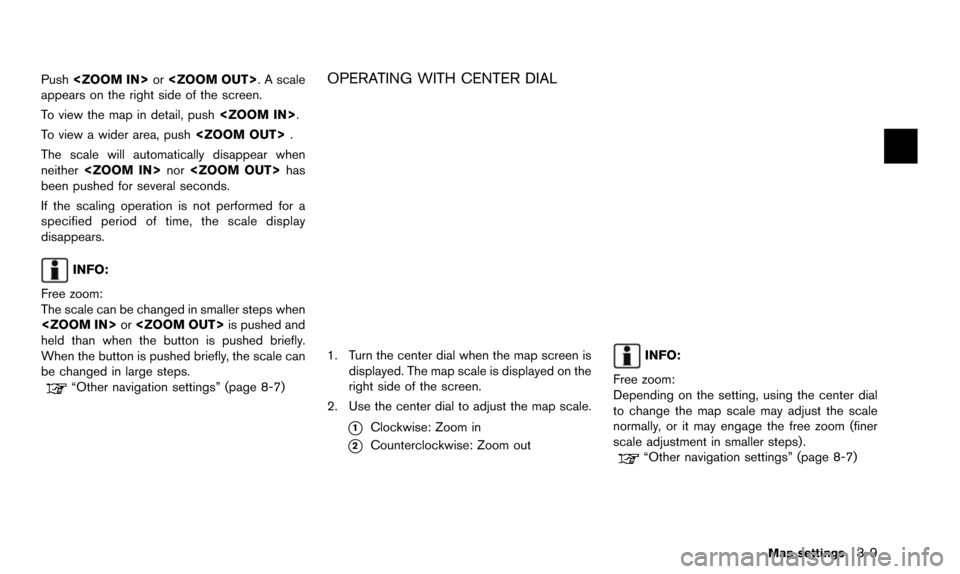
Push
appears on the right side of the screen.
To view the map in detail, push
To view a wider area, push
The scale will automatically disappear when
neither
been pushed for several seconds.
If the scaling operation is not performed for a
specified period of time, the scale display
disappears.
INFO:
Free zoom:
The scale can be changed in smaller steps when
held than when the button is pushed briefly.
When the button is pushed briefly, the scale can
be changed in large steps.
“Other navigation settings” (page 8-7)
OPERATING WITH CENTER DIAL
1. Turn the center dial when the map screen is displayed. The map scale is displayed on the
right side of the screen.
2. Use the center dial to adjust the map scale.
*1Clockwise: Zoom in
*2Counterclockwise: Zoom out
INFO:
Free zoom:
Depending on the setting, using the center dial
to change the map scale may adjust the scale
normally, or it may engage the free zoom (finer
scale adjustment in smaller steps) .
“Other navigation settings” (page 8-7)
Map settings3-9
Page 52 of 241
![NISSAN PATHFINDER 2016 R52 / 4.G 08IT Navigation Manual 3-12Map settings
3. Highlight [Change View] and push the rightbutton of the directional buttons.
4. Highlight the preferred map view and push <ENTER>. The indicator of the selected
map view illuminate NISSAN PATHFINDER 2016 R52 / 4.G 08IT Navigation Manual 3-12Map settings
3. Highlight [Change View] and push the rightbutton of the directional buttons.
4. Highlight the preferred map view and push <ENTER>. The indicator of the selected
map view illuminate](/img/5/457/w960_457-51.png)
3-12Map settings
3. Highlight [Change View] and push the rightbutton of the directional buttons.
4. Highlight the preferred map view and push
map view illuminates.
5. The display automatically returns to the map screen.
AVAILABLE VIEWS
.[2D Map]:
Switches to the 2D map.
. [Birdview (3D)]:
Switches to the Birdview
TMmap.
. [Split: 2D Map]:
Changes to the split screen mode and both
halves display maps in 2D.
. [Split: Birdview Map]:
Changes to the split screen mode and the
left half displays the map in 2D and the right half displays the map in Birdview
TM.
INFO:
. When the split screen mode is selected, the
map settings for the left screen can be
changed independently.
“Setting left screen display”
(page 3-17)
. If the split screen mode is selected, the
normal map scrolling and scale adjustment
are set in the right screen. However, if an
icon is touched before adjusting the map
direction or scale, then each screen can be
adjusted independently.
Split: 2D Map
Split: BirdviewTMMap
OTHER SETTINGS
The map view can also be set using the
following procedure.
1. Push
2. Highlight [Navigation] and push
3. Highlight [Map View] and push
4. Highlight [Change View] and push
5. Highlight the preferred item and push
Page 54 of 241
![NISSAN PATHFINDER 2016 R52 / 4.G 08IT Navigation Manual 3-14Map settings
OFF.“Settings long range map view”
(page 3-15)
. [Map Color]:
Change the map color.
“Setting map color ” (page 3-15)
. [Birdview Angle]:
Change the Birdview
TMangle.“Changin NISSAN PATHFINDER 2016 R52 / 4.G 08IT Navigation Manual 3-14Map settings
OFF.“Settings long range map view”
(page 3-15)
. [Map Color]:
Change the map color.
“Setting map color ” (page 3-15)
. [Birdview Angle]:
Change the Birdview
TMangle.“Changin](/img/5/457/w960_457-53.png)
3-14Map settings
OFF.“Settings long range map view”
(page 3-15)
. [Map Color]:
Change the map color.
“Setting map color ” (page 3-15)
. [Birdview Angle]:
Change the Birdview
TMangle.“Changing BirdviewTMangle”
(page 3-16)
. [Left Split Map Settings]:
Set the map settings for the left screen of
the split map.
“Setting left screen display”
(page 3-17)
. [Show all Freeway Exits on Route]/[Auto.
Show Turn List on Freeway]:
Set the display of the freeway exit informa-
tion ON/OFF.
“Show exit information on freeways”
(page 5-10)
Other settings
The orientation of the map can also be set using
the following procedure.
1. Push
2. Highlight [Navigation] and push
3. Highlight [Map View] and push
SETTING MAP ORIENTATION
The map direction (orientation) can also be
changed in the 2D map. These settings are
available only in the 2D map or 2D/2D split map.
1. Highlight [Map Orientation] and push
2. Highlight the preferred map orientation and push
selected map orientation illuminates.
3. Push
Page 58 of 241
3-18Map settings
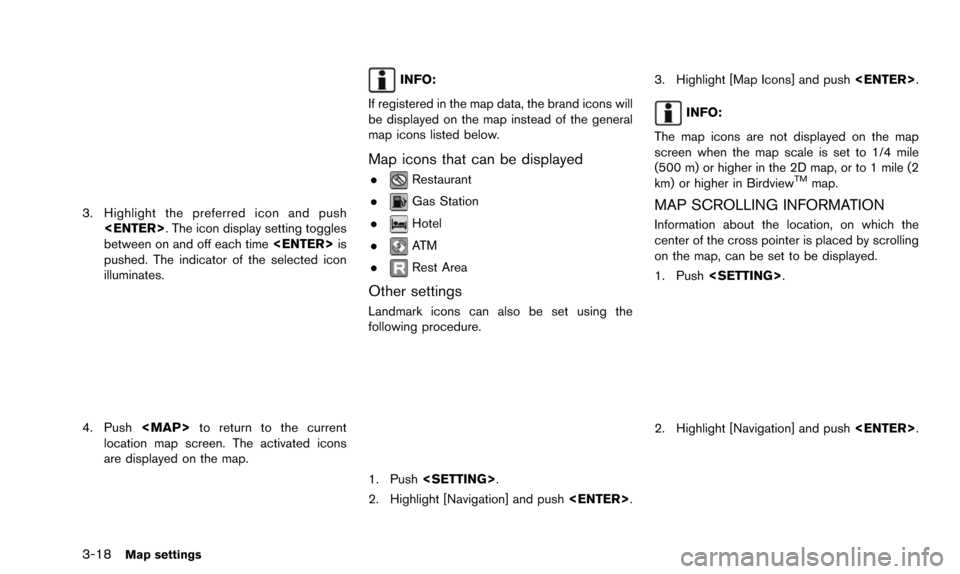
3. Highlight the preferred icon and push
between on and off each time
pushed. The indicator of the selected icon
illuminates.
4. Push
Page 60 of 241
3-20Map settings
MAP SYMBOLS
This navigation system uses symbols to display
facilities.
Page 67 of 241
INFO:
In some cases, when a street name has
been entered, the number of matching
destinations in the “Matches” column may
be different from the number displayed on
the list screen. If this occurs, enter more
characters to further reduce the number of
matches.
5. The entire route is shown on the map. Highlight [Start] after confirming the location
of the displayed destination, and push
to the selected location and starts calculat-
ing a route.
INFO:
Even after setting a destination, the location
of the destination can be adjusted, the route
can be stored, etc.
“Procedures after setting destination” (page 5-2)
Voice command
1. Push
wheel switch.
2. After the tone sounds, speak a command.
To set the destination from a street address:
“Navigation” “Address” (Standard mode)
“Address” (Alternate command mode)
INFO:
When using a voice command to set a street
name, the complete street name is recom-
mended to be stated.
Examples:
Correct input – North Elm Street East Jefferson Boulevard
Incorrect input – Elm Street East Jefferson
FINDING PLACE
There are several methods for setting a place of
interest as the destination. These include typing
a name, choosing a category or selecting a
ZAGAT reviewed location (if so equipped) . To
help improve searching, different start points
can be chosen to search from such as Near Current Location, Near the Destination, or a City
Center.
Finding nearby place
1. Push
2. Highlight [Places] and push
3. Highlight the preferred nearby category from
the list and push
A list screen is displayed.
Setting destination4-5
Page 68 of 241
![NISSAN PATHFINDER 2016 R52 / 4.G 08IT Navigation Manual 4-6Setting destination
INFO:
Highlight [Customize Nearby Places] to
customize the nearby places list to show
categories that are frequently used.
4. Highlight the preferred destination from the list, NISSAN PATHFINDER 2016 R52 / 4.G 08IT Navigation Manual 4-6Setting destination
INFO:
Highlight [Customize Nearby Places] to
customize the nearby places list to show
categories that are frequently used.
4. Highlight the preferred destination from the list,](/img/5/457/w960_457-67.png)
4-6Setting destination
INFO:
Highlight [Customize Nearby Places] to
customize the nearby places list to show
categories that are frequently used.
4. Highlight the preferred destination from the list, and push
the selected location is displayed in the
preview on the right side of the screen.
INFO:
.A maximum of 100 facilities can be displayed on the list screen.
.To search for facilities along your route, select [Show Along Route].
5. The entire route is shown on the map. Highlight [Start] after confirming the location
of the displayed destination, and push
to the selected location and starts calculat-
ing a route.
INFO:
If there is a route already set, the newly selected
location can substitute a previously set destina-
tion or be added to a route already set. Other settings:
The destination can also be set by pushing
in the current or scrolled location
map screen and selecting [Nearby Places].
Voice command
1. Push
wheel switch.
2. After the tone sounds, speak a command.
To display the nearby category list and select the
destination from it:
“Navigation” “Places” (Standard mode)
“Places” (Alternate command mode)
Page 73 of 241
SETTING HOME AS DESTINATION
The home location can be set as the destination
to which the system calculates a route. This
function is especially useful when searching for
a route to return to the home location.
1. Push
2. Highlight [Home] and push
3. The home location is displayed and set as
the destination.
INFO:
If the home location is not stored yet, the
system will automatically display a screen for
storing it.
“Storing location” (page 6-2)
4. The entire route to home is shown on the map. Highlight [Start] after confirming the
location of the displayed destination, and
push
destination to the selected location and
starts calculating a route.
Voice command
1. Push
wheel switch.
2. After the tone sounds, speak a command.
To set the home location as the destination:
“Navigation” “Destination Home” (Standard
mode) “Destination Home” (Alternate command mode)
SEARCHING FROM ADDRESS BOOK
A location stored in the Address Book can be
set as the destination to which the system
calculates a route. To utilize this function more
effectively, destinations that are often traveled to
should be stored in advance.
1. Push
2. Highlight [Address Book] and push
Setting destination4-11