NISSAN PATROL 2000 Electronic Repair Manual
Manufacturer: NISSAN, Model Year: 2000, Model line: PATROL, Model: NISSAN PATROL 2000Pages: 1033, PDF Size: 30.71 MB
Page 1021 of 1033
completely, or another malfunctioning part is detected. Go to
DIAGNOSTIC PROCEDURE 6, page RS-1044, and repair
malfunctioning part completely.
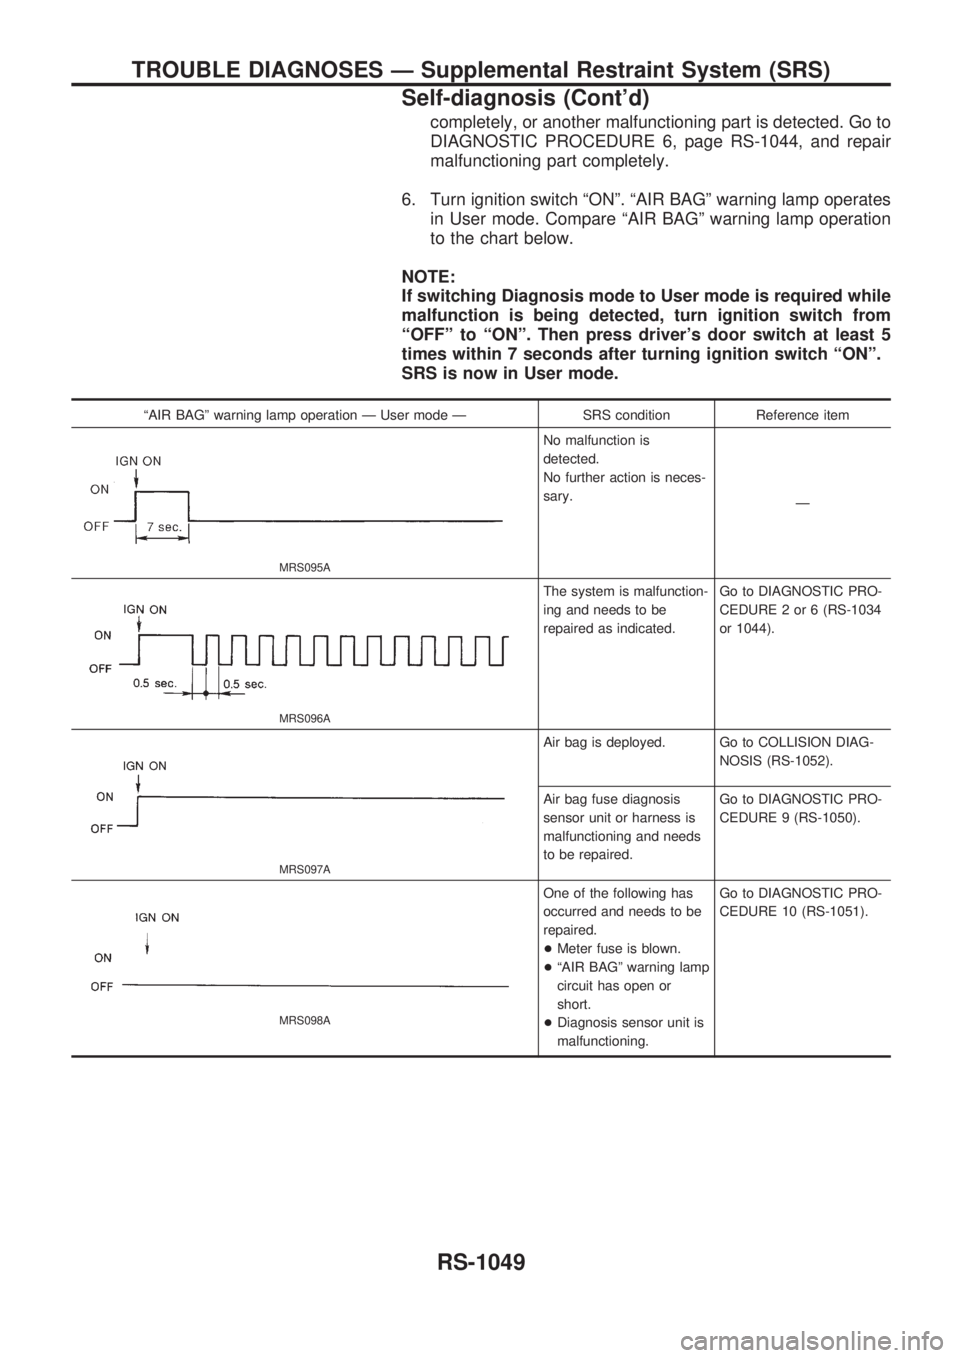
6. Turn ignition switch ªONº. ªAIR BAGº warning lamp operates
in User mode. Compare ªAIR BAGº warning lamp operation
to the chart below.
NOTE:
If switching Diagnosis mode to User mode is required while
malfunction is being detected, turn ignition switch from
ªOFFº to ªONº. Then press driver's door switch at least 5
times within 7 seconds after turning ignition switch ªONº.
SRS is now in User mode.
ªAIR BAGº warning lamp operation Ð User mode Ð SRS condition Reference item
MRS095A
No malfunction is
detected.
No further action is neces-
sary.
Ð
MRS096A
The system is malfunction-
ing and needs to be
repaired as indicated.Go to DIAGNOSTIC PRO-
CEDURE 2 or 6 (RS-1034
or 1044).
MRS097A
Air bag is deployed. Go to COLLISION DIAG-
NOSIS (RS-1052).
Air bag fuse diagnosis
sensor unit or harness is
malfunctioning and needs
to be repaired.Go to DIAGNOSTIC PRO-
CEDURE 9 (RS-1050).
MRS098A
One of the following has
occurred and needs to be
repaired.
+Meter fuse is blown.
+ªAIR BAGº warning lamp
circuit has open or
short.
+Diagnosis sensor unit is
malfunctioning.Go to DIAGNOSTIC PRO-
CEDURE 10 (RS-1051).
TROUBLE DIAGNOSES Ð Supplemental Restraint System (SRS)
Self-diagnosis (Cont'd)
RS-1049
Page 1022 of 1033
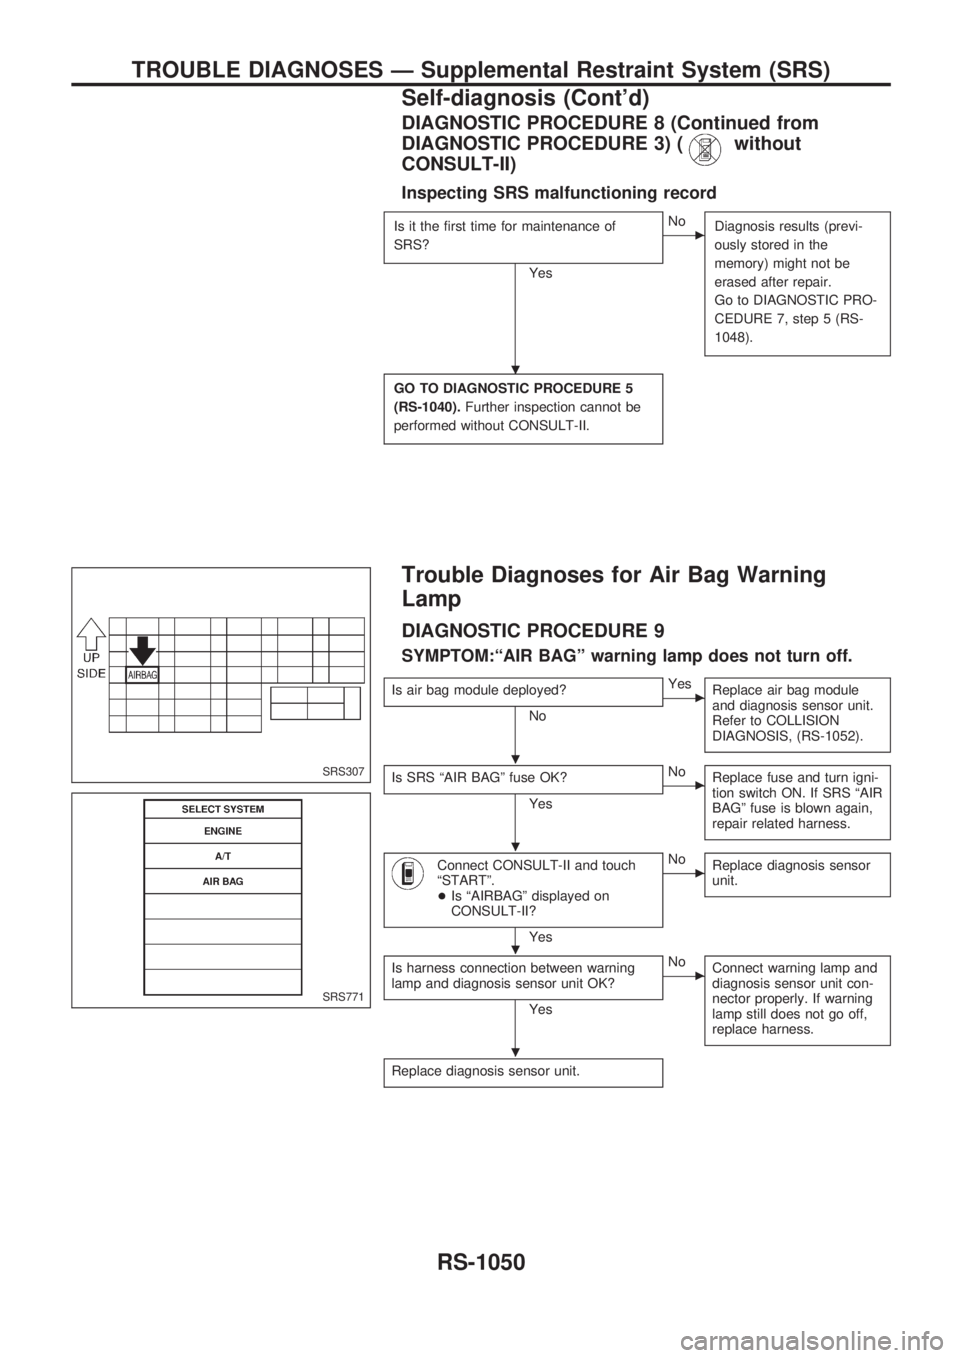
DIAGNOSTIC PROCEDURE 8 (Continued from
DIAGNOSTIC PROCEDURE 3) (
without
CONSULT-II)
Inspecting SRS malfunctioning record
Is it the first time for maintenance of
SRS?
Yes
cNo
Diagnosis results (previ-
ously stored in the
memory) might not be
erased after repair.
Go to DIAGNOSTIC PRO-
CEDURE 7, step 5 (RS-
1048).
GO TO DIAGNOSTIC PROCEDURE 5
(RS-1040).Further inspection cannot be
performed without CONSULT-II.
Trouble Diagnoses for Air Bag Warning
Lamp
DIAGNOSTIC PROCEDURE 9
SYMPTOM:ªAIR BAGº warning lamp does not turn off.
Is air bag module deployed?
No
cYes
Replace air bag module
and diagnosis sensor unit.
Refer to COLLISION
DIAGNOSIS, (RS-1052).
Is SRS ªAIR BAGº fuse OK?
Yes
cNo
Replace fuse and turn igni-
tion switch ON. If SRS ªAIR
BAGº fuse is blown again,
repair related harness.
Connect CONSULT-II and touch
ªSTARTº.
+Is ªAIRBAGº displayed on
CONSULT-II?
Yes
cNo
Replace diagnosis sensor
unit.
Is harness connection between warning
lamp and diagnosis sensor unit OK?
Yes
cNo
Connect warning lamp and
diagnosis sensor unit con-
nector properly. If warning
lamp still does not go off,
replace harness.
Replace diagnosis sensor unit.
SRS307
SRS771
.
.
.
.
.
TROUBLE DIAGNOSES Ð Supplemental Restraint System (SRS)
Self-diagnosis (Cont'd)
RS-1050
Page 1023 of 1033
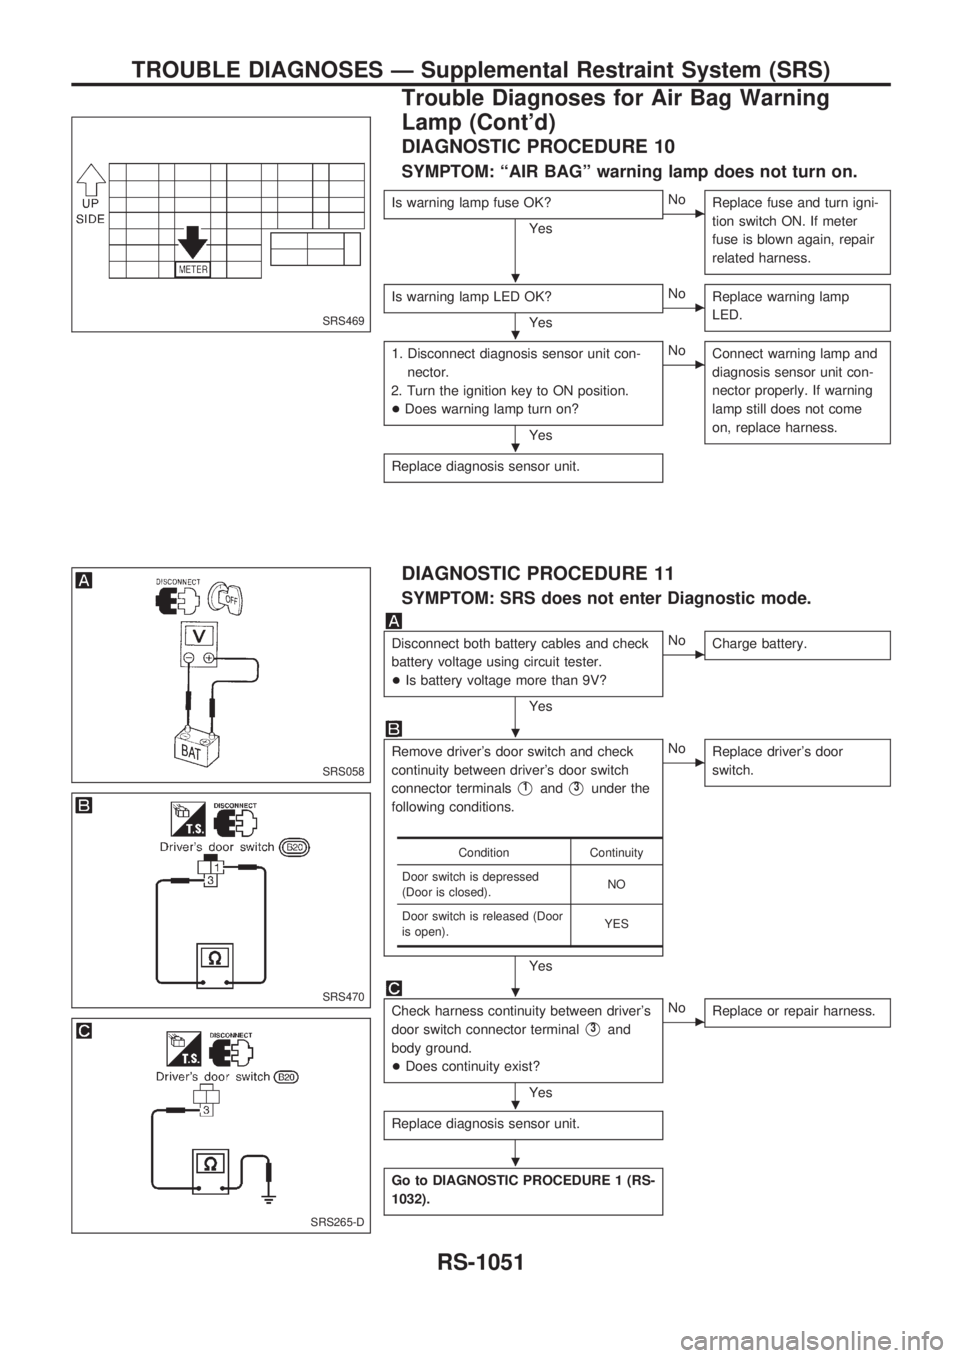
DIAGNOSTIC PROCEDURE 10
SYMPTOM: ªAIR BAGº warning lamp does not turn on.
Is warning lamp fuse OK?
YescNo
Replace fuse and turn igni-
tion switch ON. If meter
fuse is blown again, repair
related harness.
Is warning lamp LED OK?
YescNo
Replace warning lamp
LED.
1. Disconnect diagnosis sensor unit con-
nector.
2. Turn the ignition key to ON position.
+Does warning lamp turn on?
Yes
cNo
Connect warning lamp and
diagnosis sensor unit con-
nector properly. If warning
lamp still does not come
on, replace harness.
Replace diagnosis sensor unit.
DIAGNOSTIC PROCEDURE 11
SYMPTOM: SRS does not enter Diagnostic mode.
Disconnect both battery cables and check
battery voltage using circuit tester.
+Is battery voltage more than 9V?
Yes
cNo
Charge battery.
Remove driver's door switch and check
continuity between driver's door switch
connector terminals
V1andV3under the
following conditions.
Yes
cNo
Replace driver's door
switch.
Check harness continuity between driver's
door switch connector terminal
V3and
body ground.
+Does continuity exist?
Yes
cNo
Replace or repair harness.
Replace diagnosis sensor unit.
Go to DIAGNOSTIC PROCEDURE 1 (RS-
1032).
Condition Continuity
Door switch is depressed
(Door is closed).NO
Door switch is released (Door
is open).YES
SRS469
SRS058
SRS470
SRS265-D
.
.
.
.
.
.
.
TROUBLE DIAGNOSES Ð Supplemental Restraint System (SRS)
Trouble Diagnoses for Air Bag Warning
Lamp (Cont'd)
RS-1051
Page 1024 of 1033
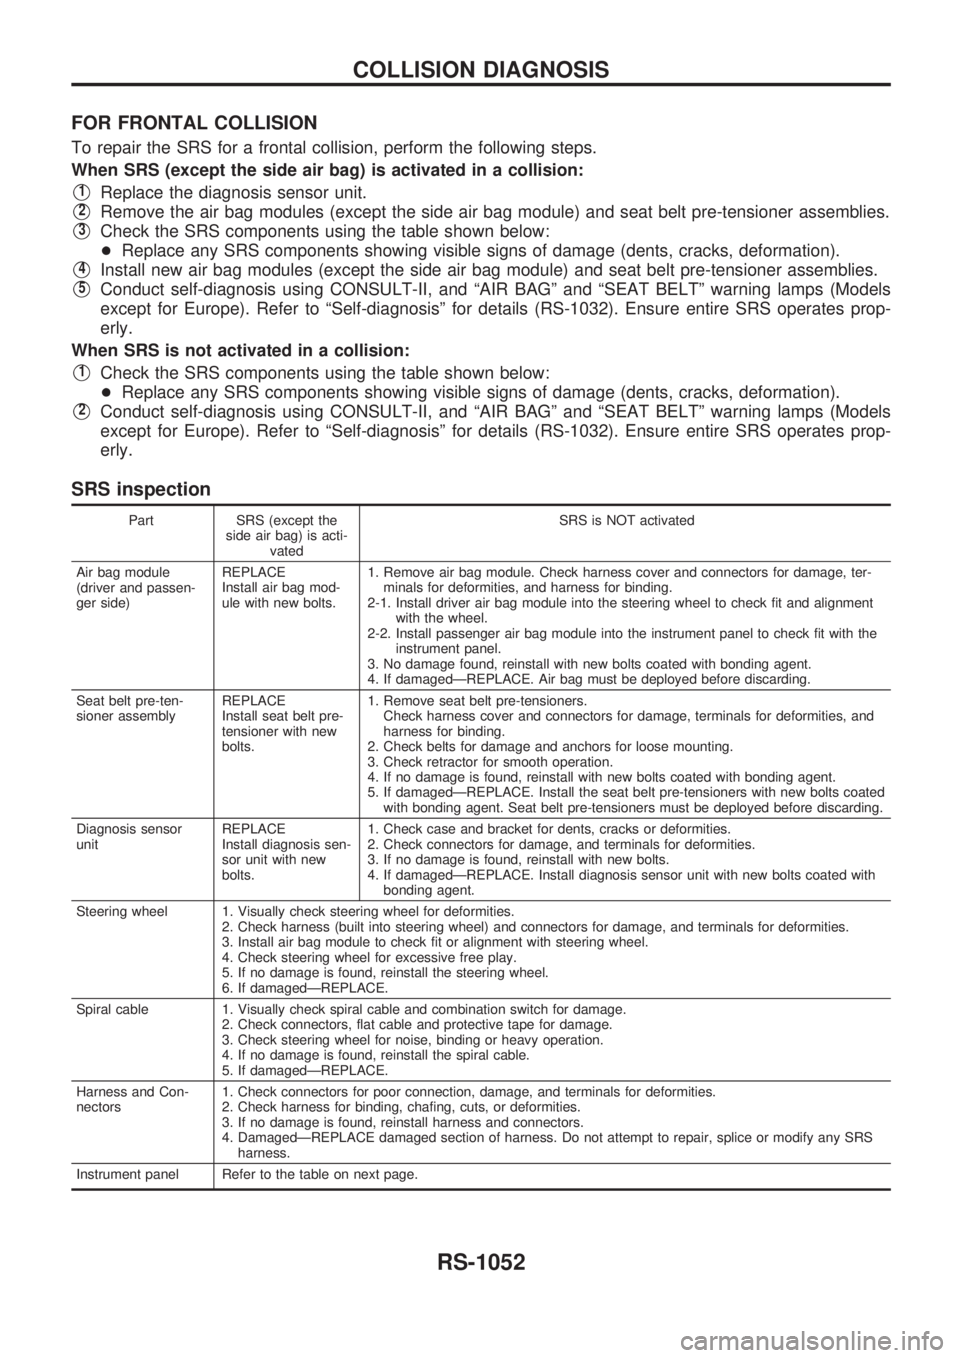
FOR FRONTAL COLLISION
To repair the SRS for a frontal collision, perform the following steps.
When SRS (except the side air bag) is activated in a collision:
V1Replace the diagnosis sensor unit.
V2Remove the air bag modules (except the side air bag module) and seat belt pre-tensioner assemblies.
V3Check the SRS components using the table shown below:
+Replace any SRS components showing visible signs of damage (dents, cracks, deformation).
V4Install new air bag modules (except the side air bag module) and seat belt pre-tensioner assemblies.
V5Conduct self-diagnosis using CONSULT-II, and ªAIR BAGº and ªSEAT BELTº warning lamps (Models
except for Europe). Refer to ªSelf-diagnosisº for details (RS-1032). Ensure entire SRS operates prop-
erly.
When SRS is not activated in a collision:
V1Check the SRS components using the table shown below:
+Replace any SRS components showing visible signs of damage (dents, cracks, deformation).
V2Conduct self-diagnosis using CONSULT-II, and ªAIR BAGº and ªSEAT BELTº warning lamps (Models
except for Europe). Refer to ªSelf-diagnosisº for details (RS-1032). Ensure entire SRS operates prop-
erly.
SRS inspection
Part SRS (except the
side air bag) is acti-
vatedSRS is NOT activated
Air bag module
(driver and passen-
ger side)REPLACE
Install air bag mod-
ule with new bolts.1. Remove air bag module. Check harness cover and connectors for damage, ter-
minals for deformities, and harness for binding.
2-1. Install driver air bag module into the steering wheel to check fit and alignment
with the wheel.
2-2. Install passenger air bag module into the instrument panel to check fit with the
instrument panel.
3. No damage found, reinstall with new bolts coated with bonding agent.
4. If damagedÐREPLACE. Air bag must be deployed before discarding.
Seat belt pre-ten-
sioner assemblyREPLACE
Install seat belt pre-
tensioner with new
bolts.1. Remove seat belt pre-tensioners.
Check harness cover and connectors for damage, terminals for deformities, and
harness for binding.
2. Check belts for damage and anchors for loose mounting.
3. Check retractor for smooth operation.
4. If no damage is found, reinstall with new bolts coated with bonding agent.
5. If damagedÐREPLACE. Install the seat belt pre-tensioners with new bolts coated
with bonding agent. Seat belt pre-tensioners must be deployed before discarding.
Diagnosis sensor
unitREPLACE
Install diagnosis sen-
sor unit with new
bolts.1. Check case and bracket for dents, cracks or deformities.
2. Check connectors for damage, and terminals for deformities.
3. If no damage is found, reinstall with new bolts.
4. If damagedÐREPLACE. Install diagnosis sensor unit with new bolts coated with
bonding agent.
Steering wheel 1. Visually check steering wheel for deformities.
2. Check harness (built into steering wheel) and connectors for damage, and terminals for deformities.
3. Install air bag module to check fit or alignment with steering wheel.
4. Check steering wheel for excessive free play.
5. If no damage is found, reinstall the steering wheel.
6. If damagedÐREPLACE.
Spiral cable 1. Visually check spiral cable and combination switch for damage.
2. Check connectors, flat cable and protective tape for damage.
3. Check steering wheel for noise, binding or heavy operation.
4. If no damage is found, reinstall the spiral cable.
5. If damagedÐREPLACE.
Harness and Con-
nectors1. Check connectors for poor connection, damage, and terminals for deformities.
2. Check harness for binding, chafing, cuts, or deformities.
3. If no damage is found, reinstall harness and connectors.
4. DamagedÐREPLACE damaged section of harness. Do not attempt to repair, splice or modify any SRS
harness.
Instrument panel Refer to the table on next page.
COLLISION DIAGNOSIS
RS-1052
Page 1025 of 1033
Part SRS (except the
side air bag) is acti-
vatedSRS is NOT activated
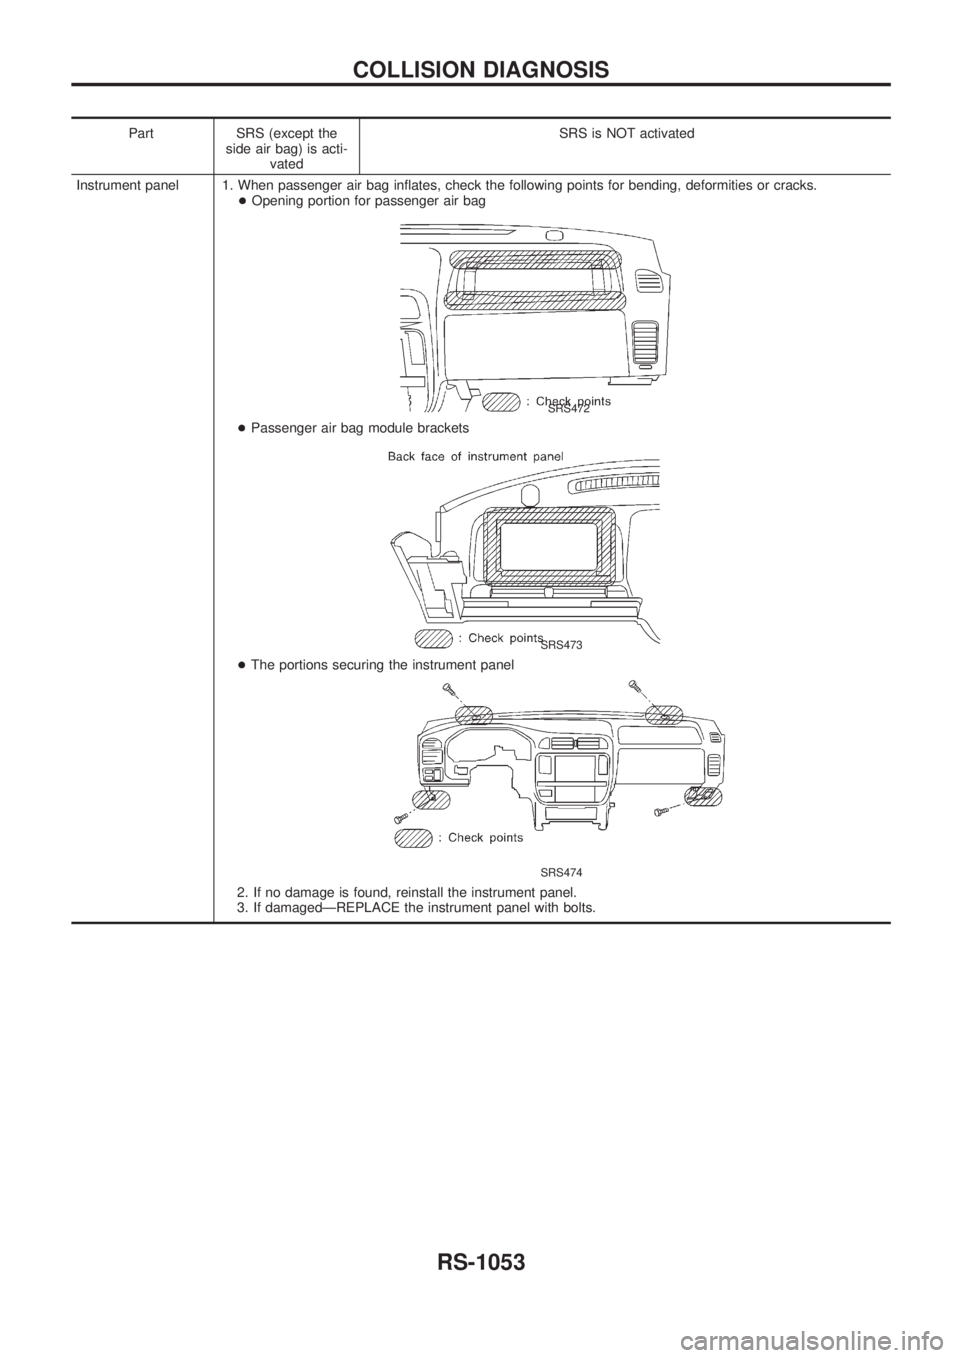
Instrument panel 1. When passenger air bag inflates, check the following points for bending, deformities or cracks.
+Opening portion for passenger air bag
SRS472
+Passenger air bag module brackets
SRS473
+The portions securing the instrument panel
SRS474
2. If no damage is found, reinstall the instrument panel.
3. If damagedÐREPLACE the instrument panel with bolts.
COLLISION DIAGNOSIS
RS-1053
Page 1026 of 1033
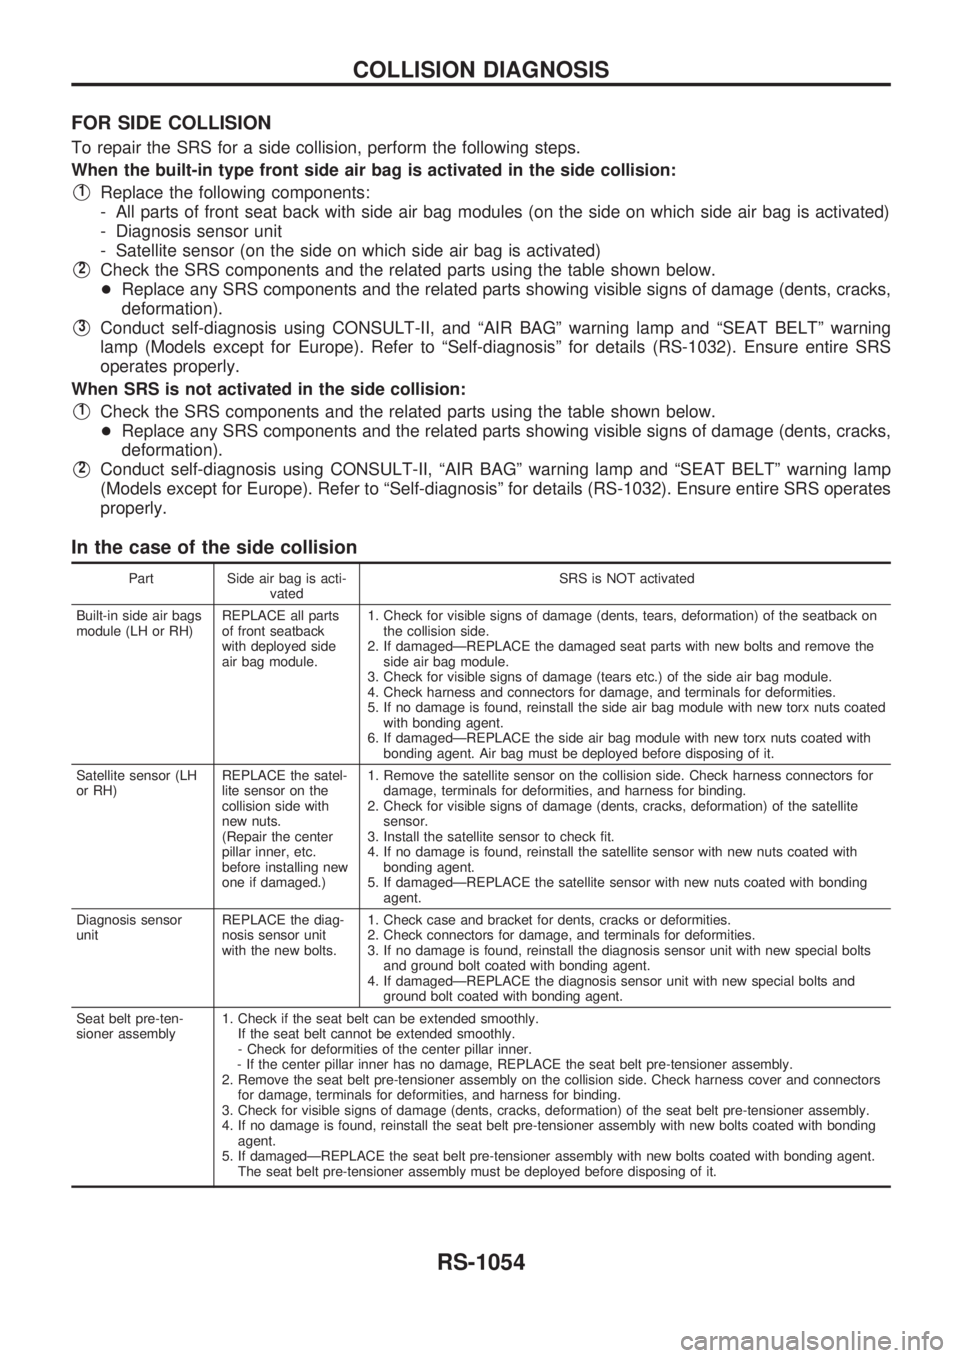
FOR SIDE COLLISION
To repair the SRS for a side collision, perform the following steps.
When the built-in type front side air bag is activated in the side collision:
V1Replace the following components:
- All parts of front seat back with side air bag modules (on the side on which side air bag is activated)
- Diagnosis sensor unit
- Satellite sensor (on the side on which side air bag is activated)
V2Check the SRS components and the related parts using the table shown below.
+Replace any SRS components and the related parts showing visible signs of damage (dents, cracks,
deformation).
V3Conduct self-diagnosis using CONSULT-II, and ªAIR BAGº warning lamp and ªSEAT BELTº warning
lamp (Models except for Europe). Refer to ªSelf-diagnosisº for details (RS-1032). Ensure entire SRS
operates properly.
When SRS is not activated in the side collision:
V1Check the SRS components and the related parts using the table shown below.
+Replace any SRS components and the related parts showing visible signs of damage (dents, cracks,
deformation).
V2Conduct self-diagnosis using CONSULT-II, ªAIR BAGº warning lamp and ªSEAT BELTº warning lamp
(Models except for Europe). Refer to ªSelf-diagnosisº for details (RS-1032). Ensure entire SRS operates
properly.
In the case of the side collision
Part Side air bag is acti-
vatedSRS is NOT activated
Built-in side air bags
module (LH or RH)REPLACE all parts
of front seatback
with deployed side
air bag module.1. Check for visible signs of damage (dents, tears, deformation) of the seatback on
the collision side.
2. If damagedÐREPLACE the damaged seat parts with new bolts and remove the
side air bag module.
3. Check for visible signs of damage (tears etc.) of the side air bag module.
4. Check harness and connectors for damage, and terminals for deformities.
5. If no damage is found, reinstall the side air bag module with new torx nuts coated
with bonding agent.
6. If damagedÐREPLACE the side air bag module with new torx nuts coated with
bonding agent. Air bag must be deployed before disposing of it.
Satellite sensor (LH
or RH)REPLACE the satel-
lite sensor on the
collision side with
new nuts.
(Repair the center
pillar inner, etc.
before installing new
one if damaged.)1. Remove the satellite sensor on the collision side. Check harness connectors for
damage, terminals for deformities, and harness for binding.
2. Check for visible signs of damage (dents, cracks, deformation) of the satellite
sensor.
3. Install the satellite sensor to check fit.
4. If no damage is found, reinstall the satellite sensor with new nuts coated with
bonding agent.
5. If damagedÐREPLACE the satellite sensor with new nuts coated with bonding
agent.
Diagnosis sensor
unitREPLACE the diag-
nosis sensor unit
with the new bolts.1. Check case and bracket for dents, cracks or deformities.
2. Check connectors for damage, and terminals for deformities.
3. If no damage is found, reinstall the diagnosis sensor unit with new special bolts
and ground bolt coated with bonding agent.
4. If damagedÐREPLACE the diagnosis sensor unit with new special bolts and
ground bolt coated with bonding agent.
Seat belt pre-ten-
sioner assembly1. Check if the seat belt can be extended smoothly.
If the seat belt cannot be extended smoothly.
- Check for deformities of the center pillar inner.
- If the center pillar inner has no damage, REPLACE the seat belt pre-tensioner assembly.
2. Remove the seat belt pre-tensioner assembly on the collision side. Check harness cover and connectors
for damage, terminals for deformities, and harness for binding.
3. Check for visible signs of damage (dents, cracks, deformation) of the seat belt pre-tensioner assembly.
4. If no damage is found, reinstall the seat belt pre-tensioner assembly with new bolts coated with bonding
agent.
5. If damagedÐREPLACE the seat belt pre-tensioner assembly with new bolts coated with bonding agent.
The seat belt pre-tensioner assembly must be deployed before disposing of it.
COLLISION DIAGNOSIS
RS-1054
Page 1027 of 1033
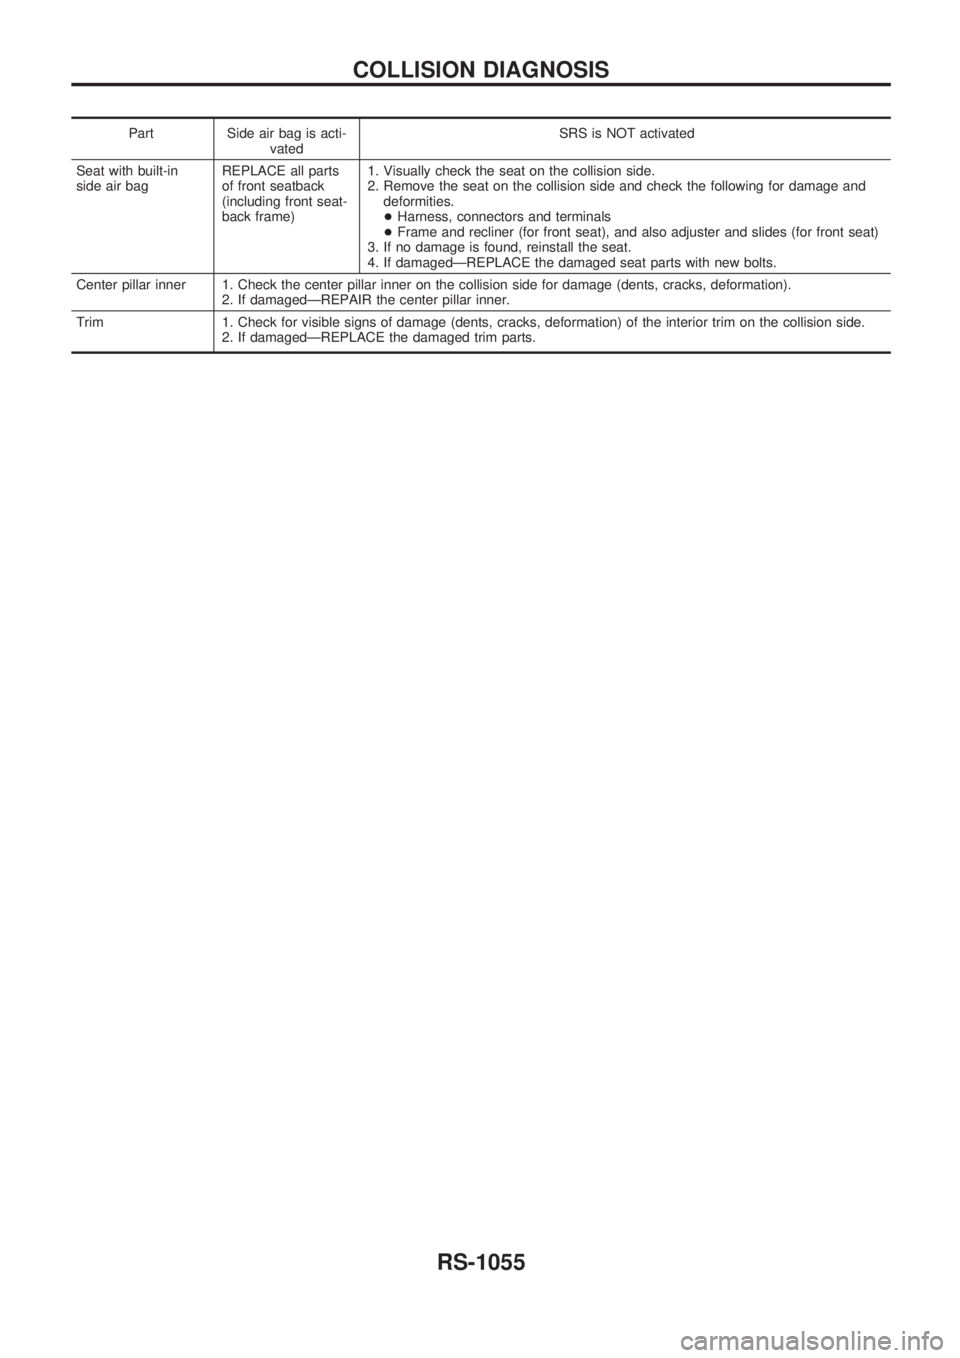
Part Side air bag is acti-
vatedSRS is NOT activated
Seat with built-in
side air bagREPLACE all parts
of front seatback
(including front seat-
back frame)1. Visually check the seat on the collision side.
2. Remove the seat on the collision side and check the following for damage and
deformities.
+Harness, connectors and terminals
+Frame and recliner (for front seat), and also adjuster and slides (for front seat)
3. If no damage is found, reinstall the seat.
4. If damagedÐREPLACE the damaged seat parts with new bolts.
Center pillar inner 1. Check the center pillar inner on the collision side for damage (dents, cracks, deformation).
2. If damagedÐREPAIR the center pillar inner.
Trim 1. Check for visible signs of damage (dents, cracks, deformation) of the interior trim on the collision side.
2. If damagedÐREPLACE the damaged trim parts.
COLLISION DIAGNOSIS
RS-1055
Page 1028 of 1033
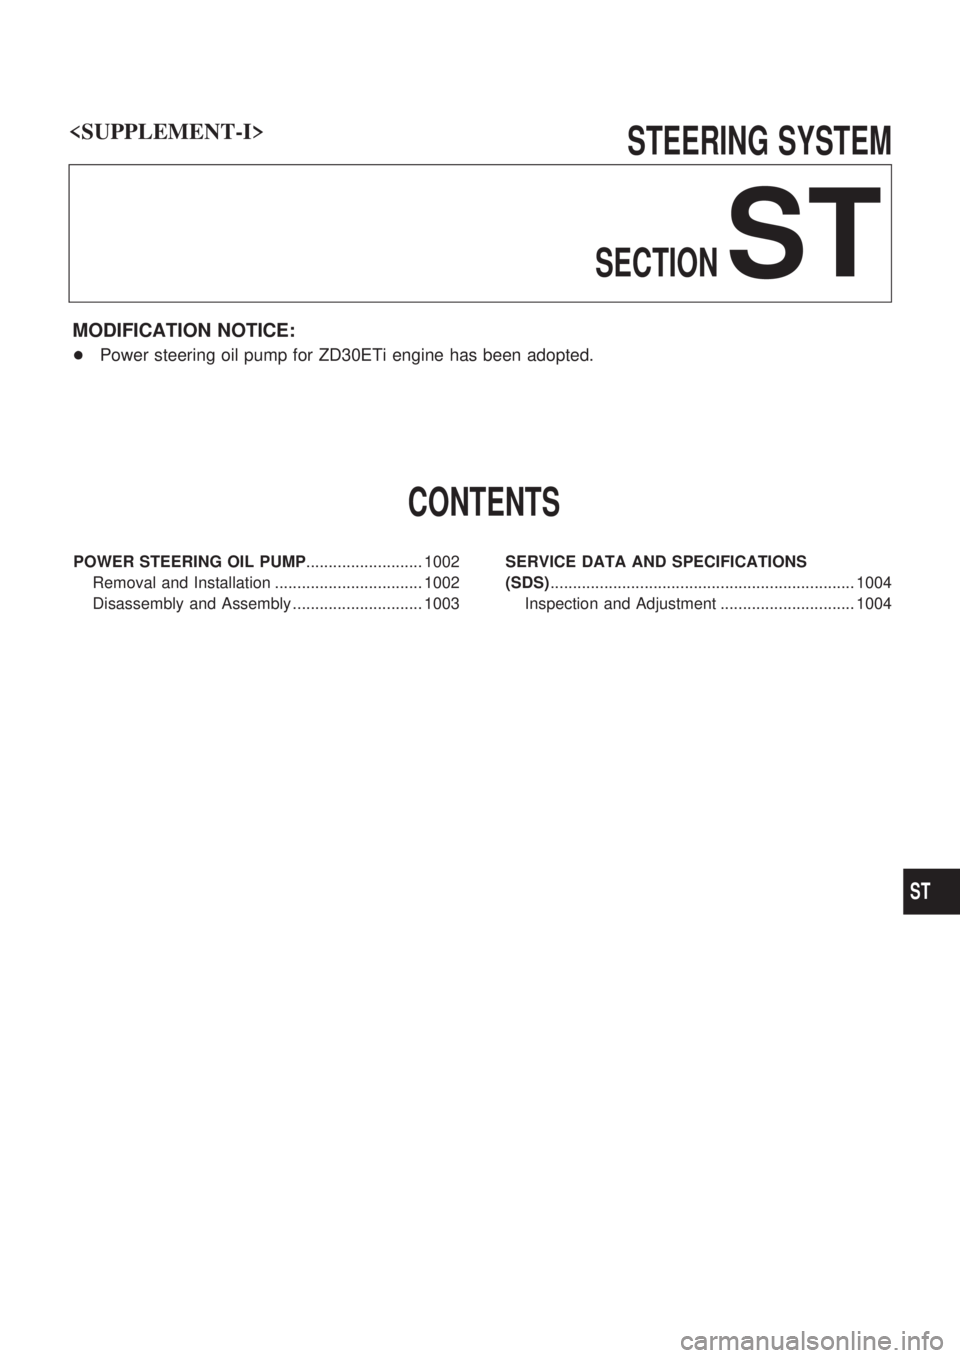
STEERING SYSTEM
SECTION
ST
MODIFICATION NOTICE:
+Power steering oil pump for ZD30ETi engine has been adopted.
CONTENTS
POWER STEERING OIL PUMP.......................... 1002
Removal and Installation ................................. 1002
Disassembly and Assembly ............................. 1003SERVICE DATA AND SPECIFICATIONS
(SDS).................................................................... 1004
Inspection and Adjustment .............................. 1004
ST
Page 1029 of 1033
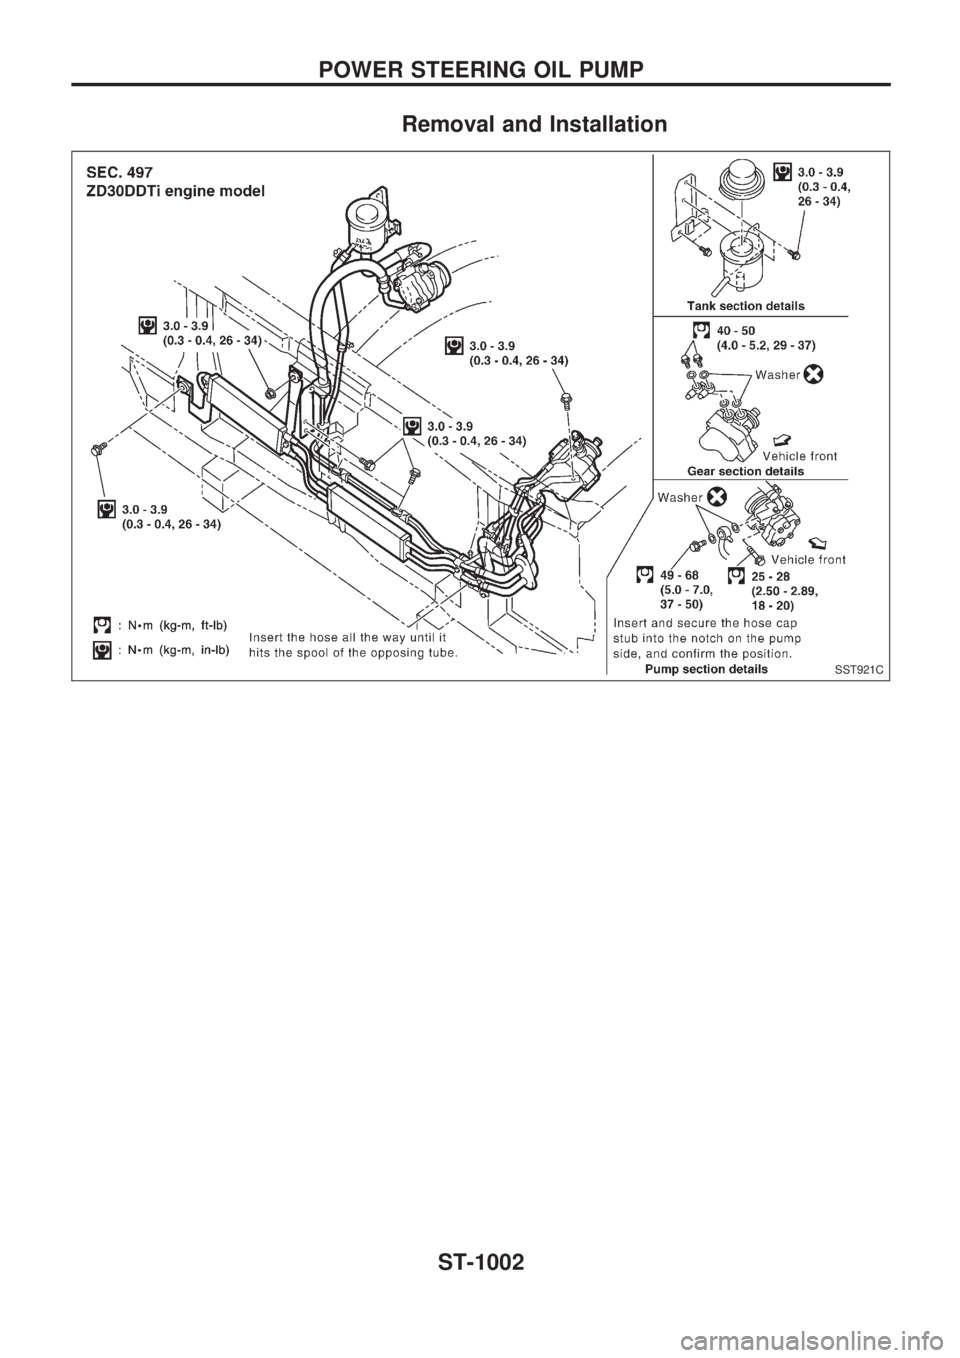
Removal and Installation
SST921C
POWER STEERING OIL PUMP
ST-1002
Page 1030 of 1033
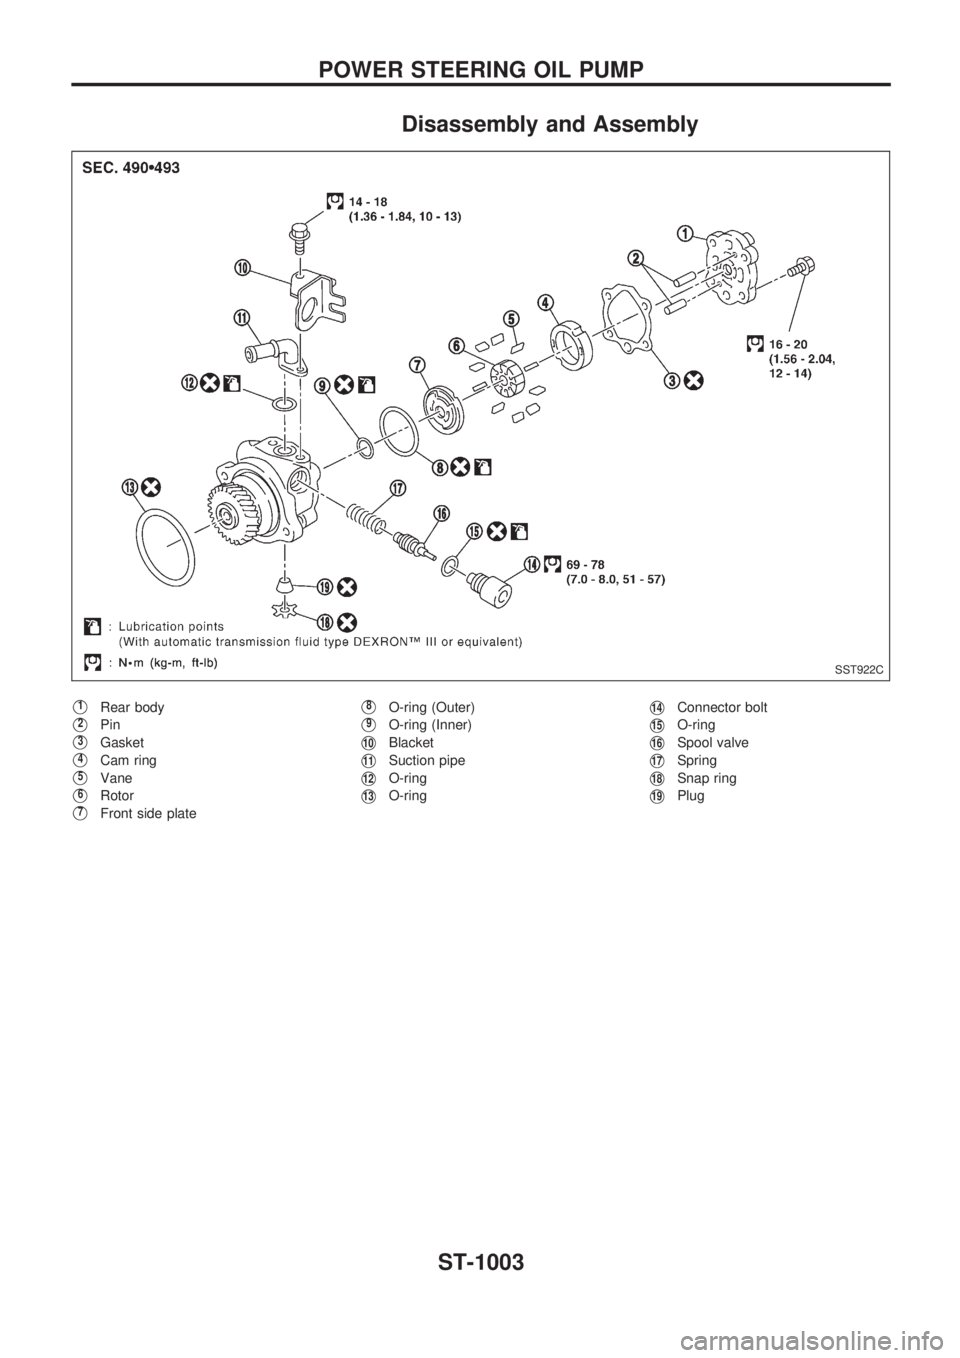
Disassembly and Assembly
V1Rear body
V2Pin
V3Gasket
V4Cam ring
V5Vane
V6Rotor
V7Front side plate
V8O-ring (Outer)
V9O-ring (Inner)
V10Blacket
V11Suction pipe
V12O-ring
V13O-ring
V14Connector bolt
V15O-ring
V16Spool valve
V17Spring
V18Snap ring
V19Plug
SST922C
POWER STEERING OIL PUMP
ST-1003