tires NISSAN PICK-UP 2001 Repair Manual
[x] Cancel search | Manufacturer: NISSAN, Model Year: 2001, Model line: PICK-UP, Model: NISSAN PICK-UP 2001Pages: 1306, PDF Size: 31.7 MB
Page 702 of 1306

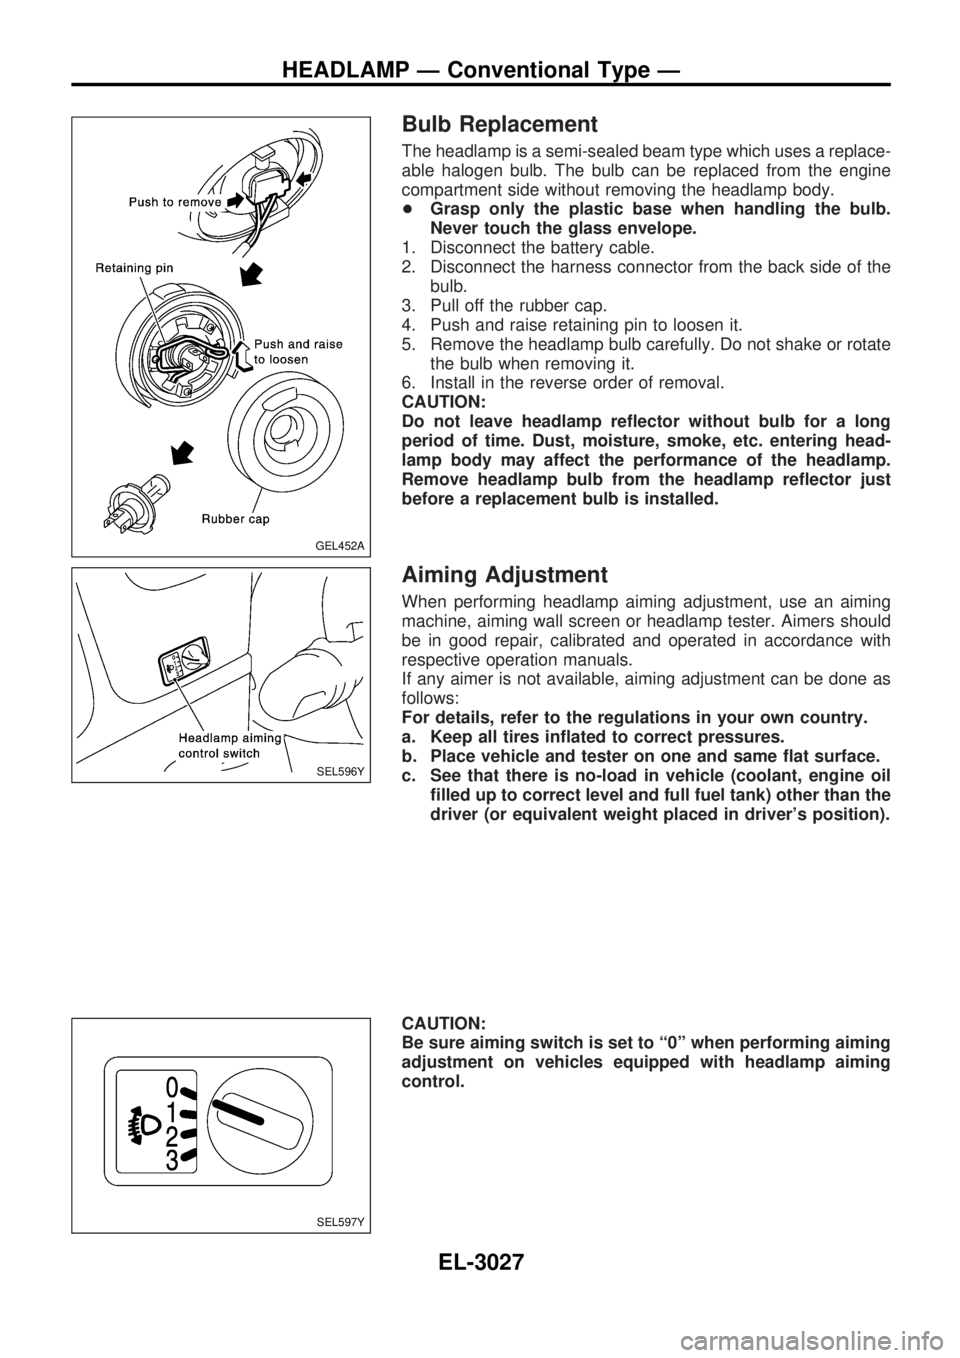
Bulb Replacement
The headlamp is a semi-sealed beam type which uses a replace-
able halogen bulb. The bulb can be replaced from the engine
compartment side without removing the headlamp body.
+Grasp only the plastic base when handling the bulb.
Never touch the glass envelope.
1. Disconnect the battery cable.
2. Disconnect the harness connector from the back side of the
bulb.
3. Pull off the rubber cap.
4. Push and raise retaining pin to loosen it.
5. Remove the headlamp bulb carefully. Do not shake or rotate
the bulb when removing it.
6. Install in the reverse order of removal.
CAUTION:
Do not leave headlamp reflector without bulb for a long
period of time. Dust, moisture, smoke, etc. entering head-
lamp body may affect the performance of the headlamp.
Remove headlamp bulb from the headlamp reflector just
before a replacement bulb is installed.
Aiming Adjustment
When performing headlamp aiming adjustment, use an aiming
machine, aiming wall screen or headlamp tester. Aimers should
be in good repair, calibrated and operated in accordance with
respective operation manuals.
If any aimer is not available, aiming adjustment can be done as
follows:
For details, refer to the regulations in your own country.
a. Keep all tires inflated to correct pressures.
b. Place vehicle and tester on one and same flat surface.
c. See that there is no-load in vehicle (coolant, engine oil
filled up to correct level and full fuel tank) other than the
driver (or equivalent weight placed in driver's position).
CAUTION:
Be sure aiming switch is set to ª0º when performing aiming
adjustment on vehicles equipped with headlamp aiming
control.
GEL452A
SEL596Y
SEL597Y
HEADLAMP Ð Conventional Type Ð
EL-3027
Page 1008 of 1306

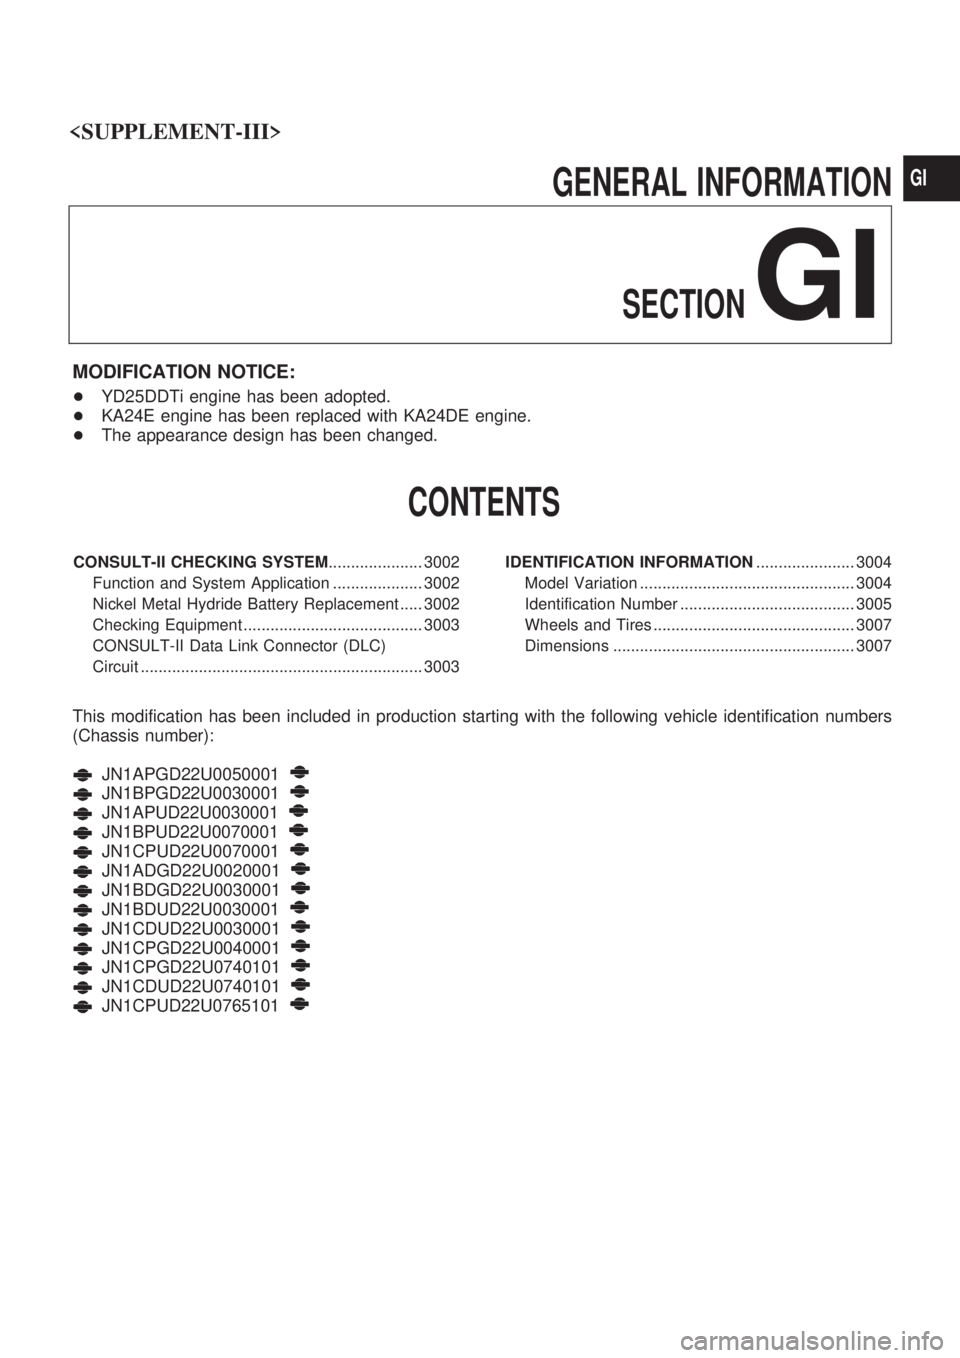
GENERAL INFORMATION
SECTION
GI
MODIFICATION NOTICE:
+YD25DDTi engine has been adopted.
+KA24E engine has been replaced with KA24DE engine.
+The appearance design has been changed.
CONTENTS
CONSULT-II CHECKING SYSTEM..................... 3002
Function and System Application .................... 3002
Nickel Metal Hydride Battery Replacement ..... 3002
Checking Equipment ........................................ 3003
CONSULT-II Data Link Connector (DLC)
Circuit ............................................................... 3003IDENTIFICATION INFORMATION...................... 3004
Model Variation ................................................ 3004
Identification Number ....................................... 3005
Wheels and Tires ............................................. 3007
Dimensions ...................................................... 3007
This modification has been included in production starting with the following vehicle identification numbers
(Chassis number):
JN1APGD22U0050001
JN1BPGD22U0030001
JN1APUD22U0030001
JN1BPUD22U0070001
JN1CPUD22U0070001
JN1ADGD22U0020001
JN1BDGD22U0030001
JN1BDUD22U0030001
JN1CDUD22U0030001
JN1CPGD22U0040001
JN1CPGD22U0740101
JN1CDUD22U0740101
JN1CPUD22U0765101
GI
Page 1014 of 1306

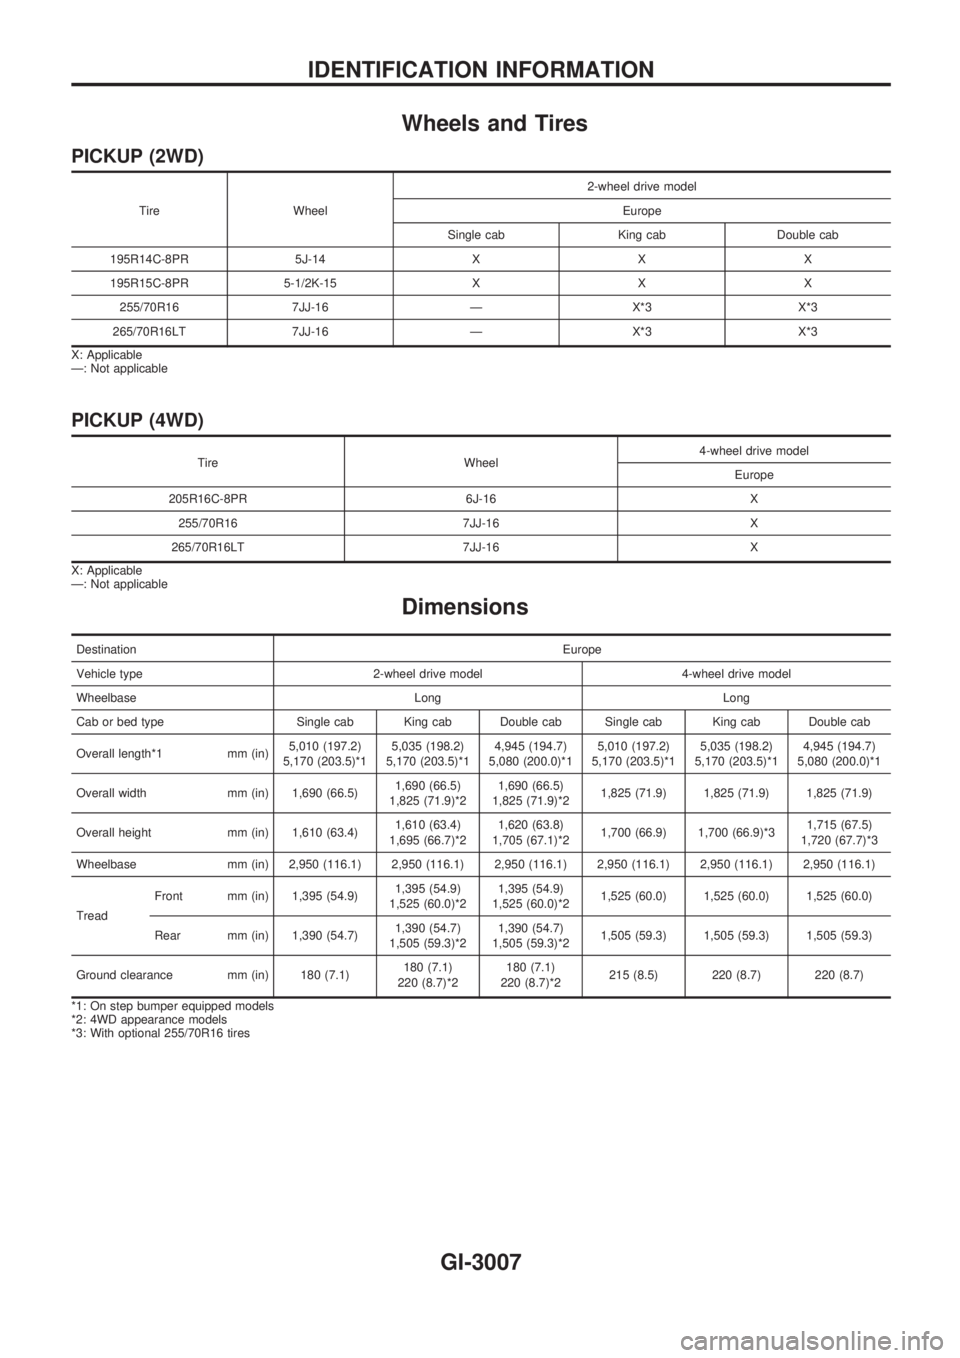
Wheels and Tires
PICKUP (2WD)
Tire Wheel2-wheel drive model
Europe
Single cab King cab Double cab
195R14C-8PR 5J-14 X X X
195R15C-8PR 5-1/2K-15 X X X
255/70R16 7JJ-16 Ð X*3 X*3
265/70R16LT 7JJ-16 Ð X*3 X*3
X: Applicable
Ð: Not applicable
PICKUP (4WD)
Tire Wheel4-wheel drive model
Europe
205R16C-8PR 6J-16 X
255/70R16 7JJ-16 X
265/70R16LT 7JJ-16 X
X: Applicable
Ð: Not applicable
Dimensions
DestinationEurope
Vehicle type 2-wheel drive model 4-wheel drive model
Wheelbase Long Long
Cab or bed type Single cab King cab Double cab Single cab King cab Double cab
Overall length*1 mm (in)5,010 (197.2)
5,170 (203.5)*15,035 (198.2)
5,170 (203.5)*14,945 (194.7)
5,080 (200.0)*15,010 (197.2)
5,170 (203.5)*15,035 (198.2)
5,170 (203.5)*14,945 (194.7)
5,080 (200.0)*1
Overall width mm (in) 1,690 (66.5)1,690 (66.5)
1,825 (71.9)*21,690 (66.5)
1,825 (71.9)*21,825 (71.9) 1,825 (71.9) 1,825 (71.9)
Overall height mm (in) 1,610 (63.4)1,610 (63.4)
1,695 (66.7)*21,620 (63.8)
1,705 (67.1)*21,700 (66.9) 1,700 (66.9)*31,715 (67.5)
1,720 (67.7)*3
Wheelbase mm (in) 2,950 (116.1) 2,950 (116.1) 2,950 (116.1) 2,950 (116.1) 2,950 (116.1) 2,950 (116.1)
TreadFront mm (in) 1,395 (54.9)1,395 (54.9)
1,525 (60.0)*21,395 (54.9)
1,525 (60.0)*21,525 (60.0) 1,525 (60.0) 1,525 (60.0)
Rear mm (in) 1,390 (54.7)1,390 (54.7)
1,505 (59.3)*21,390 (54.7)
1,505 (59.3)*21,505 (59.3) 1,505 (59.3) 1,505 (59.3)
Ground clearance mm (in) 180 (7.1)180 (7.1)
220 (8.7)*2180 (7.1)
220 (8.7)*2215 (8.5) 220 (8.7) 220 (8.7)
*1: On step bumper equipped models
*2: 4WD appearance models
*3: With optional 255/70R16 tires
IDENTIFICATION INFORMATION
GI-3007
Page 1051 of 1306

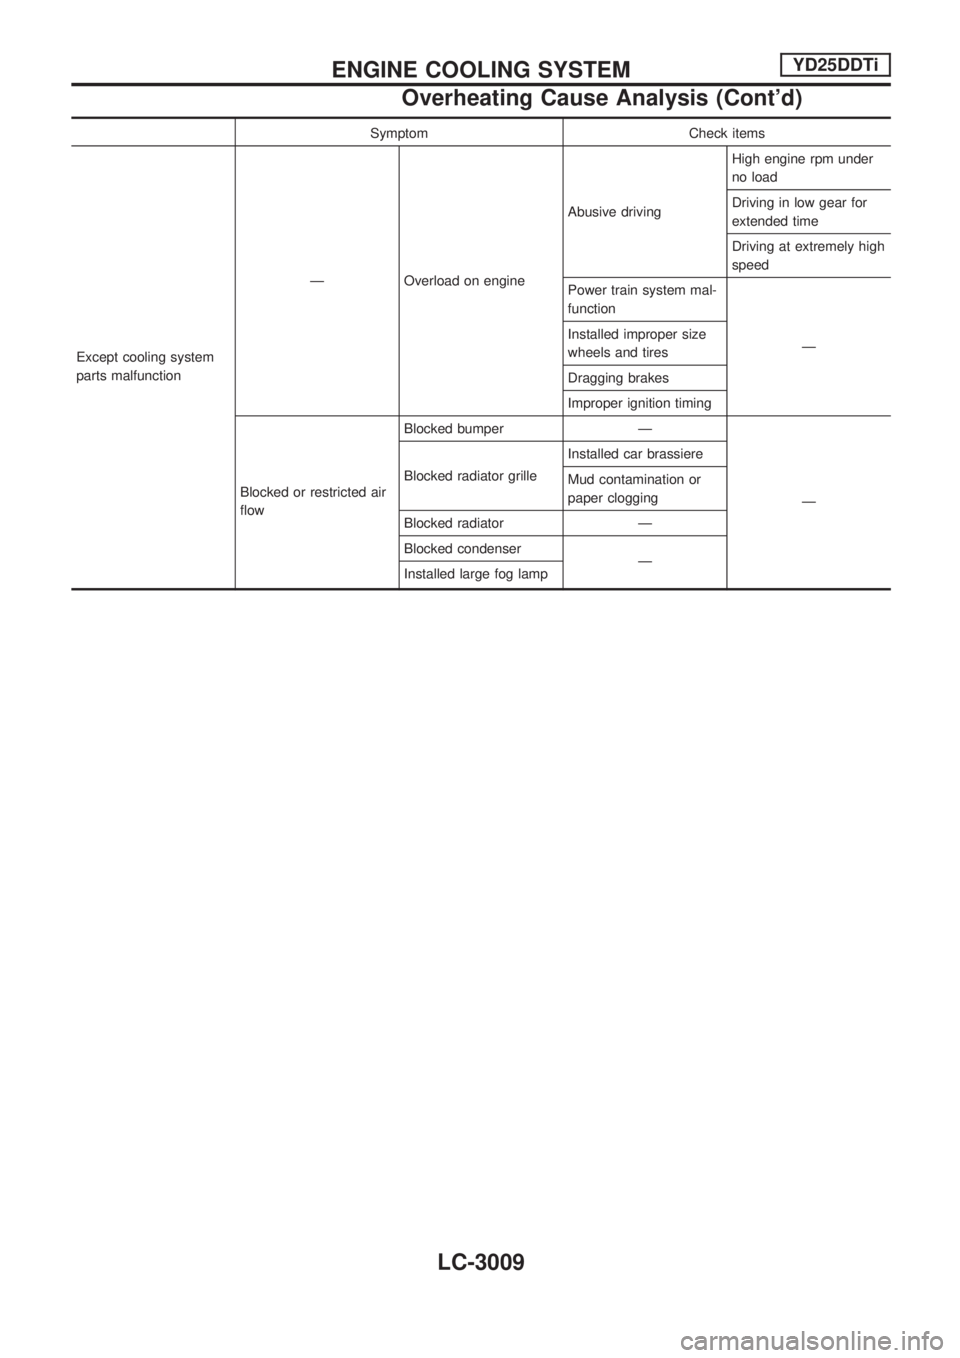
Symptom Check items
Except cooling system
parts malfunctionÐ Overload on engineAbusive drivingHigh engine rpm under
no load
Driving in low gear for
extended time
Driving at extremely high
speed
Power train system mal-
function
Ð Installed improper size
wheels and tires
Dragging brakes
Improper ignition timing
Blocked or restricted air
flowBlocked bumper Ð
Ð Blocked radiator grilleInstalled car brassiere
Mud contamination or
paper clogging
Blocked radiator Ð
Blocked condenser
Ð
Installed large fog lamp
ENGINE COOLING SYSTEMYD25DDTi
Overheating Cause Analysis (Cont'd)
LC-3009
Page 1138 of 1306

Bulb Replacement
The headlamp is a semi-sealed beam type which uses a replace-
able halogen bulb. The bulb can be replaced from the engine
compartment side without removing the headlamp body.
+Grasp only the plastic base when handling the bulb.
Never touch the glass envelope.
1. Disconnect the battery cable.
2. Disconnect the harness connector from the back side of the
bulb.
3. Pull off the rubber cap.
4. Push and raise retaining pin to loosen it.
5. Remove the headlamp bulb carefully. Do not shake or rotate
the bulb when removing it.
6. Install in the reverse order of removal.
CAUTION:
Do not leave headlamp reflector without bulb for a long
period of time. Dust, moisture, smoke, etc. entering head-
lamp body may affect the performance of the headlamp.
Remove headlamp bulb from the headlamp reflector just
before a replacement bulb is installed.
Aiming Adjustment
When performing headlamp aiming adjustment, use an aiming
machine, aiming wall screen or headlamp tester. Aimers should
be in good repair, calibrated and operated in accordance with
respective operation manuals.
If any aimer is not available, aiming adjustment can be done as
follows:
For details, refer to the regulations in your own country.
a. Keep all tires inflated to correct pressures.
b. Place vehicle and tester on one and same flat surface.
c. See that there is no-load in vehicle (coolant, engine oil
filled up to correct level and full fuel tank) other than the
driver (or equivalent weight placed in driver's position).
CAUTION:
Be sure aiming switch is set to ª0º when performing aiming
adjustment on vehicles equipped with headlamp aiming
control.
GEL452A
SEL596Y
SEL597Y
HEADLAMP Ð Conventional Type Ð
EL-3027