key NISSAN PULSAR 1987 Workshop Manual
[x] Cancel search | Manufacturer: NISSAN, Model Year: 1987, Model line: PULSAR, Model: NISSAN PULSAR 1987Pages: 238, PDF Size: 28.91 MB
Page 36 of 238
36 Roadside Trouble Shooting
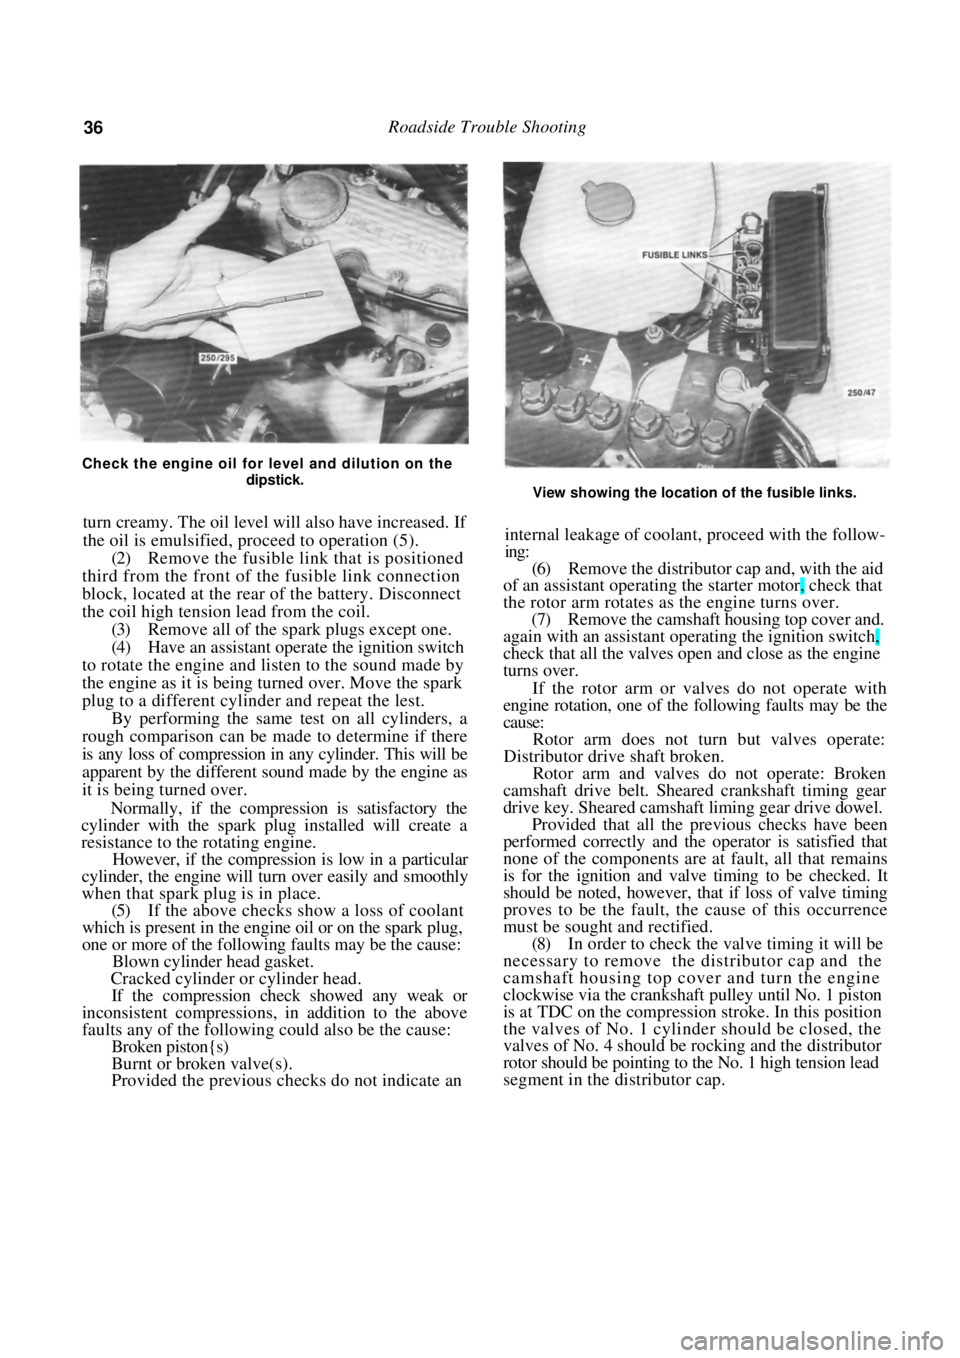
Check the engine oil for level and dilution on the dipstick.
turn creamy. The oil level will also have increased. If
the oil is emulsified, proceed to operation (5).
(2) Remove the fusible link that is positioned
third from the front of th e fusible link connection
block, located at the rear of the battery. Disconnect
the coil high tension lead from the coil. (3) Remove all of the spark plugs except one.
(4) Have an assistant operate the ignition switch
to rotate the engine and listen to the sound made by
the engine as it is being turned over. Move the spark
plug to a different cylinder and repeat the lest. By performing the same test on all cylinders, a
rough comparison can be made to determine if there
is any loss of compression in any cylinder. This will be
apparent by the different sound made by the engine as
it is being turned over.
Normally, if the compression is satisfactory the
cylinder with the spark plug installed will create a
resistance to the rotating engine.
However, if the compression is low in a particular
cylinder, the engine will tu rn over easily and smoothly
when that spark plug is in place.
(5) If the above checks show a loss of coolant
which is present in the engine oil or on the spark plug,
one or more of the following faults may be the cause:
Blown cylinder head gasket.
Cracked cylinder or cylinder head.
If the compression check showed any weak or
inconsistent compressions, in addition to the above
faults any of the following could also be the cause:
Broken piston{s)
Burnt or broken valve(s).
Provided the previous checks do not indicate an
View showing the location of the fusible links.
internal leakage of coolant, proceed with the follow-
ing:
(6) Remove the distributor cap and, with the aid
of an assistant operating th e starter motor, check that
the rotor arm rotates as the engine turns over. (7) Remove the camshaft hous ing top cover and.
again with an assistant operating the ignition switch,
check that all the valves open and close as the engine
turns over.
If the rotor arm or valves do not operate with
engine rotation, one of the following faults may be the
cause:
Rotor arm does not turn but valves operate:
Distributor drive shaft broken.
Rotor arm and valves do not operate: Broken
camshaft drive belt. Sheare d crankshaft timing gear
drive key. Sheared camshaft liming gear drive dowel.
Provided that all the previous checks have been
performed correctly and the operator is satisfied that
none of the components are at fault, all that remains
is for the ignition and valve timing to be checked. It
should be noted, however, that if loss of valve timing
proves to be the fault, th e cause of this occurrence
must be sought and rectified.
(8) In order to check the valve timing it will be
necessary to remove the distributor cap and the
camshaft housing top cover and turn the engine
clockwise via the crankshaft pulley until No. 1 piston
is at TDC on the compression stroke. In this position
the valves of No. 1 cylinder should be closed, the
valves of No. 4 should be rocking and the distributor
rotor should be pointing to the No. 1 high tension lead
segment in the distributor cap.
Page 55 of 238
Engine 55
9. OIL PUMP
TO REMOVE AND DISMANTLE
(1) Disconnect the negative battery terminal.
(2) Disconnect the lower radiator hose and drain
the cooling system. (3) Raise the front of the vehicle and support it
on chassis stands. Refer to the Wheels and Tires
section if necessary. (4) Remove the right hand front wheel.
(5) Remove the fasteners securing the engine
splash guard to the right hand front inner mudguard
and remove the splash guard. (6) Remove the engine sump and oil pump
pickup pipe as previously described. Remove the oil
filter.
(7) Remove the camshaft timing belt as de-
scribed previously. (8) Disconnect the oil pressure sender electrical
connector. (9) Using a socket and bar, remove the bolt and
spacer retaining the crankshaft timing gear to the
crankshaft. Discard the bolt.
NOTE: It may be necessary to lock the
crankshaft when removing the crankshaft
timing gear retaining bolt. If necessary,
insert a piece of timber between the crank-
case and the crankshaft to prevent the
crankshaft turning.
(10) Remove the crankshaft timing gear from the
crankshaft. It may be necessary to lever the gear from
the crankshaft using two screwdrivers. Remove the
key and spacer from the crankshaft. (11) Remove the camshaft housing top cover.
(12) Using an open ended spanner, hold the
camshaft between the inlet and exhaust lobes of
number four cylinder and remove the camshaft timing
gear retaining bolt and the camshaft timing gear.
(13) Remove the bolts securing the water pump
to the cylinder block and remove the water pump. If
necessary- refer to the Cooling and Heating Systems
section. (14) Remove the camshaft drive belt inner cover
retaining bolts and remove the inner cover. (15) Remove the bolts securing the oil pump to
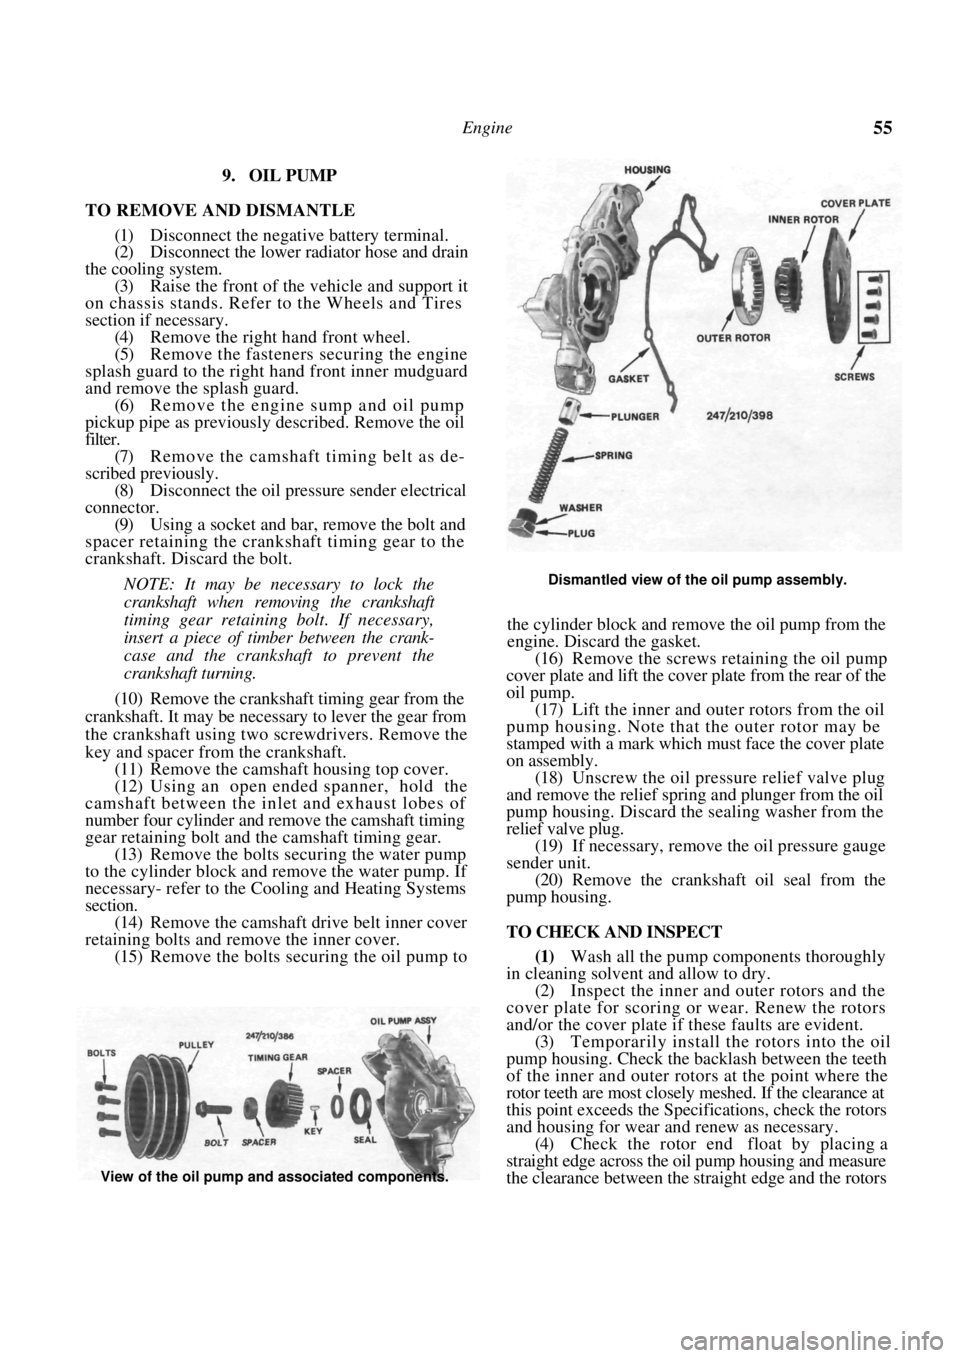
Dismantled view of the oil pump assembly.
the cylinder block and remove the oil pump from the
engine. Discard the gasket.
(16) Remove the screws retaining the oil pump
cover plate and lift the cover plate from the rear of the
oil pump. (17) Lift the inner and outer rotors from the oil
pump housing. Note that the outer rotor may be
stamped with a mark which must face the cover plate
on assembly. (18) Unscrew the oil pressure relief valve plug
and remove the relief spring and plunger from the oil
pump housing. Discard the sealing washer from the
relief valve plug. (19) If necessary, remove the oil pressure gauge
sender unit.
(20) Remove the crankshaft oil seal from the
pump housing.
TO CHECK AND INSPECT
(1) Wash all the pump components thoroughly
in cleaning solvent and allow to dry.
(2) Inspect the inner and outer rotors and the
cover plate for scoring or wear. Renew the rotors
and/or the cover plate if these faults are evident. (3) Temporarily install the rotors into the oil
pump housing. Check the b acklash between the teeth
of the inner and outer rotors at the point where the
rotor teeth are most closely meshed. If the clearance at
this point exceeds the Specif ications, check the rotors
and housing for wear and renew as necessary. (4) Check the rotor end float by placing a
straight edge across the oil pump housing and measure
the clearance between the straight edge and the rotors
View of the oil pump and associated components.
Page 56 of 238
56 Engine
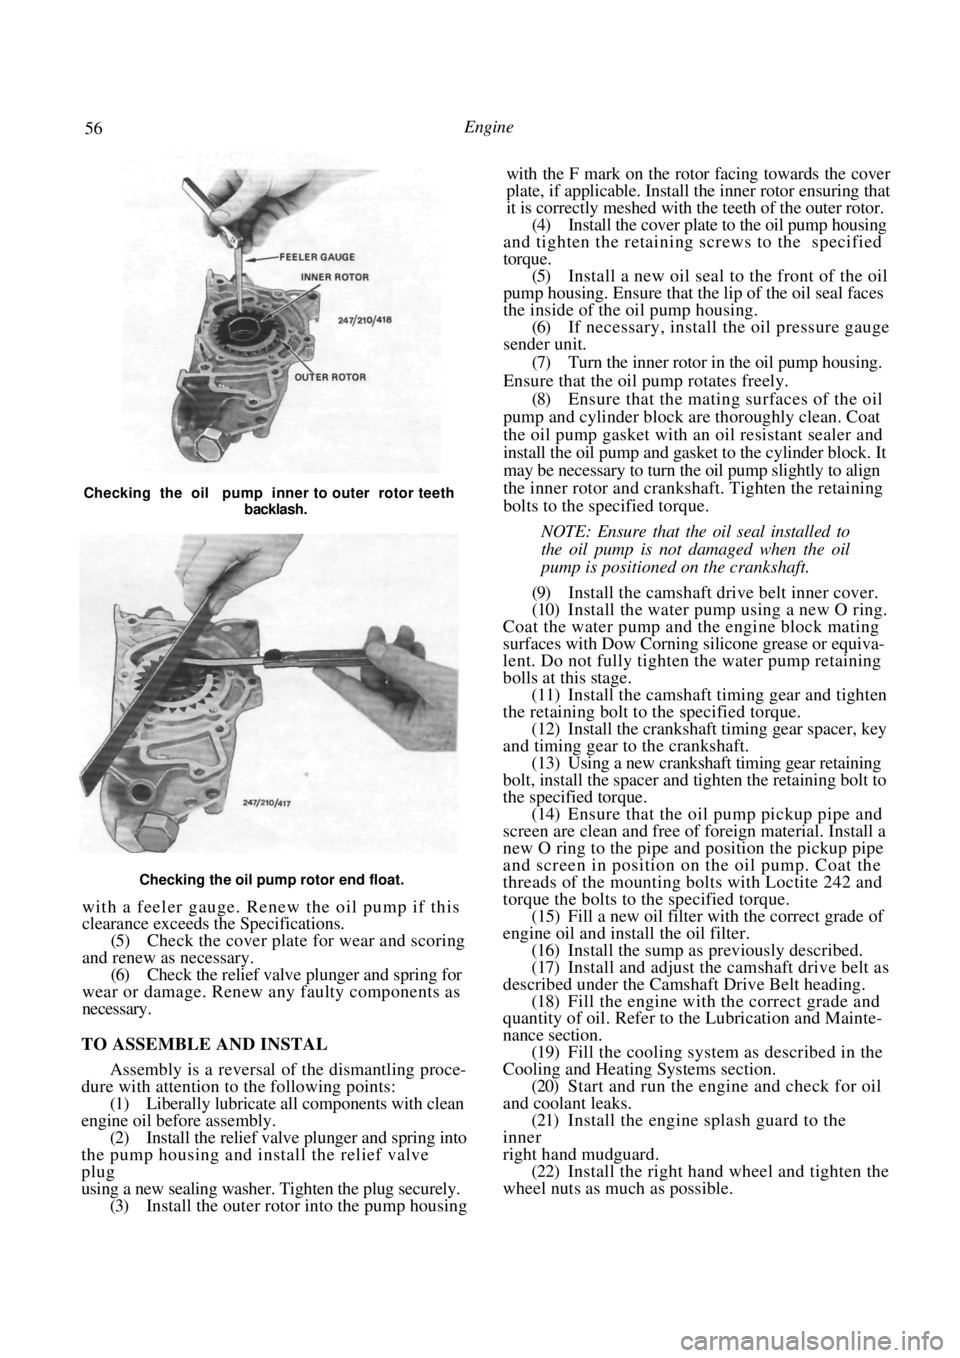
Checking the oil pump rotor end float.
with a feeler gauge. Renew the oil pump if this
clearance exceeds the Specifications.
(5) Check the cover plate for wear and scoring
and renew as necessary. (6) Check the relief valve plunger and spring for
wear or damage. Renew any faulty components as
necessary.
TO ASSEMBLE AND INSTAL
Assembly is a reversal of the dismantling proce-
dure with attention to the following points:
(1) Liberally lubricate all components with clean
engine oil before assembly. (2) Install the relief valve plunger and spring into
the pump housing and install the relief valve
plug
using a new sealing washer. Tighten the plug securely. (3) Install the outer rotor into the pump housing with the F mark on the rotor facing towards the cover
plate, if applicable. Install the inner rotor ensuring that
it is correctly meshed with the teeth of the outer rotor.
(4)
Install the cover plate to the oil pump housing
and tighten the retaining screws to the specified
torque. (5) Install a new oil seal to the front of the oil
pump housing. Ensure that the lip of the oil seal faces
the inside of the oil pump housing. (6) If necessary, install the oil pressure gauge
sender unit.
(7) Turn the inner rotor in the oil pump housing.
Ensure that the oil pump rotates freely. (8) Ensure that the mating surfaces of the oil
pump and cylinder block are thoroughly clean. Coat
the oil pump gasket with an oil resistant sealer and
install the oil pump and gasket to the cylinder block. It
may be necessary to turn the oil pump slightly to align
the inner rotor and crankshaft. Tighten the retaining
bolts to the specified torque.
NOTE: Ensure that the oil seal installed to
the oil pump is not damaged when the oil
pump is positioned on the crankshaft.
(9) Install the camshaft drive belt inner cover.
(10) Install the water pump using a new O ring.
Coat the water pump and the engine block mating
surfaces with Dow Corning silicone grease or equiva-
lent. Do not fully tighten the water pump retaining
bolls at this stage. (11) Install the camshaft timing gear and tighten
the retaining bolt to the specified torque.
(12) Install the crankshaft timing gear spacer, key
and timing gear to the crankshaft. (13) Using a new crankshaft timing gear retaining
bolt, install the spacer and tighten the retaining bolt to
the specified torque. (14) Ensure that the oil pump pickup pipe and
screen are clean and free of foreign material. Install a
new O ring to the pipe and position the pickup pipe
and screen in position on the oil pump. Coat the
threads of the mounting bolts with Loctite 242 and
torque the bolts to the specified torque. (15) Fill a new oil filter with the correct grade of
engine oil and install the oil filter. (16) Install the sump as previously described.
(17) Install and adjust the camshaft drive belt as
described under the Camshaft Drive Belt heading. (18) Fill the engine with the correct grade and
quantity of oil. Refer to the Lubrication and Mainte-
nance section.
(19) Fill the cooling system as described in the
Cooling and Heating Systems section. (20) Start and run the engine and check for oil
and coolant leaks. (21) Install the engine splash guard to the
inner
right hand mudguard. (22) Install the right hand wheel and tighten the
wheel nuts as much as possible.
Checking the oil pump inner to outer rotor teeth
backlash.
Page 63 of 238
Engine
edge of the bearing cap to cylinder block joint. Install
the bearing cap bolts and tighten to the specified
torque.
(17) Lubricate the l i p of the new oil seal with
lithium grease and carefully install the seal into
position over the crankshaft . Insert the seal as far as
possible using finger pressure and then fully install the
sea! using a tubular drift. Ensure that the seal is not
damaged during installation and that the seal is
mounted square to the block face.
(18) Install the remainder of the engine
compo-
nents by referring to the relevant headings in
this
section.
TO RENEW CRANKSHAFT OIL SEALS
Front
(1) Remove the camshaft drive belt as previ-
ously described.
(2) Disconnect the lower radiator hose and drain
the cooling system. (3) Select fifth gear on manual transaxle models
and firmly apply the handbrake. (4) On automatic transaxle models, remove the
torque converter inspection cover to allow access to
the ring gear. Have an assi stant hold the ring gear
using a suitable lever. (5) Remove the crankshaft timing gear retaining
bolt and discard. (6) Remove the crankshaft timing gear from the
crankshaft. It may be necessary to lever the gear from
the crankshaft using two screwdrivers. Remove the
key and spacer from the crankshaft. (7) Using a centre punch, tap a small hole in the
front face of the oil seal. (8) Insert a self tapping screw into the hole.
(9) Remove the seal from the oil pump by
gripping and pulling the end of the screw with a pair
of pliers. (10) Coat the l i p of a new seal with multi-purpose
grease. (11) Install the oil seal to the oil pump using a
tubular drift. Ensure that the lip of the oil seal faces
the inside of the housing.
(12) Install the remaining components in the re-
verse order of removal, usi ng a new crankshaft timing
gear retaining bolt and referring to the relevant
headings in this section as necessary.
Rear
(1) Remove the automatic transaxle or manual
transaxle as described in the appropriate section. (2) Remove the flywheel/drive plate as described
under the following heading. (3) Lever the oil seal from the rear of the
crankcase being careful not to damage the crankshaft.
(4) Coat the lip of a new seal with Lithium
grease.
(5) Install the oil seal over the crankshaft. Ensure
that the li p of the oil sea l faces towards the engine.
(6) Insert the seal as far as possible using finger
pressure, and then fully seat the seal using a tubular
drift. (7) Install the remaining components in the
re-
verse order of removal, referring to the relevant
headings in this section as necessary.
12. FLYWHEEL/DRIVE PLATE
Special Equipment Required:
To Renew Ring Gear — Suitable heat source
TO REMOVE
(1) Remove the transaxle from the vehicle as
described in the Manual or Automatic Transaxle
sections, whichever is applicable. (2) On manual transaxle models, mark the fly-
wheel and the clutch pressure plate cover to ensure
correct assembly.
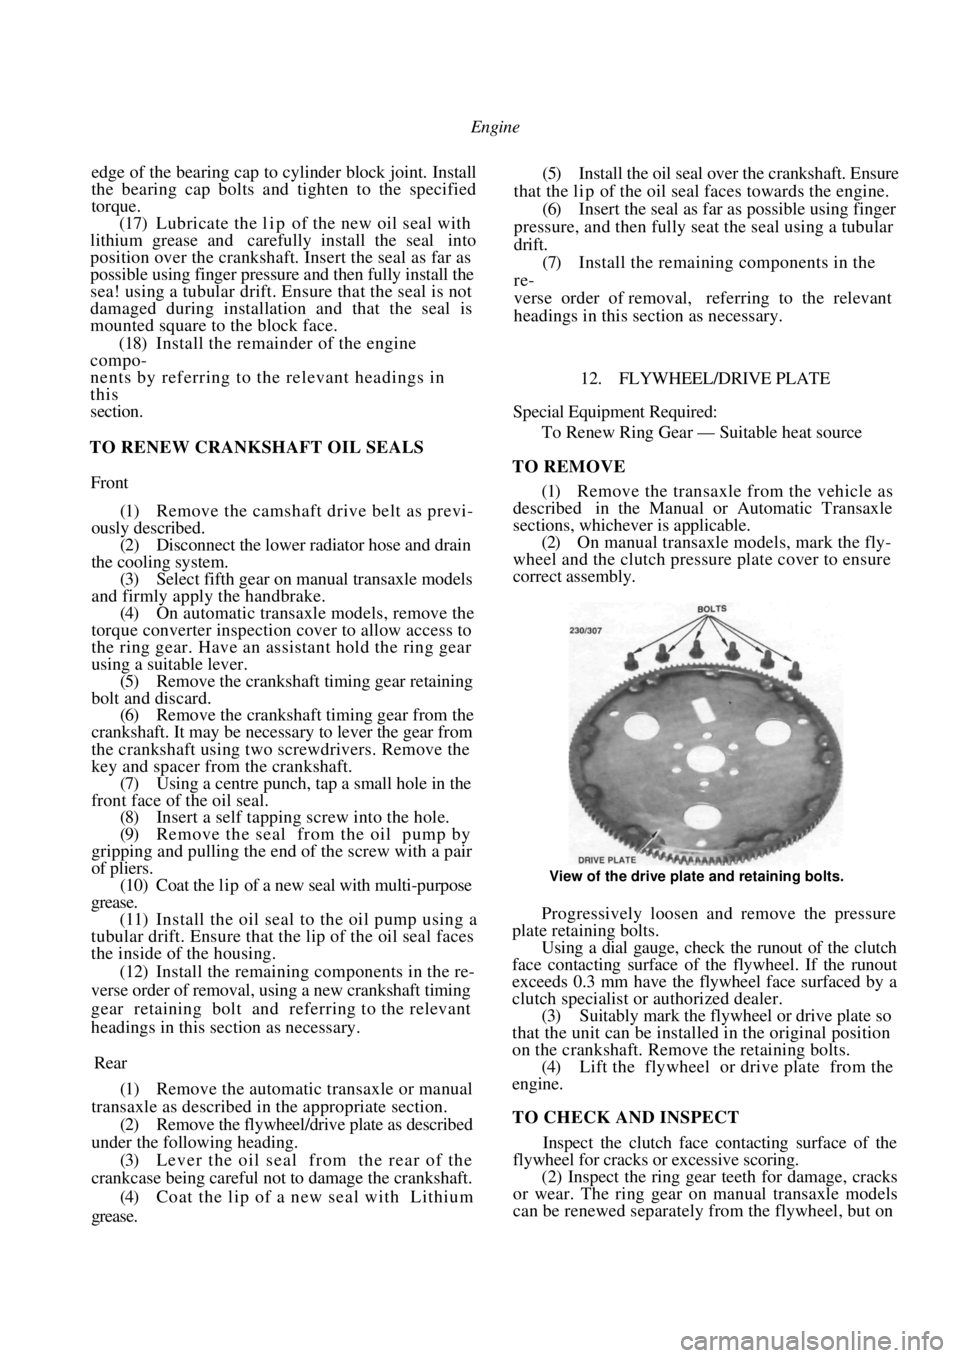
View of the drive plate and retaining bolts.
Progressively loosen and remove the pressure
plate retaining bolts.
Using a dial gauge, check the runout of the clutch
face contacting surface of the flywheel. If the runout
exceeds 0.3 mm have the flywheel face surfaced by a
clutch specialist or authorized dealer.
(3) Suitably mark the flywheel or drive plate so
that the unit can be installed in the original position
on the crankshaft. Remove the retaining bolts. (4) Lift the flywheel or drive plate from the
engine.
TO CHECK AND INSPECT
Inspect the clutch face contacting surface of the
flywheel for cracks or excessive scoring.
(2) Inspect the ring gear teeth for damage, cracks
or wear. The ring gear on manual transaxle models
can be renewed separately from the flywheel, but on
Page 73 of 238
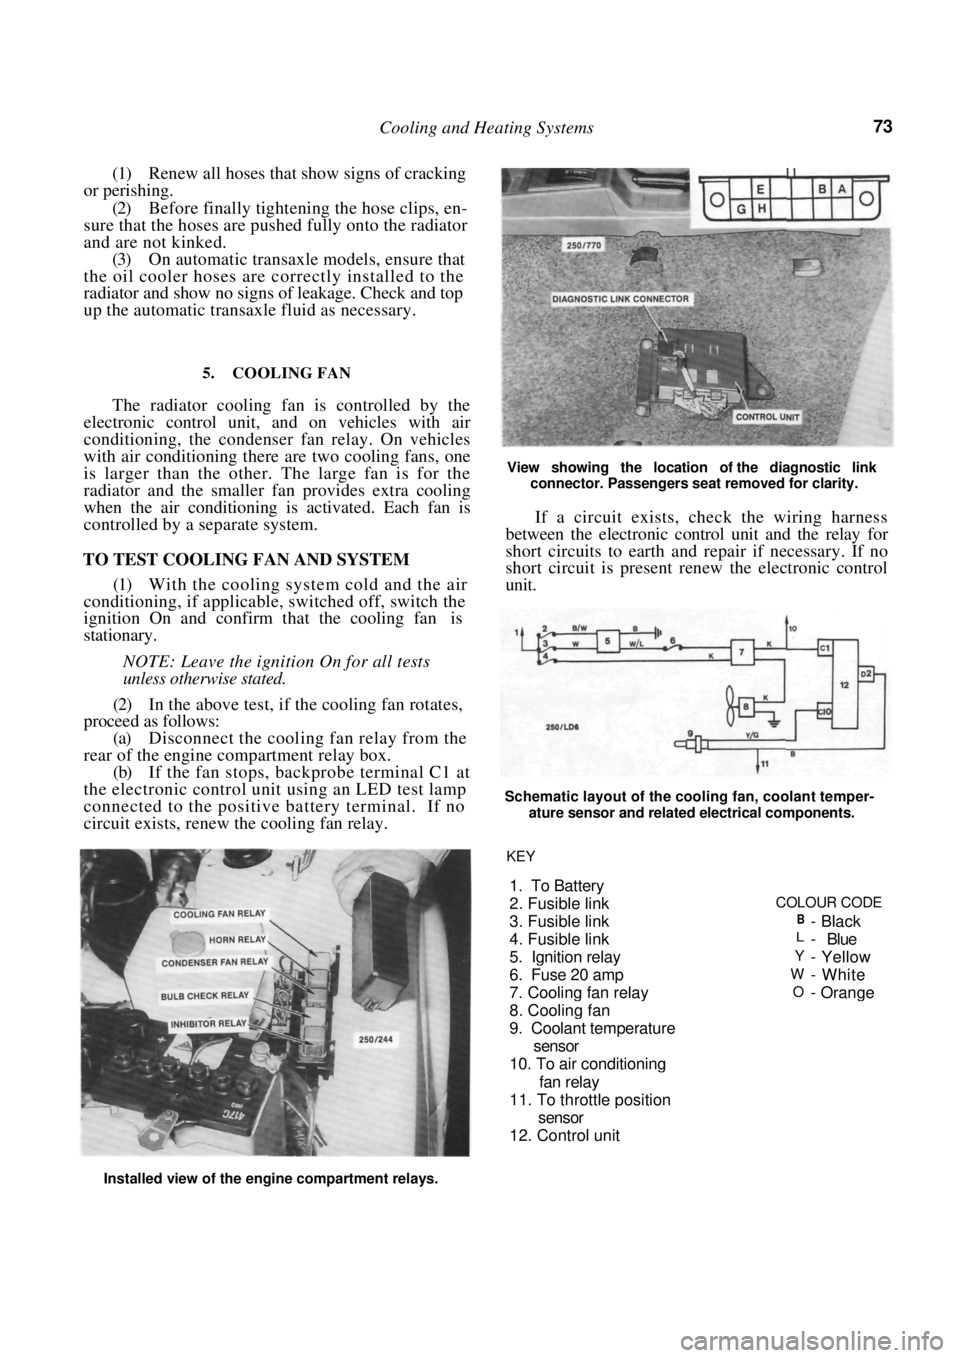
Cooling and Heating Systems 73
(1) Renew all hoses that show signs of cracking
or perishing.
(2) Before finally tightening the hose clips, en-
sure that the hoses are push ed fully onto the radiator
and are not kinked. (3) On automatic transaxle models, ensure that
the oil cooler hoses are correctly installed to the
radiator and show no signs of leakage. Check and top
up the automatic transaxle fluid as necessary.
5. COOLING FAN
The radiator cooling fan is controlled by the
electronic control unit, and on vehicles with air
conditioning, the condenser fan relay. On vehicles
with air conditioning there are two cooling fans, one
is larger than the other. The large fan is for the
radiator and the smaller fan provides extra cooling
when the air conditioning is activated. Each fan is
controlled by a separate system.
TO TEST COOLING FAN AND SYSTEM
(1) With the cooling system cold and the air
conditioning, if applicable, switched off, switch the
ignition On and confirm that the cooling fan is
stationary.
NOTE: Leave the ignition On for all tests
unless otherwise stated.
(2) In the above test, if the cooling fan rotates,
proceed as follows:
(a) Disconnect the cooling fan relay from the
rear of the engine compartment relay box.
(b) If the fan stops, backprobe terminal C1 at
the electronic control unit using an LED test lamp
connected to the positive battery terminal. If no
circuit exists, renew the cooling fan relay.
View showing the location of the diagnostic link
connector. Passengers seat removed for clarity.
If a circuit exists, check the wiring harness
between the electronic control unit and the relay for
short circuits to earth and repair if necessary. If no
short circuit is present renew the electronic control
unit.
Schematic layout of the cooling fan, coolant temper-
ature sensor and related electrical components.
Installed view of the engine compartment relays. KEY
1. To Battery
2. Fusible link
COLOUR CODE
3. Fusible link
B-Black
4. Fusible linkL- Blue
5. I
gnition relayY- Yellow
6. Fuse 20 am
pW-White
7. Coolin
g fan relayO-Orange
8. Coolin
g fan
9. Coolant tem
perature
sensor
10. To air conditionin
g
fan rela
y
11. To throttle
position
sensor
12. Control unit
Page 183 of 238
Brakes 183
To Dismantle
(1) Raise the rear of the vehicle and place it on
chassis stands. Remove the relevant rear wheel.
(2) Remove the brake hose retaining bolt from
the caliper body and plug the hose to prevent the loss
of fluid and the ingress of dirt. (3) Remove the handbrake cable bracket retain-
ing bolt and disconnect the handbrake cable from the
cam lever.
(4) Remove the guide bolts and slide the caliper
body off the pads. (5) Using a pair of long nose pliers with the nose
located in the recesses of the piston, rotate the piston
anticlockwise to remove it from the caliper body.
(6) Remove the dust cover retaining clip and dust
cover. Discard the dust cover. (7) Using a thin blunt probe, preferably made
from wood or plastic, remove and discard the piston
seal from the groove in the caliper bore. (8) Using internal snap ring pliers, remove the
snap ring from the caliper bore. (9) Withdraw the spring cover, spring, key plate,
pushrod and link from the caliper bore. Do not mix
these components from the left and right hand sides as
they differ. (10) Remove and discard the O ring from the
pushrod. (11) Remove the spring, nut and washer from the
cam lever. Remove the cam lever and cam from the
caliper body. (12) Remove the cam seal from the caliper using a
screwdriver.
(13) Clean all the caliper components in methy-
lated spirits and arrange the components in order on a
clean dry surface to aid assembly.
To Inspect
(1) Inspect the caliper bore and piston for pit-
ting, wear or damage. Renew the caliper assembly or
piston if damage is evident.
NOTE: Slight rust spots in the caliper bore
may be removed with fine emery paper. The
piston must not be polished as the plated
surface will be damaged.
(2) Inspect the guide bolts for wear or damage
and renew as necessary.
(3) Inspect the threads of the pushrod for wear or
damage and renew as necessary. (4) Inspect the nut inside the piston for wear,
damage and security. Renew the piston if any damage
is evident. (5) Inspect the cam for wear, damage or pitting,
renew as necessary. (6) Inspect the cam bearing in the caliper body
for wear, damage or pitting and renew the seal and
bearing as necessary. (7) Inspect the guide bolt rubbers for deteriora-
tion, wear or damage. Renew as required. To Assemble
(1)
Lubricate the cam bearing with multipurpose
grease and install the seal. (2) Install the cam and cam lever to the
caliper
body. Install the cam lever spring, washer and nut, and
tighten the nut to the specified torque. (3) Install a new O ring to the pushrod and
install
the link, pushrod, key plate, spring and spring cover to
the caliper body. The key plate must engage the caliper
body. Secure the assembly with the snap ring. (4) Dip a new piston seal in clean hydraulic brake
fluid. Insert the seal into the groove in the caliper bore
ensuring that the seal is correctly seated and not
twisted. (5) Install a new dust cover to the piston prior
to
installing the piston to the caliper bore.
(6) Coat the piston and caliper bore with clean
hydraulic brake fluid and using long nose pliers rotate
the piston clockwise into the caliper bore. (7) Locate the dust seal in the groove of the
caliper body and install the retaining clip.
(8) Lubricate the guide bolts using a suitable
grease. Install the caliper body and tighten the guide
bolts to the specified torque. (9) Replenish the master cylinder reservoir with
the recommended fluid and bleed the brakes as
described under the Hydraulic System heading. (10) Install the rear wheel and lower the vehicle to
the ground. (11) Road test the vehicle and check for correct
brake operation.
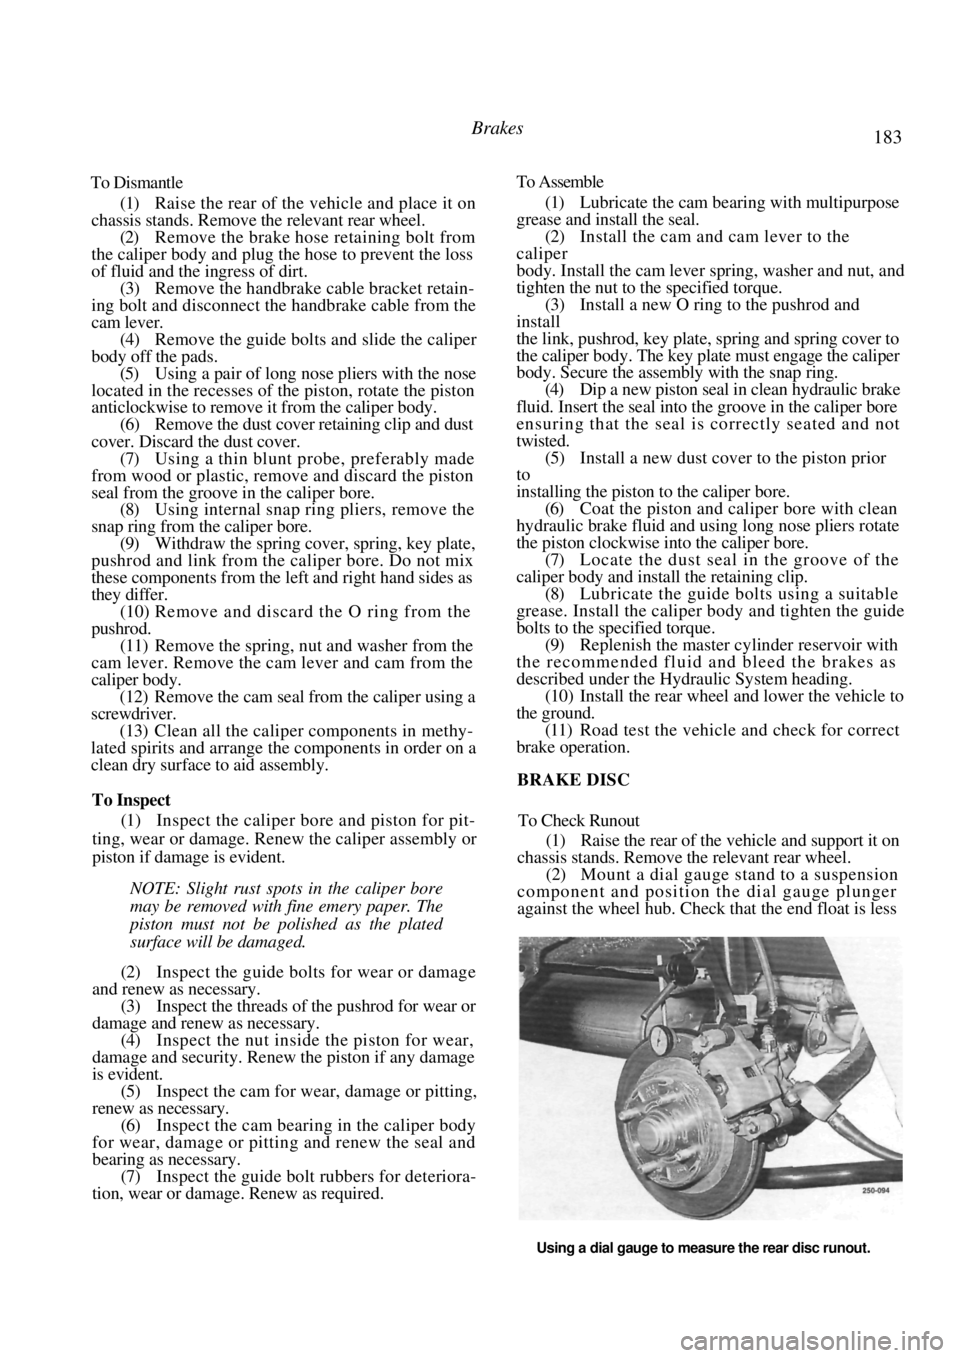
BRAKE DISC
To Check Runout
(1) Raise the rear of the vehicle and support it on
chassis stands. Remove the relevant rear wheel.
(2) Mount a dial gauge stand to a suspension
component and position the dial gauge plunger
against the wheel hub. Check that the end float is less
Using a dial gauge to measure the rear disc runout.
Page 192 of 238
192 Electrical System
transaxle models, check for a faulty or incorrectly
adjusted neutral safety switch.
1. Discharged battery: Check for a fault or short
circuit in the system. 2. Battery fully charged but will not crank
engine. Check for a locked drive and ring gear,
internal starter faul t or seized engine.
3. Fusible link blown: Check and repair the
cause and renew as necessary.
NOTE: Rotate the engine by hand to ensure
that the starter drive is not locked with the
flywheel ring gear and t hat the engine is not
seized. Ensure that the ignition key is
turned off before rotating the engine.
3. LIGHTING SYSTEM TROUBLE SHOOTING
LAMP OR LAMPS FAIL TO LIGHT
1. Faulty bulb(s): Check and renew the faulty
bulb(s). 2. Open circuit in the wiring or connections:
Check the lamp circuits and rectify as necessary.
1. Faulty lamp switch: Check and if necessary
renew the lamp switch. 2. Faulty fuse or fuse connection: Repair the
fuse connection or renew the fuse. 3. Lamp relay faulty: Check and renew as
necessary.
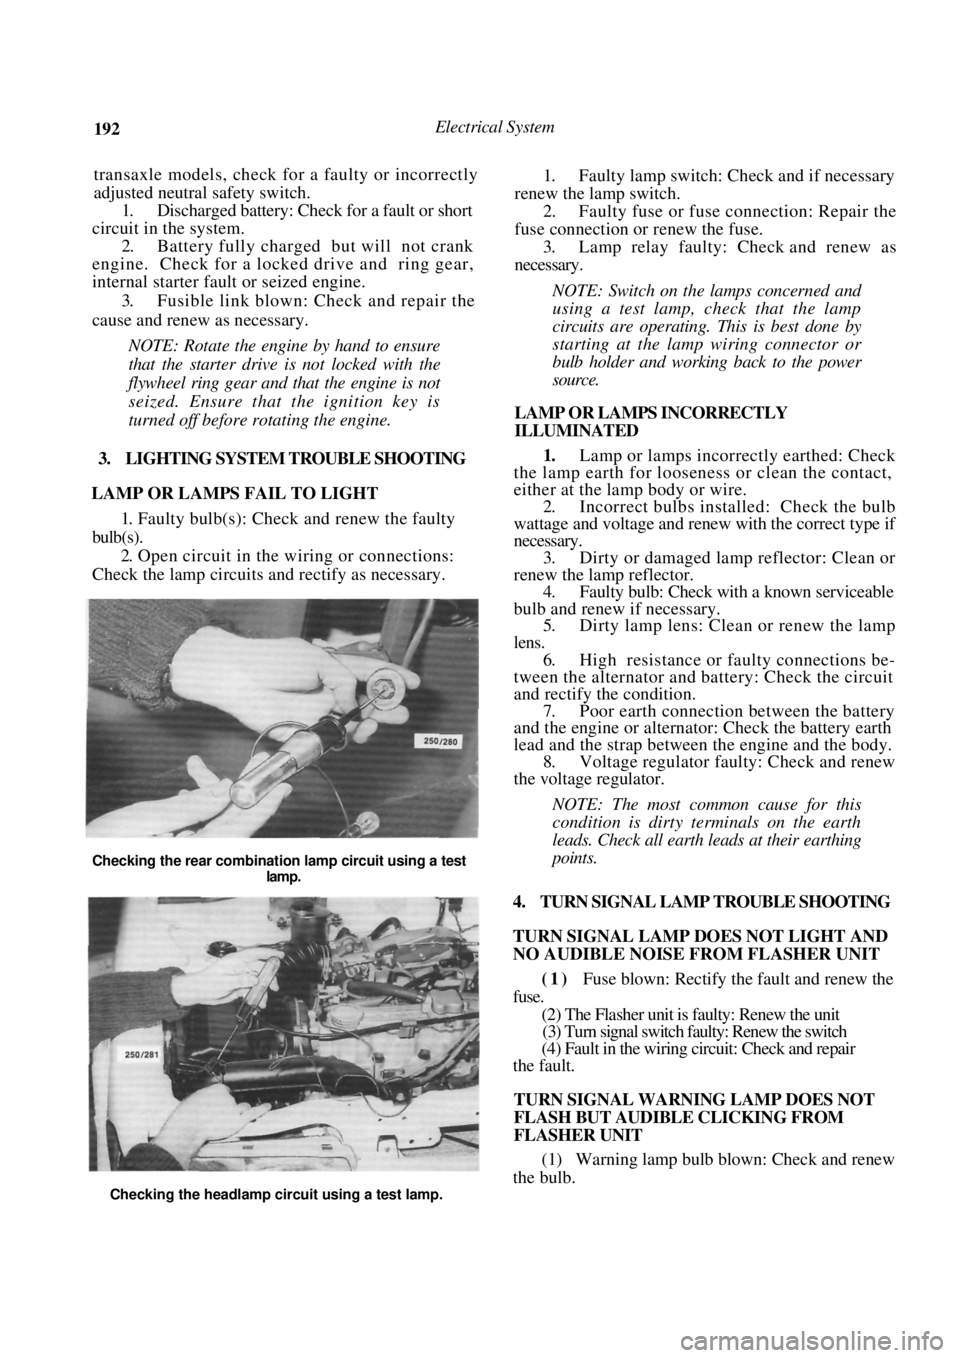
NOTE: Switch on the lamps concerned and
using a test lamp, check that the lamp
circuits are operating. This is best done by
starting at the lamp wiring connector or
bulb holder and work ing back to the power
source.
LAMP OR LAMPS INCORRECTLY
ILLUMINATED
1. Lamp or lamps incorrectly earthed: Check
the lamp earth for loosene ss or clean the contact,
either at the lamp body or wire.
2. Incorrect bulbs installe d: Check the bulb
wattage and voltage and renew with the correct type if
necessary. 3. Dirty or damaged lamp reflector: Clean or
renew the lamp reflector. 4. Faulty bulb: Check with a known serviceable
bulb and renew if necessary. 5. Dirty lamp lens: Clean or renew the lamp
lens. 6. High resistance or faulty connections be-
tween the alternator and battery: Check the circuit
and rectify th e condition.
7. Poor earth connection between the battery
and the engine or alternat or: Check the battery earth
lead and the strap between the engine and the body. 8. Voltage regulator faulty: Check and renew
the voltage regulator.
NOTE: The most common cause for this
condition is dirty t erminals on the earth
leads. Check all earth leads at their earthing
points.
4. TURN SIGNAL LAMP TROUBLE SHOOTING
TURN SIGNAL LAMP DOES NOT LIGHT AND
NO AUDIBLE NOISE FROM FLASHER UNIT
(1) Fuse blown: Rectify the fault and renew the
fuse.
(2) The Flasher unit is faulty: Renew the unit
(3) Turn signal switch faulty: Renew the switch
(4) Fault in the wiring circuit: Check and repair
the fault.
TURN SIGNAL WARNING LAMP DOES NOT
FLASH BUT AUDIBLE CLICKING FROM
FLASHER UNIT
(1) Warning lamp bulb blown: Check and renew
the bulb.
Checking the rear combination lamp circuit using a test
lamp.
Checking the headlamp circuit using a test lamp.
Page 201 of 238

Electrical System 201
nosed pliers. This will safeguard the diodes
by transferring any excess heat to the jaws of
the pliers.
Using a suitable drift, install the bearing into
the drive end bracket, install the retainer plate and
screws. Tighten the screws securely. Using a suitable press and press plates, install
the bearing to the slip ring end of the rotor shaft.
Ensure that pressure is ex erted only on the inner race
and that the stop ring groove is nearest to the sl i p
rings. Ensure that the rotor sh aft rear bearing stop
ring is positioned so that the protruding part of the
ring is located in the deepest part of the groove. Install the stator, diode pack and
regulator
assembly to the slip ring e nd bracket. Install the
retaining nuts and washers and tighten securely. Install the nut and insulator to the terminal
and tighten securely. Using a piece of wire, hold the brushes in a
retracted position. Hold the drive end bracket in a soft jawed
vice and install the rotor shaft assembly to the drive
end bracket. Install the pulley, retaining nut and washer to
the rotor shaft and tighten the retaining nut to the
specified torque. Apply a heated 200 watt soldering iron to the
slip ring end bracket at the bearing mounting boss for
3-4 minutes to heat the bracket and allow the
installation of the rotor shaft rear bearing. Aligning the marks made on dismantling and
ensuring that the rotor sh aft rear bearing retaining
ring protrusion is located in the deepest part of its
groove, install the rotor/stator assembly to the slip ring
end bracket.
Remove the brush retr acting wire from the
alternator, ensure that the alternator component
marks are aligned, install the retaining through bolts
and tighten them securely. Check the alternator rotor for smooth oper-
ation and install the al ternator to the vehicle
as
previously described.
Check the alternator operation on the vehicle
as previously described.
8. STARTER MOTOR
Special Equipment Required:
To Renew Brushes — Soldering iron
To Renew Armature Bearings — Bearing puller
DESCRIPTION
Two types of starter motors are installed to the
range of vehicles covere d by this manual, either
Hitachi or Bosch.
The starter motor is the induced pole type with
four brushes and four pole shoes with field coils.
A solenoid switch is attached to the starter drive
end bracket. The solenoid plunger is connected to
the overrunning clutch and drive pinion assembly
through a lever and pivot arrangement.
When the solenoid windings are energized, the
plunger acting on the lever and pivot engages the drive
pinion with the flywheel ri ng gear and at the same
time closes the switch supplying power from the
positive lead of the battery to the starter motor field
coils and armature to operate the motor.
As the engine fires, the over-running clutch of the
drive pinion assembly prevents high speed rotation of.
and possible damage to, the starter armature if the
solenoid windings are not immediately de-energized
by releasing the ignition key.
The starter solenoid switch windings are energized
by the ignition switch.
TO TEST ON VEHICLE
Should the starter motor fail to operate when the
ignition switch is turned to the Start position, check
the following points:
Check the battery condition and state of
charge. Refer to the Battery heading for the correct
procedure.
Clean the battery terminals, taking particular
care to remove the scale from the positive ( + )
terminal post and terminal. Check the earth connection for tightness and
cleanliness.
Switch on the headlamps and turn the igni-
tion switch to Start. If the lamps dim but the starter
motor does not operate, it could indicate that a short
circuit has developed in the starting system. Check that the engine is not seized or that the
starter motor drive pinion and ring gear are not
locked as these conditions would -give the same
indications as above.
(5) If the lamps do not dim and the starter
motor does not operate, this would indicate an open
circuit such as a broken or disconnected wire or a
switch not operating.
If the vehicle is equipped with an automatic
transaxle, turn the ignition switch to Start and move
the selector lever through all the gear selection range.
If the starter motor operates in any position other
than N or P, the neutral safety switch is faulty.
(6) Check all the external wiring to ensure that
the fault is not external. If the external circuit proves
satisfactory, indicating that the problem is in the
starter motor, the unit will have to be removed and
tested.
TO REMOVE AND INSTAL
Disconnect the negative battery terminal.
Disconnect the wiring from the starter motor
solenoid. Remove the starter motor mounting bolts,
Page 219 of 238
Electrical System 219
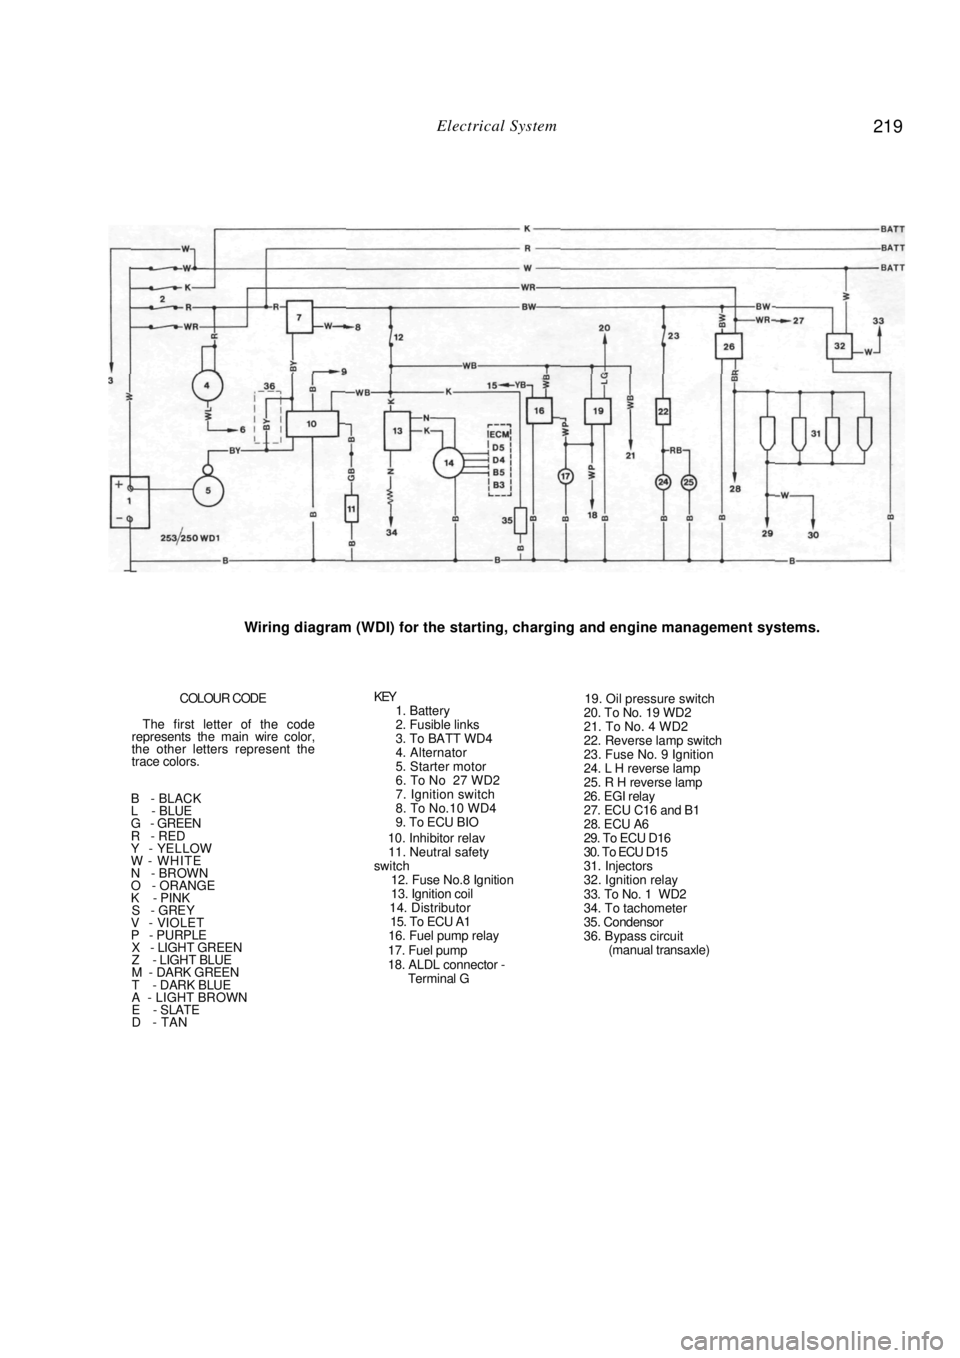
Wiring diagram (WDI) for the starting, charging and engine management systems.
COLOUR CODE
The first letter of the code
represents the main wire color,
the other letters represent the
trace colors.
B - BLACK
L - BLUE
G - GREEN
R - RED
Y - YELLOW
W - WHITE
N - BROWN
O - ORANGE
K - PINK
S - GREY V - VIOLET
P - PURPLE X - LIGHT GREEN
Z - LIGHT BLUE
M - DARK GREEN
T - DARK BLUE
A - LIGHT BROWN
E - SLATE
D - TAN
KEY 1. Battery
2. Fusible links
3. To BATT WD4
4. Alternator
5. Starter motor
6. To No 27 WD2
7. Ignition switch
8. To No.10 WD4
9. To ECU BIO
10. Inhibitor relav
11. Neutral safety
switch
12. Fuse No.8 Ignition
13. Ignition coil
14. Distributor
15. To ECU A1
16. Fuel pump relay
17. Fuel pump
18. ALDL connector - Terminal G
19. Oil pressure switch
20. To No. 19 WD2
21. To No. 4 WD2
22. Reverse lamp switch
23. Fuse No. 9 Ignition
24. L H reverse lamp
25. R H reverse lamp
26. EGI relay
27. ECU C16 and B1
28. ECU A6
29. To ECU D16
30. To ECU D15
31. Injectors
32. Ignition relay
33. To No. 1 WD2
34. To tachometer
35. Condensor
36. Bypass circuit (manual transaxle)
Page 220 of 238
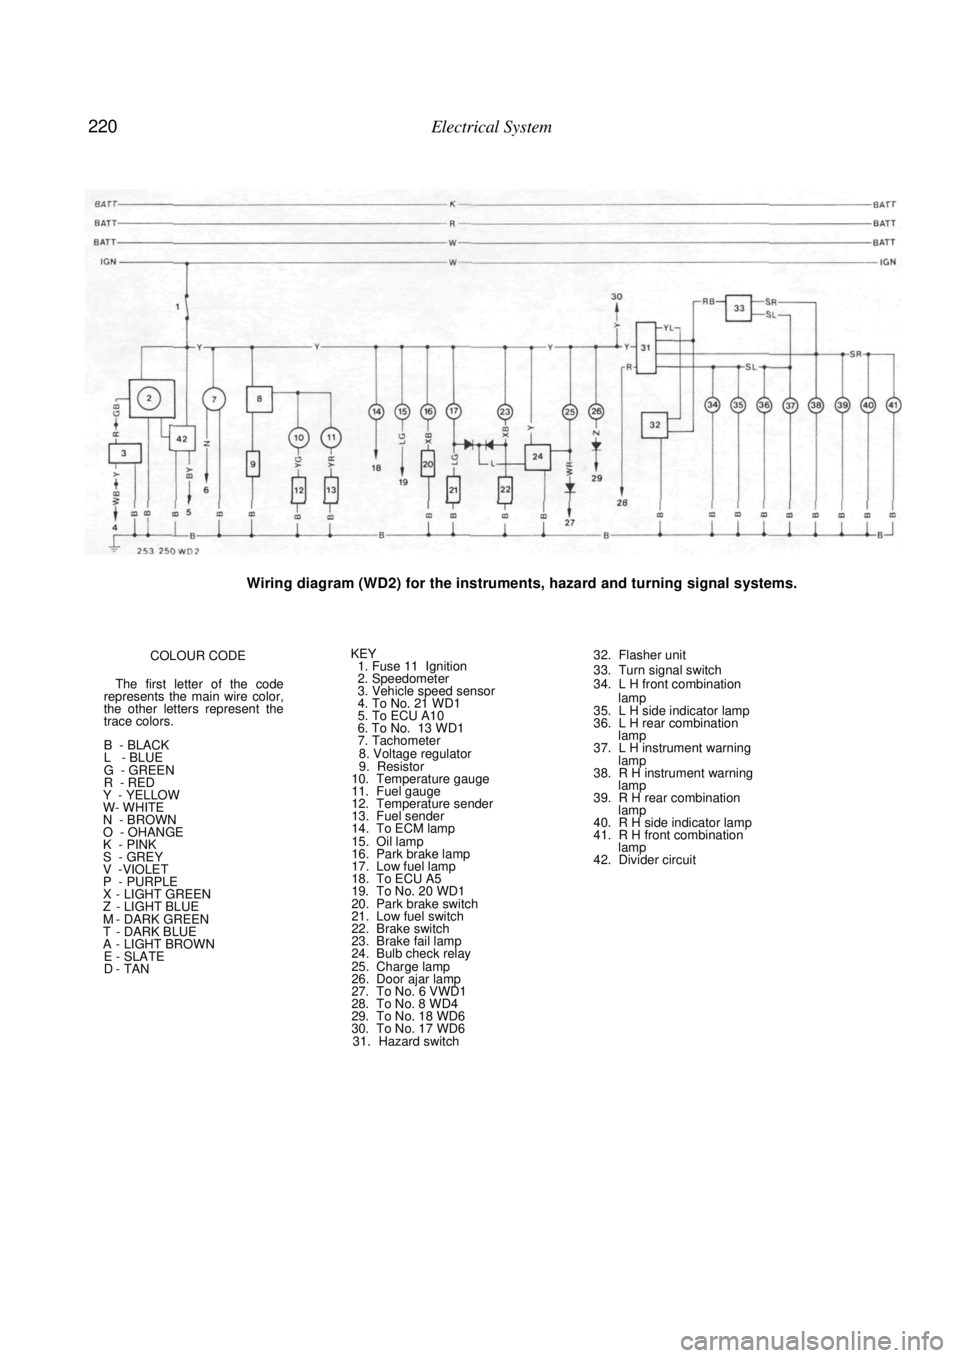
220 Electrical System
Wiring diagram (WD2) for the instruments, hazard and turning signal systems.
COLOUR CODE
The first letter of the code
represents the main wire color,
the other letters represent the
trace colors.
B - BLACK
L - BLUE
G - GREEN
R - RED
Y - YELLOW
W- WHITE
N - BROWN
O - OHANGE
K - PINK
S - GREY V -VIOLET
P - PURPLE X - LIGHT GREEN Z - LIGHT BLUE M - DARK GREEN T - DARK BLUE A - LIGHT BROWN E - SLATE D - TAN
KEY 1. Fuse 11 Ignition
2. Speedometer
3. Vehicle speed sensor
4. To No. 21 WD1
5. To ECU A10
6. To No. 13 WD1
7. Tachometer
8. Voltage regulator
9. Resistor
10. Temperature gauge
11. Fuel gauge
12. Temperature sender
13. Fuel sender
14. To ECM lamp
15. Oil lamp
16. Park brake lamp
17. Low fuel lamp
18. To ECU A5
19. To No. 20 WD1
20. Park brake switch
21. Low fuel switch
22. Brake switch
23. Brake fail lamp
24. Bulb check relay
25. Charge lamp
26. Door ajar lamp
27. To No. 6 VWD1
28. To No. 8 WD4
29. To No. 18 WD6
30. To No. 17 WD6 31. Hazard switch
32. Flasher unit
33. Turn signal switch
34. L H front combination
lamp
35. L H side indicator lamp
36. L H rear combination lamp
37. L H instrument warning
lamp
38. R H instrument warning lamp
39. R H rear combination lamp
40. R H side indicator lamp
41. R H front combination lamp
42. Divider circuit