tailgate NISSAN PULSAR 1987 Workshop Manual
[x] Cancel search | Manufacturer: NISSAN, Model Year: 1987, Model line: PULSAR, Model: NISSAN PULSAR 1987Pages: 238, PDF Size: 28.91 MB
Page 4 of 238

FRONT SUSPENSION............................ 156
Specifications......................................................... 156
Front suspension tr ouble shooting ........................ 156
Description ............................................................ 157
Steering knuckle.................................................... 157
Suspension unit..................................................... 159
Control arm ........................................................... 161
Stabiliser bar ........................................................ 162
Suspension and steering angles .......................... 163
REAR SUSPENSION................................ 164
Specifications ........................................................ 164
Rear suspension tr ouble shooting ........................ 164
Description ............................................................ 165
Rear hub ............................................................... 166
Suspension unit .................................................... 167
Control arm ........................................................... 169
Knuckle assembly.................................................. 170
Stabiliser bar ........................................................ 170
Rear wheel alignment ........................................... 171
BRAKES...................................................... 172
Specifications......................................................... 172
Brakes trouble shooting ........................................ 172
Description ............................................................ 174
Master cyli nder...................................................... 175
Brake servo unit .................................................... 177
Front brakes ......................................................... 178
Rear disc brakes................................................... 181
Rear drum brakes ................................................. 184
Handbrake cable and le ver assembly ................... 186
Brake adjustments ................................................ 187
Brake pedal ........................................................... 187
Hydraulic system................................................... 188
ELECTRICAL SYSTEM............................ 190
Specifications......................................................... 190
Battery and charging system trouble shooting ....... 190
Battery and starting system trouble shooting ........ 191
Lighting system trouble shooting ........................... 192
Turn signal lamp trouble shooting ........................ 192
Test equipment and so me applications................. 193
Battery ................................................................... 194
Alternator ............................................................... 196
Starter motor ......................................................... 201
Ignition system ...................................................... 206
Steering wheel ....................................................... 206
Switches and controls........................................... 206
Instrument cluster.................................................. 209
Blower fan .............................................................. 209
Radio/cassette...................................................... 209
lamp units ............................................................ 210
Windscreen wiper ................................................. 213
Fuses, fusible links and relays ............................. 215
Trailer wiring ......................................................... 216
Wiring diagrams ................................................... 218
BODY........................................................... 225
Windscreen and re ar glass .................................. 225
Front doors ........................................................... 225
Rear doors............................................................ 228
Engine bonnet...................................................... 231
Tailgate and lock — hatchback ............................ 231
Luggage compartment lid and lock — sedan ........ 233
Radiator grille.............................................................. 234
Centre console...................................................... 234 Dashboard ............................................................ 235
Scat belts ............................................................. 236
Seats .................................................................... 236
Vehicle cleaning ........................................................... 237
CONVERSION TABLES.......................... 238
Page 214 of 238

214 Electrical System
Removing the wiper arm.
(2) Using a suitable lever, carefully prise the
wiper arm from the drive spindle, taking care not to
damage the paintwork.
Installation is a reversal of the removal procedure
with attention to the following point:
Ensure that the wiper arms are installed so that
the wiper blades sweep within 10-20 mm of the
windscreen lower moulding.
WIPER LINKAGE
To Remove and Install
Remove both windscreen wiper arms as
previously described.
Carefully prise the wiper arm drive linkage
from the ball stud on the wiper motor driving crank. Remove the retaining nuts and metal spacers
from the wiper arm dr ive spindle housings.
Maneuver both drive spindle housings into
the plenum chamber taking care not to damage the
paintwork. Ensure that th e water seals on the spindle
housings arc not lost during the removal procedure.
Remove the assembly from the vehicle. Installation is a reversal of the removal procedure.
WINDSCREEN WIPER MOTOR
To Remove and Install
(1) Disconnect the negative battery terminal.
Carefully prise the wiper arm drive linkage
from the ball stud on the wiper motor driving crank.
Disconnect the wiring from the wiper motor
at the connector socket. Remove the wiper motor retaining screws
and remove the wiper motor from the vehicle. Installation is a reversal of the removal procedure.
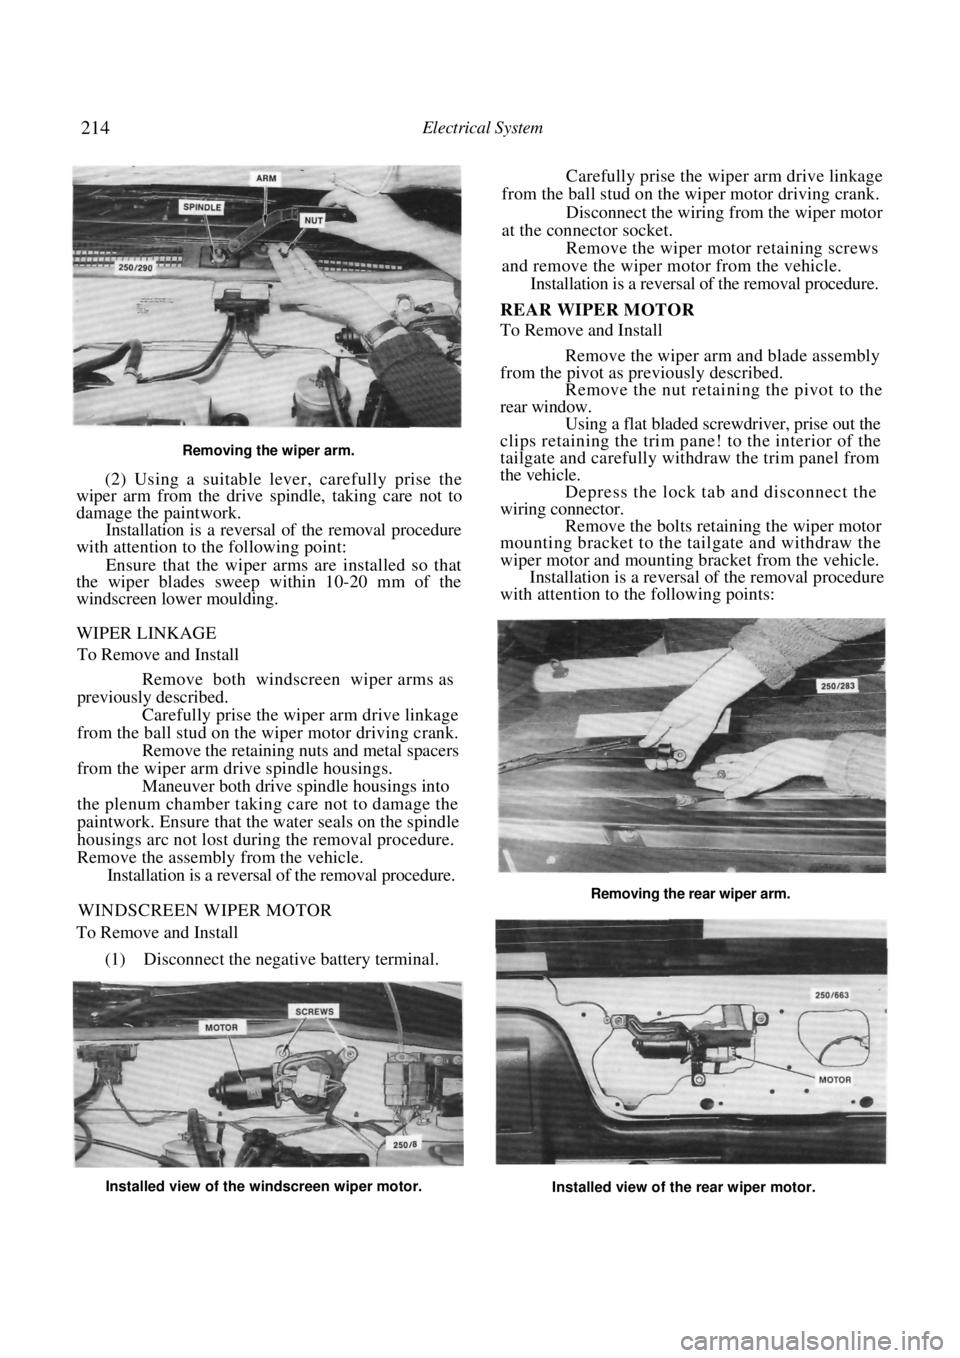
REAR WIPER MOTOR
To Remove and Install
Remove the wiper arm and blade assembly
from the pivot as previously described. Remove the nut retaining the pivot to the
rear window. Using a flat bladed screwdriver, prise out the
clips retaining the trim pane! to the interior of the
tailgate and carefully wit hdraw the trim panel from
the vehicle. Depress the lock tab and disconnect the
wiring connector. Remove the bolts retaining the wiper motor
mounting bracket to the tailgate and withdraw the
wiper motor and mounting bracket from the vehicle.
Installation is a reversal of the removal procedure
with attention to the following points:
Installed view of the windscreen wiper motor.
Installed view of the rear wiper motor.
Removing the rear wiper arm.
Page 231 of 238

Body 231
4. ENGINE BONNET
TO REMOVE, INSTAL AND ADJUST
Raise the engine bonnet and place covers on
both front mudguards. Mark the hinge mountings on
the bonnet with a soft lead pencil to aid assembly.
Place a quantity of soft rag folded several
times under each rear corner of the bonnet on the
scuttle panel. Disconnect the windscreen washer hose from
the bonnet at the tee piece. With the aid of an assistant supporting the
bonnet, remove the retaining bolts and lift the bonnet
from the vehicle. Installation is a reversal of the removal procedure
with attention to the following points:
Holding the bonnet in the position previ-
ously marked, install the bonnet hinge bolts
and
tighten to just over finger tight.
Close the bonnet and by pushing with the
hand, position the bonnet evenly in its opening.
Open the bonnet carefully and tighten the
mounting bolts. Check for correct positioning and adjust
again if necessary. Check the adjustment of the bonnet catch.
When the bonnet is closed the bonnet should align
with the front panels. When the catch is released the
bonnet should pop up sufficiently to enable the safety
catch to be released. If adjustment is necessary, mark the base
position with a pencil, loosen the retaining bolts and
move the catch in the desired direction. Tighten the
bolts and recheck.
NOTE: When adjusting the bonnet catch
ensure that the bonnet striker plate is enter-
ing centrally into the catch. Adjust the catch
or the bonnet lunges if necessary.
(7) When adjustment is complete, adjust the
bump rubbers on the radiator support panel up or
down by turning them to support the outer edges of
the bonnet.
View of the bonnet hinge showing the retaining/adjust-
ing bolts.
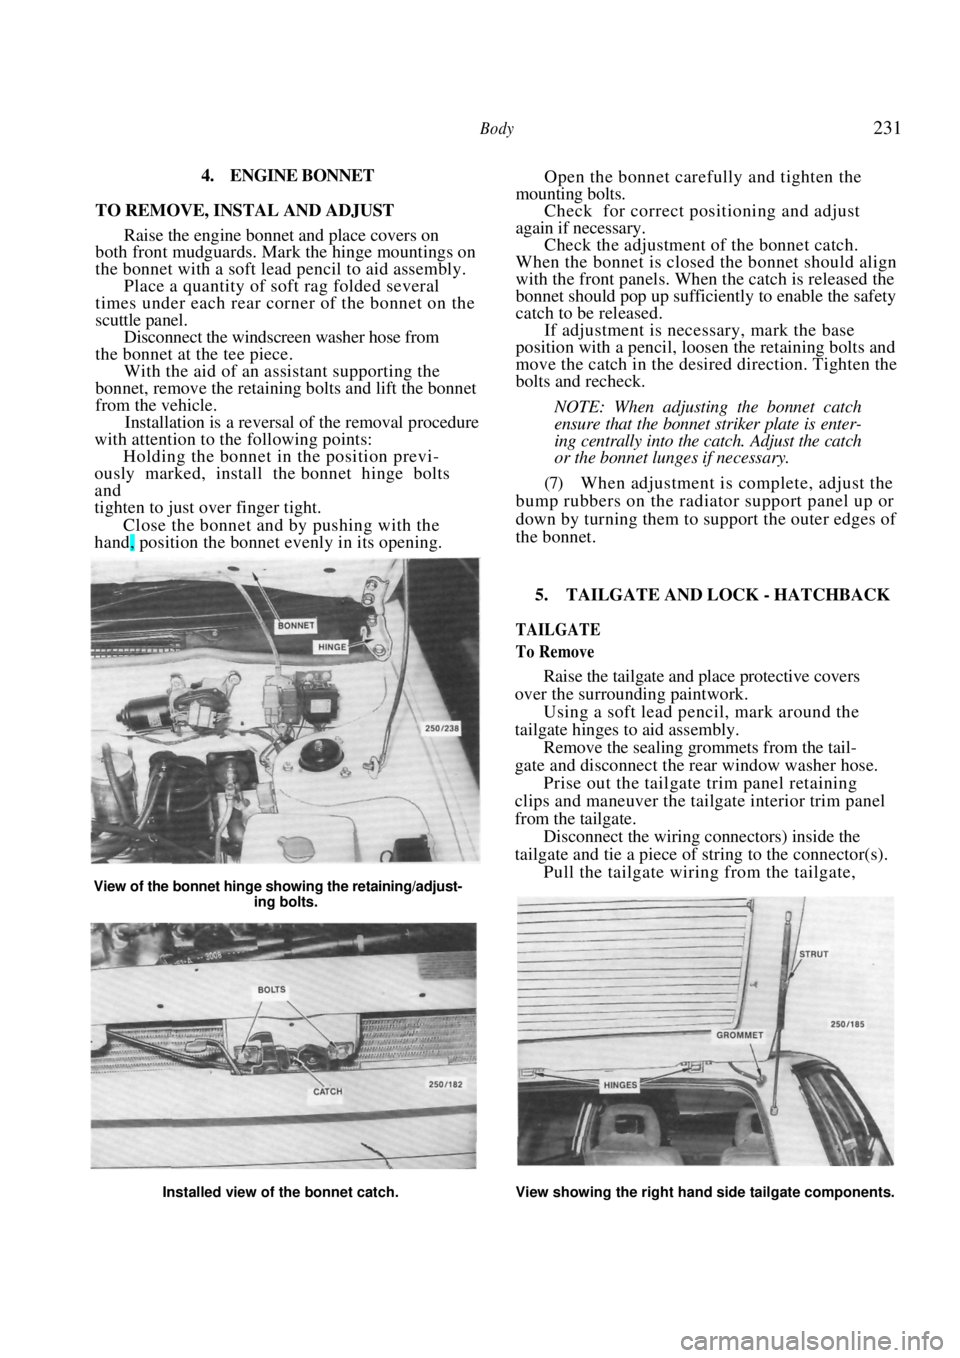
5. TAILGATE AND LOCK - HATCHBACK
TAILGATE
To Remove
Raise the tailgate and place protective covers
over the surrounding paintwork.
Using a soft lead pencil, mark around the
tailgate hinges to aid assembly. Remove the sealing grommets from the tail-
gate and disconnect the rear window washer hose. Prise out the tailgate trim panel retaining
clips and maneuver the tailgate interior trim panel
from the tailgate.
Disconnect the wiring connectors) inside the
tailgate and tie a piece of st ring to the connector(s).
Pull the tailgate wiring from the tailgate,
Installed view of the bonnet catch. View showing the right hand side tailgate components.
Page 232 of 238

232 Body
leaving the ends of the string protruding from the
tailgate. Untie the string.
NOTE: The string will be used to pull the
wiring through the tailgate on installation.
If the wiring is pulled from the tailgate
without the string attached, installation will
be very difficult.
With the aid of an assistant supporting the
tailgate, prise out the ball joint stud snap locks from
each upper strut ball joint using a small screwdriver.
Remove the bolts retaining the hinges to the
tailgate and carefully withdraw the tailgate from the
vehicle.
To Install and Adjust
With the aid of an assistant, install the
tailgate in position on the hinges according to the
marks made on removal and install the retaining bolts.
Install the tailgate support struts and retain
the ball joints with the snap locks. Pull the tailgate wiring through using the
piece of string. Connect the wiring and install
the
tailgate trim panel. Close the tailgate and check the vertical and
lateral alignment of the tailgate in relation to the
body. If adjustment is required, loosen the tailgate
hinge retaining bolts one hi nge at a time and adjust
the tailgate as required. If vertical adjustment is required, it will be
necessary to remove or install washers under the
tailgate hinges. If required, adjust the striker plate using the
procedure that follows.
STRIKER PLATE
To Remove, Install and Adjust
Using a flat bladed screwdriver, prise out the
trim plugs and remove the trim plate from above the
striker.
Using a soft lead pencil, scribe a line around
the striker plate.
Remove the striker plate retaining bolts and
partially remove the striker plate. Disconnect the remote tailgate release cable
from the striker plate and remove the striker plate
from the vehicle. Inspect the striker plate for wear and renew
it if necessary. Installation is a reversal of the removal procedure
with attention to the following points:
Install the striker plate ensuring that it is in
the position marked on dismantling and that the
remote tailgate release cable is connected. Tighten the
retaining bolts. Close the tailgate ensuring that the striker
has actuated the locking mechanism. Check the alignment of the tailgate in its
opening and adjust the locking action by moving the
striker plate in the requir ed direction. Tighten the
retaining bolts securely.
LOCK AND LOCK CYLINDER
To Remove and Install
Prise out the tailgate trim panel retaining
clips and carefully maneuver the tailgate interior
trim panel from the tailgate.
Disconnect the actuati ng rod from the lock
cylinder assembly. Disconnect the interior lamp switch wiring
connector.
Installed view of the striker plate assembly. Hatchback
models. Dismantled view of the Hatchback lock and lock cylin-
der.
Page 233 of 238

Body 233
Remove the lock assembly retaining bolts
and withdraw the lock assembly, insulator and link
from the tailgate.
Using a suitable screwdriver, remove the
lock cylinder retaining clip and withdraw the lock
cylinder from the vehicle. Installation is a reversal of the removal procedure
with attention to the following points:
Ensure that the positioning of the lock is
correct in relation to the striker plate.
Ensure that the interior lamp switch wiring
connector is connected.
6. LUGGAGE COMPARTMENT LID
AND LOCK — SEDAN
LUGGAGE COMPARTMENT LID
To Remove
Raise the luggage compartment lid and place
protective covers over the surrounding paintwork.
Using a soft lead pencil, mark around the
luggage compartment lid hi nges to aid assembly.
With the aid of an assistant supporting the
lid, remove the hinge retaining bolts and withdraw the
luggage compartment lid from the vehicle.
To Install and Adjust
With the aid of an assistant, install the
luggage compartment lid in position on the hinges
according to the marks made on removal. Install the
retaining bolts. Close the lid and check the vertical and
lateral alignment of the l i d in relation to the body.
If adjustment is necessary, loosen the l i d
hinge retaining bolts on one hinge at a time and adjust
the lid as required.
If vertical adjustment is required, loosen the
lid hinge retaining bolts and increase or decrease the
number of washers under the bolts. If required, adjust the striker plate using the
procedure that follows.
STRIKER PLATE
To Remove, Install and Adjust
Fold back the trim material from inside the
luggage compartment.
Using a soft lead pencil, scribe a line around
the outside of each striker plate retaining bolt washer. Remove the striker plate bolts and washers
and the screw retaining the remote release cable
bracket.
Installed view of the luggage compartment lid striker
with the trim material folded back.
(4) Slide the striker assembly towards the right
hand side of the vehicle and disconnect the remote
release cable. Withdraw the striker plate from the
vehicle.
Installation is a reversal of the removal procedure
with attention to the following points:
(1) Install the remote release cable to the striker
plate and install the striker plate retaining bolts and
washers to the lines made on dismantling.
Tighten the retaining bolts to just over finger
tight.
Close the lid ensuring that the striker has
actuated the locking mechanism. Check the alignment of the luggage compart-
ment lid in its opening an d adjust the locking action
by moving the striker plate. Tighten the retaining
bolts securely.
When the striker plate is adjusted correctly
pull the remote release ca ble towards the right hand
side of the vehicle until the cable end has 0.5-1.5 mm
clearance and tighten the re taining screws. Check the
operation of the remote release cable and readjust if
necessary.
Installed view of the luggage compartment lid hinge.