window NISSAN PULSAR 1987 Workshop Manual
[x] Cancel search | Manufacturer: NISSAN, Model Year: 1987, Model line: PULSAR, Model: NISSAN PULSAR 1987Pages: 238, PDF Size: 28.91 MB
Page 207 of 238
Electrical System 207
Disconnect the wiring connectors from the
rear of the combination switch.
Loosen the clamping screw located at the left
hand side of the combination switch. Push, turn and slide the combination switch
from the steering column. Installation is a reversal of the removal procedure.
REAR WINDOW DEMISTER
SWITCH/HAZARD WARNING LAMP SWITCH
To Remove and Install
Disconnect the negative battery terminal.
Using two small flat bladed screwdrivers,
carefully lever the edges of the switch forward to
release it from the instrument cluster surround.
Withdraw the switch from the surround and
disconnect the switch wiri ng at the connectors.
Installation is a reversal of the removal procedure.
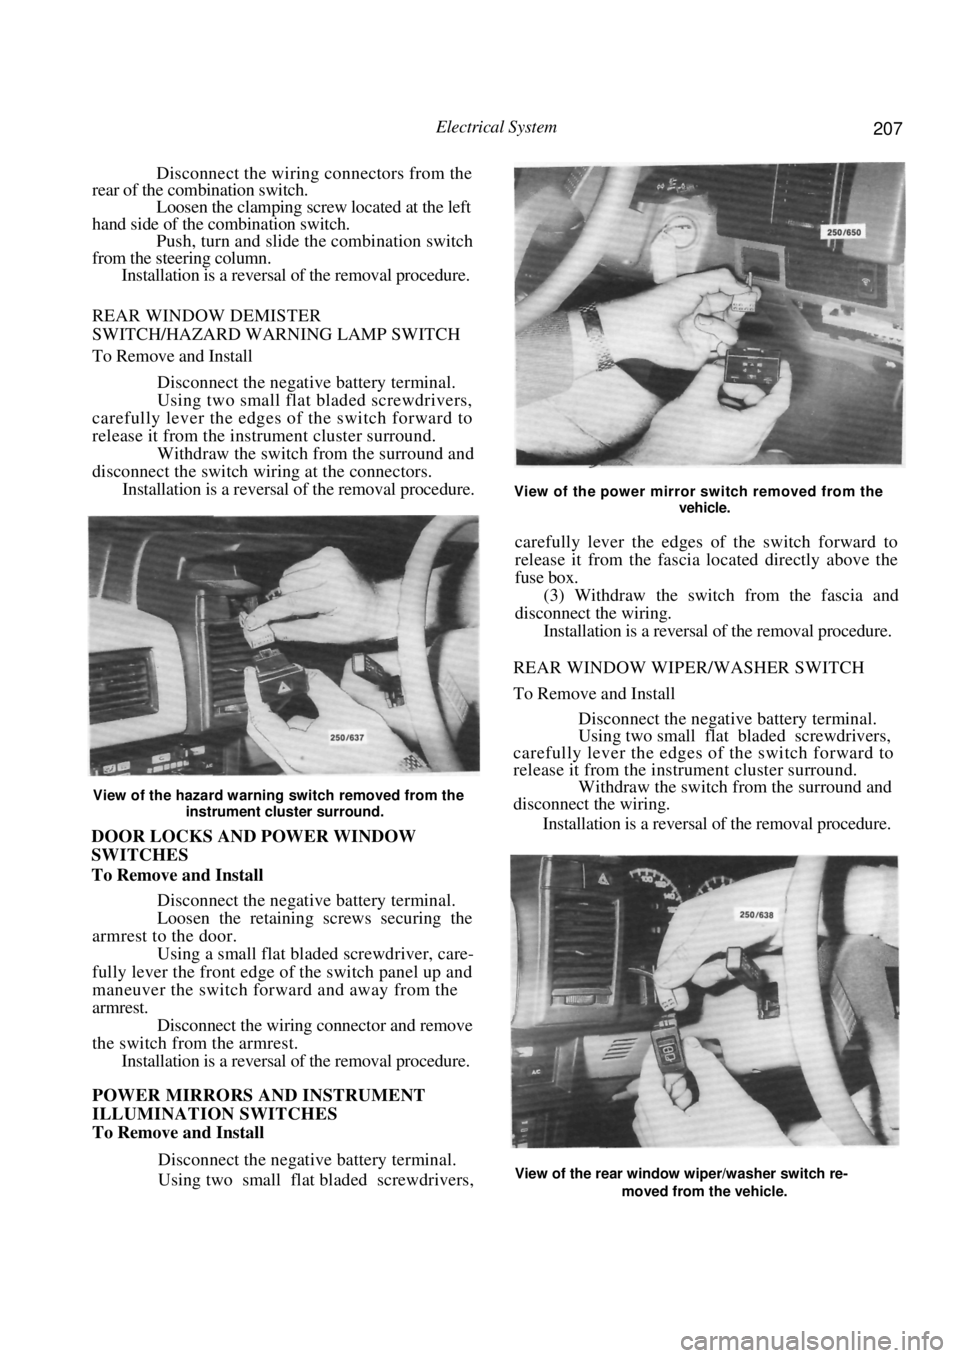
View of the hazard warning switch removed from the
instrument cluster surround.
DOOR LOCKS AND POWER WINDOW
SWITCHES
To Remove and Install
Disconnect the negative battery terminal.
Loosen the retaining screws securing the
armrest to the door. Using a small flat bladed screwdriver, care-
fully lever the front edge of the switch panel up and
maneuver the switch forward and away from the
armrest. Disconnect the wiring connector and remove
the switch from the armrest. Installation is a reversal of the removal procedure.
POWER MIRRORS AND INSTRUMENT
ILLUMINATION SWITCHES
To Remove and Install
Disconnect the negative battery terminal.
Using two small flat bladed screwdrivers,
View of the power mirror switch removed from the
vehicle.
carefully lever the edges of the switch forward to
release it from the fascia lo cated directly above the
fuse box.
(3) Withdraw the switch from the fascia and
disconnect the wiring.
Installation is a reversal of the removal procedure.
REAR WINDOW WIPER/WASHER SWITCH
To Remove and Install
Disconnect the negative battery terminal.
Using two small flat bladed screwdrivers,
carefully lever the edges of the switch forward to
release it from the instrument cluster surround. Withdraw the switch from the surround and
disconnect the wiring.
Installation is a reversal of the removal procedure.
View of the rear window wiper/washer switch re-
moved from the vehicle.
Page 214 of 238
214 Electrical System
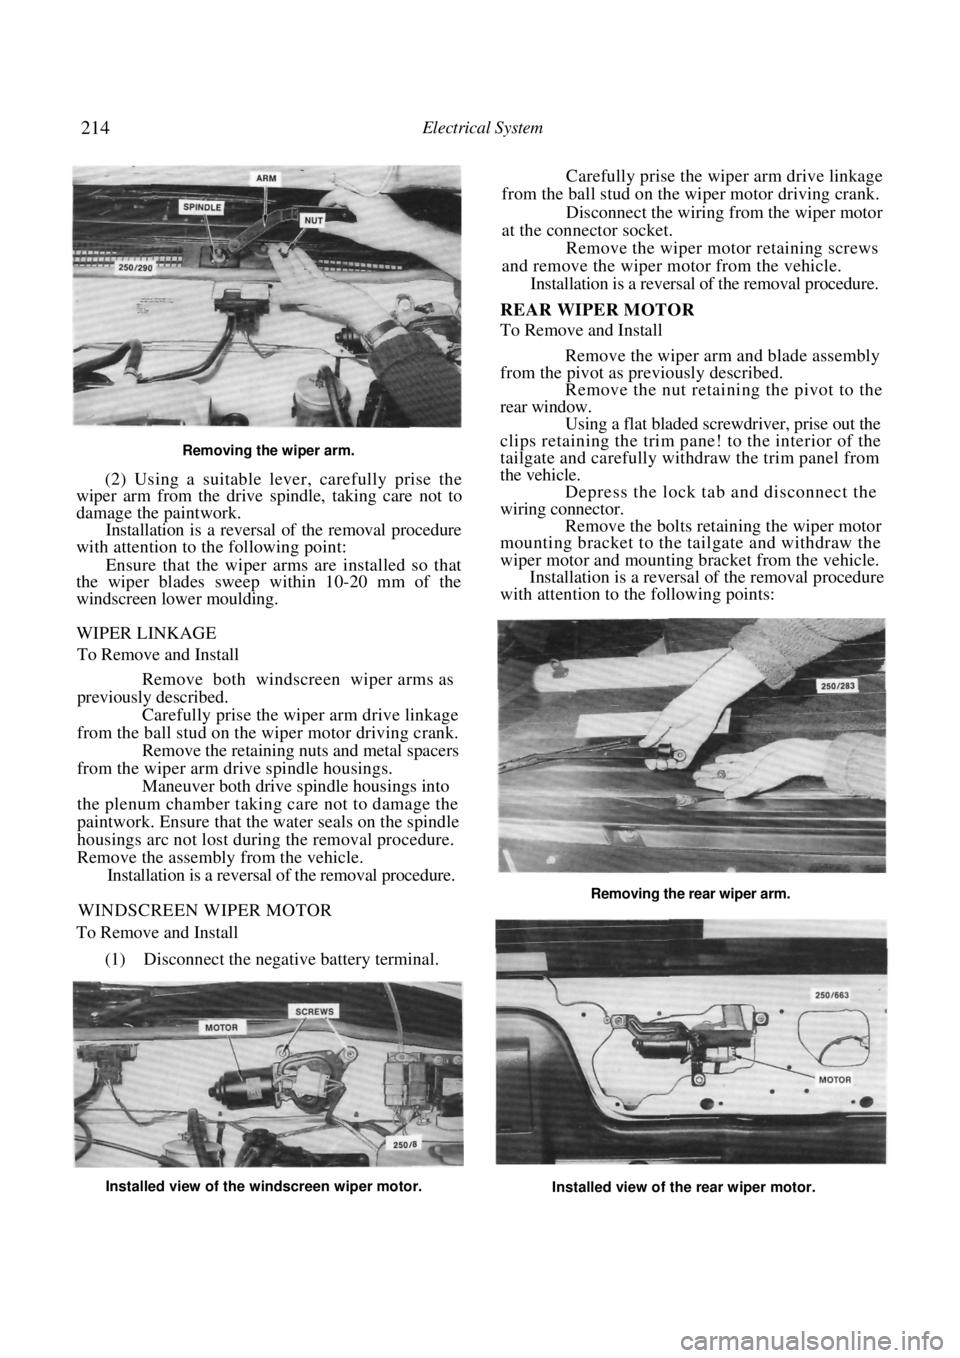
Removing the wiper arm.
(2) Using a suitable lever, carefully prise the
wiper arm from the drive spindle, taking care not to
damage the paintwork.
Installation is a reversal of the removal procedure
with attention to the following point:
Ensure that the wiper arms are installed so that
the wiper blades sweep within 10-20 mm of the
windscreen lower moulding.
WIPER LINKAGE
To Remove and Install
Remove both windscreen wiper arms as
previously described.
Carefully prise the wiper arm drive linkage
from the ball stud on the wiper motor driving crank. Remove the retaining nuts and metal spacers
from the wiper arm dr ive spindle housings.
Maneuver both drive spindle housings into
the plenum chamber taking care not to damage the
paintwork. Ensure that th e water seals on the spindle
housings arc not lost during the removal procedure.
Remove the assembly from the vehicle. Installation is a reversal of the removal procedure.
WINDSCREEN WIPER MOTOR
To Remove and Install
(1) Disconnect the negative battery terminal.
Carefully prise the wiper arm drive linkage
from the ball stud on the wiper motor driving crank.
Disconnect the wiring from the wiper motor
at the connector socket. Remove the wiper motor retaining screws
and remove the wiper motor from the vehicle. Installation is a reversal of the removal procedure.
REAR WIPER MOTOR
To Remove and Install
Remove the wiper arm and blade assembly
from the pivot as previously described. Remove the nut retaining the pivot to the
rear window. Using a flat bladed screwdriver, prise out the
clips retaining the trim pane! to the interior of the
tailgate and carefully wit hdraw the trim panel from
the vehicle. Depress the lock tab and disconnect the
wiring connector. Remove the bolts retaining the wiper motor
mounting bracket to the tailgate and withdraw the
wiper motor and mounting bracket from the vehicle.
Installation is a reversal of the removal procedure
with attention to the following points:
Installed view of the windscreen wiper motor.
Installed view of the rear wiper motor.
Removing the rear wiper arm.
Page 215 of 238
Electrical System 215
Ensure that the wiper motor is in the Park
position before installing the wiper arm. If in doubt,
turn the wiper switch to the Off position and turn the
ignition switch to the On position until the wiper
motor stops.
Install the wiper arm to the pivot so that the
wiper blade is horizontal to the lower edge of the edge
of the rear window when in the Park position.
17. FUSES, FUSIBLE LINKS AND RELAYS
TO CHECK AND RENEW FUSE
NOTE: If a fuse is found to be faulty or
burnt out, use a replacement fuse of the
specified amperage only. The specified amp-
erage is marked on the fuse.
The use of a higher amperage fuse than
that specified could cause damage to the
vehicle wiring harness.
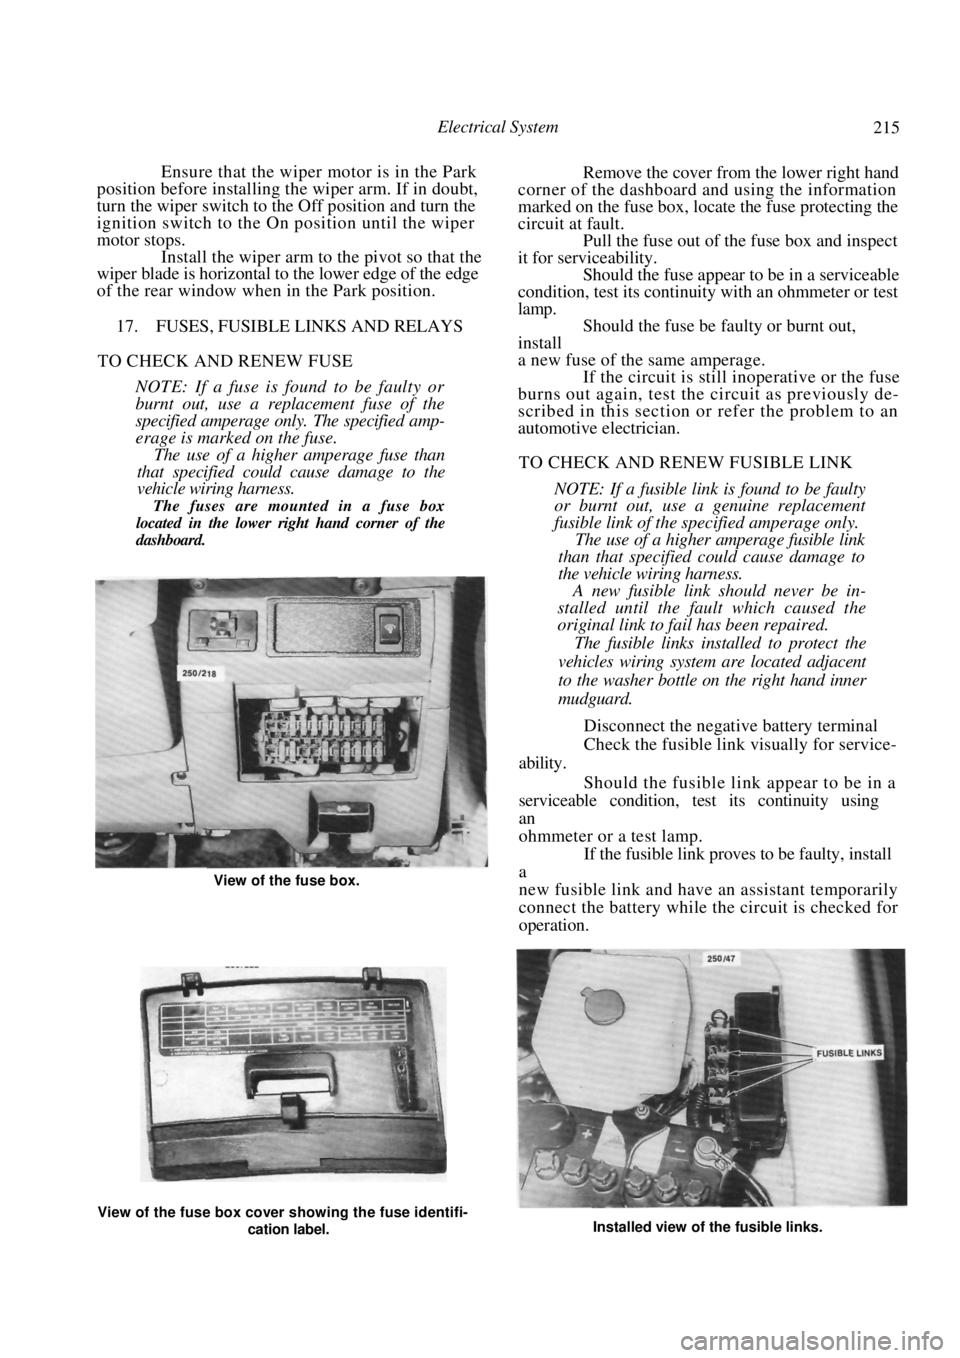
The fuses are mounted in a fuse box
located in the lower right hand corner of the
dashboard.
Remove the cover from the lower right hand
corner of the dashboard and using the information
marked on the fuse box, locate the fuse protecting the
circuit at fault. Pull the fuse out of the fuse box and inspect
it for serviceability.
Should the fuse appear to be in a serviceable
condition, test its continuity with an ohmmeter or test
lamp. Should the fuse be faulty or burnt out,
install
a new fuse of the same amperage. If the circuit is still inoperative or the fuse
burns out again, test the circuit as previously de-
scribed in this section or refer the problem to an
automotive electrician.
TO CHECK AND RENEW FUSIBLE LINK
NOTE: If a fusible link is found to be faulty
or burnt out, use a genuine replacement
fusible link of the specified amperage only.
The use of a higher amperage fusible link
than that specified could cause damage to
the vehicle wiring harness.
A new fusible link should never be in-
stalled until the fault which caused the
original link to fail has been repaired.
The fusible links installed to protect the
vehicles wiring system are located adjacent
to the washer bottle on the right hand inner
mudguard.
Disconnect the negative battery terminal
Check the fusible link visually for service-
ability.
Should the fusible link appear to be in a
serviceable condition, test its continuity using
an
ohmmeter or a test lamp. If the fusible link proves to be faulty, install
a
new fusible link and have an assistant temporarily
connect the battery while the circuit is checked for
operation.
View of the fuse box cover showing the fuse identifi-
cation label. Installed view of the fusible links.
View of the fuse box.
Page 221 of 238
Electrical System 221
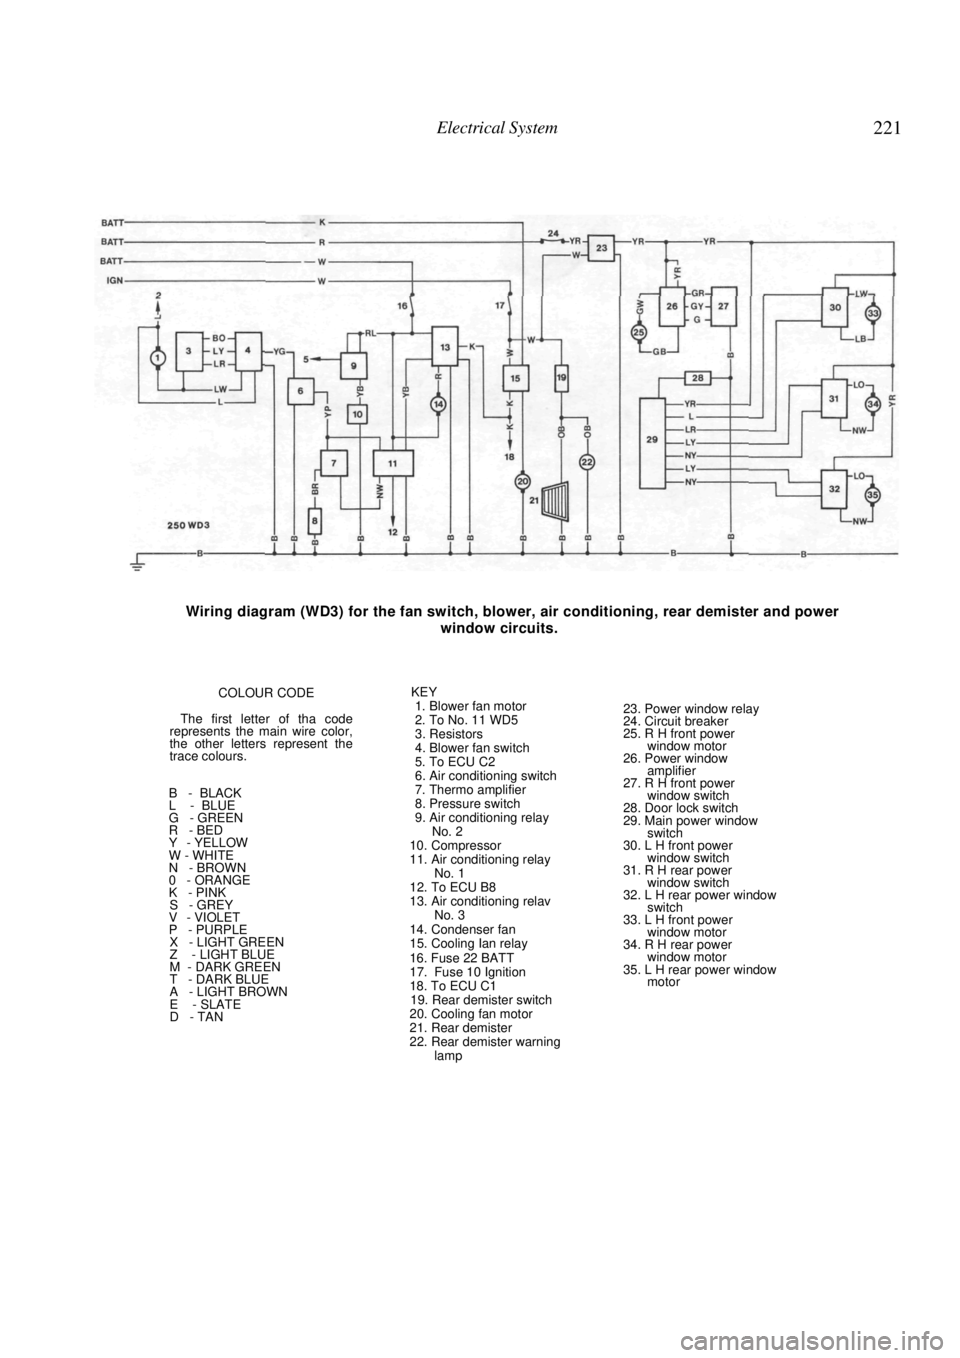
Wiring diagram (WD3) for the fan switch, blower, air conditioning, rear demister and power
window circuits.
COLOUR CODE
The first letter of tha code
represents the main wire color,
the other letters represent the
trace colours.
B - BLACK
L - BLUE
G - GREEN
R - BED
Y - YELLOW
W - WHITE
N - BROWN
0 - ORANGE
K - PINK
S - GREY
V - VIOLET
P - PURPLE
X - LIGHT GREEN
Z - LIGHT BLUE
M - DARK GREEN
T - DARK BLUE
A - LIGHT BROWN
E - SLATE
D - TAN KEY
1. Blower fan motor
2. To No. 11 WD5
3. Resistors
4. Blower fan switch
5. To ECU C2
6. Air conditioning switch
7. Thermo amplifier
8. Pressure switch
9. Air conditioning relay No. 2
10. Compressor
11. Air conditioning relay No. 1
12. To ECU B8
13. Air conditioning relav No. 3
14. Condenser fan
15. Cooling Ian relay
16. Fuse 22 BATT
17. Fuse 10 Ignition
18. To ECU C1
19. Rear demister switch
20. Cooling fan motor
21. Rear demister
22. Rear demister warning lamp
23. Power window relay
24. Circuit breaker
25. R H front power
window motor
26. Power window amplifier
27. R H front power window switch
28. Door lock switch
29. Main power window switch
30. L H front power
window switch
31. R H rear power window switch
32. L H rear power window switch
33. L H front power
window motor
34. R H rear power window motor
35. L H rear power window motor
Page 225 of 238
225
BODY
1. WINDSCREEN AND REAR GLASS
The renewal or replacement of the windscreen
and the rear glass follows the same basic procedure.
The successful installation and sealing of the
windscreen or rear glass will depend to a large extent
on the technical knowledge and experience of the
operator and it is not recomm ended that rear glass or
windscreen replacement be attempted by anyone
lacking in previous experience.
2. FRONT DOORS
INTERIOR HANDLES AND TRIM PANEL
TO Remove and Install
On models with manual windows, carefully
prise out the armrest trim plugs and remove the
retaining screws. Withdraw the armrest from the
vehicle. On models with power windows, proceed as
follows: Carefully prise out the armrest trim plugs
and remove the retaining screws. Hold the armrest away from the door trim
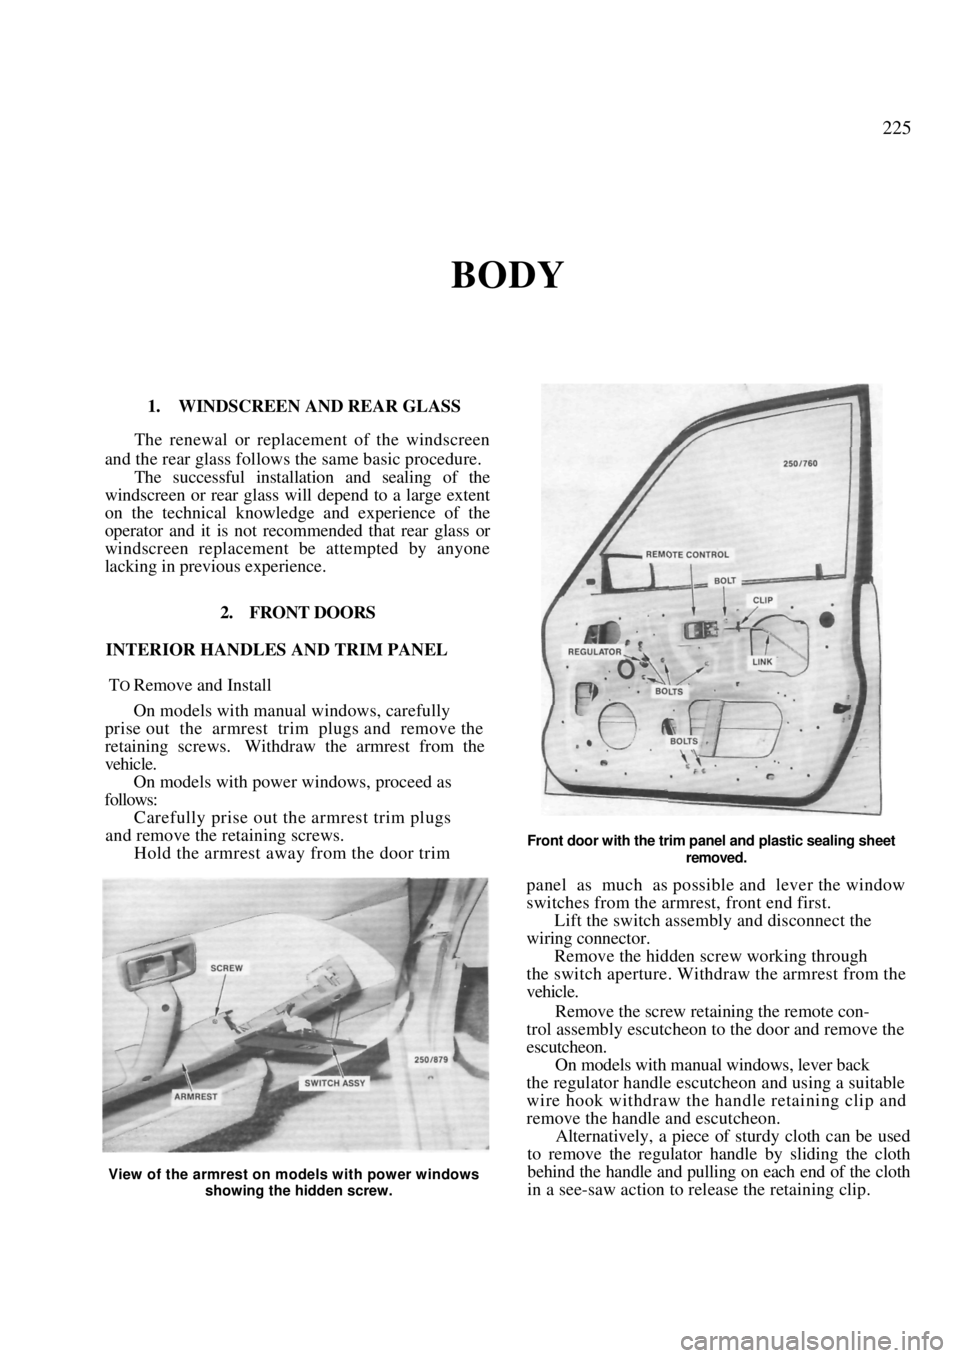
Front door with the trim panel and plastic sealing sheet
removed.
panel as much as possible and lever the window
switches from the armrest, front end first.
Lift the switch assembly and disconnect the
wiring connector. Remove the hidden screw working through
the switch aperture. Withdraw the armrest from the
vehicle.
Remove the screw retaining the remote con-
trol assembly escutcheon to the door and remove the
escutcheon.
On models with manual windows, lever back
the regulator handle escutcheon and using a suitable
wire hook withdraw the handle retaining clip and
remove the handle and escutcheon. Alternatively, a piece of sturdy cloth can be used
to remove the regulator handle by sliding the cloth
behind the handle and pulling on each end of the cloth
in a see-saw action to release the retaining clip.
View of the armrest on models with power windows
showing the hidden screw.
Page 226 of 238
226 Body
Remove the screws retaining the speaker to
the trim panel, withdraw the speaker slightly and
disconnect the wiring connector at the rear. Place the
speaker to one side clear of the work area.
On models with a step lamp located in the
door trim panel, remove the screws, withdraw the step
lamp and disconnect the wiring connector. Using a broad bladed screwdriver, carefully
lever the trim panel outwa rds and disengage all the
retaining clips. When all the clips have been disen-
gaged maneuver the trim panel from the door. Remove the screw retaining the speaker
water deflector to the inner door panel and withdraw
the water deflector.
Carefully remove the plastic sealing sheet from
the inner door panel.
Installation is a reversal of the removal procedure
with attention to the following points:
Ensure that the plastic sealing sheet is cor-
rectly installed and not torn or damaged.
Check the trim panel retaining clips and
renew any damaged clips as necessary. On models with manual windows, wind the
door glass to the closed position, install the
retaining
clip to the regulator handle and install the regulator
handle to correspond with the regulator handle on the
opposite door.
DOOR GLASS AND REGULATOR
To Remove and Install
Remove the interior trim panel and handles
as previously described. Lower the door glass to align the lift channel
with the lower aperture. Support the door glass and remove the
retaining screws from the lift channel and door glass. Tilt the door glass to disengage it from the
run channel, then lift the door glass out through the
door glass opening. Remove the retaining bolts securing the
regulator assembly to the door panel. On models with
power windows, disconnect the wiring connector.
Maneuver the regulator assembly from the door
through the lower aperture. Installation is a reversal of the removal procedure
with attention to the following points:
Ensure that the sliding surfaces are ade-
quately lubricated with a zinc oxide grease.
Loosely install the regulator assembly to the
inner door panel. Install the doo r glass through the door glass
opening, engage the door glass in the run channel and
loosely install the retaining screws.
Tighten the regulator retaining bolts and
operate the door glass a few times up and down to
ensure that the glass is centralized. Tighten the lift
channel screws and check the operation of the door
glass. Adjust as required.
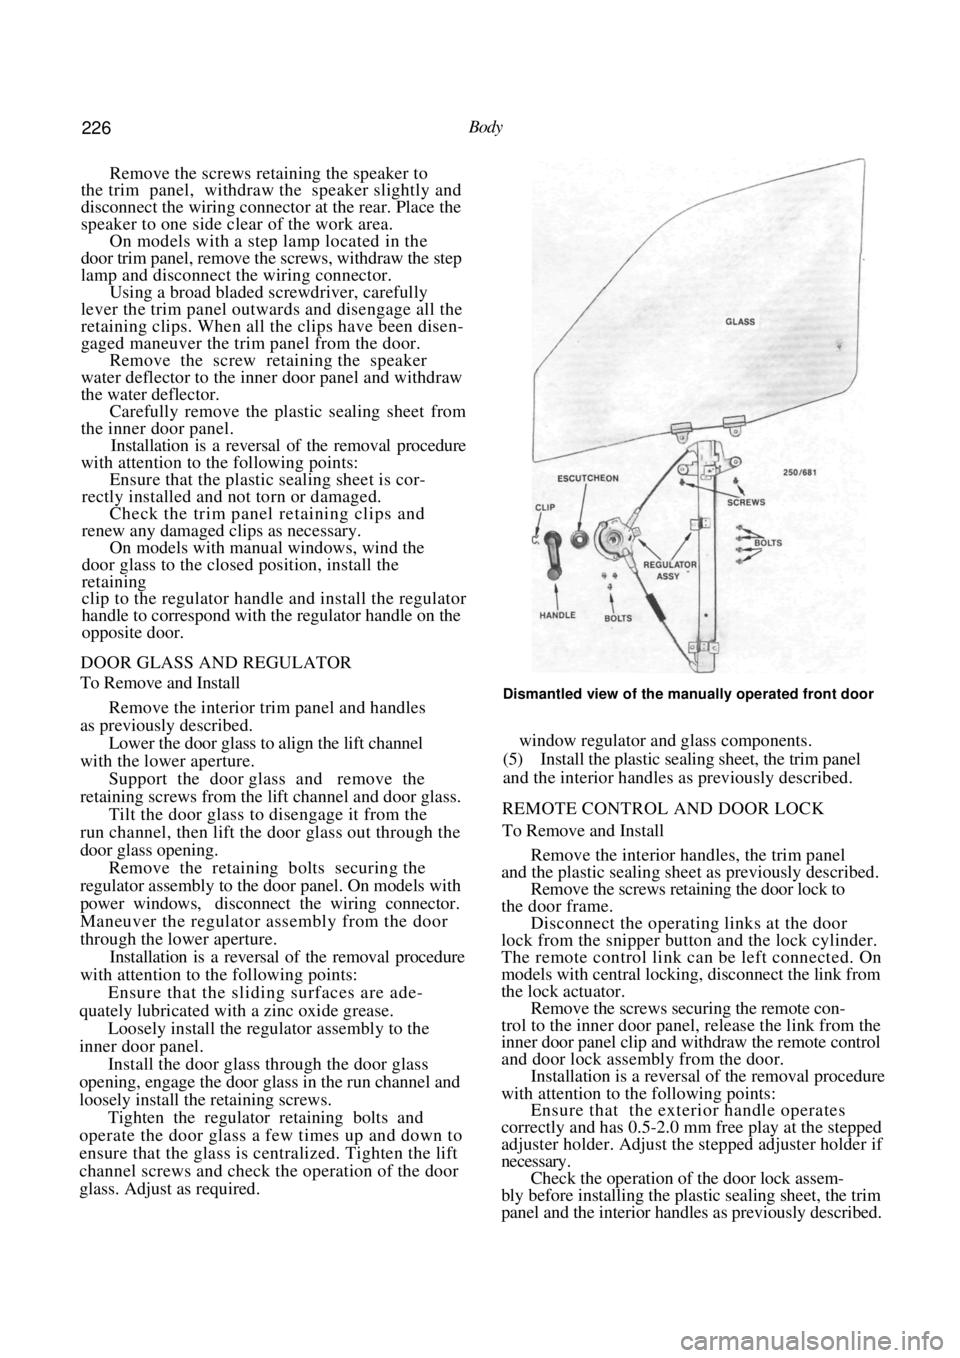
Dismantled view of the manually operated front door
window regulator and glass components.
(5) Install the plastic sealing sheet, the trim panel
and the interior handles as previously described.
REMOTE CONTROL AND DOOR LOCK
To Remove and Install
Remove the interior handles, the trim panel
and the plastic sealing sheet as previously described.
Remove the screws retaining the door lock to
the door frame. Disconnect the operating links at the door
lock from the snipper button and the lock cylinder.
The remote control link can be left connected. On
models with central locking, disconnect the link from
the lock actuator.
Remove the screws securing the remote con-
trol to the inner door panel, release the link from the
inner door panel clip and w ithdraw the remote control
and door lock assembly from the door. Installation is a reversal of the removal procedure
with attention to the following points:
Ensure that the exterior handle operates
correctly and has 0.5-2.0 mm free play at the stepped
adjuster holder. Adjust the stepped adjuster holder if
necessary. Check the operation of the door lock assem-
bly before installing the plastic sealing sheet, the trim
panel and the interior handles as previously described.
Page 228 of 238
228 Body
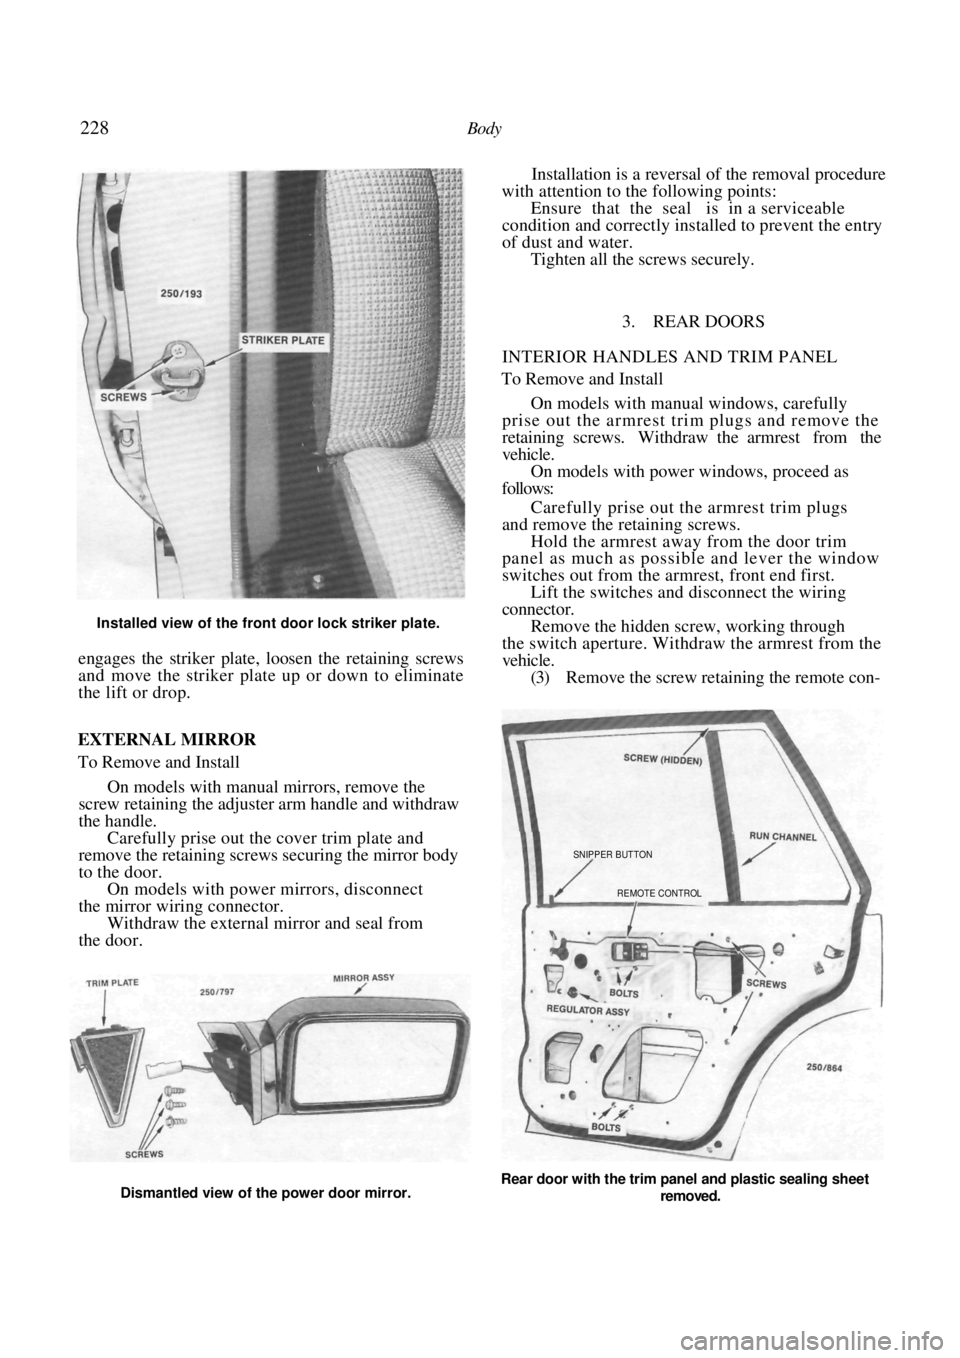
Installed view of the front door lock striker plate.
engages the striker plate, loosen the retaining screws
and move the striker plate up or down to eliminate
the lift or drop.
Installation is a reversal of the removal procedure
with attention to the following points:
Ensure that the seal is in a serviceable
condition and correctly installed to prevent the entry
of dust and water. Tighten all the screws securely.
3. REAR DOORS
INTERIOR HANDLES AND TRIM PANEL
To Remove and Install
On models with manual windows, carefully
prise out the armrest trim plugs and remove the
retaining screws. Withdraw the armrest from the
vehicle. On models with power windows, proceed as
follows:
Carefully prise out the armrest trim plugs
and remove the retaining screws. Hold the armrest away from the door trim
panel as much as possible and lever the window
switches out from the armrest, front end first.
Lift the switches and disconnect the wiring
connector. Remove the hidden screw, working through
the switch aperture. Withdraw the armrest from the
vehicle. (3) Remove the screw retaining the remote con-
EXTERNAL MIRROR
To Remove and Install
On models with manual mirrors, remove the
screw retaining the adjuster arm handle and withdraw
the handle. Carefully prise out the cover trim plate and
remove the retaining screws securing the mirror body
to the door. On models with power mirrors, disconnect
the mirror wiring connector. Withdraw the external mirror and seal from
the door.
Rear door with the trim panel and plastic sealing sheet
removed.
SNIPPER BUTTON
REMOTE CONTROL
Dismantled view of the power door mirror.
Page 229 of 238
Body 229
trol assembly escutcheon to the door and remove the
escutcheon.
(4) On models with manual windows, lever back
the regulator handle escutcheon and using a suitable
wire hook, withdraw the handle retaining clip and
remove the handle and escutcheon.
Alternatively, a piece of sturdy cloth can be used
to remove the regulator handle by sliding the cloth
behind the handle and pulling on each end of the cloth
in a see-saw action to release the retaining clip.
On models with a step lamp located in the
door trim panel, remove the screws, withdraw the
lamp and disconnect the wiring connector. Using a broad bladed screwdriver, carefully
lever the trim panel outwa rds and disengage all the
retaining clips. When all the clips have been disen-
gaged maneuver the trim panel from the door. Carefully remove the plastic sealing sheet
from the inner door panel. Installation is a reversal of the removal procedure
with attention to the following points:
Ensure that the plastic sealing sheet is cor-
rectly installed and not torn or damaged. Check the trim panel retaining clips and
renew any damaged clips as necessary. On models with manual windows, wind the
door glass to the closed position, install the
retaining
clip to the regulator handle and install the regulator
handle to correspond with the regulator handle on the
opposite door.
DOOR GLASS, REGULATOR AND QUARTER
GLASS
To Remove and Install
Remove the interior handles, the trim panel
and the plastic scaling sheet as previously described. Lower the door glass to align the lift channel
with the lower aperture.
Support the door glass and remove the
retaining screws from the lift channel.
Remove the screws retaining the rear run
channel to the door.
NOTE: To gain a ccess to the upper screw
carefully ease a small section of the door
rubber from the upper door flange.
Maneuver the run channel from the door
using care not to chip the d oor paintwork or the glass.
Withdraw the door glass through the door
glass aperture. Slide the quarter glass and seal assembly
towards the front top corner of the door and withdraw
the quarter glass from the vehicle. Remove the regulator retaining bolts and
withdraw the regulator from the door through the
lower aperture. Installation is a reversal of the removal procedure
with attention to the following points:
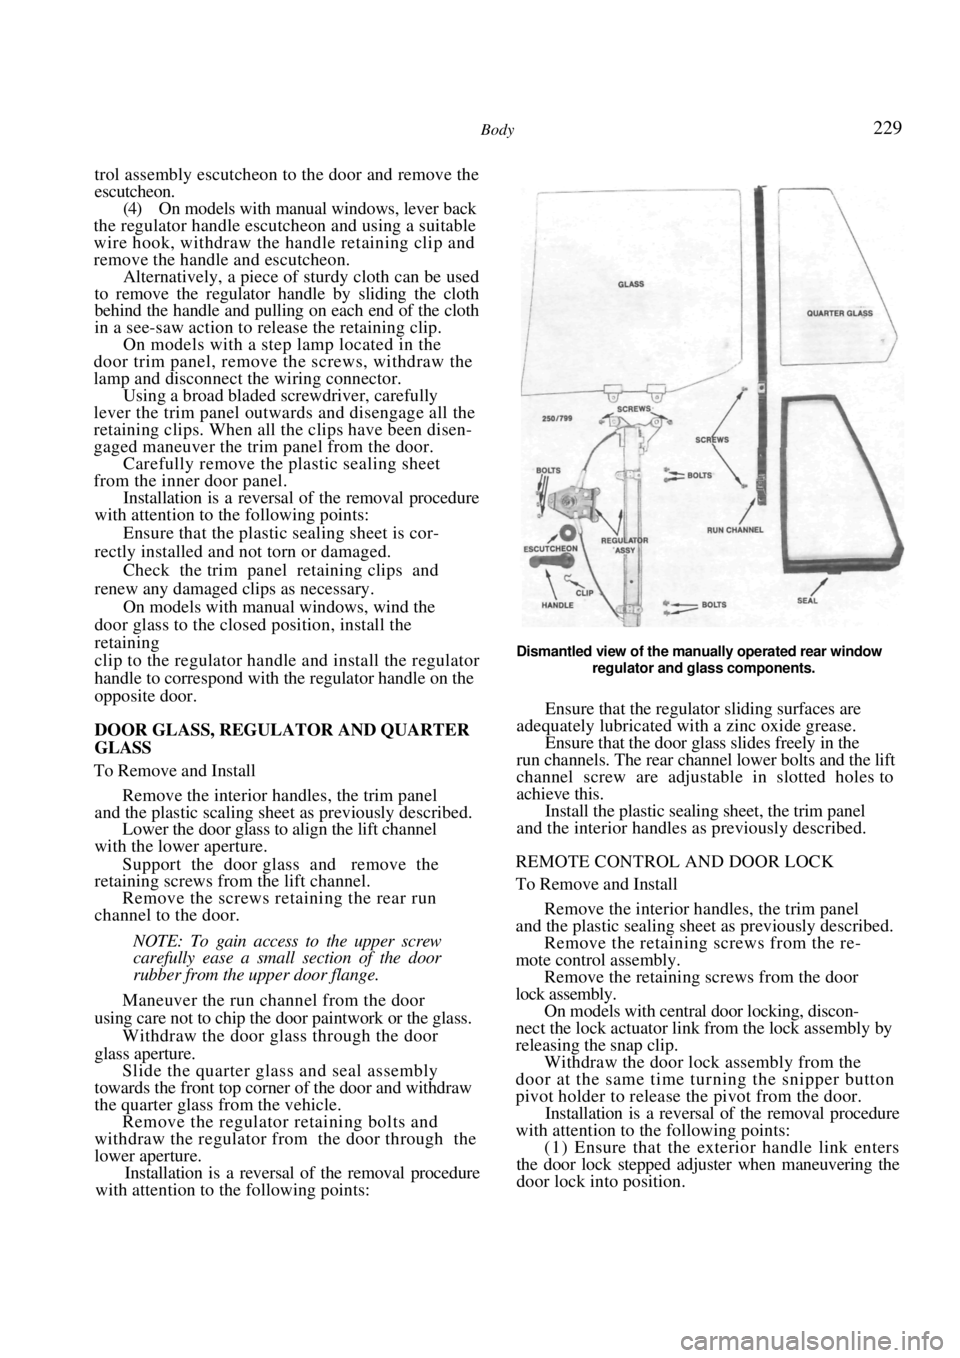
Dismantled view of the manually operated rear window
regulator and glass components.
Ensure that the regulator sliding surfaces are
adequately lubricated with a zinc oxide grease. Ensure that the door glass slides freely in the
run channels. The rear channe l lower bolts and the lift
channel screw are adjustable in slotted holes to
achieve this. Install the plastic sealing sheet, the trim panel
and the interior handles as previously described.
REMOTE CONTROL AND DOOR LOCK
To Remove and Install
Remove the interior handles, the trim panel
and the plastic sealing sheet as previously described. Remove the retaining screws from the re-
mote control assembly.
Remove the retaining screws from the door
lock assembly. On models with central door locking, discon-
nect the lock actuator li nk from the lock assembly by
releasing the snap clip. Withdraw the door lock assembly from the
door at the same time turning the snipper button
pivot holder to release the pivot from the door. Installation is a reversal of the removal procedure
with attention to the following points:
(1) Ensure that the exterior handle link enters
the door lock stepped adjuster when maneuvering the
door lock into position.
Page 231 of 238
Body 231
4. ENGINE BONNET
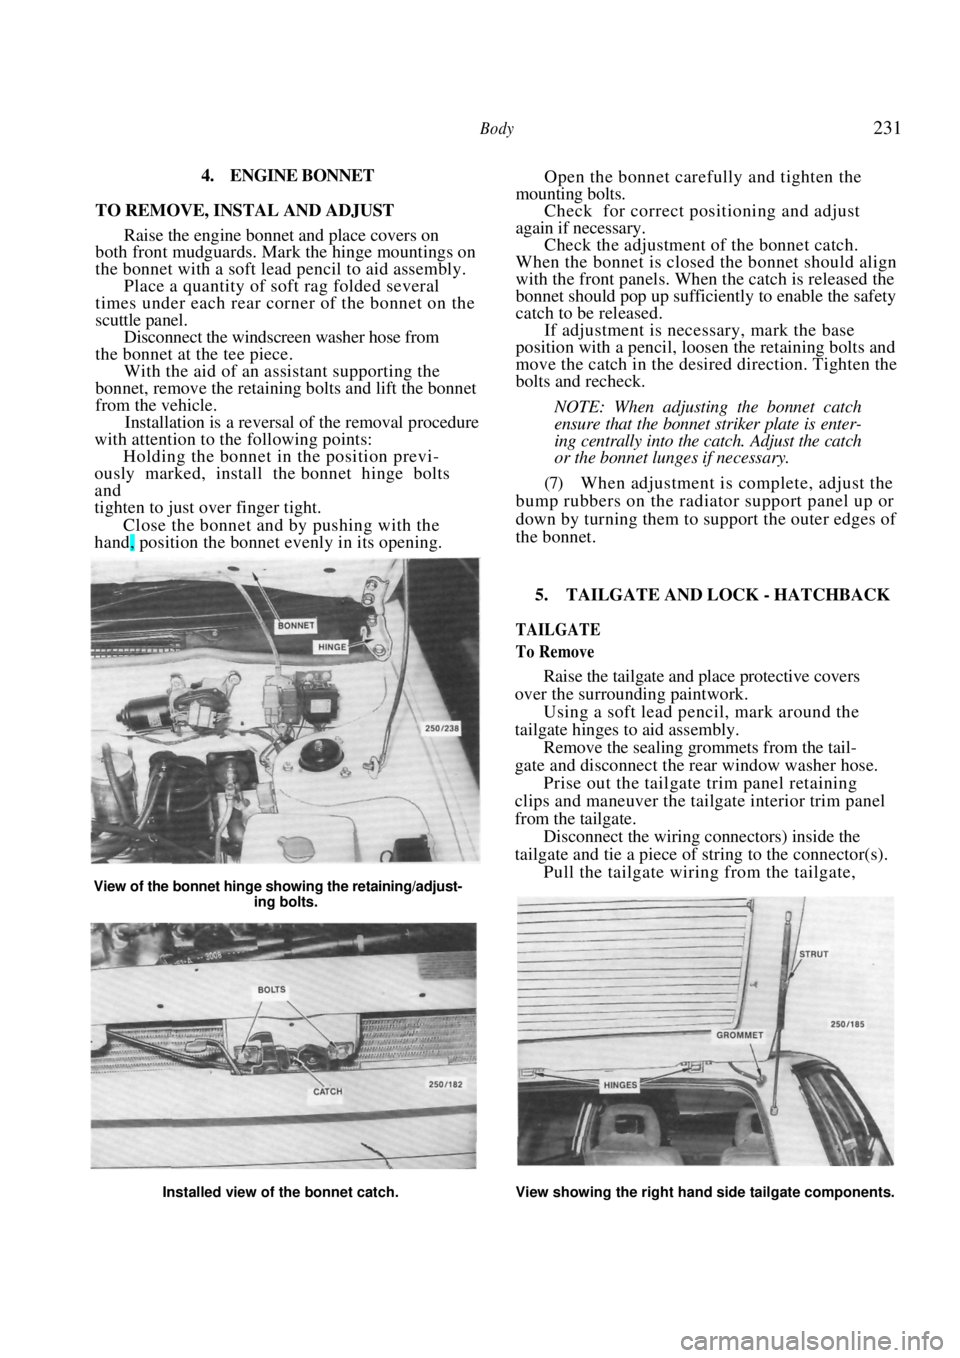
TO REMOVE, INSTAL AND ADJUST
Raise the engine bonnet and place covers on
both front mudguards. Mark the hinge mountings on
the bonnet with a soft lead pencil to aid assembly.
Place a quantity of soft rag folded several
times under each rear corner of the bonnet on the
scuttle panel. Disconnect the windscreen washer hose from
the bonnet at the tee piece. With the aid of an assistant supporting the
bonnet, remove the retaining bolts and lift the bonnet
from the vehicle. Installation is a reversal of the removal procedure
with attention to the following points:
Holding the bonnet in the position previ-
ously marked, install the bonnet hinge bolts
and
tighten to just over finger tight.
Close the bonnet and by pushing with the
hand, position the bonnet evenly in its opening.
Open the bonnet carefully and tighten the
mounting bolts. Check for correct positioning and adjust
again if necessary. Check the adjustment of the bonnet catch.
When the bonnet is closed the bonnet should align
with the front panels. When the catch is released the
bonnet should pop up sufficiently to enable the safety
catch to be released. If adjustment is necessary, mark the base
position with a pencil, loosen the retaining bolts and
move the catch in the desired direction. Tighten the
bolts and recheck.
NOTE: When adjusting the bonnet catch
ensure that the bonnet striker plate is enter-
ing centrally into the catch. Adjust the catch
or the bonnet lunges if necessary.
(7) When adjustment is complete, adjust the
bump rubbers on the radiator support panel up or
down by turning them to support the outer edges of
the bonnet.
View of the bonnet hinge showing the retaining/adjust-
ing bolts.
5. TAILGATE AND LOCK - HATCHBACK
TAILGATE
To Remove
Raise the tailgate and place protective covers
over the surrounding paintwork.
Using a soft lead pencil, mark around the
tailgate hinges to aid assembly. Remove the sealing grommets from the tail-
gate and disconnect the rear window washer hose. Prise out the tailgate trim panel retaining
clips and maneuver the tailgate interior trim panel
from the tailgate.
Disconnect the wiring connectors) inside the
tailgate and tie a piece of st ring to the connector(s).
Pull the tailgate wiring from the tailgate,
Installed view of the bonnet catch. View showing the right hand side tailgate components.