display NISSAN QASHQAI 2010 Manual Online
[x] Cancel search | Manufacturer: NISSAN, Model Year: 2010, Model line: QASHQAI, Model: NISSAN QASHQAI 2010Pages: 297, PDF Size: 4.09 MB
Page 168 of 297
Downloaded from www.Manualslib.com manuals search engine The turbocharger system uses engine oil for lubrica-
tion and cooling of its rotating components. The tur-
bocharger turbine turns at extremely high speeds
and it can reach an extremely high temperature. It is
essential to maintain a flow of clean oil through the
turbocharger system. A sudden interruption to the
oil supply may cause a malfunction in the turbo-
charger.
To ensure prolonged life and performance of the
turbocharger, it is essential to comply with the fol-
lowing maintenance procedure:
CAUTION
Change the engine oil of the turbo-charged
diesel engine as prescribed. See the sepa-
rately provided Warranty Information & Main-
tenance Booklet for additional information.
Use only the recommended engine oil. See
“Capacities and recommended
fuel/lubricants” in the “9. Technical
information” section.
If the engine has been operating at high rpm
for an extended period of time, let it idle for a
few minutes prior to shutdown.
Do not accelerate the engine to high rpm im-
mediately after starting it.
WARNING
Be careful not to burn yourself with exhaust
gases.
Do not park the vehicle over flammable mate-
rials such as dry grass, waste paper or rags,
as they may burn easily.
If the vehicle continues to be driven at a low
speed with the DPF warning light illuminated,
the fail-safe will limit engine revolutions and/
or torque. In this case, the engine oil must be
replaced and the process of burning accumu-
lated particulate matter must be carried out
by a NISSAN dealer or qualified workshop.
Service regeneration is a maintenance item
and is not covered by the NISSAN warranty.
Use engine oil for DPF equipped models. For
details, see “Capacities and recommended
fuel/lubricants” in the “9. Technical
information” section.
CAUTION
The DPF becomes extremely hot after burning
particulate matter.
NISSAN GREEN PROGRAM
Some diesel engine models are fitted with a Diesel
Particulate Filter (DPF), which is a device that re-
moves carbon (soot) from the exhaust gas. To oper-
ate effectively, the DPF system must routinely con-
duct a cleaning operation, called regeneration, that burns-off the accumulated carbon. This regenera-
tion process is normally automatic and not visible to
the driver.
REGENERATION RESTRICTIONS
Driving conditions such as frequent short journeys
or stop/start driving can result in excessive build up
of carbon in the filter. When this happens the DPF
warning light
will illuminate (and a message
will appear in the vehicle information display, see
“Vehicle information display” later in this section) to
inform you that the vehicle must be driven in a par-
ticular manner to begin regeneration.
When the DPF warning light is illuminated, provided
that legal and safety conditions allow, the vehicle
should be driven at a speed of over 60 km/h (37.5
MPH) until the DPF warning light turns off. This pro-
cess can take up to 30 minutes to complete.
IF REGENERATION FAILS
Failure to react to the DPF warning lightmay
lead to saturation of the DPF system. If this hap-
pens, the Malfunction Indicator (MI)
will also
illuminate to indicate that a Service Regeneration by
a NISSAN dealer or qualified workshop is required.
The engine speed may also be limited to 3,000 rpm
to protect the DPF system.
NOTE
Contact a NISSAN dealer or qualified workshop
to perform a forced regeneration.
TURBOCHARGER SYSTEM
(Diesel engine models) DIESEL PARTICULATE FILTER
(DPF) (where fitted)
Starting and driving5-5
Page 171 of 297
Downloaded from www.Manualslib.com manuals search engine For additional information, see “NISSAN Anti-Theft
System (NATS)” in the “3. Pre-driving checks and
adjustments” section.
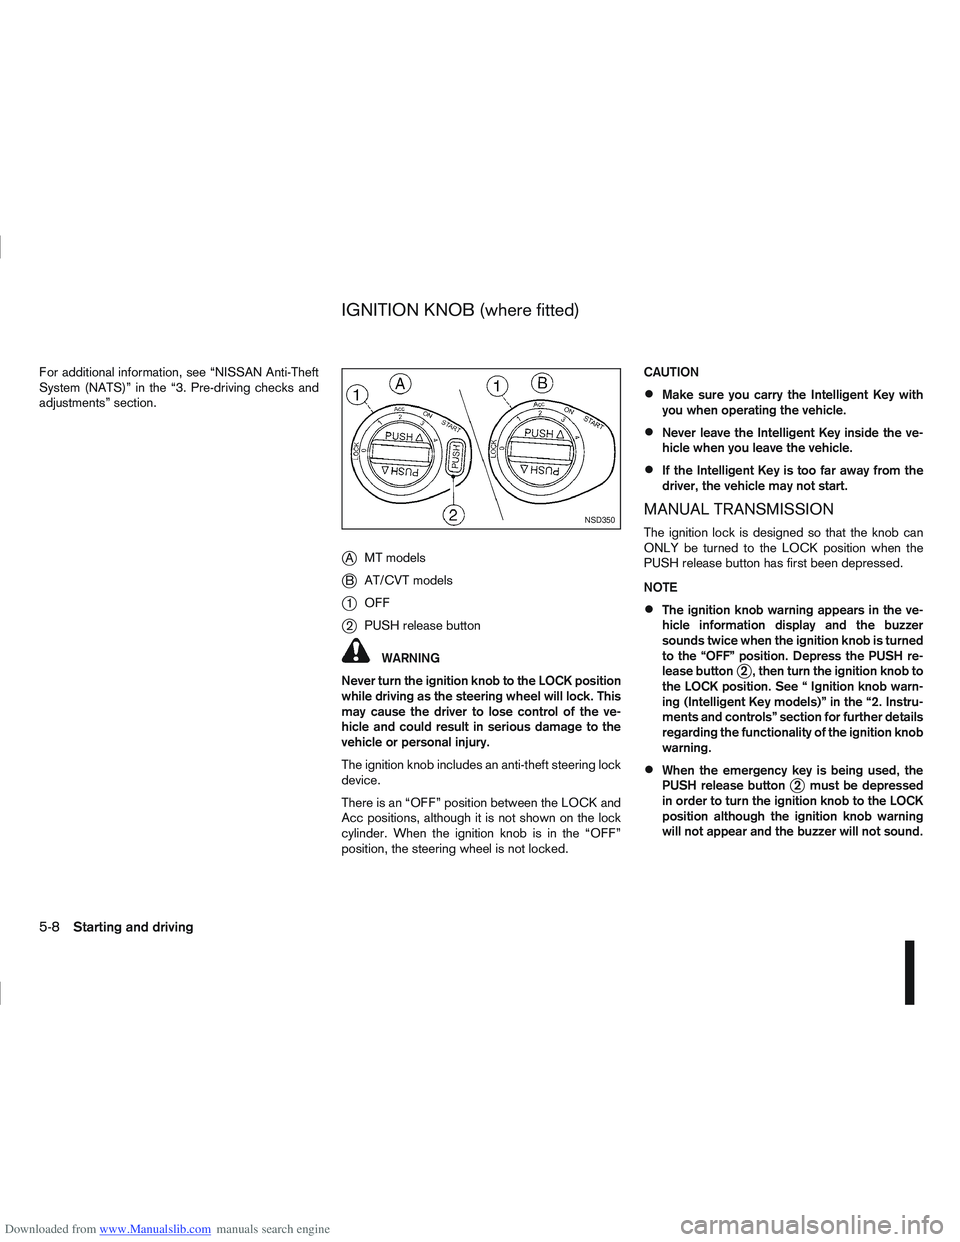
jAMT models
jB AT/CVT models
j1OFF
j2PUSH release button
WARNING
Never turn the ignition knob to the LOCK position
while driving as the steering wheel will lock. This
may cause the driver to lose control of the ve-
hicle and could result in serious damage to the
vehicle or personal injury.
The ignition knob includes an anti-theft steering lock
device.
There is an “OFF” position between the LOCK and
Acc positions, although it is not shown on the lock
cylinder. When the ignition knob is in the “OFF”
position, the steering wheel is not locked. CAUTION
Make sure you carry the Intelligent Key with
you when operating the vehicle.
Never leave the Intelligent Key inside the ve-
hicle when you leave the vehicle.
If the Intelligent Key is too far away from the
driver, the vehicle may not start.
MANUAL TRANSMISSION
The ignition lock is designed so that the knob can
ONLY be turned to the LOCK position when the
PUSH release button has first been depressed.
NOTE
The ignition knob warning appears in the ve-
hicle information display and the buzzer
sounds twice when the ignition knob is turned
to the “OFF” position. Depress the PUSH re-
lease button
j2 , then turn the ignition knob to
the LOCK position. See “ Ignition knob warn-
ing (Intelligent Key models)” in the “2. Instru-
ments and controls” section for further details
regarding the functionality of the ignition knob
warning.
When the emergency key is being used, the
PUSH release buttonj2 must be depressed
in order to turn the ignition knob to the LOCK
position although the ignition knob warning
will not appear and the buzzer will not sound.
NSD350
IGNITION KNOB (where fitted)
5-8Starting and driving
Page 176 of 297
Downloaded from www.Manualslib.com manuals search engine To ensure smooth gear changes, fully depress the
clutch pedal before operating the gear lever. If the
clutch pedal is not fully depressed before the trans-
mission is shifted, a gear noise may be heard. This
could result in damage to the transmission.
Start the vehicle in 1st gear and shift through the
gears in sequence according to the vehicle speed.Gear shift indicator (where fitted):
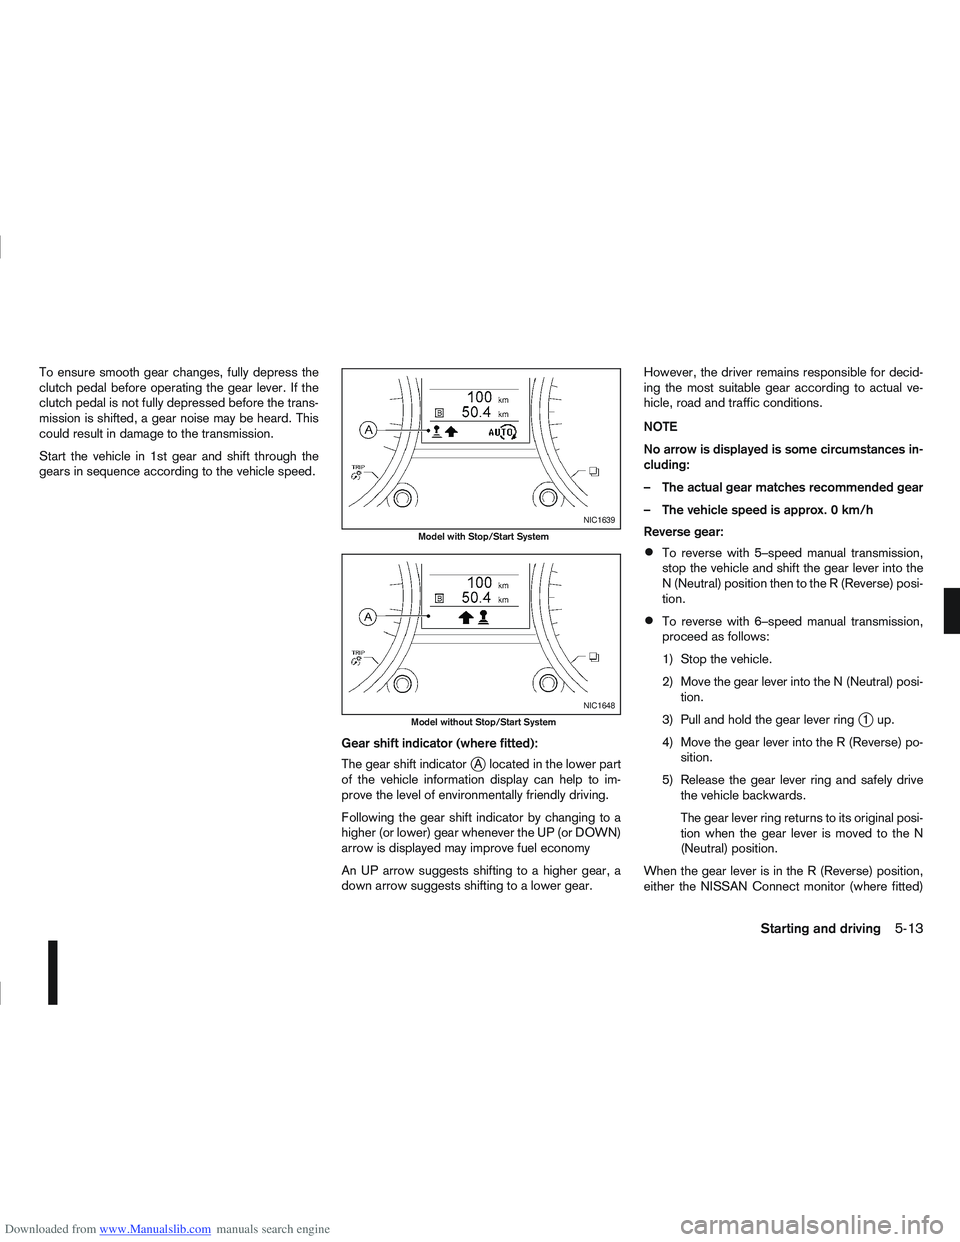
The gear shift indicator
jA located in the lower part
of the vehicle information display can help to im-
prove the level of environmentally friendly driving.
Following the gear shift indicator by changing to a
higher (or lower) gear whenever the UP (or DOWN)
arrow is displayed may improve fuel economy
An UP arrow suggests shifting to a higher gear, a
down arrow suggests shifting to a lower gear. However, the driver remains responsible for decid-
ing the most suitable gear according to actual ve-
hicle, road and traffic conditions.
NOTE
No arrow is displayed is some circumstances in-
cluding:
– The actual gear matches recommended gear
– The vehicle speed is approx. 0 km/h
Reverse gear:
To reverse with 5–speed manual transmission,
stop the vehicle and shift the gear lever into the
N (Neutral) position then to the R (Reverse) posi-
tion.
To reverse with 6–speed manual transmission,
proceed as follows:
1) Stop the vehicle.
2) Move the gear lever into the N (Neutral) posi-
tion.
3) Pull and hold the gear lever ring
j1up.
4) Move the gear lever into the R (Reverse) po- sition.
5) Release the gear lever ring and safely drive the vehicle backwards.
The gear lever ring returns to its original posi-
tion when the gear lever is moved to the N
(Neutral) position.
When the gear lever is in the R (Reverse) position,
either the NISSAN Connect monitor (where fitted)
NIC1639
Model with Stop/Start System
NIC1648
Model without Stop/Start System
Starting and driving5-13
Page 177 of 297

Downloaded from www.Manualslib.com manuals search engine or the ultra sonic parking sensor (where fitted) will
be activated. For details, see “Rear-view monitor
(where fitted)” in the “4. Display screen, heater and
air conditioner, and audio system” section, “Around
view monitor (where fitted)” in the “4. Display
screen, heater and air conditioner, and audio
system” section or “Ultrasonic Parking Sensor
(where fitted)” later in this section.
If it is difficult to move the gear lever into R (Re-
verse) or 1st. Shift into N (Neutral), then release the
clutch pedal. Fully depress the clutch pedal again
and shift into R (Reverse) or 1st.
DRIVING WITH AUTOMATIC
TRANSMISSION OR WITH
CONTINUOUSLY VARIABLE
TRANSMISSION (Models with manual
shift)
CAUTION
The cold engine idle speed is high, so use
caution when shifting into a forward or re-
verse gear before the engine has warmed up.
Avoid revving up the engine while the vehicle
is stopped. This could cause unexpected ve-
hicle movement.
Driving precautions
Never shift to P (Park) or R (Reverse) while
the vehicle is moving, this could result in dam-
age to the transmission.
Start the engine in the P (Park) or N (Neutral)
position. The engine will not start in any otherselector position. If it does, have your vehicle
checked by a NISSAN dealer or qualified
workshop.
Do not depress the accelerator pedal while
shifting from P (Park) or N (Neutral) to R (Re-
verse), D (Drive) or Manual shift modes posi-
tion. Always depress the brake pedal until
shifting is completed.
On an uphill grade, do not hold the vehicle by
depressing the accelerator pedal. The foot-
brake should be used for this purpose, in or-
der to hold the vehicle in place and to prevent
overheating of the transmission.
Shift into the N (Neutral) position and apply
the handbrake when at a standstill for longer
than a short waiting period.
Keep the engine at idling speed while shifting
from the N (Neutral) position to any driving
position.
CAUTION (when starting the vehicle):
DEPRESS THE FOOTBRAKE PEDAL
When the engine is running, shifting the se-
lector lever into the R (Reverse), D (Drive) or
Manual shift mode position without depress-
ing the brake pedal causes the vehicle to
move slowly. Be sure the brake pedal is fully
depressed and the vehicle is stopped, before
shifting the selector lever.
BE AWARE OF THE SELECTOR LEVER POSI-
TION Make sure that the selector lever is in the
desired position. Use the D (Drive), or Manual
shift mode to move forwards and the R (Re-
verse) to move backwards. Release the hand-
brake lever and the footbrake pedal, then de-
press the accelerator pedal to start the vehicle
in motion and merge with traffic (avoid abrupt
starting and spinning the wheels).
Avoid revving up the engine while the vehicle
is stopped, this could cause unexpected ve-
hicle movement [if the selector lever is in the
R (Reverse), D (Drive), or Manual shift mode
position] or damage the engine [if the selec-
tor lever is in the N (Neutral) or P (Park) posi-
tion].
WARM THE ENGINE UP
Due to the higher idle speeds when the en-
gine is cold, extra caution must be taken when
shifting the selector lever into the driving po-
sition immediately after starting the engine.
PARKING THE VEHICLE
Depress the footbrake pedal and, once the
vehicle stops, move the selector lever into the
P (Park) position, pull the handbrake lever and
release the footbrake pedal.
Starting the vehicle
1. After starting the engine, fully depress the foot-
brake pedal before shifting the selector lever from
P (Park) to R (Reverse), D (Drive) or Manual shift
mode.
5-14Starting and driving
Page 178 of 297

Downloaded from www.Manualslib.com manuals search engine 2. Keep the footbrake pedal depressed and pushthe selector lever button to shift into a driving
gear.
3. Release the handbrake and footbrake, then gradually start the vehicle in motion by pressing
the accelerator pedal.
The automatic transmission or continuously variable
transmission is designed so that the footbrake pedal
MUST be depressed before shifting from P (Park)
to any drive position while the ignition switch is ON.
Shifting
j
A LHD models
jB RHD models
To move the selector lever:
mPush the button while depressing the
brake pedal.
mPush the button to shift.
mShift without depressing the brake
pedal.
Push the button to shift into P (Park) or R (Reverse).
All other positions can be selected without pushing
the button.
P (Park):
Use this position when the vehicle is parked or when
starting the engine. Always make sure that the ve-
hicle is completely stopped before moving the se-
lector lever into the P (Park) position. For maximum
safety, the footbrake pedal must be depressed be-
fore moving the selector lever into the P (Park) posi-
tion. Use this position together with the handbrake.
When parking on a hill, first depress the footbrake
pedal, apply the handbrake and then shift into the P
(Park) position.
R (Reverse):
CAUTION
Shift into this position only after the vehicle has
completely stopped.
Use this position to reverse the vehicle.
When the selector lever is in the R (Reverse) posi-
tion, either the NISSAN Connect monitor (where fit-
ted) or the ultra sonic parking sensor (where fitted)
will be activated. For details, see “Rear-view moni-
tor (where fitted)” in the “4. Display screen, heater and air conditioner, and audio system” section,
“Around view monitor (where fitted)” in the “4. Dis-
play screen, heater and air conditioner, and audio
system” section or “Ultrasonic Parking Sensor
(where fitted)” later in this section.
N (Neutral):
Neither forward nor reverse gear is engaged. The
engine can be started in this position. You may shift
to N and restart a stalled engine while driving the
vehicle.
D (Drive):
Use this position for all normal forward driving.
Gear shift indicator:
The gear shift indicator
jA located in the lower part
of the vehicle information display shows the current
position of the transmission.
It shows the P,R,N,D modes when the transmission
is in auto mode. It shows the gear number when the
transmission is in manual mode.
NSD323Z
NIC1649
Starting and driving5-15
Page 179 of 297
Downloaded from www.Manualslib.com manuals search engine Manual shift mode
When the selector lever is shifted from D (Drive) to
the manual shift gate with the vehicle stopped or
while driving, the transmission enters manual shift
mode. Shift range can be selected manually.
In manual shift mode, the selected gear is displayed
on the position indicator in the combination meter.
Shift ranges up or down one by one as follows:
1st⇔2nd ⇔3rd ⇔4th ⇔5th ⇔6th
When shifting up, move the selector lever to the
+ (up) side. (Shifts to higher range).
When shifting down, move the selector lever to
the – (down) side. (Shifts to lower range).
Moving the selector lever rapidly to the same
side twice will shift the ranges in succession.
Use the 1st position when driving slowly on steep
hills, slow driving through deep snow, sand or
mud, or for maximum engine braking on steep
downhill grades.
Use the 2nd, 3rd or 4th position when driving
steep hills or for engine braking on steep down-
hill grades.
Use the 5th position for driving up or down long
slopes.
Use the 6th position for all normal forward driv-
ing. However, you need to shift down the gears
when accelerating or passing another vehicle.
When cancelling manual shift mode, return the
selector lever to the D (Drive) position. The trans-
mission returns to the normal driving mode.
In manual shift mode, the transmission may
not shift to the selected gear under certain
circumstances. This helps maintain driving
performance and reduces the chance of ve-
hicle damage or loss of control.
If the engine is revving up to a hazardous
speed in manual shift mode, the transmission
may shift up automatically. When the vehicle
speed decreases, the transmission automati-
cally shifts down and shifts to 1st gear before
the vehicle comes to a stop.
Accelerator downshift – In the D (Drive)
position
For rapid passing or driving uphill, fully depress the
accelerator pedal to the floor. This shifts the trans-
mission down into a lower gear, depending on the
vehicle speed.
Shift lock release
If the battery is discharged, the selector lever can-
not be moved from the P (Park) position even with
the brake pedal depressed and the ignition switch in
the ON position.
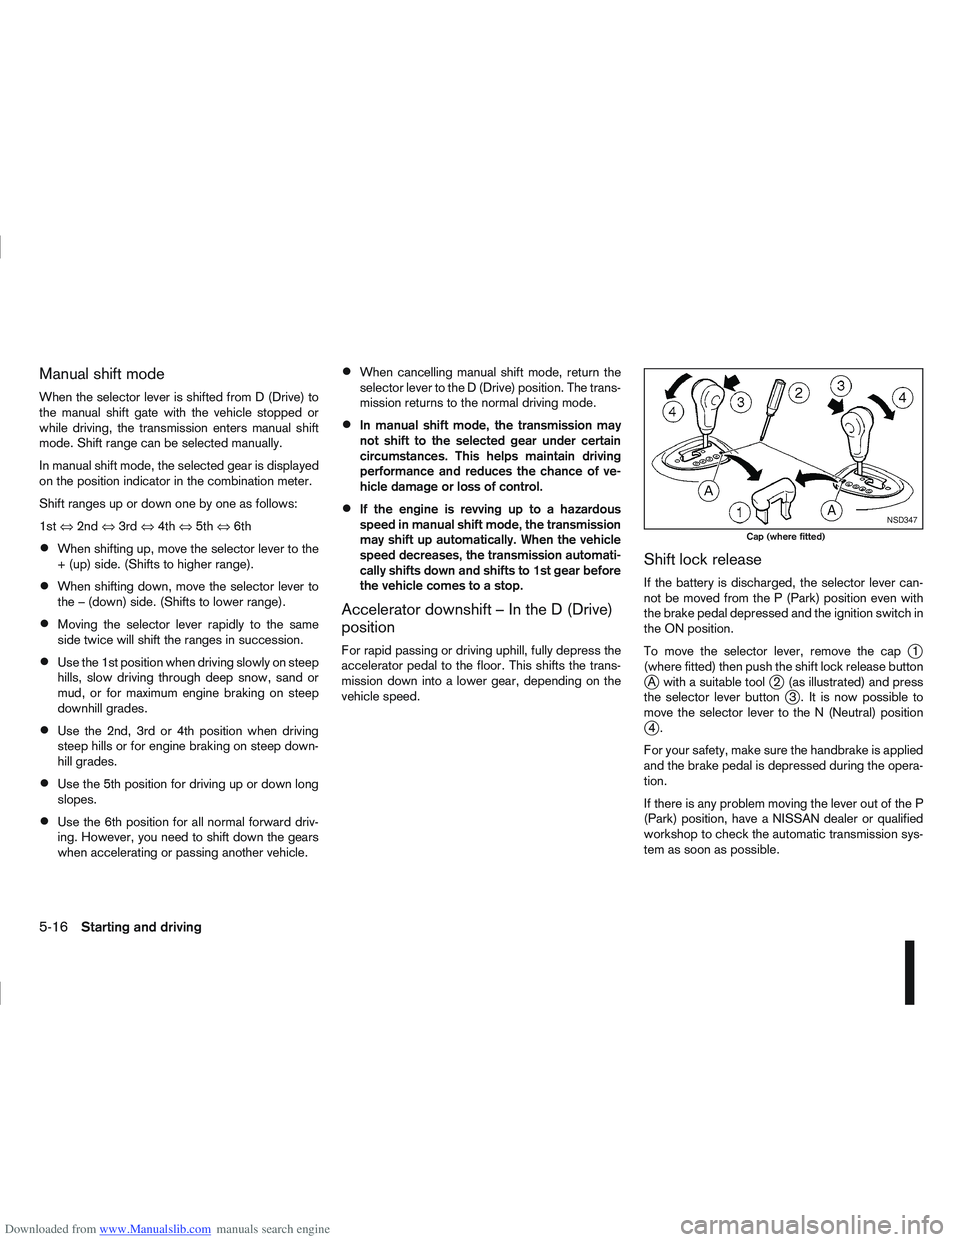
To move the selector lever, remove the cap
j1
(where fitted) then push the shift lock release button
jA with a suitable toolj2 (as illustrated) and press
the selector lever buttonj3 . It is now possible to
move the selector lever to the N (Neutral) position
j4.
For your safety, make sure the handbrake is applied
and the brake pedal is depressed during the opera-
tion.
If there is any problem moving the lever out of the P
(Park) position, have a NISSAN dealer or qualified
workshop to check the automatic transmission sys-
tem as soon as possible.
NSD347
Cap (where fitted)
5-16Starting and driving
Page 184 of 297
Downloaded from www.Manualslib.com manuals search engine NISSAN GREEN PROGRAM
The Stop/Start System is designed to prevent un-
necessary fuel consumption, exhaust emissions,
and noise during a journey:
When the vehicle comes to rest the engine is
automatically stopped*.
The engine is then automatically restarted before
you are ready to drive away**.
CAUTION
At the end of the journey the engine must be
stopped and ignition turned OFF. Lock the ve-
hicle as normal. Turning the ignition OFF will shut
down all electrical systems. Failure to do this may
result in a flat battery.
NORMAL OPERATION
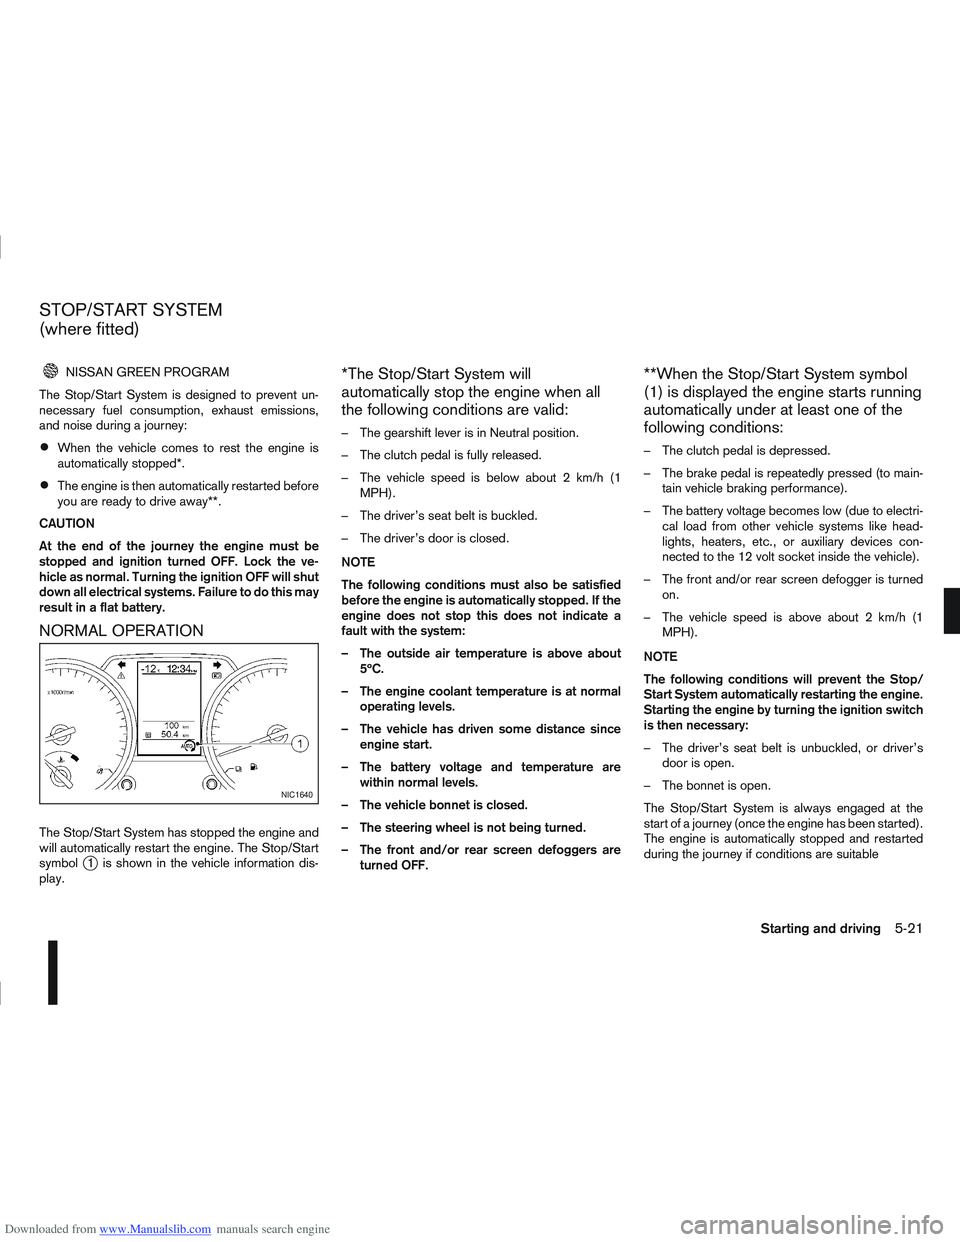
The Stop/Start System has stopped the engine and
will automatically restart the engine. The Stop/Start
symbol
j1 is shown in the vehicle information dis-
play.
*The Stop/Start System will
automatically stop the engine when all
the following conditions are valid:
– The gearshift lever is in Neutral position.
– The clutch pedal is fully released.
– The vehicle speed is below about 2 km/h (1 MPH).
– The driver’s seat belt is buckled.
– The driver’s door is closed.
NOTE
The following conditions must also be satisfied
before the engine is automatically stopped. If the
engine does not stop this does not indicate a
fault with the system:
– The outside air temperature is above about 5ºC.
– The engine coolant temperature is at normal operating levels.
– The vehicle has driven some distance since engine start.
– The battery voltage and temperature are within normal levels.
– The vehicle bonnet is closed.
– The steering wheel is not being turned.
– The front and/or rear screen defoggers are turned OFF.
**When the Stop/Start System symbol
(1) is displayed the engine starts running
automatically under at least one of the
following conditions:
– The clutch pedal is depressed.
– The brake pedal is repeatedly pressed (to main-tain vehicle braking performance).
– The battery voltage becomes low (due to electri- cal load from other vehicle systems like head-
lights, heaters, etc., or auxiliary devices con-
nected to the 12 volt socket inside the vehicle).
– The front and/or rear screen defogger is turned on.
– The vehicle speed is above about 2 km/h (1 MPH).
NOTE
The following conditions will prevent the Stop/
Start System automatically restarting the engine.
Starting the engine by turning the ignition switch
is then necessary:
– The driver’s seat belt is unbuckled, or driver’s door is open.
– The bonnet is open.
The Stop/Start System is always engaged at the
start of a journey (once the engine has been started).
The engine is automatically stopped and restarted
during the journey if conditions are suitable
NIC1640
STOP/START SYSTEM
(where fitted)
Starting and driving5-21
Page 185 of 297
Downloaded from www.Manualslib.com manuals search engine When the engine is stopped the following informa-
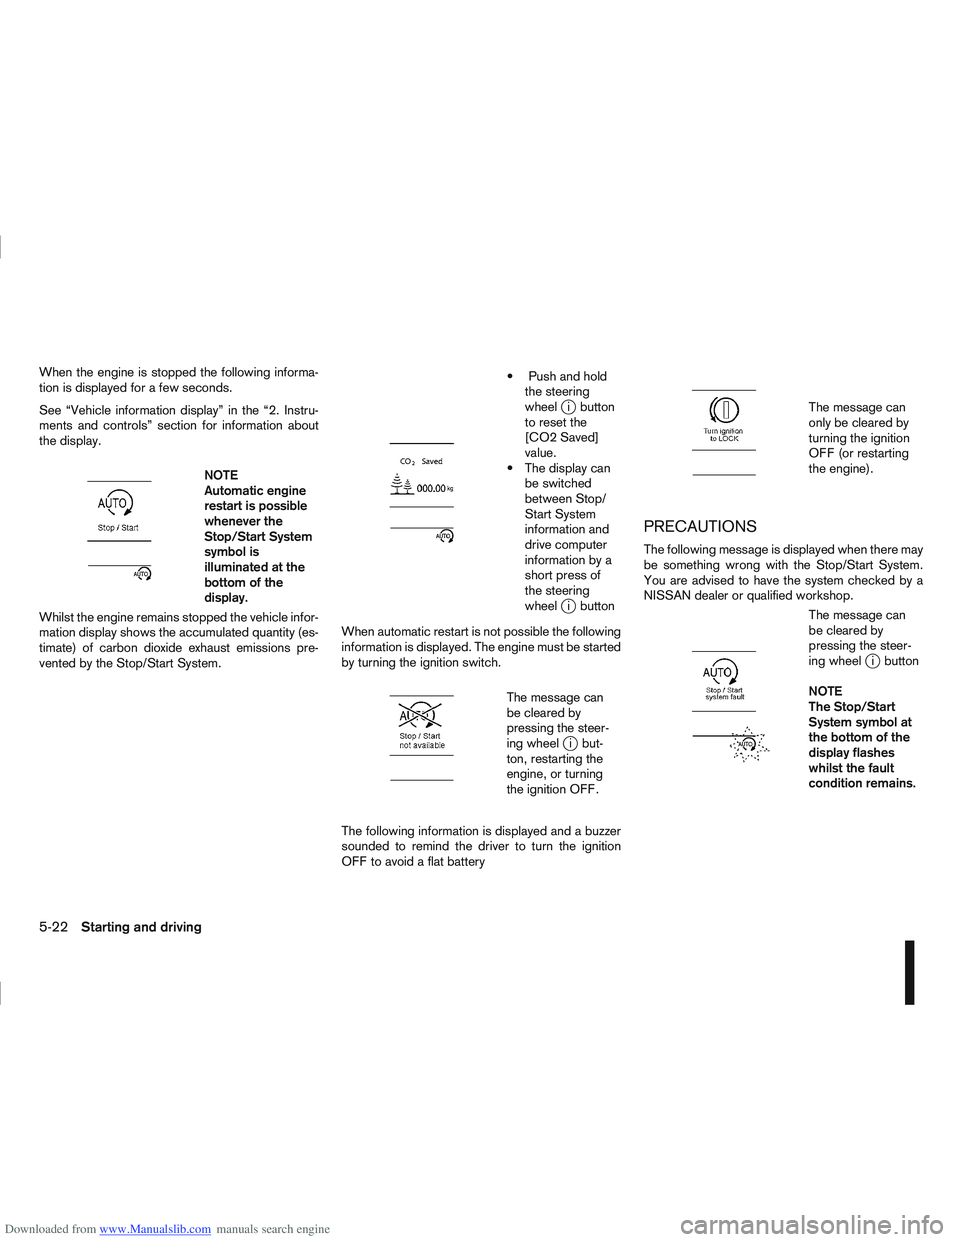
tion is displayed for a few seconds.
See “Vehicle information display” in the “2. Instru-
ments and controls” section for information about
the display.
m
NOTE
Automatic engine
restart is possible
whenever the
Stop/Start System
symbol is
illuminated at the
bottomofthe
display.
Whilst the engine remains stopped the vehicle infor-
mation display shows the accumulated quantity (es-
timate) of carbon dioxide exhaust emissions pre-
vented by the Stop/Start System.
m
Push and hold the steering
wheel
ji button
to reset the
[CO2 Saved]
value.
The display can be switched
between Stop/
Start System
information and
drive computer
information by a
short press of
the steering
wheel
ji button
When automatic restart is not possible the following
information is displayed. The engine must be started
by turning the ignition switch.
m
The message can
be cleared by
pressing the steer-
ing wheel
ji but-
ton, restarting the
engine, or turning
the ignition OFF.
The following information is displayed and a buzzer
sounded to remind the driver to turn the ignition
OFF to avoid a flat battery
m
The message can
only be cleared by
turning the ignition
OFF (or restarting
the engine).
PRECAUTIONS
The following message is displayed when there may
be something wrong with the Stop/Start System.
You are advised to have the system checked by a
NISSAN dealer or qualified workshop.
m
The message can
be cleared by
pressing the steer-
ing wheel
ji button
NOTE
The Stop/Start
System symbol at
the bottom of the
display flashes
whilst the fault
condition remains.
5-22Starting and driving
Page 186 of 297
Downloaded from www.Manualslib.com manuals search engine STOP/START SYSTEM OFF SWITCH
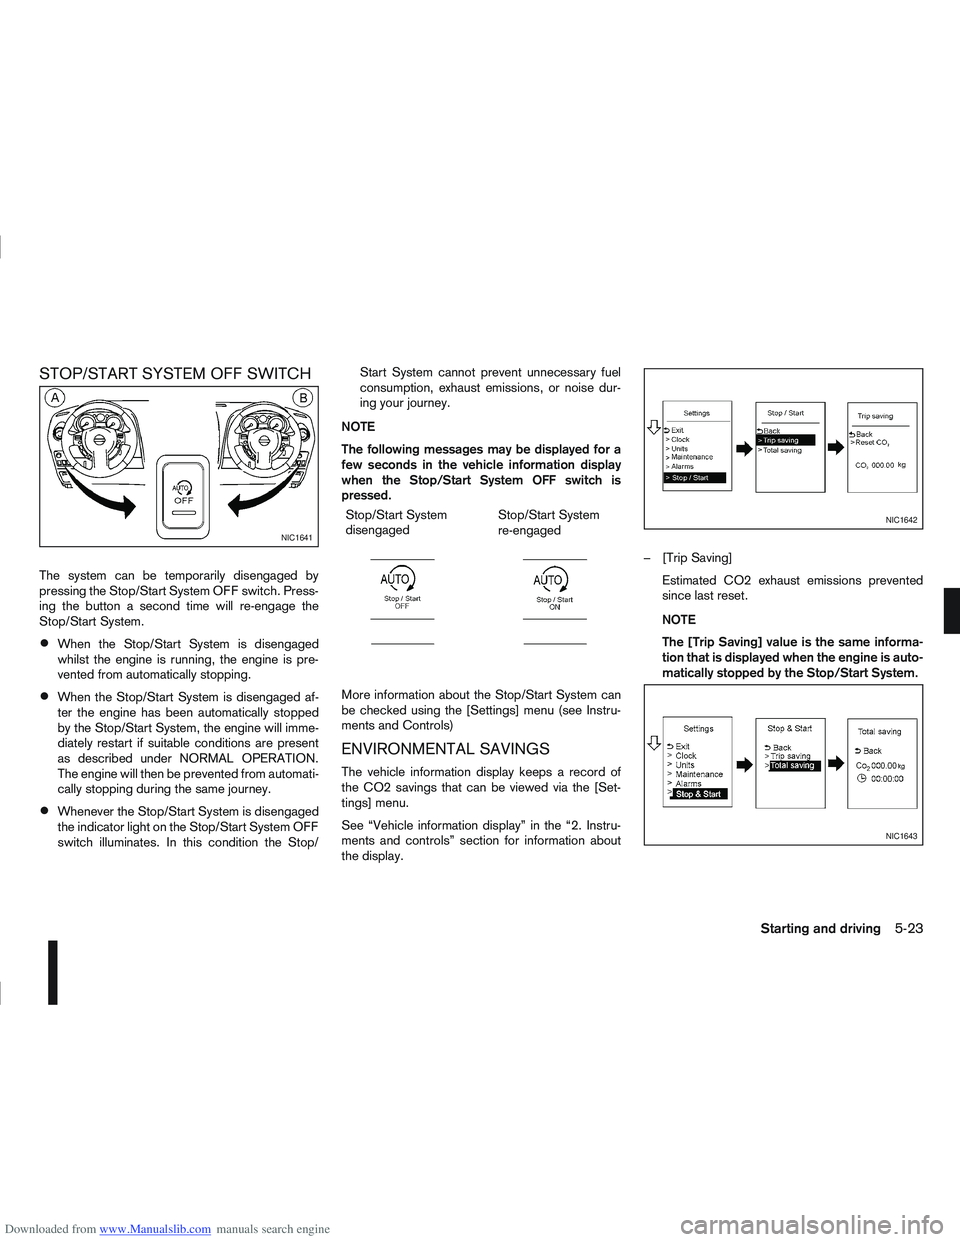
The system can be temporarily disengaged by
pressing the Stop/Start System OFF switch. Press-
ing the button a second time will re-engage the
Stop/Start System.
When the Stop/Start System is disengaged
whilst the engine is running, the engine is pre-
vented from automatically stopping.
When the Stop/Start System is disengaged af-
ter the engine has been automatically stopped
by the Stop/Start System, the engine will imme-
diately restart if suitable conditions are present
as described under NORMAL OPERATION.
The engine will then be prevented from automati-
cally stopping during the same journey.
Whenever the Stop/Start System is disengaged
the indicator light on the Stop/Start System OFF
switch illuminates. In this condition the Stop/Start System cannot prevent unnecessary fuel
consumption, exhaust emissions, or noise dur-
ing your journey.
NOTE
The following messages may be displayed for a
few seconds in the vehicle information display
when the Stop/Start System OFF switch is
pressed. Stop/Start System
disengaged
m
Stop/Start System
re-engaged
m
More information about the Stop/Start System can
be checked using the [Settings] menu (see Instru-
ments and Controls)
ENVIRONMENTAL SAVINGS
The vehicle information display keeps a record of
the CO2 savings that can be viewed via the [Set-
tings] menu.
See “Vehicle information display” in the “2. Instru-
ments and controls” section for information about
the display. – [Trip Saving]
Estimated CO2 exhaust emissions prevented
since last reset.
NOTE
The [Trip Saving] value is the same informa-
tion that is displayed when the engine is auto-
matically stopped by the Stop/Start System.
NIC1641
NIC1642
NIC1643
Starting and driving5-23
Page 190 of 297
Downloaded from www.Manualslib.com manuals search engine – Blinks slowly (about once every 2 seconds)Change the driving mode to 2WD and reduce
the vehicle speed as soon as safely possible.
If the warning light is still on after performing
the above operation, have the system
checked by a NISSAN dealer or qualified
workshop as soon as possible.
4WD MODE INDICATOR LIGHTS
4WD mode indicator light ( LOCK):
This light comes on when the ignition switch is
turned to the ON position, and turns off within 1
second. When selecting LOCK mode while the
engine is running, this light will illuminate simul-
taneously along with the 4WD mode indicator
light (AUTO).
4WD mode indicator light ( AUTO):
This light comes on when the ignition switch is
turned to the ON position, and turns off within 1
second. If the engine is running, this light will illu-
minate when selecting AUTO mode.
The 4WD mode indicator light is located in the
tachometer.
The light should turn off within 1 second of the
ignition switch being turned to the ON position.
While the engine is running, the 4WD mode indi-
cator light will display the position selected by
the 4WD mode control. NOTE
The 4WD mode indicator light may blink while
shifting from one drive mode to another. Once
shifting is completed, the 4WD mode indicator
light will come on. If the indicator light does not
come on immediately, make sure that the area
around the vehicle is safe and free from ob-
stacles. Drive the vehicle straight (DO NOT ac-
celerate, decelerate or reverse), then turn the
4WD mode control.
If the 4WD warning lights comes on, the 4WD indi-
cator light(s) will go out.
DRIVING FOUR-WHEEL DRIVE (4WD)
SAFELY
Your NISSAN is designed for both normal and off-
road use. However, avoid driving in deep water or
mud as your NISSAN is mainly designed for leisure
use, unlike a conventional off-road vehicle.
Remember that Two-Wheel drive (2WD) models are
less capable than Four-Wheel Drive (4WD) models
for rough road driving and extrication when stuck,
for example, in deep snow or mud.
Please observe the following precautions:
Drive carefully when off-road and avoid danger-
ous areas. Always wear seat belts to help keep
you and your passengers in position when driv-
ing over rough terrain.
Do not drive across steep slopes. Instead drive
either straight up or straight down the slope. Off- road vehicles can tip over sideways much more
easily than they can forwards or backwards.
Many hills are too steep for any vehicle. If you
drive up them, you may stall. If you drive down
them, you may not be able to control your speed.
If you drive across them, you may roll over.
Do not shift gears when driving on downhill
grades as this could cause loss of control of the
vehicle.
Stay alert when driving to the top of a hill. At the
top there could be a drop-off or other hazard that
could cause an accident.
If the engine of the vehicle stalls or you cannot
make it to the top of a steep grade, never at-
tempt to turn around. Your vehicle could tip or
roll over. Always drive backwards and straight
down in R (Reverse) gear.
Never drive backwards under the following con-
ditions as this could result in loss of control:
– with the gear lever in N (Neutral) and/or with
the clutch depressed and using the brake
(MT models).
– with the selector lever in N (Neutral) and us- ing only the brake (AT or CVT models).
Heavy braking down a hill could cause your
brakes to overheat and fade, resulting in loss of
control and an accident. Apply the brakes lightly
and use a low gear to control your vehicle speed.
Starting and driving5-27