NISSAN QASHQAI 2014 Owner´s Manual
Manufacturer: NISSAN, Model Year: 2014, Model line: QASHQAI, Model: NISSAN QASHQAI 2014Pages: 338, PDF Size: 4.87 MB
Page 131 of 338
4Display screen, heater and air conditioner,
and audio systemDisplay screen, heater and air conditioner,
and audio system
Safety precautions ................................................... 4-2
Rear-view monitor (where fitted)............................... 4-2
How to read the displayed lines .......................... 4-3
Rear-view monitor setting.................................... 4-3
Operating tips..................................................... 4-3
Around View Monitor (where fitted) .......................... 4-4
Operation ........................................................... 4-7
Guide lines ......................................................... 4-7
Difference between predictive and actual
distances ............................................................ 4-9
Moving object detection (MOD) .......................... 4-12
How to adjust the screen view ............................ 4-13
Around View Monitor settings ............................. 4-13
Operating tips..................................................... 4-13
Vents ....................................................................... 4-14
Side and centre vents ......................................... 4-14
Heater and air conditioner operation ........................ 4-15
Manual air conditioner......................................... 4-16
Automatic dual zone air conditioner (where
fitted).................................................................. 4-20
Audio system ........................................................... 4-23Audio operation precautions ............................... 4-23
Antenna .............................................................. 4-23
FM AM radio with CD player (where fitted) .............. 4-24
Audio main operation .......................................... 4-25
Radio operation .................................................. 4-25
SETUP button .................................................... 4-26
Compact Disc (CD) operation ............................ 4-28
AUX socket ........................................................ 4-30
USB Memory operation (where fitted) ................. 4-30
iPod® player operation (where fitted) .................. 4-31
Bluetooth® operation.......................................... 4-32
NissanConnect (where fitted)................................... 4-38
Steering wheel switch for audio control (where
fitted) ....................................................................... 4-38
Main operation .................................................... 4-38
Mobile phone integration for FM AM radio with
CD player (where fitted)........................................... 4-39
Bluetooth® mobile phone feature ........................ 4-39
Hands-free telephone control .............................. 4-42
Steering wheel switches (where fitted)................ 4-44
Car phone or CB radio ............................................ 4-45
Page 132 of 338
WARNING
•Do not adjust the heater and air conditioner
controls or audio controls while driving so that
full attention may be given to vehicle opera-
tion.
•If you noticed any foreign objects entering the
system hardware, spilled liquid on the sys-
tem, or noticed smoke or fumes coming out
from the system, or any other unusual opera-
tion is observed, stop using the system imme-
diately and contact the nearest NISSAN dealer
or qualified workshop. Ignoring such condi-
tions may lead to an accident, fire or electric
shock.
•Do not disassemble or modify this system. If
you do, it may lead to an accident, fire, or
electric shock.
CAUTION
Do not use the system when the engine is not
running for extended periods of time to prevent
battery discharge.
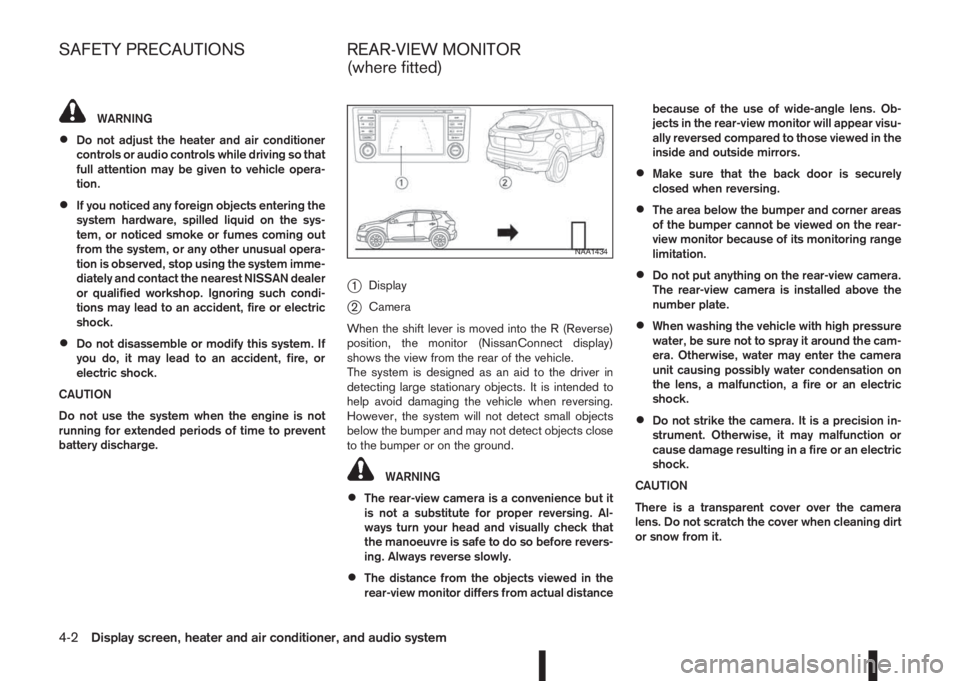
j1Display
j2Camera
When the shift lever is moved into the R (Reverse)
position, the monitor (NissanConnect display)
shows the view from the rear of the vehicle.
The system is designed as an aid to the driver in
detecting large stationary objects. It is intended to
help avoid damaging the vehicle when reversing.
However, the system will not detect small objects
below the bumper and may not detect objects close
to the bumper or on the ground.
WARNING
•The rear-view camera is a convenience but it
is not a substitute for proper reversing. Al-
ways turn your head and visually check that
the manoeuvre is safe to do so before revers-
ing. Always reverse slowly.
•The distance from the objects viewed in the
rear-view monitor differs from actual distancebecause of the use of wide-angle lens. Ob-
jects in the rear-view monitor will appear visu-
ally reversed compared to those viewed in the
inside and outside mirrors.
•Make sure that the back door is securely
closed when reversing.
•The area below the bumper and corner areas
of the bumper cannot be viewed on the rear-
view monitor because of its monitoring range
limitation.
•Do not put anything on the rear-view camera.
The rear-view camera is installed above the
number plate.
•When washing the vehicle with high pressure
water, be sure not to spray it around the cam-
era. Otherwise, water may enter the camera
unit causing possibly water condensation on
the lens, a malfunction, a fire or an electric
shock.
•Do not strike the camera. It is a precision in-
strument. Otherwise, it may malfunction or
cause damage resulting in a fire or an electric
shock.
CAUTION
There is a transparent cover over the camera
lens. Do not scratch the cover when cleaning dirt
or snow from it.
NAA1434
SAFETY PRECAUTIONS REAR-VIEW MONITOR
(where fitted)
4-2Display screen, heater and air conditioner, and audio system
Page 133 of 338
HOW TO READ THE DISPLAYED
LINES
WARNING
•Use the displayed lines as a reference. The
lines are highly affected by the number of oc-
cupants, fuel level, vehicle position, road con-
dition and road grade. Always check with your
eyes directly around the vehicle while revers-
ing.
•The distance guide line and the vehicle width
line should be used as a reference only when
the vehicle is on a level paved surface. The
distance viewed on the monitor is for refer-
ence only and may be different than the ac-
tual distance between the vehicle and dis-
played objects.
•When reversing the vehicle up a hill, objects
viewed in the monitor are further than they
appear. When reversing the vehicle down a
hill, objects viewed in the monitor are closerthan they appear. Use the inside mirror or
glance over your shoulder to properly judge
distances to other objects.
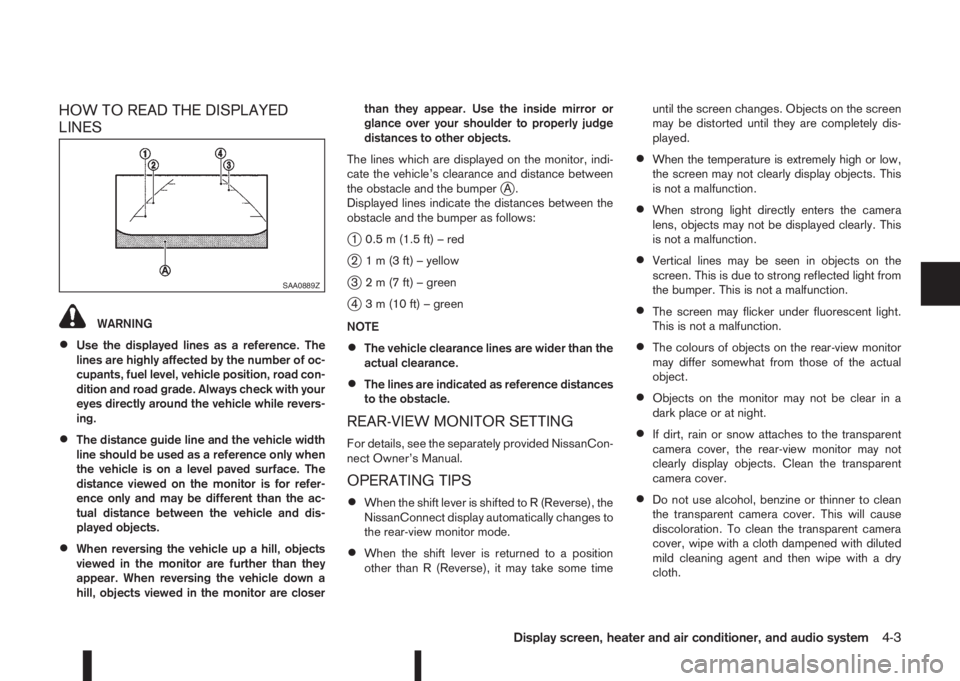
The lines which are displayed on the monitor, indi-
cate the vehicle’s clearance and distance between
the obstacle and the bumper
jA.
Displayed lines indicate the distances between the
obstacle and the bumper as follows:
j1 0.5 m (1.5 ft) – red
j2 1 m (3 ft) – yellow
j3 2 m (7 ft) – green
j4 3 m (10 ft) – green
NOTE
•The vehicle clearance lines are wider than the
actual clearance.
•The lines are indicated as reference distances
to the obstacle.
REAR-VIEW MONITOR SETTING
For details, see the separately provided NissanCon-
nect Owner’s Manual.
OPERATING TIPS
•When the shift lever is shifted to R (Reverse), the
NissanConnect display automatically changes to
the rear-view monitor mode.
•When the shift lever is returned to a position
other than R (Reverse), it may take some timeuntil the screen changes. Objects on the screen
may be distorted until they are completely dis-
played.
•When the temperature is extremely high or low,
the screen may not clearly display objects. This
is not a malfunction.
•When strong light directly enters the camera
lens, objects may not be displayed clearly. This
is not a malfunction.
•Vertical lines may be seen in objects on the
screen. This is due to strong reflected light from
the bumper. This is not a malfunction.
•The screen may flicker under fluorescent light.
This is not a malfunction.
•The colours of objects on the rear-view monitor
may differ somewhat from those of the actual
object.
•Objects on the monitor may not be clear in a
dark place or at night.
•If dirt, rain or snow attaches to the transparent
camera cover, the rear-view monitor may not
clearly display objects. Clean the transparent
camera cover.
•Do not use alcohol, benzine or thinner to clean
the transparent camera cover. This will cause
discoloration. To clean the transparent camera
cover, wipe with a cloth dampened with diluted
mild cleaning agent and then wipe with a dry
cloth.
SAA0889Z
Display screen, heater and air conditioner, and audio system4-3
Page 134 of 338
•Do not damage the transparent camera cover as
the NissanConnect display may be adversely af-
fected.
•Do not use body wax on the transparent camera
cover. Wipe off any wax with a clean cloth damp-
ened with mild detergent diluted with water.
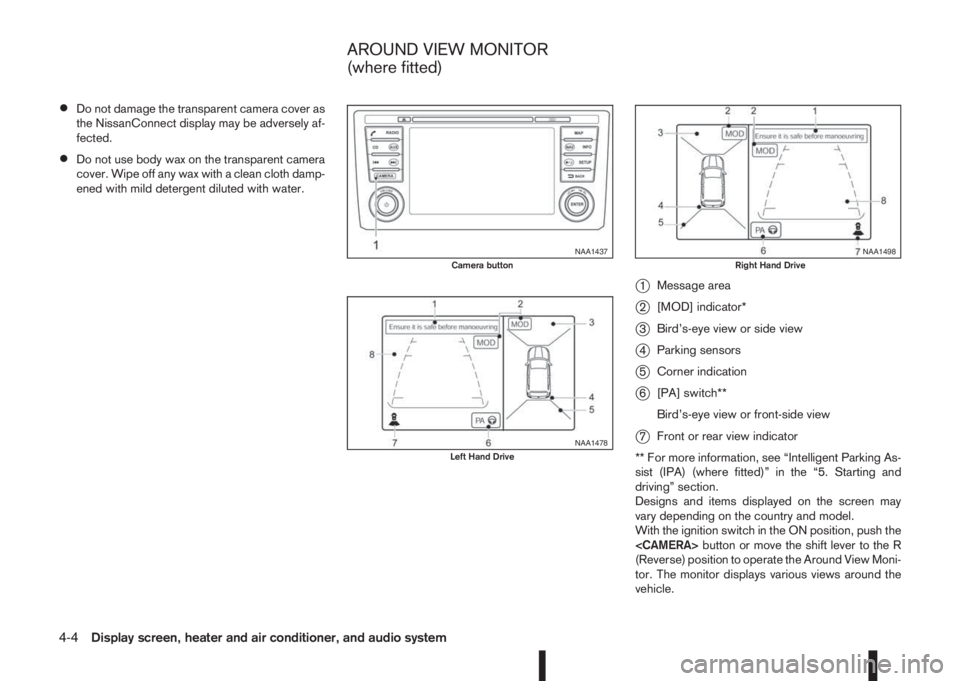
j1Message area
j2[MOD] indicator*
j3Bird’s-eye view or side view
j4Parking sensors
j5Corner indication
j6[PA] switch**
Bird’s-eye view or front-side view
j7Front or rear view indicator
** For more information, see “Intelligent Parking As-
sist (IPA) (where fitted)” in the “5. Starting and
driving” section.
Designs and items displayed on the screen may
vary depending on the country and model.
With the ignition switch in the ON position, push the
(Reverse) position to operate the Around View Moni-
tor. The monitor displays various views around the
vehicle.
NAA1437Camera button
NAA1478Left Hand Drive
NAA1498Right Hand Drive
AROUND VIEW MONITOR
(where fitted)
4-4Display screen, heater and air conditioner, and audio system
Page 135 of 338
NOTE
At first operation, the corner lines are blinking
yellow for about 3 seconds. This is not a malfunc-
tion but a reminder to be cautious.
Available views:
•Bird’s-eye View
The surrounding view of the vehicle.
•Front-side View
The view around and ahead of the front passen-
ger’s side wheel.
•Front view
The view to the front of the vehicle.
•Rear view
The view to the rear of the vehicle.
•Full screen rear view
The view to the rear of the vehicle (which is a
little wider than the standard rear view)
The system is designed as an aid to the driver in
situations such as slot parking or parallel parking.
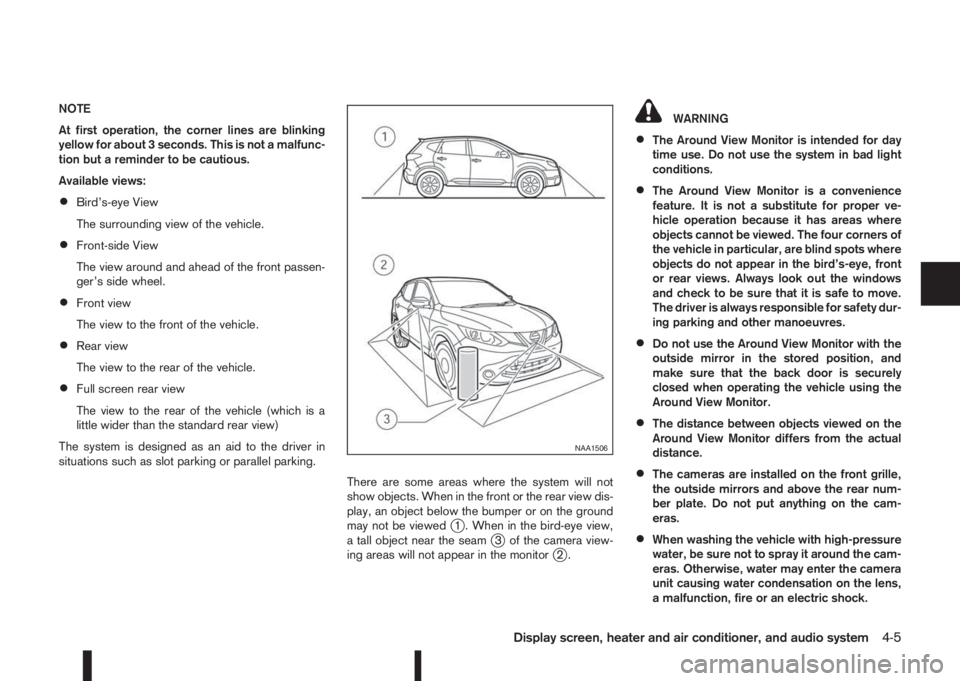
There are some areas where the system will not
show objects. When in the front or the rear view dis-
play, an object below the bumper or on the ground
may not be viewed
j1 . When in the bird-eye view,
a tall object near the seamj3 of the camera view-
ing areas will not appear in the monitorj2.
WARNING
•The Around View Monitor is intended for day
time use. Do not use the system in bad light
conditions.
•The Around View Monitor is a convenience
feature. It is not a substitute for proper ve-
hicle operation because it has areas where
objects cannot be viewed. The four corners of
the vehicle in particular, are blind spots where
objects do not appear in the bird’s-eye, front
or rear views. Always look out the windows
and check to be sure that it is safe to move.
The driver is always responsible for safety dur-
ing parking and other manoeuvres.
•Do not use the Around View Monitor with the
outside mirror in the stored position, and
make sure that the back door is securely
closed when operating the vehicle using the
Around View Monitor.
•The distance between objects viewed on the
Around View Monitor differs from the actual
distance.
•The cameras are installed on the front grille,
the outside mirrors and above the rear num-
ber plate. Do not put anything on the cam-
eras.
•When washing the vehicle with high-pressure
water, be sure not to spray it around the cam-
eras. Otherwise, water may enter the camera
unit causing water condensation on the lens,
a malfunction, fire or an electric shock.
NAA1506
Display screen, heater and air conditioner, and audio system4-5
Page 136 of 338
•Do not strike the cameras. They are precision
instruments. Doing so could cause a malfunc-
tion or cause damage resulting in a fire or an
electric shock.
CAUTION
Do not scratch the lens when cleaning dirt or
snow from the front of the camera.
NAA1450Example for Left-Hand Drive (LHD) models, for the Right-Hand Drive (RHD) models, the screen layout will be opposite.
4-6Display screen, heater and air conditioner, and audio system
Page 137 of 338
OPERATION
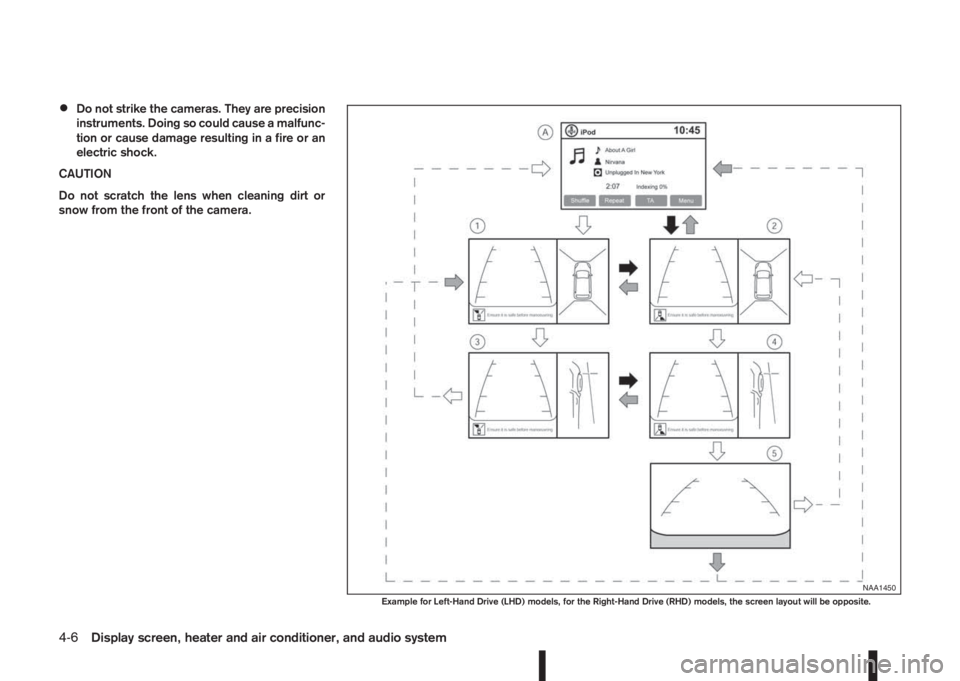
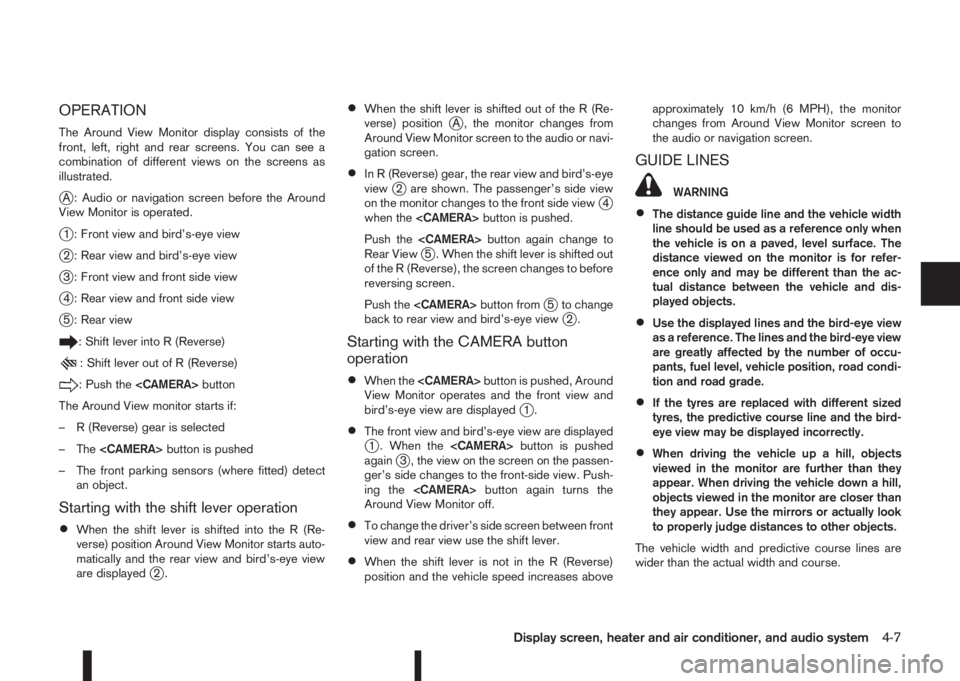
The Around View Monitor display consists of the
front, left, right and rear screens. You can see a
combination of different views on the screens as
illustrated.
jA : Audio or navigation screen before the Around
View Monitor is operated.
j1 : Front view and bird’s-eye view
j2 : Rear view and bird’s-eye view
j3 : Front view and front side view
j4 : Rear view and front side view
j5 : Rear view
: Shift lever into R (Reverse)
: Shift lever out of R (Reverse)
: Push the
The Around View monitor starts if:
– R (Reverse) gear is selected
– The
– The front parking sensors (where fitted) detect
an object.
Starting with the shift lever operation
•When the shift lever is shifted into the R (Re-
verse) position Around View Monitor starts auto-
matically and the rear view and bird’s-eye view
are displayed
j2.
•When the shift lever is shifted out of the R (Re-
verse) positionjA , the monitor changes from
Around View Monitor screen to the audio or navi-
gation screen.
•In R (Reverse) gear, the rear view and bird’s-eye
viewj2 are shown. The passenger’s side view
on the monitor changes to the front side viewj4
when the
Push the
Rear View
j5 . When the shift lever is shifted out
of the R (Reverse), the screen changes to before
reversing screen.
Push the
j5 to change
back to rear view and bird’s-eye viewj2.
Starting with the CAMERA button
operation
•When the
View Monitor operates and the front view and
bird’s-eye view are displayed
j1.
•The front view and bird’s-eye view are displayedj1 . When the
againj3 , the view on the screen on the passen-
ger’s side changes to the front-side view. Push-
ing the
Around View Monitor off.
•To change the driver’s side screen between front
view and rear view use the shift lever.
•When the shift lever is not in the R (Reverse)
position and the vehicle speed increases aboveapproximately 10 km/h (6 MPH), the monitor
changes from Around View Monitor screen to
the audio or navigation screen.
GUIDE LINES
WARNING
•The distance guide line and the vehicle width
line should be used as a reference only when
the vehicle is on a paved, level surface. The
distance viewed on the monitor is for refer-
ence only and may be different than the ac-
tual distance between the vehicle and dis-
played objects.
•Use the displayed lines and the bird-eye view
as a reference. The lines and the bird-eye view
are greatly affected by the number of occu-
pants, fuel level, vehicle position, road condi-
tion and road grade.
•If the tyres are replaced with different sized
tyres, the predictive course line and the bird-
eye view may be displayed incorrectly.
•When driving the vehicle up a hill, objects
viewed in the monitor are further than they
appear. When driving the vehicle down a hill,
objects viewed in the monitor are closer than
they appear. Use the mirrors or actually look
to properly judge distances to other objects.
The vehicle width and predictive course lines are
wider than the actual width and course.
Display screen, heater and air conditioner, and audio system4-7
Page 138 of 338
Guiding lines
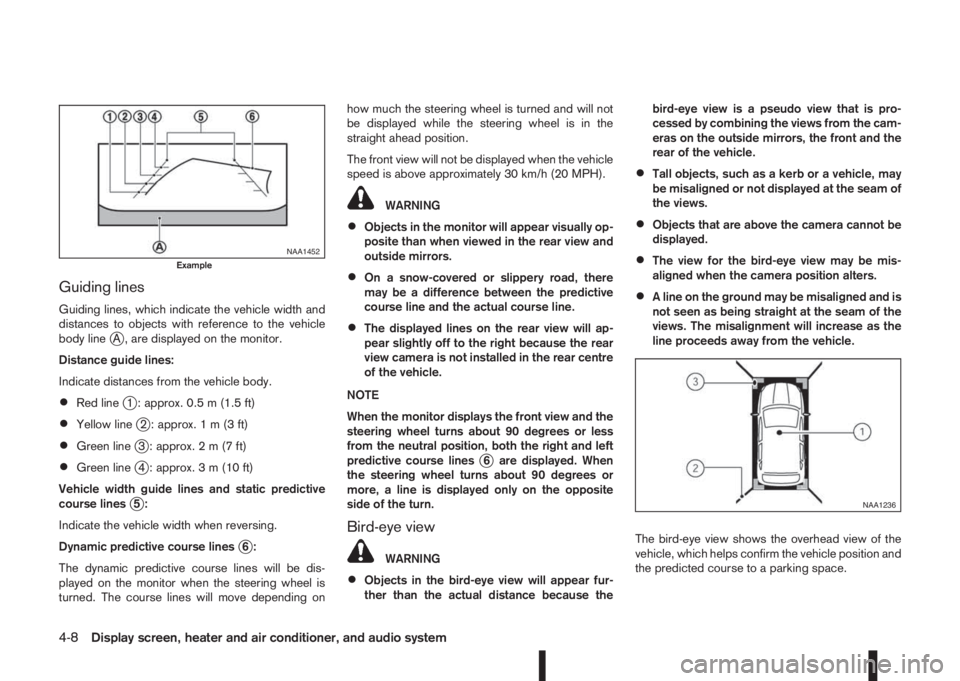
Guiding lines, which indicate the vehicle width and
distances to objects with reference to the vehicle
body line
jA , are displayed on the monitor.
Distance guide lines:
Indicate distances from the vehicle body.
•Red linej1 : approx. 0.5 m (1.5 ft)
•Yellow linej2 : approx.1m(3ft)
•Green linej3 : approx.2m(7ft)
•Green linej4 : approx. 3 m (10 ft)
Vehicle width guide lines and static predictive
course lines
j5:
Indicate the vehicle width when reversing.
Dynamic predictive course lines
j6:
The dynamic predictive course lines will be dis-
played on the monitor when the steering wheel is
turned. The course lines will move depending onhow much the steering wheel is turned and will not
be displayed while the steering wheel is in the
straight ahead position.
The front view will not be displayed when the vehicle
speed is above approximately 30 km/h (20 MPH).
WARNING
•Objects in the monitor will appear visually op-
posite than when viewed in the rear view and
outside mirrors.
•On a snow-covered or slippery road, there
may be a difference between the predictive
course line and the actual course line.
•The displayed lines on the rear view will ap-
pear slightly off to the right because the rear
view camera is not installed in the rear centre
of the vehicle.
NOTE
When the monitor displays the front view and the
steering wheel turns about 90 degrees or less
from the neutral position, both the right and left
predictive course lines
j6 are displayed. When
the steering wheel turns about 90 degrees or
more, a line is displayed only on the opposite
side of the turn.
Bird-eye view
WARNING
•Objects in the bird-eye view will appear fur-
ther than the actual distance because thebird-eye view is a pseudo view that is pro-
cessed by combining the views from the cam-
eras on the outside mirrors, the front and the
rear of the vehicle.
•Tall objects, such as a kerb or a vehicle, may
be misaligned or not displayed at the seam of
the views.
•Objects that are above the camera cannot be
displayed.
•The view for the bird-eye view may be mis-
aligned when the camera position alters.
•A line on the ground may be misaligned and is
not seen as being straight at the seam of the
views. The misalignment will increase as the
line proceeds away from the vehicle.
The bird-eye view shows the overhead view of the
vehicle, which helps confirm the vehicle position and
the predicted course to a parking space.
NAA1452Example
NAA1236
4-8Display screen, heater and air conditioner, and audio system
Page 139 of 338
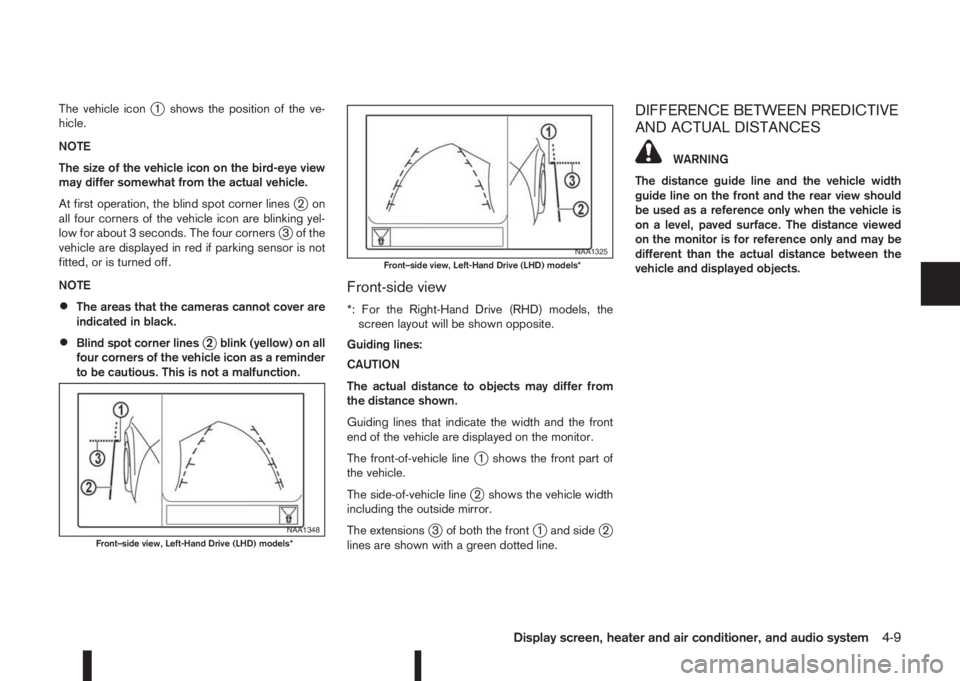
The vehicle iconj1 shows the position of the ve-
hicle.
NOTE
The size of the vehicle icon on the bird-eye view
may differ somewhat from the actual vehicle.
At first operation, the blind spot corner lines
j2on
all four corners of the vehicle icon are blinking yel-
low for about 3 seconds. The four corners
j3 of the
vehicle are displayed in red if parking sensor is not
fitted, or is turned off.
NOTE
•The areas that the cameras cannot cover are
indicated in black.
•Blind spot corner linesj2 blink (yellow) on all
four corners of the vehicle icon as a reminder
to be cautious. This is not a malfunction.
Front-side view
*: For the Right-Hand Drive (RHD) models, the
screen layout will be shown opposite.
Guiding lines:
CAUTION
The actual distance to objects may differ from
the distance shown.
Guiding lines that indicate the width and the front
end of the vehicle are displayed on the monitor.
The front-of-vehicle line
j1 shows the front part of
the vehicle.
The side-of-vehicle line
j2 shows the vehicle width
including the outside mirror.
The extensions
j3 of both the frontj1 and sidej2
lines are shown with a green dotted line.
DIFFERENCE BETWEEN PREDICTIVE
AND ACTUAL DISTANCES
WARNING
The distance guide line and the vehicle width
guide line on the front and the rear view should
be used as a reference only when the vehicle is
on a level, paved surface. The distance viewed
on the monitor is for reference only and may be
different than the actual distance between the
vehicle and displayed objects.
NAA1348Front–side view, Left-Hand Drive (LHD) models*
NAA1325Front–side view, Left-Hand Drive (LHD) models*
Display screen, heater and air conditioner, and audio system4-9
Page 140 of 338
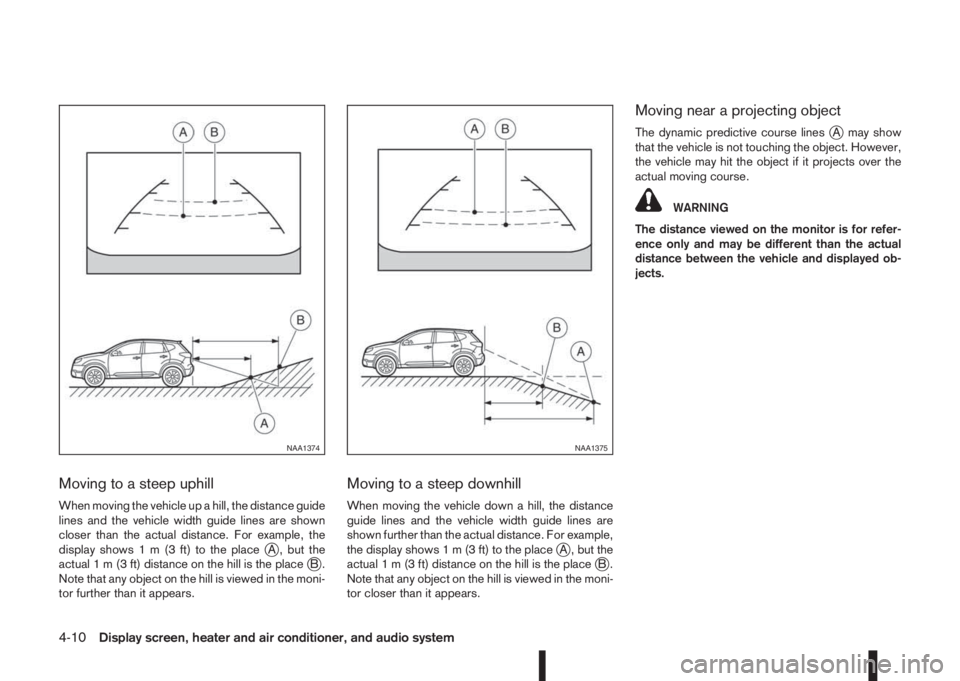
Moving to a steep uphill
When moving the vehicle up a hill, the distance guide
lines and the vehicle width guide lines are shown
closer than the actual distance. For example, the
display shows1m(3ft)totheplace
jA , but the
actual1m(3ft)distanceonthehill is the placejB.
Note that any object on the hill is viewed in the moni-
tor further than it appears.
Moving to a steep downhill
When moving the vehicle down a hill, the distance
guide lines and the vehicle width guide lines are
shown further than the actual distance. For example,
thedisplayshows1m(3ft)totheplace
jA , but the
actual1m(3ft)distance on the hill is the placejB.
Note that any object on the hill is viewed in the moni-
tor closer than it appears.
Moving near a projecting object
The dynamic predictive course linesjA may show
that the vehicle is not touching the object. However,
the vehicle may hit the object if it projects over the
actual moving course.
WARNING
The distance viewed on the monitor is for refer-
ence only and may be different than the actual
distance between the vehicle and displayed ob-
jects.
NAA1374NAA1375
4-10Display screen, heater and air conditioner, and audio system