NISSAN QASHQAI 2016 Owner´s Manual
Manufacturer: NISSAN, Model Year: 2016, Model line: QASHQAI, Model: NISSAN QASHQAI 2016Pages: 338, PDF Size: 4.87 MB
Page 241 of 338
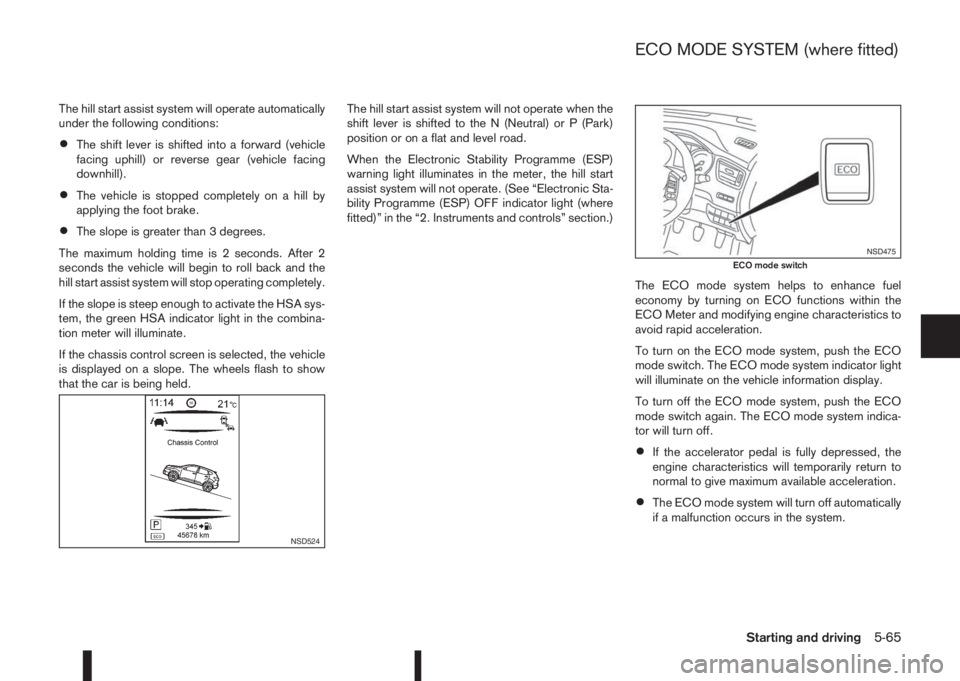
The hill start assist system will operate automatically
under the following conditions:
•The shift lever is shifted into a forward (vehicle
facing uphill) or reverse gear (vehicle facing
downhill).
•The vehicle is stopped completely on a hill by
applying the foot brake.
•The slope is greater than 3 degrees.
The maximum holding time is 2 seconds. After 2
seconds the vehicle will begin to roll back and the
hill start assist system will stop operating completely.
If the slope is steep enough to activate the HSA sys-
tem, the green HSA indicator light in the combina-
tion meter will illuminate.
If the chassis control screen is selected, the vehicle
is displayed on a slope. The wheels flash to show
that the car is being held.The hill start assist system will not operate when the
shift lever is shifted to the N (Neutral) or P (Park)
position or on a flat and level road.
When the Electronic Stability Programme (ESP)
warning light illuminates in the meter, the hill start
assist system will not operate. (See “Electronic Sta-
bility Programme (ESP) OFF indicator light (where
fitted)” in the “2. Instruments and controls” section.)
The ECO mode system helps to enhance fuel
economy by turning on ECO functions within the
ECO Meter and modifying engine characteristics to
avoid rapid acceleration.
To turn on the ECO mode system, push the ECO
mode switch. The ECO mode system indicator light
will illuminate on the vehicle information display.
To turn off the ECO mode system, push the ECO
mode switch again. The ECO mode system indica-
tor will turn off.
•If the accelerator pedal is fully depressed, the
engine characteristics will temporarily return to
normal to give maximum available acceleration.
•The ECO mode system will turn off automatically
if a malfunction occurs in the system.
NSD524
NSD475ECO mode switch
ECO MODE SYSTEM (where fitted)
Starting and driving5-65
Page 242 of 338
•Turn off the ECO mode system when accelera-
tion is required, such as when:
– driving with a heavy load of passengers or
cargo in the vehicle
– driving on a steep uphill slopeWARNING
•Whatever the conditions, drive with caution.
Accelerate and decelerate with great care. If
accelerating or decelerating too fast, the drive
wheels will lose even more traction.
•Allow more stopping distance in cold weather
driving. Braking should be started sooner than
on dry surfaces.
•Keep at a greater distance from the vehicle in
front of you on slippery roads.
•Wet ice (0°C, 32°F and freezing rain), very cold
snow and ice can be slick and very difficult to
drive on. The vehicle will have a lot less trac-
tion or grip under these conditions. Try to
avoid driving on wet ice until the road is salted
or sanded.
•Watch for slippery spots (black ice). These
may appear on an otherwise clear road in
shaded areas. If a patch of ice is seen ahead,
brake before driving on it. Try not to brake
while actually on the ice and avoid any sud-
den steering manoeuvres.
•Do not use cruise control (where fitted) on
slippery roads.
•Snow can trap dangerous exhaust gas under
your vehicle. Keep snow clear of the exhaust
pipe and from around your vehicle.
BATTERY
If the battery is not fully charged during extremely
cold weather conditions, the battery fluid may freeze
and damage the battery. To maintain maximum effi-
ciency, the battery should be checked regularly. For
details, see “Battery” in the “8. Maintenance and
do-it-yourself” section.
ENGINE COOLANT
If the vehicle is to be left outside without anti-freeze,
drain the cooling system. Refill before operating the
vehicle. For details, see “Engine cooling system” in
the “8. Maintenance and do-it-yourself” section.
TYRE EQUIPMENT
1) The SUMMER tyres are of a tread design to pro-
vide superior performance on dry surfaces. How-
ever, the performance of these tyres will be sub-
stantially reduced in snowy and icy conditions. If
you operate your vehicle on snowy or icy roads,
NISSAN recommends the use of MUD & SNOW
or ALL SEASON tyres on all four wheels. Please
consult a NISSAN dealer or qualified workshop
for tyre type, size, speed rating and availability
information.
2) For additional traction on icy roads, studded
tyres may be used. However, some countries,
provinces and states prohibit their use. Check
applicable laws before installing studded tyres.
COLD WEATHER DRIVING
5-66Starting and driving
Page 243 of 338
CAUTION
Skid and traction capabilities of studded snow
tyres on wet or dry surfaces may be poorer
than that of non-studded snow tyres.
3) Snow chains may be used, if desired. But the
use of snow chains may be prohibited in some
areas. Therefore, check the local laws before
installing snow chains. When installing snow
chains, make sure they are of proper size for the
tyres on your vehicle and are installed according
to the snow chain manufacturer’s instructions.
Use chain tensioners when recommended by the
snow chain manufacturer to ensure a tight fit.
Loose end links of the snow chain must be se-
cured or removed to prevent the possibility of
whipping action damage to the wings or under-
carriage. In addition, drive at a reduced speed,
otherwise, your vehicle may be damaged and/or
vehicle handling and performance may be ad-
versely affected.
SPECIAL WINTER EQUIPMENT
It is recommended to carry the following items in the
vehicle during winter:
•A scraper and stiff-bristled brush to remove ice
and snow from the windows.
•A sturdy, flat board to be placed under the jack
to give it firm support.
•A shovel to dig the vehicle out of snowdrifts.
•Extra windscreen washer fluid to refill the reser-
voir tank.
CORROSION PROTECTION
Chemicals used for road surface de-icing are ex-
tremely corrosive and will accelerate corrosion and
the deterioration of underbody components such as
the exhaust system, fuel and brake lines, brake
cables, floor pan, and wings.
In the winter, the underbody must be cleaned
periodically. For additional information, see “Cor-
rosion protection” in the “7. Appearance and
care” section.
For additional protection against rust and corrosion,
which may be required in some areas, consult a
NISSAN dealer or qualified workshop.
Starting and driving5-67
Page 244 of 338

NOTE
5-68Starting and driving
Page 245 of 338
6In case of emergencyIn case of emergency
Hazard warning flasher switch ................................. 6-2
Spare tyre................................................................ 6-2
Temporary-use spare tyre (where fitted) .............. 6-2
Conventional spare tyre (where fitted) ................. 6-2
Flat tyre ................................................................... 6-3
Stopping the vehicle ........................................... 6-3
Changing flat tyre (Models with spare wheel,
where fitted) ....................................................... 6-3
Tyre Pressure Monitoring System (TPMS)
(where fitted) ...................................................... 6-7
Repairing flat tyre (Models with emergency
tyre puncture repair kit) ....................................... 6-8Jump-starting ........................................................... 6-11
Push-starting ........................................................... 6-13
Engine overheat ....................................................... 6-13
Tow truck towing ..................................................... 6-14
Towing precautions ............................................ 6-14
Recommended towing for two-wheel drive
(2WD) models .................................................... 6-15
Recommended towing for four-wheel drive
(4WD) models .................................................... 6-15
Towing eye ......................................................... 6-16
Freeing the vehicle from sand, snow or mud ....... 6-16
Page 246 of 338
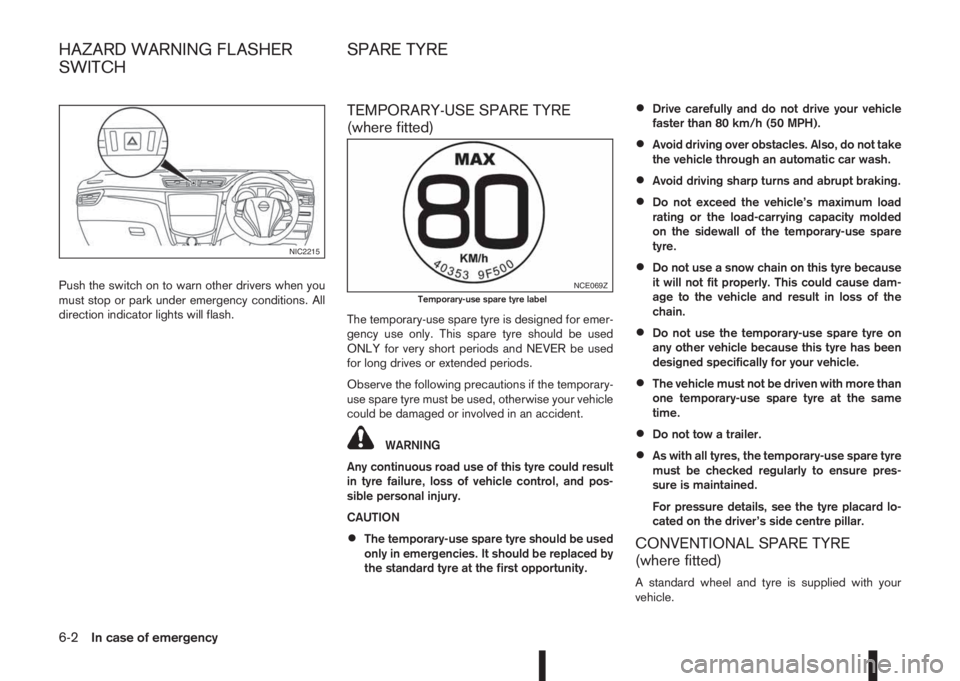
Push the switch on to warn other drivers when you
must stop or park under emergency conditions. All
direction indicator lights will flash.
TEMPORARY-USE SPARE TYRE
(where fitted)
The temporary-use spare tyre is designed for emer-
gency use only. This spare tyre should be used
ONLY for very short periods and NEVER be used
for long drives or extended periods.
Observe the following precautions if the temporary-
use spare tyre must be used, otherwise your vehicle
could be damaged or involved in an accident.
WARNING
Any continuous road use of this tyre could result
in tyre failure, loss of vehicle control, and pos-
sible personal injury.
CAUTION
•The temporary-use spare tyre should be used
only in emergencies. It should be replaced by
the standard tyre at the first opportunity.
•Drive carefully and do not drive your vehicle
faster than 80 km/h (50 MPH).
•Avoid driving over obstacles. Also, do not take
the vehicle through an automatic car wash.
•Avoid driving sharp turns and abrupt braking.
•Do not exceed the vehicle’s maximum load
rating or the load-carrying capacity molded
on the sidewall of the temporary-use spare
tyre.
•Do not use a snow chain on this tyre because
it will not fit properly. This could cause dam-
age to the vehicle and result in loss of the
chain.
•Do not use the temporary-use spare tyre on
any other vehicle because this tyre has been
designed specifically for your vehicle.
•The vehicle must not be driven with more than
one temporary-use spare tyre at the same
time.
•Do not tow a trailer.
•As with all tyres, the temporary-use spare tyre
must be checked regularly to ensure pres-
sure is maintained.
For pressure details, see the tyre placard lo-
cated on the driver’s side centre pillar.
CONVENTIONAL SPARE TYRE
(where fitted)
A standard wheel and tyre is supplied with your
vehicle.
NIC2215
NCE069ZTemporary-use spare tyre label
HAZARD WARNING FLASHER
SWITCHSPARE TYRE
6-2In case of emergency
Page 247 of 338
In case of a flat tyre, follow the instructions as de-
scribed below:
STOPPING THE VEHICLE
WARNING
•Make sure that the parking brake is securely
applied.
•For Manual Transmission (MT) models: Make
sure the shift lever is in the R (Reverse) posi-
tion.
For XTRONIC models: Make sure that the shift
lever is in the P (Park) position.
•Never change tyres when the vehicle is on a
slope, ice or a slippery area. This is hazard-
ous.
•Never change tyres if oncoming traffic is close
to your vehicle. Wait for professional road as-
sistance.
1. Safely move the vehicle off the road, away from
traffic.
2. Switch on the hazard warning flashers.
3. Park on a level surface.
4. Apply the parking brake.
5. Shift the shift lever (MT models) into the R (Re-
verse) position [XTRONIC models, move the shift
lever to the P (Park) position].
6. Turn off the engine.7. Open the bonnet (for details, see “Bonnet
release” in the “3. Pre-driving checks and
adjustments” section) in order to:
•Warn other traffic.
•Signal to professional road assistance that
you require assistance.
8. Have all passengers exit the vehicle and stand in
a safe place, away from traffic and clear of the
vehicle.
CHANGING FLAT TYRE (Models with
spare wheel, where fitted)
Blocking the wheels
WARNING
Make sure to block the appropriate wheel to pre-
vent the vehicle from moving, which may cause
personal injury.
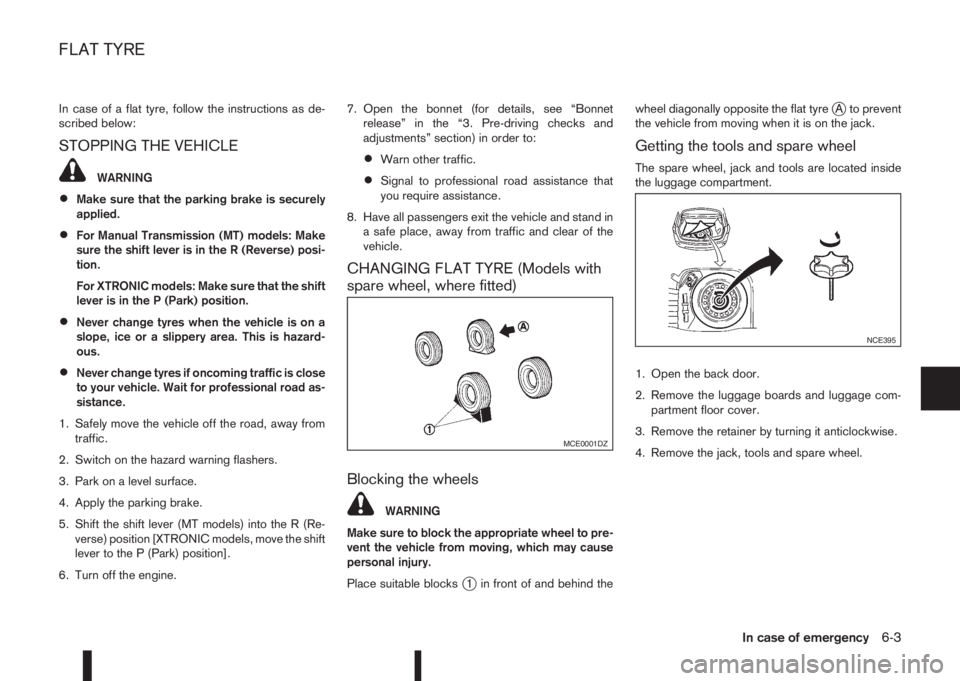
Place suitable blocks
j1 in front of and behind thewheel diagonally opposite the flat tyre
jA to prevent
the vehicle from moving when it is on the jack.
Getting the tools and spare wheel
The spare wheel, jack and tools are located inside
the luggage compartment.
1. Open the back door.
2. Remove the luggage boards and luggage com-
partment floor cover.
3. Remove the retainer by turning it anticlockwise.
4. Remove the jack, tools and spare wheel.
MCE0001DZ
NCE395
FLAT TYRE
In case of emergency6-3
Page 248 of 338
Removing wheel cover (where fitted)
WARNING
Take care when removing the wheel cover as the
cover may detach suddenly.
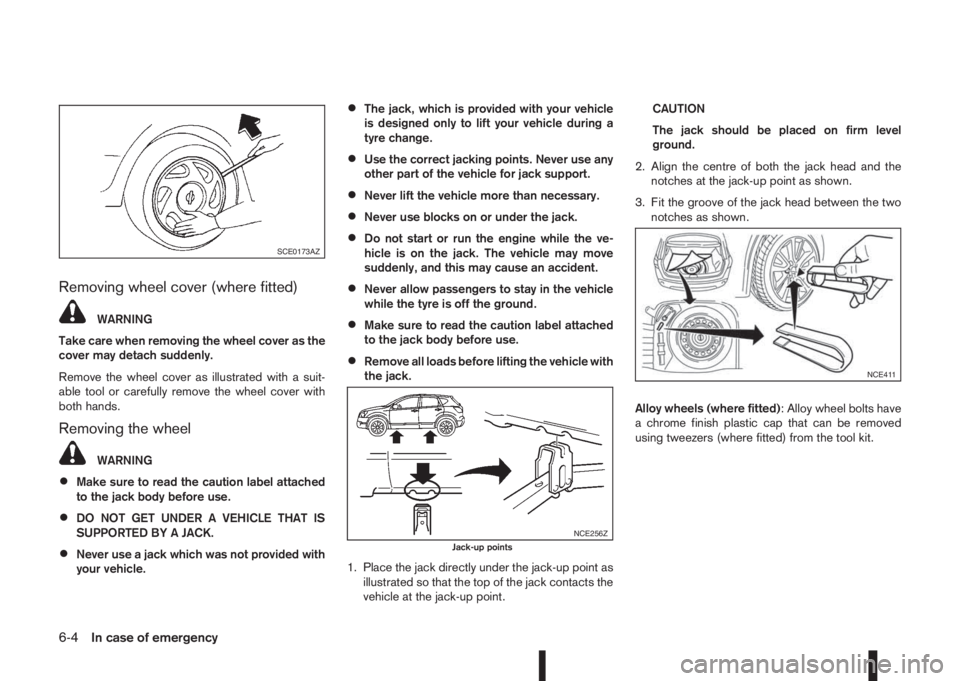
Remove the wheel cover as illustrated with a suit-
able tool or carefully remove the wheel cover with
both hands.
Removing the wheel
WARNING
•Make sure to read the caution label attached
to the jack body before use.
•DO NOT GET UNDER A VEHICLE THAT IS
SUPPORTED BY A JACK.
•Never use a jack which was not provided with
your vehicle.
•The jack, which is provided with your vehicle
is designed only to lift your vehicle during a
tyre change.
•Use the correct jacking points. Never use any
other part of the vehicle for jack support.
•Never lift the vehicle more than necessary.
•Never use blocks on or under the jack.
•Do not start or run the engine while the ve-
hicle is on the jack. The vehicle may move
suddenly, and this may cause an accident.
•Never allow passengers to stay in the vehicle
while the tyre is off the ground.
•Make sure to read the caution label attached
to the jack body before use.
•Remove all loads before lifting the vehicle with
the jack.
1. Place the jack directly under the jack-up point as
illustrated so that the top of the jack contacts the
vehicle at the jack-up point.CAUTION
The jack should be placed on firm level
ground.
2. Align the centre of both the jack head and the
notches at the jack-up point as shown.
3. Fit the groove of the jack head between the two
notches as shown.
Alloy wheels (where fitted): Alloy wheel bolts have
a chrome finish plastic cap that can be removed
using tweezers (where fitted) from the tool kit.
SCE0173AZ
NCE256ZJack-up points
NCE411
6-4In case of emergency
Page 249 of 338
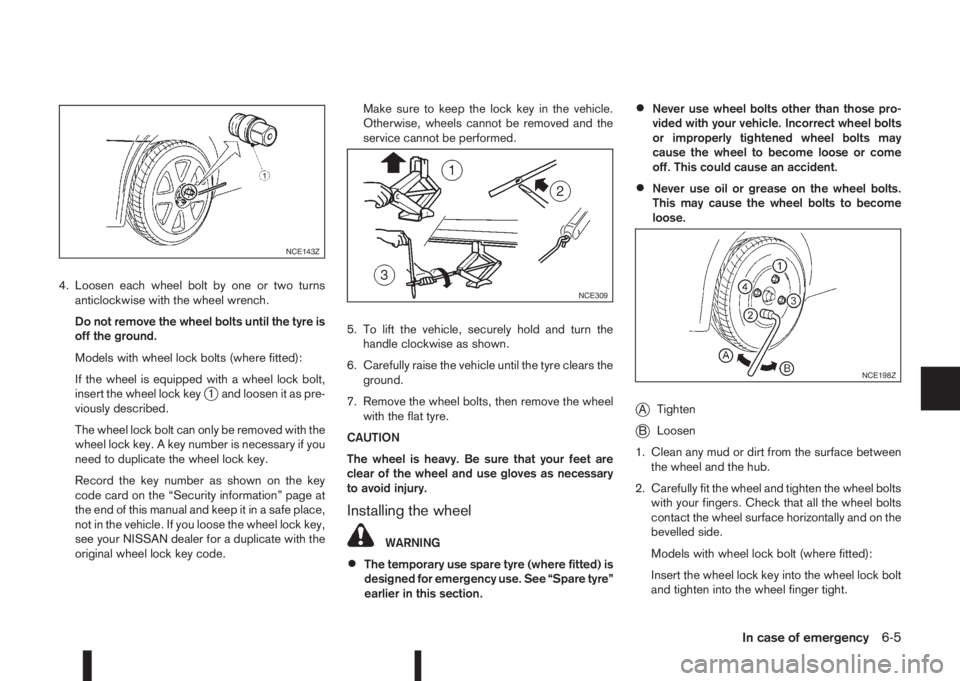
4. Loosen each wheel bolt by one or two turns
anticlockwise with the wheel wrench.
Do not remove the wheel bolts until the tyre is
off the ground.
Models with wheel lock bolts (where fitted):
If the wheel is equipped with a wheel lock bolt,
insert the wheel lock key
j1 and loosen it as pre-
viously described.
The wheel lock bolt can only be removed with the
wheel lock key. A key number is necessary if you
need to duplicate the wheel lock key.
Record the key number as shown on the key
code card on the “Security information” page at
the end of this manual and keep it in a safe place,
not in the vehicle. If you loose the wheel lock key,
see your NISSAN dealer for a duplicate with the
original wheel lock key code.Make sure to keep the lock key in the vehicle.
Otherwise, wheels cannot be removed and the
service cannot be performed.
5. To lift the vehicle, securely hold and turn the
handle clockwise as shown.
6. Carefully raise the vehicle until the tyre clears the
ground.
7. Remove the wheel bolts, then remove the wheel
with the flat tyre.
CAUTION
The wheel is heavy. Be sure that your feet are
clear of the wheel and use gloves as necessary
to avoid injury.
Installing the wheel
WARNING
•The temporary use spare tyre (where fitted) is
designed for emergency use. See “Spare tyre”
earlier in this section.
•Never use wheel bolts other than those pro-
vided with your vehicle. Incorrect wheel bolts
or improperly tightened wheel bolts may
cause the wheel to become loose or come
off. This could cause an accident.
•Never use oil or grease on the wheel bolts.
This may cause the wheel bolts to become
loose.
jATighten
jBLoosen
1. Clean any mud or dirt from the surface between
the wheel and the hub.
2. Carefully fit the wheel and tighten the wheel bolts
with your fingers. Check that all the wheel bolts
contact the wheel surface horizontally and on the
bevelled side.
Models with wheel lock bolt (where fitted):
Insert the wheel lock key into the wheel lock bolt
and tighten into the wheel finger tight.
NCE143Z
NCE309
NCE198Z
In case of emergency6-5
Page 250 of 338
3. With the wheel wrench, tighten the wheel bolts
alternately and evenly in the sequence as illus-
trated (
j1-j5 ) until they are tight.
4. Lower the vehicle slowly until the tyre touches
the ground.
5. Tighten the wheel bolts securely using the wheel
wrench in the sequence as illustrated.
6. Lower the vehicle completely.
7. Install the wheel cover (where fitted).
NOTE
Before installation, align NISSAN logo (centre
cap) with the wheel bolts/or perpendicular to
valve hole (where fitted), to correctly align to
the centre.
Wheel bolt tightening torque:
113 N•m (12 kg-m, 83 ft-lb)
As soon as possible, tighten the wheel bolts to
the specified torque with a torque wrench.
WARNING
Retighten the wheel bolts after the vehicle has
been driven for 1,000 km (600 miles) (also in
cases of a flat tyre, etc.).
The wheel bolts must be kept tightened to specifi-
cation at all times. It is recommended that the wheel
bolts be tightened to specification at each mainte-
nance interval.
Adjust the tyre pressure to the COLD pressure.COLD pressure is the tyre pressure as measured
after the vehicle has been parked for three hours or
more or driven for less than 1.6 km (1 mile).
COLD tyre pressures are shown on the tyre placard
affixed to the driver’s side centre pillar.
Stowing the wheel and tools
Securely store the wheel with the flat tyre, the jack
and the tools in the specified storage areas.
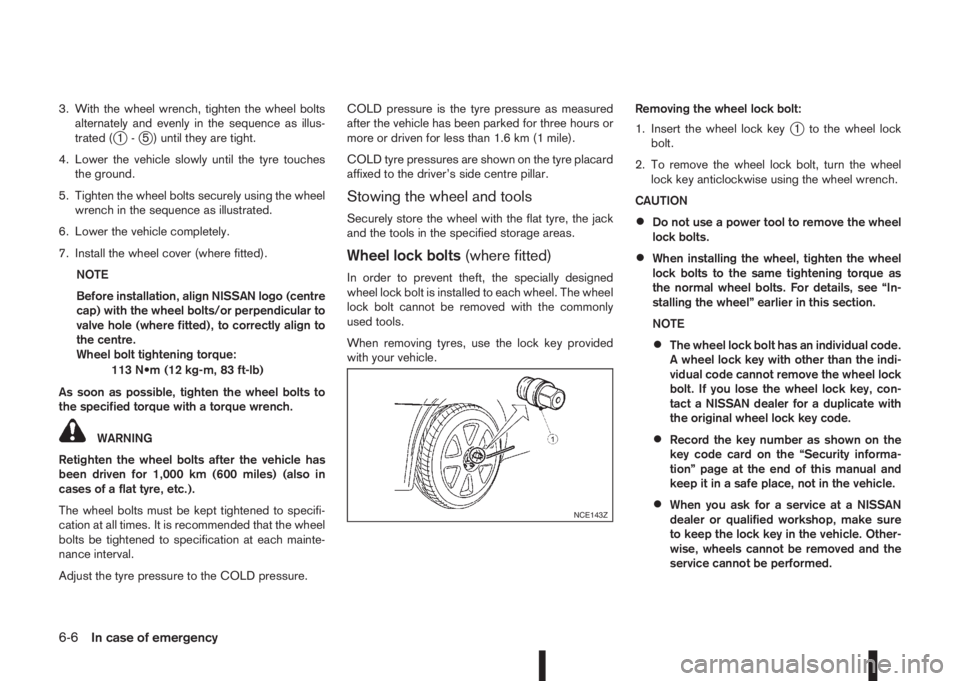
Wheel lock bolts(where fitted)
In order to prevent theft, the specially designed
wheel lock bolt is installed to each wheel. The wheel
lock bolt cannot be removed with the commonly
used tools.
When removing tyres, use the lock key provided
with your vehicle.Removing the wheel lock bolt:
1. Insert the wheel lock key
j1 to the wheel lock
bolt.
2. To remove the wheel lock bolt, turn the wheel
lock key anticlockwise using the wheel wrench.
CAUTION
•Do not use a power tool to remove the wheel
lock bolts.
•When installing the wheel, tighten the wheel
lock bolts to the same tightening torque as
the normal wheel bolts. For details, see “In-
stalling the wheel” earlier in this section.
NOTE
•The wheel lock bolt has an individual code.
A wheel lock key with other than the indi-
vidual code cannot remove the wheel lock
bolt. If you lose the wheel lock key, con-
tact a NISSAN dealer for a duplicate with
the original wheel lock key code.
•Record the key number as shown on the
key code card on the “Security informa-
tion” page at the end of this manual and
keep it in a safe place, not in the vehicle.
•When you ask for a service at a NISSAN
dealer or qualified workshop, make sure
to keep the lock key in the vehicle. Other-
wise, wheels cannot be removed and the
service cannot be performed.NCE143Z
6-6In case of emergency