change time NISSAN QASHQAI 2017 Owner´s Manual
[x] Cancel search | Manufacturer: NISSAN, Model Year: 2017, Model line: QASHQAI, Model: NISSAN QASHQAI 2017Pages: 508, PDF Size: 2.68 MB
Page 187 of 508
4-6Heater, air conditioner, audio and phone systems
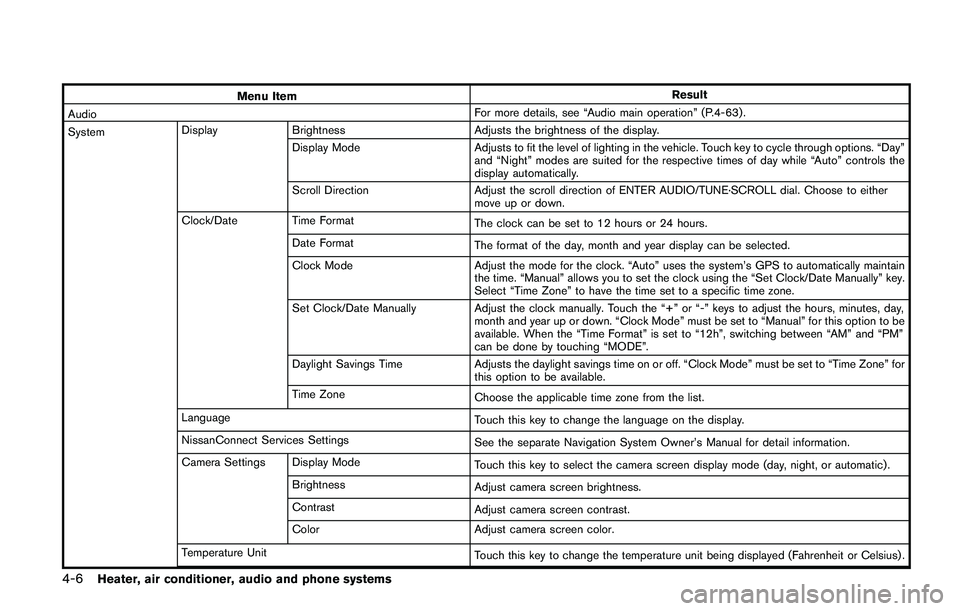
Menu ItemResult
AudioFor more details, see “Audio main operation” (P.4-63) .
SystemDisplay Brightness Adjusts the brightness of the display.
Display Mode Adjusts to fit the level of lighting in the vehicle. Touch key to cycle through options. “Day”
and “Night” modes are suited for the respective times of day while “Auto” controls the
display automatically.
Scroll Direction Adjust the scroll direction of ENTER AUDIO/TUNE·SCROLL dial. Choose to either
move up or down.
Clock/Date Time Format
The clock can be set to 12 hours or 24 hours.
Date Format
The format of the day, month and year display can be selected.
Clock Mode Adjust the mode for the clock. “Auto” uses the system’s GPS to automatically maintain
the time. “Manual” allows you to set the clock using the “Set Clock/Date Manually” key.
Select “Time Zone” to have the time set to a specific time zone.
Set Clock/Date Manually Adjust the clock manually. Touch the “+” or “-” keys to adjust the hours, minutes, day,
month and year up or down. “Clock Mode” must be set to “Manual” for this option to be
available. When the “Time Format” is set to “12h”, switching between “AM” and “PM”
can be done by touching “MODE”.
Daylight Savings Time Adjusts the daylight savings time on or off. “Clock Mode” must be set to “Time Zone” for
this option to be available.
Time Zone
Choose the applicable time zone from the list.
Language
Touch this key to change the language on the display.
NissanConnect Services Settings
See the separate Navigation System Owner’s Manual for detail information.
Camera Settings Display Mode
Touch this key to select the camera screen display mode (day, night, or automatic) .
Brightness
Adjust camera screen brightness.
Contrast
Adjust camera screen contrast.
Color Adjust camera screen color.
Temperature Unit
Touch this key to change the temperature unit being displayed (Fahrenheit or Celsius) .
Page 212 of 508
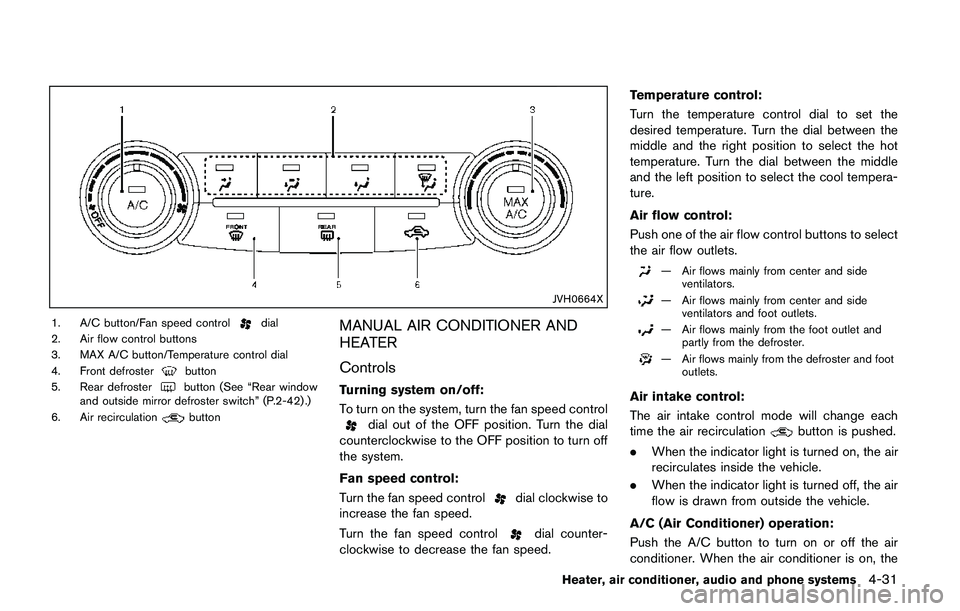
JVH0664X
1. A/C button/Fan speed controldial
2. Air flow control buttons
3. MAX A/C button/Temperature control dial
4. Front defroster
button
5. Rear defrosterbutton (See “Rear window
and outside mirror defroster switch” (P.2-42) .)
6. Air recirculation
button
MANUAL AIR CONDITIONER AND
HEATER
Controls
Turning system on/off:
To turn on the system, turn the fan speed control
dial out of the OFF position. Turn the dial
counterclockwise to the OFF position to turn off
the system.
Fan speed control:
Turn the fan speed control
dial clockwise to
increase the fan speed.
Turn the fan speed control
dial counter-
clockwise to decrease the fan speed.Temperature control:
Turn the temperature control dial to set the
desired temperature. Turn the dial between the
middle and the right position to select the hot
temperature. Turn the dial between the middle
and the left position to select the cool tempera-
ture.
Air flow control:
Push one of the air flow control buttons to select
the air flow outlets.
— Air flows mainly from center and side
ventilators.
— Air flows mainly from center and side
ventilators and foot outlets.
— Air flows mainly from the foot outlet and
partly from the defroster.
— Air flows mainly from the defroster and foot
outlets.
Air intake control:
The air intake control mode will change each
time the air recirculation
button is pushed.
.When the indicator light is turned on, the air
recirculates inside the vehicle.
.When the indicator light is turned off, the air
flow is drawn from outside the vehicle.
A/C (Air Conditioner) operation:
Push the A/C button to turn on or off the air
conditioner. When the air conditioner is on, the
Heater, air conditioner, audio and phone systems4-31
Page 219 of 508
4-38Heater, air conditioner, audio and phone systems
AUDIO OPERATION PRECAUTIONS
Radio
Place the ignition switch in the ACC or ON
position and push the FM·AM button to turn on
the radio. If you listen to the radio with the
engine not running, the ignition switch should be
placed in the ACC position.
Radio reception is affected by station signal
strength, distance from radio transmitter, build-
ings, bridges, mountains and other external
influences. Intermittent changes in reception
quality normally are caused by these external
influences.
Using a cellular phone in or near the
vehicle may influence radio reception
quality.
Radio reception:
Your vehicle radio system is equipped with
state-of-the-art electronic circuits to enhance
radio reception. These circuits are designed to
extend reception range, and to enhance the
quality of that reception.
However there are some general characteristics
of both FM and AM radio signals that can affect
radio reception quality in a moving vehicle, even
when the finest equipment is used. These
characteristics are completely normal in a given
reception area, and do not indicate any mal-function in your vehicle radio system.
Reception conditions will constantly change
because of vehicle movement. Buildings, terrain,
signal distance and interference from other
vehicles can work against ideal reception.
Described below are some of the factors that
can affect your radio reception.
Some cellular phones or other devices may
cause interference or a buzzing noise to come
from the audio system speakers. Storing the
device in a different location may reduce or
eliminate the noise.
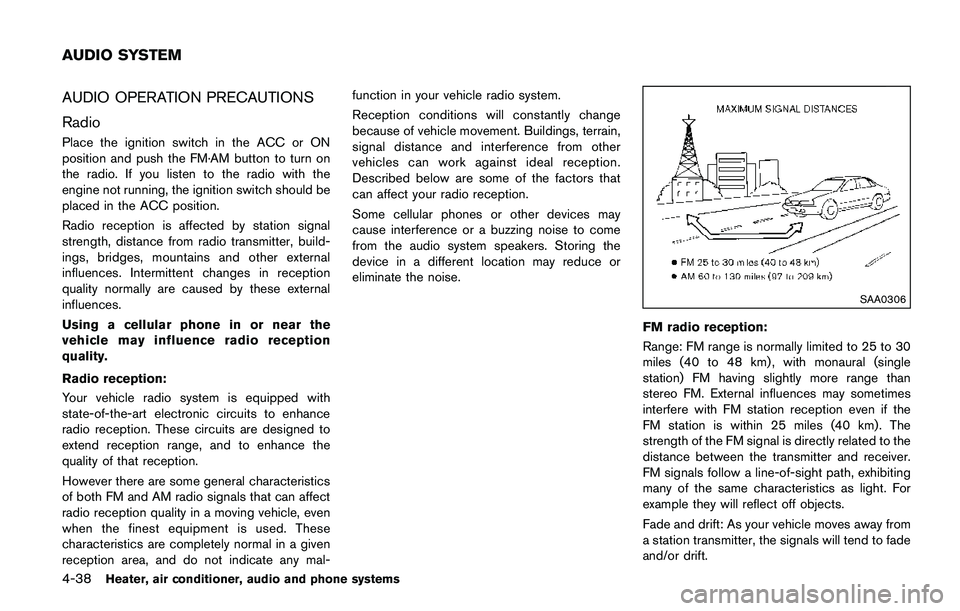
SAA0306
FM radio reception:
Range: FM range is normally limited to 25 to 30
miles (40 to 48 km) , with monaural (single
station) FM having slightly more range than
stereo FM. External influences may sometimes
interfere with FM station reception even if the
FM station is within 25 miles (40 km). The
strength of the FM signal is directly related to the
distance between the transmitter and receiver.
FM signals follow a line-of-sight path, exhibiting
many of the same characteristics as light. For
example they will reflect off objects.
Fade and drift: As your vehicle moves away from
a station transmitter, the signals will tend to fade
and/or drift.
AUDIO SYSTEM
Page 232 of 508
case, reset the desired stations.
CD player operation
Place the ignition switch in the ACC or ON
position. Insert the Compact Disc (CD) into the
slot with the label side facing up. The CD will be
guided automatically into the slot and start
playing.
After loading the CD, the number of tracks on
the CD and the play time will appear on the
display.
If another audio source is already operating, it
will automatically turn off and the CD will play.
If the system has been turned off while the CD
was playing, pushing the Power/VOL dial will
start the CD.
PLAY:
When the CD button is pushed while a CD is
loaded, the CD will start playing.
CD/MP3 display mode:
While listening to an MP3/WMA CD, certain text
may be displayed on the screen if the CD has
been encoded with text information. Depending
on how the MP3/WMA CD is encoded,
information such as Artist, Song and Folder will
be displayed. The track number and the total
number of tracks in the current folder or on the
current disc are displayed on the screen as well.
SEEK/TRACK:
When the
orbutton is pushed and hold
while the CD is being played, the CD will play
while fast forwarding or rewinding. When the
button is released, the CD will return to normal
play speed.
When the
orbutton is pushed while
the CD is being played, the next track or the
beginning of the current track on the CD will be
played. Push the
button again to select the
previous track.
REPEAT (RPT):
When the
button is pushed while the CD is
played, the play pattern can be changed as
follows:
(CD)
(Normal)�œ1 Track Repeat
(CD with compressed audio files)
(Normal)?1 Folder Repeat?1 Track Repeat
?(Normal)
RANDOM (RDM):
When the
button is pushed while a CD is
being played, the play pattern can be changed
as follows:
(CD)
(Normal)�œ1 Disc Random
(CD with compressed audio files)
(Normal)?1 Disc Random?1 Folder
Random?(Normal)
CD eject:
When the
button is pushed with the CD
loaded, the CD will be ejected.
If the CD comes out and is not removed, it
will be pulled back into the slot to protect
it.
USB memory player operation
USB memory main operation:
The USB connection port is located on the
lower part of the instrument panel. (See “USB
(Universal Serial Bus) connection port” (P.4-
72) .) Connect a USB memory into the port.
When the audio system operates, the system
will switch to the USB memory mode auto-
matically.
If the system has been turned off while the USB
Heater, air conditioner, audio and phone systems4-51
Page 248 of 508
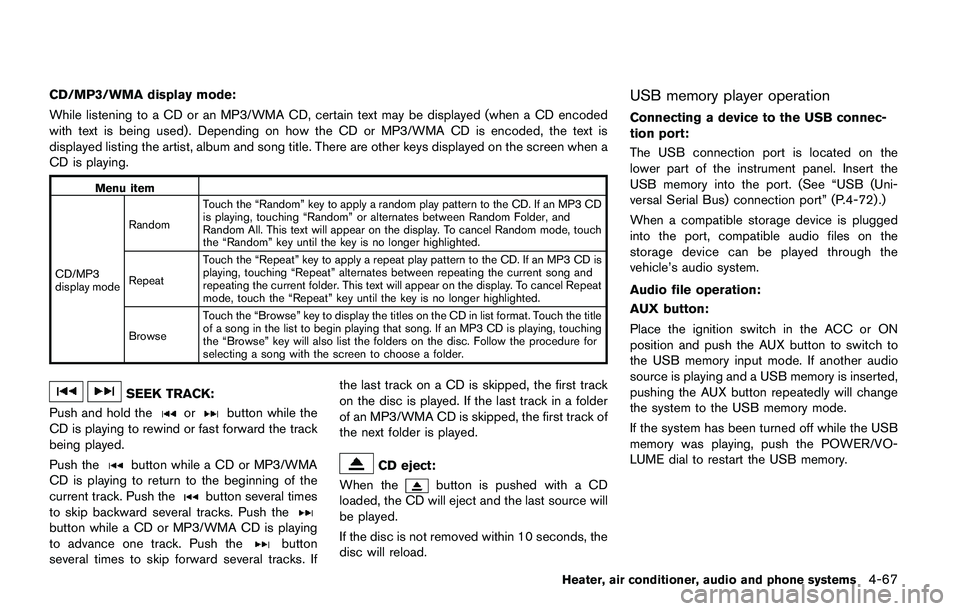
CD/MP3/WMA display mode:
While listening to a CD or an MP3/WMA CD, certain text may be displayed (when a CD encoded
with text is being used) . Depending on how the CD or MP3/WMA CD is encoded, the text is
displayed listing the artist, album and song title. There are other keys displayed on the screen when a
CD is playing.
Menu item
CD/MP3
display modeRandomTouch the “Random” key to apply a random play pattern to the CD. If an MP3 CD
is playing, touching “Random” or alternates between Random Folder, and
Random All. This text will appear on the display. To cancel Random mode, touch
the “Random” key until the key is no longer highlighted.
RepeatTouch the “Repeat” key to apply a repeat play pattern to the CD. If an MP3 CD is
playing, touching “Repeat” alternates between repeating the current song and
repeating the current folder. This text will appear on the display. To cancel Repeat
mode, touch the “Repeat” key until the key is no longer highlighted.
BrowseTouch the “Browse” key to display the titles on the CD in list format. Touch the title
of a song in the list to begin playing that song. If an MP3 CD is playing, touching
the “Browse” key will also list the folders on the disc. Follow the procedure for
selecting a song with the screen to choose a folder.
SEEK TRACK:
Push and hold the
orbutton while the
CD is playing to rewind or fast forward the track
being played.
Push the
button while a CD or MP3/WMA
CD is playing to return to the beginning of the
current track. Push the
button several times
to skip backward several tracks. Push the
button while a CD or MP3/WMA CD is playing
to advance one track. Push thebutton
several times to skip forward several tracks. Ifthe last track on a CD is skipped, the first track
on the disc is played. If the last track in a folder
of an MP3/WMA CD is skipped, the first track of
the next folder is played.
CD eject:
When the
button is pushed with a CD
loaded, the CD will eject and the last source will
be played.
If the disc is not removed within 10 seconds, the
disc will reload.
USB memory player operation
Connecting a device to the USB connec-
tion port:
The USB connection port is located on the
lower part of the instrument panel. Insert the
USB memory into the port. (See “USB (Uni-
versal Serial Bus) connection port” (P.4-72) .)
When a compatible storage device is plugged
into the port, compatible audio files on the
storage device can be played through the
vehicle’s audio system.
Audio file operation:
AUX button:
Place the ignition switch in the ACC or ON
position and push the AUX button to switch to
the USB memory input mode. If another audio
source is playing and a USB memory is inserted,
pushing the AUX button repeatedly will change
the system to the USB memory mode.
If the system has been turned off while the USB
memory was playing, push the POWER/VO-
LUME dial to restart the USB memory.
Heater, air conditioner, audio and phone systems4-67
Page 262 of 508
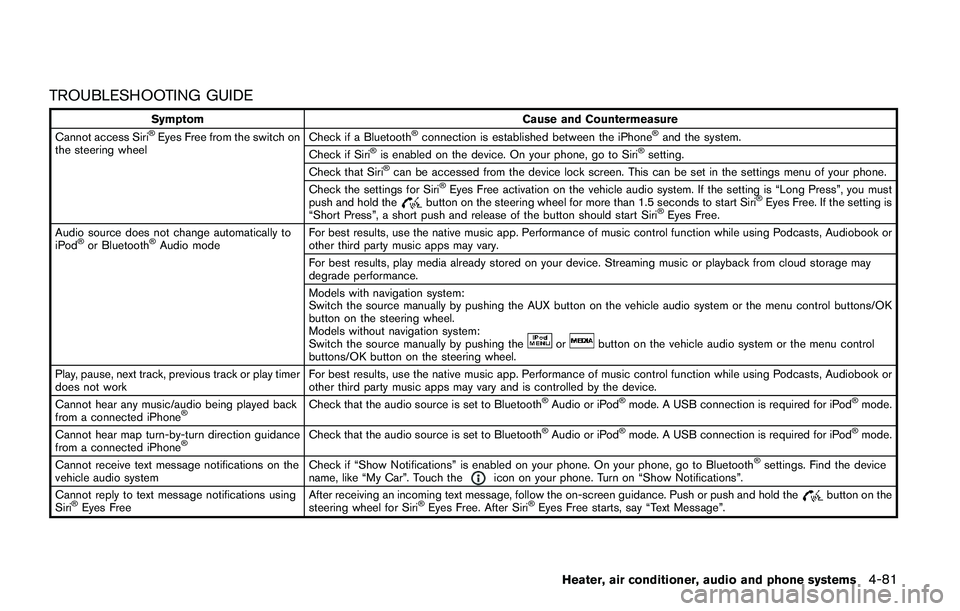
TROUBLESHOOTING GUIDE
Symptom Cause and Countermeasure
Cannot access Siri�ŠEyes Free from the switch on
the steering wheelCheck if a Bluetooth�Šconnection is established between the iPhone�Šand the system.
Check if Siri�Šis enabled on the device. On your phone, go to Siri�Šsetting.
Check that Siri�Šcan be accessed from the device lock screen. This can be set in the settings menu of your phone.
Check the settings for Siri�ŠEyes Free activation on the vehicle audio system. If the setting is “Long Press”, you must
push and hold thebutton on the steering wheel for more than 1.5 seconds to start Siri�ŠEyes Free. If the setting is
“Short Press”, a short push and release of the button should start Siri�ŠEyes Free.
Audio source does not change automatically to
iPod
�Šor Bluetooth�ŠAudio modeFor best results, use the native music app. Performance of music control function while using Podcasts, Audiobook or
other third party music apps may vary.
For best results, play media already stored on your device. Streaming music or playback from cloud storage may
degrade performance.
Models with navigation system:
Switch the source manually by pushing the AUX button on the vehicle audio system or the menu control buttons/OK
button on the steering wheel.
Models without navigation system:
Switch the source manually by pushing the
orbutton on the vehicle audio system or the menu control
buttons/OK button on the steering wheel.
Play, pause, next track, previous track or play timer
does not workFor best results, use the native music app. Performance of music control function while using Podcasts, Audiobook or
other third party music apps may vary and is controlled by the device.
Cannot hear any music/audio being played back
from a connected iPhone
�ŠCheck that the audio source is set to Bluetooth�ŠAudio or iPod�Šmode. A USB connection is required for iPod�Šmode.
Cannot hear map turn-by-turn direction guidance
from a connected iPhone
�ŠCheck that the audio source is set to Bluetooth�ŠAudio or iPod�Šmode. A USB connection is required for iPod�Šmode.
Cannot receive text message notifications on the
vehicle audio systemCheck if “Show Notifications” is enabled on your phone. On your phone, go to Bluetooth
�Šsettings. Find the device
name, like “My Car”. Touch theicon on your phone. Turn on “Show Notifications”.
Cannot reply to text message notifications using
Siri
�ŠEyes FreeAfter receiving an incoming text message, follow the on-screen guidance. Push or push and hold thebutton on the
steering wheel for Siri�ŠEyes Free. After Siri�ŠEyes Free starts, say “Text Message”.
Heater, air conditioner, audio and phone systems4-81
Page 266 of 508
The manual control mode does not allow dialing
a phone number by digits. The user may select
an entry from the Phonebook or Recent Calls
lists. To reactivate Voice Recognition, exit the
manual control mode by pushing and holding the
button. At that time, pushing thebutton
will start the Bluetooth�ŠHands-Free Phone
System.
Choosing a language
You can interact with the Bluetooth�ŠHands-
Free Phone System using several languages
that are available. For operations to change the
language, see “Audio main operation” (P.4-48)
or “Audio main operation” (P.4-56) .
Changing voice feedback volume
If you want to adjust the volume of the voice
feedback, push the volume control buttons on
the steering wheel while being provided with
feedback. You can also use the Power/VOL dial
on the control panel.
Initialization
When the ignition switch is placed in the ACC
or ON position, voice recognition is initialized,
which takes a few seconds. If the
button is
pushed before the initialization completes, the
system will announce “Hands-free phone sys-
tem not ready” and will not react to voice
commands.
Connecting procedure:
NOTE:
The connecting procedure must be per-
formed when the vehicle is stationary. If
the vehicle starts moving during the pro-
cedure, the procedure will be cancelled.
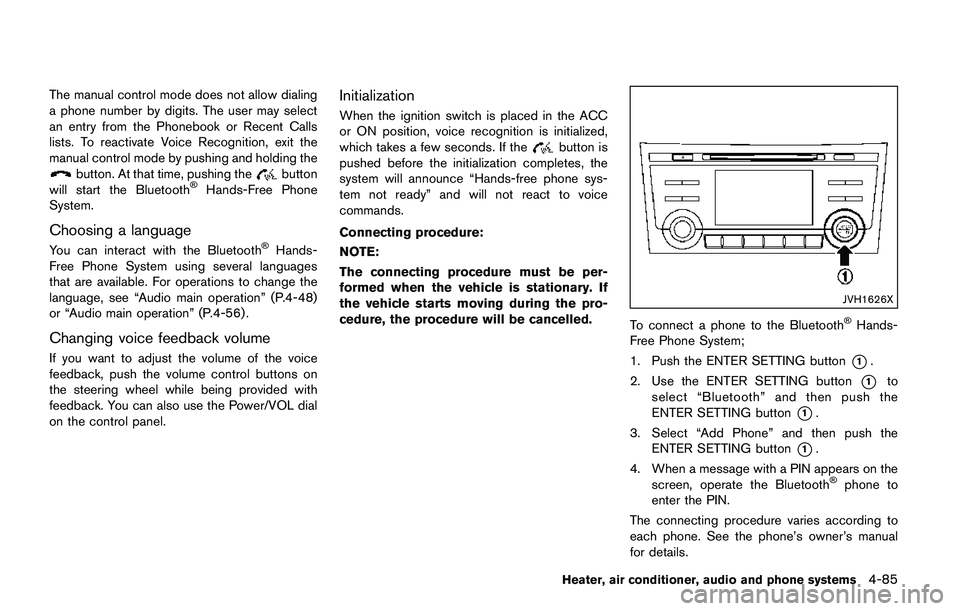
JVH1626X
To connect a phone to the Bluetooth�ŠHands-
Free Phone System;
1. Push the ENTER SETTING button
*1.
2. Use the ENTER SETTING button
*1to
select “Bluetooth” and then push the
ENTER SETTING button
*1.
3. Select “Add Phone” and then push the
ENTER SETTING button
*1.
4. When a message with a PIN appears on the
screen, operate the Bluetooth
�Šphone to
enter the PIN.
The connecting procedure varies according to
each phone. See the phone’s owner’s manual
for details.
Heater, air conditioner, audio and phone systems4-85
Page 273 of 508
4-92Heater, air conditioner, audio and phone systems
.Auto Reply (if so equipped)
Select to turn on or off the Auto Reply
function. When enabled, the vehicle will
automatically send a predefined text
message to the sender when a text
message is received while driving.
.Auto Reply Message (if so equipped)
Select to choose the message that is
sent when the Auto Reply function is
enabled. Choose from “I’m Driving” or
one of the three custom messages
stored in the system.
.Vehicle Signature On/Off (if so equipped)
Select to choose whether or not the
vehicle signature is added to outgoing
text messages from the vehicle. This
message cannot be changed or custo-
mized.
WARNING
.Use a phone after stopping your
vehicle in a safe location. If you
have to use a phone while driving,
exercise extreme caution at all
times so full attention may be given
to vehicle operation.
.If you are unable to devote full
attention to vehicle operation while
talking on the phone, pull off the
road to a safe location and stop
your vehicle.
CAUTION
To avoid discharging the vehicle bat-
tery, use a phone after starting the
engine.
Your vehicle is equipped with the Bluetooth
�Š
Hands-Free Phone System. If you have a
compatible Bluetooth�Šenabled cellular phone,
you can set up the wireless connection between
your cellular phone and the in-vehicle phone
module. With Bluetooth
�Šwireless technology,
you can make or receive a hands-free telephonecall with your cellular phone in the vehicle.
Once your cellular phone is connected to the in-
vehicle phone module, no other phone connect-
ing procedure is required. Your phone is
automatically connected with the in-vehicle
phone module when the ignition switch is
placed in the ON position with the connected
cellular phone turned on and carried in the
vehicle.
You can register up to five different Bluetooth
�Š
cellular phones to the in-vehicle phone module.
However, you can talk on only one cellular phone
at a time.
NISSAN Voice Recognition system supports the
phone commands, so dialing a phone number
using your voice is possible. For more details,
see “NISSAN Voice Recognition system (mod-
els with navigation system)” (P.4-99).
Before using the Bluetooth
�ŠHands-Free Phone
System, refer to the following notes.
.Set up the wireless connection between a
cellular phone and the in-vehicle phone
module before using the Hands-Free Phone
System.
.Some Bluetooth
�Šenabled cellular phones
may not be recognized by the in-vehicle
phone module. Please visit www.nissanusa.
com/bluetooth or www.nissan.ca/bluetooth
for a recommended phone list and connect-
Bluetooth�ŠHANDS-FREE PHONE
SYSTEM (models with navigation
system)
Page 289 of 508
5-4Starting and driving
WARNING
.Do not leave children or adults who
would normally require the support
of others alone in your vehicle. Pets
should not be left alone either. They
could accidentally injure themselves
or others through inadvertent op-
eration of the vehicle. Also, on hot,
sunny days, temperatures in a
closed vehicle could quickly become
high enough to cause severe or
possibly fatal injuries to people or
animals.
.Properly secure all cargo with ropes
or straps to help prevent it from
sliding or shifting. Do not place
cargo higher than the seatbacks. In
a sudden stop or collision, unse-
cured cargo could cause personal
injury.
EXHAUST GAS (carbon monoxide)
WARNING
.Do not breathe exhaust gas; it
contains colorless and odorless
carbon monoxide. Carbon monoxide
is dangerous. It can cause uncon-
sciousness or death.
.If you suspect that exhaust fumes
are entering the vehicle, drive with
all windows fully open, and have the
vehicle inspected immediately.
.Do not run the engine in closed
spaces such as a garage.
.Do not park the vehicle with the
engine running for an extended
period of time.
.Keep the liftgate closed while driv-
ing, otherwise exhaust gas could be
drawn into the passenger compart-
ment. If you must drive with the
liftgate open, follow these precau-
tions:
— Open all the windows.
— Turn the air recirculation mode
off and set the fan speed control
to the highest level to circulatethe air.
.If a special body or other equipment
is added for recreational or other
usage, follow the manufacturer’s
recommendation to prevent carbon
monoxide entry into the vehicle.
(Some recreational vehicle appli-
ances such as stoves, refrigerators,
heaters, etc. may also generate
carbon monoxide.)
.The exhaust system and body
should be inspected by a qualified
mechanic whenever:
— Your vehicle is raised while
being serviced.
— You suspect that exhaust fumes
are entering into the passenger
compartment.
— You notice a change in the
sound of the exhaust system.
— You have had an accident invol-
ving damage to the exhaust
system, underbody, or rear of
the vehicle.
PRECAUTIONS WHEN STARTING
AND DRIVING
Page 295 of 508
5-10Starting and driving
3. When appropriate, slowly release the accel-
erator pedal to gradually slow the vehicle.
4. Gradually steer the vehicle to a safe location
off the road and away from traffic if possible.
5. Lightly apply the brake pedal to gradually
stop the vehicle.
6. Turn on the hazard warning flashers and
either contact a roadside emergency service
to change the tire or see “Changing a flat
tire” (P.6-4) of this Owner’s Manual.
DRINKING ALCOHOL/DRUGS AND
DRIVING
WARNING
Never drive under the influence of
alcohol or drugs. Alcohol in the blood-
stream reduces coordination, delays
reaction time and impairs judgement.
Driving after drinking alcohol increases
the likelihood of being involved in an
accident injuring yourself and others.
Additionally, if you are injured in an
accident, alcohol can increase the se-
verity of the injury.
NISSAN is committed to safe driving. However,
you must choose not to drive under the influenceof alcohol. Every year thousands of people are
injured or killed in alcohol-related accidents.
Although the local laws vary on what is
considered to be legally intoxicated, the fact is
that alcohol affects all people differently and
most people underestimate the effects of
alcohol.
Remember, drinking and driving don’t mix! And
that is true for drugs, too (over-the-counter,
prescription, and illegal drugs) . Don’t drive if
your ability to operate your vehicle is impaired by
alcohol, drugs, or some other physical condition.
DRIVING SAFETY PRECAUTIONS
Your vehicle is designed for both normal and off-
road use. However, avoid driving in deep water
or mud as your vehicle is mainly designed for
leisure use, unlike a conventional off-road
vehicle.
Remember that Two-Wheel Drive (2WD) mod-
els are less capable than All-Wheel Drive
(AWD) models for rough road driving and
extrication when stuck in deep snow, mud, or
the like.
Please observe the following precautions:
WARNING
.Drive carefully when off the road
and avoid dangerous areas. Every
person who drives or rides in this
vehicle should be seated with their
seat belt fastened. This will keep
you and your passengers in position
when driving over rough terrain.
.Do not drive across steep slopes.
Instead drive either straight up or
straight down the slopes. Off-road
vehicles can tip over sideways much
more easily than they can forward or
backward.
.Many hills are too steep for any
vehicle. If you drive up them, you
may stall. If you drive down them,
you may not be able to control your
speed. If you drive across them, you
may roll over.
.Do not shift ranges while driving on
downhill grades as this could cause
loss of control of the vehicle.
.Stay alert when driving to the top of
a hill. At the top there could be a
drop-off or other hazard that could
cause an accident.