reset NISSAN QASHQAI 2017 Owner´s Manual
[x] Cancel search | Manufacturer: NISSAN, Model Year: 2017, Model line: QASHQAI, Model: NISSAN QASHQAI 2017Pages: 508, PDF Size: 2.68 MB
Page 105 of 508
2-26Instruments and controls
Language
The language of the vehicle information display
can be changed.
Use the
button*2, and the OK button*1
to select and change the language of the vehicle
information display.
Factory Reset
The settings in the vehicle information display
can be reset back to the factory default. To reset
the vehicle information display:
1. Select “Factory Reset” using the
button
*2and press the OK button*1.
2. Select “YES” to return all settings back to
default by pressing the OK button
*1.
Page 113 of 508
2-34Instruments and controls
TRIP COMPUTER
1. Safety Shield (if so equipped)
The safety shield mode shows the operating
condition for the following systems.
.Lane Departure Warning (LDW) (if so
equipped)
.Lane Departure Prevention (LDP) (if so
equipped)
.Blind Spot Warning (BSW) (if so equipped)
.Forward Emergency Braking (FEB) (if so
equipped)
.Forward Emergency Braking (FEB) with
pedestrian detection system (if so
equipped)
For more details, see “Lane Departure Warning
(LDW)” (P.5-31) , “Lane Departure Prevention
(LDP)” (P.5-36) , “Blind Spot Warning (BSW)”
(P.5-42) , “Forward Emergency Braking (FEB)”
(P.5-80) or “Forward Emergency Braking (FEB)
with pedestrian detection system” (P.5-86) .
2. Average speed 1 and 2 (MPH or km/h)
The average speed 1 mode shows the average
vehicle speed since the last reset. The average
speed 2 mode shows the average vehicle speed
since the time the ignition switch was turned
ON. The average speed 2 is automatically reset
each time the ignition is placed in the OFFposition.
Resetting is done by pushing the OK
*1button.
When the OK
*1button is pushed, the
following menu items are displayed.
.Cancel
— Return to the previous screen without
resetting.
.Average Speed
— Reset the average speed.
.All
— Reset all items of “Average Speed”,
“Elapsed time and trip odometer” and
“Fuel economy.”
Once the “Average speed 1” is displayed, you
can use
*2buttons to switch between the
“Average speed 1” and “Average speed 2.”
The display is updated every 30 seconds. The
first 30 seconds after a reset, the display shows
“——”.
3. Elapsed time and trip odometer 1 and
2 (mile or km)
Elapsed time:
The elapsed time mode 1 shows the time since
the last reset. The elapsed time 2 mode shows
the time since the ignition switch was turned
ON. (The trip odometer is also reset at the same
time.)
Trip odometer:
The trip odometer 1 mode shows the total
distance the vehicle has been driven since the
last reset. The trip odometer 2 mode shows the
total distance the vehicle has been driven since
the time the ignition switch was placed in the
ON position. (The elapsed time is also reset at
the same time.)
The elapsed time and trip odometer 2 is
automatically reset each time the ignition is
placed in the OFF position.
Resetting is done by pushing the OK
*1button.
When the OK
*1button is pushed, the
following menu items are displayed.
.Cancel
— Return to the previous screen without
resetting.
.Distance
Page 114 of 508
— Reset the elapsed time and trip od-
ometer.
.All
— Reset all items of “Average Speed”,
“Elapsed time and trip odometer” and
“Fuel economy.”
Once the “Elapsed time and trip odometer 1” is
displayed, you can use
*2buttons to
switch between the “Elapsed time and trip
odometer 1” and “Elapsed time and trip
odometer 2.”
4-5. Fuel economy 1 and 2 (MPG, l
(litre)/100 km or km/l(litre))
Current fuel consumption:
The current fuel consumption mode shows the
current fuel consumption.
Average fuel consumption:
The average fuel consumption 1 mode shows
the average fuel consumption since the last
reset. The average fuel consumption 2 mode
shows the average fuel consumption since the
time the ignition switch was placed in the ON
position. The average fuel consumption 2 is
automatically reset each time the ignition is
placed in the OFF position.
Resetting is done by pushing the OK
*1button.
When the OK
*1button is pushed, the
following menu items are displayed..Cancel
— Return to the previous screen without
resetting.
.Fuel Economy
— Reset the fuel economy.
.All
— Reset all items of “Average Speed”,
“Elapsed time and trip odometer” and
“Fuel economy”.
Once the “Fuel economy 1” is displayed, you
can use
*2buttons to switch between the
“Fuel economy 1” and “Fuel economy 2”.
The display is updated every 30 seconds. For
about the first 1/3 mile (500 m) after a reset, the
display shows “——”.
6. Audio
The audio mode shows the status of audio
information.
7. Navigation (if so equipped)
When the route guidance is set in the navigation
system, this item shows the navigation route
information.
8. Compass (if so equipped)
This display indicates the heading direction of
the vehicle.
9. “4x4-i” display (if so equipped)
When the “4x4-i” display is selected, you can
view the distribution ratio of the transmission
torque to the front and rear wheels during
driving.
10. Chassis control
When Active Trace Control, Active Engine Brake
(Continuously Variable Transmission (CVT)
models) or Active Ride Control system is
operated, it shows the operating condition. It
also shows operating condition of Hill Start
Assist. See “Active Trace Control” (P.5-106) ,
“Active Engine Brake (Continuously Variable
Transmission (CVT) models)” (P.5-107) , “Active
Ride Control” (P.5-108) or “Hill Start Assist
system” (P.5-109)for more details.
11. Tire Pressures
The tire pressure mode shows the pressure of all
four tires while the vehicle is driven.
When the Tire Pressure Low — Add Air warning
appears, the display can be switched to the tire
pressure mode by pushing the OK
*1button to
reveal additional details on the displayed warn-
ing.
Instruments and controls2-35
Page 172 of 508
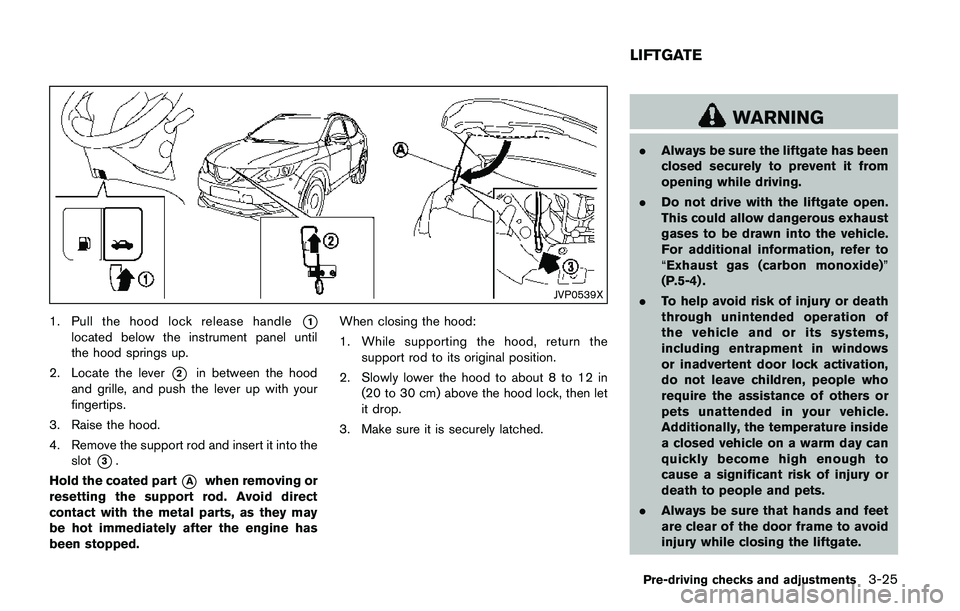
JVP0539X
1. Pull the hood lock release handle*1
located below the instrument panel until
the hood springs up.
2. Locate the lever
*2in between the hood
and grille, and push the lever up with your
fingertips.
3. Raise the hood.
4. Remove the support rod and insert it into the
slot
*3.
Hold the coated part
*Awhen removing or
resetting the support rod. Avoid direct
contact with the metal parts, as they may
be hot immediately after the engine has
been stopped.When closing the hood:
1. While supporting the hood, return the
support rod to its original position.
2. Slowly lower the hood to about 8 to 12 in
(20 to 30 cm) above the hood lock, then let
it drop.
3. Make sure it is securely latched.
WARNING
.Always be sure the liftgate has been
closed securely to prevent it from
opening while driving.
.Do not drive with the liftgate open.
This could allow dangerous exhaust
gases to be drawn into the vehicle.
For additional information, refer to
“Exhaust gas (carbon monoxide)”
(P.5-4) .
.To help avoid risk of injury or death
through unintended operation of
the vehicle and or its systems,
including entrapment in windows
or inadvertent door lock activation,
do not leave children, people who
require the assistance of others or
pets unattended in your vehicle.
Additionally, the temperature inside
a closed vehicle on a warm day can
quickly become high enough to
cause a significant risk of injury or
death to people and pets.
.Always be sure that hands and feet
are clear of the door frame to avoid
injury while closing the liftgate.
Pre-driving checks and adjustments3-25
LIFTGATE
Page 222 of 508
tentionally. Pulling the cable may
damage the port.
The vehicle is not equipped with a USB device.
USB devices should be purchased separately
as necessary.
This system cannot be used to format USB
devices. To format a USB device, use a personal
computer.
In some states/area, the USB device for the
front seats plays only sound without images for
regulatory reasons, even when the vehicle is
parked.
This system supports various USB memory
devices, USB hard drives and iPod
�Šplayers.
Some USB devices may not be supported by
this system.
.Partitioned USB devices may not be played
correctly.
.Some characters used in other languages
(Chinese, Japanese, etc.) are not displayed
properly on display. Using English language
characters with a USB device is recom-
mended.
General notes for USB use:
Refer to your device manufacturer’s owner
information regarding the proper use and care
of the device.Notes for iPod
�Šuse:
“Made for iPod�Š”, “Made for iPhone�Š”, and
“Made for iPad�Š” mean that an electronic
accessory has been designed to connect
specifically to iPod
�Š, iPhone�Š, or iPad�Š, respec-
tively, and has been certified by the developer to
meet Apple performance standards.
Apple is not responsible for the operation of this
device or its compliance with safety and
regulatory standards.
Please note that the use of this accessory with
iPod
�Š, iPhone�Š, or iPad�Šmay affect wireless
performance.
iPad
�Š, iPhone�Š,iPod�Š, iPod classic�Š,iPod
nano�Š, iPod shuffle�Š, and iPod touch�Šare
trademarks of Apple Inc., registered in the U.S.
and other countries. Lightning is a trademark of
Apple Inc.
.Improperly plugging in the iPod
�Šmay cause
a checkmark to be displayed on and off
(flickering) . Always make sure that the iPod
�Š
is connected properly.
.An iPod nano�Š(1st Generation) may remain
in fast forward or rewind mode if it is
connected during a seek operation. In this
case, please manually reset the iPod
�Š.
.An iPod nano�Š(2nd Generation) will con-
tinue to fast-forward or rewind if it is
disconnected during a seek operation..An incorrect song title may appear when the
Play Mode is changed while using an iPod
nano
�Š(2nd Generation)
.Audiobooks may not play in the same order
as they appear on an iPod
�Š.
.Large video files cause slow responses in an
iPod
�Š. The display may momentarily black
out, but will soon recover.
.If an iPod
�Šautomatically selects large video
files while in the shuffle mode, the display
may momentarily black out, but will soon
recover.
Compressed Audio Files (MP3/WMA)
Explanation of terms:
.MP3 — MP3 is short for Moving Pictures
Experts Group Audio Layer 3. MP3 is the
most well known compressed digital audio
file format. This format allows for near “CD
quality” sound, but at a fraction of the size of
normal audio files. MP3 conversion of an
audio track can reduce the file size by
approximately a 10:1 ratio (Sampling: 44.1
kHz, Bit rate: 128 kbps) with virtually no
perceptible loss in quality. The compression
reduces certain parts of sound that seem
inaudible to most people.
.WMA — Windows Media Audio (WMA) is a
compressed audio format created by Micro-
Heater, air conditioner, audio and phone systems4-41
Page 229 of 508
4-48Heater, air conditioner, audio and phone systems
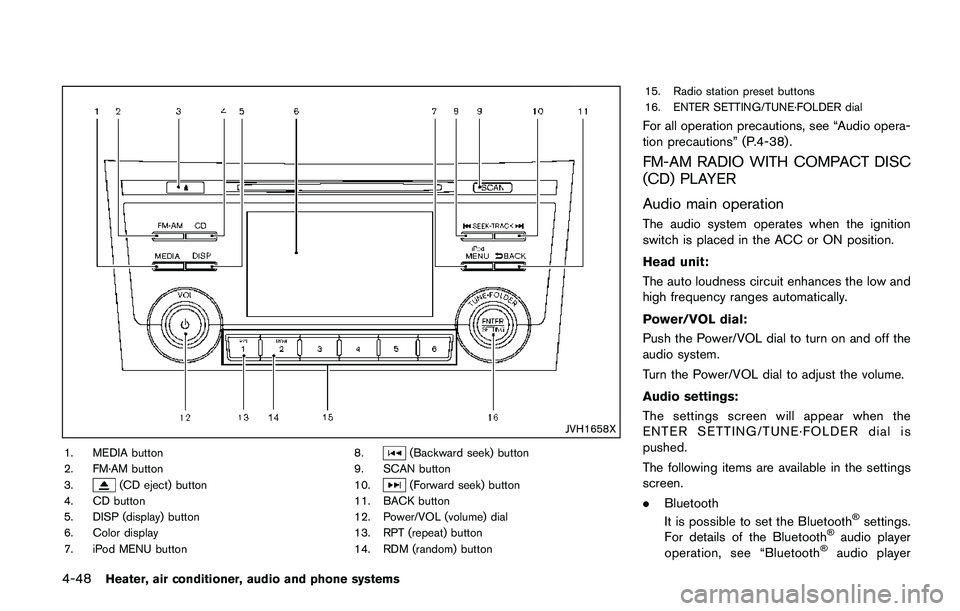
JVH1658X
1. MEDIA button
2. FM·AM button
3.
(CD eject) button
4. CD button
5. DISP (display) button
6. Color display
7. iPod MENU button8.
(Backward seek) button
9. SCAN button
10.
(Forward seek) button
11. BACK button
12. Power/VOL (volume) dial
13. RPT (repeat) button
14. RDM (random) button15. Radio station preset buttons
16. ENTER SETTING/TUNE·FOLDER dial
For all operation precautions, see “Audio opera-
tion precautions” (P.4-38) .
FM-AM RADIO WITH COMPACT DISC
(CD) PLAYER
Audio main operation
The audio system operates when the ignition
switch is placed in the ACC or ON position.
Head unit:
The auto loudness circuit enhances the low and
high frequency ranges automatically.
Power/VOL dial:
Push the Power/VOL dial to turn on and off the
audio system.
Turn the Power/VOL dial to adjust the volume.
Audio settings:
The settings screen will appear when the
ENTER SETTING/TUNE·FOLDER dial is
pushed.
The following items are available in the settings
screen.
.Bluetooth
It is possible to set the Bluetooth
�Šsettings.
For details of the Bluetooth�Šaudio player
operation, see “Bluetooth�Šaudio player
Page 231 of 508
4-50Heater, air conditioner, audio and phone systems
SETTING/TUNE·FOLDER dial and then
push the ENTER SETTING/TUNE·FOLDER
dial. Use the ENTER SETTING/
TUNE·FOLDER dial to select the preferred
language. Push the ENTER SETTING/
TUNE·FOLDER dial to apply the setting.
DISP button:
Display of the screen can be canceled by
pushing the
button. You can still listen to
music that is being played back even while the
screen display is turned off. If you want to
display the screen again, push the
button
once more. Pushing some of the audio source
buttons will also turn the screen back on and
display the screens of the corresponding
sources.
MEDIA button:
Pushing the
button will switch the audio
source as follows:
USB/iPod?Bluetooth Audio?AUX?USB/
iPod
FM-AM Radio operation
radio (FM·AM) band select:
Push the
button to change the band as
follows:
AM?FM1?FM2?AM
The FM stereo indicator (STEREO) is shown on
the screen during FM stereo reception. When
the stereo broadcast signal is weak, the radio
automatically changes from stereo to monaural
reception.
TUNE (Tuning):
Turn the ENTER SETTING/TUNE·FOLDER dial
for manual tuning.
Radio Data System (RDS):
RDS stands for Radio Data System, and is a
data information service transmitted by some
radio stations on the FM band (not AM band)
encoded within a regular radio broadcast.
Currently, most RDS stations are in large cities,
but many stations are now considering broad-
casting RDS data.
The station name, such as “The Groove”, is
displayed on the display.
SEEK tuning:
Push the
orbutton to tune from low tohigh or high to low frequencies and to stop at
the next broadcasting station.
SCAN tuning:
Push the
button to tune from low to high
frequencies and stop at each broadcasting
station for several seconds. Pushing the
button again during this several seconds period
will stop SCAN tuning and the radio will remain
tuned to that station.
If the
button is not pushed within this
period, SCAN tuning moves to the next station.
toStation memory operations:
Up to 12 stations can be set for the FM band (6
each for FM1 and FM2) and 6 stations can be
set for the AM band.
1. Choose the radio band using the
button.
2. Tune to the desired station.
3. Push and hold the desired station preset
button
tountil beep sounds.
4. The station indicator will then come on. The
station is now set to the button memory.
5. Other buttons can be set in the same
manner.
If the battery cable is disconnected, or if the fuse
opens, the station memory will be erased. In that
Page 232 of 508
case, reset the desired stations.
CD player operation
Place the ignition switch in the ACC or ON
position. Insert the Compact Disc (CD) into the
slot with the label side facing up. The CD will be
guided automatically into the slot and start
playing.
After loading the CD, the number of tracks on
the CD and the play time will appear on the
display.
If another audio source is already operating, it
will automatically turn off and the CD will play.
If the system has been turned off while the CD
was playing, pushing the Power/VOL dial will
start the CD.
PLAY:
When the CD button is pushed while a CD is
loaded, the CD will start playing.
CD/MP3 display mode:
While listening to an MP3/WMA CD, certain text
may be displayed on the screen if the CD has
been encoded with text information. Depending
on how the MP3/WMA CD is encoded,
information such as Artist, Song and Folder will
be displayed. The track number and the total
number of tracks in the current folder or on the
current disc are displayed on the screen as well.
SEEK/TRACK:
When the
orbutton is pushed and hold
while the CD is being played, the CD will play
while fast forwarding or rewinding. When the
button is released, the CD will return to normal
play speed.
When the
orbutton is pushed while
the CD is being played, the next track or the
beginning of the current track on the CD will be
played. Push the
button again to select the
previous track.
REPEAT (RPT):
When the
button is pushed while the CD is
played, the play pattern can be changed as
follows:
(CD)
(Normal)�œ1 Track Repeat
(CD with compressed audio files)
(Normal)?1 Folder Repeat?1 Track Repeat
?(Normal)
RANDOM (RDM):
When the
button is pushed while a CD is
being played, the play pattern can be changed
as follows:
(CD)
(Normal)�œ1 Disc Random
(CD with compressed audio files)
(Normal)?1 Disc Random?1 Folder
Random?(Normal)
CD eject:
When the
button is pushed with the CD
loaded, the CD will be ejected.
If the CD comes out and is not removed, it
will be pulled back into the slot to protect
it.
USB memory player operation
USB memory main operation:
The USB connection port is located on the
lower part of the instrument panel. (See “USB
(Universal Serial Bus) connection port” (P.4-
72) .) Connect a USB memory into the port.
When the audio system operates, the system
will switch to the USB memory mode auto-
matically.
If the system has been turned off while the USB
Heater, air conditioner, audio and phone systems4-51
Page 235 of 508
4-54Heater, air conditioner, audio and phone systems
Regulatory information:
Bluetooth�Štrademark:
Bluetooth�Šis a trademark owned
by Bluetooth SIG, Inc. and li-
censed to Visteon Corporation.
Connecting Bluetooth�Šdevice:
To connect your Bluetooth�Šdevice to the
vehicle, follow the procedure below:
1. Push the ENTER SETTING/TUNE·FOLDER
dial.
JVH0620X
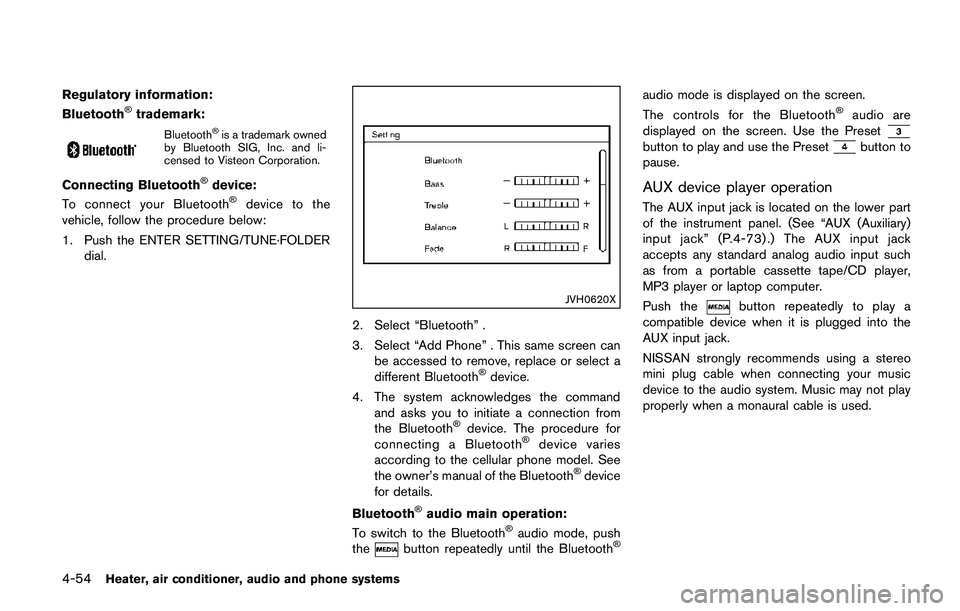
2. Select “Bluetooth” .
3. Select “Add Phone” . This same screen can
be accessed to remove, replace or select a
different Bluetooth
�Šdevice.
4. The system acknowledges the command
and asks you to initiate a connection from
the Bluetooth
�Šdevice. The procedure for
connecting a Bluetooth�Šdevice varies
according to the cellular phone model. See
the owner’s manual of the Bluetooth
�Šdevice
for details.
Bluetooth
�Šaudio main operation:
To switch to the Bluetooth�Šaudio mode, push
thebutton repeatedly until the Bluetooth�Š
audio mode is displayed on the screen.
The controls for the Bluetooth�Šaudio are
displayed on the screen. Use the Preset
button to play and use the Presetbutton to
pause.
AUX device player operation
The AUX input jack is located on the lower part
of the instrument panel. (See “AUX (Auxiliary)
input jack” (P.4-73) .) The AUX input jack
accepts any standard analog audio input such
as from a portable cassette tape/CD player,
MP3 player or laptop computer.
Push the
button repeatedly to play a
compatible device when it is plugged into the
AUX input jack.
NISSAN strongly recommends using a stereo
mini plug cable when connecting your music
device to the audio system. Music may not play
properly when a monaural cable is used.
Page 236 of 508
JVH1590X
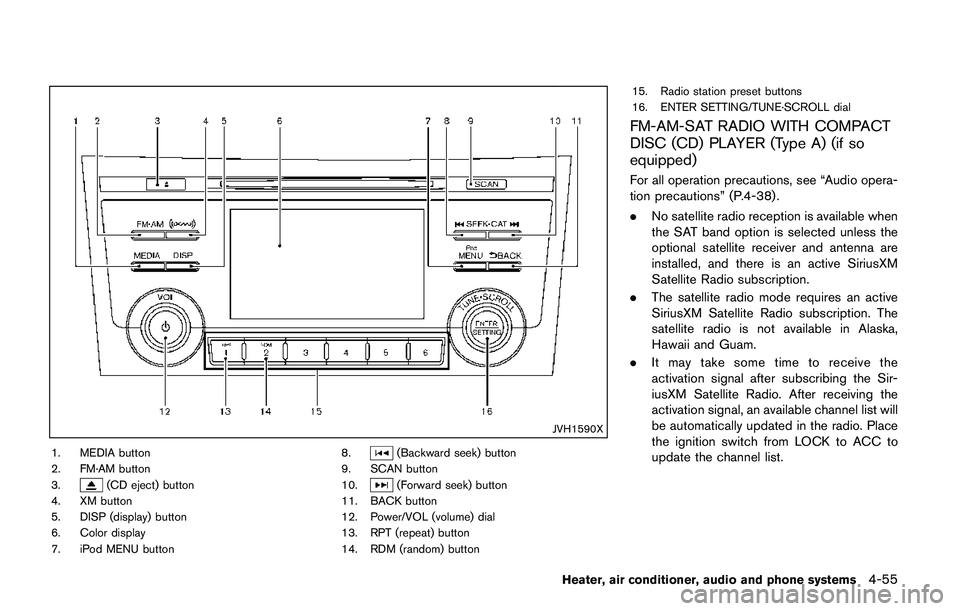
1. MEDIA button
2. FM·AM button
3.
(CD eject) button
4. XM button
5. DISP (display) button
6. Color display
7. iPod MENU button8.
(Backward seek) button
9. SCAN button
10.
(Forward seek) button
11. BACK button
12. Power/VOL (volume) dial
13. RPT (repeat) button
14. RDM (random) button15. Radio station preset buttons
16. ENTER SETTING/TUNE·SCROLL dial
FM-AM-SAT RADIO WITH COMPACT
DISC (CD) PLAYER (Type A) (if so
equipped)
For all operation precautions, see “Audio opera-
tion precautions” (P.4-38) .
.No satellite radio reception is available when
the SAT band option is selected unless the
optional satellite receiver and antenna are
installed, and there is an active SiriusXM
Satellite Radio subscription.
.The satellite radio mode requires an active
SiriusXM Satellite Radio subscription. The
satellite radio is not available in Alaska,
Hawaii and Guam.
.It may take some time to receive the
activation signal after subscribing the Sir-
iusXM Satellite Radio. After receiving the
activation signal, an available channel list will
be automatically updated in the radio. Place
the ignition switch from LOCK to ACC to
update the channel list.
Heater, air conditioner, audio and phone systems4-55