NISSAN QUEST 2000 V41 / 2.G Owners Manual
Manufacturer: NISSAN, Model Year: 2000, Model line: QUEST, Model: NISSAN QUEST 2000 V41 / 2.GPages: 292, PDF Size: 2.48 MB
Page 221 of 292
CAUTION
Oil level should be checked regularly.
Operating with an insufficient amount
of oil can damage the engine, and such
damage is not covered by warranty.
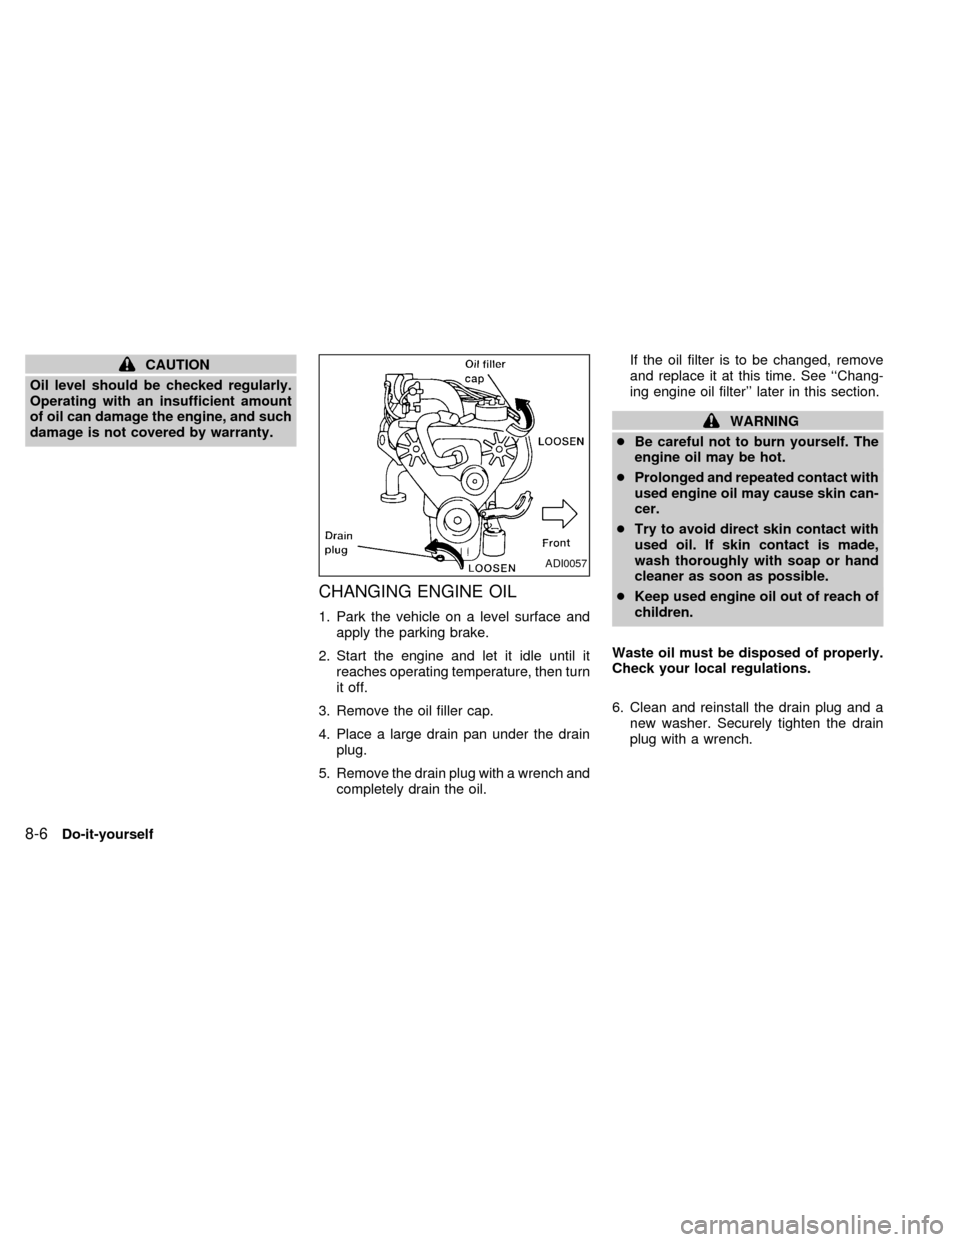
CHANGING ENGINE OIL
1. Park the vehicle on a level surface and
apply the parking brake.
2. Start the engine and let it idle until it
reaches operating temperature, then turn
it off.
3. Remove the oil filler cap.
4. Place a large drain pan under the drain
plug.
5. Remove the drain plug with a wrench and
completely drain the oil.If the oil filter is to be changed, remove
and replace it at this time. See ``Chang-
ing engine oil filter'' later in this section.
WARNING
cBe careful not to burn yourself. The
engine oil may be hot.
cProlonged and repeated contact with
used engine oil may cause skin can-
cer.
cTry to avoid direct skin contact with
used oil. If skin contact is made,
wash thoroughly with soap or hand
cleaner as soon as possible.
cKeep used engine oil out of reach of
children.
Waste oil must be disposed of properly.
Check your local regulations.
6. Clean and reinstall the drain plug and a
new washer. Securely tighten the drain
plug with a wrench.
ADI0057
8-6Do-it-yourself
ZX
Page 222 of 292
Drain plug tightening torque:
22 to 29 ft-lb
(29 to 39 Nzm)
Do not use excessive force.
7. Refill the engine with a recommended oil
through the oil filler opening then install
the oil filler cap securely.
See the ``Technical and consumer infor-
mation'' section for drain and refill capac-
ity.
The drain and refill capacity depends on
the oil temperature and drain time. Use
these specifications for reference only.
Always use the dipstick to determine
when the proper amount of oil is in the
engine.
8. Start the engine. Check for leakage
around the drain plug. Correct as re-
quired.
9. Turn the engine off and wait several
minutes. Check the oil level with the
dipstick. Add engine oil if necessary.
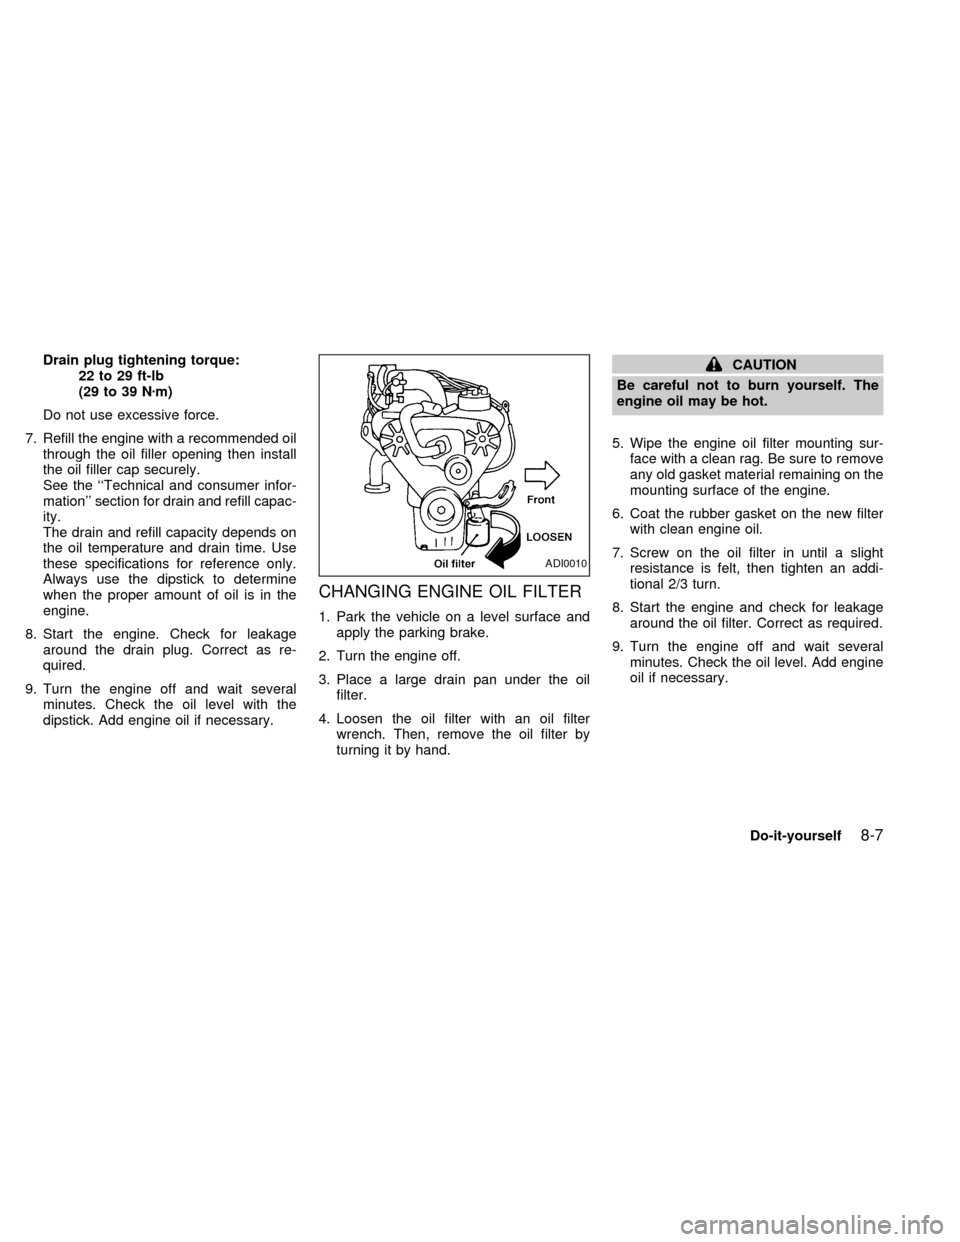
CHANGING ENGINE OIL FILTER
1. Park the vehicle on a level surface and
apply the parking brake.
2. Turn the engine off.
3. Place a large drain pan under the oil
filter.
4. Loosen the oil filter with an oil filter
wrench. Then, remove the oil filter by
turning it by hand.
CAUTION
Be careful not to burn yourself. The
engine oil may be hot.
5. Wipe the engine oil filter mounting sur-
face with a clean rag. Be sure to remove
any old gasket material remaining on the
mounting surface of the engine.
6. Coat the rubber gasket on the new filter
with clean engine oil.
7. Screw on the oil filter in until a slight
resistance is felt, then tighten an addi-
tional 2/3 turn.
8. Start the engine and check for leakage
around the oil filter. Correct as required.
9. Turn the engine off and wait several
minutes. Check the oil level. Add engine
oil if necessary.
ADI0010
Do-it-yourself8-7
ZX
Page 223 of 292
WARNING
cWhen the engine is running, keep
hands, jewelry and clothing away
from any moving parts such as the
cooling fan and drive belts.
cAutomatic transmission fluid is poi-
sonous and should be stored care-
fully in marked containers out of the
reach of children.
TEMPERATURE CONDITIONS
FOR CHECKING
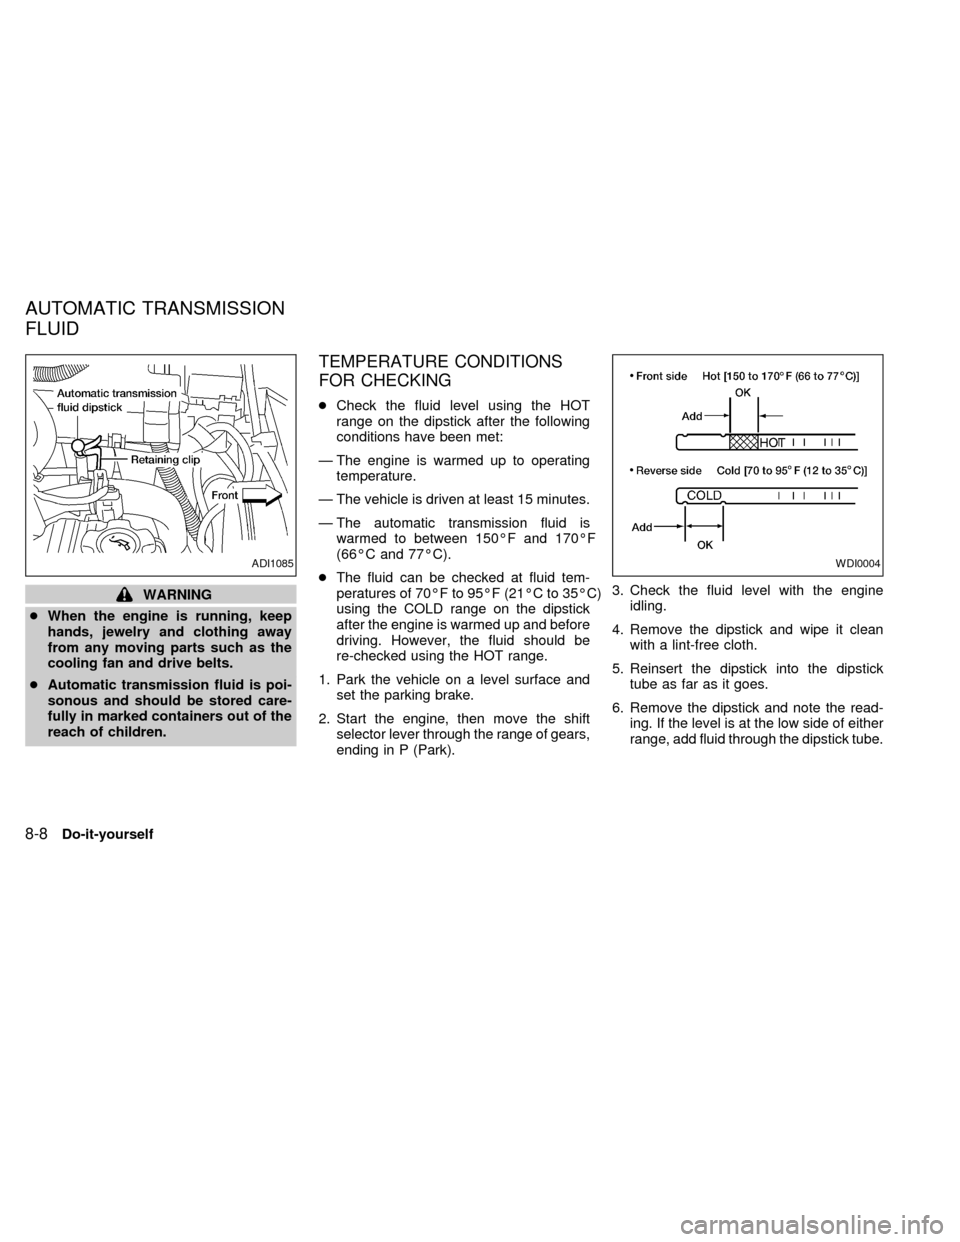
cCheck the fluid level using the HOT
range on the dipstick after the following
conditions have been met:
Ð The engine is warmed up to operating
temperature.
Ð The vehicle is driven at least 15 minutes.
Ð The automatic transmission fluid is
warmed to between 150ÉF and 170ÉF
(66ÉC and 77ÉC).
cThe fluid can be checked at fluid tem-
peratures of 70ÉF to 95ÉF (21ÉC to 35ÉC)
using the COLD range on the dipstick
after the engine is warmed up and before
driving. However, the fluid should be
re-checked using the HOT range.
1. Park the vehicle on a level surface and
set the parking brake.
2. Start the engine, then move the shift
selector lever through the range of gears,
ending in P (Park).3. Check the fluid level with the engine
idling.
4. Remove the dipstick and wipe it clean
with a lint-free cloth.
5. Reinsert the dipstick into the dipstick
tube as far as it goes.
6. Remove the dipstick and note the read-
ing. If the level is at the low side of either
range, add fluid through the dipstick tube.
WDI0004ADI1085
AUTOMATIC TRANSMISSION
FLUID
8-8Do-it-yourself
ZX
Page 224 of 292
CAUTION
DO NOT OVERFILL. Use ONLY Nissan
Matic `D' (Continental U.S. and Alaska)
or Canada NISSAN Automatic Trans-
mission Fluid. Dexron
TMIII/MerconTM
or equivalent may also be used. Out-
side the continental United States and
Alaska contact a Nissan dealership for
more information regarding suitable
fluids, including recommended
brand(s) of Dexron
TMIII/MerconTM.
NOTE:
If the vehicle has been driven for a long
time at high speeds, or in city traffic in
hot weather, or if it is being used to pull
a trailer, the accurate fluid level cannot
be read. You should wait until the fluid
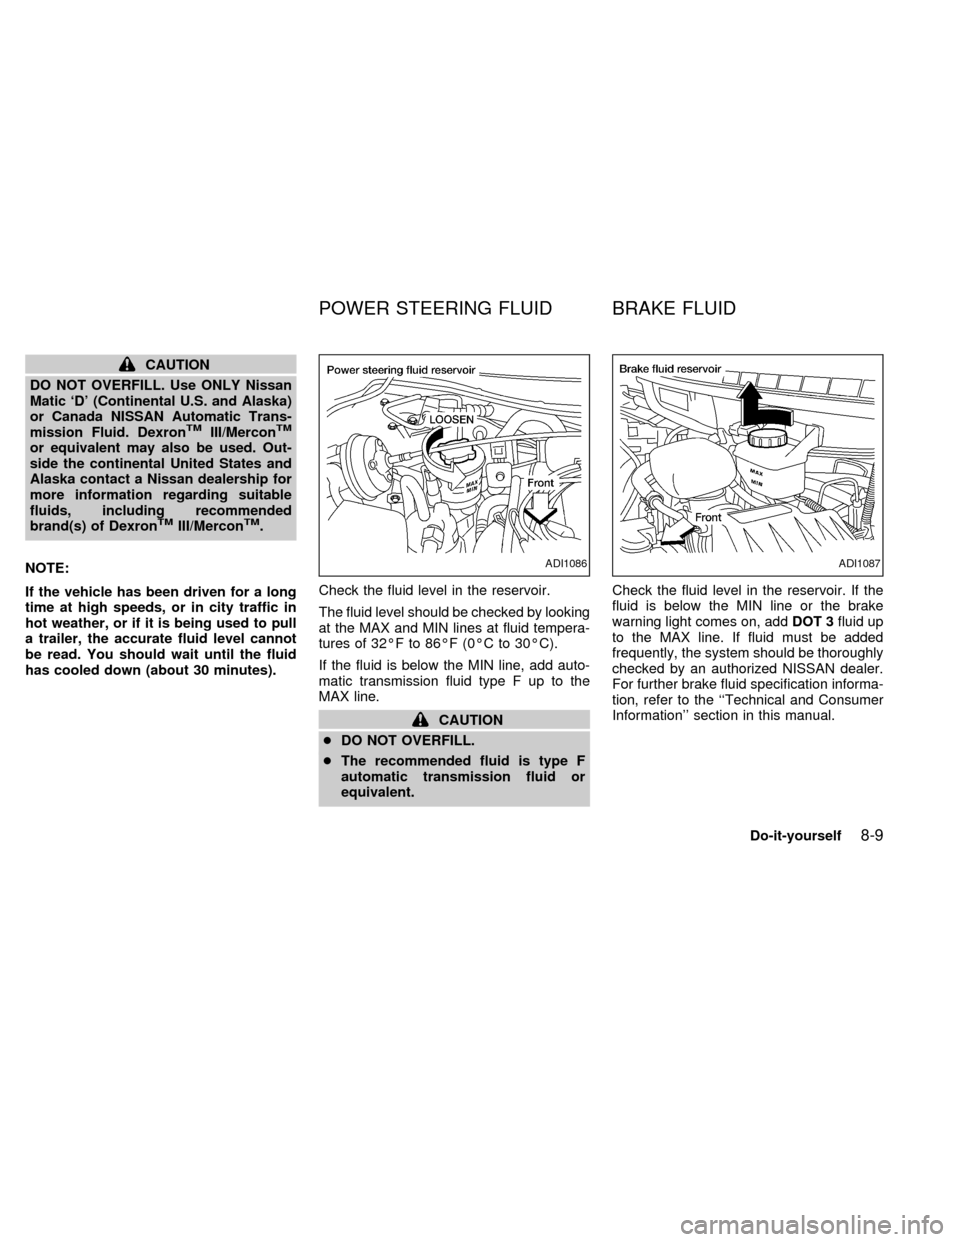
has cooled down (about 30 minutes).Check the fluid level in the reservoir.
The fluid level should be checked by looking
at the MAX and MIN lines at fluid tempera-
tures of 32ÉF to 86ÉF (0ÉC to 30ÉC).
If the fluid is below the MIN line, add auto-
matic transmission fluid type F up to the
MAX line.
CAUTION
cDO NOT OVERFILL.
cThe recommended fluid is type F
automatic transmission fluid or
equivalent.Check the fluid level in the reservoir. If the
fluid is below the MIN line or the brake
warning light comes on, addDOT 3fluid up
to the MAX line. If fluid must be added
frequently, the system should be thoroughly
checked by an authorized NISSAN dealer.
For further brake fluid specification informa-
tion, refer to the ``Technical and Consumer
Information'' section in this manual.
ADI1086ADI1087
POWER STEERING FLUID BRAKE FLUID
Do-it-yourself8-9
ZX
Page 225 of 292
WARNING
Use only new fluid from a sealed con-
tainer. Old, inferior, or contaminated
fluid may damage the brake system.
The use of improper fluids can damage
the brake system and affect the vehi-
cle's stopping ability.
CAUTION
Do not spill the fluid on painted sur-
faces. This will damage the paint. If
fluid is spilled, wash with water.
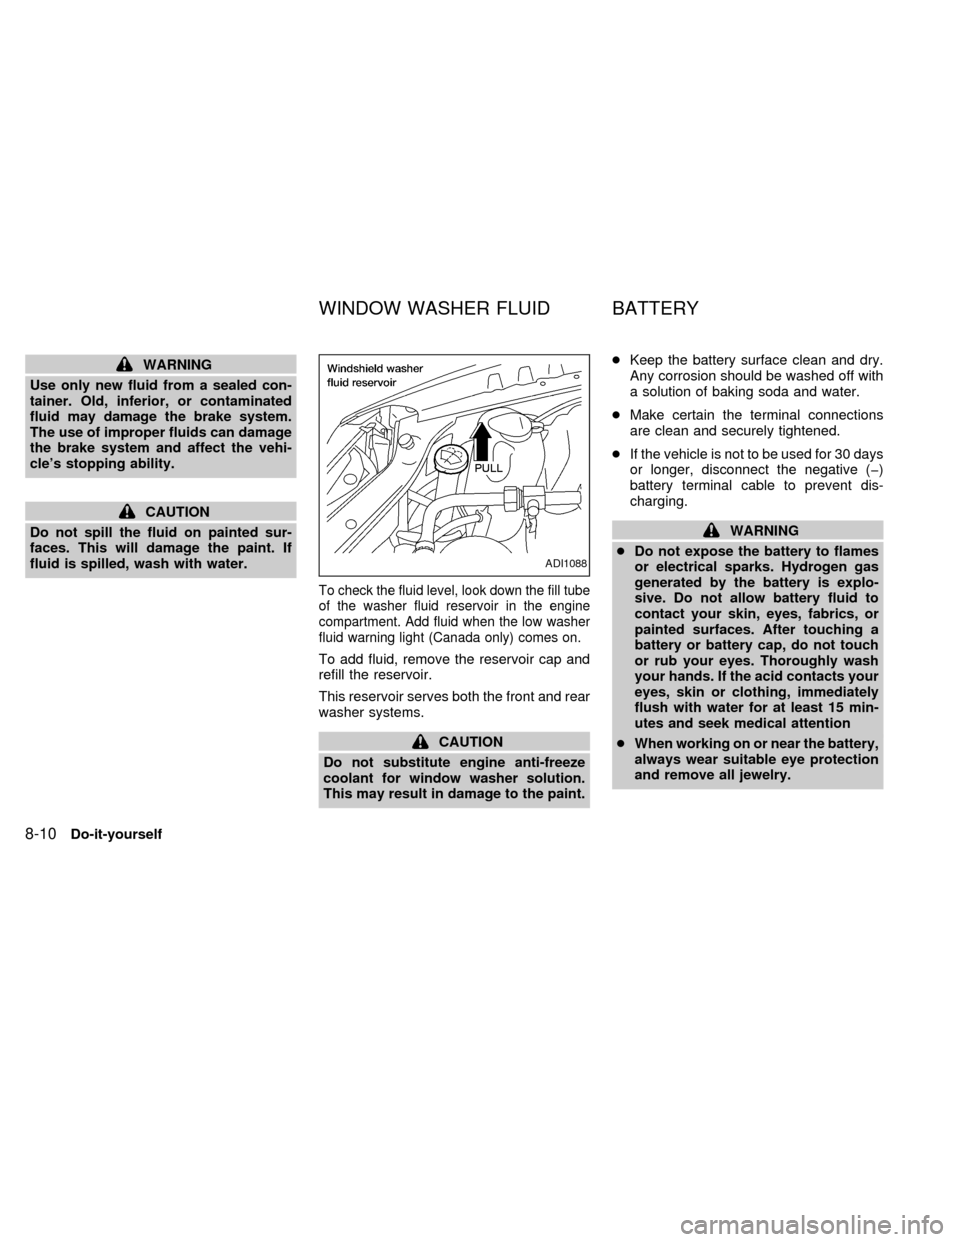
To check the fluid level, look down the fill tube
of the washer fluid reservoir in the engine
compartment. Add fluid when the low washer
fluid warning light (Canada only) comes on.
To add fluid, remove the reservoir cap and
refill the reservoir.
This reservoir serves both the front and rear
washer systems.
CAUTION
Do not substitute engine anti-freeze
coolant for window washer solution.
This may result in damage to the paint.cKeep the battery surface clean and dry.
Any corrosion should be washed off with
a solution of baking soda and water.
cMake certain the terminal connections
are clean and securely tightened.
cIf the vehicle is not to be used for 30 days
or longer, disconnect the negative (þ)
battery terminal cable to prevent dis-
charging.
WARNING
cDo not expose the battery to flames
or electrical sparks. Hydrogen gas
generated by the battery is explo-
sive. Do not allow battery fluid to
contact your skin, eyes, fabrics, or
painted surfaces. After touching a
battery or battery cap, do not touch
or rub your eyes. Thoroughly wash
your hands. If the acid contacts your
eyes, skin or clothing, immediately
flush with water for at least 15 min-
utes and seek medical attention
cWhen working on or near the battery,
always wear suitable eye protection
and remove all jewelry.
ADI1088
WINDOW WASHER FLUID BATTERY
8-10Do-it-yourself
ZX
Page 226 of 292
cBattery posts, terminals and related
accessories contain lead and lead
compounds. Wash hands after han-
dling.
cKeep the battery out of the reach of
children.
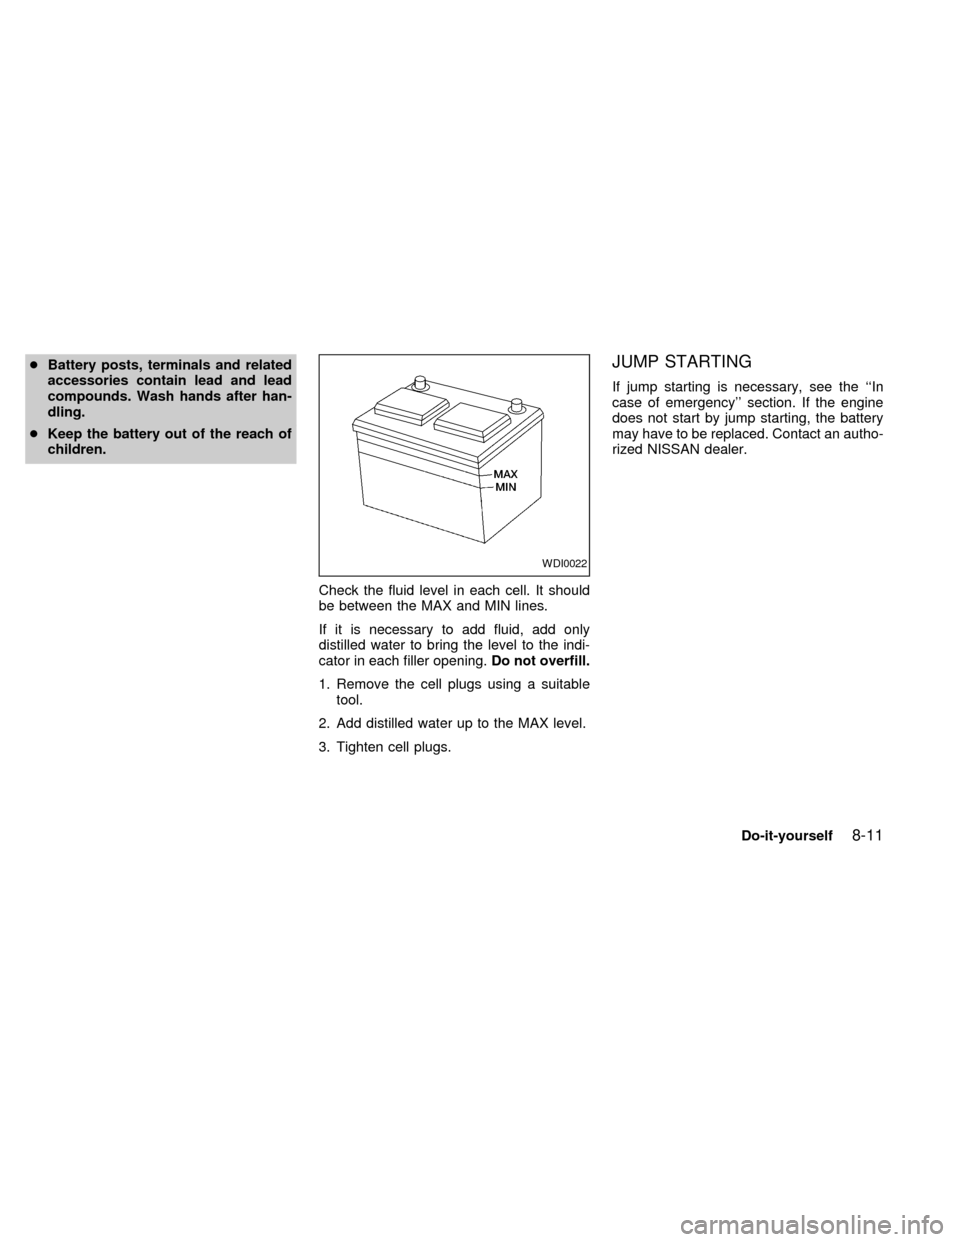
Check the fluid level in each cell. It should
be between the MAX and MIN lines.
If it is necessary to add fluid, add only
distilled water to bring the level to the indi-
cator in each filler opening.Do not overfill.
1. Remove the cell plugs using a suitable
tool.
2. Add distilled water up to the MAX level.
3. Tighten cell plugs.JUMP STARTING
If jump starting is necessary, see the ``In
case of emergency'' section. If the engine
does not start by jump starting, the battery
may have to be replaced. Contact an autho-
rized NISSAN dealer.
WDI0022
Do-it-yourself8-11
ZX
Page 227 of 292
WARNING
Be sure the ignition key is in the OFF or
LOCK position. The engine could rotate
unexpectedly.
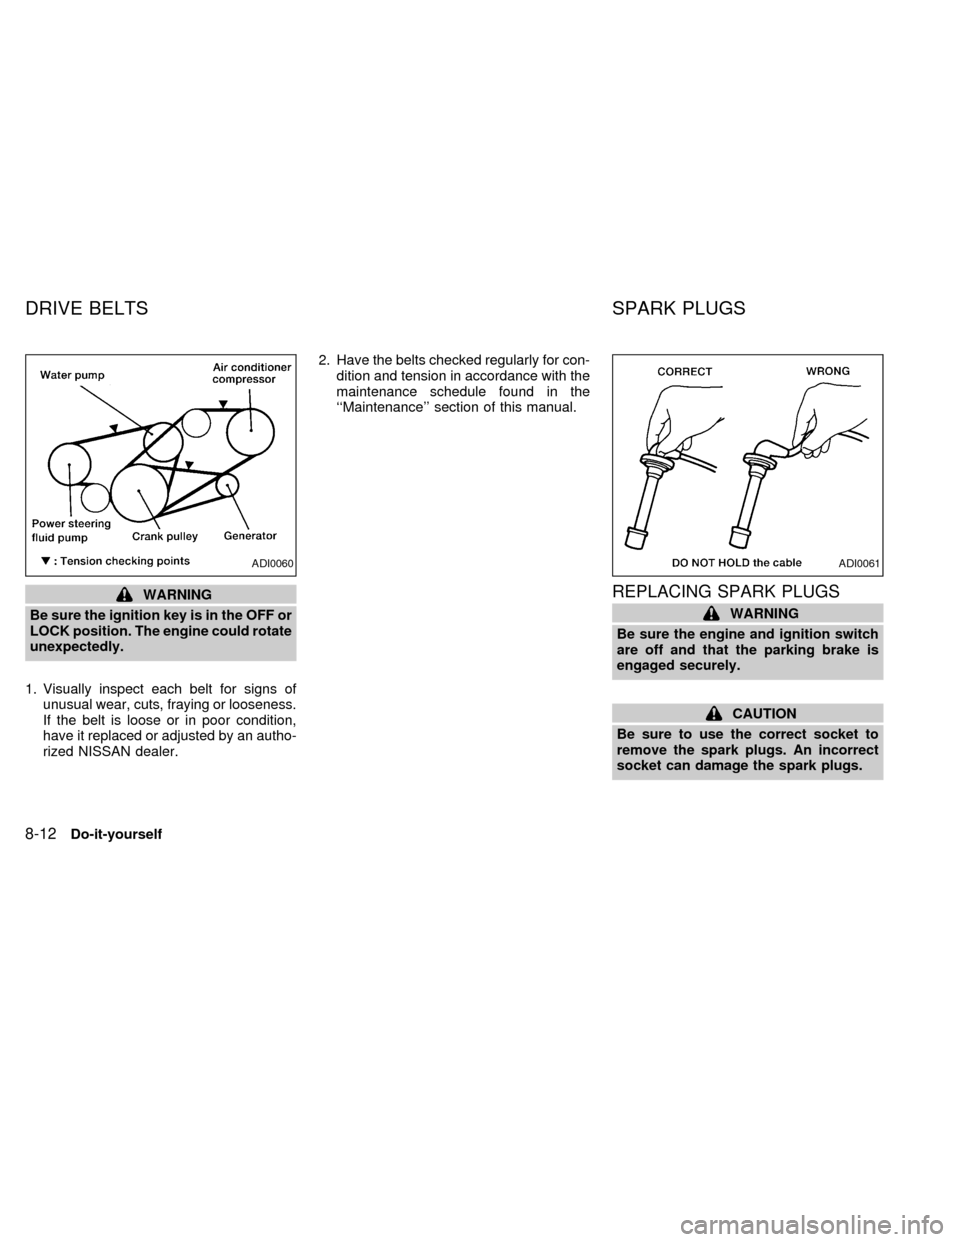
1. Visually inspect each belt for signs of
unusual wear, cuts, fraying or looseness.
If the belt is loose or in poor condition,
have it replaced or adjusted by an autho-
rized NISSAN dealer.2. Have the belts checked regularly for con-
dition and tension in accordance with the
maintenance schedule found in the
``Maintenance'' section of this manual.REPLACING SPARK PLUGS
WARNING
Be sure the engine and ignition switch
are off and that the parking brake is
engaged securely.
CAUTION
Be sure to use the correct socket to
remove the spark plugs. An incorrect
socket can damage the spark plugs.
ADI0060ADI0061
DRIVE BELTS SPARK PLUGS
8-12Do-it-yourself
ZX
Page 228 of 292

Platinum-tipped spark plugs
It is not necessary to replace platinum-
tipped spark plugs as frequently as conven-
tional type spark plugs because they last
much longer. Follow the maintenance
schedule, but do not reuse the spark plugs
by cleaning or regapping.
cAlways replace spark plugs with rec-
ommended or equivalent ones.
1. Disconnect the spark plug cables from
the spark plugs.
When disconnecting, always hold the boots,
not the cables.2. Remove the spark plugs with a spark
plug socket. The plug socket has a rub-
ber seal that holds the spark plug so it
does not fall when it is pulled out. Make
sure each spark plug is snugly fitted into
the plug socket.
3. Fit the new plugs, one at a time, into the
spark plug socket and install them.Use
only the specified spark plugs.Turn
each plug several full turns by hand, then
tighten with the spark plug socket to the
correct torque. Do not overtighten.
Spark plug tightening torque:
14 to 22 ft-lb (20 to 29 Nzm)
4. Holding the boot, re-connect each high
tension cable to its proper spark plug by
pushing it on until you feel a snap.The filter should not be cleaned and reused.
Replace it according to the maintenance
intervals shown in the ``Maintenance'' sec-
tion of this manual. When replacing the
filter, unclip the four clamps and remove the
filter. Wipe the inside of the air cleaner
housing and the cover with a damp cloth
when replacing filter.
ADI1100ADI0579
AIR CLEANER
Do-it-yourself8-13
ZX
Page 229 of 292
WARNING
cOperating the engine with the air
cleaner removed can cause you or
others to be burned. The air cleaner
not only cleans the air, it stops flame
if the engine backfires. If it isn't there
and the engine backfires, you could
be burned. Do not drive with the air
cleaner removed, and be careful
when working on the engine with the
air cleaner removed.
cNever pour fuel into the throttle body
or attempt to start the engine with
the air cleaner removed. Doing so
could result in serious injury.
CABIN AIR FILTER
The cabin air filter restricts the entry of
airborne dust and pollen particles and re-
duces some objectionable outside odors.
The filter is located just in front of the
windshield under the cowl cover on the
passenger side of the vehicle.
To replace the filter, perform the following
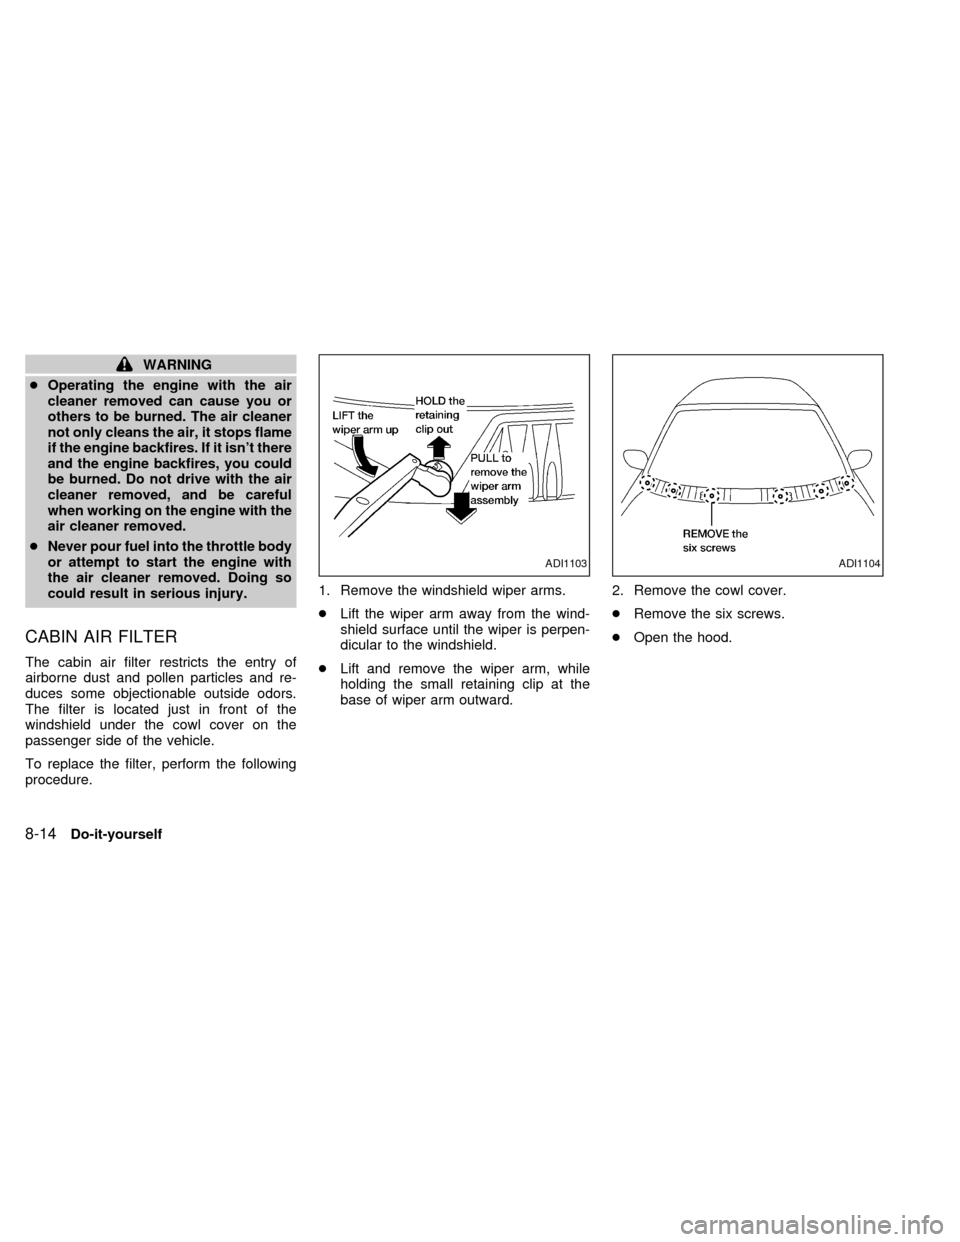
procedure.1. Remove the windshield wiper arms.
cLift the wiper arm away from the wind-
shield surface until the wiper is perpen-
dicular to the windshield.
cLift and remove the wiper arm, while
holding the small retaining clip at the
base of wiper arm outward.2. Remove the cowl cover.
cRemove the six screws.
cOpen the hood.
ADI1103ADI1104
8-14Do-it-yourself
ZX
Page 230 of 292

cRemove the four plastic screws from the
forward edge of the cowl cover.
cRemove the four plastic screw anchors.cDisconnect the windshield washer hose
at the passenger side rear corner of the
engine compartment.
cPush the windshield washer hose and
the grommet through the sheet metal
hole.
cLift the cowl cover and remove it from
the vehicle.3. Locate the cabin air filter on the passen-
ger side of the vehicle.
cRemove the four screws from the cabin
air filter cover.
cRemove the cabin air filter cover.
ADI1105ADI1106ADI1107
Do-it-yourself8-15
ZX