NISSAN SERENA 1993 Service Repair Manual
SERENA 1993
NISSAN
NISSAN
https://www.carmanualsonline.info/img/5/57387/w960_57387-0.png
NISSAN SERENA 1993 Service Repair Manual
Trending: fuse box diagram, torque, brake, tire pressure, control motor, length, checking oil
Page 1131 of 1254
STARTING
SYSTEM -
Starter -
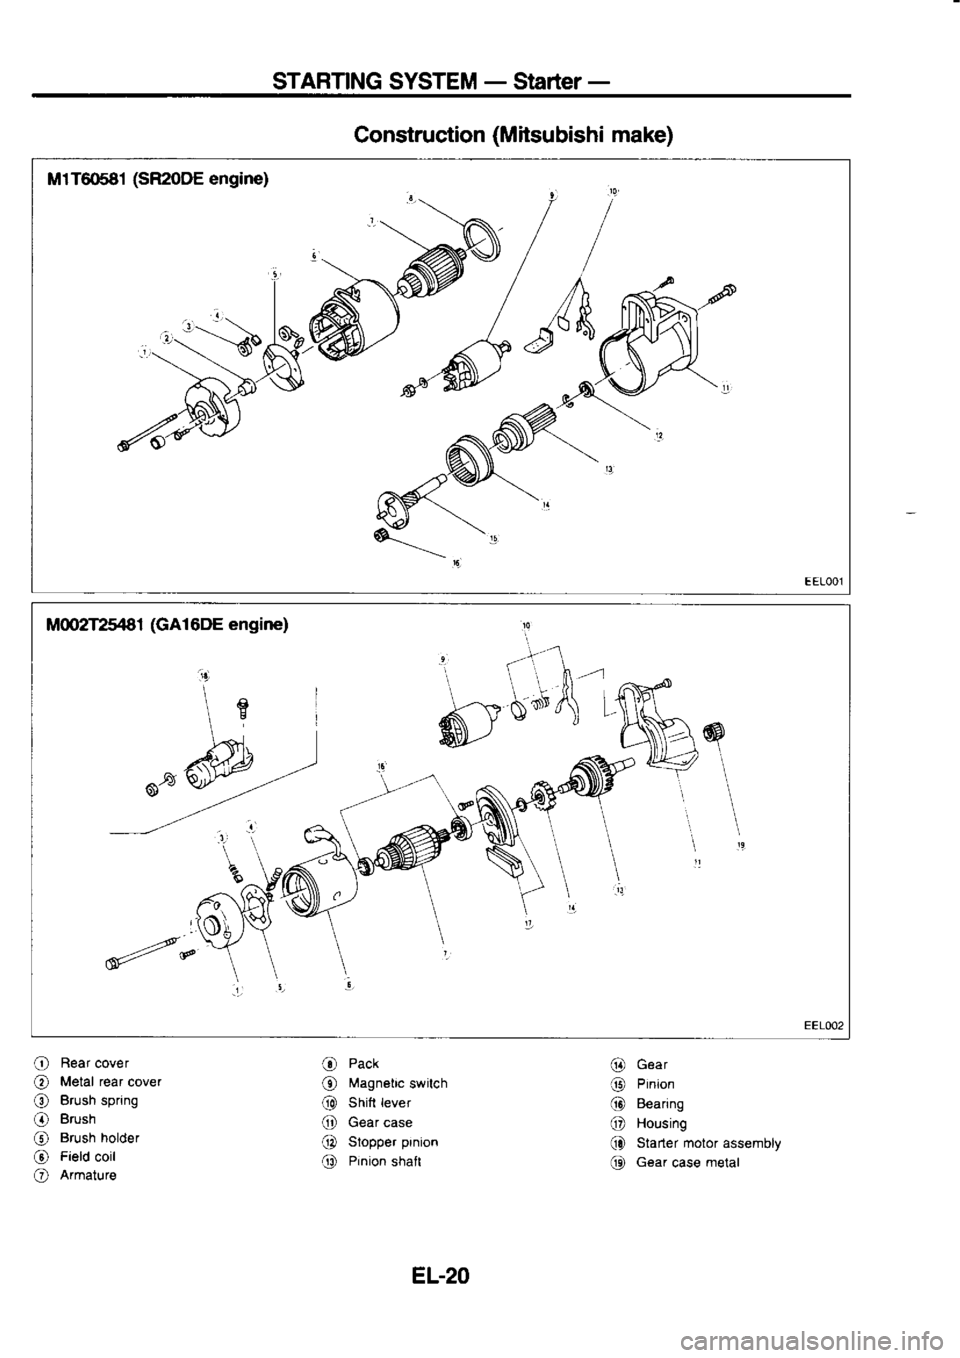
Construction (Mitsubishi
make)
M1T6681 (SR2oDE
engine)
O Rear
cover
O Metal
rear
cover
O Brush
spring
O Brush
@ Brush
holder
@ Field
coil
O Armature O
Pack
@ Magnetic
switch
@ Shitt
lever
@ Gear
case
@ Stopper
prnion
@ Pinion
shalt @
Gear
'rt Hrnron
@ Bearing
@ Housing
(} Starter motor
assembly
(t Gear case metal
EL-20
Page 1132 of 1254
STARTING
SYSTEM -
Stader-
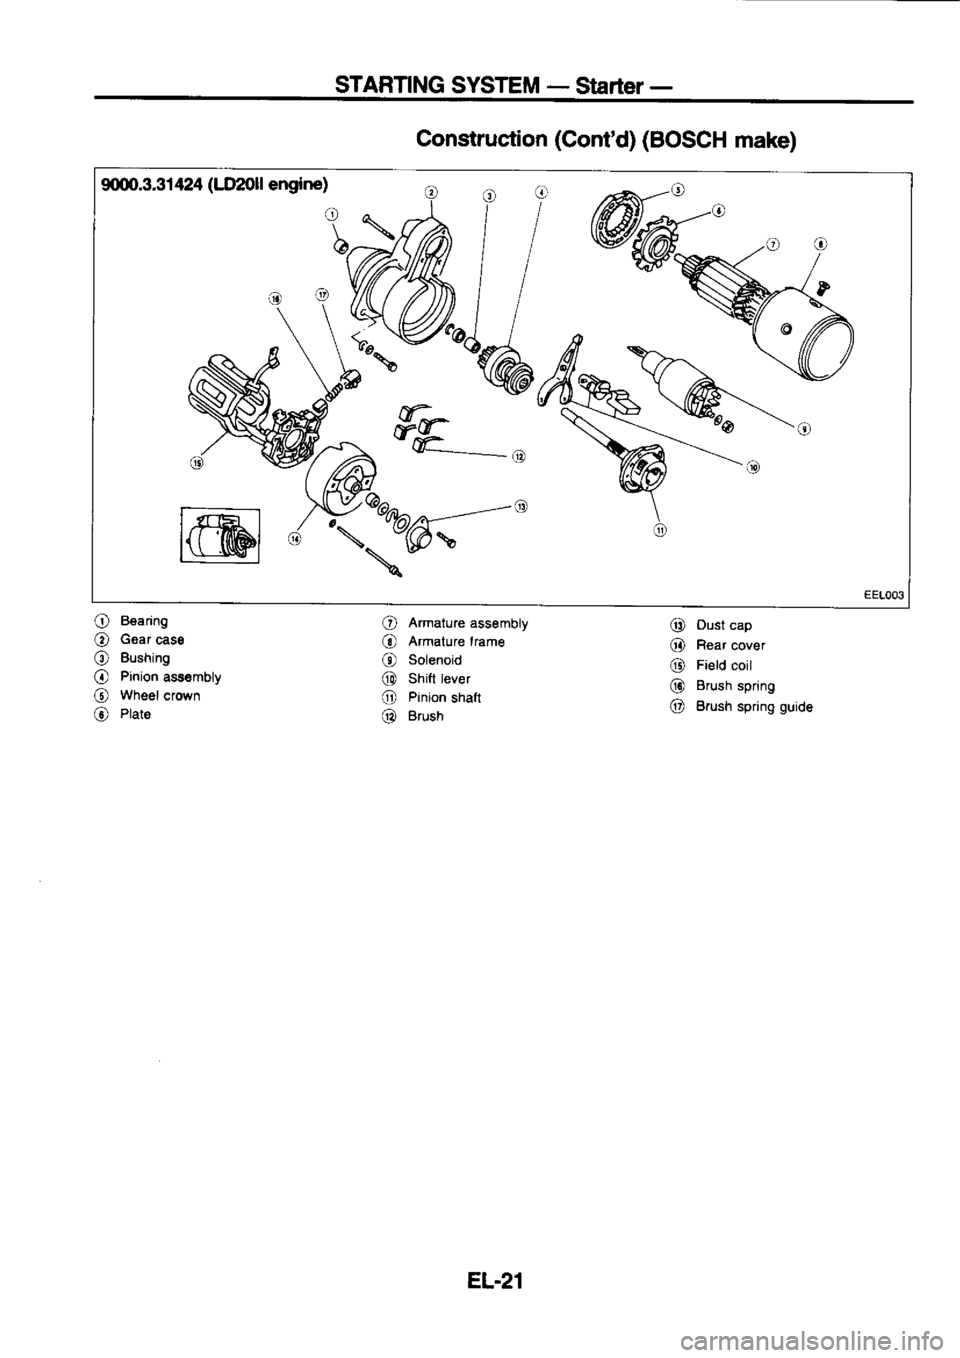
9q)0.3.31 424 (LlI2Oll
engine)
wk
w$ FF.-,
@ /K:b@;-" I@----.*
Construction
(Cont'd)
(BOSCH
make)
O Armature
assembly
@ Dust
cap
O Bearing
O Gear
cass
O Bushing
O Pinion
ass€mbty
@ wheel
crown
O Plate @
Armature
lrame
@ Solenoid
@ shitt
tever
O Pinion
shatt
@ Brush @
Rear
cover
@ Field
coil
@ Brush
spring
O Brush
spring guide
EL.21
Page 1133 of 1254
STARTING
SYSTEM _
StArtEr _
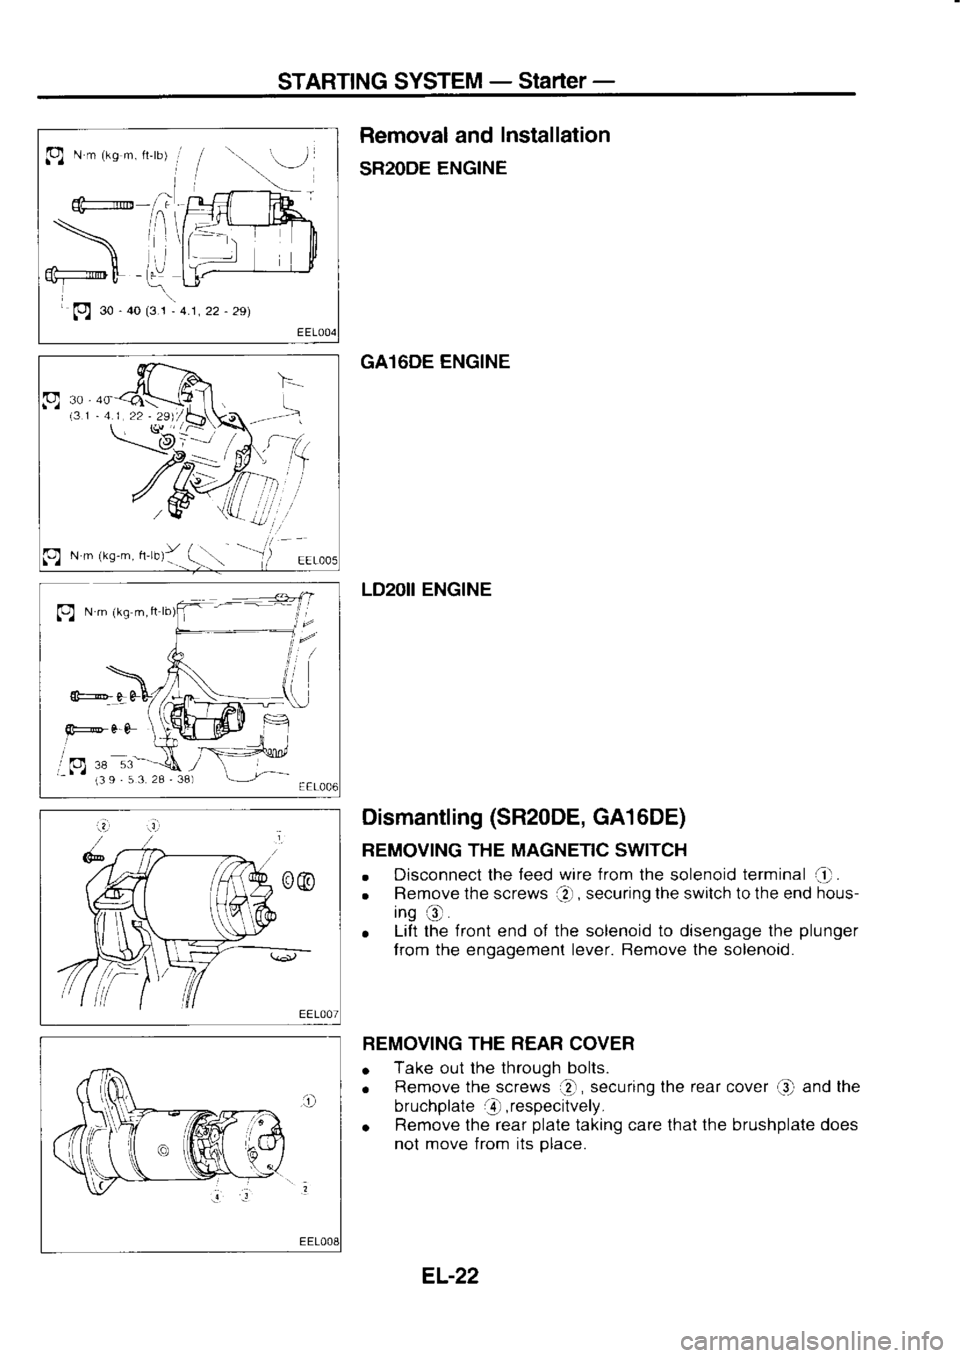
Bemoval and Installation
SR2ODE ENGINE
GA16DE ENGINE
LD2OII ENGINE
p
N
m
1rs-m. h.ru1y
(
Dismantling (SR20DE,
GA1 6DE)
REMOVING THE MAGNETIC SWITCH
o Disconnect
the feed
wire irom
the solenoid terminal
af .
. Remove
the screws
if , securing
the switch to the end hous-
ing O
o Lift
the front
end of the
solenoid to
disengage the plunger
from the engagemenl lever. Remove the solenoid.
BEMOVING THE REAR COVER
o Take
out the through bolts.
o Remove
the screws
@, securing
the rear
cover
Q and
the
bruchplate i!
, respecitvely.
o Remove
the rear plate
taking care lhat the
brushplate does
not move f rom its place.
EL-22
Page 1134 of 1254
STARTING
SYSTEM _
Starter _
Dismantling (SR20DE,
GA1 6DE) (Cont'd)
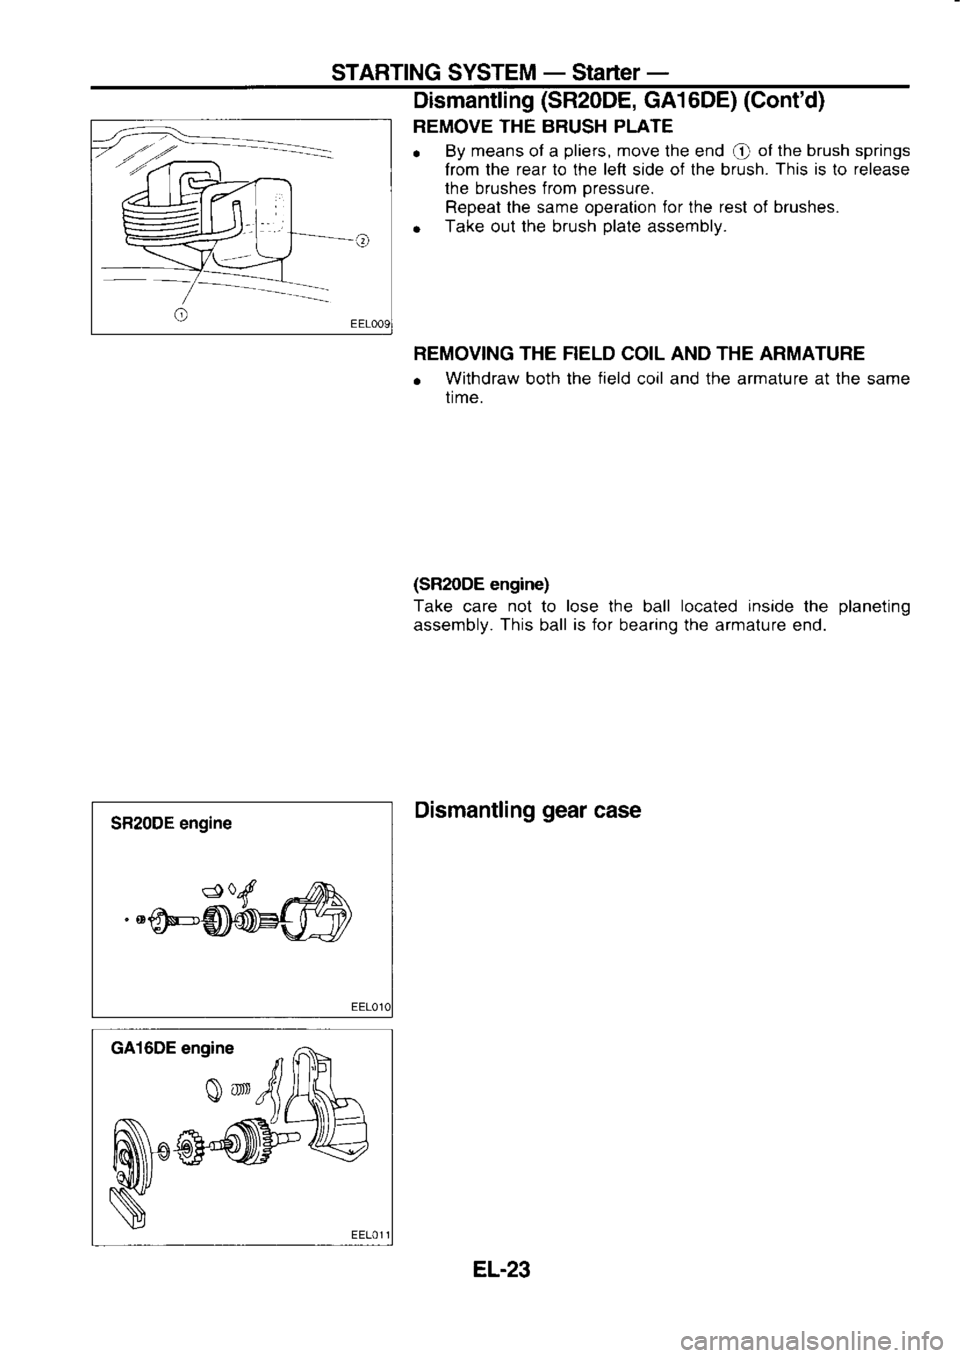
REMOVE THE BRUSH PLATE
o By
means of a pliers,
move the end
@ of
the brush springs
Irom the rear lo the left side of the brush. This
is
to release
the brushes from pressure.
Repeat the same operation for
the rest
of brushes.
o Take
out the brush plate
assembly.
REMOVING THE FIELD COIL AND THE ARMATURE
o Withdraw
both the field
coil and the armature at the same
time.
(SMODE engine)
Take care not
to lose
the ball located
inside
the planeting
assembly. This ball is
for
bearing the armature end.
Dismantling gear
case
SR20DE engine
EL-23
Page 1135 of 1254
STARTING
SYSTEM _
Starter _
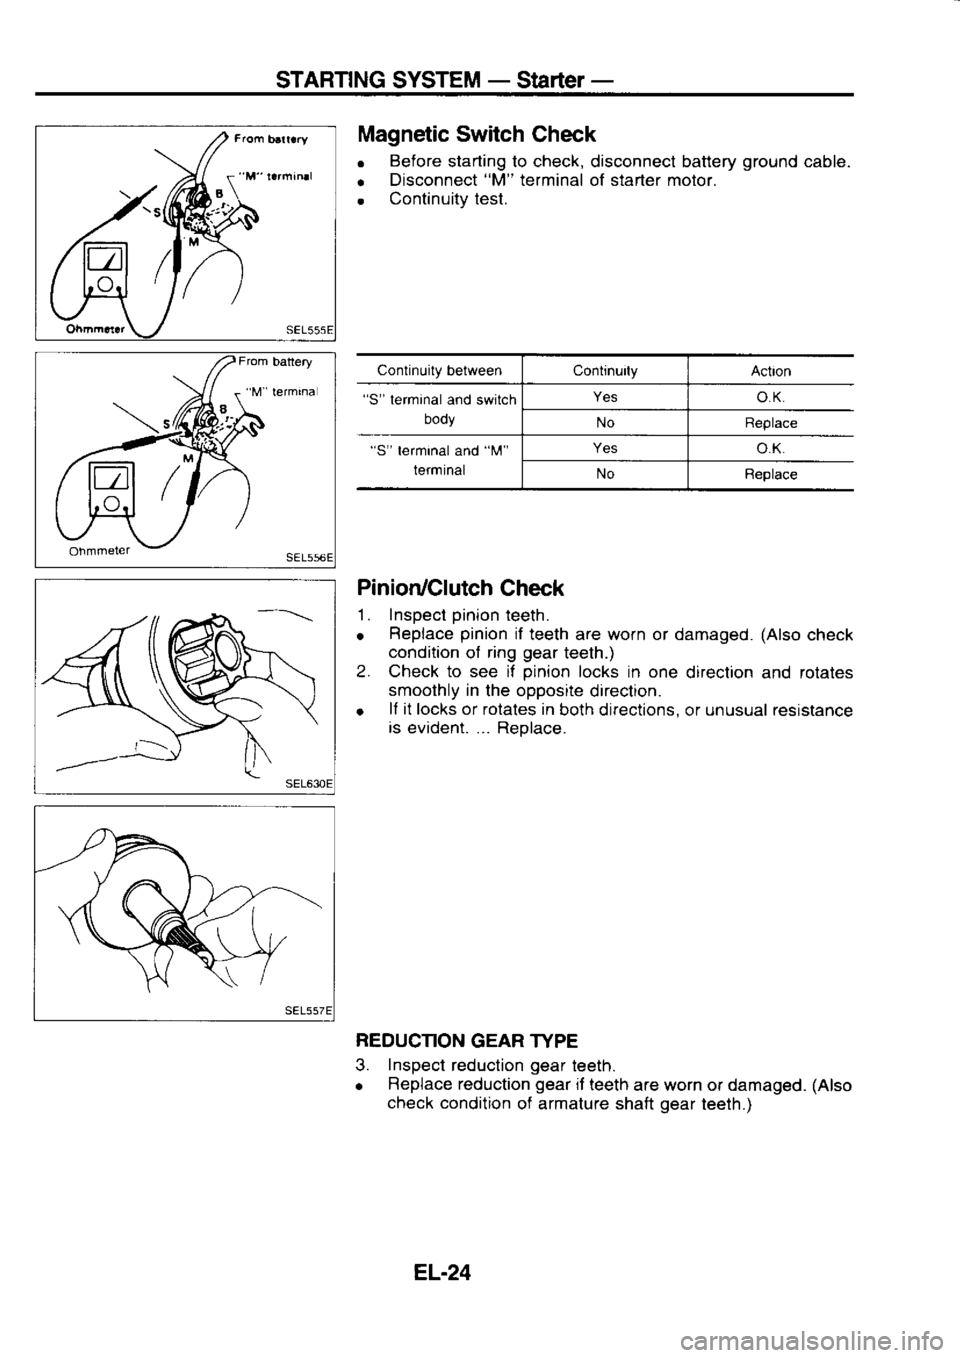
Magnetic Switch
Check
Before starting to check, disconnecl battery ground
cable.
Disconnect "M"
terminal of starter motor.
Continuitv test.
Pinion/Clutch Check
1. Inspect pinion
teeth.
o Replace pinion
if teeth are worn or damaged. (Also
check
condition of ring gear
teeth.)
2. Check to see if pinion
locks in one
direction and rotates
smoothly in
the opposite
direction.
o lf
it
locks or rotales in
both directions,
or unusual
resistance
is evident. ... Reolace.
REDUCTION GEAR TYPE
3. Inspect
reduction gear
teeth.
o Replace
reduction gear
it teeth are worn or damaged. (Also
check condition
of armalure shaft gear
teeth.)
Continuily
between Continurty
Action
"S" lerminal and switch
DOOy Yes
o.K.
No Replace
"S" terminal and "l\,t"
terminal Yes
o.K.
No Replace
EL.24
Page 1136 of 1254
STARTING
SYSTEM _
Starter _
Srush spring Brush
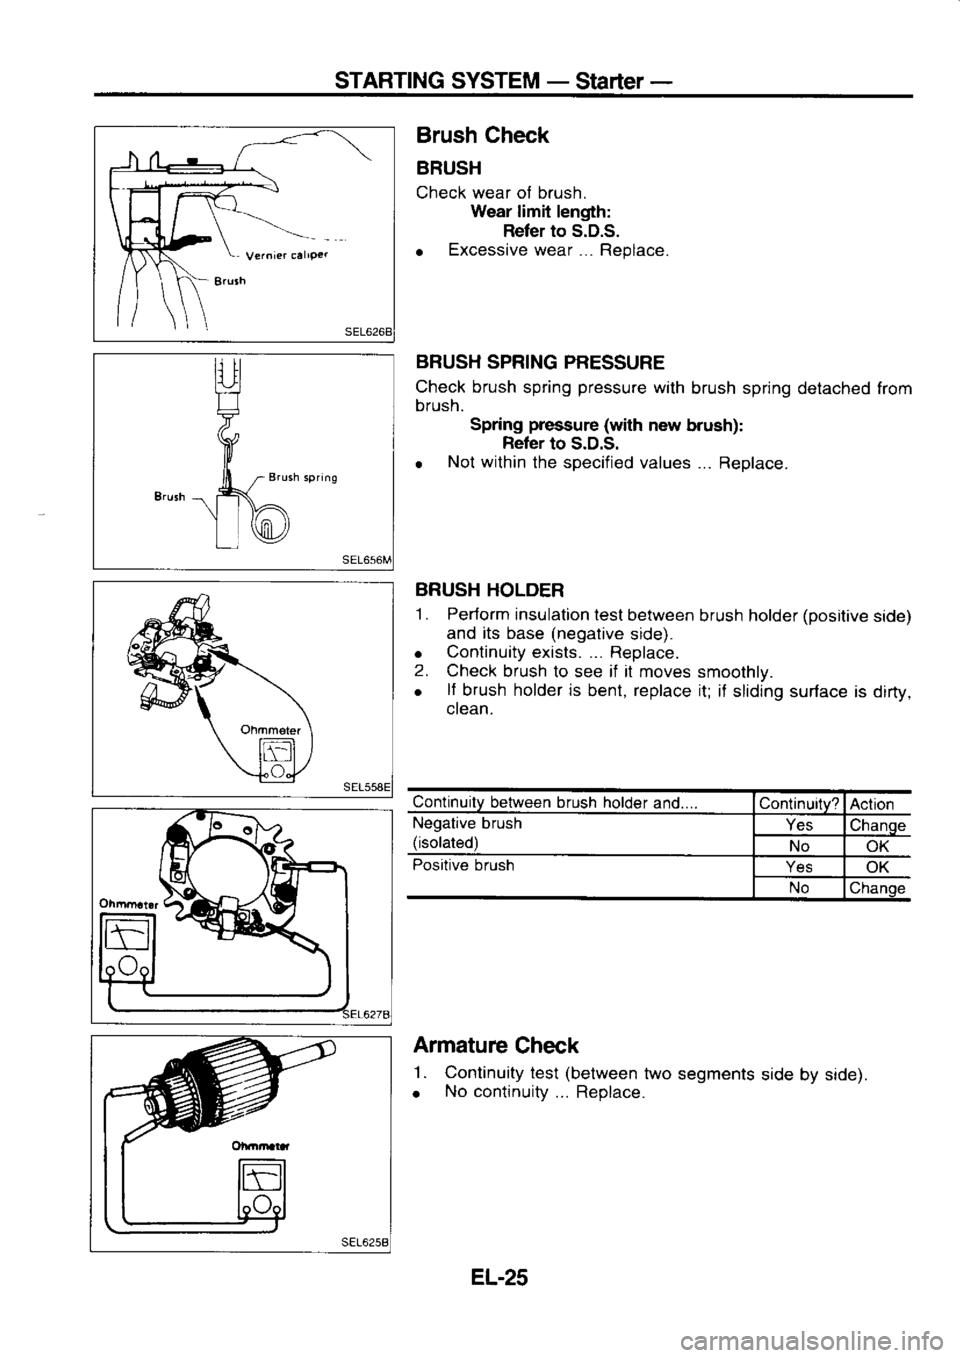
Check
BRUSH
Check wear of brush.
Wear limit
length:
Refer to S.D.S.
o Excessive
wear...
Replace.
BRUSH SPRING PRESSURE
Check brush
spring pressure
with brush spring
detached from
brush.
Spring pressure
(with
new brush):
Refer to S.D.S.
o Not
within
the specified
values... Replace.
BRUSH HOLDER
1 . Perform
insulation test
between brush holder (positive
side)
and its base (negative
side).
Continuity exists. ... Replace.
Check brush to see if il moves
smoothlv.
lf brush holder is
bent. replace
it: if
sliding surface is dirty.
ctean.
ilv between brush holder
and....
Negative brush
rsolat
Positive brush
Armature Check
1 .
Continuity test (between
two segments side by side).
o No
continuiw...
Reolace.
2.
EL-25
Page 1137 of 1254
STARTING
SYSTEM _
StaTteT _
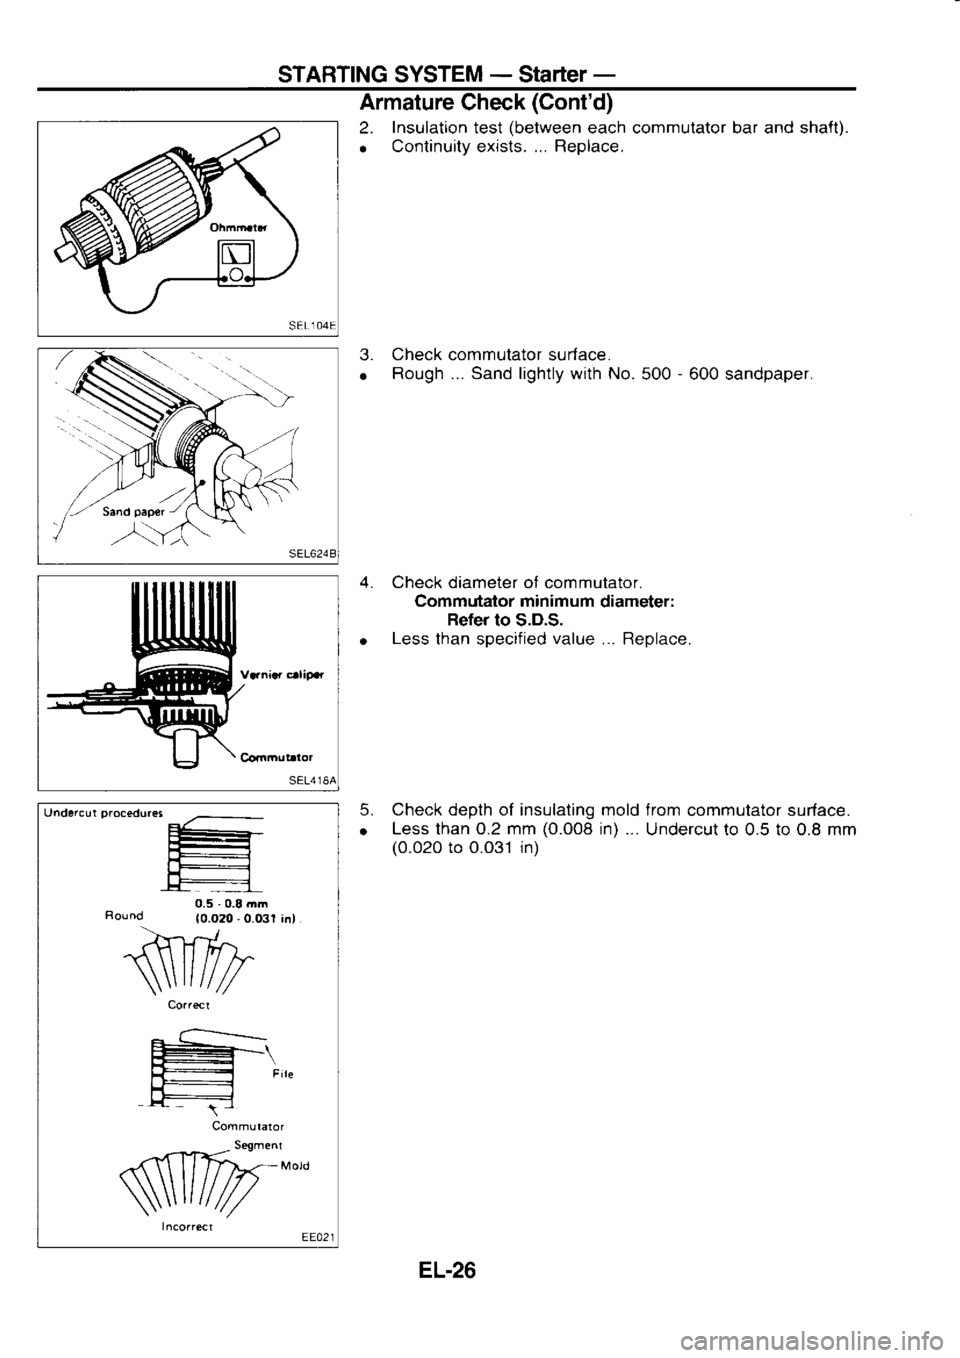
Vnniar ctlipar Armature
Check (Cont'd)
2. Insulatron test (between
each commutator bar and shafl).
o Continuity
exrsts. ... Replace.
3. Check commutator surface.
o Rough
... Sand lightly with No.500 -
600 sandpaper.
Check diameter ol commutator.
Commutator minimum
diameter:
Refer to S.D.S.
Less than specified value...
Replace.
5. Check depth of insulating mold irom
commutator suriace.
o Less
than 0.2 mm (0.008
in) ...
Undercut to 0.5 to 0.8 mm
(0.020 to 0.031 in)
Undercut
procedures
Round IO.O2O. O.
-->-
^/
r{\\il rr,
\\\
'//// Correc!
Sr F, te
rF:=
E1.26
Page 1138 of 1254
STARTING
SYSTEM -
Starter -
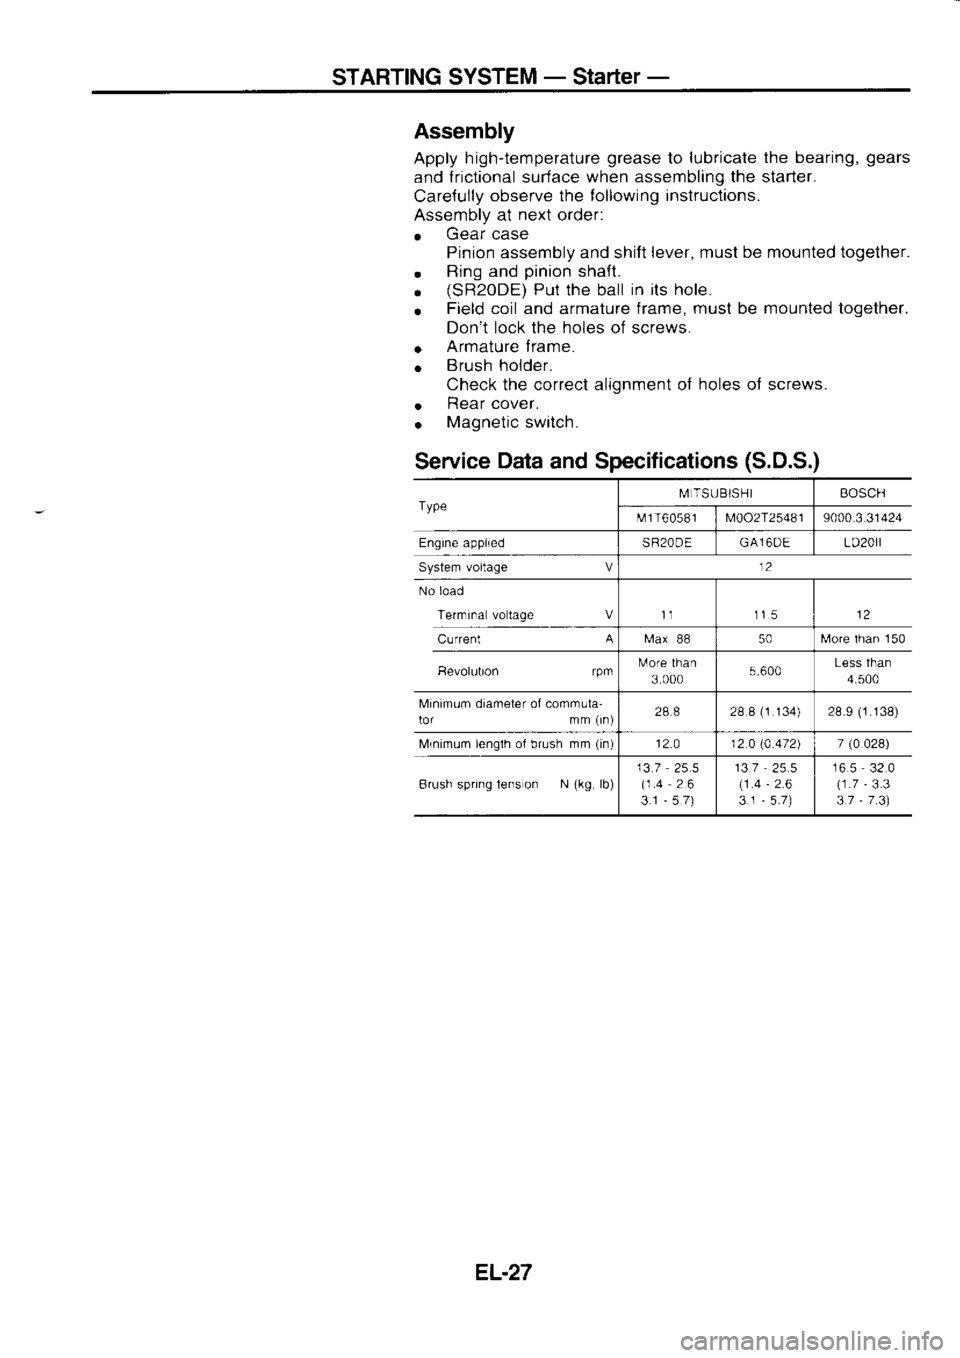
Assembly
Apply h igh-temperature grease
to lubricate
the bearing, gears
and frictional
surface when
assembling the starter.
Care{ully observe
the following inslructions.
Assembly at next
order:
. Gear
case
Pinion assembly and shift lever,
musl be mounted together.
. Ring
and pinion
shaft.
. (sR20DE)
Put the ball in
its hole.
o Field
coil and armature frame, must
be mounted
together.
Don't lock the holes of screws.
o Armature
f rame.
o Brush
holder.
Check the correct alignment of holes
of screws.
o Rear
cover.
. Magnetic
switch.
Service Data
and Specifications (S.D.S.)
Type M
TSUBISHI BOSCH
t\.rf 1 T6
05 8 I
M002T25481 9000.3
31424
Engine applied SR20DEGA16DE LD20rl
System voltage V 12
No load
Terrnrna voltage Vt1 115
Current A
[ra.x
88 50[,,lore
lhan 150
Bevolubon rpmtulore
than
3 000 5.600Less
than
4,500
Minimum diameter of comrnula-
lor mm (rn) 288
28 8 (1
134) 28.9 (1.138)
Mrnimum lenglh of brush mm (in)
12.0 12 0 (4.472)
7 (0
028)
Brush spring tens on N (kg,
lb) 13.7
25.5
(1.4 26
3.1 -57) 137
(1 .4
3.1 -
2.6 16.5
32.0
(1.7 -
3.3
3.7 -
7 .3)
EL.27
Page 1139 of 1254
CHARGING
SYSTEM
Wiring Diagram
t
o
z
E
o
ffi
dd
EE
'H
-Fr Fl-1
Etr
F
t44
@
t-.t-.]
-H
t-f1
t-t-1
H
t:]-
F;
ll r-.
9t I
[!J0
r.g?
c
c
E
3
c
rr,
(E/
8sF
," fsl
EF+
ai_ A
z
.
o
cD
f)
^l
t9E
.6\F
tsF
@+
A.r-
\sl'-Y
@
taA.
r?r r
€_llD
@# ra$ d@
SoS *@
*- :
|r
At-- -------r
lln 6 -l
il' a 'l
frt6 lEt I
-l -:? J
-=:' !!
9! o
3 6; .9
;;p !F
;'; P F 9
;;::v:l
6 i,
ofo)to6
n -
HHI'::IP:
ooo(,
0a
v1 0 )u
urr!
it:
I
.<
,,!f_
"Ll
o
tr
o
v)Z
@@@@@@ec
EL.28
Page 1140 of 1254
CHARGING
SYSTEM
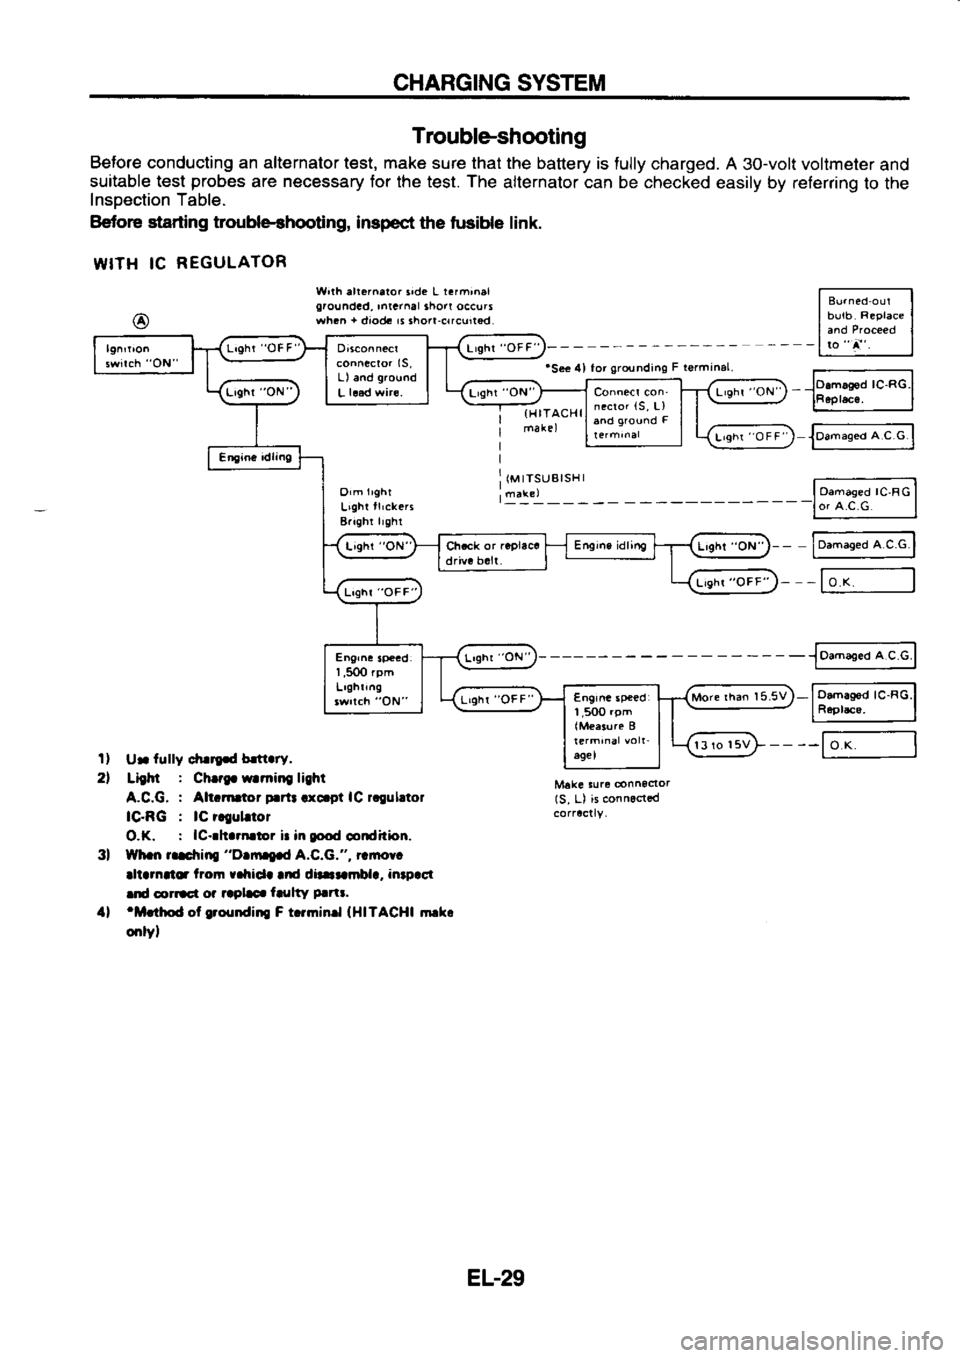
Troubleshooting
Before conducting an alternator
test, make sure that the
battery is fully charged. A
3o-volt voltmeter
and
suitable test probes
are necessary
for the test. The
alternator can be checked
easily by relerring
to the
Insoection Table.
Betore starting troubleshooting,
inspec,t the fusible link.
WITH IC REGULATOR
l/Vrrh.lt.rn.to. iid. L r.rm;nel
groundad, Intcrnal 3ho7t occuri
whln +
diod. ri
3hoit-crrcurtod. |;;;;-l
I burb
Repl.ce
I
I end
Proceed
I
- -l'."r-"
I
\--6;;"*;l
,/
lRepleco. I
) F"-"r""
"c;:l
E."*;;I
- -lo,
a.c.c I
- F;"d"-l
--F* _-l
-@
D-|;;;d'cnc'l
/
lR6elacs. I
---l;* __l
'SGe
4l lor grounding F
termrnel.
(H ITACH I
1)
2l Ur
lully
dr.n d brtr.ty.
Light :
Cbrgt wrming light
A.C.G. :
Alt.nrator p.rtr
ax6pt lC
lrguhtot
IC.RG :
lC r.!ul
or
O.K. : lC-rhrrtt.tor
it in good
@ndhbn.
Wbn r.aafiing
"O.nrqad A.C.G.", rar|oy!
allarnatc tron
r.lrida
||td ditaaxmbla, intpasr
|rrd corrrct or
aapLc. fasltY prn!.
'Mrthod of ero{Ddirt F
t.rmin.l
{HITACHI mrkc
onlyl Make
suro connodor
(S, L) is
connocted
3)
4) More
than 15.5V
13 ro l5V
EL-29
Trending: steering, oil pressure, tires, check engine light, tire pressure, air condition, low oil pressure

![NISSAN SERENA 1993 Service Repair Manual CHARGING
SYSTEM
Wiring Diagram
t
o
z
E
o
ffi
dd
EE
H
-Fr Fl-1
Etr
F
t44
@
t-.t-.]
-H
t-f1
t-t-1
H
t:]-
F;
ll r-.
9t I
[!J0
r.g?
c
c
E
3
c
rr,
(E/
8sF
," fsl
EF+
ai_ A
z
.
o
cD
f)
^l
t9E
.6\F
ts NISSAN SERENA 1993 Service Repair Manual CHARGING
SYSTEM
Wiring Diagram
t
o
z
E
o
ffi
dd
EE
H
-Fr Fl-1
Etr
F
t44
@
t-.t-.]
-H
t-f1
t-t-1
H
t:]-
F;
ll r-.
9t I
[!J0
r.g?
c
c
E
3
c
rr,
(E/
8sF
," fsl
EF+
ai_ A
z
.
o
cD
f)
^l
t9E
.6\F
ts](/img/5/57387/w960_57387-1138.png)
