NISSAN SERENA 1993 Service Repair Manual
SERENA 1993
NISSAN
NISSAN
https://www.carmanualsonline.info/img/5/57387/w960_57387-0.png
NISSAN SERENA 1993 Service Repair Manual
Trending: warning, roof, low oil pressure, wheel bolts, belt, USB port, check engine light
Page 1141 of 1254
CHARGING
SYSTEM _
Alternator _
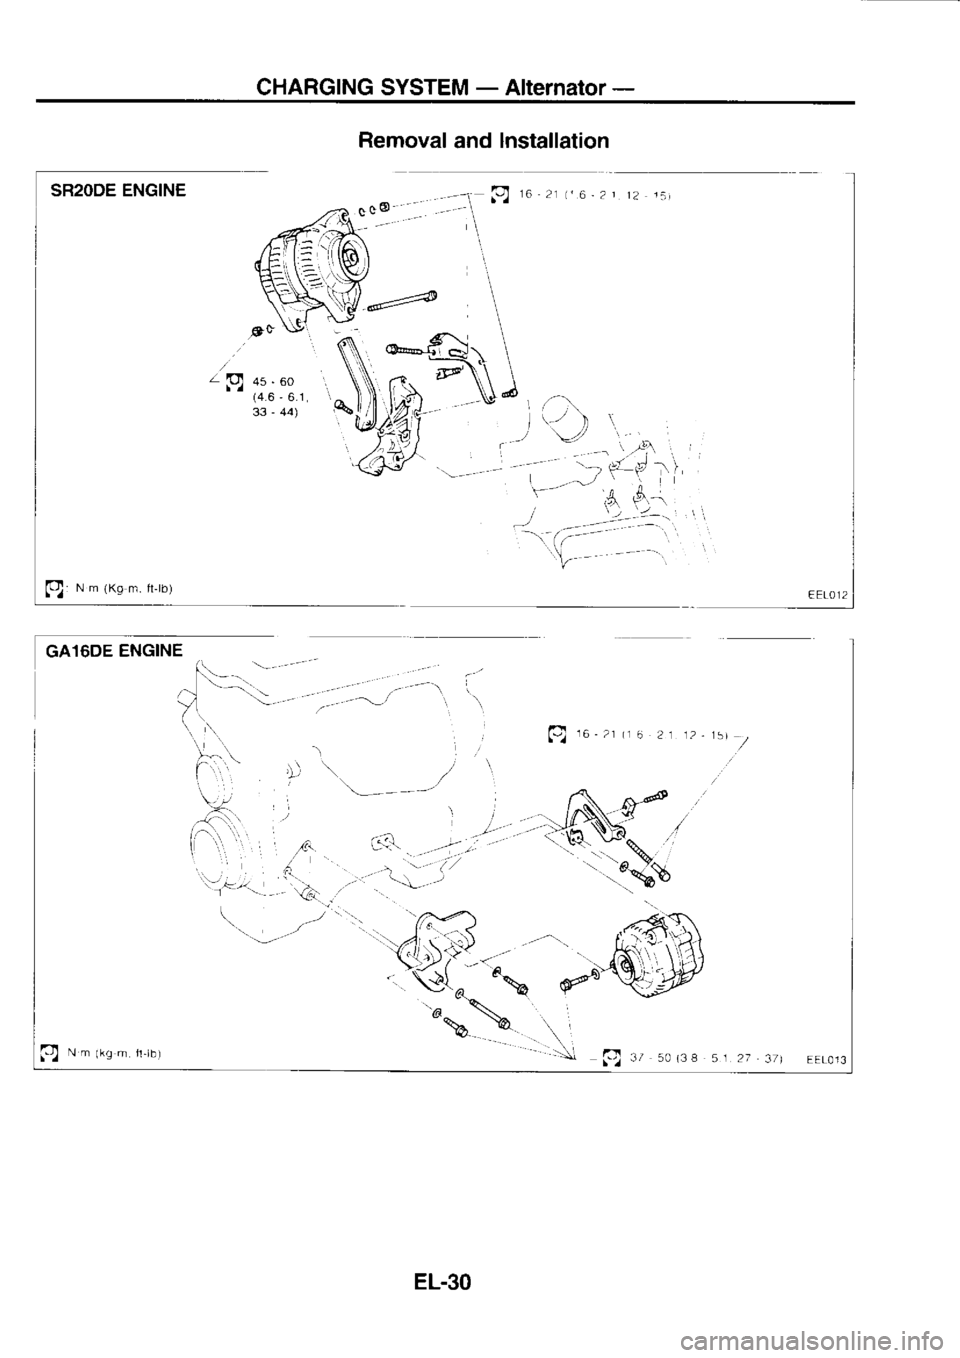
Removal and lnstallation
SR2ODE ENGINE
fq: N
m
{Ko m. tl-lb)
GA16DE ENGINE pl
ro :r t.6-p1
12 i,,i
."-"'-E
Z|o! as. so
(4.6 ,
6.1
33 -
44)
r?)
--'-.! Q re-zr
t1
6 21 1p,i5t
//
t) Nm
rr.tjm a,b)
f) rz
so (38
s r
27 37r EEL0]3
EL-30
Page 1142 of 1254
CHARGING
SYSTEM _
Alternator _
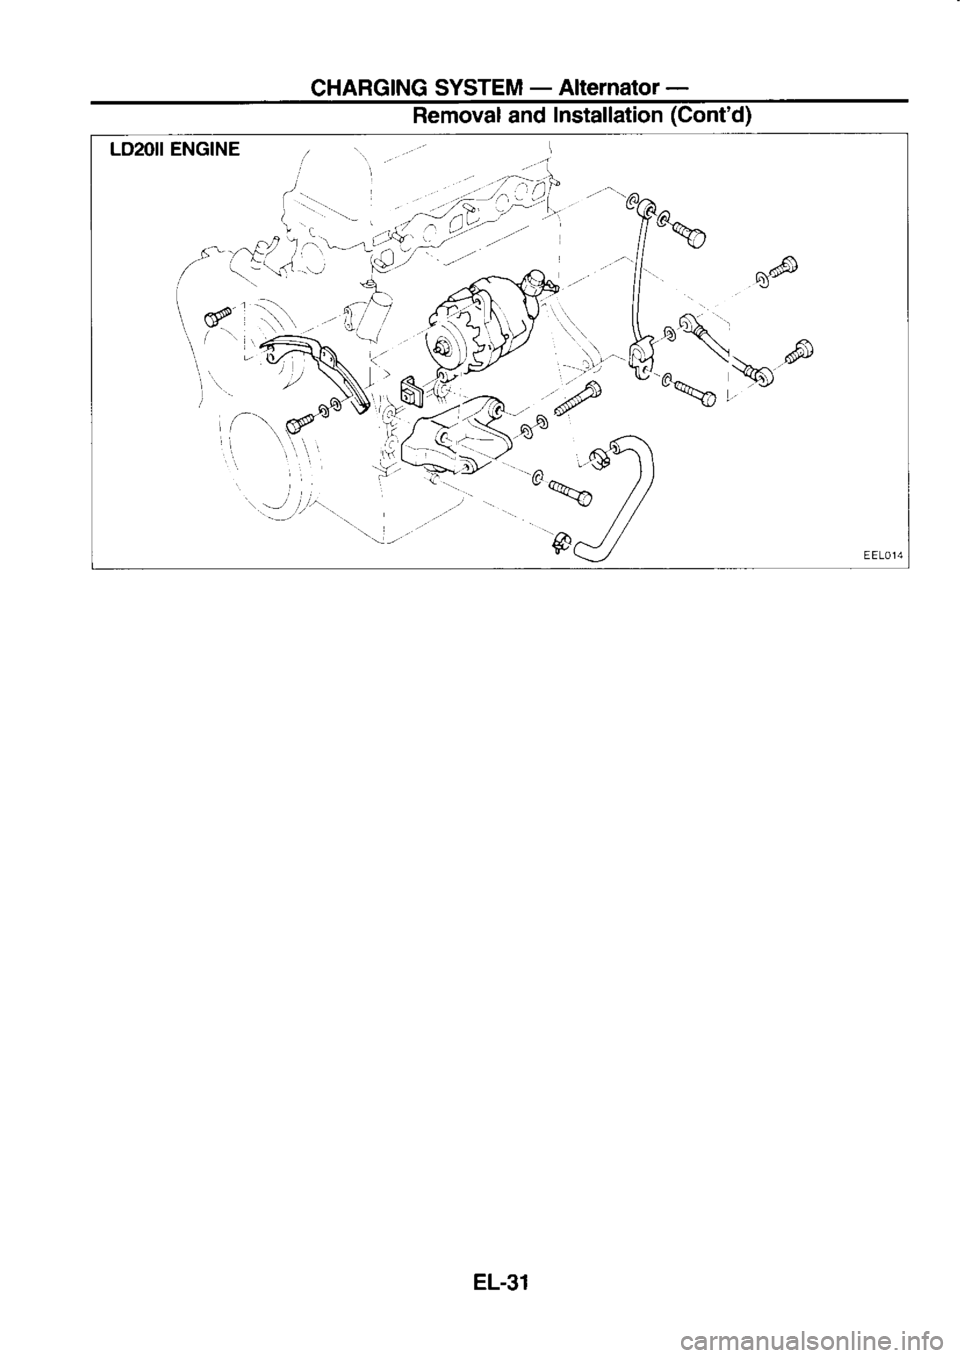
Removal and Installation (Cont'd)
EL-31
Page 1143 of 1254
CHARGING
SYSTEM -
Alternator -
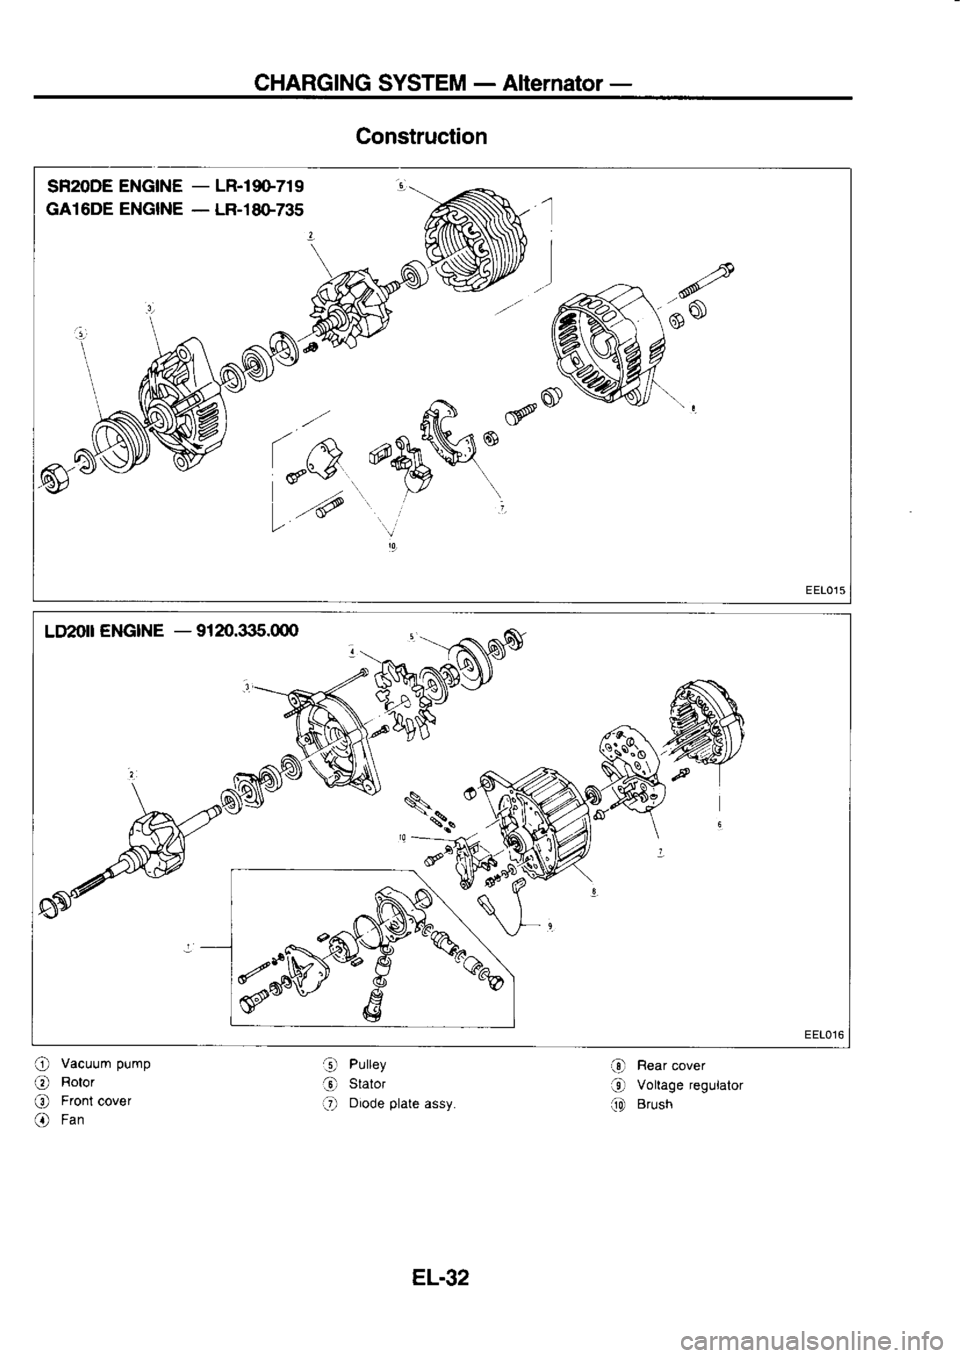
Construction
SF2ODE ENGINE _
LR.19O-719
GA16DE ENGINE _
LR-18G735
(n.eu'r6
,"d *>d0
@shM* (v\
".Y\ \.
.' .i,
,9
LII20[ ENGINE -
9120.335.000
@ Rear
cover
O Voltage
regulator
f,Q Brush
.9
Pulley
O stator
O Diode
plate
assy.
EL.32
O
Vacuum
pump
O Rotor
(D Front cover
@ Fan
Page 1144 of 1254
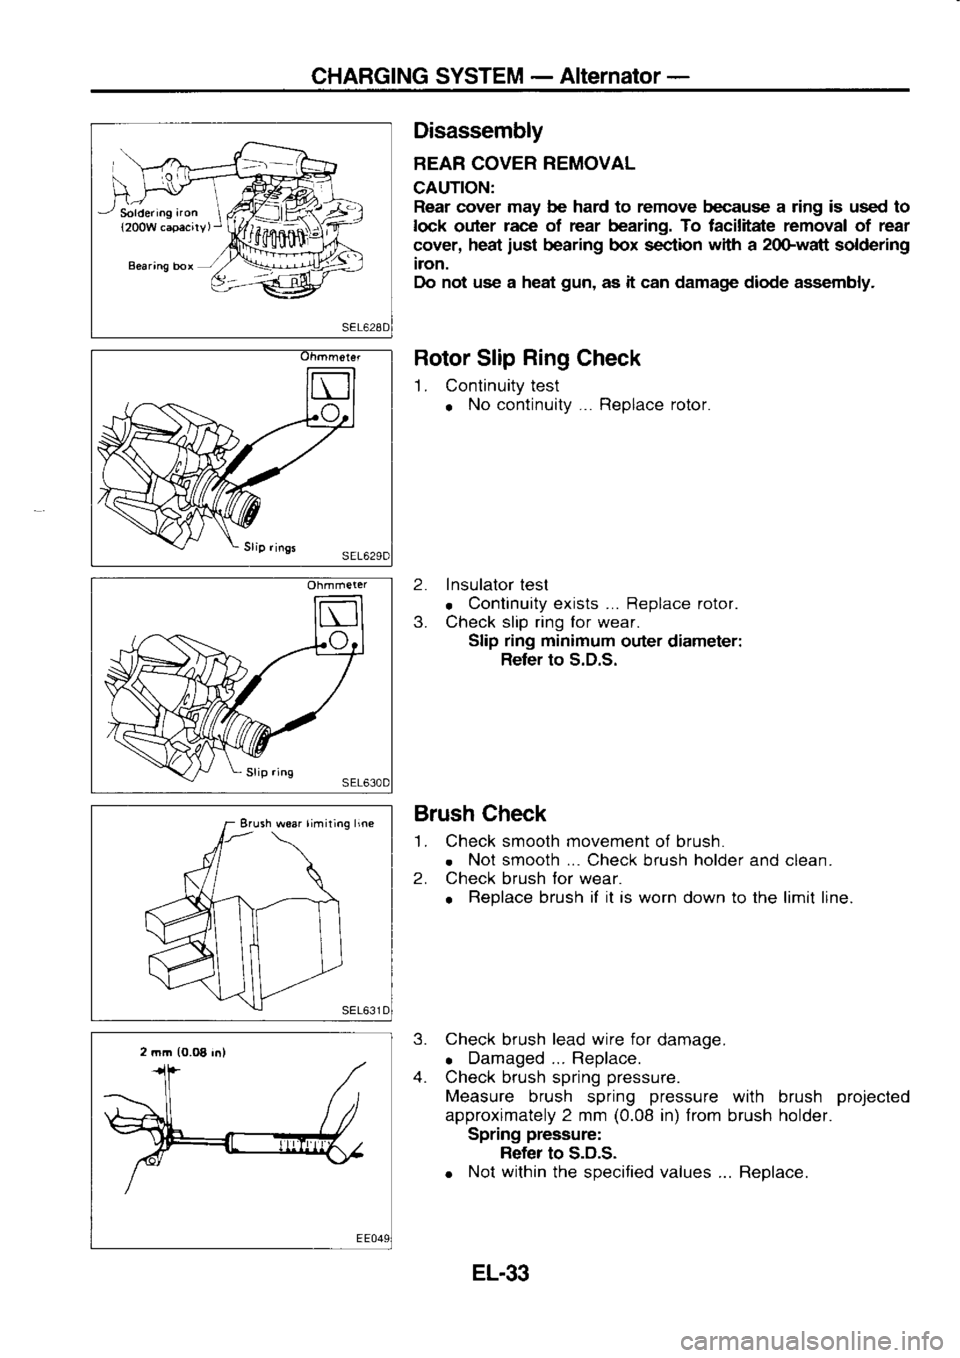
CHARGING
SYSTEM -
Alternator -
Soldering aron
{200W capacirv, Disassembly
BEAR COVER REMOVAL
CAUTION: Rear cover may be hard to remove because a ring is used to
lock outer race
of rear bearing. To facilitate removal of rear
cover, heat
iust bearing
box section with
a 2oGwatt
soldering
iron.
Do not use a heat gun,
as it can damage diode assembly.
Rotor Slip Ring
Check
1. Continuity test
o No
continuity... Replace rotor.
2. Insulator
test
. Continuity
exists ... Replace rotor.
3. Check slip ring for wear.
Slip ring minimum
outer diameter:
Refer to S.D.S.
Brush Check
'L Check smooth movement
of brush.
. Not
smooth ...
Check brush holder
and clean.
2. Check
brush for
wear.
o Replace
brush if
it
is worn down to the limit line.
3. Check
brush lead
wire for
damage.
o Damaged...
Replace.
4. Check brush spring pressure.
Measure brush spring pressure
with brush projected
approximately 2 mm (0.08
in) from
brush holder.
Spring pressure:
Refer to S.D.S.
o Not
within
the specified values ... Replace.
Ohmmeter
Erush woar limiting
line
2 mm (0.O8
in)
EL.33
Page 1145 of 1254
CHARGING
SYSTEM -
Alternator -
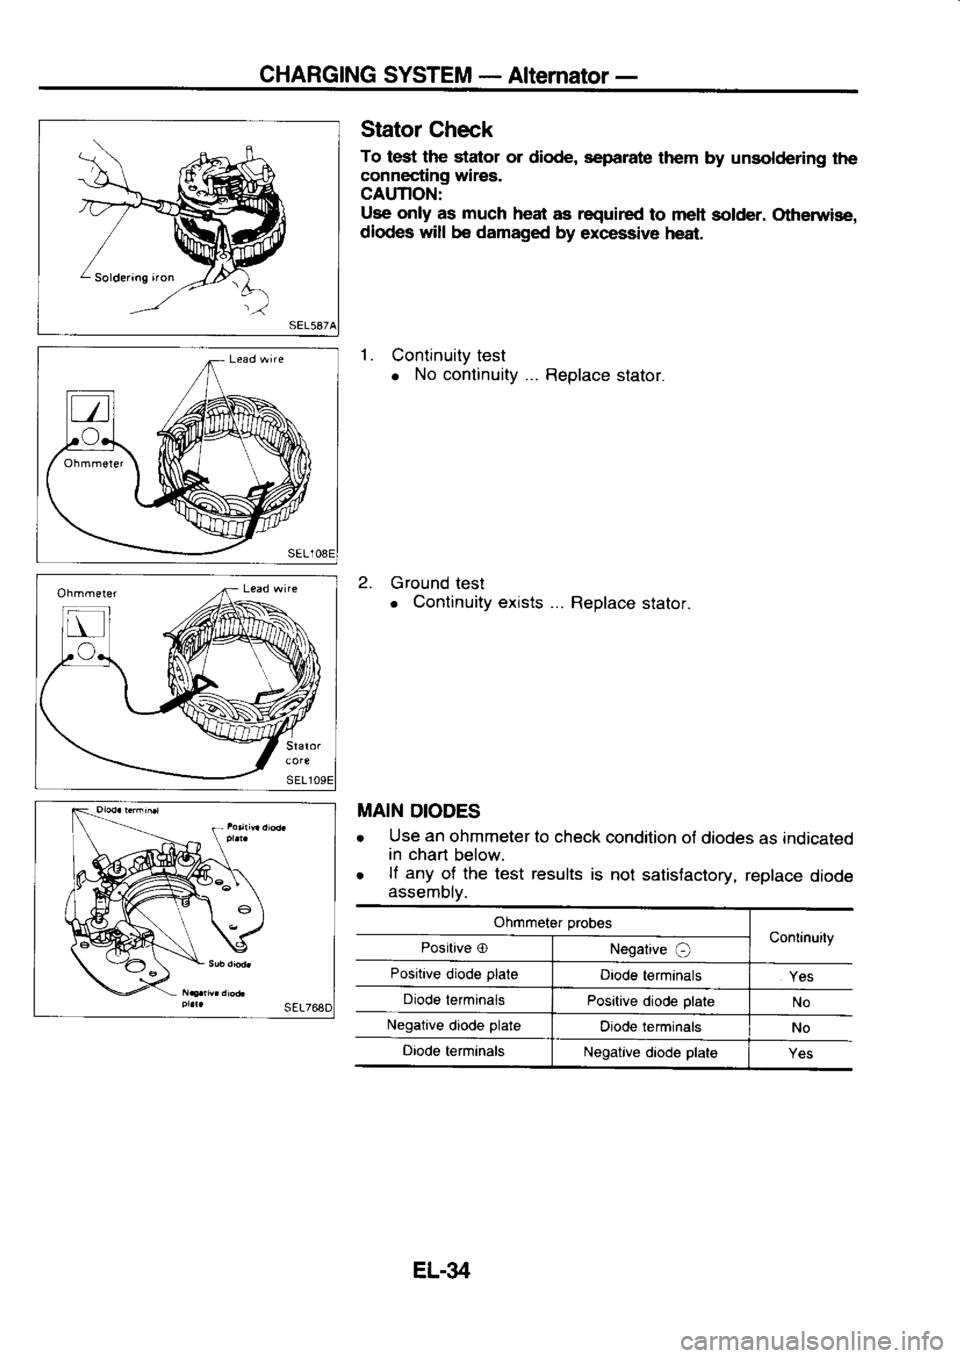
Stator Check
To test the stator
or diode, separate
them by unsoldering
the
connecting wires.
CAUTION:
Use only
as much heat
as required
to melt solder. Otherwise,
diodes will
be damaged
by excessive heat.
1 .
Continuity test
o No
continuity... Replace stator.
2. Ground test
o Continuity
exists... Replace stator.
MAIN DIODES
r Use
an ohmmeter
to check
condition of
diodes as indicated
in chart
below.
o lf
any
of the test results
is not satisfactory,
replace diode
assembly.
Ohmmeter probes
Continuity
Positive O
Negative
O
Positive diode plale
Diode terminals
Yes
Diode lerminals Positive diode plate
No
Negalive diode plate
Oiode terminals
No
Oiode terminals
Negative
diode plate
Yes
EL-34
Page 1146 of 1254
CHARGING
SYSTEM -
Altemator -
Crolin .nia|| ,Dod.l
Brurh litt
rvira Stator
Check (Gont'd)
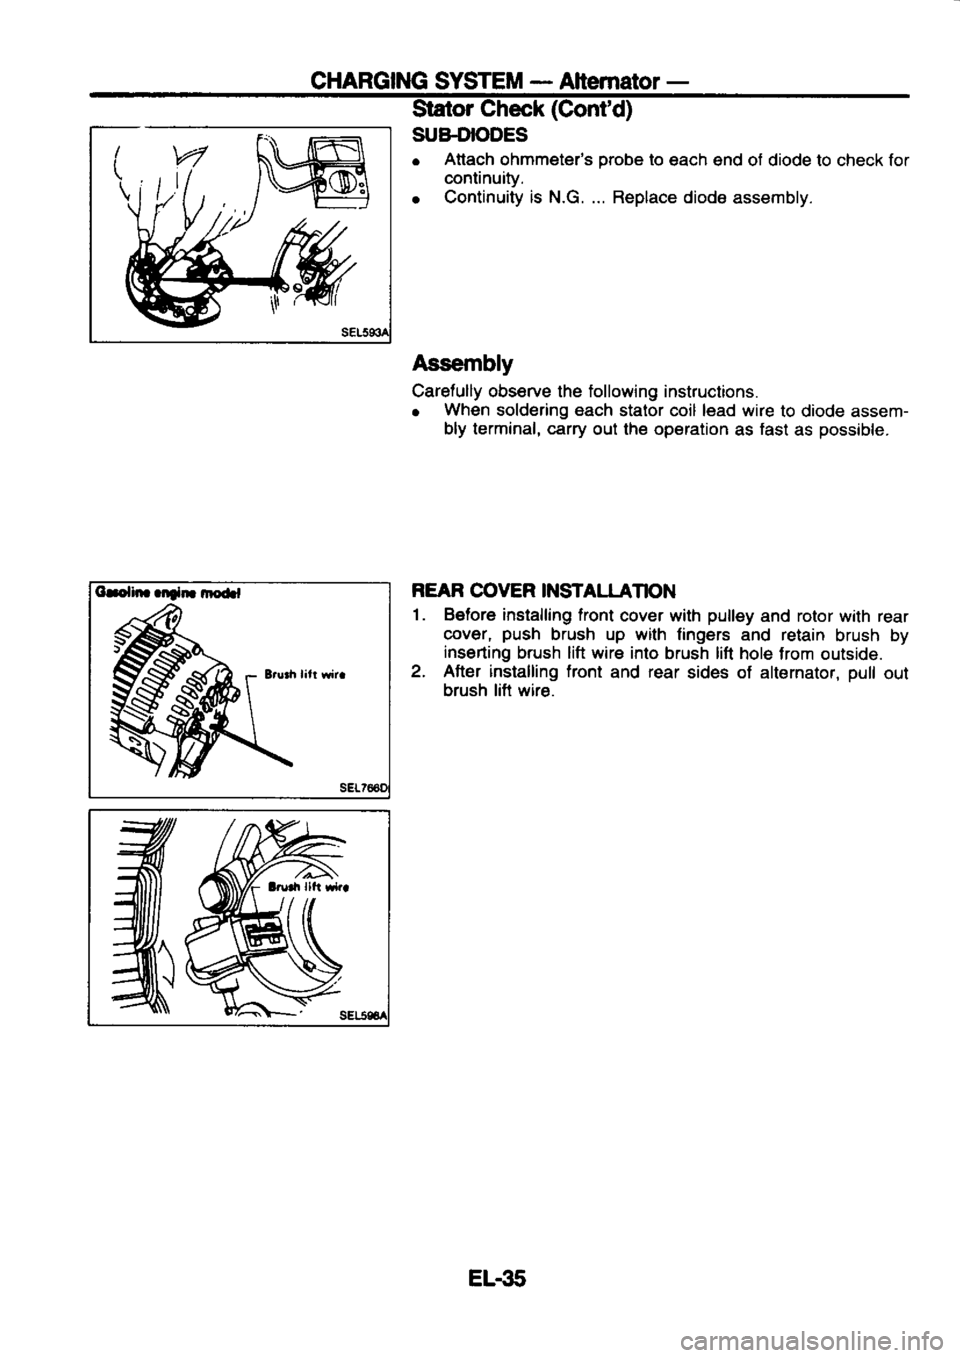
SUB-DIODES
o Attach
ohmmeter's orobe to
€ach end of diode to check for
continuity.
o Continuity
is N.G. ... Replace diode
assembly.
Assembly
Carefully observe the following instructions.
o When
soldering each
stator coil lead wire
to diode assem-
bly terminal, carry
oul lhe operation
as fast
as possible.
REAR COVER INSTALLATION
1. Before installing front
cover with pulley
and rotor with rear
cover, push
brush up with lingers
and retain
brush by
inserting brush lift wire
into brush lift
hole lrom outside.
2. After installing front
and rear
sides of
alternator, pull
out
brush lift wire.
EL€5
Page 1147 of 1254
CHARGING
SYSTEM -
Alternator -
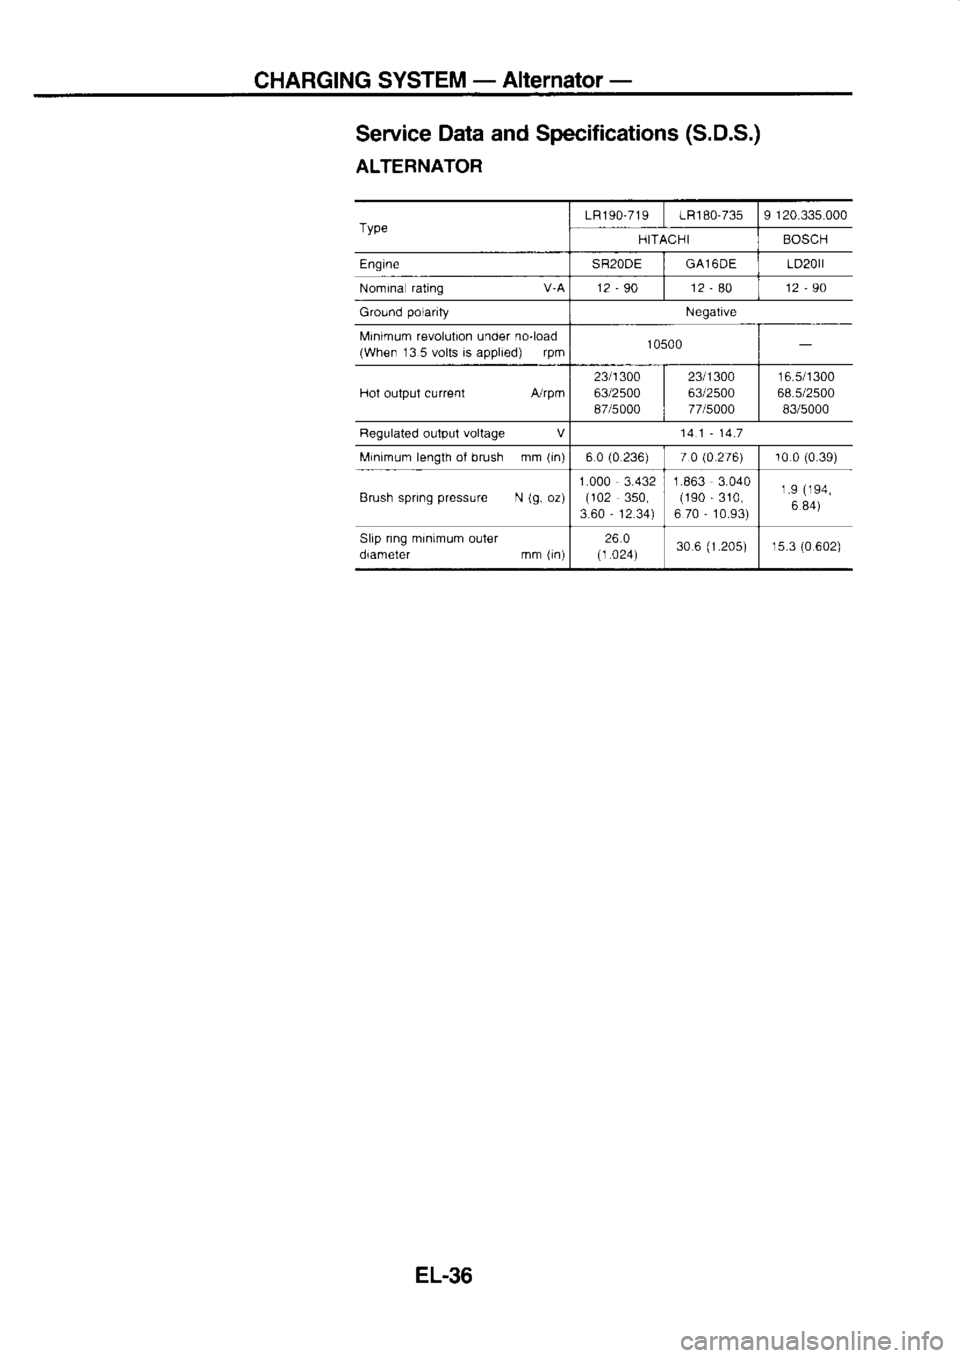
Service Data
and Specifications (S.D.S.)
ALTERNATOR
Type LR190-719
1R180-735I 120.335.000
HITACHI BOSCH
Engine SR2ODEGAl6DE LD20rl
Nomina rating
V-A12-90 12 -
80 12-90
Ground polarity
Negalrve
l\,4inimum revolution
under no-load
(When 13 5 volts
is
applred) rpm 10500
Hot output current A./rpm234300
63/2500
87/5000 2311300
63/2500
77l5000 16.5/1300
68.5/2500 B3/5000
Regulated oulpul vollage
V 14.114.7
Minimum length ot brush mm (in)
6 0 (0
236) t
010.276) 10
0
{0.39)
Brush spring pressure
N (9,
oz) 1.000
3.432
(102 350,
3.60 -
12.34) 1.863
3.040
(1S0 -
310,
6 70 -
10.93) 1.9
(194,
6 84)
Slip nng
minimum
outer
orameler mm (1n) 26.0
(1 024) 30
6 (1.20s)
1s.3 (0
602)
E1.36
Page 1148 of 1254
COMBINATION
SWITCH
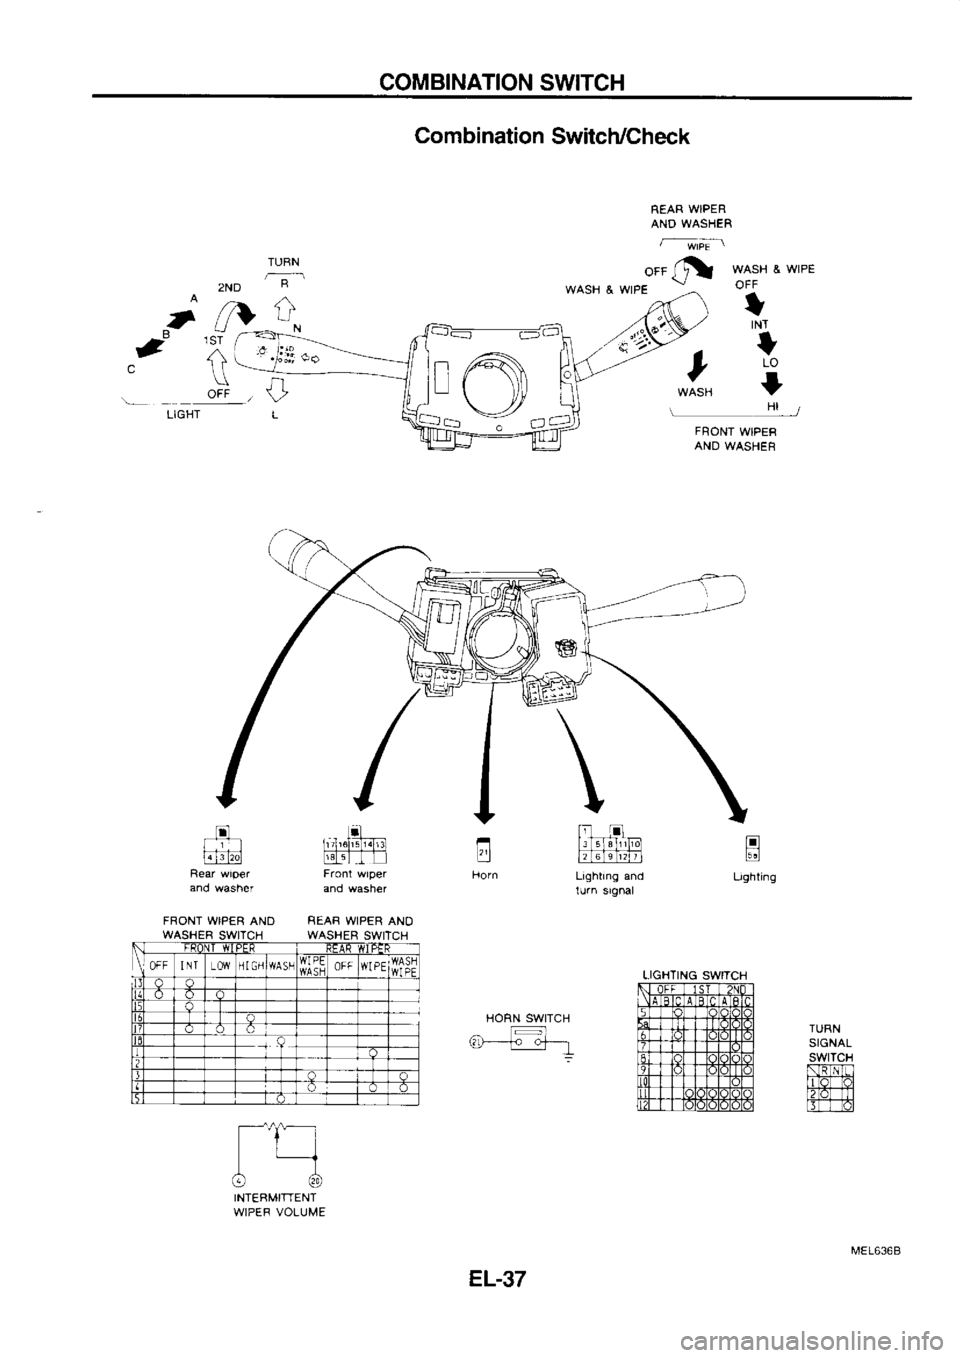
Combination Switch/Check
REAR WIPER
AND WASHER
-wrpEa
TURN
a; --r
Lf o"fr
WASH
& WIPE
OFF
tINT
t LO
I Ht /
u
e 1ST
^ t\
OFF ,
LIGHT FNONT WIPER
AND WASHEF
FRONT WIPER AND
WASHER SWITCH a]
I ii
,6iGT,
.td
tq-Tfll
REAR WIPER AND
WASHER SWITCH til
l-l
l, L6le L,rtr I
Lrghtrng and
rurn srgnal
HORN SWITCH
TURN
SIGNAL
swtTcH
NmNn
llo ol
f2TdTm
ETT r0l
I
l-1
tGt
INTERMITTENT
wlPEF VOLUME in,A
ll
tl { \\1t F
-r- // L
\-:=/
;*-a o a-Lj
PER
OFF
I NT
I]I GH WIPE
OFFWIPE
LIGHTING SWITCH
EL-37
Page 1149 of 1254
COMBINATION
SWTCH
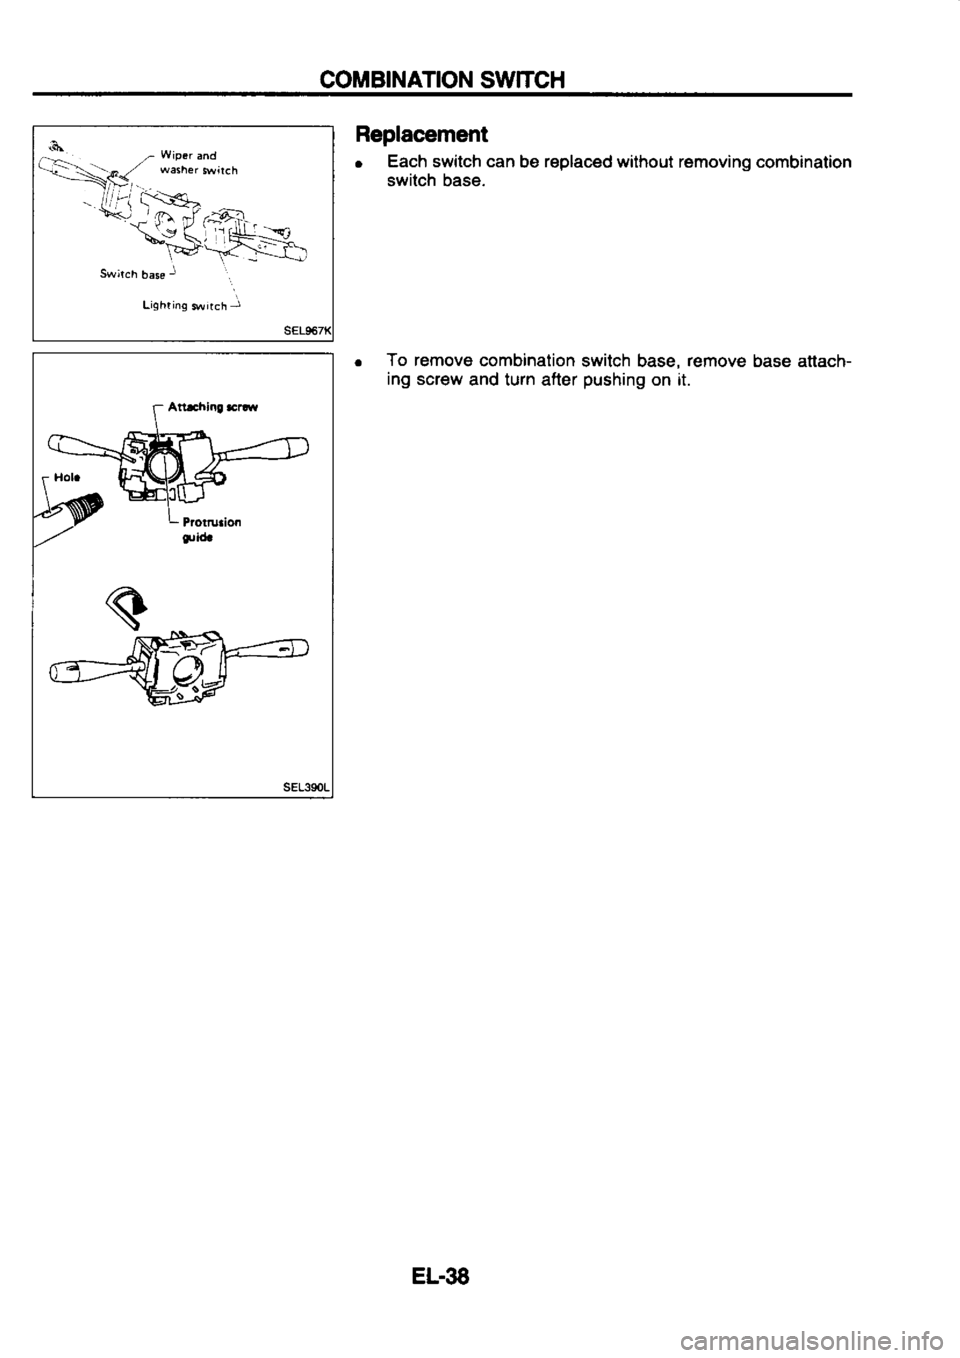
SEL39OL Replacement
o Each
switch can
be replaced
without removing combination
switch base.
r To
remove
combination switch base, remove
base anach-
ing screw
and turn after pushing
on rt.
EL.38
Page 1150 of 1254
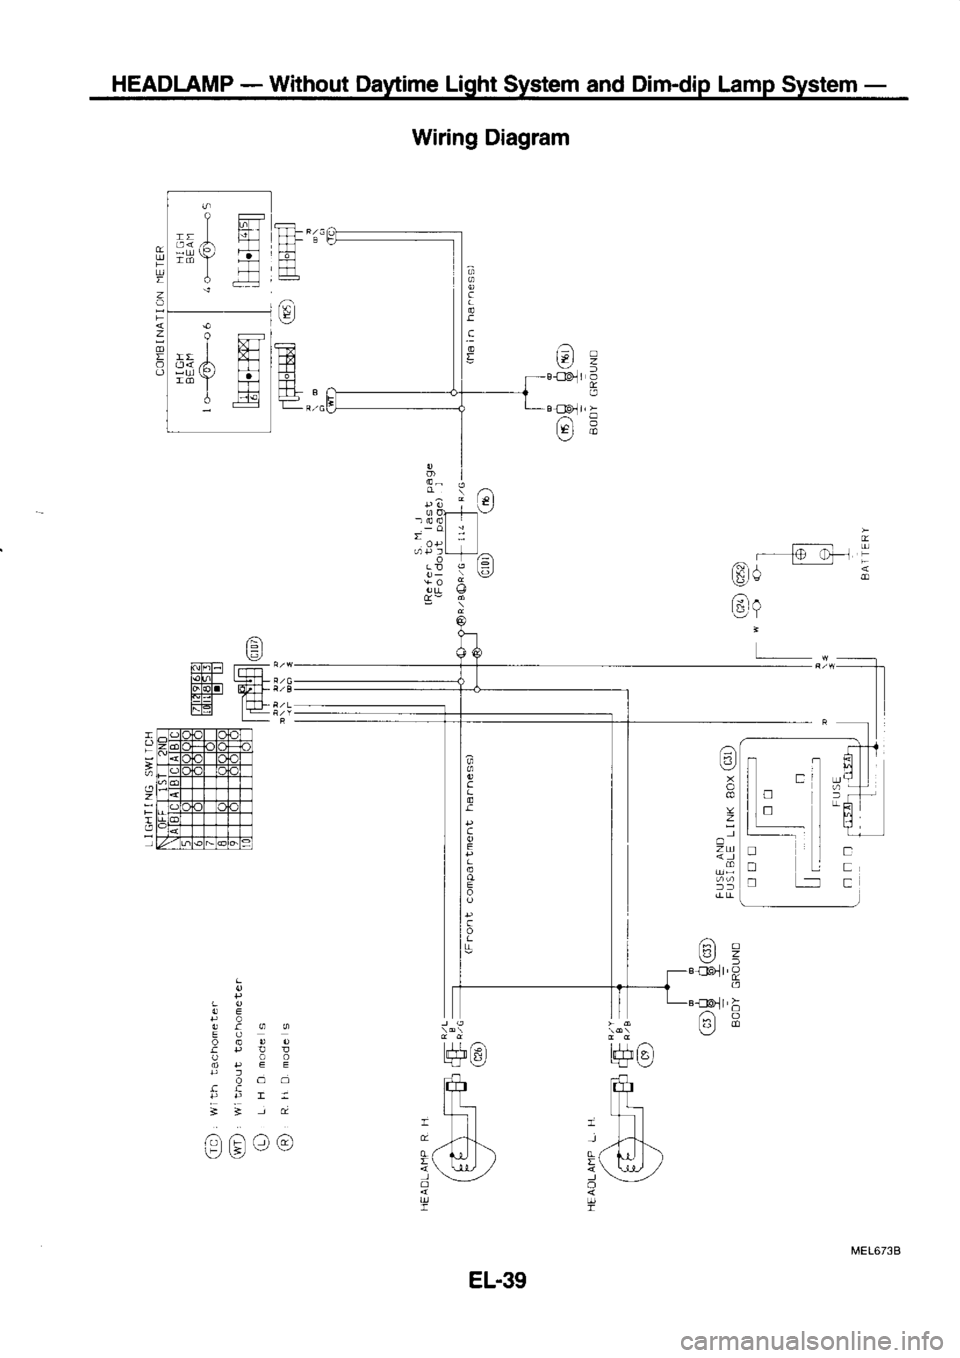
HEADLAMP
-
Without Daytime Light
System and Dim-dip
Lamp System -
ttf
ffi
T.-l
m
G
= ffii
ff-l
E
L Wiring
Diagram
I /-:\
qtrLdl
t=
t-:J!.ll= rT_-
m q4+
L
[-/
z
=
o
ztx
.o11' A
@E
/-,
-
lEl z
aolr, ?
a
al
6i rA r-l 6\
!-rtrr"" tP
q+
1+ +
rf rJl
" --1-tf- '
--.1-t+.
9( t.A.r ) g(
ur )
; \-r-{-/
/ ;
\ll,
,/
3 v
d '\-,--l
fiff II
EL.39
Trending: fuel cap, oil reset, radiator, length, charging, turn signal bulb, wiper blades
