display NISSAN TEANA 2008 Service Manual
[x] Cancel search | Manufacturer: NISSAN, Model Year: 2008, Model line: TEANA, Model: NISSAN TEANA 2008Pages: 5121, PDF Size: 69.03 MB
Page 11 of 5121
DIAGNOSIS AND REPAIR WORKFLOW
ADP-5
< BASIC INSPECTION >
C
D
E
F
G
H
I
K
L
MA
B
ADP
N
O
P
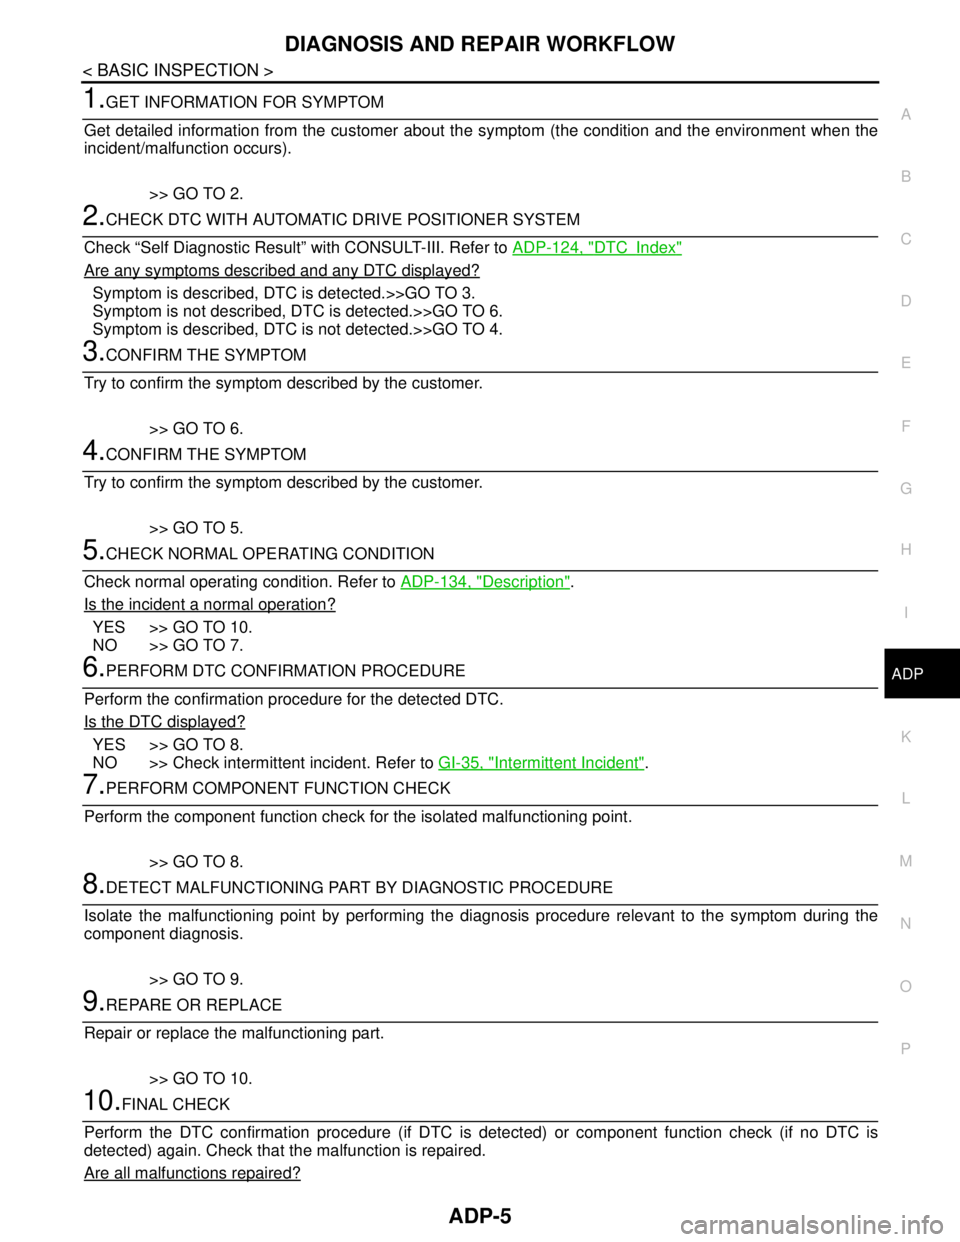
1.GET INFORMATION FOR SYMPTOM
Get detailed information from the customer about the symptom (the condition and the environment when the
incident/malfunction occurs).
>> GO TO 2.
2.CHECK DTC WITH AUTOMATIC DRIVE POSITIONER SYSTEM
Check “Self Diagnostic Result” with CONSULT-III. Refer to ADP-124, "
DTCIndex"
Are any symptoms described and any DTC displayed?
Symptom is described, DTC is detected.>>GO TO 3.
Symptom is not described, DTC is detected.>>GO TO 6.
Symptom is described, DTC is not detected.>>GO TO 4.
3.CONFIRM THE SYMPTOM
Try to confirm the symptom described by the customer.
>> GO TO 6.
4.CONFIRM THE SYMPTOM
Try to confirm the symptom described by the customer.
>> GO TO 5.
5.CHECK NORMAL OPERATING CONDITION
Check normal operating condition. Refer to ADP-134, "
Description".
Is the incident a normal operation?
YES >> GO TO 10.
NO >> GO TO 7.
6.PERFORM DTC CONFIRMATION PROCEDURE
Perform the confirmation procedure for the detected DTC.
Is the DTC displayed?
YES >> GO TO 8.
NO >> Check intermittent incident. Refer to GI-35, "
Intermittent Incident".
7.PERFORM COMPONENT FUNCTION CHECK
Perform the component function check for the isolated malfunctioning point.
>> GO TO 8.
8.DETECT MALFUNCTIONING PART BY DIAGNOSTIC PROCEDURE
Isolate the malfunctioning point by performing the diagnosis procedure relevant to the symptom during the
component diagnosis.
>> GO TO 9.
9.REPARE OR REPLACE
Repair or replace the malfunctioning part.
>> GO TO 10.
10.FINAL CHECK
Perform the DTC confirmation procedure (if DTC is detected) or component function check (if no DTC is
detected) again. Check that the malfunction is repaired.
Are all malfunctions repaired?
Page 15 of 5121

INSPECTION AND ADJUSTMENT
ADP-9
< BASIC INSPECTION >
C
D
E
F
G
H
I
K
L
MA
B
ADP
N
O
P
MEMORY STORING : Special Repair RequirementINFOID:0000000003759065
Memory Storage Procedure
Two positions for the driver seat can be stored for memory operation by the following procedure.
1.STEP 1
Shift selector lever to the P position.
>> GO TO 2.
2.STEP 2
Turn ignition switch ON.
>> GO TO 3.
3.STEP 3
Adjust driver seat position manually.
>> GO TO 4.
4.STEP 4
1. Push set switch.
NOTE:
Memory indicator for which driver seat position is already retained in memory is illuminated for 5 sec-
onds.
Memory indicator for which driver seat position is not retained in memory is illuminated for 0.5 seconds.
2. Push the memory switch (1 or 2) for at least 1 second within 5 seconds after pushing the set switch.
NOTE:
When entering driver seat positions into blank memory, memory indicator turns ON for 5 seconds.
When changing driver seat positions, memory indicator turns OFF for 0.5 seconds, then turns ON for 5
seconds.
NOTE:
If memory is stored in the same memory switch, the previous memory will be deleted.
Do you need to link Intelligent Keys?
YES >> GO TO 5.
NO >> END
5.STEP 6
Push the Intelligent Key unlock button within 5 seconds after pushing memory switch (while the memory indi-
cator is ON).
>> GO TO 6.
6.STEP 7
Confirm the operation of each part with memory operation and Intelligent Key interlock operation.
>> END
SYSTEM SETTING
SYSTEM SETTING : DescriptionINFOID:0000000003759066
The settings of the automatic driving positioner system can be changed, using CONSULT-III, the display unit
in the center of the instrument panel and the set switch. Always check the settings before and after discon-
necting the battery terminal or replacing driver seat control unit.
Setting Change
Page 16 of 5121

ADP-10
< BASIC INSPECTION >
INSPECTION AND ADJUSTMENT
×: Applicable
SYSTEM SETTING : Special Repair RequirementINFOID:0000000003759067
1. CHOOSE METHOD
There are three ways of setting methods.
Which method do you choose?
With display>>GO TO 2.
With set switch>>GO TO 4.
With CONSULT-III>>GO TO 6.
2. WITH DISPLAY - STEP 1
Turn ignition switch ON.
>> GO TO 3.
3. WITH DISPLAY - STEP 2
1. Push “SETTING” button.
2. Select “Comfort & Conv.”.
3. Select “Slide Driver′s Seat Back ON Exit” on display, then push
- Slide Driver's Seat Back On Exit: Entry/exit assist (seat)
>> END
4. WITH SET SWITCH - STEP 1
Turn ignition switch OFF.
>> GO TO 5.
5. WITH SET SWITCH - STEP 2
Push setting button and hold for more than 10 seconds, then confirm blinking of the memory switch indicator.
Entry/exit assist (seat) are ON: Memory switch indicator blinks two times.
Entry/exit assist (seat) are OFF: Memory switch indicator blinks once.
>> END
6. WITH CONSULT-III - STEP 1
Select “Work support”.
>> GO TO 7.
7. WITH CONSULT-III - STEP 2
1. Select “EXIT SEAT SLIDE SETTING”, or “SEAT SLIDE VOLUME SET” then touch display to change
between ON and OFF.
- EXIT SEAT SLIDE SETTING: Entry/exit assist (seat)
2. Then touch “OK”.
Item ContentCON-
SULT
–IIIDisplaySet
switchFactory
setting
Amount of seat sliding for
entry/exit assistThe amount of seat sliding for entry/exit assist can
be selected from 3 items.
[40mm/80mm/150mm]x——40mm
Entry/exit assist
(seat)Entry/exit assist (seat) can be selected:
ON (operated) – OFF (not operated)xxxON
Reset custom settings All settings can be set to default (factory setting). — x — —
Page 21 of 5121

AUTOMATIC DRIVE POSITIONER SYSTEM
ADP-15
< FUNCTION DIAGNOSIS >
C
D
E
F
G
H
I
K
L
MA
B
ADP
N
O
P
AUTOMATIC DRIVE POSITIONER SYSTEM : Component DescriptionINFOID:0000000003759071
CONTROL UNITS
INPUT PARTS
Switches
Sensors
OUTPUT PARTS
10. Lifting motor (rear) (driver side) B456 11. Power seat switch (driver side) B459
(sliding, lifting switch)12. Power seat switch (driver side) B459
(reclining switch)
13. TCM (transmission control module)
F2314. Control device (detention switch)
M5715. ABS actuator and electric unit (con-
trol unit) E36
A. Behind the combination meter B. View with seat cushion and seatback
pad removedC. Back side of the seat cushion
D. Engine room (LH) E. View with the center console assem-
bly removedF. Engine room (RH)
Item Function
Driver seat control unit Main unit of automatic drive positioner system
Connected to the CAN
BCMTransmits the following status to the driver seat control unit via CAN communication
Driver door: OPEN/CLOSE
Ignition switch position: ACC/ON
Door lock: UNLOCK (with Intelligent Key or driver side door request switch oper-
ation)
Key ID
Key switch: Insert/Pull out Intelligent Key
Starter: CRANKING/OTHER
Steering lock unit status: Lock/Unlock
Handle position
Combination meter / ABS actuator and
electric unit (control unit)Transmits the vehicle speed signal to the driver seat control unit via CAN commu-
nication
AV control unit The setting change of auto drive positioner system can be performed on the display
TCMTransmits the shift position signal (P range) to the driver seat control unit via CAN
communication
Item Function
Key slot The key switch is installed to detect the key inserted/removed status
Front door switch (driver side) Detects front door (driver side) open/close status
Control device (detention switch) Detects the P range position of selector lever
Set switch The registration and system setting can be performed with its operation
Memory switch 1/2 The registration and operation can be performed with its operation
Power seat switchThe following switches are installed
Reclining switch
Lifting switch (front)
Lifting switch (rear)
Sliding switch
Item Function
Lifting sensor (front) Detects the up/down position of seat lifting (front)
Lifting sensor (rear) Detects the up/down position of seat lifting (rear)
Reclining sensor Detects the tilt of seatback
Sliding sensor Detects the front/rear position of seat
Page 41 of 5121
DIAGNOSIS SYSTEM (DRIVER SEAT CONTROL UNIT)
ADP-35
< FUNCTION DIAGNOSIS >
C
D
E
F
G
H
I
K
L
MA
B
ADP
N
O
P
DIAGNOSIS SYSTEM (DRIVER SEAT CONTROL UNIT)
Diagnosis DescriptionINFOID:0000000003759092
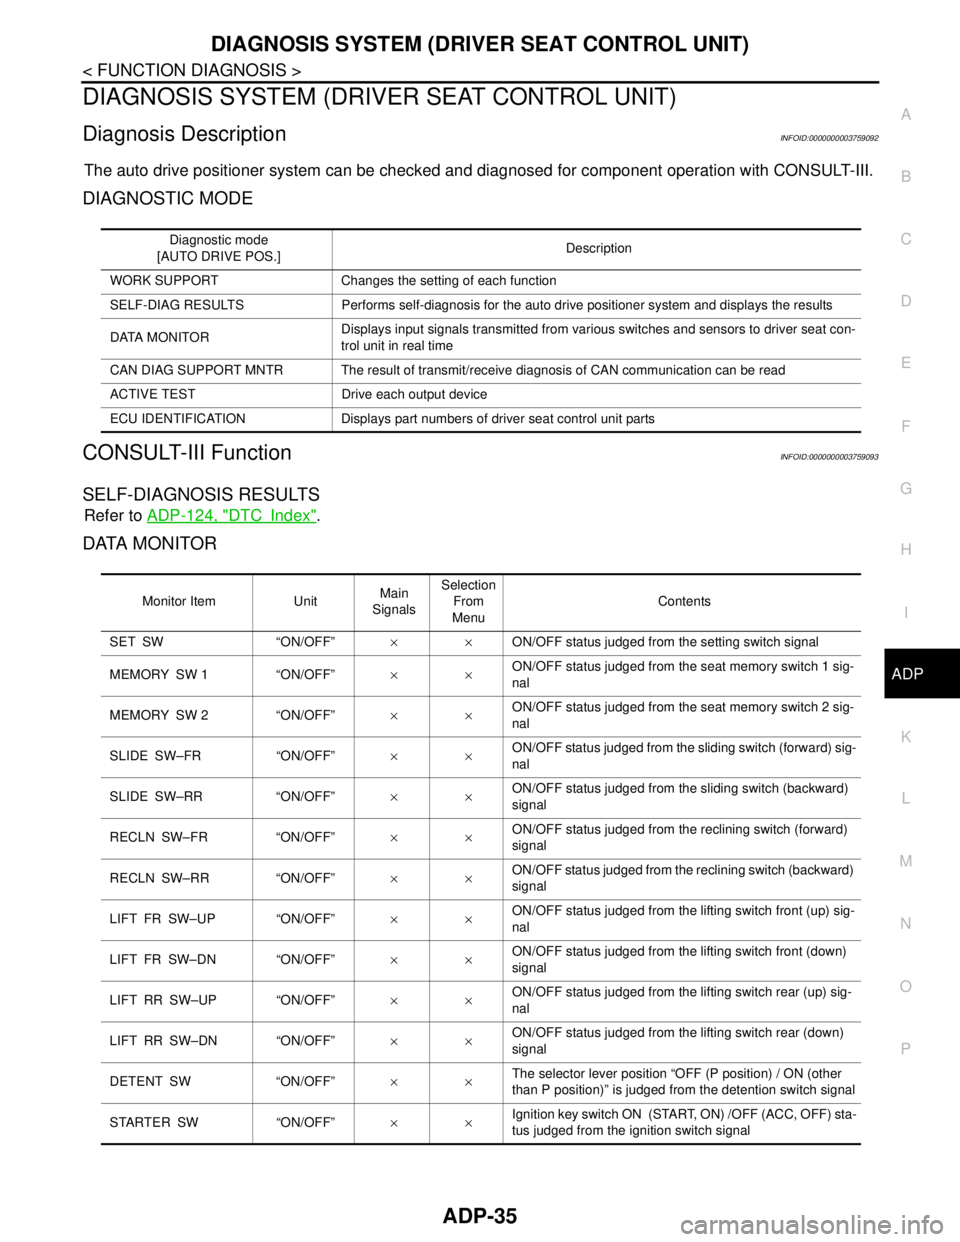
The auto drive positioner system can be checked and diagnosed for component operation with CONSULT-III.
DIAGNOSTIC MODE
CONSULT-III FunctionINFOID:0000000003759093
SELF-DIAGNOSIS RESULTS
Refer to ADP-124, "DTCIndex".
DATA MONITOR
Diagnostic mode
[AUTO DRIVE POS.]Description
WORK SUPPORT Changes the setting of each function
SELF-DIAG RESULTS Performs self-diagnosis for the auto drive positioner system and displays the results
DATA MONITORDisplays input signals transmitted from various switches and sensors to driver seat con-
trol unit in real time
CAN DIAG SUPPORT MNTR The result of transmit/receive diagnosis of CAN communication can be read
ACTIVE TEST Drive each output device
ECU IDENTIFICATION Displays part numbers of driver seat control unit parts
Monitor Item UnitMain
SignalsSelection
From
MenuContents
SET SW “ON/OFF”××ON/OFF status judged from the setting switch signal
MEMORY SW 1 “ON/OFF”××ON/OFF status judged from the seat memory switch 1 sig-
nal
MEMORY SW 2 “ON/OFF”××ON/OFF status judged from the seat memory switch 2 sig-
nal
SLIDE SW–FR “ON/OFF”××ON/OFF status judged from the sliding switch (forward) sig-
nal
SLIDE SW–RR “ON/OFF”××ON/OFF status judged from the sliding switch (backward)
signal
RECLN SW–FR “ON/OFF”××ON/OFF status judged from the reclining switch (forward)
signal
RECLN SW–RR “ON/OFF”××ON/OFF status judged from the reclining switch (backward)
signal
LIFT FR SW–UP “ON/OFF”××ON/OFF status judged from the lifting switch front (up) sig-
nal
LIFT FR SW–DN “ON/OFF”××ON/OFF status judged from the lifting switch front (down)
signal
LIFT RR SW–UP “ON/OFF”××ON/OFF status judged from the lifting switch rear (up) sig-
nal
LIFT RR SW–DN “ON/OFF”××ON/OFF status judged from the lifting switch rear (down)
signal
DETENT SW “ON/OFF”××The selector lever position “OFF (P position) / ON (other
than P position)” is judged from the detention switch signal
STARTER SW “ON/OFF”××Ignition key switch ON (START, ON) /OFF (ACC, OFF) sta-
tus judged from the ignition switch signal
Page 42 of 5121

ADP-36
< FUNCTION DIAGNOSIS >
DIAGNOSIS SYSTEM (DRIVER SEAT CONTROL UNIT)
ACTIVE TEST
CAUTION:
When driving vehicle never perform active test.
WORK SUPPORT
SLIDE PULSE — –×Value (32768) when battery connections are standard. If it
moves backward, the value increases. If it moves forward,
the value decreases
RECLN PULSE — –×Value (32768) when battery connections are standard. If it
moves backward, the value increases. If it moves forward,
the value decreases
LIFT FR PULSE — –×Value (32768) when battery connections are standard. If it
moves DOWN, the value increases. If it moves UP, the val-
ue decreases
LIFT RR PULSE — –×Value (32768) when battery connections are standard. If it
moves DOWN, the value increases. If it moves UP, the val-
ue decreases
VEHICLE SPEED —××Display the vehicle speed signal received from combination
meter by numerical value [km/h]
P RANG SW CAN “ON/OFF”××ON/OFF status judged from the P range switch signal
R RANGE (CAN) “ON/OFF”××ON/OFF status judged from the R range switch signal
DOOR SW–FL “ON/OFF”××ON/OFF status judged from the door switch (front driver
side) signal
DOOR SW–FR “ON/OFF”××ON/OFF status judged from the door switch (front passen-
ger side) signal
IGN ON SW “ON/OFF”××ON/OFF status judged from the ignition switch signal
ACC ON SW “ON/OFF”××ON/OFF status judged from the ACC switch signal
KEY ON SW “ON/OFF”××ON/OFF status judged from the key on switch signal
KEYLESS ID —××Key ID status judged from the key ID signal
KYLS DR UNLK “ON/OFF”××ON/OFF status judged from the driver side door unlock ac-
tuator output switch signal
VHCL SPEED (ABS) “ON/OFF”××ON/OFF status judged from vehicle speed signal
HANDLE “RHD/LHD”××RHD/LHD status judged from handle position signal
TRANSMISSION“AT or CVT/
MT”××AT or CVT/MT status judged from transmission
STEERING STATUS“LOCK/UN-
LOCK”××LOCK/UNLOCK status judged from steering lock unit Monitor Item UnitMain
SignalsSelection
From
MenuContents
Test item Description
SEAT SLIDE Activates/deactivates the sliding motor
SEAT RECLINING Activates/deactivates the reclining motor
SEAT LIFTER FR Activates/deactivates the lifting motor (front)
SEAT LIFTER RR Activates/deactivates the lifting motor (rear)
MEMORY SW INDCTR Turns ON/OFF the memory indicator
Work item Content Item
SEAT SLIDE VOLUME SETThe amount of seat sliding for entry/exit assist can be selected
from 3 items.40 mm
80 mm
150 mm
Page 46 of 5121
ADP-40
< COMPONENT DIAGNOSIS >
B2130 EEPROM
B2130 EEPROM
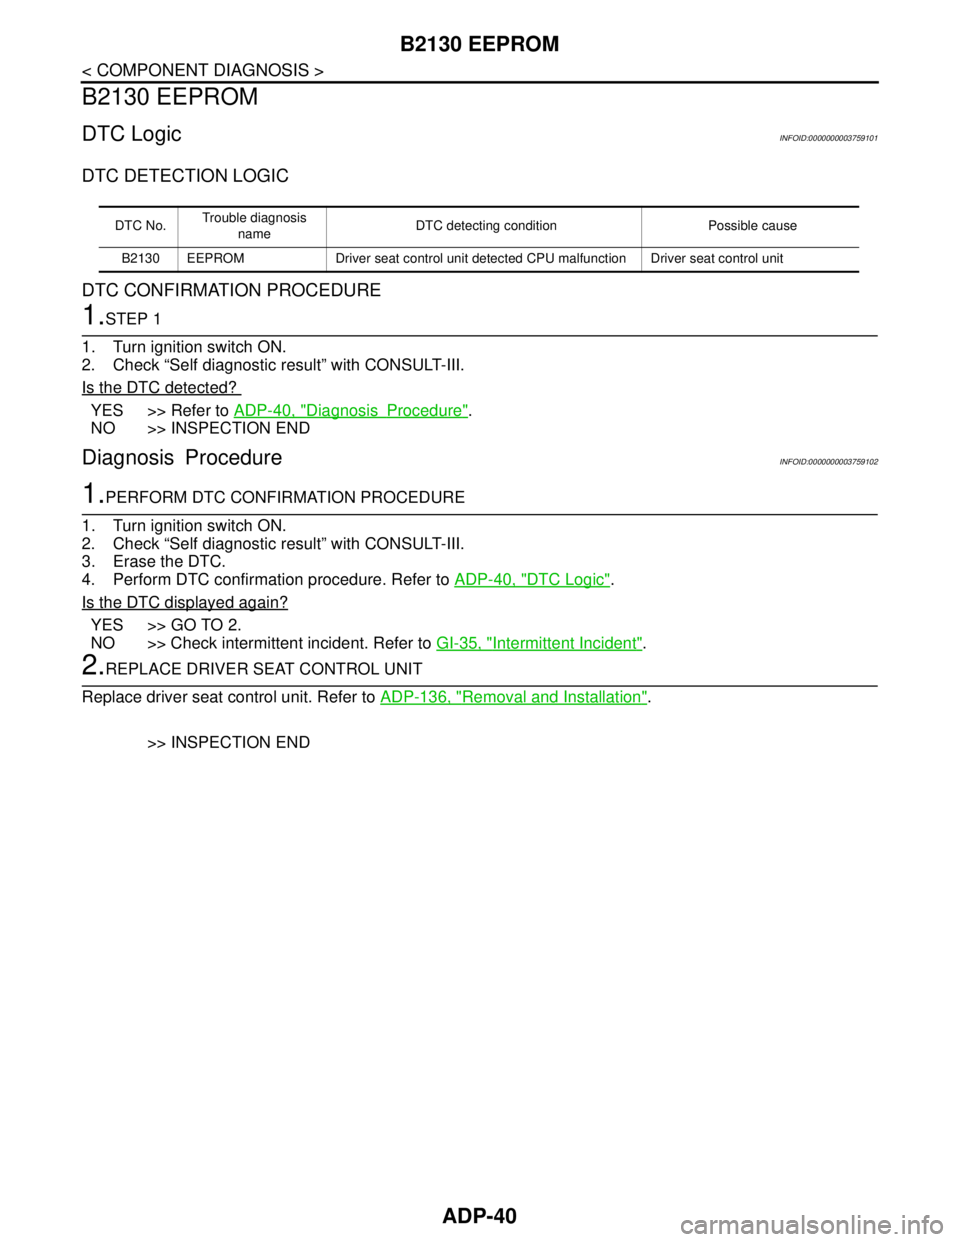
DTC LogicINFOID:0000000003759101
DTC DETECTION LOGIC
DTC CONFIRMATION PROCEDURE
1.STEP 1
1. Turn ignition switch ON.
2. Check “Self diagnostic result” with CONSULT-III.
Is the DTC detected?
YES >> Refer to ADP-40, "DiagnosisProcedure".
NO >> INSPECTION END
Diagnosis ProcedureINFOID:0000000003759102
1.PERFORM DTC CONFIRMATION PROCEDURE
1. Turn ignition switch ON.
2. Check “Self diagnostic result” with CONSULT-III.
3. Erase the DTC.
4. Perform DTC confirmation procedure. Refer to ADP-40, "
DTC Logic".
Is the DTC displayed again?
YES >> GO TO 2.
NO >> Check intermittent incident. Refer to GI-35, "
Intermittent Incident".
2.REPLACE DRIVER SEAT CONTROL UNIT
Replace driver seat control unit. Refer to ADP-136, "
Removal and Installation".
>> INSPECTION END
DTC No.Trouble diagnosis
nameDTC detecting condition Possible cause
B2130 EEPROM Driver seat control unit detected CPU malfunction Driver seat control unit
Page 47 of 5121
B2112 SLIDING MOTOR
ADP-41
< COMPONENT DIAGNOSIS >
C
D
E
F
G
H
I
K
L
MA
B
ADP
N
O
P
B2112 SLIDING MOTOR
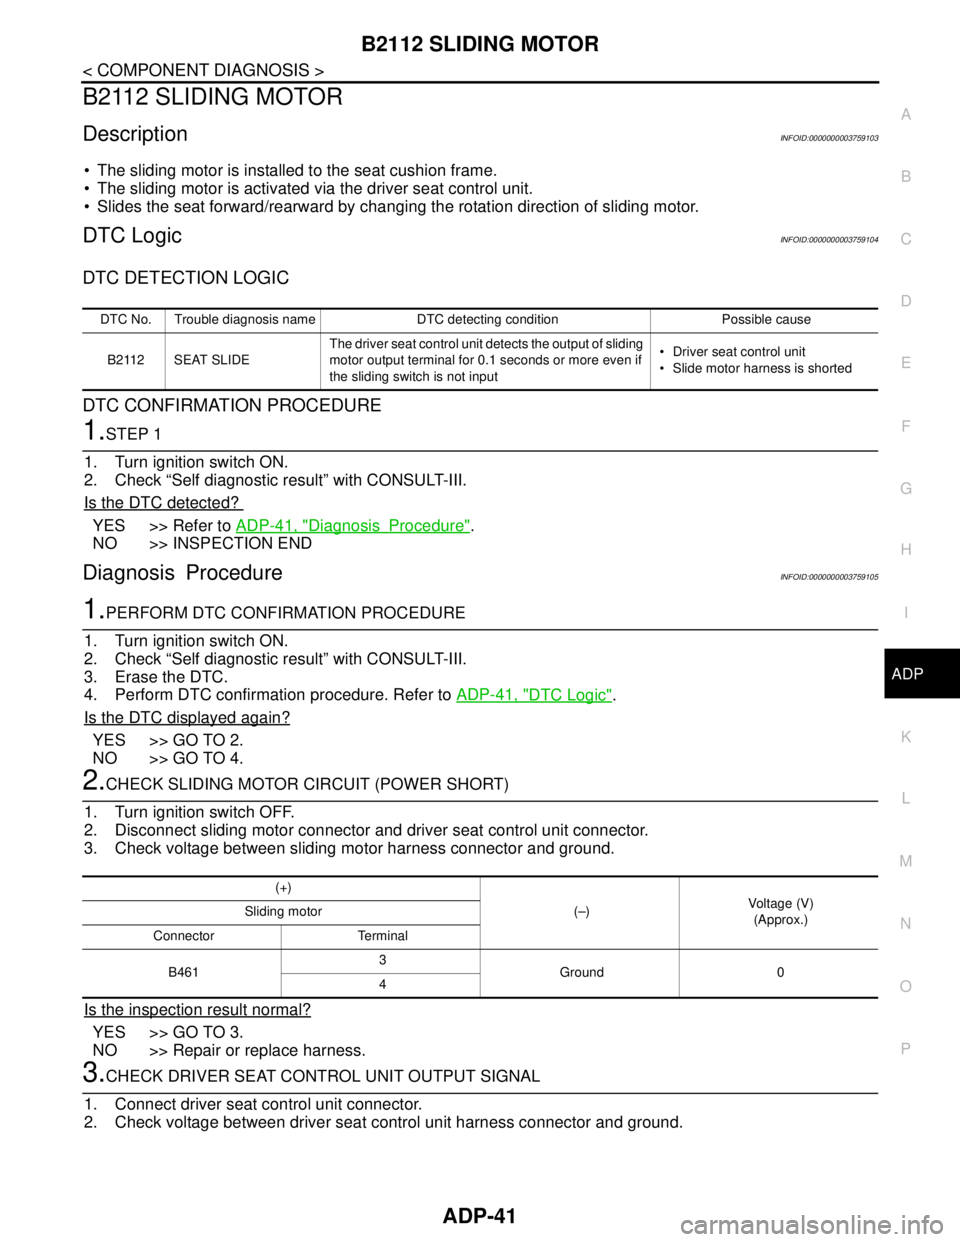
DescriptionINFOID:0000000003759103
The sliding motor is installed to the seat cushion frame.
The sliding motor is activated via the driver seat control unit.
Slides the seat forward/rearward by changing the rotation direction of sliding motor.
DTC LogicINFOID:0000000003759104
DTC DETECTION LOGIC
DTC CONFIRMATION PROCEDURE
1.STEP 1
1. Turn ignition switch ON.
2. Check “Self diagnostic result” with CONSULT-III.
Is the DTC detected?
YES >> Refer to ADP-41, "DiagnosisProcedure".
NO >> INSPECTION END
Diagnosis ProcedureINFOID:0000000003759105
1.PERFORM DTC CONFIRMATION PROCEDURE
1. Turn ignition switch ON.
2. Check “Self diagnostic result” with CONSULT-III.
3. Erase the DTC.
4. Perform DTC confirmation procedure. Refer to ADP-41, "
DTC Logic".
Is the DTC displayed again?
YES >> GO TO 2.
NO >> GO TO 4.
2.CHECK SLIDING MOTOR CIRCUIT (POWER SHORT)
1. Turn ignition switch OFF.
2. Disconnect sliding motor connector and driver seat control unit connector.
3. Check voltage between sliding motor harness connector and ground.
Is the inspection result normal?
YES >> GO TO 3.
NO >> Repair or replace harness.
3.CHECK DRIVER SEAT CONTROL UNIT OUTPUT SIGNAL
1. Connect driver seat control unit connector.
2. Check voltage between driver seat control unit harness connector and ground.
DTC No. Trouble diagnosis name DTC detecting condition Possible cause
B2112 SEAT SLIDEThe driver seat control unit detects the output of sliding
motor output terminal for 0.1 seconds or more even if
the sliding switch is not input Driver seat control unit
Slide motor harness is shorted
(+)
(–)Voltage (V)
(Approx.) Sliding motor
Connector Terminal
B4613
Ground 0
4
Page 49 of 5121
B2113 RECLINING MOTOR
ADP-43
< COMPONENT DIAGNOSIS >
C
D
E
F
G
H
I
K
L
MA
B
ADP
N
O
P
B2113 RECLINING MOTOR
DescriptionINFOID:0000000003759106
The reclining motor is installed to the seatback frame.
The reclining motor is activated via the driver seat control unit.
Tilts the seatback forward/rearward by changing the rotation direction of reclining motor.
DTC LogicINFOID:0000000003759107
DTC DETECTION LOGIC
DTC CONFIRMATION PROCEDURE
1.STEP 1
1. Turn ignition switch ON.
2. Check “Self diagnostic result” with CONSULT-III.
Is the DTC detected?
YES >> Refer to ADP-43, "DiagnosisProcedure".
NO >> INSPECTION END
Diagnosis ProcedureINFOID:0000000003759108
1.PERFORM DTC CONFIRMATION PROCEDURE
1. Turn ignition switch ON.
2. Check “Self diagnostic result” with CONSULT-III.
3. Erase the DTC.
4. Perform DTC confirmation procedure. Refer to ADP-43, "
DTC Logic".
Is the DTC displayed again?
YES >> GO TO 2.
NO >> GO TO 4.
2.CHECK RECLINING MOTOR CIRCUIT (POWER SHORT)
1. Turn ignition switch OFF.
2. Disconnect reclining motor connector and driver seat control unit connector.
3. Check voltage between reclining motor harness connector and ground.
Is the inspection result normal?
YES >> GO TO 3.
NO >> Repair or replace harness.
3.CHECK DRIVER SEAT CONTROL UNIT OUTPUT SIGNAL
1. Connect driver seat control unit connector.
2. Check voltage between driver seat control unit harness connector and ground.
DTC No. Trouble diagnosis name DTC detecting condition Possible cause
B2113 SEAT RECLININGThe driver seat control unit detects the output of reclin-
ing motor output terminal for 0.1 second or more even
if the reclining switch is not input Driver seat control unit
Reclining motor harness is shorted
(+)
(–)Voltage (V)
(Approx.) Reclining motor
Connector Terminal
B4545
Ground 0
6
Page 114 of 5121

ADP-108
< COMPONENT DIAGNOSIS >
BCM (BODY CONTROL MODULE)
Display contents of CONSULT Fail-safe Cancellation
B2013: ID DISCORD BCM-S/L Inhibit engine cranking Erase DTC
B2014: CHAIN OF S/L-BCM Inhibit engine cranking Erase DTC
B2190: NATS ANTENNA AMP Inhibit engine cranking Erase DTC
B2191: DIFFERENCE OF KEY Inhibit engine cranking Erase DTC
B2192: ID DISCORD BCM-ECM Inhibit engine cranking Erase DTC
B2193: CHAIN OF BCM-ECM Inhibit engine cranking Erase DTC
B2557: VEHICLE SPEED Inhibit steering lockWhen normal vehicle speed signals have been received from ABS
actuator and electric unit (control unit) for 500 ms
B2560: STARTER CONT RELAY Inhibit engine cranking500 ms after the following CAN signal communication status has
become consistent
Starter control relay signal
Starter relay status signal
B2601: SHIFT POSITION Inhibit steering lock500 ms after the following signal reception status becomes consis-
tent
Selector lever P position switch signal
P range signal (CAN)
B2602: SHIFT POSITION Inhibit steering lock5 seconds after the following BCM recognition conditions are ful-
filled
Ignition switch is in the ON position
Selector lever P position switch signal: Except P position (battery
voltage)
Vehicle speed: 4 km/h (2.5 MPH) or more
B2603: SHIFT POSI STATUS Inhibit steering lock500 ms after the following BCM recognition conditions are fulfilled
Ignition switch is in the ON position
Selector lever P position switch signal: Except P position (battery
voltage)
Selector lever P/N position signal: Except P and N positions (0 V)
B2604: PNP SW Inhibit steering lock500 ms after any of the following BCM recognition conditions is ful-
filled
Status 1
- Ignition switch is in the ON position
- Selector lever P/N position signal: P and N position (battery volt-
age)
- P range signal or N range signal (CAN): ON
Status 2
- Ignition switch is in the ON position
- Selector lever P/N position signal: Except P and N positions (0 V)
- P range signal and N range signal (CAN): OFF
B2605: PNP SW Inhibit steering lock500 ms after any of the following BCM recognition conditions is ful-
filled
Ignition switch is in the ON position
- Power position: IGN
- Selector lever P/N position signal: Except P and N positions (0 V)
- Interlock/PNP switch signal (CAN): OFF
Status 2
- Ignition switch is in the ON position
- Selector lever P/N position signal: P or N position (battery volt-
age)
- PNP switch signal (CAN): ON
B2606: S/L RELAY Inhibit engine cranking500 ms after the following CAN signal communication status has
become consistent
Steering lock relay signal (Request signal)
Steering lock relay signal (Condition signal)
B2607: S/L RELAY Inhibit engine cranking500 ms after the following CAN signal communication status has
become consistent
Steering lock relay signal (Request signal)
Steering lock relay signal (Condition signal)