check NISSAN TEANA 2014 Owner's Guide
[x] Cancel search | Manufacturer: NISSAN, Model Year: 2014, Model line: TEANA, Model: NISSAN TEANA 2014Pages: 4801, PDF Size: 51.2 MB
Page 100 of 4801
BR-4
< PRECAUTION >
PRECAUTIONS
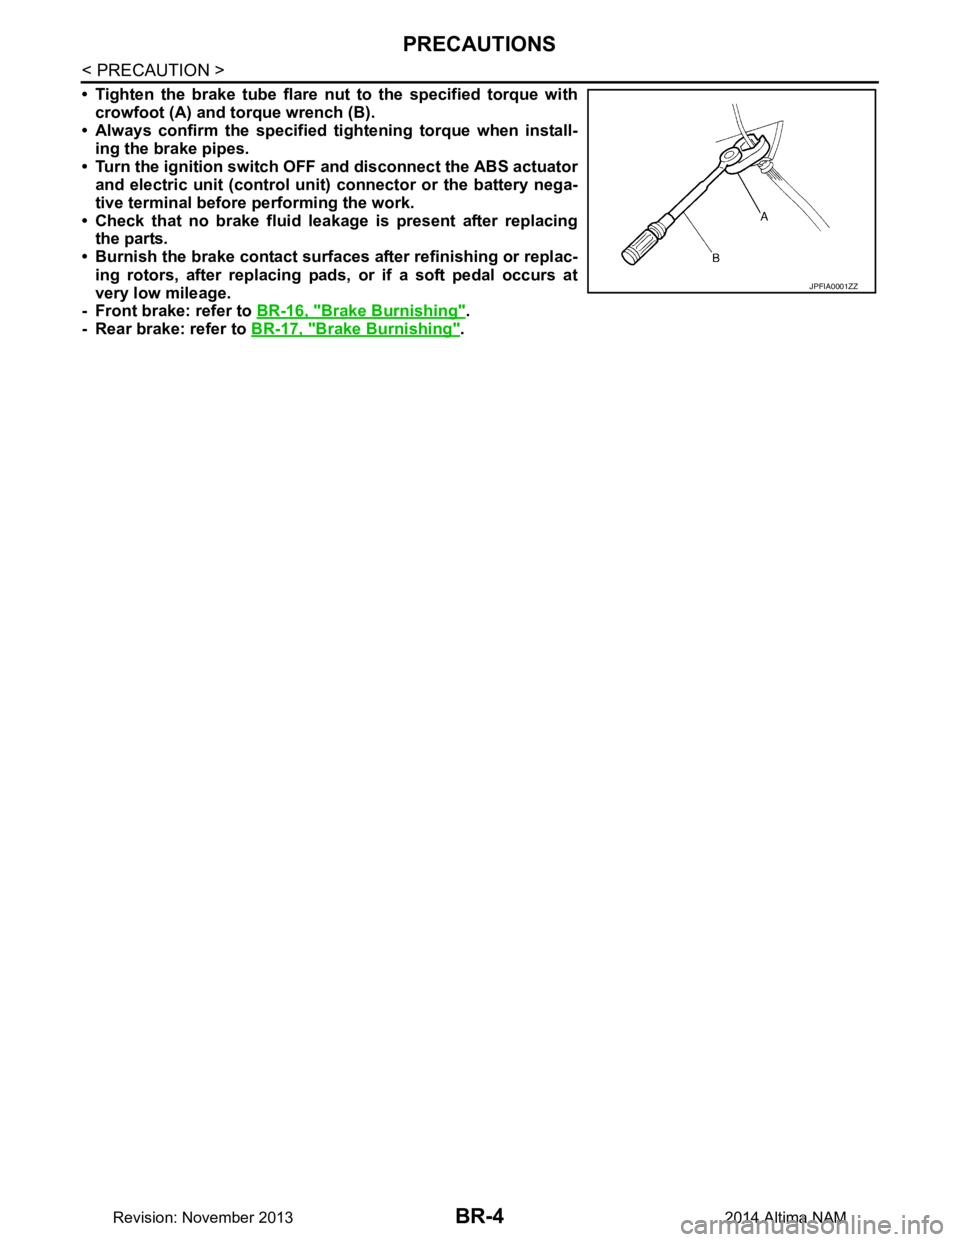
• Tighten the brake tube flare nut to the specified torque with
crowfoot (A) and torque wrench (B).
• Always confirm the specified ti ghtening torque when install-
ing the brake pipes.
• Turn the ignition switch OFF and disconnect the ABS actuator
and electric unit (control unit) connector or the battery nega-
tive terminal before performing the work.
• Check that no brake fluid leakage is present after replacing the parts.
• Burnish the brake contact surf aces after refinishing or replac-
ing rotors, after replacing pads, or if a soft pedal occurs at
very low mileage.
- Front brake: refer to BR-16, "Brake Burnishing"
.
- Rear brake: refer to BR-17, "Brake Burnishing"
.
JPFIA0001ZZ
Revision: November 20132014 Altima NAM
Page 104 of 4801
BR-8
< BASIC INSPECTION >
BRAKE FLUID
BRAKE FLUID
InspectionINFOID:0000000009463683
BRAKE FLUID LEVEL
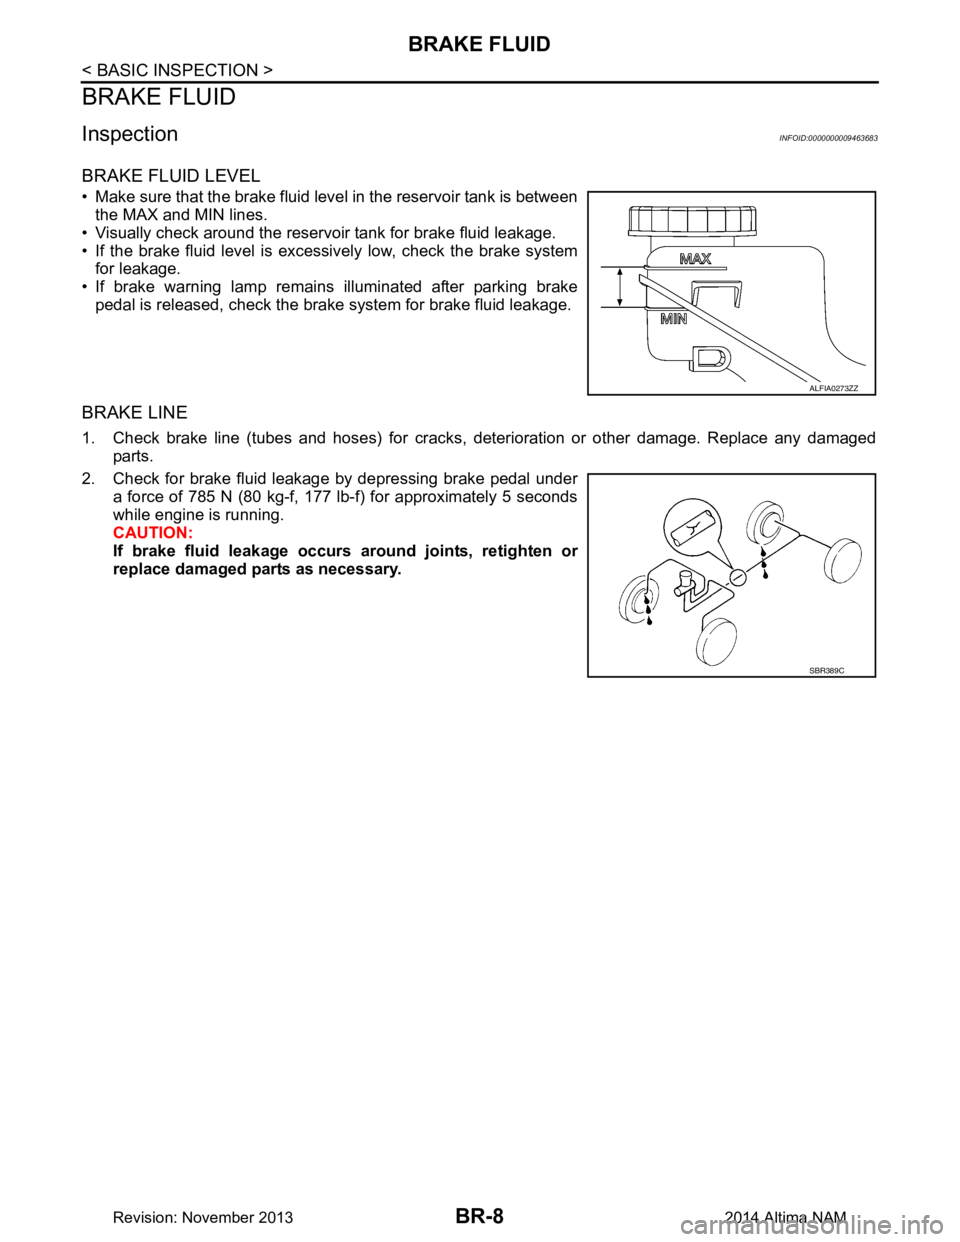
• Make sure that the brake fluid level in the reservoir tank is betweenthe MAX and MIN lines.
• Visually check around the reservoir tank for brake fluid leakage.
• If the brake fluid level is excessively low, check the brake system for leakage.
• If brake warning lamp remains illuminated after parking brake pedal is released, check the brake system for brake fluid leakage.
BRAKE LINE
1. Check brake line (tubes and hoses) for cracks, deterioration or other damage. Replace any damaged
parts.
2. Check for brake fluid leakage by depressing brake pedal under a force of 785 N (80 kg-f, 177 lb-f) for approximately 5 seconds
while engine is running.
CAUTION:
If brake fluid leakage occurs around joints, retighten or
replace damaged parts as necessary.
ALFIA0273ZZ
SBR389C
Revision: November 20132014 Altima NAM
Page 105 of 4801
BRAKE MASTER CYLINDERBR-9
< BASIC INSPECTION >
C
D E
G H
I
J
K L
M A
B
BR
N
O P
BRAKE MASTER CYLINDER
InspectionINFOID:0000000009463684
Check for brake fluid leakage at the following areas:
• Master cylinder mounting face
• Reservoir tank mounting face
• Brake tube and brake tube connections
• Brake hose and brake hose connections
If any brake fluid leakage is found, repair as necessary.
On Board InspectionINFOID:0000000009463685
LEAK INSPECTION
Check for leaks in the master cylinder installation surf ace, reservoir tank installation surface, and brake pipe
and hose connections.
Revision: November 20132014 Altima NAM
Page 106 of 4801
BR-10
< BASIC INSPECTION >
BRAKE BOOSTER
BRAKE BOOSTER
InspectionINFOID:0000000009463686
OPERATION
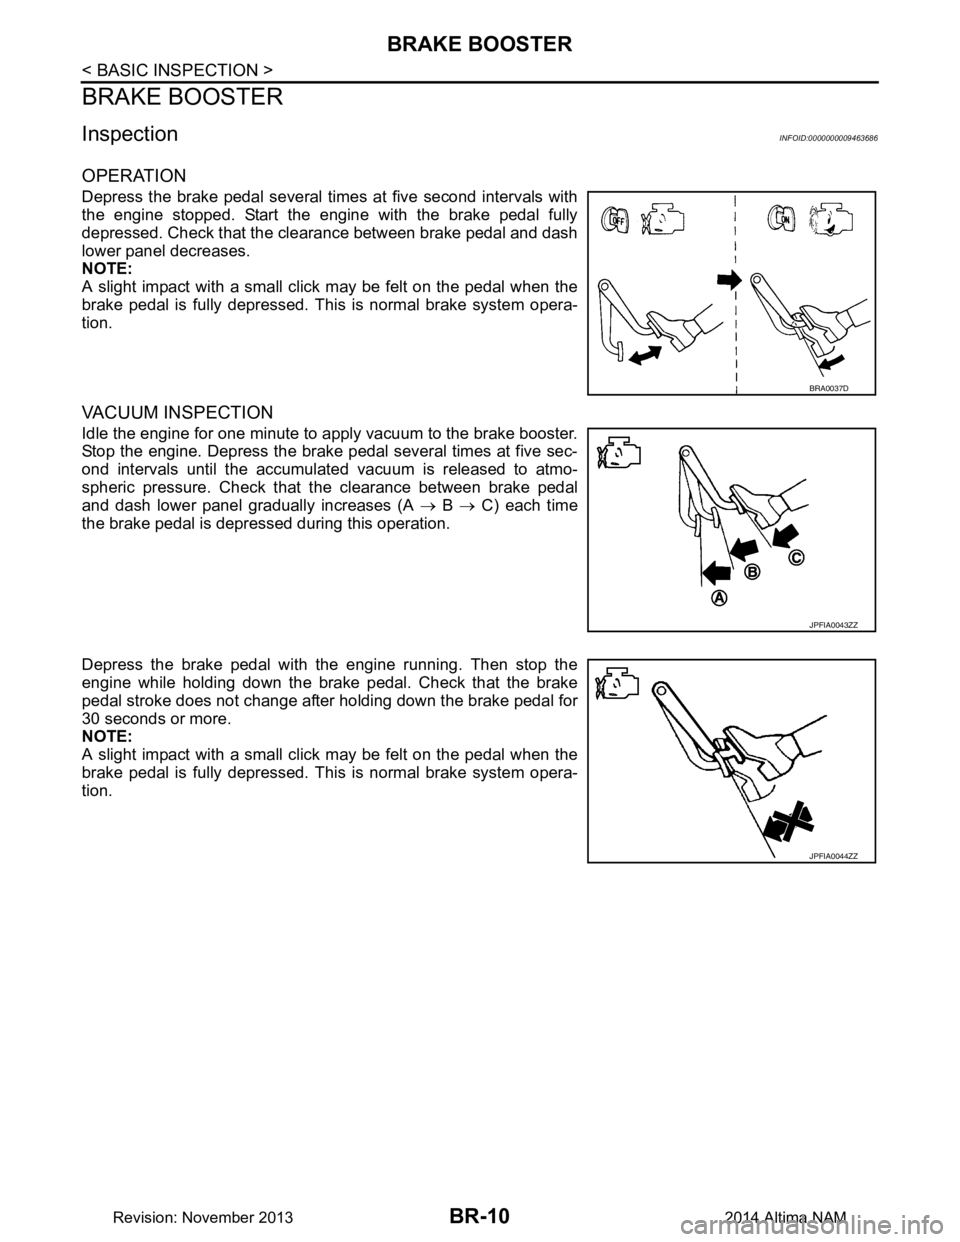
Depress the brake pedal several times at five second intervals with
the engine stopped. Start the engine with the brake pedal fully
depressed. Check that the cl earance between brake pedal and dash
lower panel decreases.
NOTE:
A slight impact with a small click may be felt on the pedal when the
brake pedal is fully depressed. Th is is normal brake system opera-
tion.
VACUUM INSPECTION
Idle the engine for one minute to apply vacuum to the brake booster.
Stop the engine. Depress the brake pedal several times at five sec-
ond intervals until the accumulated vacuum is released to atmo-
spheric pressure. Check that the clearance between brake pedal
and dash lower panel gradually increases (A → B → C) each time
the brake pedal is depressed during this operation.
Depress the brake pedal with the engine running. Then stop the
engine while holding down the brake pedal. Check that the brake
pedal stroke does not change after holding down the brake pedal for
30 seconds or more.
NOTE:
A slight impact with a small click may be felt on the pedal when the
brake pedal is fully depressed. Th is is normal brake system opera-
tion.
BRA0037D
JPFIA0043ZZ
JPFIA0044ZZ
Revision: November 20132014 Altima NAM
Page 107 of 4801
FRONT DISC BRAKEBR-11
< BASIC INSPECTION >
C
D E
G H
I
J
K L
M A
B
BR
N
O P
FRONT DISC BRAKE
BRAKE PAD
BRAKE PAD : InspectionINFOID:0000000009463687
PA D W E A R
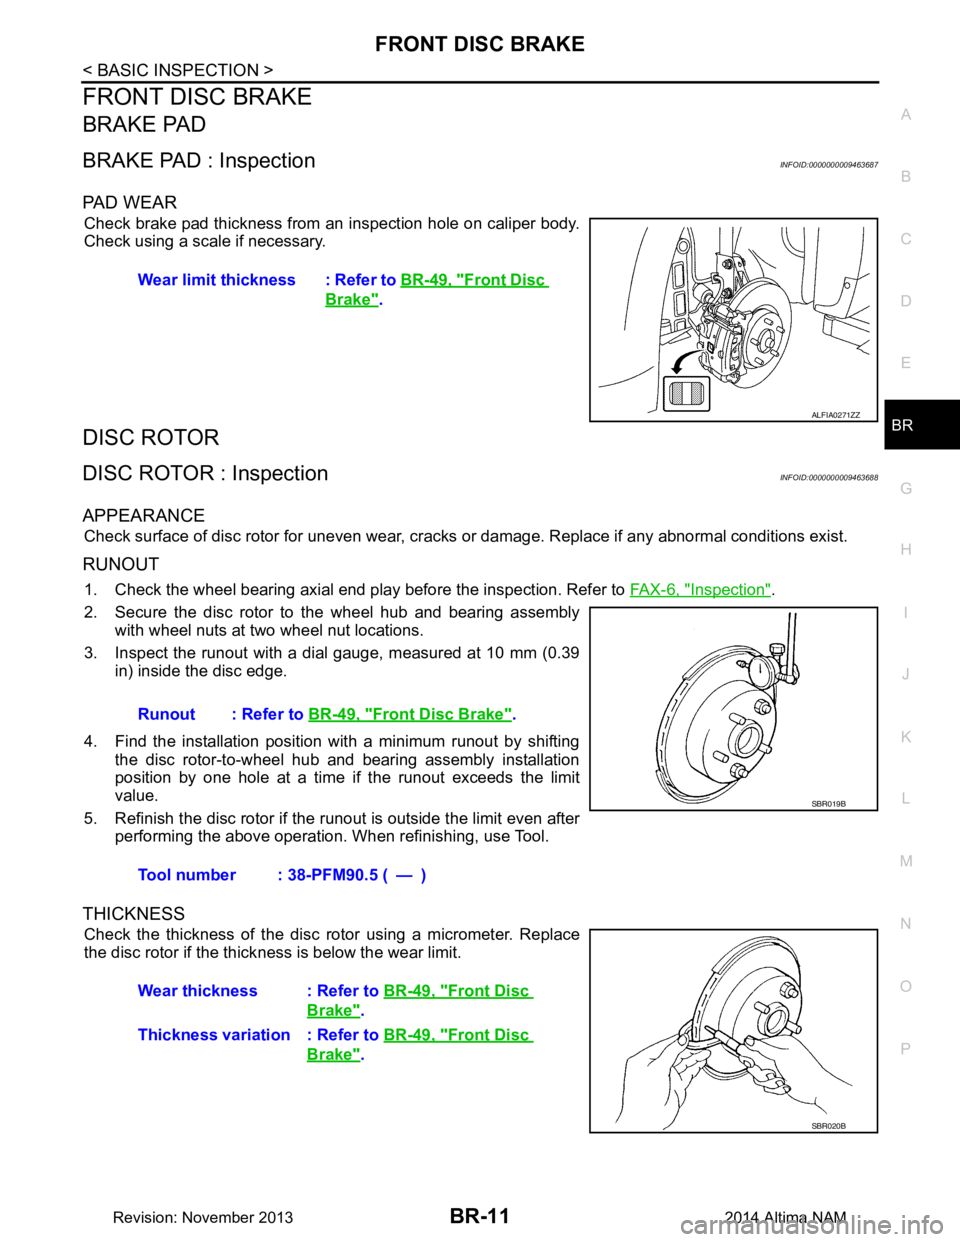
Check brake pad thickness from an inspection hole on caliper body.
Check using a scale if necessary.
DISC ROTOR
DISC ROTOR : InspectionINFOID:0000000009463688
APPEARANCE
Check surface of disc rotor for uneven wear, cracks or damage. Replace if any abnormal conditions exist.
RUNOUT
1. Check the wheel bearing axial end play before the inspection. Refer to FAX-6, "Inspection".
2. Secure the disc rotor to the wheel hub and bearing assembly with wheel nuts at two wheel nut locations.
3. Inspect the runout with a dial gauge, measured at 10 mm (0.39 in) inside the disc edge.
4. Find the installation position with a minimum runout by shifting the disc rotor-to-wheel hub and bearing assembly installation
position by one hole at a time if the runout exceeds the limit
value.
5. Refinish the disc rotor if the runout is outside the limit even after performing the above operation. When refinishing, use Tool.
THICKNESS
Check the thickness of the disc rotor using a micrometer. Replace
the disc rotor if the thick ness is below the wear limit.
Wear limit thickness : Refer to
BR-49, "Front Disc
Brake".
ALFIA0271ZZ
Runout : Refer to BR-49, "Front Disc Brake".
Tool number : 38-PFM90.5 ( — )
SBR019B
Wear thickness : Refer to BR-49, "Front Disc
Brake".
Thickness variation : Refer to BR-49, "Front Disc
Brake".
SBR020B
Revision: November 20132014 Altima NAM
Page 108 of 4801
BR-12
< BASIC INSPECTION >
REAR DISC BRAKE
REAR DISC BRAKE
BRAKE PAD
BRAKE PAD : InspectionINFOID:0000000009463689
PA D W E A R
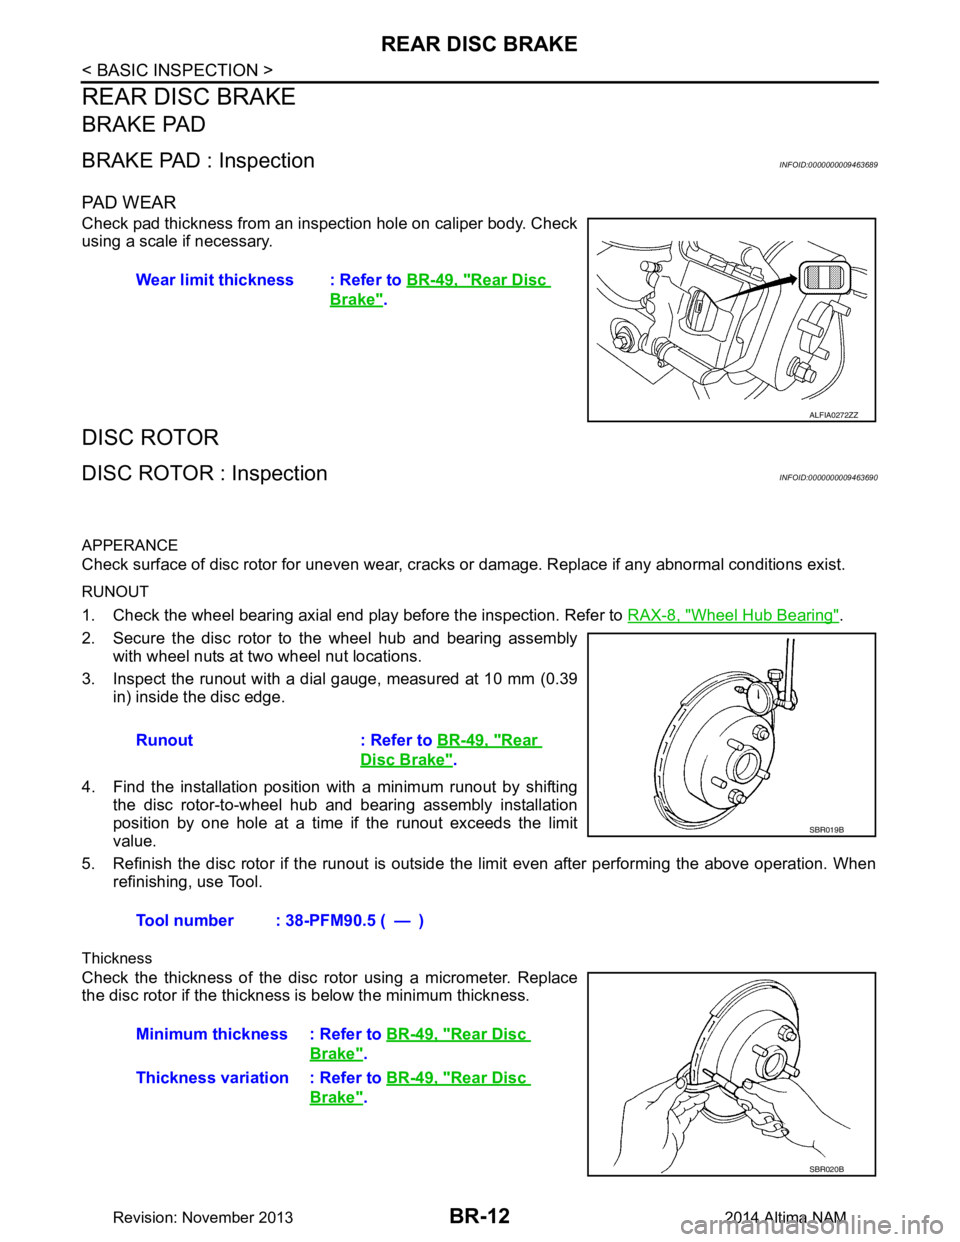
Check pad thickness from an inspection hole on caliper body. Check
using a scale if necessary.
DISC ROTOR
DISC ROTOR : InspectionINFOID:0000000009463690
APPERANCE
Check surface of disc rotor for uneven wear, cracks or damage. Replace if any abnormal conditions exist.
RUNOUT
1. Check the wheel bearing axial end play before the inspection. Refer to RAX-8, "Wheel Hub Bearing".
2. Secure the disc rotor to the wheel hub and bearing assembly with wheel nuts at two wheel nut locations.
3. Inspect the runout with a dial gauge, measured at 10 mm (0.39 in) inside the disc edge.
4. Find the installation position with a minimum runout by shifting the disc rotor-to-wheel hub and bearing assembly installation
position by one hole at a time if the runout exceeds the limit
value.
5. Refinish the disc rotor if the runout is outside t he limit even after performing the above operation. When
refinishing, use Tool.
Thickness
Check the thickness of the disc ro tor using a micrometer. Replace
the disc rotor if the thickness is below the minimum thickness. Wear limit thickness : Refer to
BR-49, "Rear Disc
Brake".
ALFIA0272ZZ
Runout : Refer to BR-49, "Rear
Disc Brake".
Tool number : 38-PFM90.5 ( — )
SBR019B
Minimum thickness : Refer to BR-49, "Rear Disc
Brake".
Thickness variation : Refer to BR-49, "Rear Disc
Brake".
SBR020B
Revision: November 20132014 Altima NAM
Page 109 of 4801
BRAKE PEDALBR-13
< PERIODIC MAINTENANCE >
C
D E
G H
I
J
K L
M A
B
BR
N
O P
PERIODIC MAINTENANCE
BRAKE PEDAL
Inspection and AdjustmentINFOID:0000000009463691
ADJUSTMENT
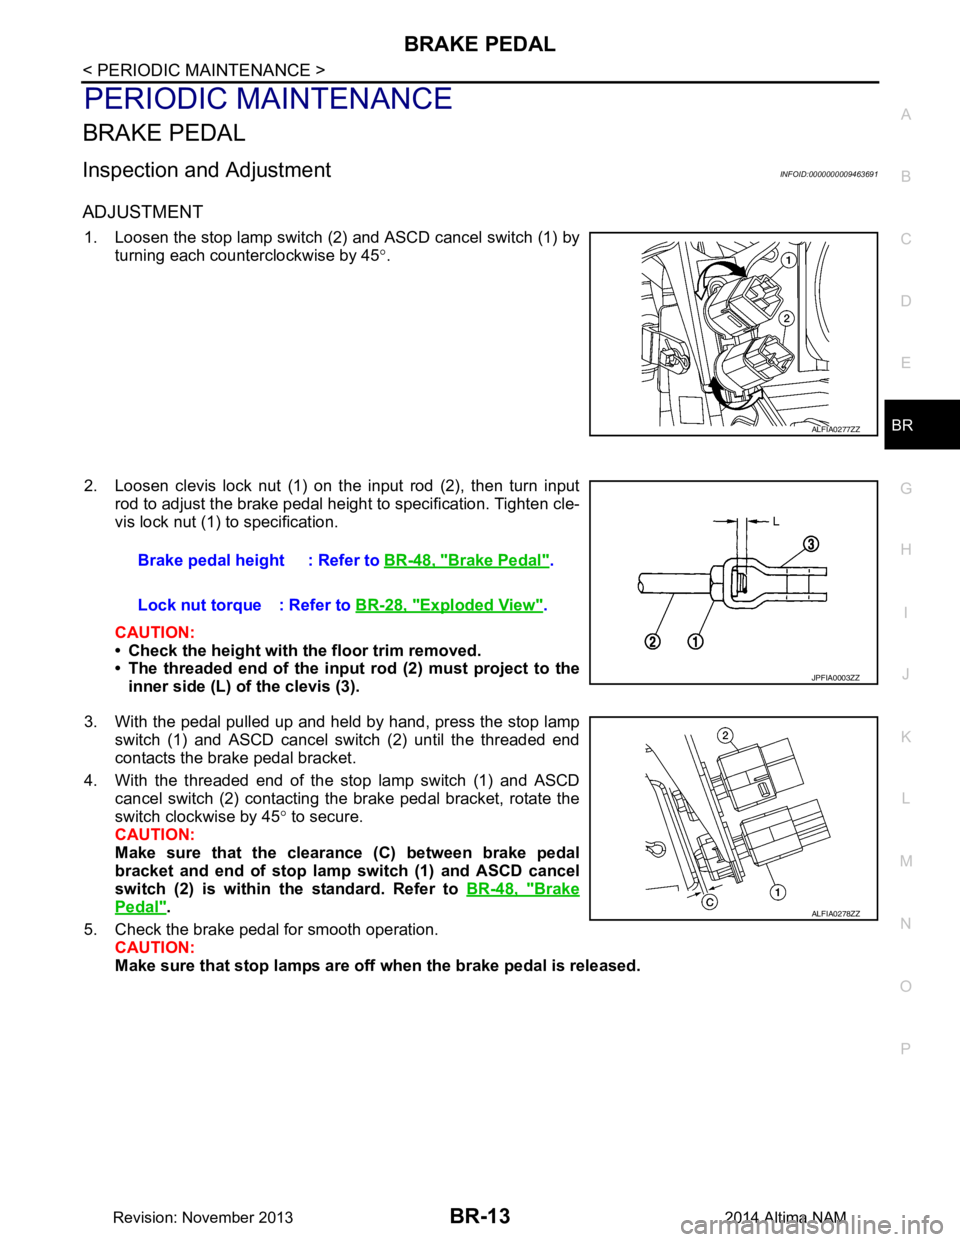
1. Loosen the stop lamp switch (2) and ASCD cancel switch (1) by turning each counterclockwise by 45 °.
2. Loosen clevis lock nut (1) on the input rod (2), then turn input rod to adjust the brake pedal height to specification. Tighten cle-
vis lock nut (1) to specification.
CAUTION:
• Check the height with the floor trim removed.
• The threaded end of the input rod (2) must project to the
inner side (L) of the clevis (3).
3. With the pedal pulled up and held by hand, press the stop lamp switch (1) and ASCD cancel switch (2) until the threaded end
contacts the brake pedal bracket.
4. With the threaded end of the stop lamp switch (1) and ASCD cancel switch (2) contacting the brake pedal bracket, rotate the
switch clockwise by 45 ° to secure.
CAUTION:
Make sure that the clearance (C) between brake pedal
bracket and end of stop lamp switch (1) and ASCD cancel
switch (2) is within the standard. Refer to BR-48, "Brake
Pedal".
5. Check the brake pedal for smooth operation. CAUTION:
Make sure that stop lamps are off when the brake pedal is released.
ALFIA0277ZZ
Brake pedal height : Refer to BR-48, "Brake Pedal".
Lock nut torque : Refer to BR-28, "Exploded View"
.
JPFIA0003ZZ
ALFIA0278ZZ
Revision: November 20132014 Altima NAM
Page 121 of 4801
BRAKE PIPINGBR-25
< REMOVAL AND INSTALLATION >
C
D E
G H
I
J
K L
M A
B
BR
N
O P
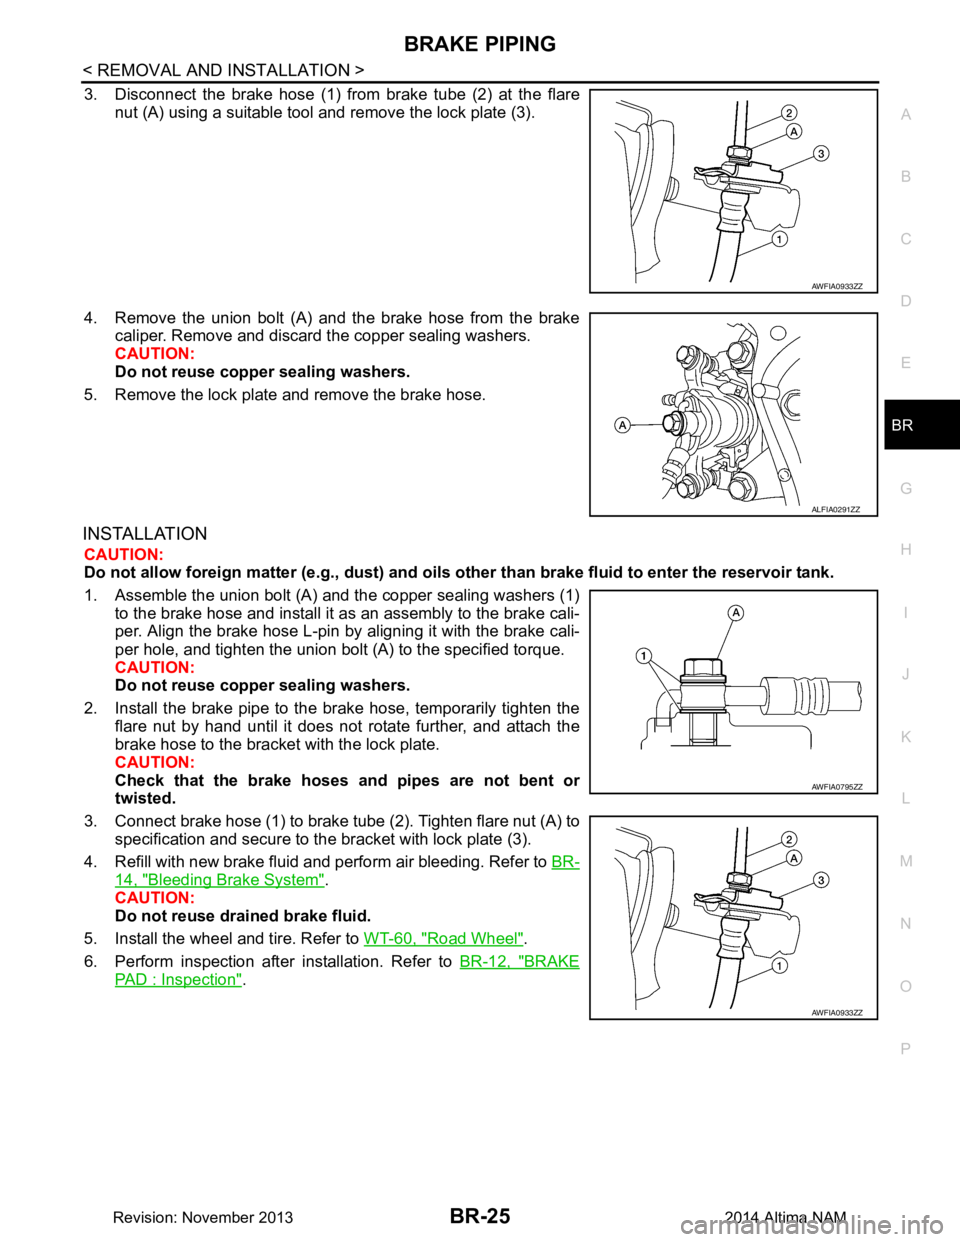
3. Disconnect the brake hose (1) from brake tube (2) at the flare nut (A) using a suitable tool and remove the lock plate (3).
4. Remove the union bolt (A) and the brake hose from the brake caliper. Remove and discard the copper sealing washers.
CAUTION:
Do not reuse copper sealing washers.
5. Remove the lock plate and remove the brake hose.
INSTALLATION
CAUTION:
Do not allow foreign matte r (e.g., dust) and oils other than brake fluid to enter the reservoir tank.
1. Assemble the union bolt (A) and the copper sealing washers (1) to the brake hose and install it as an assembly to the brake cali-
per. Align the brake hose L-pin by aligning it with the brake cali-
per hole, and tighten the union bolt (A) to the specified torque.
CAUTION:
Do not reuse copper sealing washers.
2. Install the brake pipe to the brake hose, temporarily tighten the flare nut by hand until it does not rotate further, and attach the
brake hose to the bracket with the lock plate.
CAUTION:
Check that the brake hoses and pipes are not bent or
twisted.
3. Connect brake hose (1) to brake tube (2). Tighten flare nut (A) to specification and secure to the bracket with lock plate (3).
4. Refill with new brake fluid and perform air bleeding. Refer to BR-
14, "Bleeding Brake System".
CAUTION:
Do not reuse drained brake fluid.
5. Install the wheel and tire. Refer to WT-60, "Road Wheel"
.
6. Perform inspection after installation. Refer to BR-12, "BRAKE
PAD : Inspection".
AWFIA0933ZZ
ALFIA0291ZZ
AWFIA0795ZZ
AWFIA0933ZZ
Revision: November 20132014 Altima NAM
Page 122 of 4801
BR-26
< REMOVAL AND INSTALLATION >
BRAKE MASTER CYLINDER
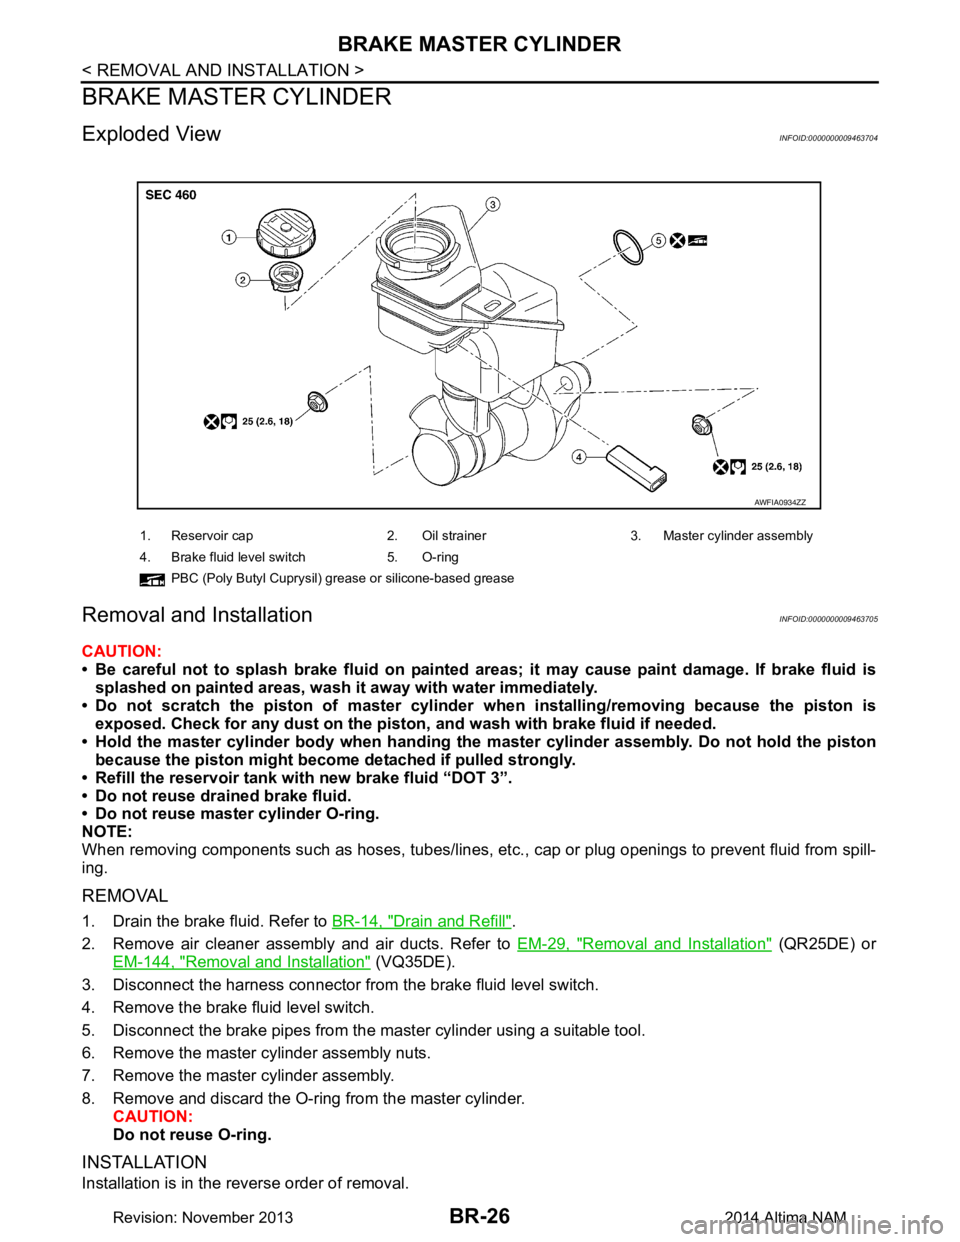
BRAKE MASTER CYLINDER
Exploded ViewINFOID:0000000009463704
Removal and InstallationINFOID:0000000009463705
CAUTION:
• Be careful not to splash brake fluid on painted areas; it may cause paint damage. If brake fluid is
splashed on painted areas, wash it away with water immediately.
• Do not scratch the piston of master cylinder when installing/removing because the piston is
exposed. Check for any dust on the piston , and wash with brake fluid if needed.
• Hold the master cylinder body when handing the master cylinder assembly. Do not hold the piston
because the piston might become detached if pulled strongly.
• Refill the reservoir tank wi th new brake fluid “DOT 3”.
• Do not reuse drained brake fluid.
• Do not reuse master cylinder O-ring.
NOTE:
When removing components such as hoses, tubes/lines, etc. , cap or plug openings to prevent fluid from spill-
ing.
REMOVAL
1. Drain the brake fluid. Refer to BR-14, "Drain and Refill".
2. Remove air cleaner assembly and air ducts. Refer to EM-29, "Removal and Installation"
(QR25DE) or
EM-144, "Removal and Installation"
(VQ35DE).
3. Disconnect the harness connector from the brake fluid level switch.
4. Remove the brake fluid level switch.
5. Disconnect the brake pipes from the master cylinder using a suitable tool.
6. Remove the master cylinder assembly nuts.
7. Remove the master cylinder assembly.
8. Remove and discard the O-ring from the master cylinder. CAUTION:
Do not reuse O-ring.
INSTALLATION
Installation is in the reverse order of removal.
1. Reservoir cap 2. Oil strainer 3. Master cylinder assembly
4. Brake fluid level switch 5. O-ring PBC (Poly Butyl Cuprysil) grease or silicone-based grease
AWFIA0934ZZ
Revision: November 20132014 Altima NAM
Page 123 of 4801
BRAKE MASTER CYLINDERBR-27
< REMOVAL AND INSTALLATION >
C
D E
G H
I
J
K L
M A
B
BR
N
O P
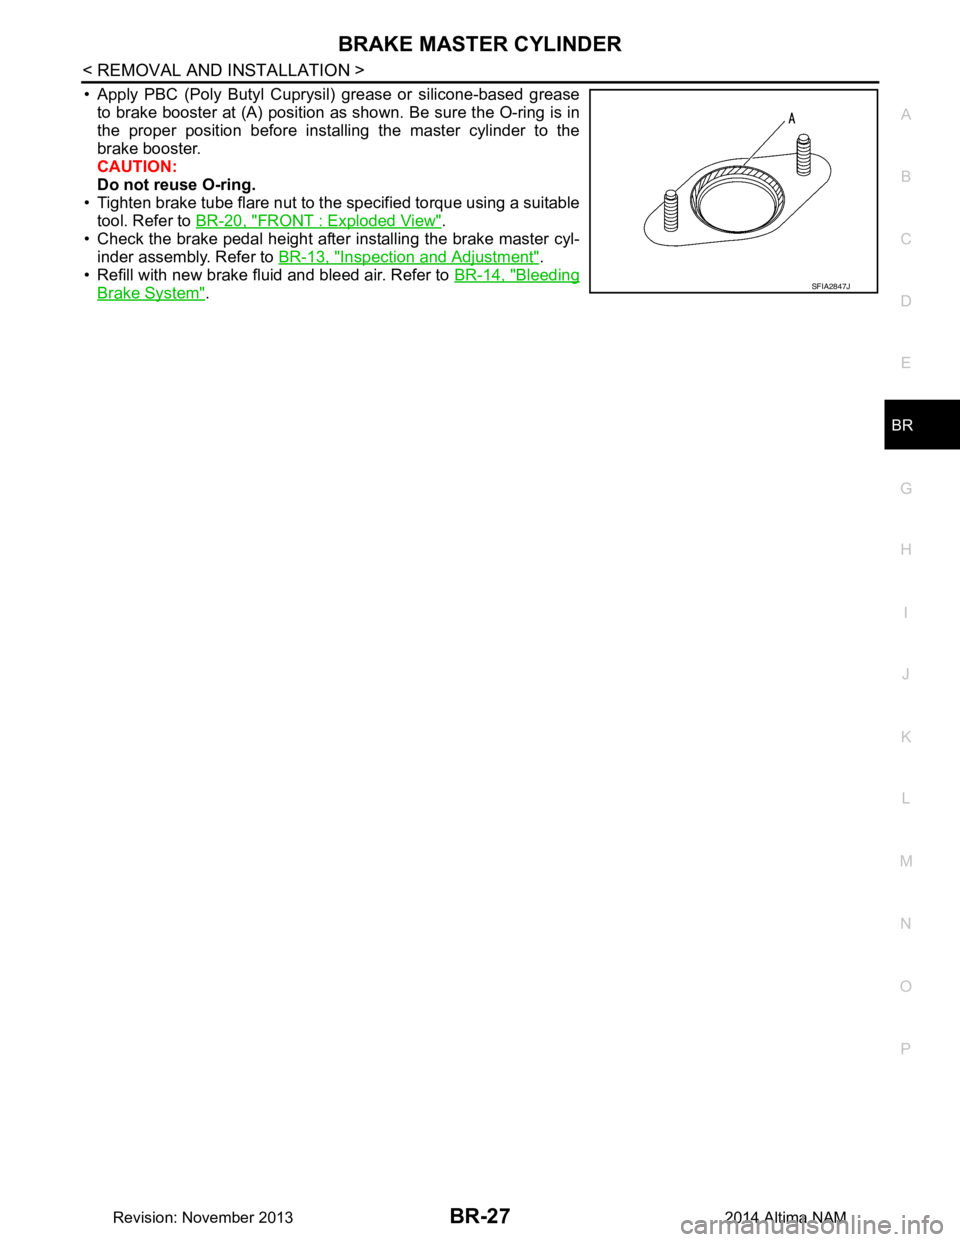
• Apply PBC (Poly Butyl Cuprysil) grease or silicone-based grease to brake booster at (A) position as shown. Be sure the O-ring is in
the proper position before installing the master cylinder to the
brake booster.
CAUTION:
Do not reuse O-ring.
• Tighten brake tube flare nut to the specified torque using a suitable tool. Refer to BR-20, "FRONT : Exploded View"
.
• Check the brake pedal height after installing the brake master cyl-
inder assembly. Refer to BR-13, "Inspection and Adjustment"
.
• Refill with new brake fluid and bleed air. Refer to BR-14, "Bleeding
Brake System".SFIA2847J
Revision: November 20132014 Altima NAM