fuse NISSAN TERRANO 2002 Service Repair Manual
[x] Cancel search | Manufacturer: NISSAN, Model Year: 2002, Model line: TERRANO, Model: NISSAN TERRANO 2002Pages: 1767, PDF Size: 41.51 MB
Page 79 of 1767
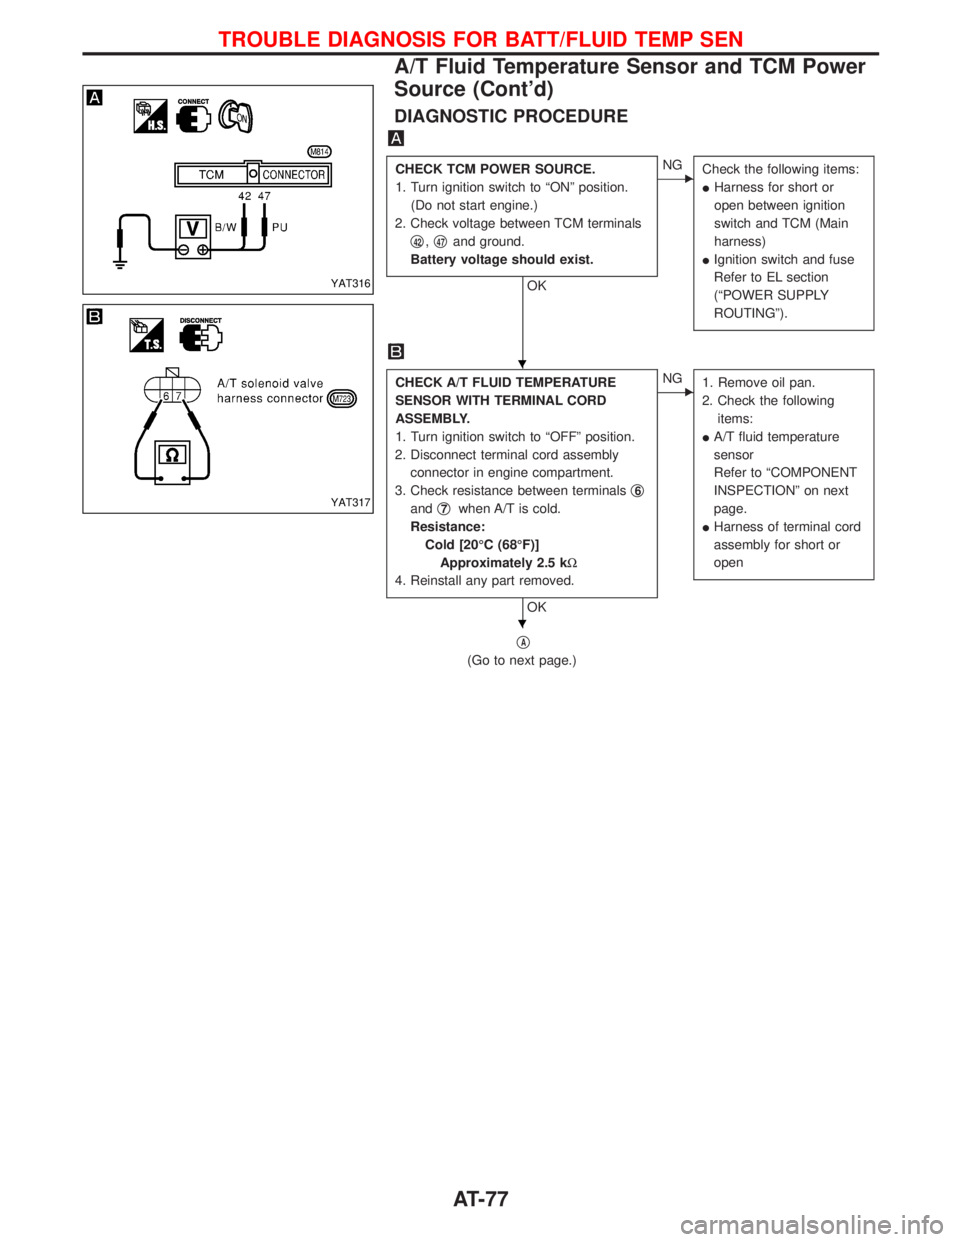
DIAGNOSTIC PROCEDURE
CHECK TCM POWER SOURCE.
1. Turn ignition switch to ªONº position.
(Do not start engine.)
2. Check voltage between TCM terminals
q
42,q47and ground.
Battery voltage should exist.
OK
ENG
Check the following items:
IHarness for short or
open between ignition
switch and TCM (Main
harness)
IIgnition switch and fuse
Refer to EL section
(ªPOWER SUPPLY
ROUTINGº).
CHECK A/T FLUID TEMPERATURE
SENSOR WITH TERMINAL CORD
ASSEMBLY.
1. Turn ignition switch to ªOFFº position.
2. Disconnect terminal cord assembly
connector in engine compartment.
3. Check resistance between terminalsq
6
andq7when A/T is cold.
Resistance:
Cold [20ÉC (68ÉF)]
Approximately 2.5 kW
4. Reinstall any part removed.
OK
ENG
1. Remove oil pan.
2. Check the following
items:
IA/T fluid temperature
sensor
Refer to ªCOMPONENT
INSPECTIONº on next
page.
IHarness of terminal cord
assembly for short or
open
qA
(Go to next page.)
YAT316
YAT317
H
H
TROUBLE DIAGNOSIS FOR BATT/FLUID TEMP SEN
A/T Fluid Temperature Sensor and TCM Power
Source (Cont'd)
AT-77
Page 96 of 1767
1. SPORT Indicator Lamp Does Not Come On
SYMPTOM:
POWER indicator lamp does not come on for about 2 seconds
when turning ignition switch to ªONº.
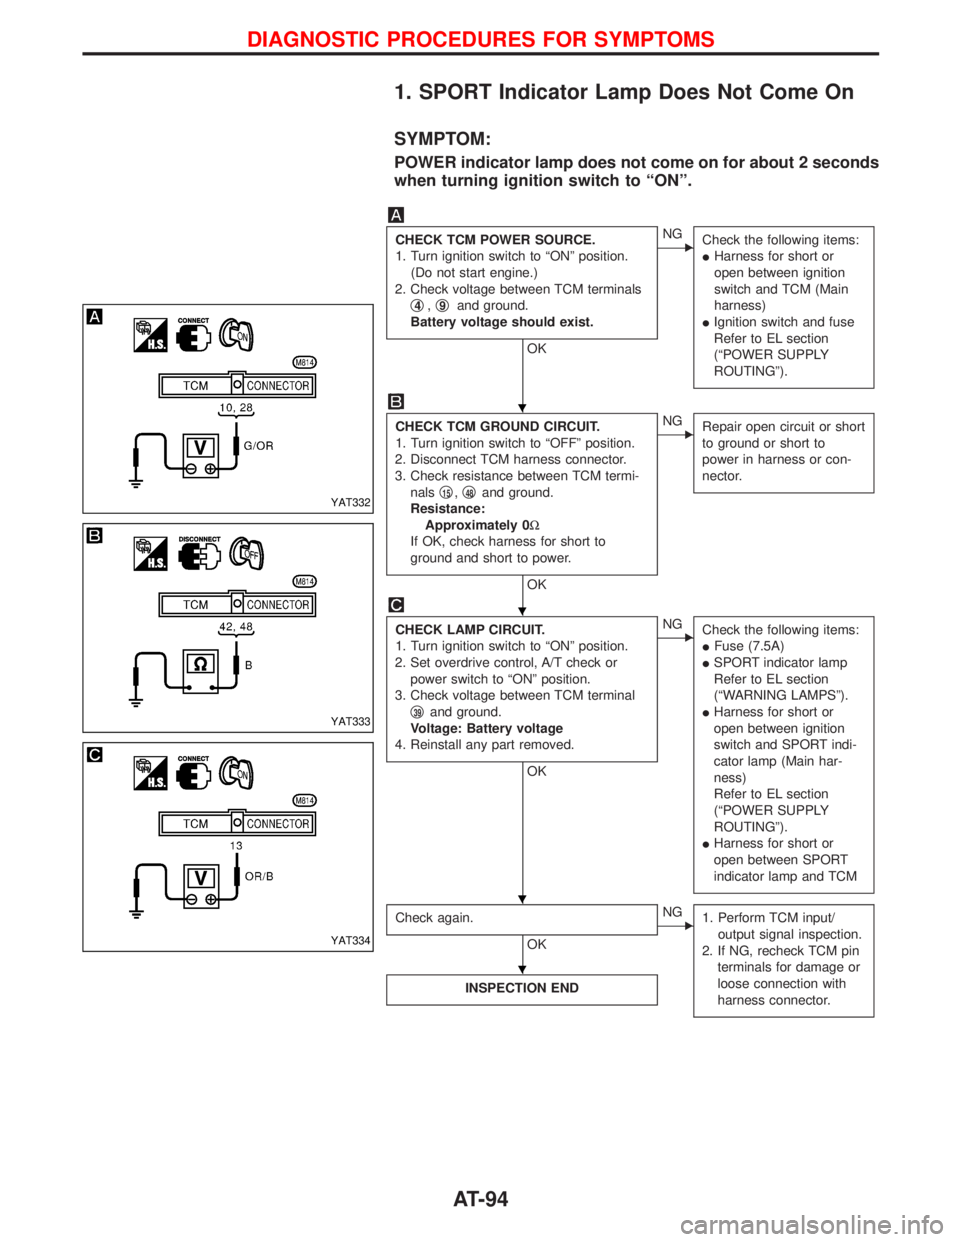
CHECK TCM POWER SOURCE.
1. Turn ignition switch to ªONº position.
(Do not start engine.)
2. Check voltage between TCM terminals
q
4,q9and ground.
Battery voltage should exist.
OK
ENG
Check the following items:
IHarness for short or
open between ignition
switch and TCM (Main
harness)
IIgnition switch and fuse
Refer to EL section
(ªPOWER SUPPLY
ROUTINGº).
CHECK TCM GROUND CIRCUIT.
1. Turn ignition switch to ªOFFº position.
2. Disconnect TCM harness connector.
3. Check resistance between TCM termi-
nalsq
15,q48and ground.
Resistance:
Approximately 0W
If OK, check harness for short to
ground and short to power.
OK
ENG
Repair open circuit or short
to ground or short to
power in harness or con-
nector.
CHECK LAMP CIRCUIT.
1. Turn ignition switch to ªONº position.
2. Set overdrive control, A/T check or
power switch to ªONº position.
3. Check voltage between TCM terminal
q
39and ground.
Voltage: Battery voltage
4. Reinstall any part removed.
OK
ENG
Check the following items:
IFuse (7.5A)
ISPORT indicator lamp
Refer to EL section
(ªWARNING LAMPSº).
IHarness for short or
open between ignition
switch and SPORT indi-
cator lamp (Main har-
ness)
Refer to EL section
(ªPOWER SUPPLY
ROUTINGº).
IHarness for short or
open between SPORT
indicator lamp and TCM
Check again.
OK
ENG
1. Perform TCM input/
output signal inspection.
2. If NG, recheck TCM pin
terminals for damage or
loose connection with
harness connector.
INSPECTION END
YAT332
YAT333
YAT334
H
H
H H
H
DIAGNOSTIC PROCEDURES FOR SYMPTOMS
AT-94
Page 210 of 1767
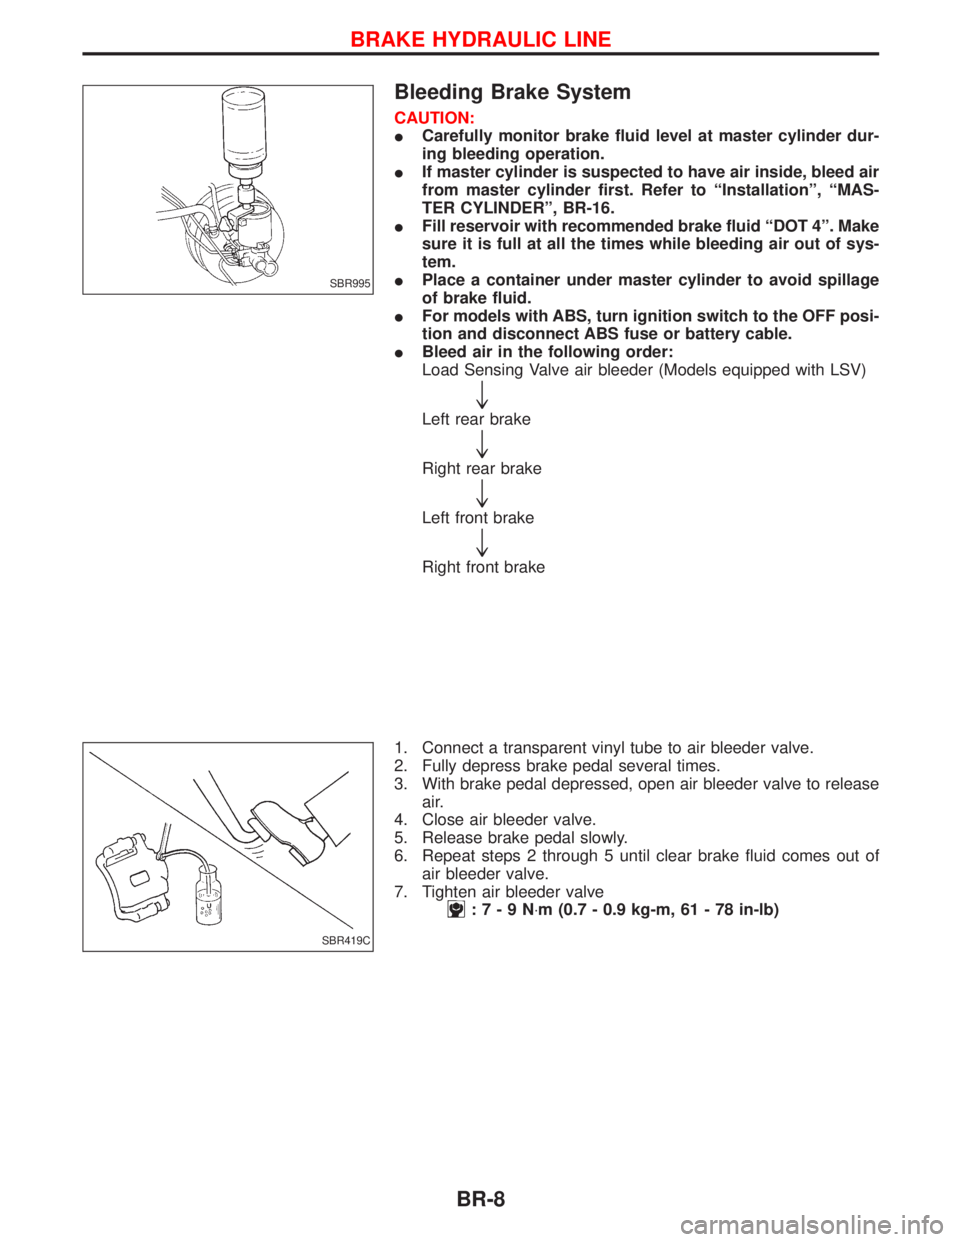
Bleeding Brake System
CAUTION:
ICarefully monitor brake fluid level at master cylinder dur-
ing bleeding operation.
IIf master cylinder is suspected to have air inside, bleed air
from master cylinder first. Refer to ªInstallationº, ªMAS-
TER CYLINDERº, BR-16.
IFill reservoir with recommended brake fluid ªDOT 4º. Make
sure it is full at all the times while bleeding air out of sys-
tem.
IPlace a container under master cylinder to avoid spillage
of brake fluid.
IFor models with ABS, turn ignition switch to the OFF posi-
tion and disconnect ABS fuse or battery cable.
IBleed air in the following order:
Load Sensing Valve air bleeder (Models equipped with LSV)
"
Left rear brake
"
Right rear brake
"
Left front brake
"
Right front brake
1. Connect a transparent vinyl tube to air bleeder valve.
2. Fully depress brake pedal several times.
3. With brake pedal depressed, open air bleeder valve to release
air.
4. Close air bleeder valve.
5. Release brake pedal slowly.
6. Repeat steps 2 through 5 until clear brake fluid comes out of
air bleeder valve.
7. Tighten air bleeder valve
:7-9N×m (0.7 - 0.9 kg-m, 61 - 78 in-lb)
SBR995
SBR419C
BRAKE HYDRAULIC LINE
BR-8
Page 267 of 1767
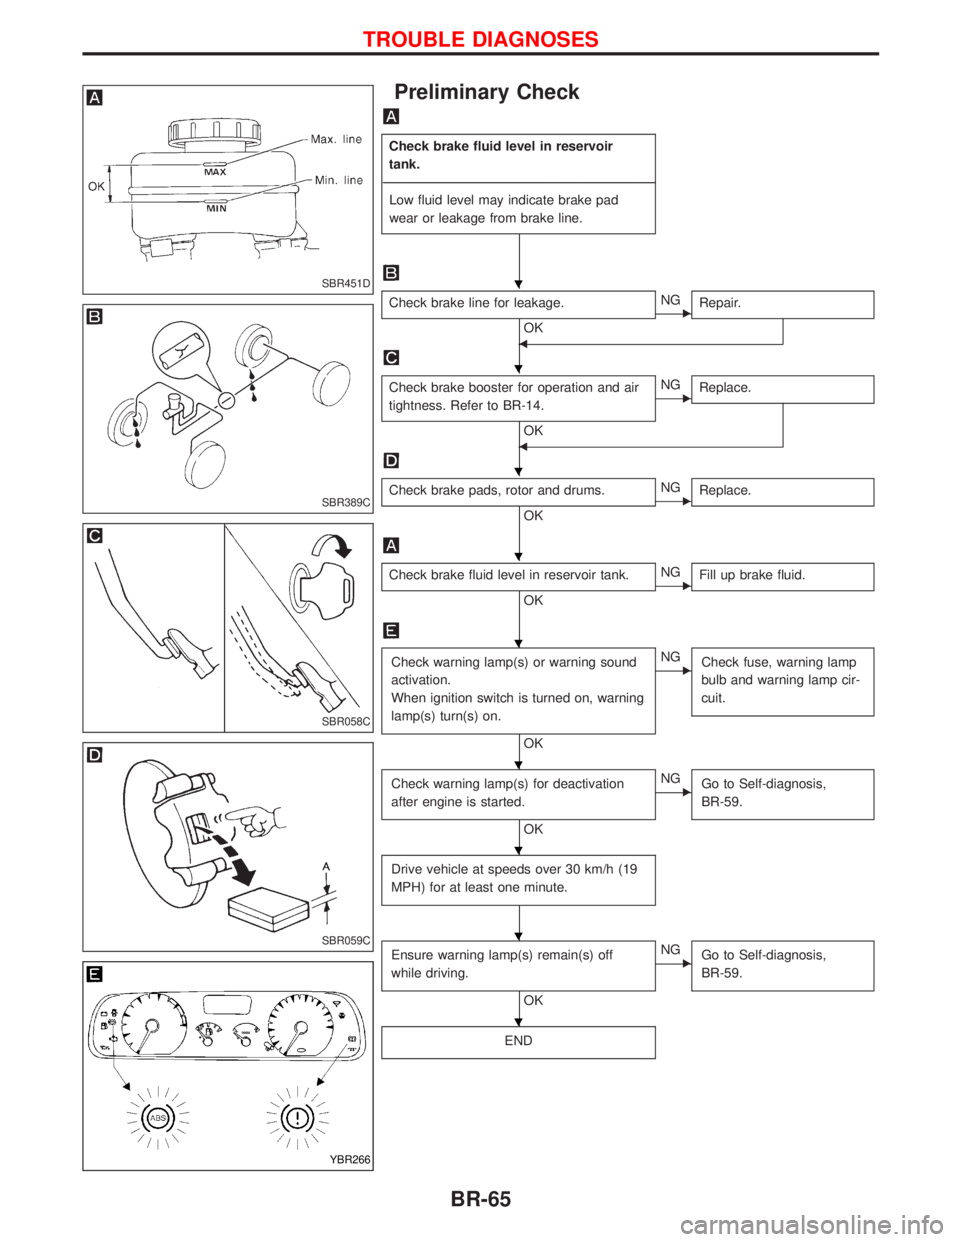
Preliminary Check
Check brake fluid level in reservoir
tank.
----------------------------------------------------------------------------------------------------------------------------------------------------------------------------------------------------------------------------------------------------------------------------------------------------------------
Low fluid level may indicate brake pad
wear or leakage from brake line.
Check brake line for leakage.
OKENG
Repair.
F
Check brake booster for operation and air
tightness. Refer to BR-14.
OK
ENG
Replace.
F
Check brake pads, rotor and drums.
OKENG
Replace.
Check brake fluid level in reservoir tank.
OKENG
Fill up brake fluid.
Check warning lamp(s) or warning sound
activation.
When ignition switch is turned on, warning
lamp(s) turn(s) on.
OK
ENG
Check fuse, warning lamp
bulb and warning lamp cir-
cuit.
Check warning lamp(s) for deactivation
after engine is started.
OK
ENG
Go to Self-diagnosis,
BR-59.
Drive vehicle at speeds over 30 km/h (19
MPH) for at least one minute.
Ensure warning lamp(s) remain(s) off
while driving.
OK
ENG
Go to Self-diagnosis,
BR-59.
END
SBR451D
SBR389C
SBR058C
SBR059C
YBR266
H
H
H
H
H
H
H
H
H
TROUBLE DIAGNOSES
BR-65
Page 269 of 1767
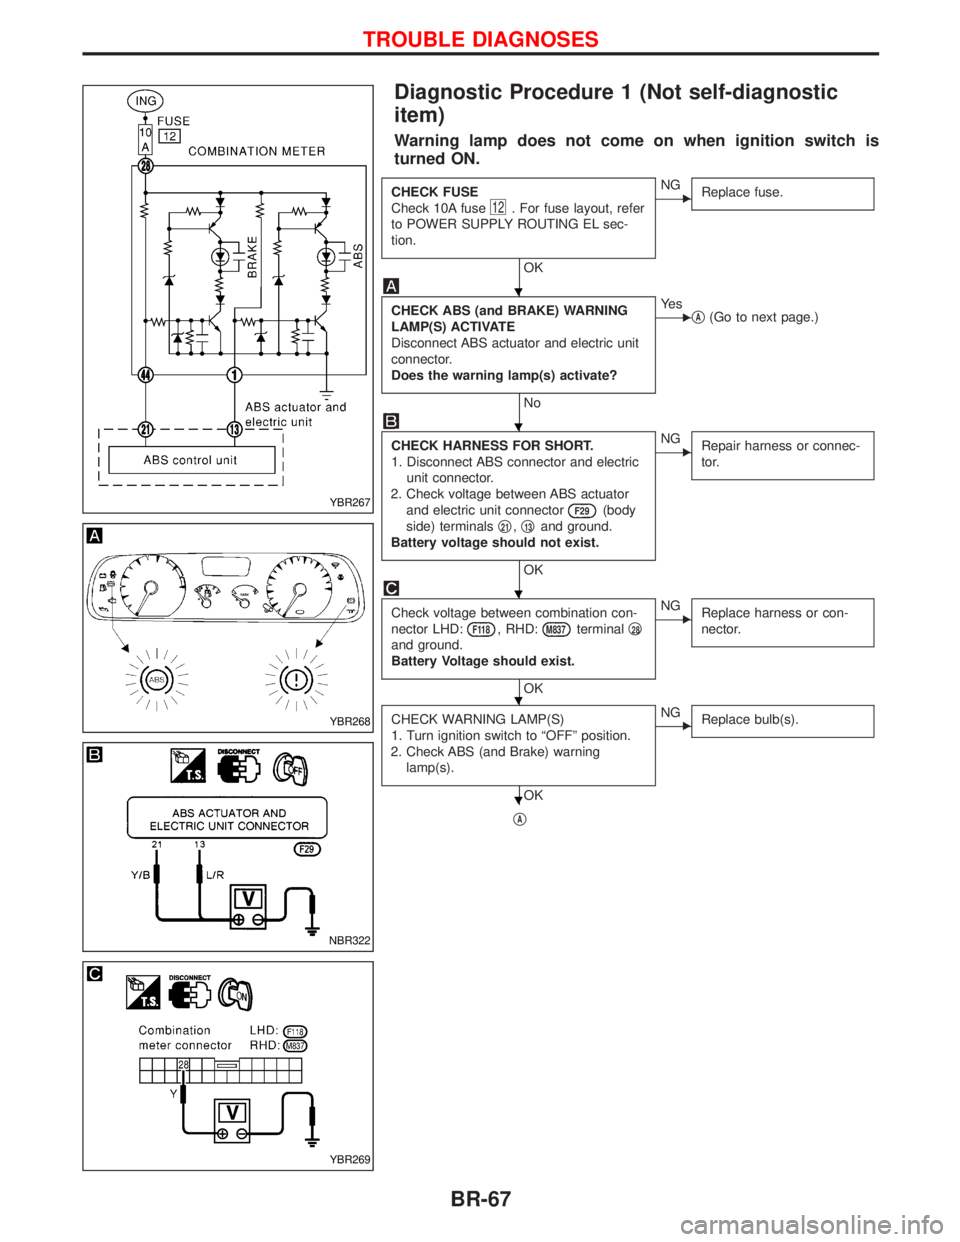
Diagnostic Procedure 1 (Not self-diagnostic
item)
Warning lamp does not come on when ignition switch is
turned ON.
CHECK FUSE
Check 10A fuse
12. For fuse layout, refer
to POWER SUPPLY ROUTING EL sec-
tion.
OK
ENG
Replace fuse.
CHECK ABS (and BRAKE) WARNING
LAMP(S) ACTIVATE
Disconnect ABS actuator and electric unit
connector.
Does the warning lamp(s) activate?
No
EYe s
qA(Go to next page.)
CHECK HARNESS FOR SHORT.
1. Disconnect ABS connector and electric
unit connector.
2. Check voltage between ABS actuator
and electric unit connector
F29(body
side) terminalsq
21,q13and ground.
Battery voltage should not exist.
OK
ENG
Repair harness or connec-
tor.
Check voltage between combination con-
nector LHD:
F118, RHD:M837terminalq28
and ground.
Battery Voltage should exist.
OK
ENG
Replace harness or con-
nector.
CHECK WARNING LAMP(S)
1. Turn ignition switch to ªOFFº position.
2. Check ABS (and Brake) warning
lamp(s).
OK
ENG
Replace bulb(s).
qA
YBR267
YBR268
NBR322
YBR269
H
H
H
H
H
TROUBLE DIAGNOSES
BR-67
Page 271 of 1767
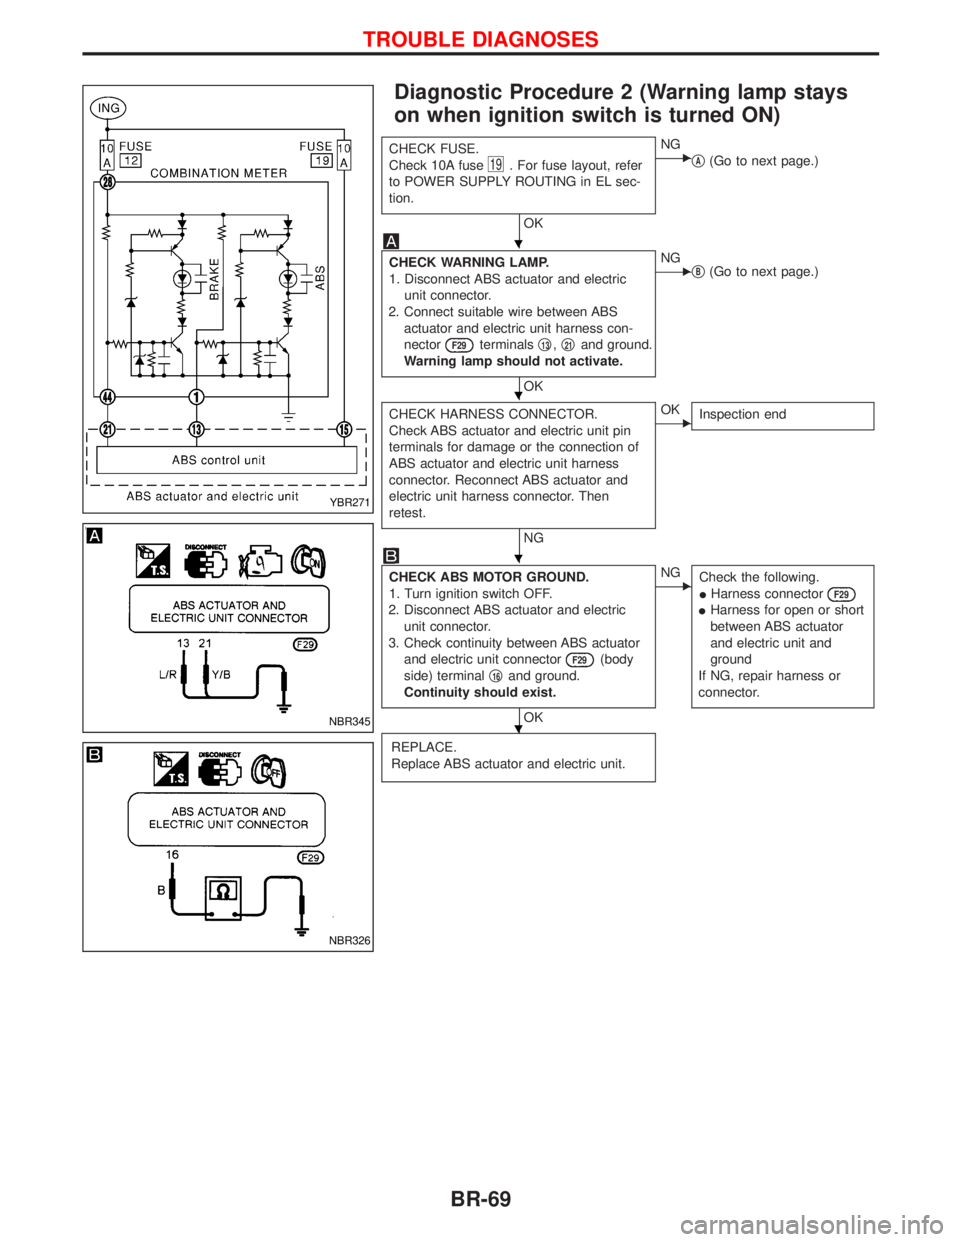
Diagnostic Procedure 2 (Warning lamp stays
on when ignition switch is turned ON)
CHECK FUSE.
Check 10A fuse
19. For fuse layout, refer
to POWER SUPPLY ROUTING in EL sec-
tion.
OK
ENG
qA(Go to next page.)
CHECK WARNING LAMP.
1. Disconnect ABS actuator and electric
unit connector.
2. Connect suitable wire between ABS
actuator and electric unit harness con-
nector
F29terminalsq13,q21and ground.
Warning lamp should not activate.
OK
ENG
qB(Go to next page.)
CHECK HARNESS CONNECTOR.
Check ABS actuator and electric unit pin
terminals for damage or the connection of
ABS actuator and electric unit harness
connector. Reconnect ABS actuator and
electric unit harness connector. Then
retest.
NG
EOK
Inspection end
CHECK ABS MOTOR GROUND.
1. Turn ignition switch OFF.
2. Disconnect ABS actuator and electric
unit connector.
3. Check continuity between ABS actuator
and electric unit connector
F29(body
side) terminalq
16and ground.
Continuity should exist.
OK
ENG
Check the following.
IHarness connector
F29
IHarness for open or short
between ABS actuator
and electric unit and
ground
If NG, repair harness or
connector.
REPLACE.
Replace ABS actuator and electric unit.
YBR271
NBR345
NBR326
H
H
H
H
TROUBLE DIAGNOSES
BR-69
Page 272 of 1767
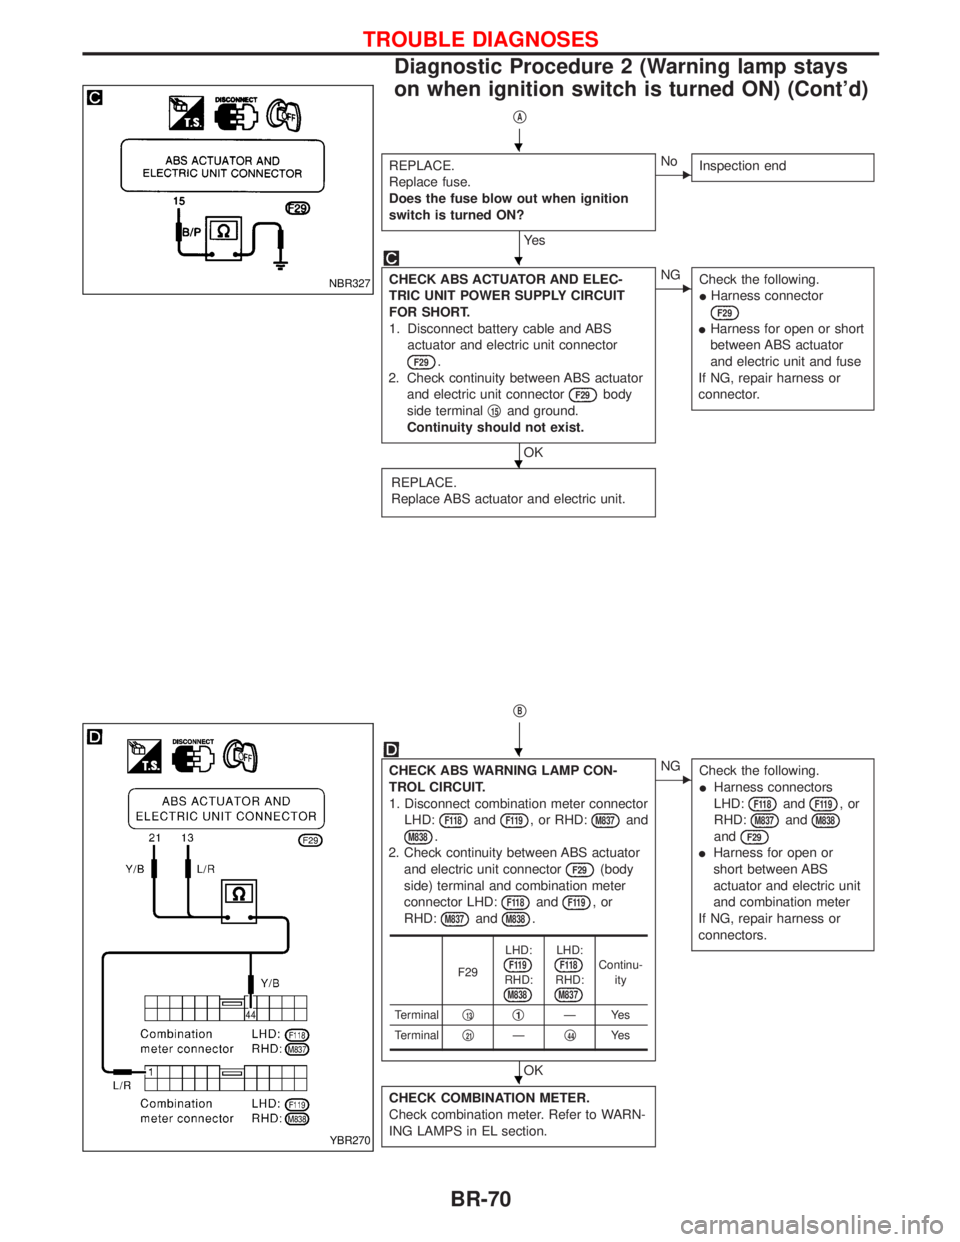
qA
REPLACE.
Replace fuse.
Does the fuse blow out when ignition
switch is turned ON?
Ye s
ENo
Inspection end
CHECK ABS ACTUATOR AND ELEC-
TRIC UNIT POWER SUPPLY CIRCUIT
FOR SHORT.
1. Disconnect battery cable and ABS
actuator and electric unit connector
F29.
2. Check continuity between ABS actuator
and electric unit connector
F29body
side terminalq
15and ground.
Continuity should not exist.
OK
ENG
Check the following.
IHarness connector
F29
IHarness for open or short
between ABS actuator
and electric unit and fuse
If NG, repair harness or
connector.
REPLACE.
Replace ABS actuator and electric unit.
qB
CHECK ABS WARNING LAMP CON-
TROL CIRCUIT.
1. Disconnect combination meter connector
LHD:
F118andF119, or RHD:M837and
M838.
2. Check continuity between ABS actuator
and electric unit connector
F29(body
side) terminal and combination meter
connector LHD:
F118andF119,or
RHD:
M837andM838.
OK
ENG
Check the following.
IHarness connectors
LHD:
F118andF119,or
RHD:
M837andM838
andF29
IHarness for open or
short between ABS
actuator and electric unit
and combination meter
If NG, repair harness or
connectors.
CHECK COMBINATION METER.
Check combination meter. Refer to WARN-
ING LAMPS in EL section.
F29LHD:F119RHD:M838
LHD:F118RHD:M837
Continu-
ity
Terminalq
13q1ÐYes
Terminalq
21Ðq44Ye s
NBR327
YBR270
H
H
H
H
H
TROUBLE DIAGNOSES
Diagnostic Procedure 2 (Warning lamp stays
on when ignition switch is turned ON) (Cont'd)
BR-70
Page 273 of 1767
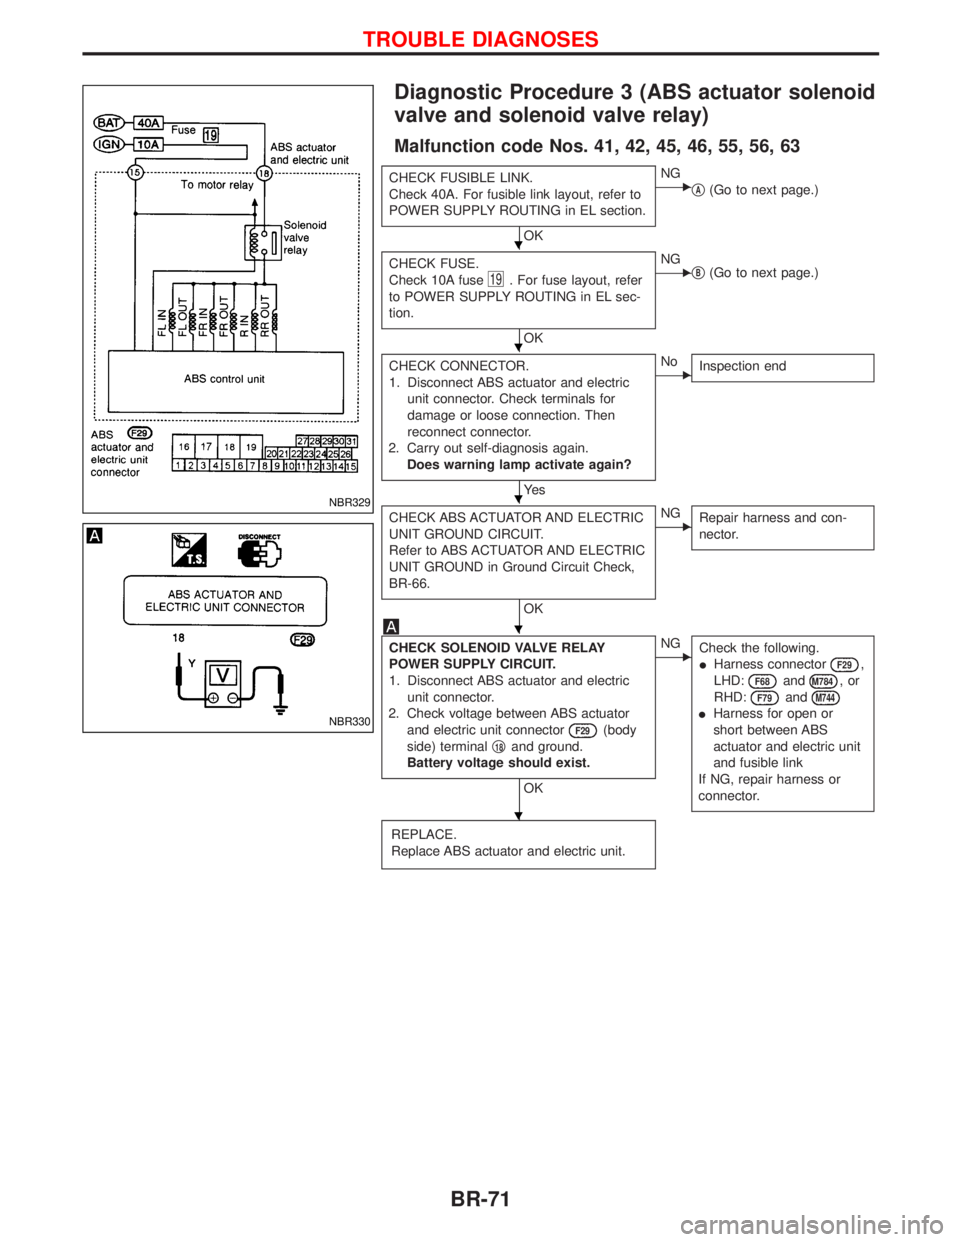
Diagnostic Procedure 3 (ABS actuator solenoid
valve and solenoid valve relay)
Malfunction code Nos. 41, 42, 45, 46, 55, 56, 63
CHECK FUSIBLE LINK.
Check 40A. For fusible link layout, refer to
POWER SUPPLY ROUTING in EL section.
OK
ENG
qA(Go to next page.)
CHECK FUSE.
Check 10A fuse
19. For fuse layout, refer
to POWER SUPPLY ROUTING in EL sec-
tion.
OK
ENG
qB(Go to next page.)
CHECK CONNECTOR.
1. Disconnect ABS actuator and electric
unit connector. Check terminals for
damage or loose connection. Then
reconnect connector.
2. Carry out self-diagnosis again.
Does warning lamp activate again?
Ye s
ENo
Inspection end
CHECK ABS ACTUATOR AND ELECTRIC
UNIT GROUND CIRCUIT.
Refer to ABS ACTUATOR AND ELECTRIC
UNIT GROUND in Ground Circuit Check,
BR-66.
OK
ENG
Repair harness and con-
nector.
CHECK SOLENOID VALVE RELAY
POWER SUPPLY CIRCUIT.
1. Disconnect ABS actuator and electric
unit connector.
2. Check voltage between ABS actuator
and electric unit connector
F29(body
side) terminalq
18and ground.
Battery voltage should exist.
OK
ENG
Check the following.
IHarness connector
F29,
LHD:
F68andM784,or
RHD:
F79andM744
IHarness for open or
short between ABS
actuator and electric unit
and fusible link
If NG, repair harness or
connector.
REPLACE.
Replace ABS actuator and electric unit.
NBR329
NBR330
H
H
H
H
H
TROUBLE DIAGNOSES
BR-71
Page 274 of 1767
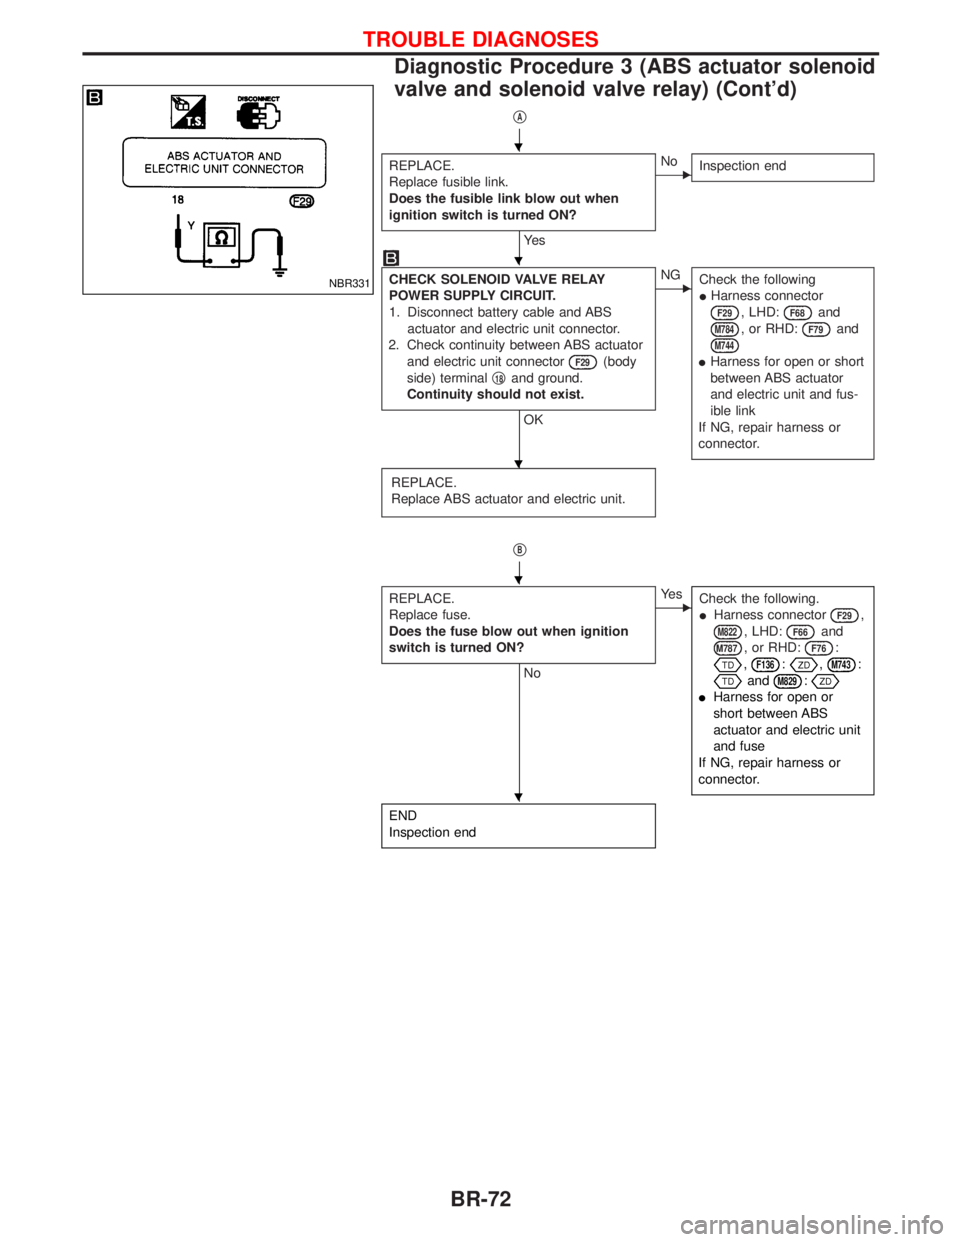
qA
REPLACE.
Replace fusible link.
Does the fusible link blow out when
ignition switch is turned ON?
Ye s
ENo
Inspection end
CHECK SOLENOID VALVE RELAY
POWER SUPPLY CIRCUIT.
1. Disconnect battery cable and ABS
actuator and electric unit connector.
2. Check continuity between ABS actuator
and electric unit connector
F29(body
side) terminalq
18and ground.
Continuity should not exist.
OK
ENG
Check the following
IHarness connector
F29, LHD:F68and
M784, or RHD:F79and
M744
IHarness for open or short
between ABS actuator
and electric unit and fus-
ible link
If NG, repair harness or
connector.
REPLACE.
Replace ABS actuator and electric unit.
qB
REPLACE.
Replace fuse.
Does the fuse blow out when ignition
switch is turned ON?
No
EYe s
Check the following.
IHarness connector
F29,
M822, LHD:F66and
M787, or RHD:F76:
,F136:,M743:
andM829:
IHarness for open or
short between ABS
actuator and electric unit
and fuse
If NG, repair harness or
connector.
END
Inspection end
NBR331
H
H
H
H
H
TROUBLE DIAGNOSES
Diagnostic Procedure 3 (ABS actuator solenoid
valve and solenoid valve relay) (Cont'd)
BR-72
Page 279 of 1767
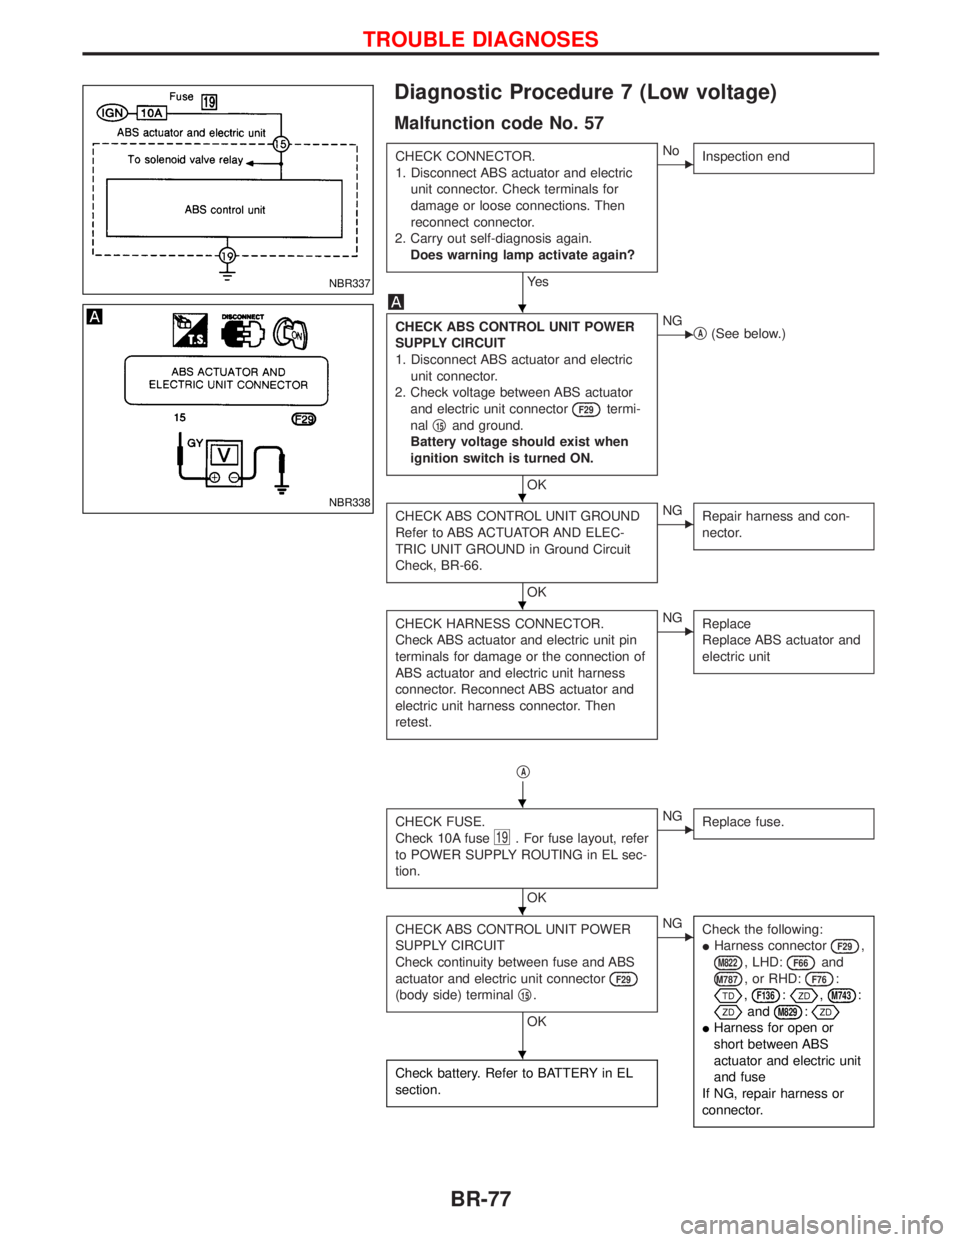
Diagnostic Procedure 7 (Low voltage)
Malfunction code No. 57
CHECK CONNECTOR.
1. Disconnect ABS actuator and electric
unit connector. Check terminals for
damage or loose connections. Then
reconnect connector.
2. Carry out self-diagnosis again.
Does warning lamp activate again?
Ye s
ENo
Inspection end
CHECK ABS CONTROL UNIT POWER
SUPPLY CIRCUIT
1. Disconnect ABS actuator and electric
unit connector.
2. Check voltage between ABS actuator
and electric unit connector
F29termi-
nalq
15and ground.
Battery voltage should exist when
ignition switch is turned ON.
OK
ENG
qA(See below.)
CHECK ABS CONTROL UNIT GROUND
Refer to ABS ACTUATOR AND ELEC-
TRIC UNIT GROUND in Ground Circuit
Check, BR-66.
OK
ENG
Repair harness and con-
nector.
CHECK HARNESS CONNECTOR.
Check ABS actuator and electric unit pin
terminals for damage or the connection of
ABS actuator and electric unit harness
connector. Reconnect ABS actuator and
electric unit harness connector. Then
retest.ENG
Replace
Replace ABS actuator and
electric unit
qA
CHECK FUSE.
Check 10A fuse
19. For fuse layout, refer
to POWER SUPPLY ROUTING in EL sec-
tion.
OK
ENG
Replace fuse.
CHECK ABS CONTROL UNIT POWER
SUPPLY CIRCUIT
Check continuity between fuse and ABS
actuator and electric unit connector
F29
(body side) terminalq15.
OK
ENG
Check the following:
IHarness connector
F29,
M822, LHD:F66and
M787, or RHD:F76:
,F136:,M743:
andM829:
IHarness for open or
short between ABS
actuator and electric unit
and fuse
If NG, repair harness or
connector.
Check battery. Refer to BATTERY in EL
section.
NBR337
NBR338
H
H
H
H
H
H
TROUBLE DIAGNOSES
BR-77