NISSAN TERRANO 2004 Service Repair Manual
TERRANO 2004
NISSAN
NISSAN
https://www.carmanualsonline.info/img/5/57394/w960_57394-0.png
NISSAN TERRANO 2004 Service Repair Manual
Trending: wheel alignment, 4WD, torque, diagnostic menu, lug pattern, seat adjustment, radiator cap
Page 1021 of 1833
Replacing Oil Seal
CENTER CASE OIL SEAL
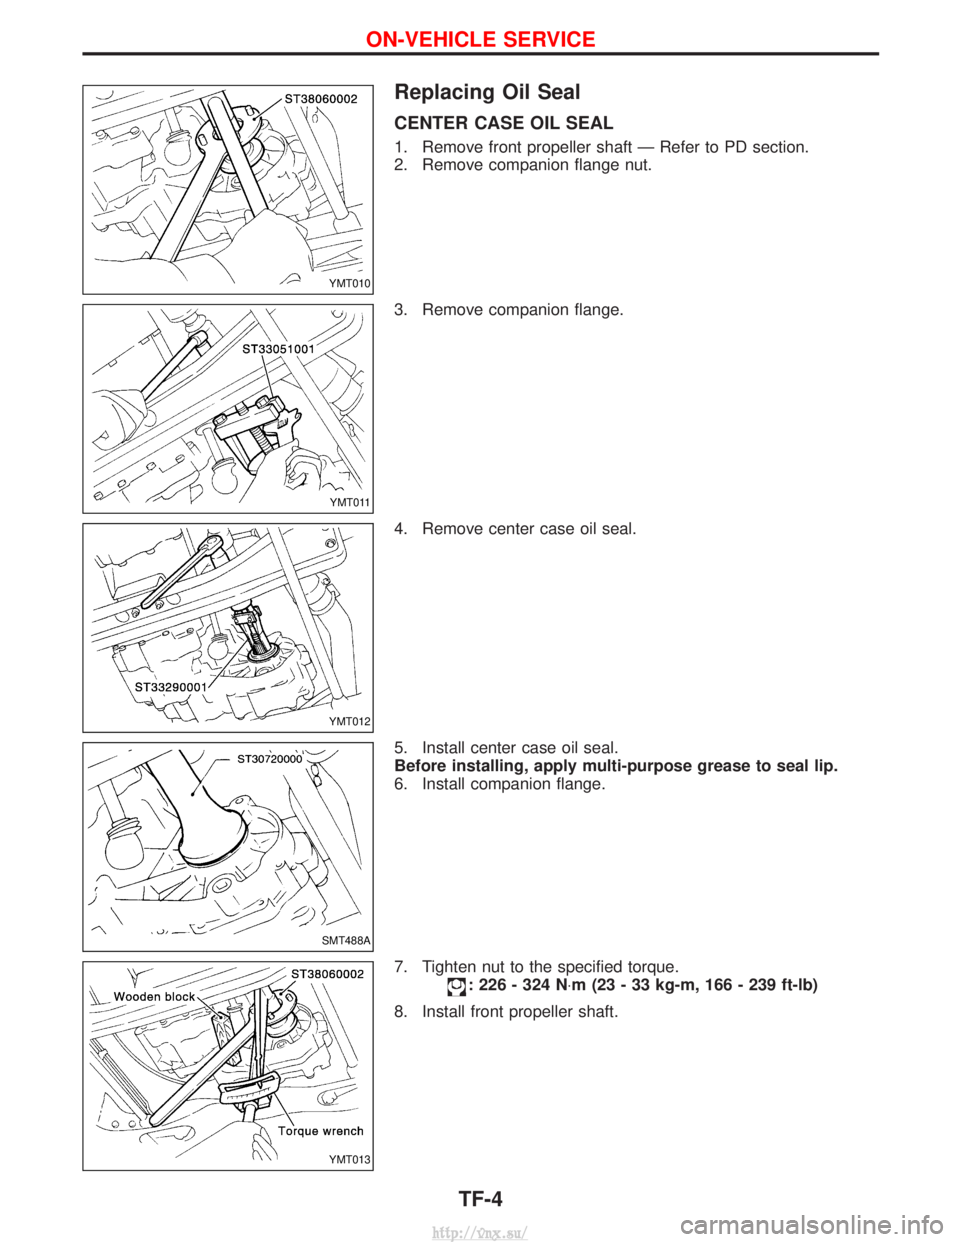
1. Remove front propeller shaft Ð Refer to PD section.
2. Remove companion flange nut.
3. Remove companion flange.
4. Remove center case oil seal.
5. Install center case oil seal.
Before installing, apply multi-purpose grease to seal lip.
6. Install companion flange.
7. Tighten nut to the specified torque.
: 226 - 324 N×m (23 - 33 kg-m, 166 - 239 ft-lb)
8. Install front propeller shaft.
YMT010
YMT011
YMT012
SMT488A
YMT013
ON-VEHICLE SERVICE
TF-4
http://vnx.su/
Page 1022 of 1833
SHIFT SHAFT OIL SEAL
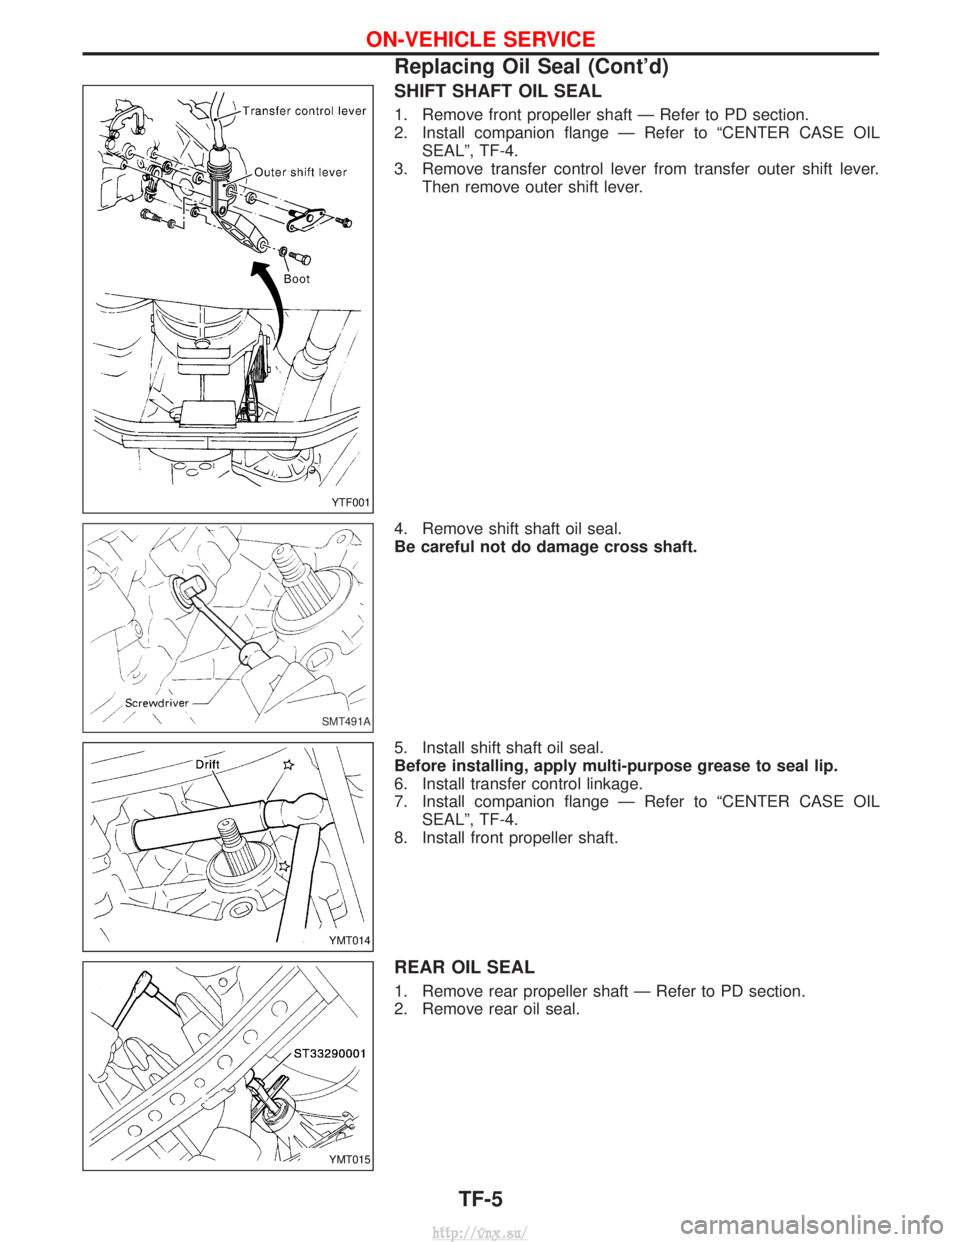
1. Remove front propeller shaft Ð Refer to PD section.
2. Install companion flange Ð Refer to ªCENTER CASE OILSEALº, TF-4.
3. Remove transfer control lever from transfer outer shift lever. Then remove outer shift lever.
4. Remove shift shaft oil seal.
Be careful not do damage cross shaft.
5. Install shift shaft oil seal.
Before installing, apply multi-purpose grease to seal lip.
6. Install transfer control linkage.
7. Install companion flange Ð Refer to ªCENTER CASE OIL SEALº, TF-4.
8. Install front propeller shaft.
REAR OIL SEAL
1. Remove rear propeller shaft Ð Refer to PD section.
2. Remove rear oil seal.
YTF001
SMT491A
YMT014
YMT015
ON-VEHICLE SERVICE
Replacing Oil Seal (Cont'd)
TF-5
http://vnx.su/
Page 1023 of 1833
3. Install rear oil seal.
Before installing apply multi-purpose grease to seal lip.
4. Install rear propeller shaft.
YMT016
ON-VEHICLE SERVICE
Replacing Oil Seal (Cont'd)TF-6
http://vnx.su/
Page 1024 of 1833
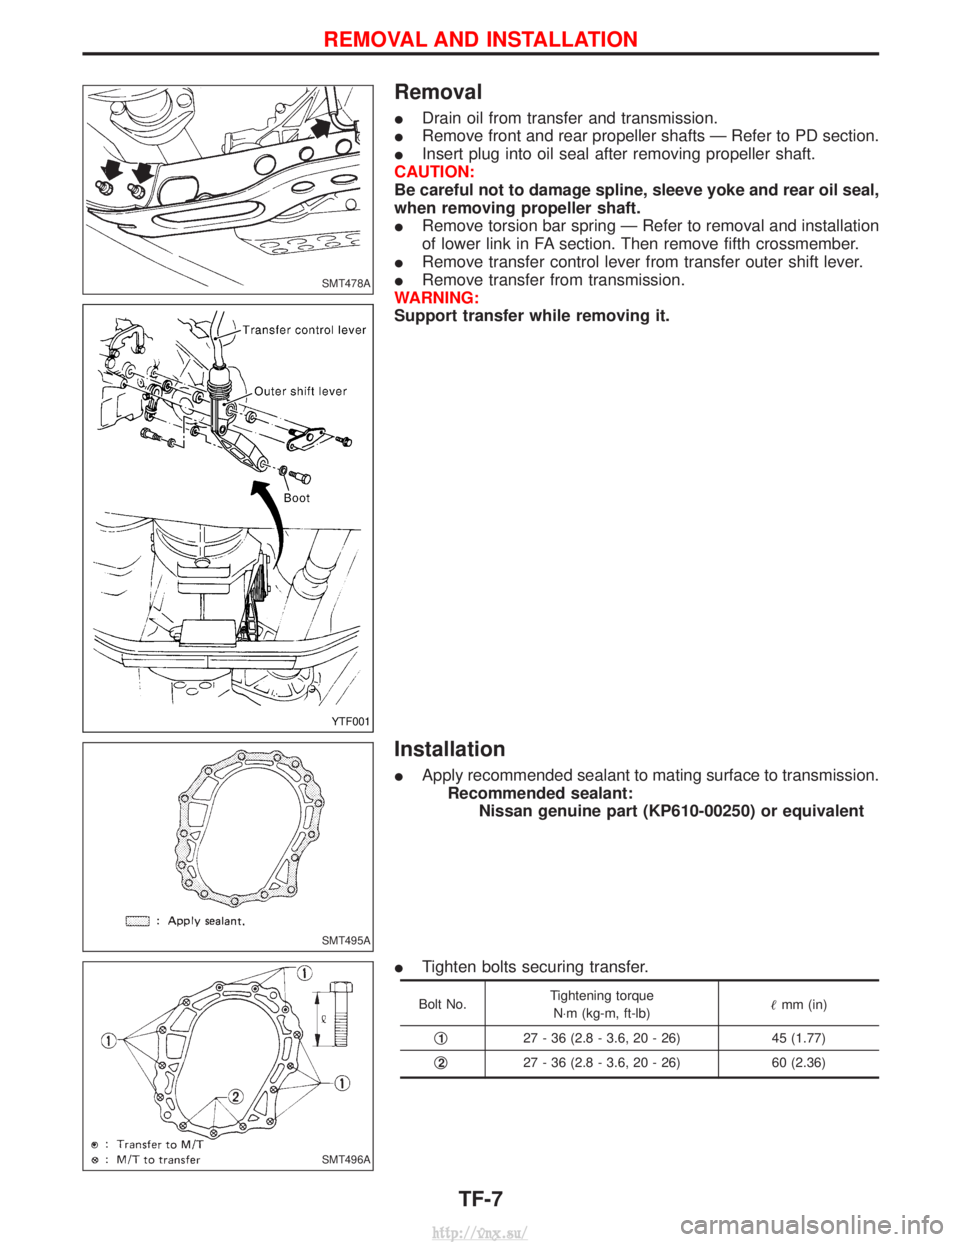
Removal
IDrain oil from transfer and transmission.
I Remove front and rear propeller shafts Ð Refer to PD section.
I Insert plug into oil seal after removing propeller shaft.
CAUTION:
Be careful not to damage spline, sleeve yoke and rear oil seal,
when removing propeller shaft.
I Remove torsion bar spring Ð Refer to removal and installation
of lower link in FA section. Then remove fifth crossmember.
I Remove transfer control lever from transfer outer shift lever.
I Remove transfer from transmission.
WARNING:
Support transfer while removing it.
Installation
I Apply recommended sealant to mating surface to transmission.
Recommended sealant: Nissan genuine part (KP610-00250) or equivalent
I Tighten bolts securing transfer.
Bolt No. Tightening torque
N×m (kg-m, ft-lb)
mm (in)
q
127 - 36 (2.8 - 3.6, 20 - 26) 45 (1.77)
q
227 - 36 (2.8 - 3.6, 20 - 26) 60 (2.36)
SMT478A
YTF001
SMT495A
SMT496A
REMOVAL AND INSTALLATION
TF-7
http://vnx.su/
Page 1025 of 1833
YTF002
TRANSFER GEAR CONTROL
TF-8
http://vnx.su/
Page 1026 of 1833
Case Components
YTF003
MAJOR OVERHAUL
TF-9
http://vnx.su/
Page 1027 of 1833
Gear Components
SMT212B
MAJOR OVERHAUL
TF-10
http://vnx.su/
Page 1028 of 1833
Shift Control Components
YMT008
MAJOR OVERHAUL
TF-11
http://vnx.su/
Page 1029 of 1833
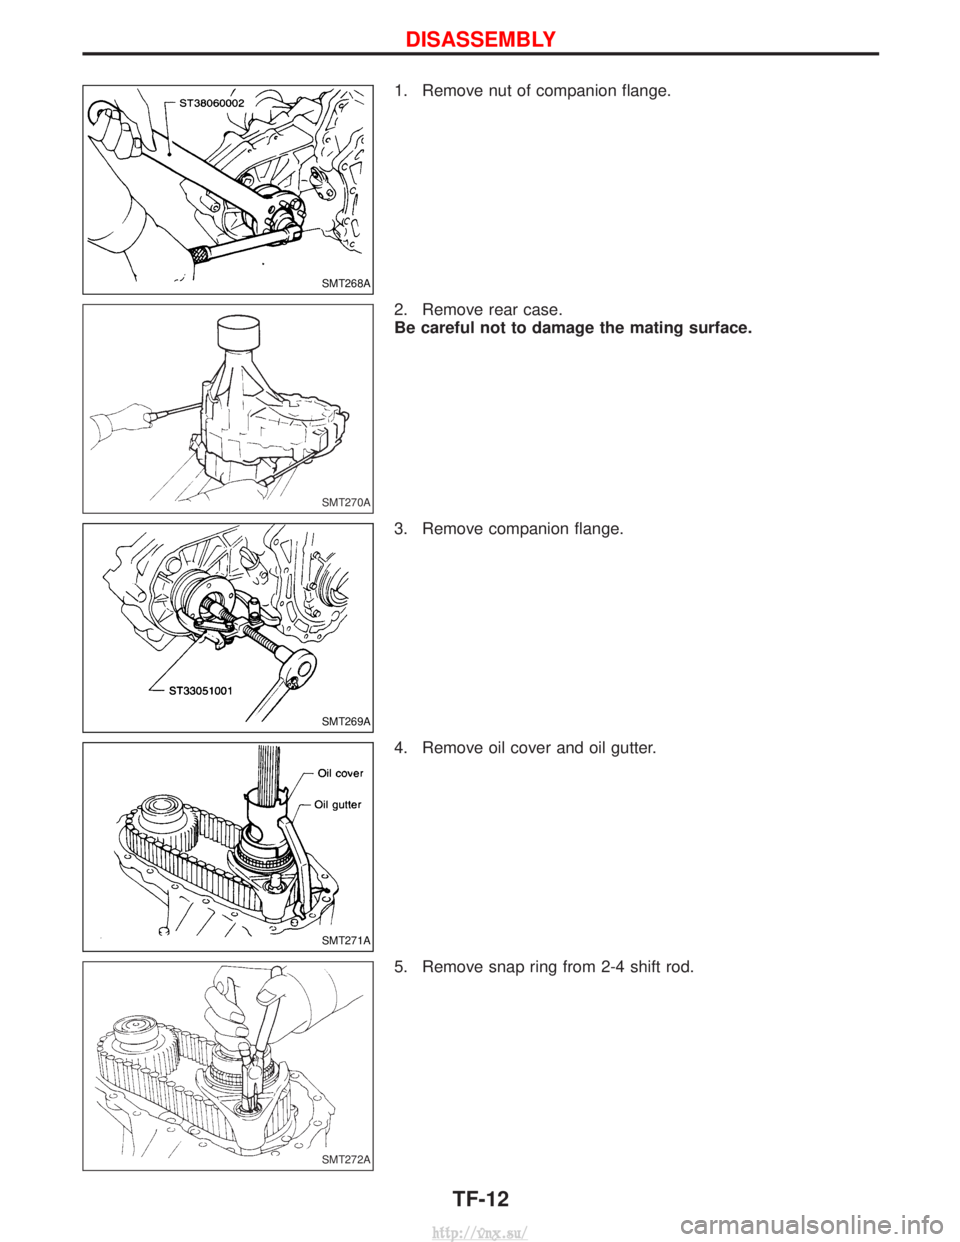
1. Remove nut of companion flange.
2. Remove rear case.
Be careful not to damage the mating surface.
3. Remove companion flange.
4. Remove oil cover and oil gutter.
5. Remove snap ring from 2-4 shift rod.
SMT268A
SMT270A
SMT269A
SMT271A
SMT272A
DISASSEMBLY
TF-12
http://vnx.su/
Page 1030 of 1833
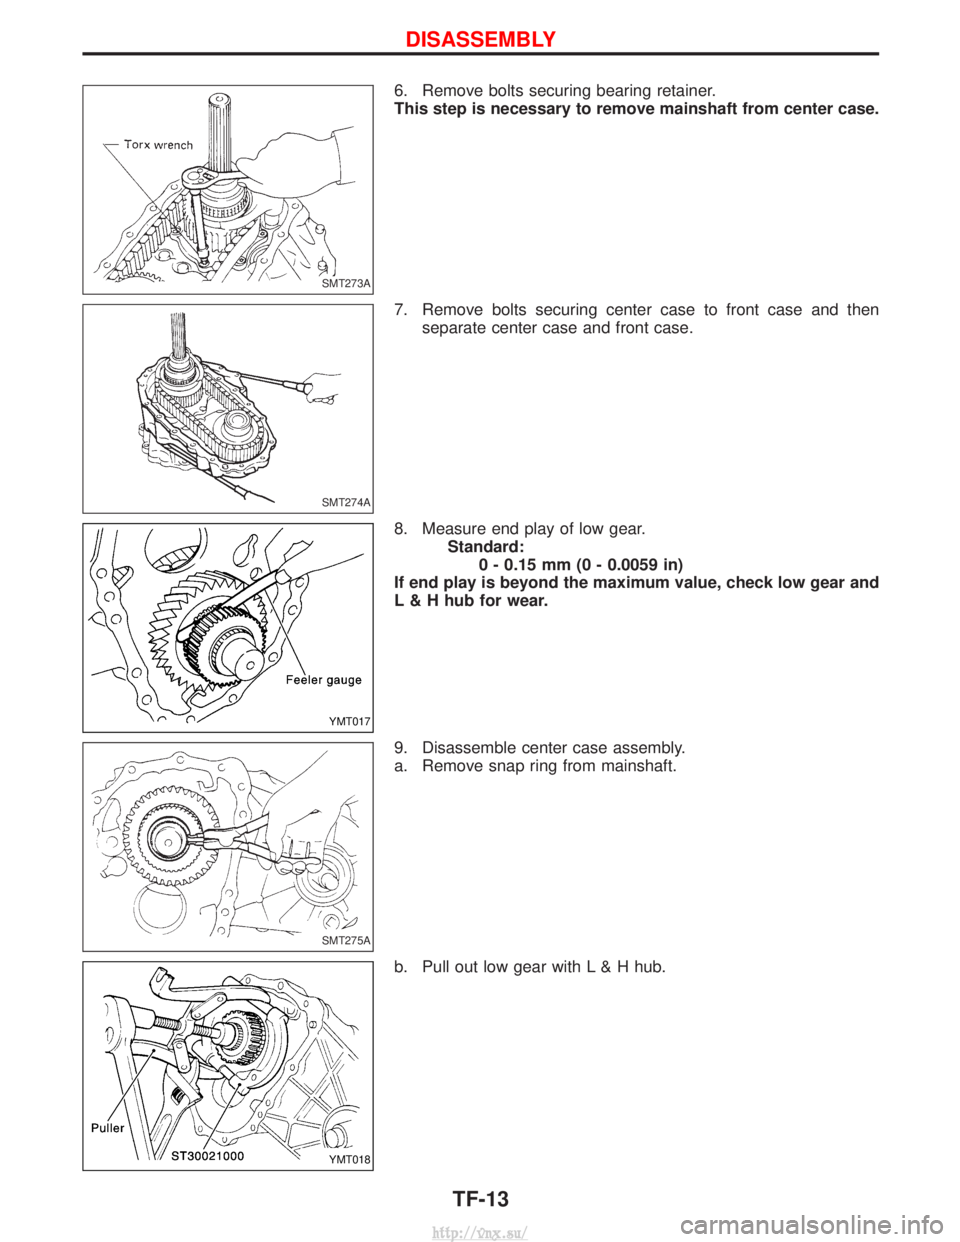
6. Remove bolts securing bearing retainer.
This step is necessary to remove mainshaft from center case.
7. Remove bolts securing center case to front case and thenseparate center case and front case.
8. Measure end play of low gear. Standard:0 - 0.15 mm (0 - 0.0059 in)
If end play is beyond the maximum value, check low gear and
L & H hub for wear.
9. Disassemble center case assembly.
a. Remove snap ring from mainshaft.
b. Pull out low gear with L & H hub.
SMT273A
SMT274A
YMT017
SMT275A
YMT018
DISASSEMBLY
TF-13
http://vnx.su/
Trending: seats, ESP, driver seat adjustment, engine coolant, phone, alternator wiring, jump start terminals
