NISSAN TIIDA 2008 Service Repair Manual
Manufacturer: NISSAN, Model Year: 2008, Model line: TIIDA, Model: NISSAN TIIDA 2008Pages: 2771, PDF Size: 60.61 MB
Page 611 of 2771
TRUNK LID OPENER
BL-177
< SERVICE INFORMATION >
C
D
E
F
G
H
J
K
L
MA
B
BL
N
O
P
BCM Power Supply and Ground CircuitINFOID:0000000001704077
Refer to BCS-15, "BCM Power Supply and Ground Circuit Inspection".
Check Trunk Lid Opener Switch Circuit (Without Intelligent Key or Power Windows)
INFOID:0000000001704078
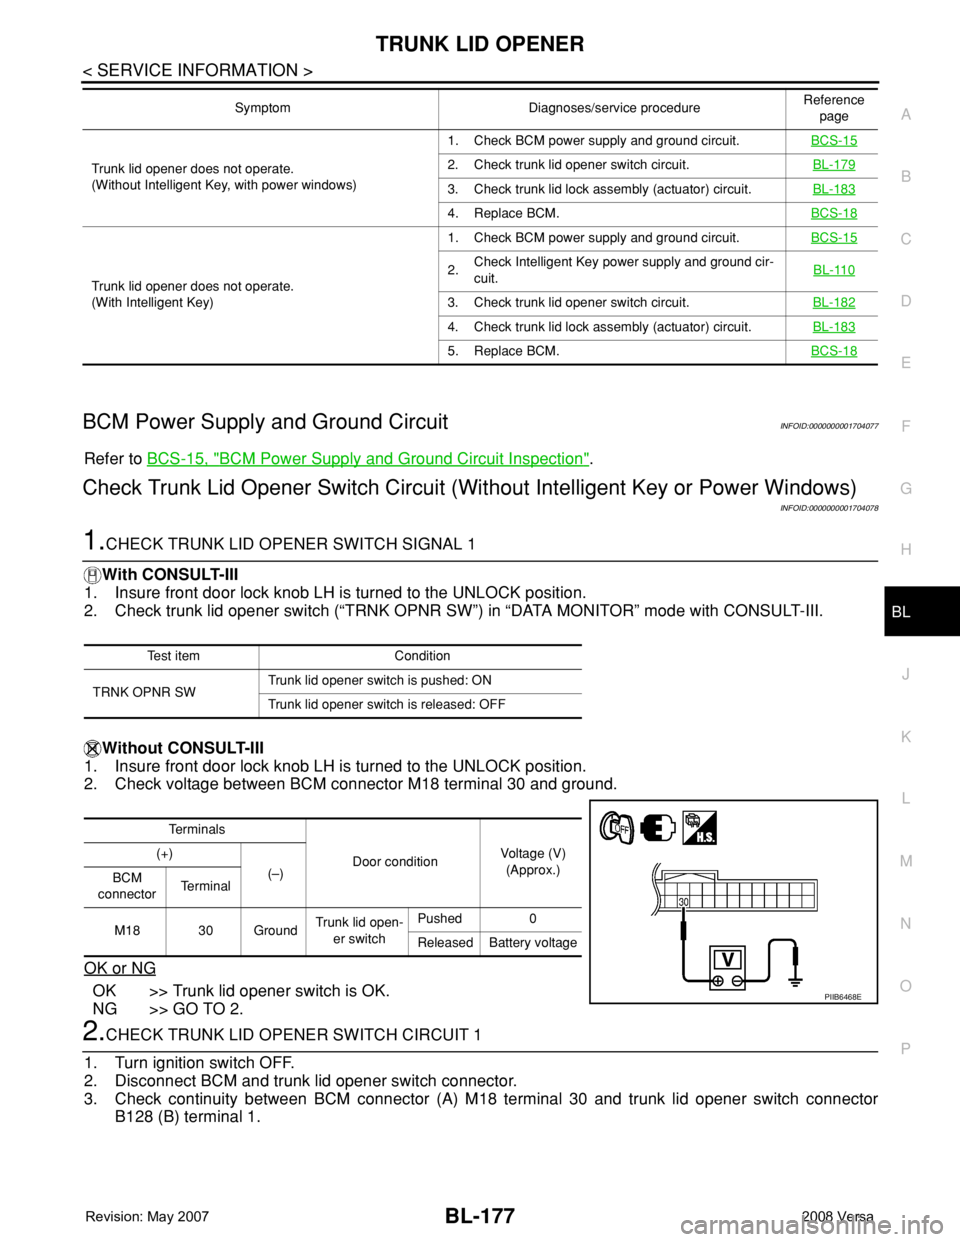
1.CHECK TRUNK LID OPENER SWITCH SIGNAL 1
With CONSULT-III
1. Insure front door lock knob LH is turned to the UNLOCK position.
2. Check trunk lid opener switch (“TRNK OPNR SW”) in “DATA MONITOR” mode with CONSULT-III.
Without CONSULT-III
1. Insure front door lock knob LH is turned to the UNLOCK position.
2. Check voltage between BCM connector M18 terminal 30 and ground.
OK or NG
OK >> Trunk lid opener switch is OK.
NG >> GO TO 2.
2.CHECK TRUNK LID OPENER SWITCH CIRCUIT 1
1. Turn ignition switch OFF.
2. Disconnect BCM and trunk lid opener switch connector.
3. Check continuity between BCM connector (A) M18 terminal 30 and trunk lid opener switch connector
B128 (B) terminal 1.
Trunk lid opener does not operate.
(Without Intelligent Key, with power windows)1. Check BCM power supply and ground circuit.BCS-152. Check trunk lid opener switch circuit.BL-179
3. Check trunk lid lock assembly (actuator) circuit.BL-183
4. Replace BCM.BCS-18
Trunk lid opener does not operate.
(With Intelligent Key)1. Check BCM power supply and ground circuit.BCS-15
2.Check Intelligent Key power supply and ground cir-
cuit.BL-110
3. Check trunk lid opener switch circuit.BL-182
4. Check trunk lid lock assembly (actuator) circuit.BL-183
5. Replace BCM.BCS-18
Symptom Diagnoses/service procedureReference
page
Test item Condition
TRNK OPNR SWTrunk lid opener switch is pushed: ON
Trunk lid opener switch is released: OFF
Te r m i n a l s
Door conditionVoltage (V)
(Approx.) (+)
(–)
BCM
connectorTe r m i n a l
M18 30 GroundTrunk lid open-
er switchPushed 0
Released Battery voltage
PIIB6468E
Page 612 of 2771
BL-178
< SERVICE INFORMATION >
TRUNK LID OPENER
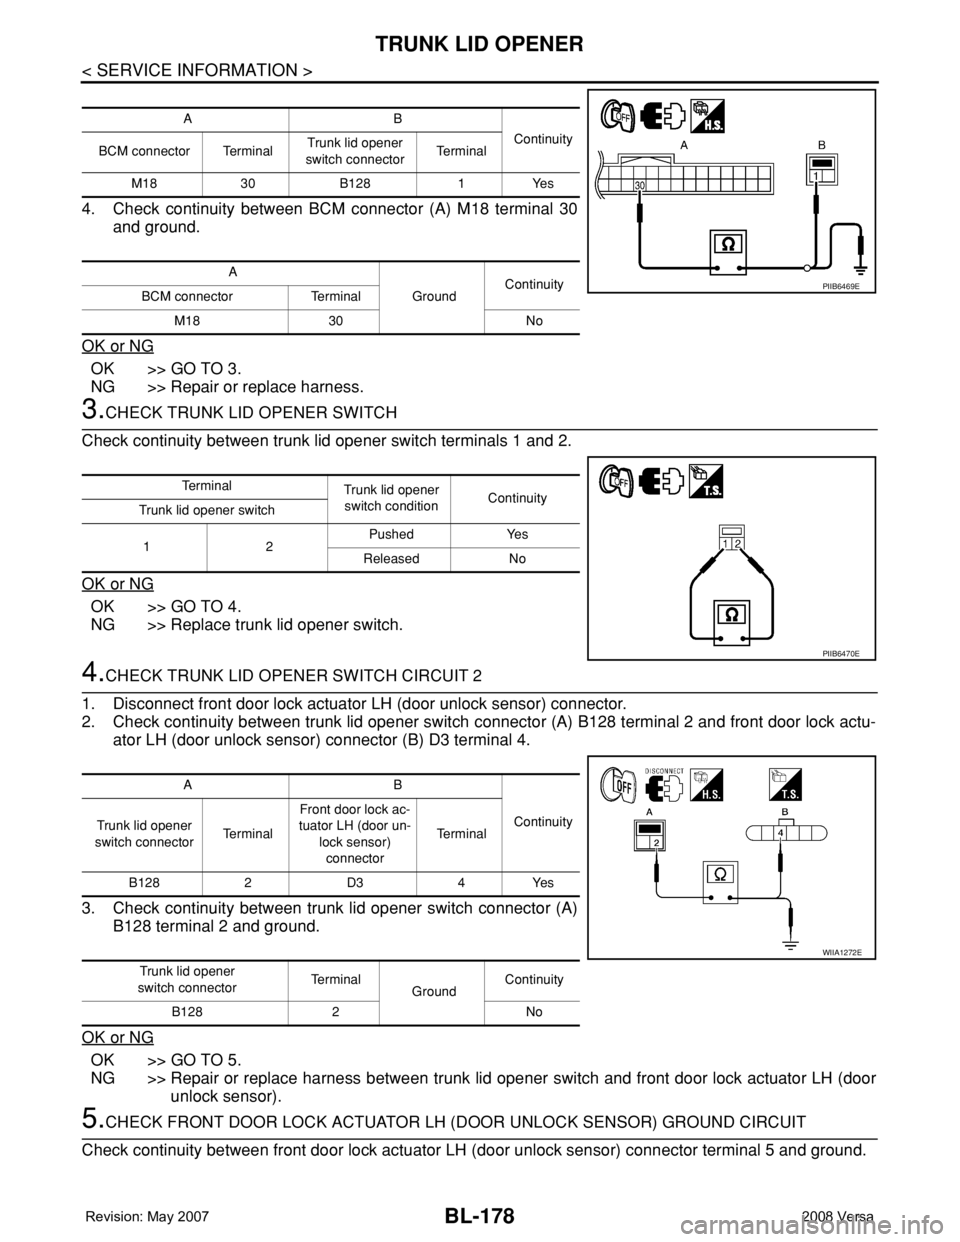
4. Check continuity between BCM connector (A) M18 terminal 30
and ground.
OK or NG
OK >> GO TO 3.
NG >> Repair or replace harness.
3.CHECK TRUNK LID OPENER SWITCH
Check continuity between trunk lid opener switch terminals 1 and 2.
OK or NG
OK >> GO TO 4.
NG >> Replace trunk lid opener switch.
4.CHECK TRUNK LID OPENER SWITCH CIRCUIT 2
1. Disconnect front door lock actuator LH (door unlock sensor) connector.
2. Check continuity between trunk lid opener switch connector (A) B128 terminal 2 and front door lock actu-
ator LH (door unlock sensor) connector (B) D3 terminal 4.
3. Check continuity between trunk lid opener switch connector (A)
B128 terminal 2 and ground.
OK or NG
OK >> GO TO 5.
NG >> Repair or replace harness between trunk lid opener switch and front door lock actuator LH (door
unlock sensor).
5.CHECK FRONT DOOR LOCK ACTUATOR LH (DOOR UNLOCK SENSOR) GROUND CIRCUIT
Check continuity between front door lock actuator LH (door unlock sensor) connector terminal 5 and ground.
AB
Continuity
BCM connector TerminalTrunk lid opener
switch connectorTe r m i n a l
M18 30 B128 1 Yes
A
GroundContinuity
BCM connector Terminal
M18 30 No
PIIB6469E
Te r m i n a l
Trunk lid opener
switch conditionContinuity
Trunk lid opener switch
12Pushed Yes
Released No
PIIB6470E
AB
Continuity
Trunk lid opener
switch connectorTe r m i n a lFront door lock ac-
tuator LH (door un-
lock sensor)
connectorTe r m i n a l
B128 2 D3 4 Yes
Trunk lid opener
switch connectorTe r m i n a l
GroundContinuity
B128 2 No
WIIA1272E
Page 613 of 2771
TRUNK LID OPENER
BL-179
< SERVICE INFORMATION >
C
D
E
F
G
H
J
K
L
MA
B
BL
N
O
P
OK or NG
OK >> GO TO 6.
NG >> Repair or replace harness.
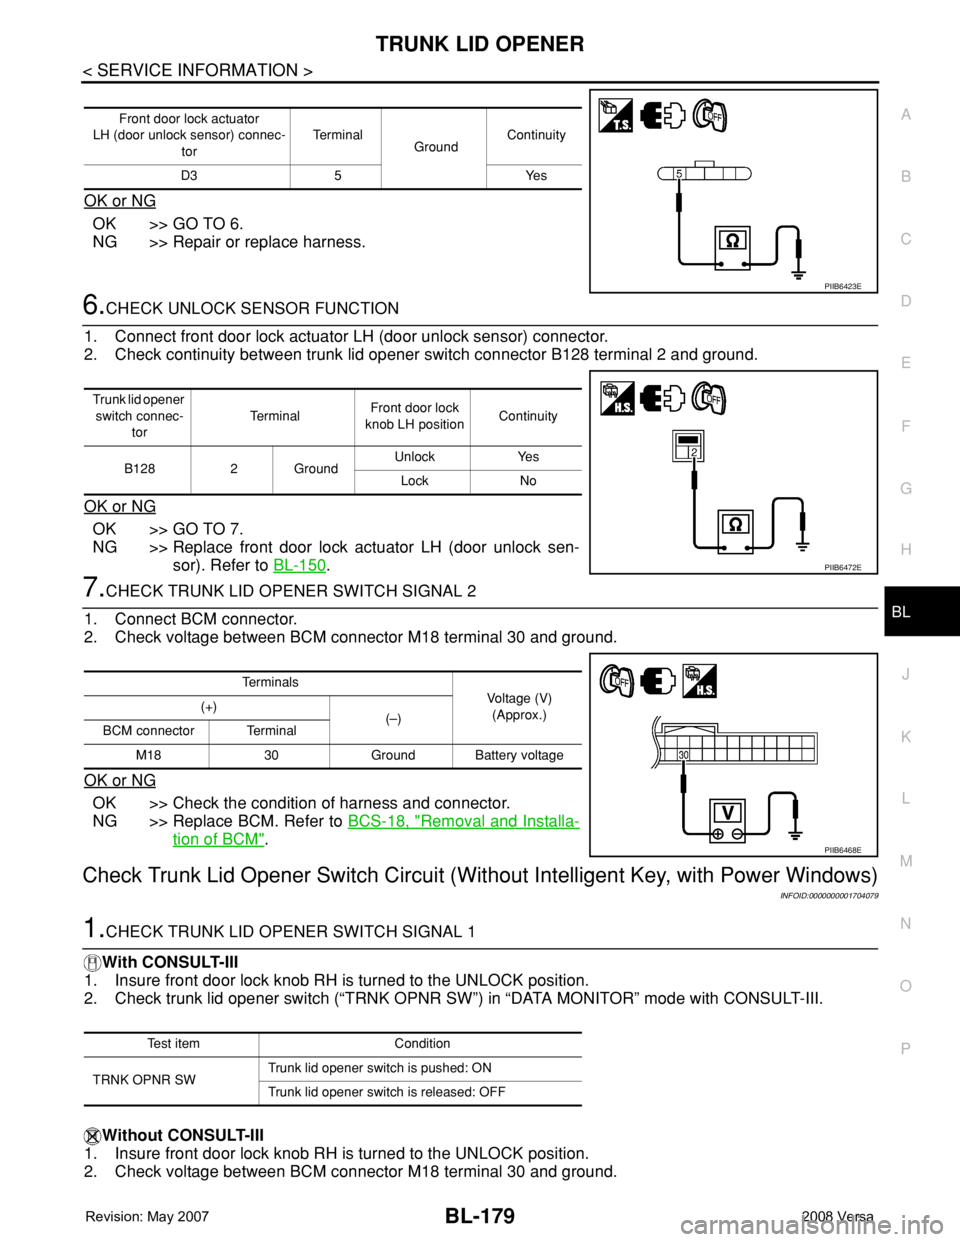
6.CHECK UNLOCK SENSOR FUNCTION
1. Connect front door lock actuator LH (door unlock sensor) connector.
2. Check continuity between trunk lid opener switch connector B128 terminal 2 and ground.
OK or NG
OK >> GO TO 7.
NG >> Replace front door lock actuator LH (door unlock sen-
sor). Refer to BL-150
.
7.CHECK TRUNK LID OPENER SWITCH SIGNAL 2
1. Connect BCM connector.
2. Check voltage between BCM connector M18 terminal 30 and ground.
OK or NG
OK >> Check the condition of harness and connector.
NG >> Replace BCM. Refer to BCS-18, "
Removal and Installa-
tion of BCM".
Check Trunk Lid Opener Switch Circuit (Without Intelligent Key, with Power Windows)
INFOID:0000000001704079
1.CHECK TRUNK LID OPENER SWITCH SIGNAL 1
With CONSULT-III
1. Insure front door lock knob RH is turned to the UNLOCK position.
2. Check trunk lid opener switch (“TRNK OPNR SW”) in “DATA MONITOR” mode with CONSULT-III.
Without CONSULT-III
1. Insure front door lock knob RH is turned to the UNLOCK position.
2. Check voltage between BCM connector M18 terminal 30 and ground.
Front door lock actuator
LH (door unlock sensor) connec-
torTe r m i n a l
GroundContinuity
D3 5 Yes
PIIB6423E
Trunk lid opener
switch connec-
torTe r m i n a lFront door lock
knob LH positionContinuity
B128 2 GroundUnlock Yes
Lock No
PIIB6472E
Te r m i n a l s
Voltage (V)
(Approx.) (+)
(–)
BCM connector Terminal
M18 30 Ground Battery voltage
PIIB6468E
Test item Condition
TRNK OPNR SWTrunk lid opener switch is pushed: ON
Trunk lid opener switch is released: OFF
Page 614 of 2771
BL-180
< SERVICE INFORMATION >
TRUNK LID OPENER
OK or NG
OK >> Trunk lid opener switch is OK.
NG >> GO TO 2.
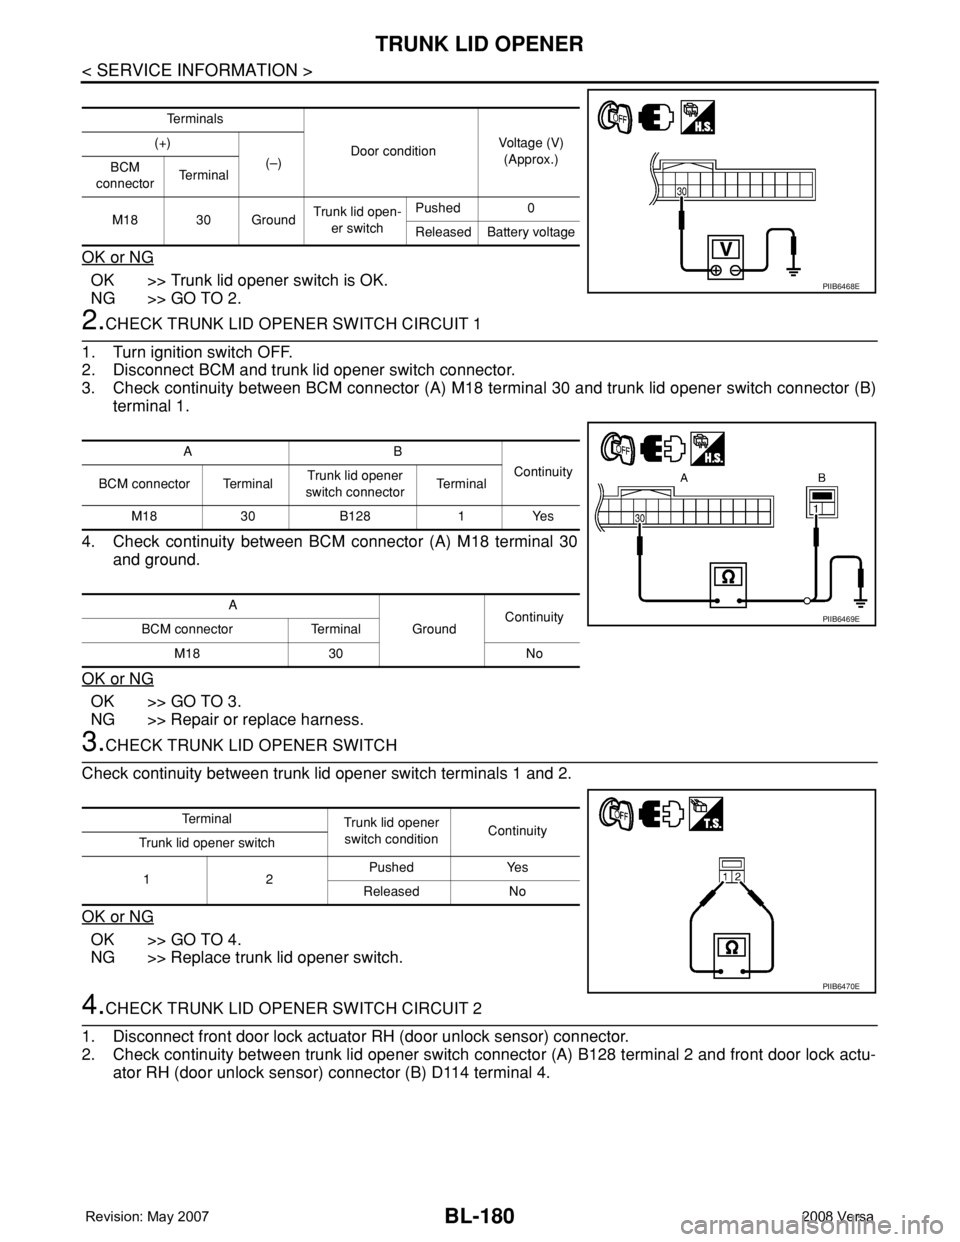
2.CHECK TRUNK LID OPENER SWITCH CIRCUIT 1
1. Turn ignition switch OFF.
2. Disconnect BCM and trunk lid opener switch connector.
3. Check continuity between BCM connector (A) M18 terminal 30 and trunk lid opener switch connector (B)
terminal 1.
4. Check continuity between BCM connector (A) M18 terminal 30
and ground.
OK or NG
OK >> GO TO 3.
NG >> Repair or replace harness.
3.CHECK TRUNK LID OPENER SWITCH
Check continuity between trunk lid opener switch terminals 1 and 2.
OK or NG
OK >> GO TO 4.
NG >> Replace trunk lid opener switch.
4.CHECK TRUNK LID OPENER SWITCH CIRCUIT 2
1. Disconnect front door lock actuator RH (door unlock sensor) connector.
2. Check continuity between trunk lid opener switch connector (A) B128 terminal 2 and front door lock actu-
ator RH (door unlock sensor) connector (B) D114 terminal 4.
Te r m i n a l s
Door conditionVoltage (V)
(Approx.) (+)
(–)
BCM
connectorTe r m i n a l
M18 30 GroundTrunk lid open-
er switchPushed 0
Released Battery voltage
PIIB6468E
AB
Continuity
BCM connector TerminalTrunk lid opener
switch connectorTe r m i n a l
M18 30 B128 1 Yes
A
GroundContinuity
BCM connector Terminal
M18 30 No
PIIB6469E
Te r m i n a l
Trunk lid opener
switch conditionContinuity
Trunk lid opener switch
12Pushed Yes
Released No
PIIB6470E
Page 615 of 2771
TRUNK LID OPENER
BL-181
< SERVICE INFORMATION >
C
D
E
F
G
H
J
K
L
MA
B
BL
N
O
P
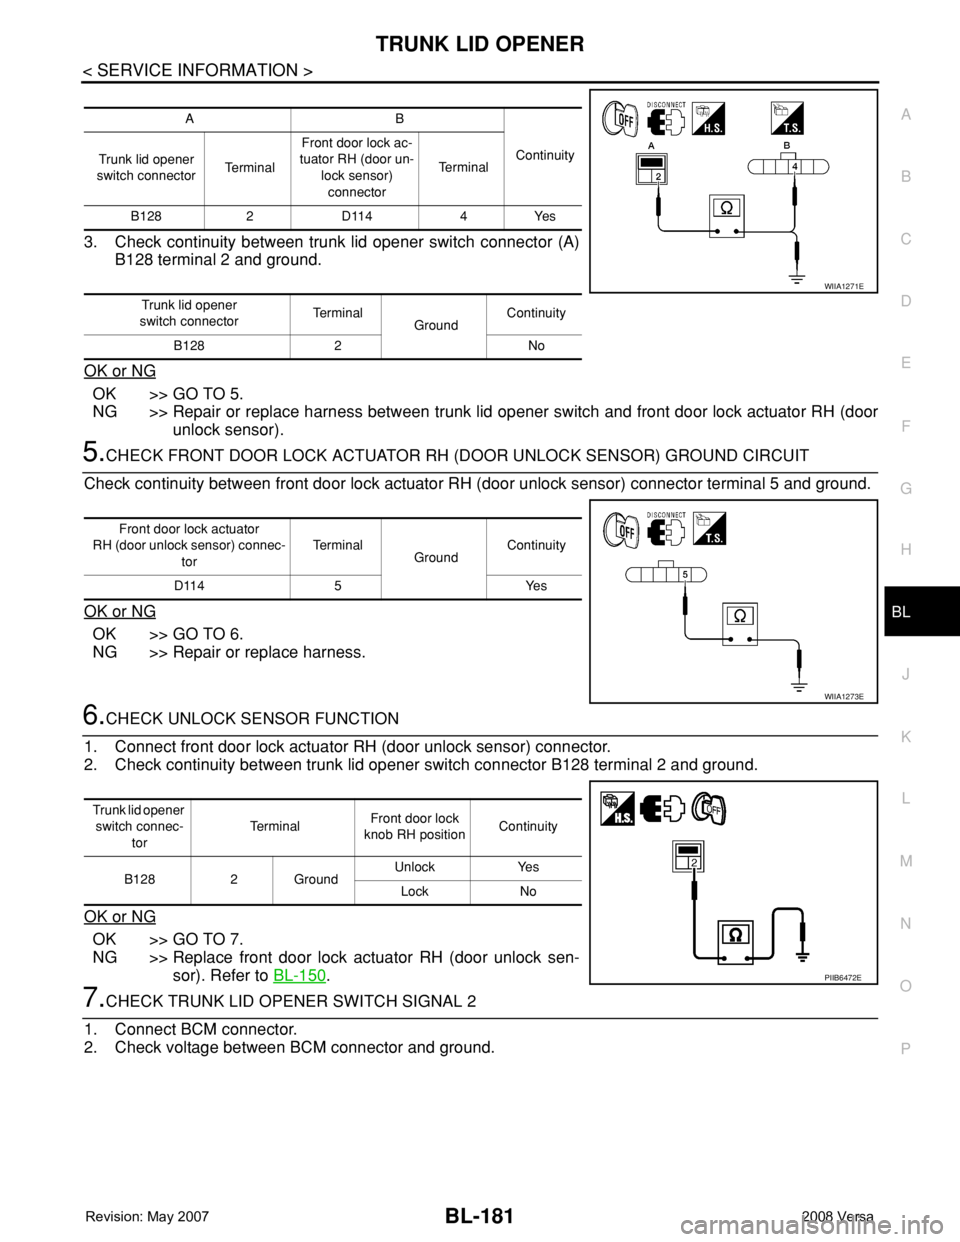
3. Check continuity between trunk lid opener switch connector (A)
B128 terminal 2 and ground.
OK or NG
OK >> GO TO 5.
NG >> Repair or replace harness between trunk lid opener switch and front door lock actuator RH (door
unlock sensor).
5.CHECK FRONT DOOR LOCK ACTUATOR RH (DOOR UNLOCK SENSOR) GROUND CIRCUIT
Check continuity between front door lock actuator RH (door unlock sensor) connector terminal 5 and ground.
OK or NG
OK >> GO TO 6.
NG >> Repair or replace harness.
6.CHECK UNLOCK SENSOR FUNCTION
1. Connect front door lock actuator RH (door unlock sensor) connector.
2. Check continuity between trunk lid opener switch connector B128 terminal 2 and ground.
OK or NG
OK >> GO TO 7.
NG >> Replace front door lock actuator RH (door unlock sen-
sor). Refer to BL-150
.
7.CHECK TRUNK LID OPENER SWITCH SIGNAL 2
1. Connect BCM connector.
2. Check voltage between BCM connector and ground.
AB
Continuity
Trunk lid opener
switch connectorTe r m i n a lFront door lock ac-
tuator RH (door un-
lock sensor)
connectorTe r m i n a l
B128 2 D114 4 Yes
Trunk lid opener
switch connectorTe r m i n a l
GroundContinuity
B128 2 No
WIIA1271E
Front door lock actuator
RH (door unlock sensor) connec-
torTe r m i n a l
GroundContinuity
D114 5 Yes
WIIA1273E
Trunk lid opener
switch connec-
torTe r m i n a lFront door lock
knob RH positionContinuity
B128 2 GroundUnlock Yes
Lock No
PIIB6472E
Page 616 of 2771
BL-182
< SERVICE INFORMATION >
TRUNK LID OPENER
OK or NG
OK >> Check the condition of harness and connector.
NG >> Replace BCM. Refer to BCS-18, "
Removal and Installa-
tion of BCM".
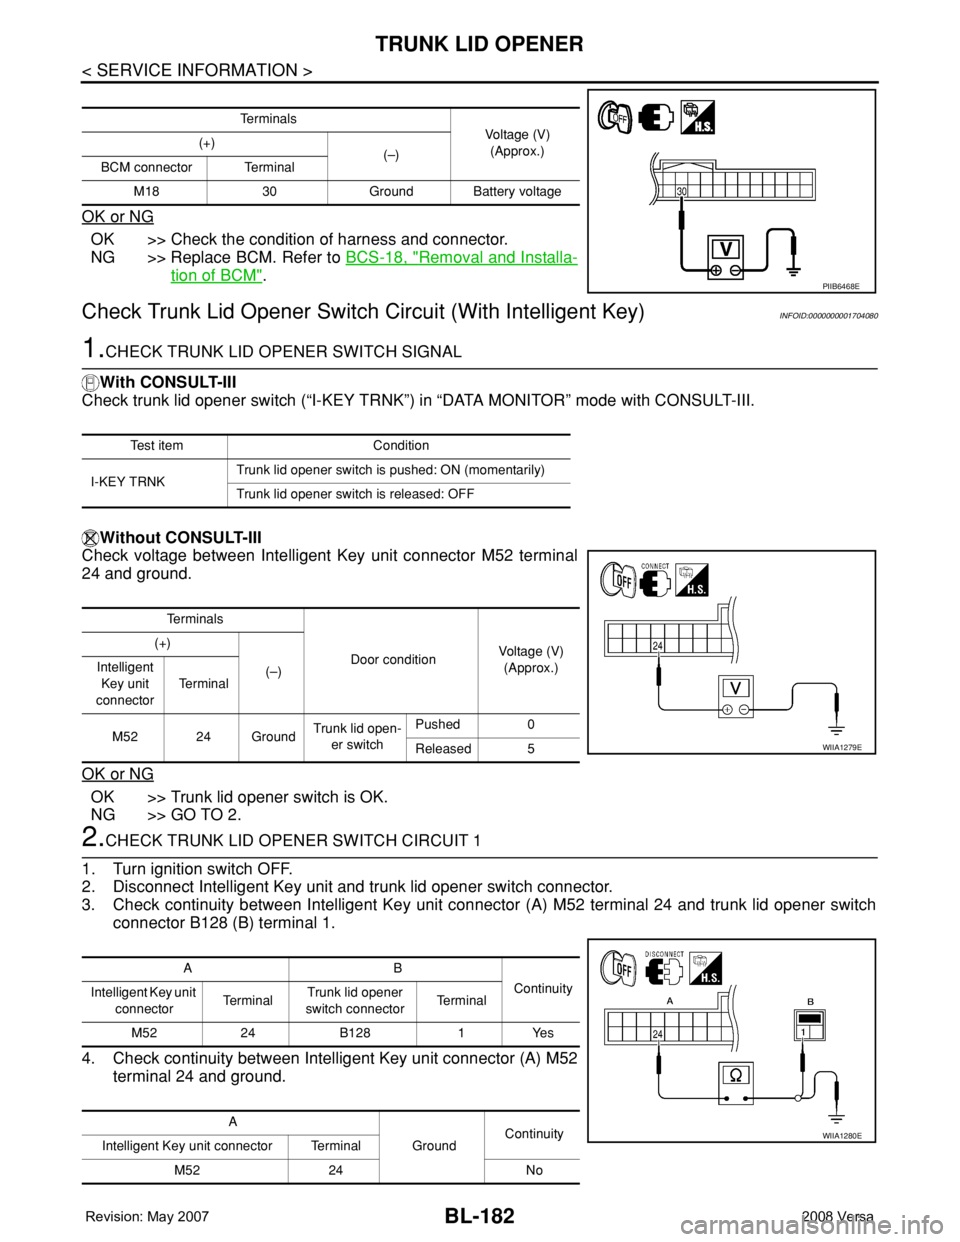
Check Trunk Lid Opener Switch Circuit (With Intelligent Key)INFOID:0000000001704080
1.CHECK TRUNK LID OPENER SWITCH SIGNAL
With CONSULT-III
Check trunk lid opener switch (“I-KEY TRNK”) in “DATA MONITOR” mode with CONSULT-III.
Without CONSULT-III
Check voltage between Intelligent Key unit connector M52 terminal
24 and ground.
OK or NG
OK >> Trunk lid opener switch is OK.
NG >> GO TO 2.
2.CHECK TRUNK LID OPENER SWITCH CIRCUIT 1
1. Turn ignition switch OFF.
2. Disconnect Intelligent Key unit and trunk lid opener switch connector.
3. Check continuity between Intelligent Key unit connector (A) M52 terminal 24 and trunk lid opener switch
connector B128 (B) terminal 1.
4. Check continuity between Intelligent Key unit connector (A) M52
terminal 24 and ground.
Te r m i n a l s
Voltage (V)
(Approx.) (+)
(–)
BCM connector Terminal
M18 30 Ground Battery voltage
PIIB6468E
Test item Condition
I-KEY TRNKTrunk lid opener switch is pushed: ON (momentarily)
Trunk lid opener switch is released: OFF
Te r m i n a l s
Door conditionVoltage (V)
(Approx.) (+)
(–) Intelligent
Key unit
connectorTe r m i n a l
M52 24 GroundTrunk lid open-
er switchPushed 0
Released 5
WIIA1279E
AB
Continuity
Intelligent Key unit
connectorTe r m i n a lTrunk lid opener
switch connectorTe r m i n a l
M52 24 B128 1 Yes
A
GroundContinuity
Intelligent Key unit connector Terminal
M52 24 No
WIIA1280E
Page 617 of 2771
TRUNK LID OPENER
BL-183
< SERVICE INFORMATION >
C
D
E
F
G
H
J
K
L
MA
B
BL
N
O
P
OK or NG
OK >> GO TO 3.
NG >> Repair or replace harness.
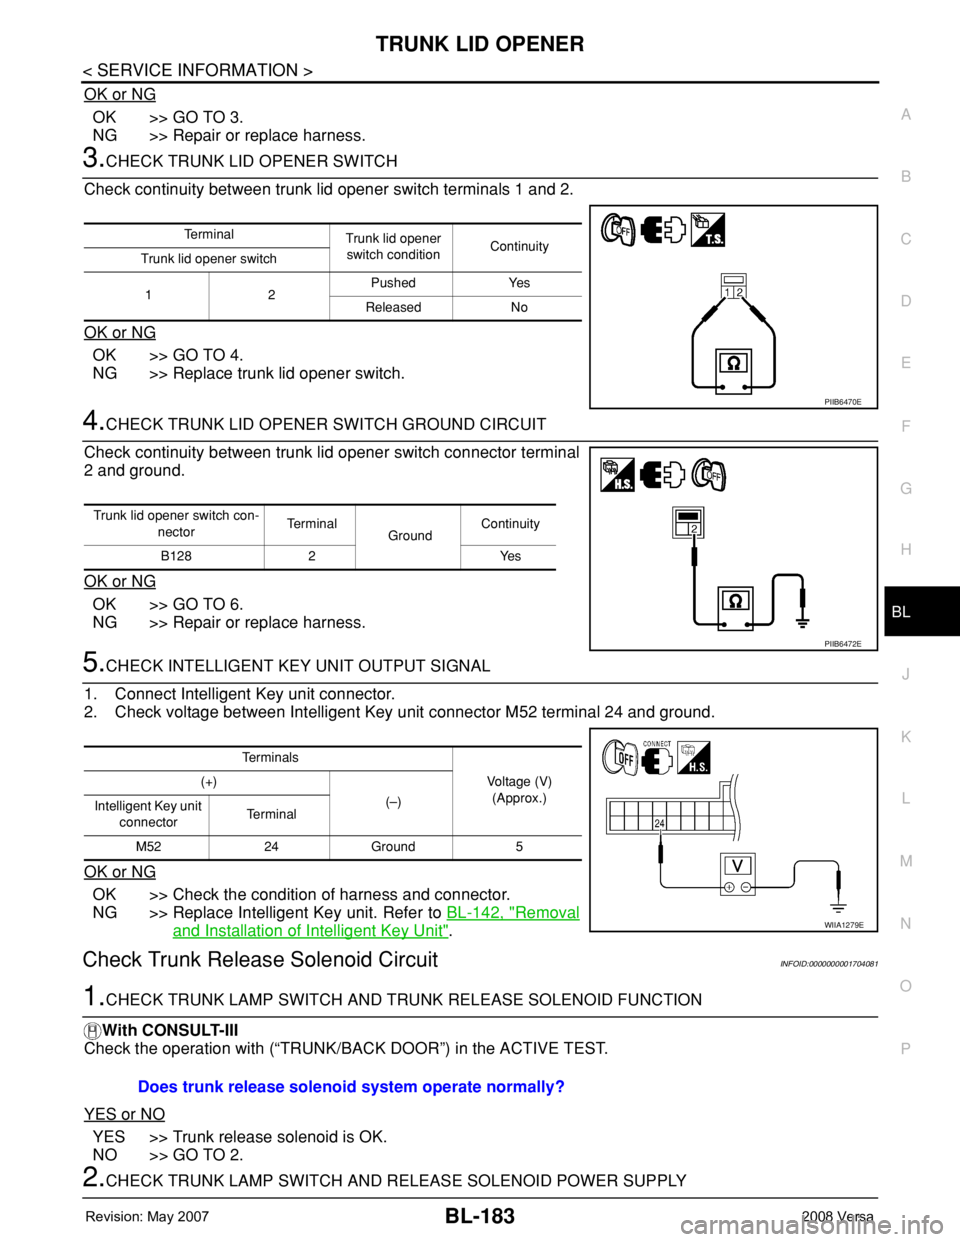
3.CHECK TRUNK LID OPENER SWITCH
Check continuity between trunk lid opener switch terminals 1 and 2.
OK or NG
OK >> GO TO 4.
NG >> Replace trunk lid opener switch.
4.CHECK TRUNK LID OPENER SWITCH GROUND CIRCUIT
Check continuity between trunk lid opener switch connector terminal
2 and ground.
OK or NG
OK >> GO TO 6.
NG >> Repair or replace harness.
5.CHECK INTELLIGENT KEY UNIT OUTPUT SIGNAL
1. Connect Intelligent Key unit connector.
2. Check voltage between Intelligent Key unit connector M52 terminal 24 and ground.
OK or NG
OK >> Check the condition of harness and connector.
NG >> Replace Intelligent Key unit. Refer to BL-142, "
Removal
and Installation of Intelligent Key Unit".
Check Trunk Release Solenoid CircuitINFOID:0000000001704081
1.CHECK TRUNK LAMP SWITCH AND TRUNK RELEASE SOLENOID FUNCTION
With CONSULT-III
Check the operation with (“TRUNK/BACK DOOR”) in the ACTIVE TEST.
YES or NO
YES >> Trunk release solenoid is OK.
NO >> GO TO 2.
2.CHECK TRUNK LAMP SWITCH AND RELEASE SOLENOID POWER SUPPLY
Te r m i n a l
Trunk lid opener
switch conditionContinuity
Trunk lid opener switch
12Pushed Yes
Released No
PIIB6470E
Trunk lid opener switch con-
nectorTe r m i n a l
GroundContinuity
B128 2 Yes
PIIB6472E
Te r m i n a l s
Voltage (V)
(Approx.) (+)
(–)
Intelligent Key unit
connectorTe r m i n a l
M52 24 Ground 5
WIIA1279E
Does trunk release solenoid system operate normally?
Page 618 of 2771
BL-184
< SERVICE INFORMATION >
TRUNK LID OPENER
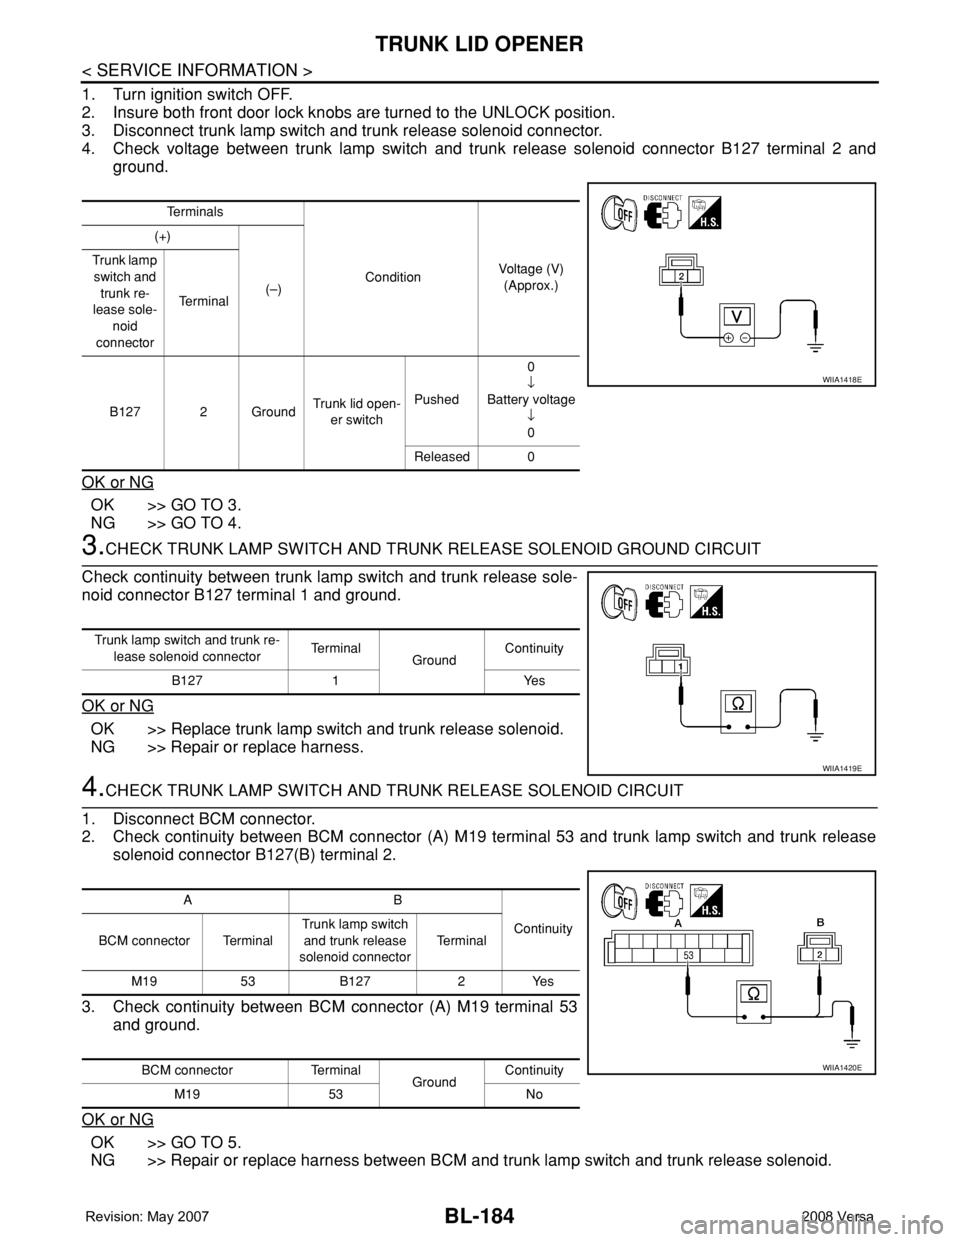
1. Turn ignition switch OFF.
2. Insure both front door lock knobs are turned to the UNLOCK position.
3. Disconnect trunk lamp switch and trunk release solenoid connector.
4. Check voltage between trunk lamp switch and trunk release solenoid connector B127 terminal 2 and
ground.
OK or NG
OK >> GO TO 3.
NG >> GO TO 4.
3.CHECK TRUNK LAMP SWITCH AND TRUNK RELEASE SOLENOID GROUND CIRCUIT
Check continuity between trunk lamp switch and trunk release sole-
noid connector B127 terminal 1 and ground.
OK or NG
OK >> Replace trunk lamp switch and trunk release solenoid.
NG >> Repair or replace harness.
4.CHECK TRUNK LAMP SWITCH AND TRUNK RELEASE SOLENOID CIRCUIT
1. Disconnect BCM connector.
2. Check continuity between BCM connector (A) M19 terminal 53 and trunk lamp switch and trunk release
solenoid connector B127(B) terminal 2.
3. Check continuity between BCM connector (A) M19 terminal 53
and ground.
OK or NG
OK >> GO TO 5.
NG >> Repair or replace harness between BCM and trunk lamp switch and trunk release solenoid.
Te r m i n a l s
ConditionVoltage (V)
(Approx.) (+)
(–) Trunk lamp
switch and
trunk re-
lease sole-
noid
connectorTe r m i n a l
B127 2 GroundTrunk lid open-
er switchPushed0
↓
Battery voltage
↓
0
Released 0
WIIA1418E
Trunk lamp switch and trunk re-
lease solenoid connectorTe r m i n a l
GroundContinuity
B127 1 Yes
WIIA1419E
AB
Continuity
BCM connector TerminalTrunk lamp switch
and trunk release
solenoid connectorTe r m i n a l
M19 53 B127 2 Yes
BCM connector Terminal
GroundContinuity
M19 53 No
WIIA1420E
Page 619 of 2771
TRUNK LID OPENER
BL-185
< SERVICE INFORMATION >
C
D
E
F
G
H
J
K
L
MA
B
BL
N
O
P
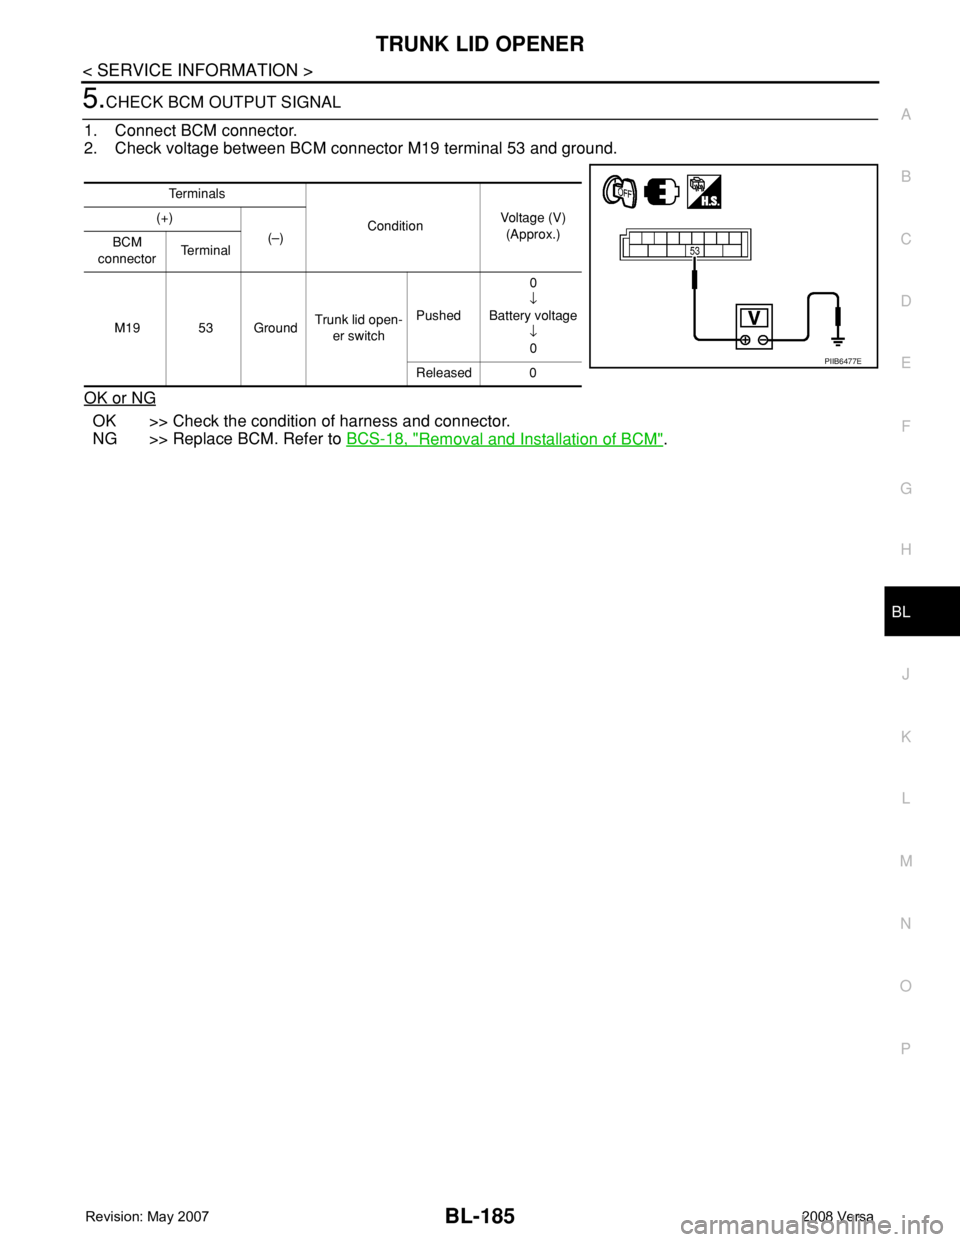
5.CHECK BCM OUTPUT SIGNAL
1. Connect BCM connector.
2. Check voltage between BCM connector M19 terminal 53 and ground.
OK or NG
OK >> Check the condition of harness and connector.
NG >> Replace BCM. Refer to BCS-18, "
Removal and Installation of BCM".
Te r m i n a l s
ConditionVoltage (V)
(Approx.) (+)
(–)
BCM
connectorTe r m i n a l
M19 53 GroundTrunk lid open-
er switchPushed0
↓
Battery voltage
↓
0
Released 0
PIIB6477E
Page 620 of 2771
BL-186
< SERVICE INFORMATION >
FUEL FILLER LID OPENER
FUEL FILLER LID OPENER
Removal and Installation of Fuel Filler Lid OpenerINFOID:0000000001704082
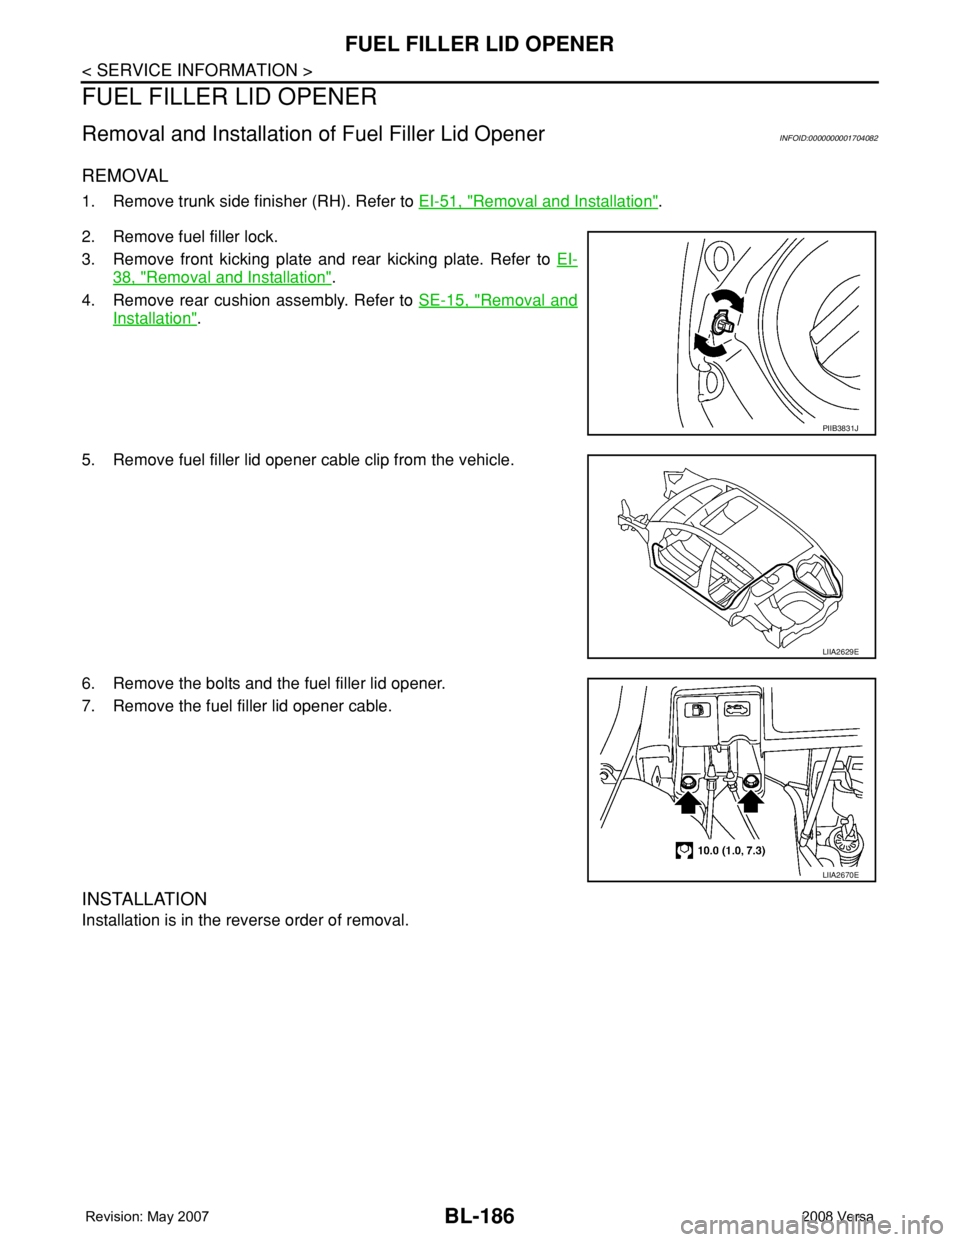
REMOVAL
1. Remove trunk side finisher (RH). Refer to EI-51, "Removal and Installation".
2. Remove fuel filler lock.
3. Remove front kicking plate and rear kicking plate. Refer to EI-
38, "Removal and Installation".
4. Remove rear cushion assembly. Refer to SE-15, "
Removal and
Installation".
5. Remove fuel filler lid opener cable clip from the vehicle.
6. Remove the bolts and the fuel filler lid opener.
7. Remove the fuel filler lid opener cable.
INSTALLATION
Installation is in the reverse order of removal.
PIIB3831J
LIIA2629E
LIIA2670E