NISSAN TIIDA 2009 Service Repair Manual
TIIDA 2009
NISSAN
NISSAN
https://www.carmanualsonline.info/img/5/57398/w960_57398-0.png
NISSAN TIIDA 2009 Service Repair Manual
Trending: keyless entry, seat adjustment, door, transmission, air filter, service interval reset, GW-19
Page 3681 of 4331
LT
N
O P
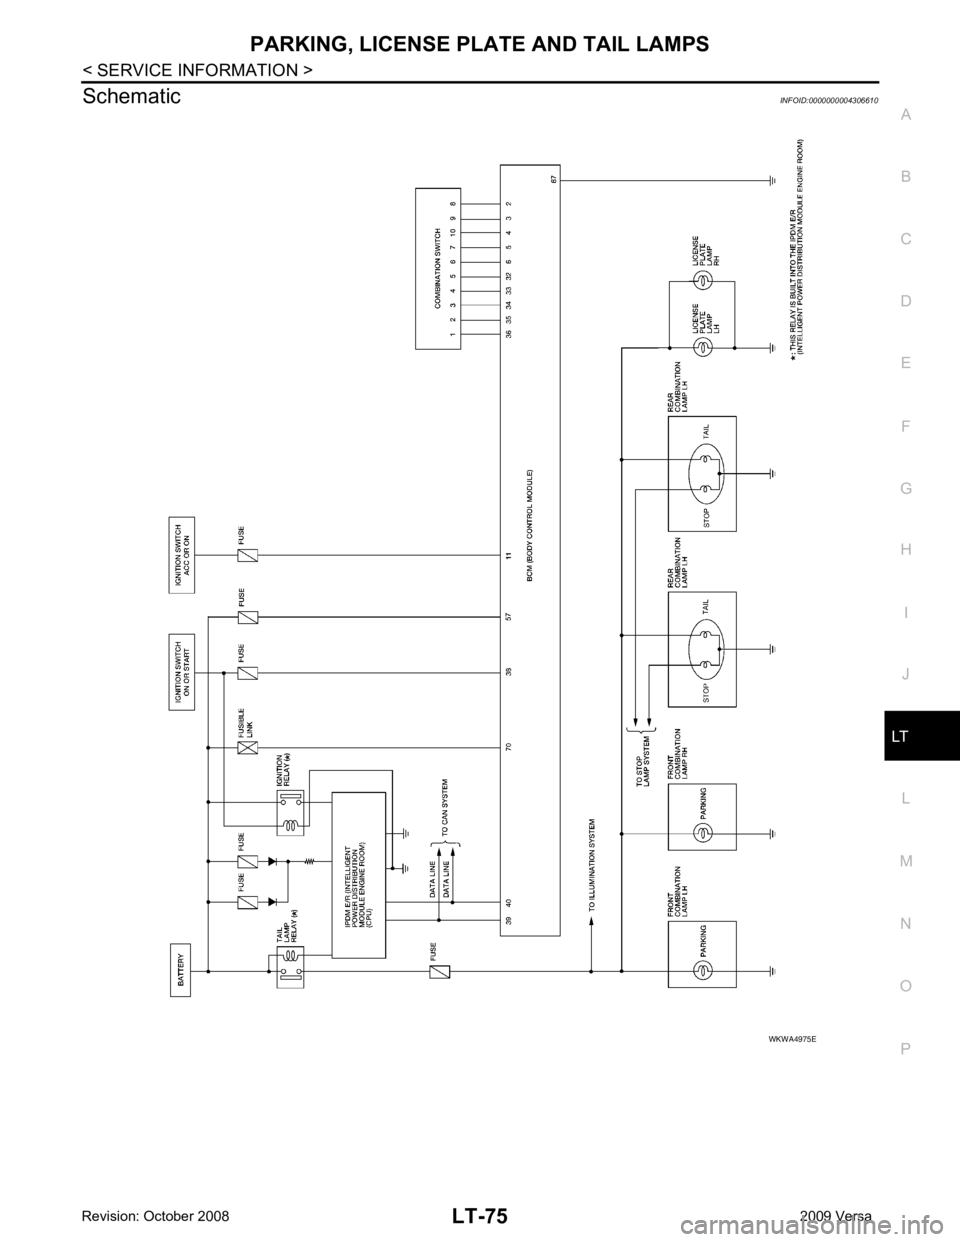
Schematic
INFOID:0000000004306610
Page 3682 of 4331
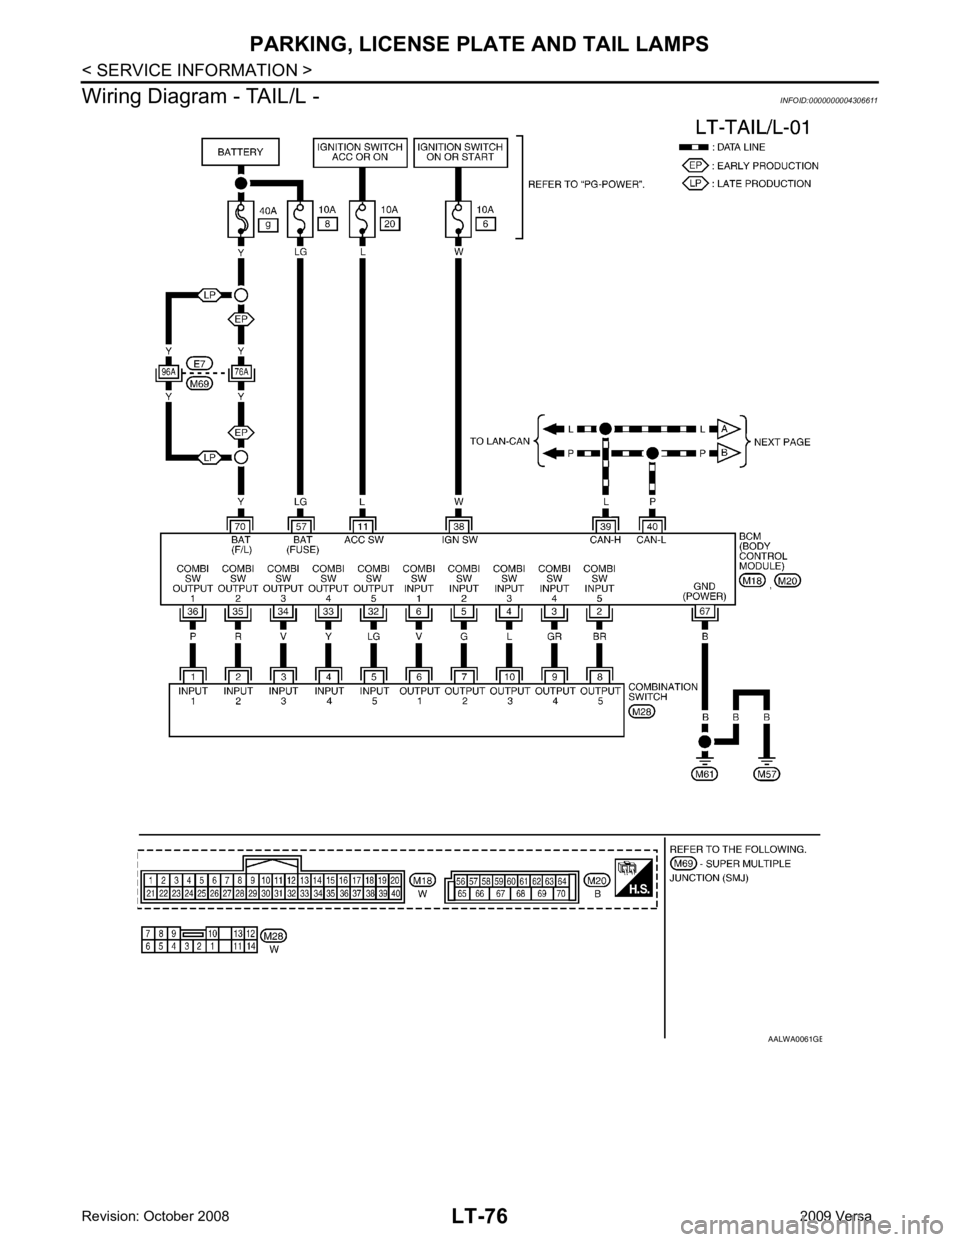
Page 3683 of 4331
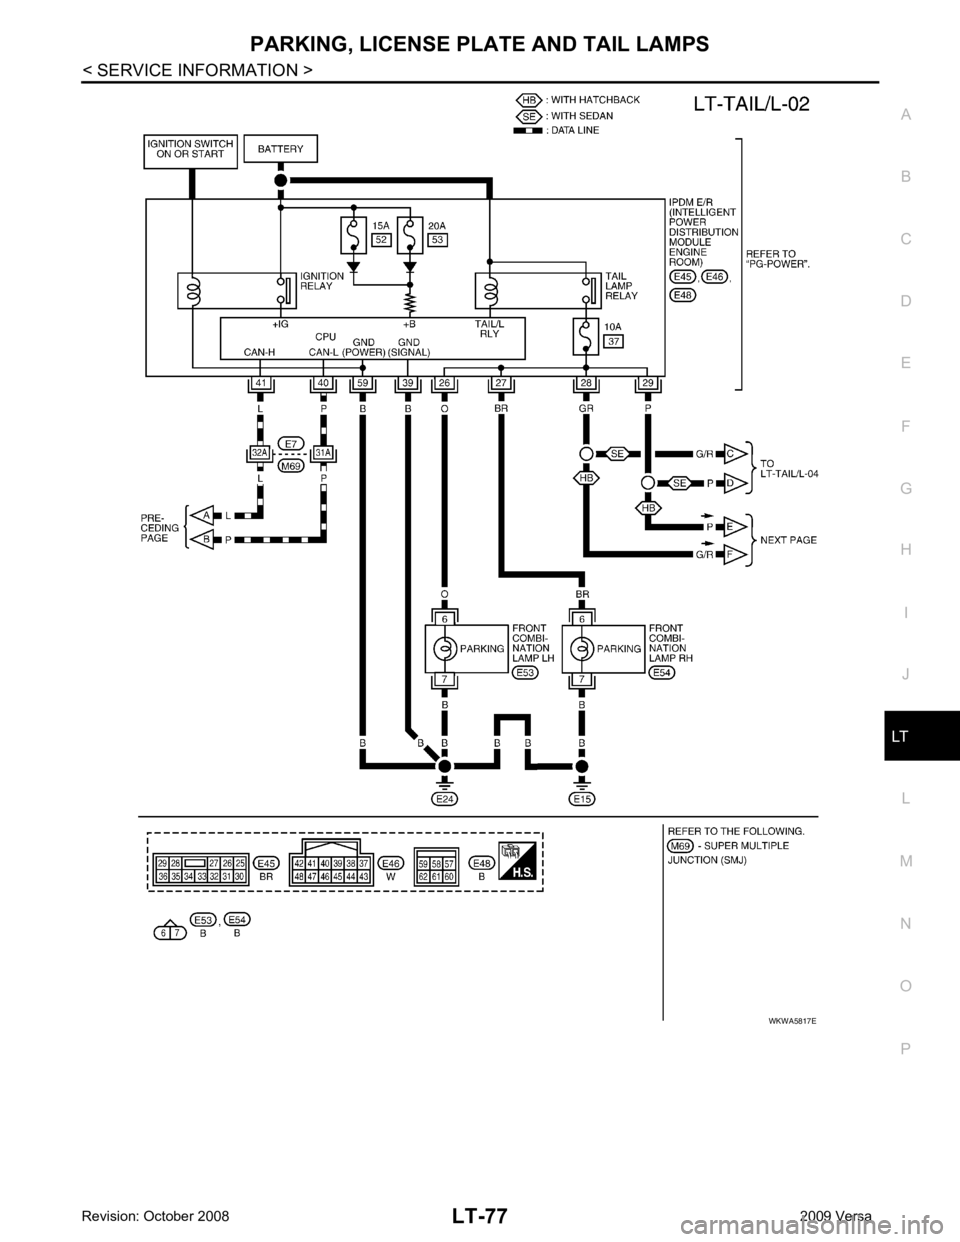
Page 3684 of 4331
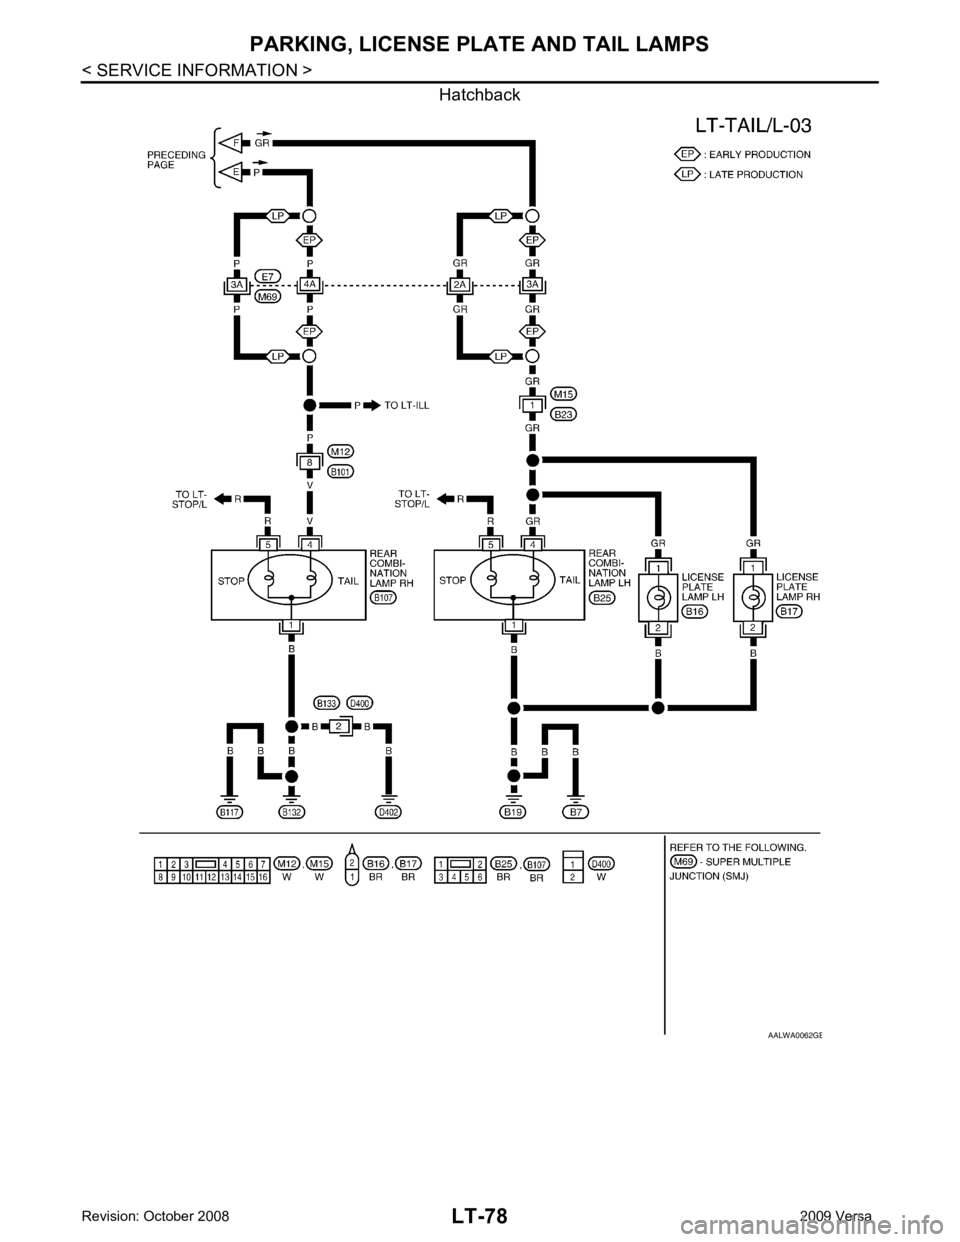
Page 3685 of 4331
LT
N
O P
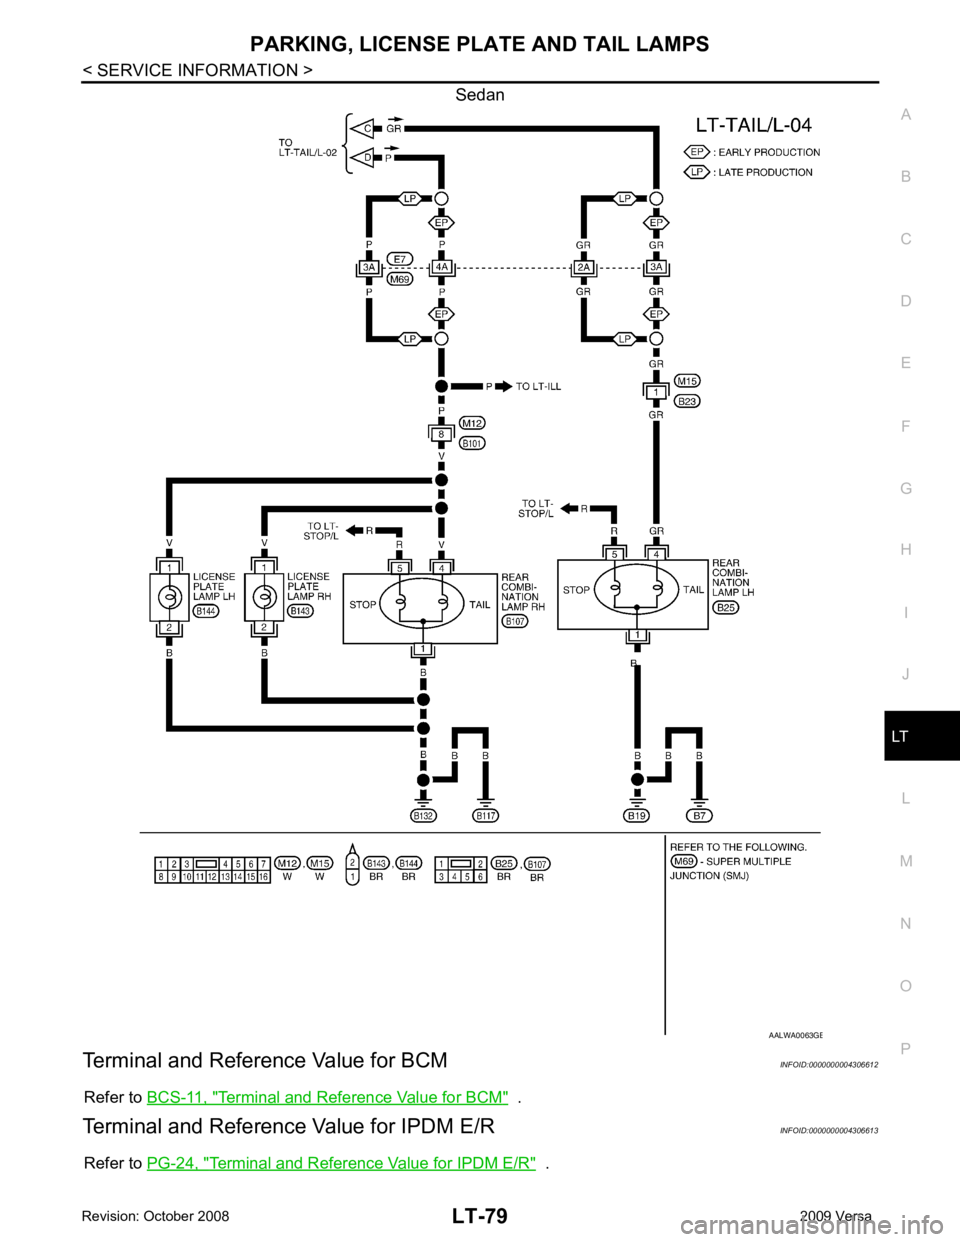
Sedan
Terminal and Reference Value for BCM INFOID:0000000004306612
Refer to BCS-11, " Terminal and Reference Value for BCM " .
Terminal and Reference Value for IPDM E/R INFOID:0000000004306613
Refer to PG-24, " Terminal and Reference Value for IPDM E/R " . B
Page 3686 of 4331
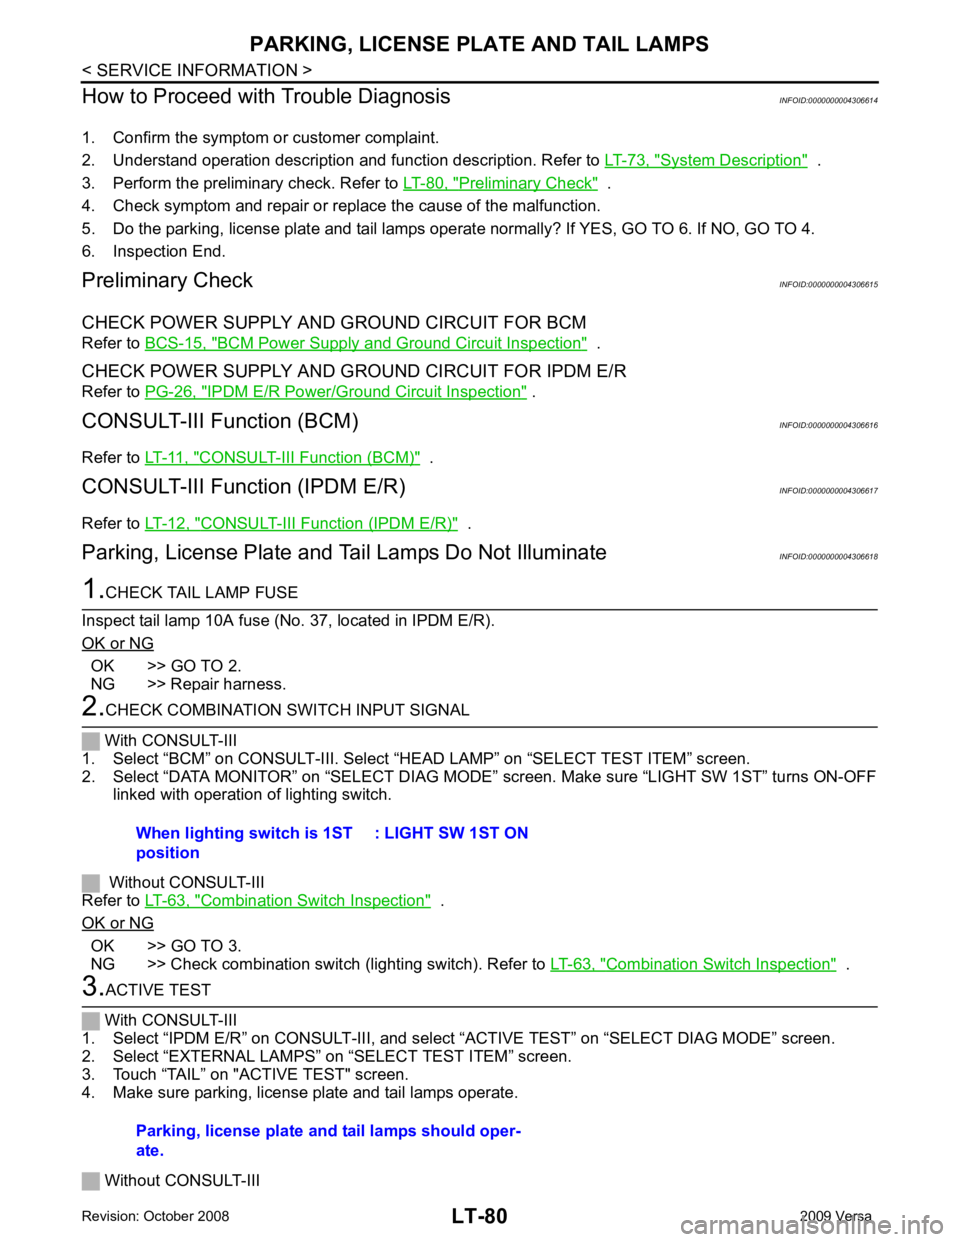
System Description " .
3. Perform the preliminary check. Refer to LT-80, " Preliminary Check " .
4. Check symptom and repair or repl ace the cause of the malfunction.
5. Do the parking, license plate and tail lamps operate normally? If YES, GO TO 6. If NO, GO TO 4.
6. Inspection End.
Preliminary Check INFOID:0000000004306615
CHECK POWER SUPPLY AND GROUND CIRCUIT FOR BCM
Refer to BCS-15, " BCM Power Supply and Ground Circuit Inspection " .
CHECK POWER SUPPLY AND GROUND CIRCUIT FOR IPDM E/R
Refer to PG-26, " IPDM E/R Power/Ground Circuit Inspection " .
CONSULT-III Function (BCM) INFOID:0000000004306616
Refer to LT-11, " CONSULT-III Function (BCM) " .
CONSULT-III Function (IPDM E/R) INFOID:0000000004306617
Refer to LT-12, " CONSULT-III Function (IPDM E/R) " .
Parking, License Plate and Tail Lamps Do Not Illuminate INFOID:0000000004306618OK >> GO TO 2.
NG >> Repair harness. Combination Switch Inspection " .
OK or NG OK >> GO TO 3.
NG >> Check combination switch (lighting switch). Refer to LT-63, " Combination Switch Inspection " .
Parking, license plate and tail lamps should oper-
ate.
Page 3687 of 4331
LT
N
O P
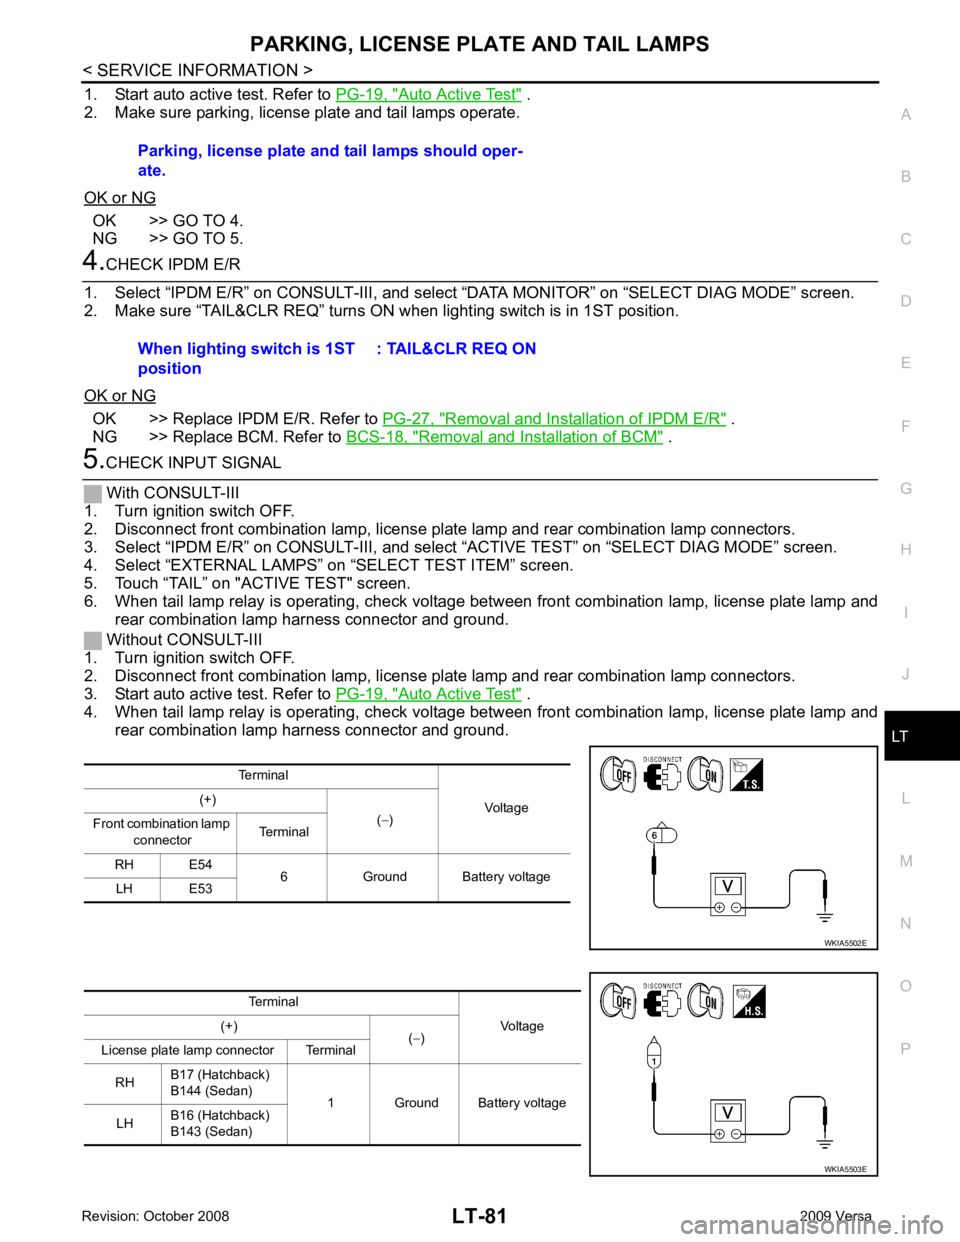
1. Start auto active test. Refer to
PG-19, " Auto Active Test " .
2. Make sure parking, license plate and tail lamps operate.
OK or NG OK >> GO TO 4.
NG >> GO TO 5. OK >> Replace IPDM E/R. Refer to
PG-27, " Removal and Installation of IPDM E/R " .
NG >> Replace BCM. Refer to BCS-18, " Removal and Installation of BCM " .
Auto Active Test " .
4. When tail lamp relay is operating, check voltage bet ween front combination lamp, license plate lamp and
rear combination lamp harness connector and ground. Parking, license plate and tail lamps should oper-
ate.
When lighting switch is 1ST
position : TAIL&CLR REQ ON
Terminal Voltage
(+)
(− )
Front combination lamp
connector Terminal
RH E54 6 Ground Battery voltage
LH E53
Page 3688 of 4331
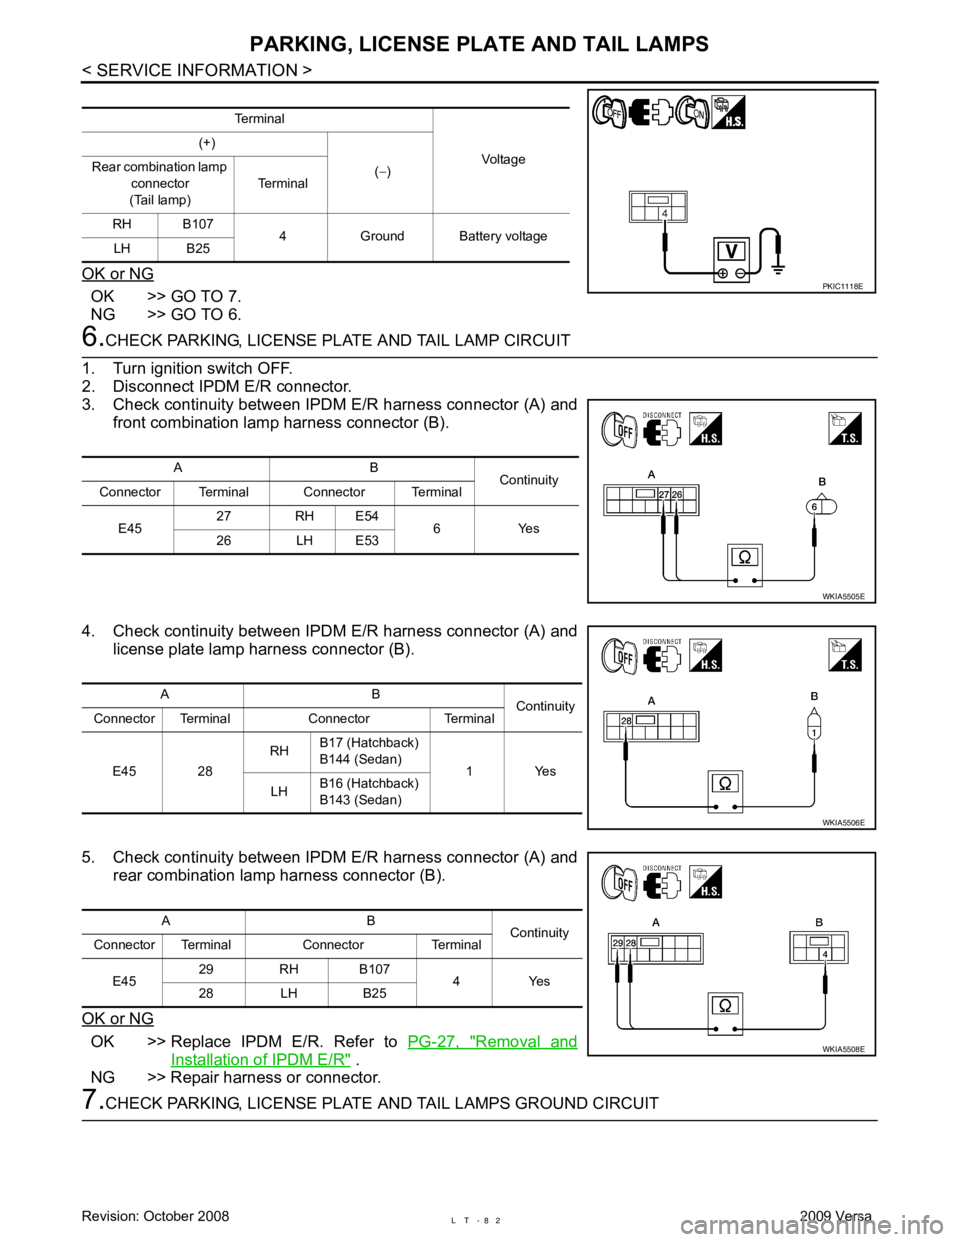
OK >> GO TO 7.
NG >> GO TO 6. OK >> Replace IPDM E/R. Refer to
PG-27, " Removal and
Installation of IPDM E/R " .
NG >> Repair harness or connector.
Page 3689 of 4331
LT
N
O P
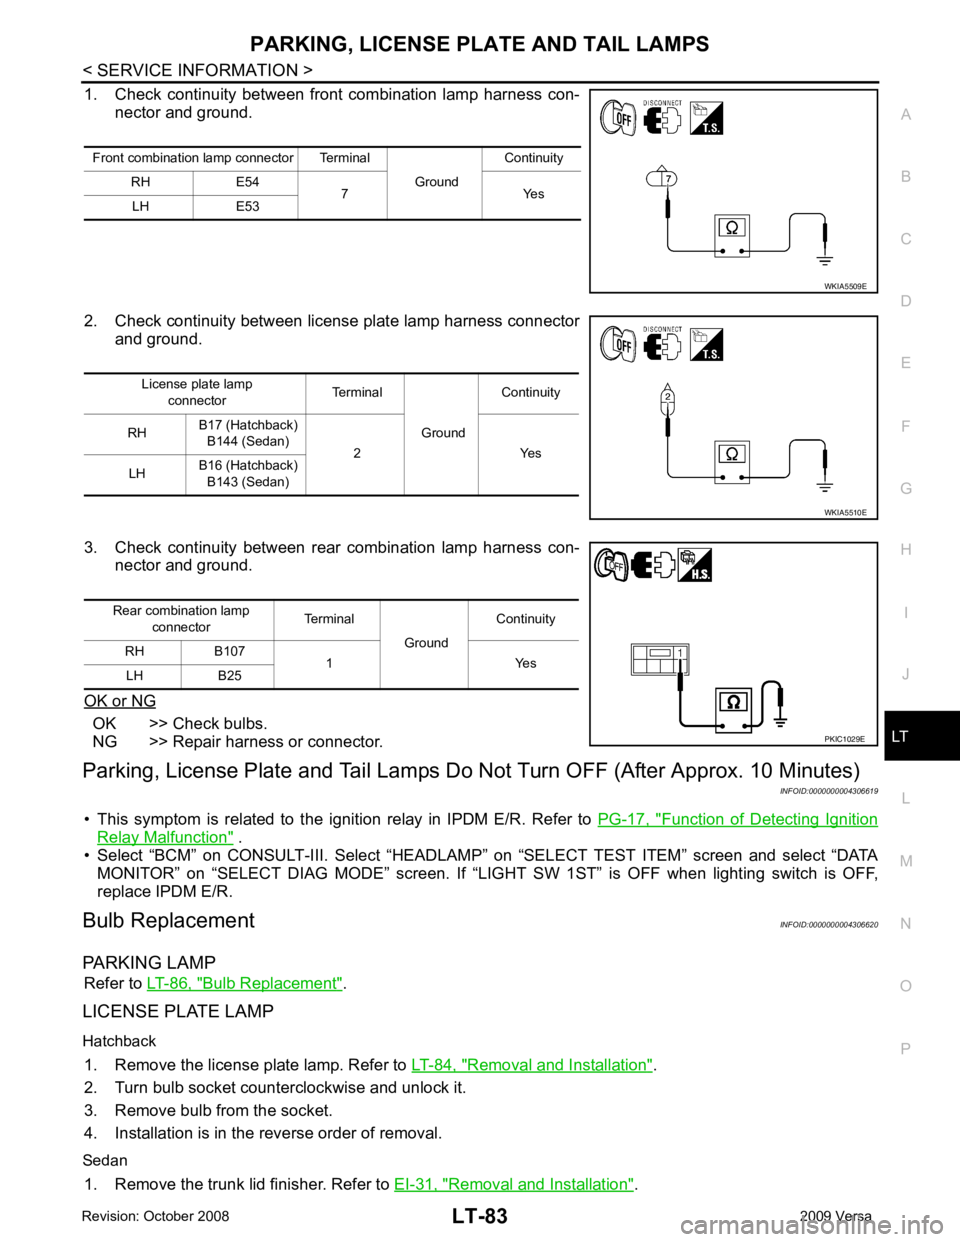
1. Check continuity between front
combination lamp harness con-
nector and ground.
2. Check continuity between license plate lamp harness connector and ground.
3. Check continuity between rear combination lamp harness con- nector and ground.
OK or NG OK >> Check bulbs.
NG >> Repair harness or connector.
Parking, License Plate and Tail Lamps Do Not Turn OFF (After Approx. 10 Minutes)
INFOID:0000000004306619
• This symptom is related to the ignition relay in IPDM E/R. Refer to PG-17, " Function of Detecting Ignition
Relay Malfunction " .
• Select “BCM” on CONSULT-III. Select “HEADLAM P” on “SELECT TEST ITEM” screen and select “DATA
MONITOR” on “SELECT DIAG MODE” sc reen. If “LIGHT SW 1ST” is OFF when lighting switch is OFF,
replace IPDM E/R.
Bulb Replacement INFOID:0000000004306620
PARKING LAMP Refer to LT-86, " Bulb Replacement " .
LICENSE PLATE LAMP
Hatchback 1. Remove the license plate lamp. Refer to LT-84, " Removal and Installation " .
2. Turn bulb socket counterclockwise and unlock it.
3. Remove bulb from the socket.
4. Installation is in the reverse order of removal.
Sedan 1. Remove the trunk lid finisher. Refer to EI-31, " Removal and Installation " .
Front combination lamp connector Terminal
GroundContinuity
RH E54 7 Yes
LH E53
Page 3690 of 4331
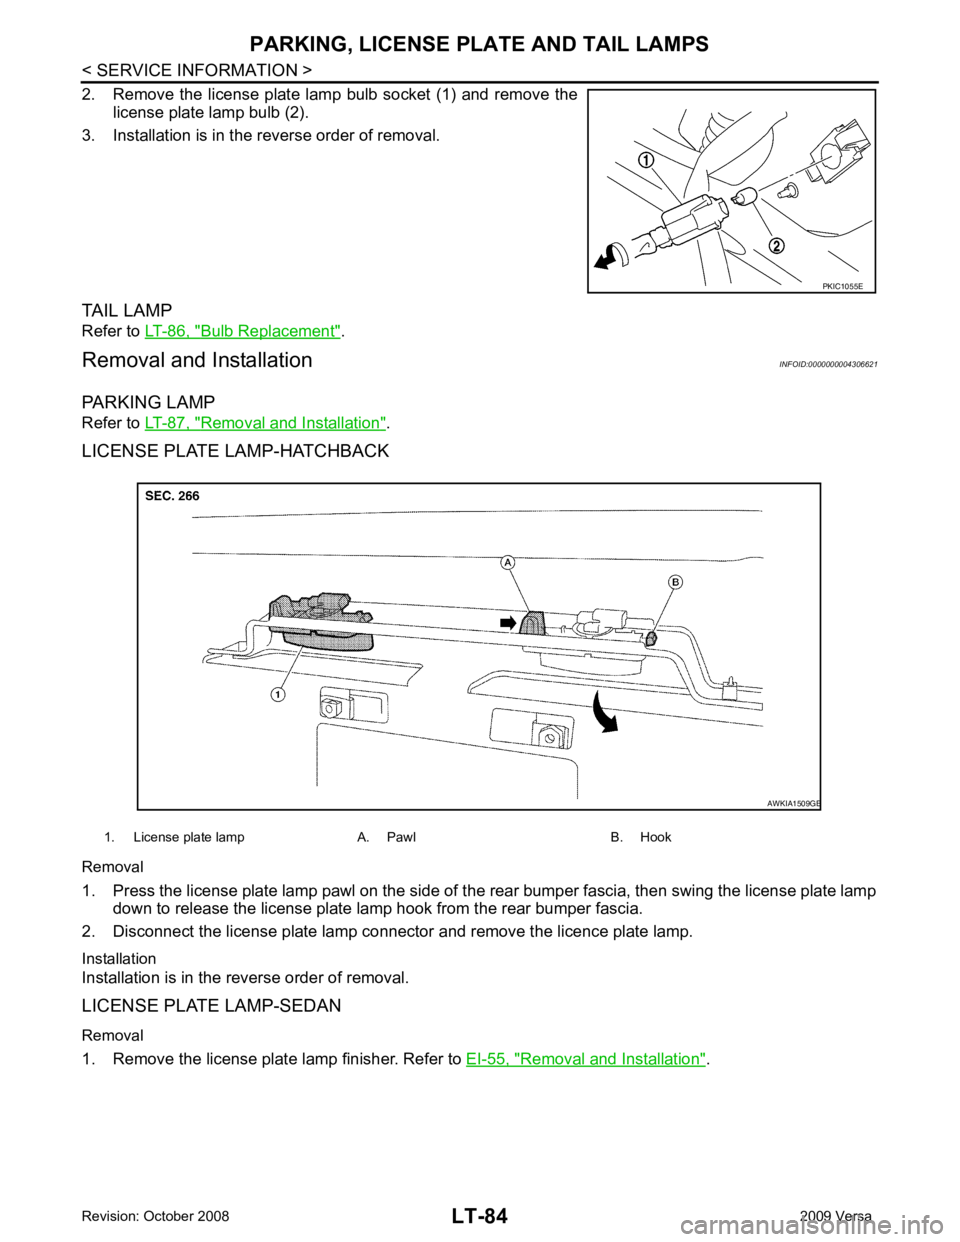
Bulb Replacement " .
Removal and Installation INFOID:0000000004306621
PARKING LAMP
Refer to LT-87, " Removal and Installation " .
LICENSE PLATE LAMP-HATCHBACK
Removal
1. Press the license plate lamp pawl on the side of t he rear bumper fascia, then swing the license plate lamp
down to release the license plate lamp hook from the rear bumper fascia.
2. Disconnect the license plate lamp connector and remove the licence plate lamp.
Installation
Installation is in the reverse order of removal.
LICENSE PLATE LAMP-SEDAN
Removal
1. Remove the license plate lamp finisher. Refer to EI-55, " Removal and Installation " .
Trending: engine control system, wiper blades, automatic transmission, Pressure switch, Tools location, turn signal bulb, oil additives
