NISSAN TIIDA 2009 Service Repair Manual
TIIDA 2009
NISSAN
NISSAN
https://www.carmanualsonline.info/img/5/57398/w960_57398-0.png
NISSAN TIIDA 2009 Service Repair Manual
Trending: drain bolt, coolant, jump start terminals, Battery type, schematic, ad blue, stop start
Page 4181 of 4331
Page 4182 of 4331
SE
N
O P
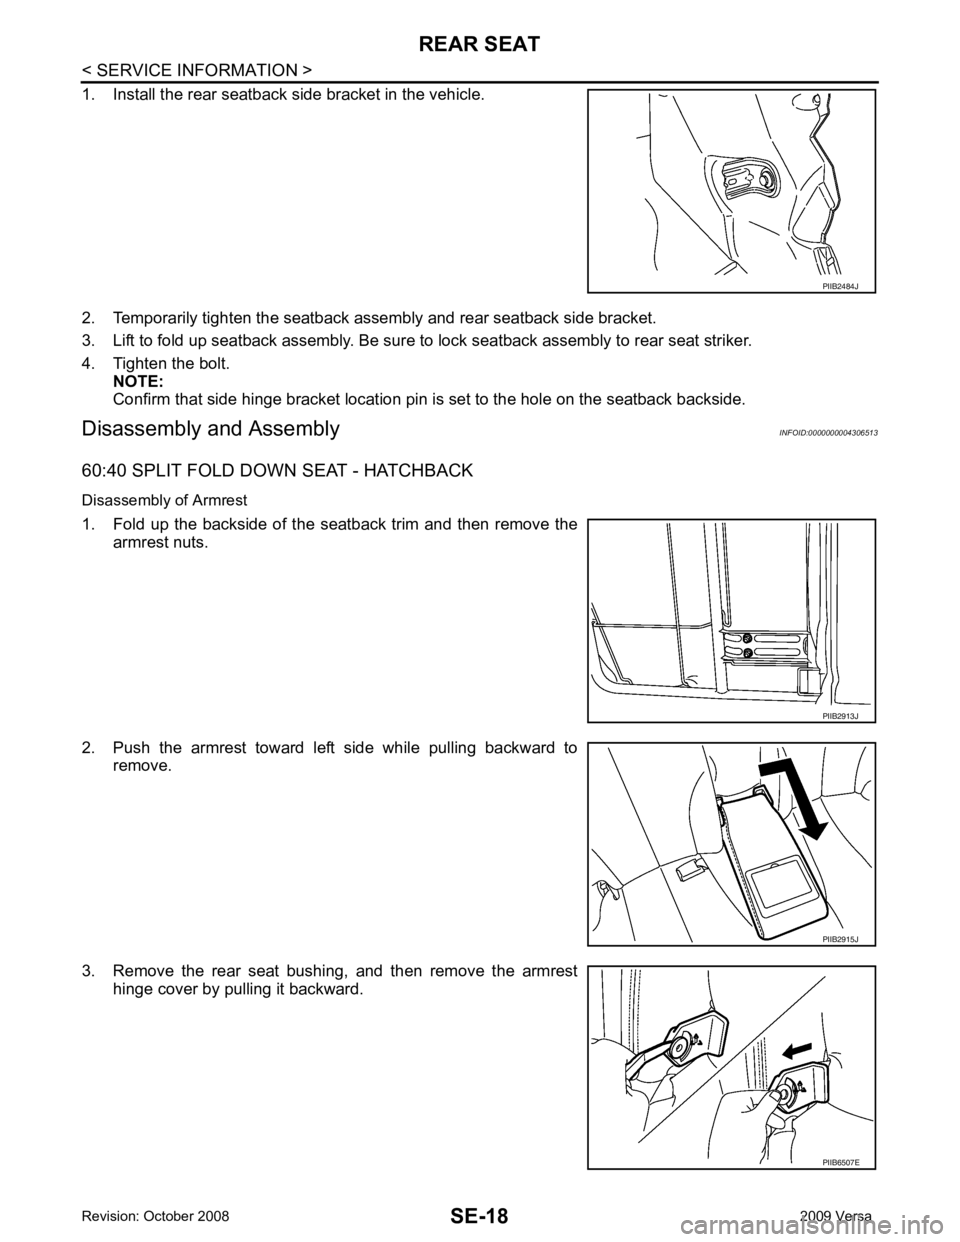
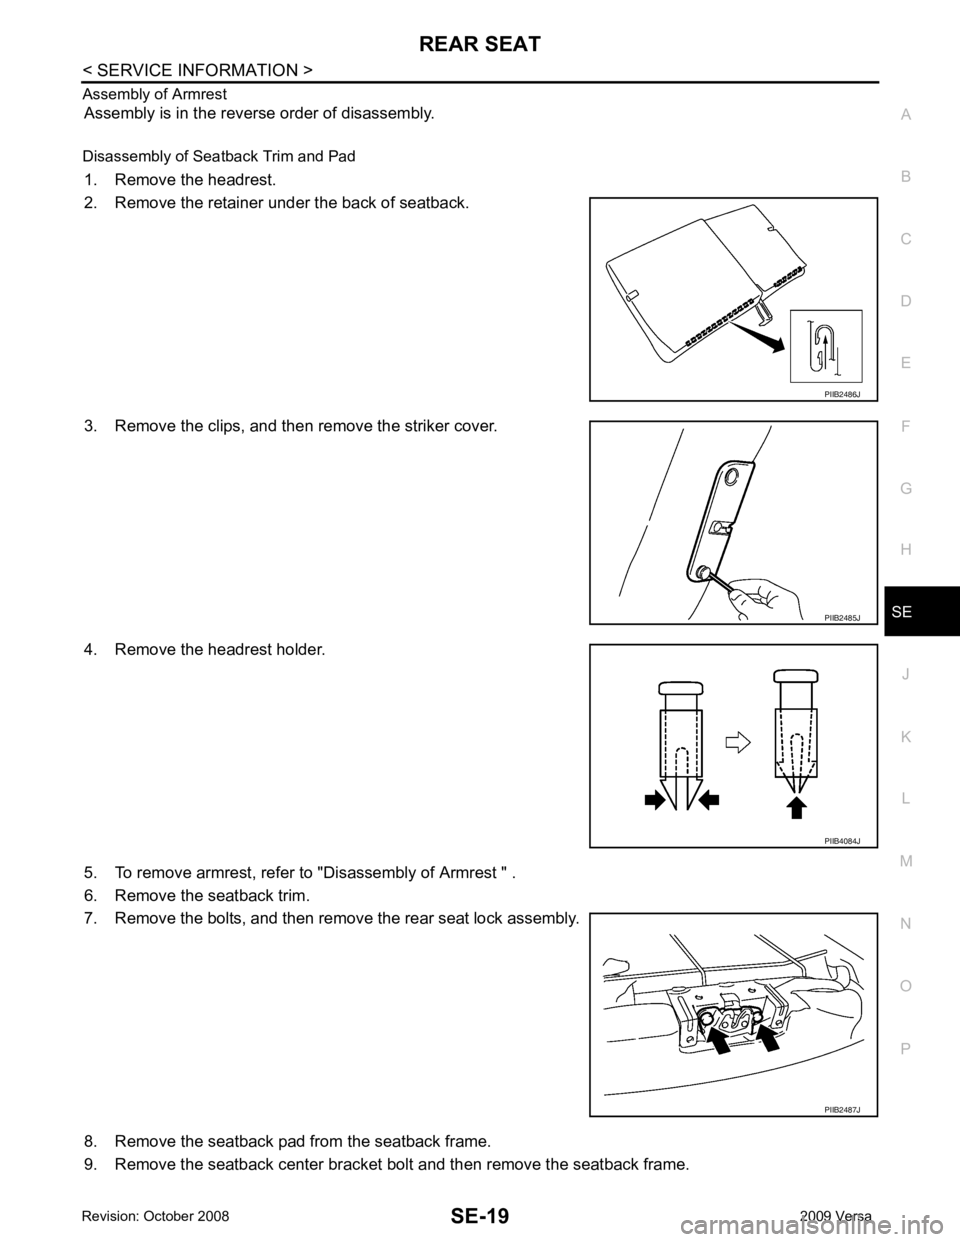
Assembly of Armrest
Assembly is in the reverse order of disassembly.
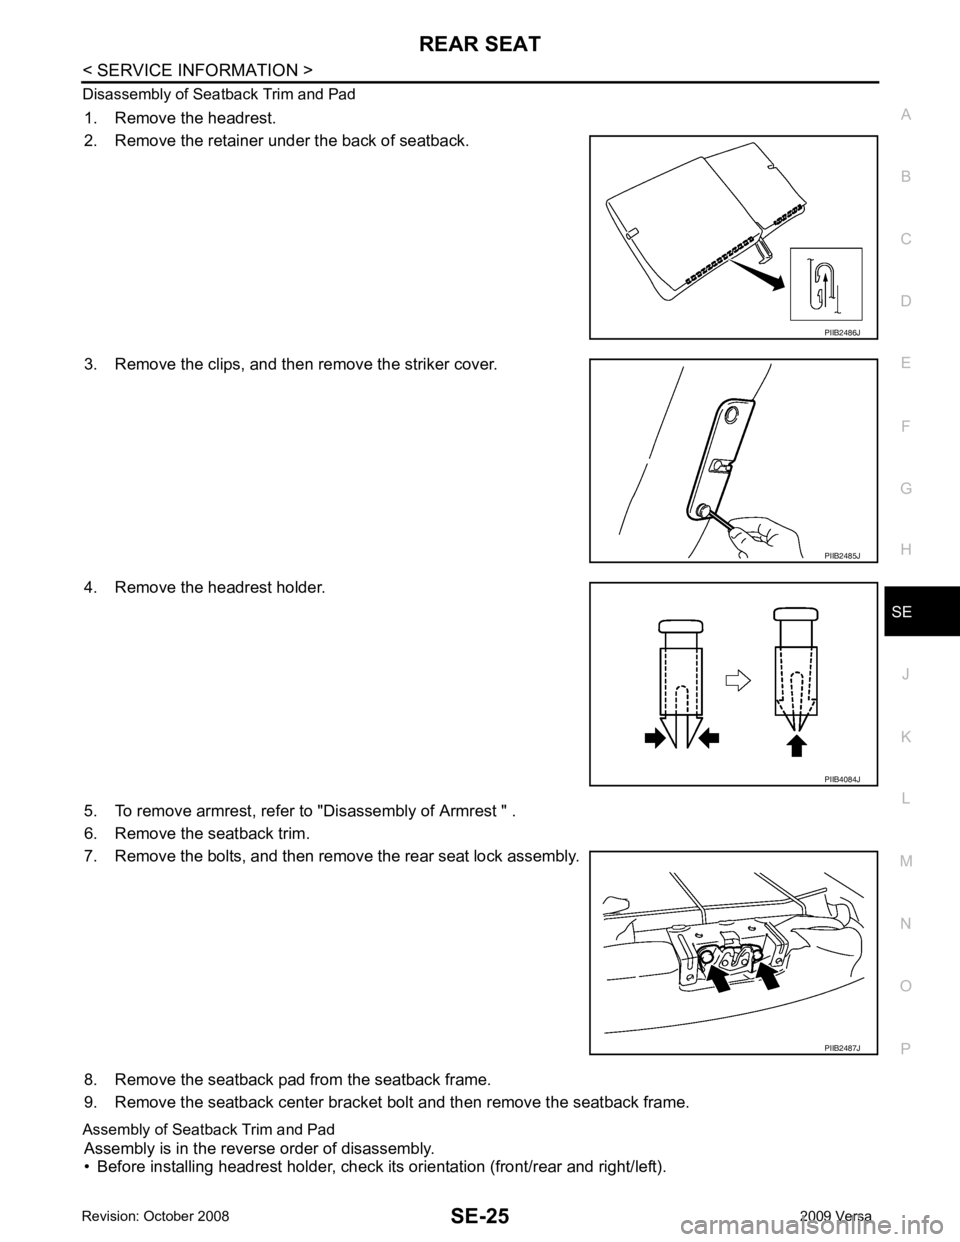
Disassembly of Seatback Trim and Pad 1. Remove the headrest.
2. Remove the retainer under the back of seatback.
3. Remove the clips, and then remove the striker cover.
4. Remove the headrest holder.
5. To remove armrest, refer to "Disassembly of Armrest " .
6. Remove the seatback trim.
7. Remove the bolts, and then remove the rear seat lock assembly.
8. Remove the seatback pad from the seatback frame.
9. Remove the seatback center bracket bolt and then remove the seatback frame. PIIB2485J
PIIB2487J
Page 4183 of 4331
Page 4184 of 4331
SE
N
O P
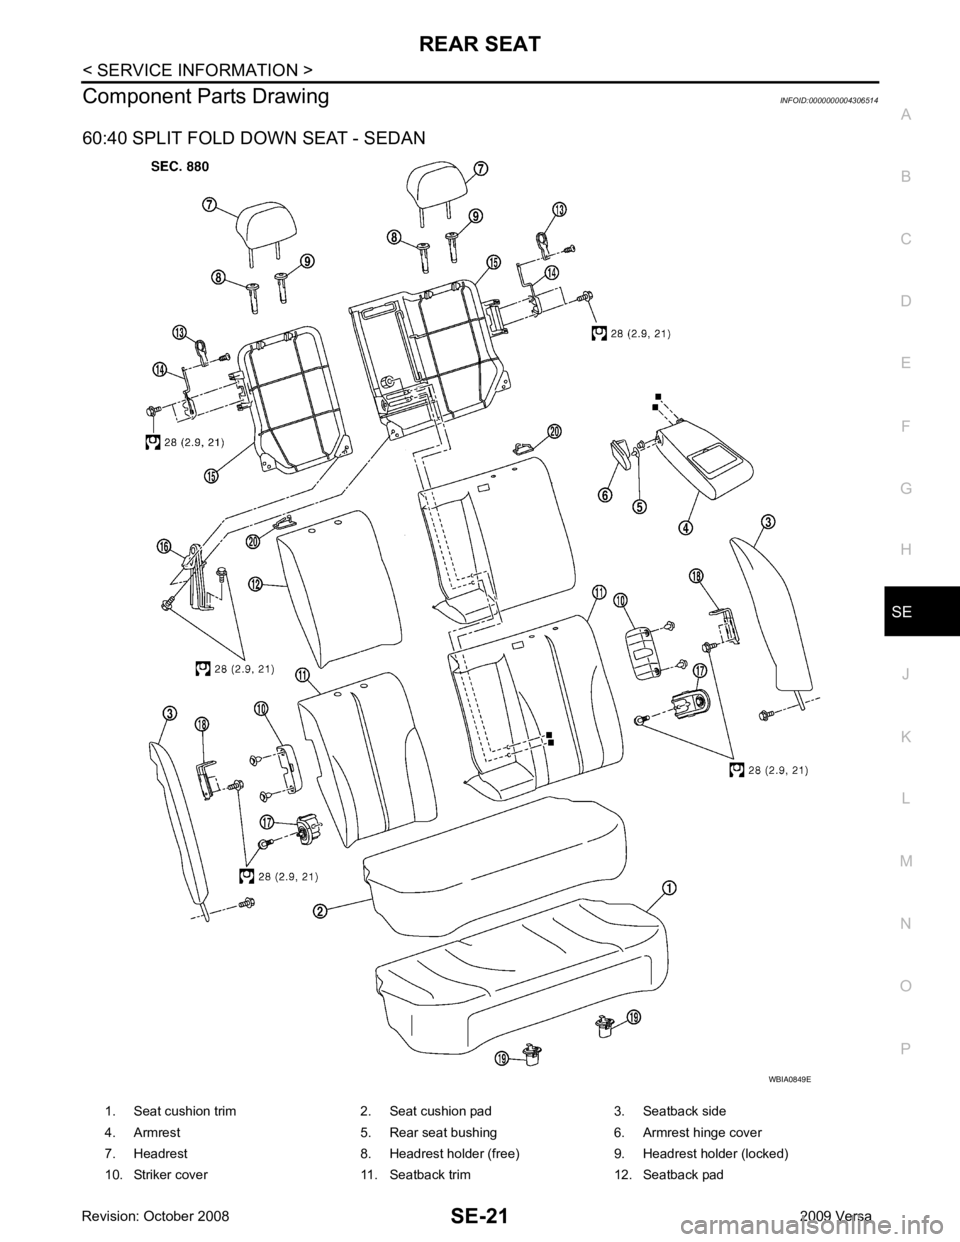
Component Parts Drawing
INFOID:0000000004306514
60:40 SPLIT FOLD DOWN SEAT - SEDAN
Page 4185 of 4331
SE-22< SERVICE INFORMATION >
REAR SEAT
Removal and Installation INFOID:0000000004306515
CAUTION:
When removing and in stalling, use shop cloths to protect parts from damage.
60:40 SPLIT FOLD DOWN SEAT - SEDAN
Removal
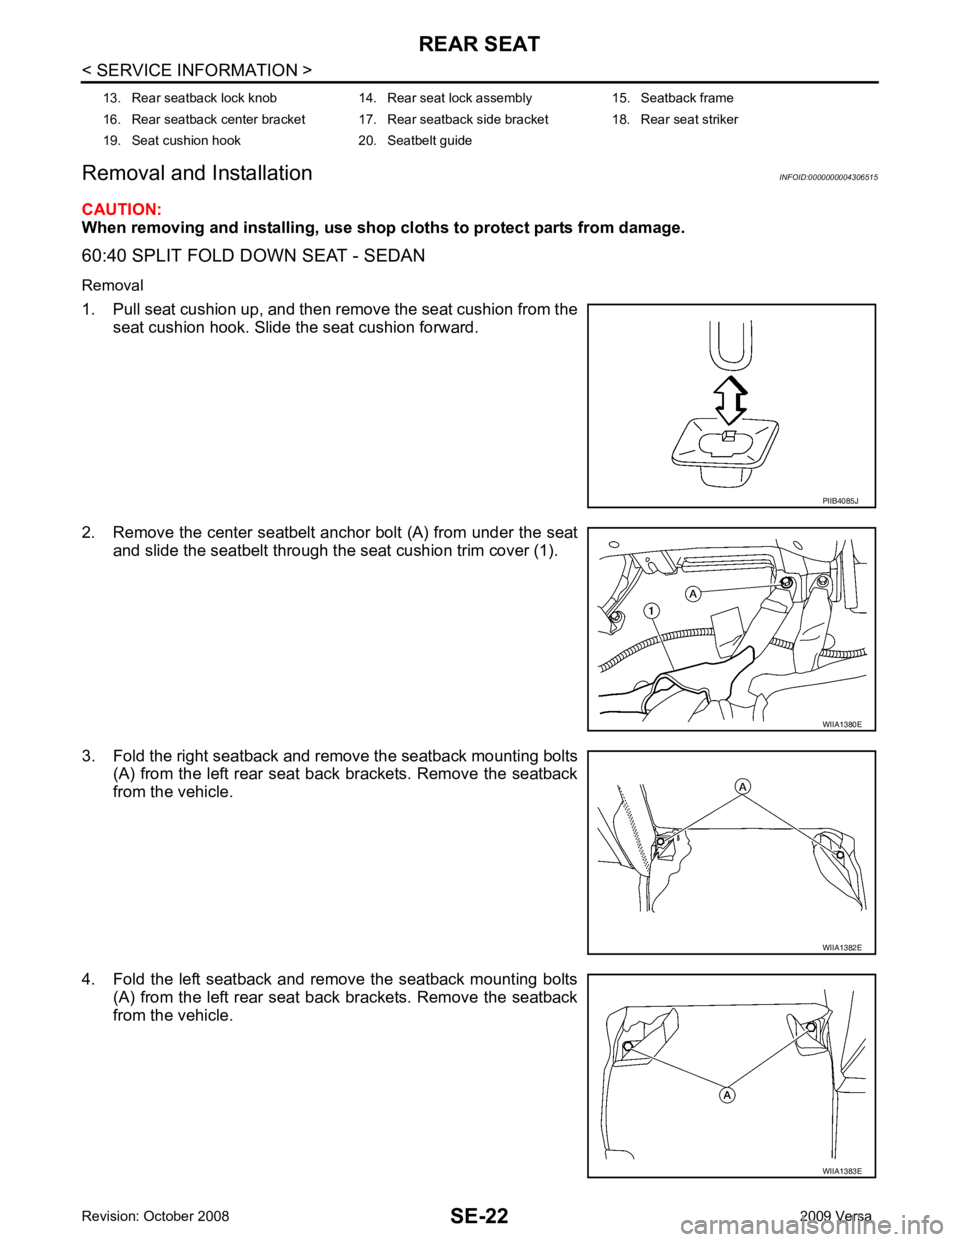
1. Pull seat cushion up, and then remove the seat cushion from the seat cushion hook. Slide the seat cushion forward.
2. Remove the center seatbelt anchor bolt (A) from under the seat and slide the seatbelt through the seat cushion trim cover (1).
3. Fold the right seatback and remove the seatback mounting bolts (A) from the left rear seat back brackets. Remove the seatback
from the vehicle.
4. Fold the left seatback and remove the seatback mounting bolts (A) from the left rear seat back brackets. Remove the seatback
from the vehicle.
13. Rear seatback lock knob 14. Rear seat lock assembly 15. Seatback frame
16. Rear seatback center bracket 17. Rear seatback side bracket 18. Rear seat striker
19. Seat cushion hook 20. Seatbelt guide PIIB4085J
WIIA1380E
WIIA1382E
WIIA1383E
Page 4186 of 4331
REAR SEAT
SE-23
< SERVICE INFORMATION >
C
D E
F
G H
J
K L
M A
B SE
N
O P
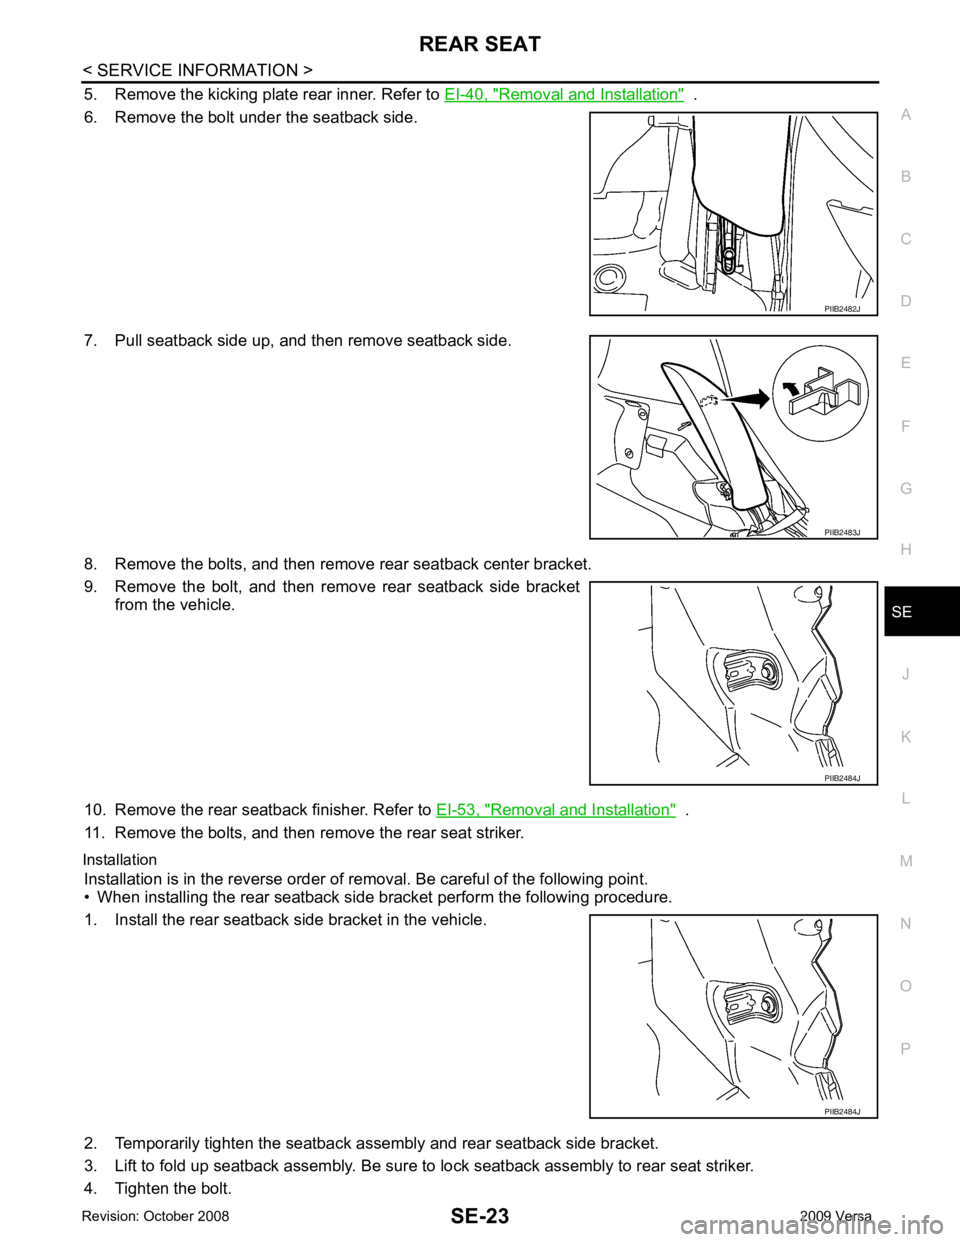
5. Remove the kicking plate rear inner. Refer to
EI-40, " Removal and Installation " .
6. Remove the bolt under the seatback side.
7. Pull seatback side up, and then remove seatback side.
8. Remove the bolts, and then remove rear seatback center bracket.
9. Remove the bolt, and then remove rear seatback side bracket from the vehicle.
10. Remove the rear seatback finisher. Refer to EI-53, " Removal and Installation " .
11. Remove the bolts, and then remove the rear seat striker.
Installation Installation is in the reverse order of removal. Be careful of the following point.
• When installing the rear seatback side bracket perform the following procedure.
1. Install the rear seatback side bracket in the vehicle.
2. Temporarily tighten the seatback asse mbly and rear seatback side bracket.
3. Lift to fold up seatback assembly. Be sure to lock seatback assembly to rear seat striker.
4. Tighten the bolt. PIIB2482J
PIIB2483J
PIIB2484J
PIIB2484J
Page 4187 of 4331
SE-24< SERVICE INFORMATION >
REAR SEAT
NOTE:
Confirm that side hinge bracket location pin is set to the hole on the seatback backside.
Disassembly and Assembly INFOID:0000000004306516
60:40 SPLIT FOLD DOWN SEAT - SEDAN
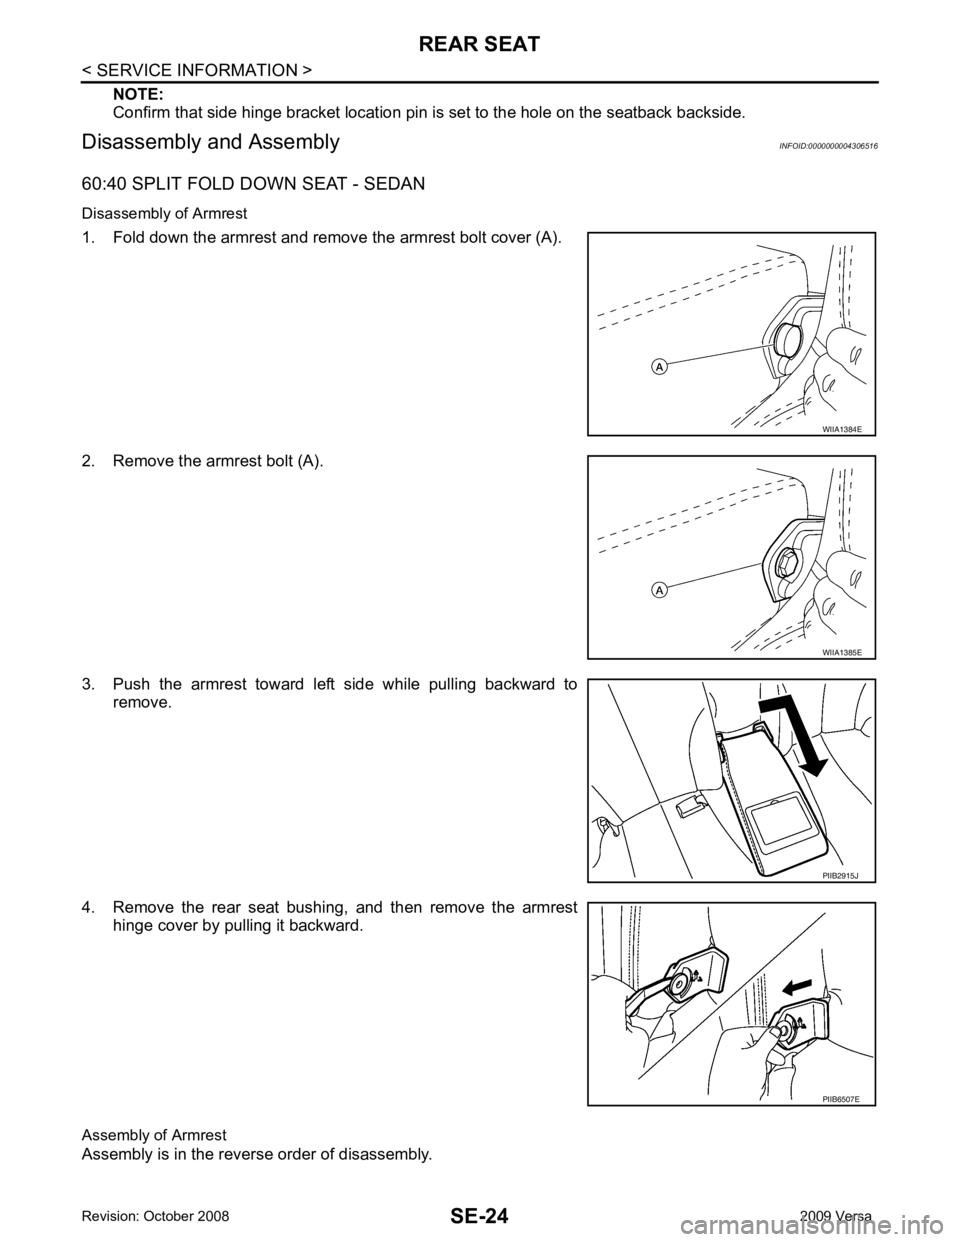
Disassembly of Armrest
1. Fold down the armrest and remove the armrest bolt cover (A).
2. Remove the armrest bolt (A).
3. Push the armrest toward left side while pulling backward to remove.
4. Remove the rear seat bushing, and then remove the armrest hinge cover by pulling it backward.
Assembly of Armrest
Assembly is in the reverse order of disassembly. WIIA1384E
WIIA1385E
PIIB2915J
PIIB6507E
Page 4188 of 4331
REAR SEAT
SE-25
< SERVICE INFORMATION >
C
D E
F
G H
J
K L
M A
B SE
N
O P
Disassembly of Seatback Trim and Pad
1. Remove the headrest.
2. Remove the retainer under the back of seatback.
3. Remove the clips, and then remove the striker cover.
4. Remove the headrest holder.
5. To remove armrest, refer to "Disassembly of Armrest " .
6. Remove the seatback trim.
7. Remove the bolts, and then remove the rear seat lock assembly.
8. Remove the seatback pad from the seatback frame.
9. Remove the seatback center bracket bolt and then remove the seatback frame.
Assembly of Seatback Trim and Pad Assembly is in the reverse order of disassembly.
• Before installing headrest holder, check its orientation (front/rear and right/left). PIIB2486J
PIIB2485J
PIIB4084J
PIIB2487J
Page 4189 of 4331
SE-26< SERVICE INFORMATION >
REAR SEAT
Disassembly of Seat Cushion Trim and Pad
Remove the rings to separate the trim and pad.
Assembly of Seat Cushion Trim and Pad
Assembly is in the reverse order of disassembly.
Removal and Installation INFOID:0000000004306517
CAUTION:
When removing and in stalling, use shop cloths to protect parts from damage.
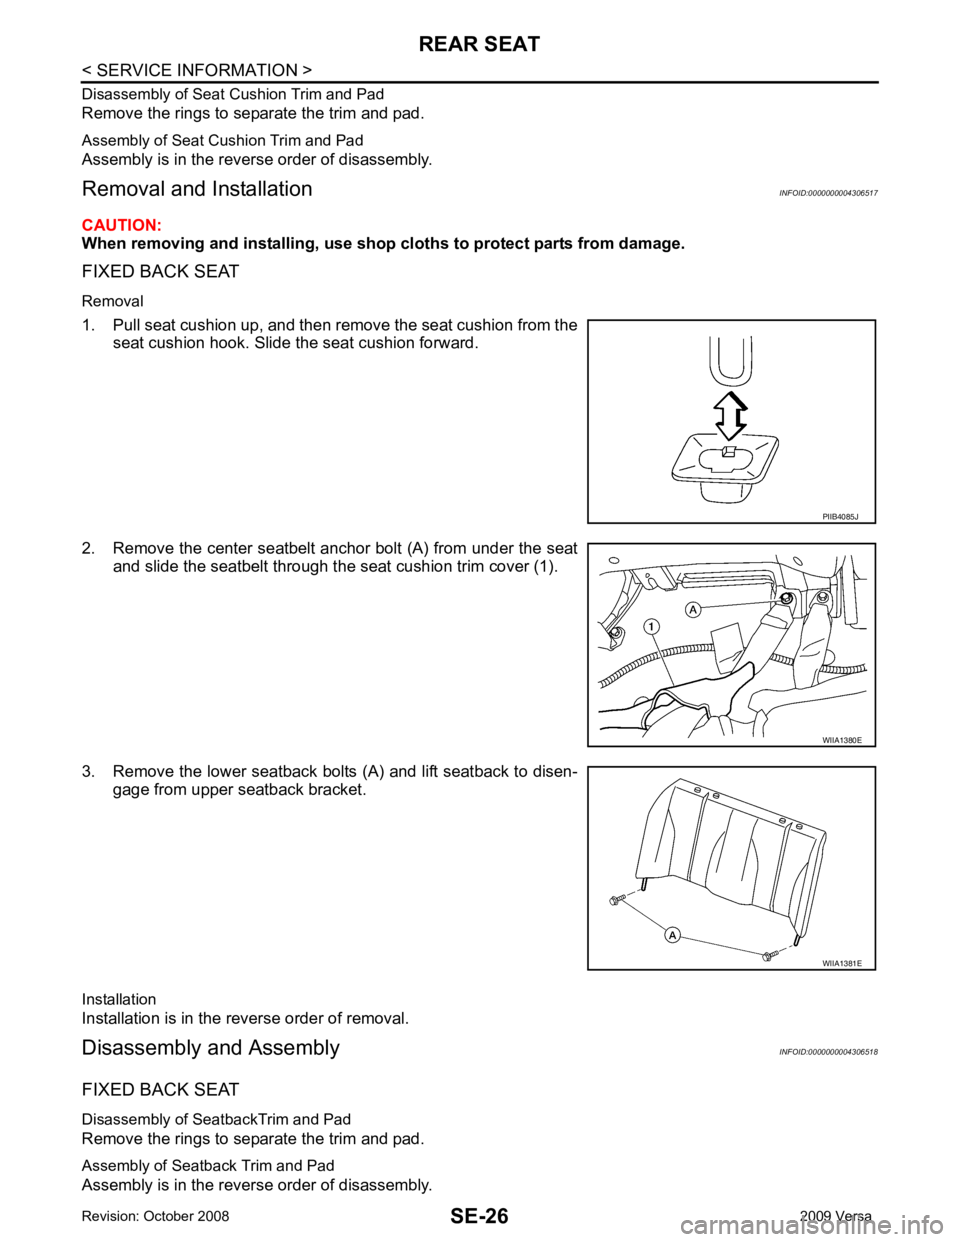
FIXED BACK SEAT
Removal
1. Pull seat cushion up, and then remove the seat cushion from the seat cushion hook. Slide the seat cushion forward.
2. Remove the center seatbelt anchor bolt (A) from under the seat and slide the seatbelt through the seat cushion trim cover (1).
3. Remove the lower seatback bolts (A) and lift seatback to disen- gage from upper seatback bracket.
Installation
Installation is in the reverse order of removal.
Disassembly and Assembly INFOID:0000000004306518
FIXED BACK SEAT
Disassembly of SeatbackTrim and Pad
Remove the rings to separate the trim and pad.
Assembly of Seatback Trim and Pad
Assembly is in the reverse order of disassembly. PIIB4085J
WIIA1380E
WIIA1381E
Page 4190 of 4331
SE
N
O P
Disassembly of Seat Cushion Trim and Pad
Remove the rings to separate the trim and pad.
Assembly of Seat Cushion Trim and Pad Assembly is in the reverse order of disassembly.
Trending: radiator cap, bumper, Fuel pump relay, Cruise control, CD player, battery capacity, engine control unit
