torque NISSAN TIIDA 2009 Service Manual PDF
[x] Cancel search | Manufacturer: NISSAN, Model Year: 2009, Model line: TIIDA, Model: NISSAN TIIDA 2009Pages: 4331, PDF Size: 58.04 MB
Page 374 of 4331
AT
N
O P
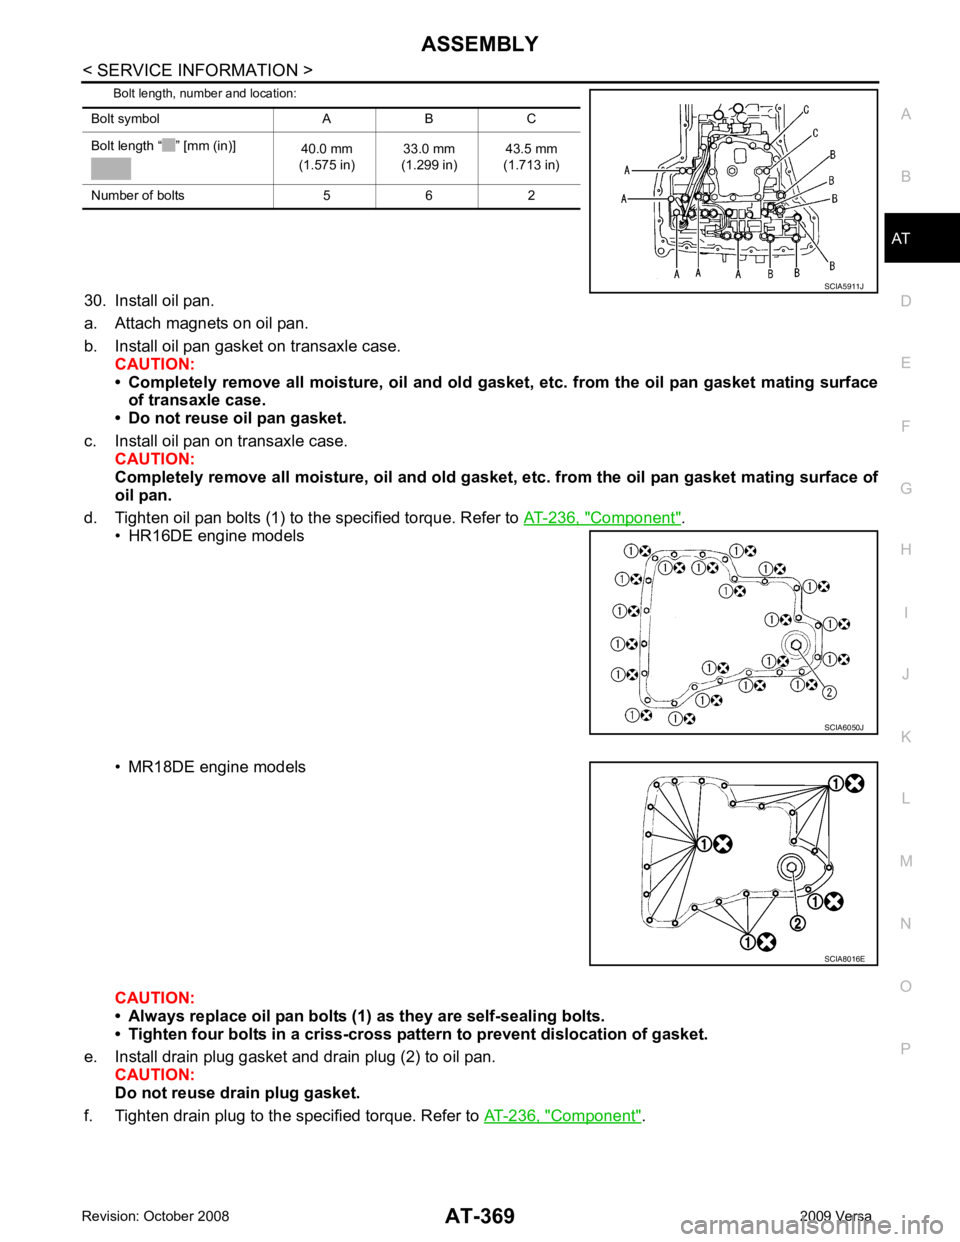
Bolt length, number and location:
30. Install oil pan.
a. Attach magnets on oil pan.
b. Install oil pan gasket on transaxle case. CAUTION:
• Completely remove all moisture, oil and old gasket , etc. from the oil pan gasket mating surface
of transaxle case.
• Do not reuse oil pan gasket.
c. Install oil pan on transaxle case. CAUTION:
Completely remove all moisture, oil and old gasket , etc. from the oil pan gasket mating surface of
oil pan.
d. Tighten oil pan bolts (1) to the specified torque. Refer to AT-236, " Component " .
• HR16DE engine models
• MR18DE engine models
CAUTION:
• Always replace oil pan bolts (1) as they are self-sealing bolts.
• Tighten four bolts in a criss-cross pattern to prevent dislocation of gasket.
e. Install drain plug gasket and drain plug (2) to oil pan. CAUTION:
Do not reuse drain plug gasket.
f. Tighten drain plug to the specified torque. Refer to AT-236, " Component " .
Bolt symbol A B C
Bolt length “ ” [mm (in)] 40.0 mm
(1.575 in) 33.0 mm
(1.299 in) 43.5 mm
(1.713 in)
Number of bolts 5 6 2 SCIA6050J
Page 375 of 4331
AT-370< SERVICE INFORMATION >
ASSEMBLY
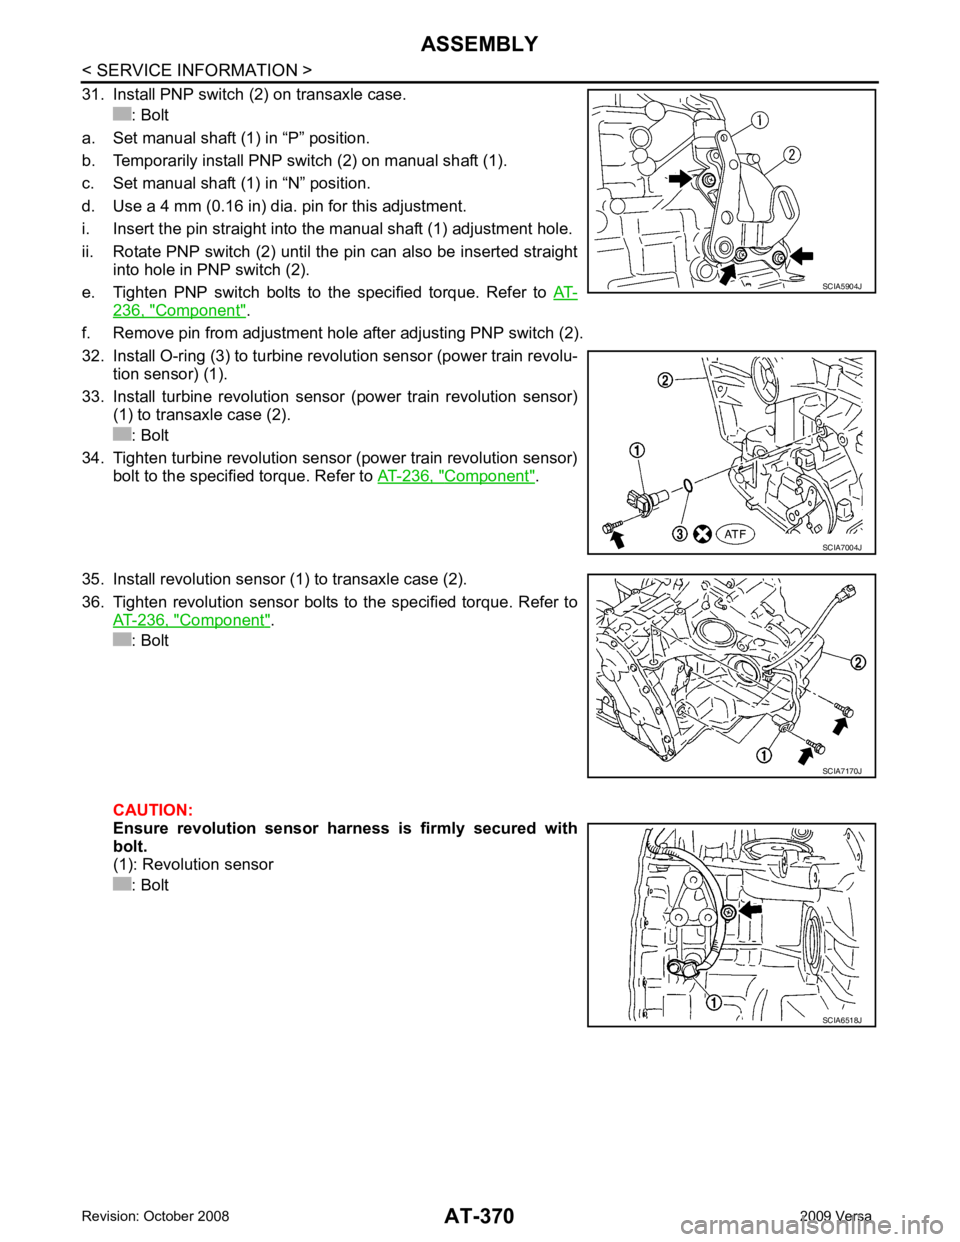
31. Install PNP switch (2) on transaxle case. : Bolt
a. Set manual shaft (1) in “P” position.
b. Temporarily install PNP switch (2) on manual shaft (1).
c. Set manual shaft (1) in “N” position.
d. Use a 4 mm (0.16 in) dia. pin for this adjustment.
i. Insert the pin straight into the manual shaft (1) adjustment hole.
ii. Rotate PNP switch (2) until the pin can also be inserted straight into hole in PNP switch (2).
e. Tighten PNP switch bolts to the specified torque. Refer to AT-236, " Component " .
f. Remove pin from adjustment hole after adjusting PNP switch (2).
32. Install O-ring (3) to turbine revolution sensor (power train revolu- tion sensor) (1).
33. Install turbine revolution sensor (power train revolution sensor) (1) to transaxle case (2).
: Bolt
34. Tighten turbine revolution sensor (power train revolution sensor) bolt to the specified torque. Refer to AT-236, " Component " .
35. Install revolution sensor (1) to transaxle case (2).
36. Tighten revolution sensor bolts to the specified torque. Refer to AT-236, " Component " .
: Bolt
CAUTION:
Ensure revolution sensor harness is firmly secured with
bolt.
(1): Revolution sensor
: Bolt SCIA5904J
SCIA7004J
SCIA7170J
SCIA6518J
Page 376 of 4331
AT
N
O P
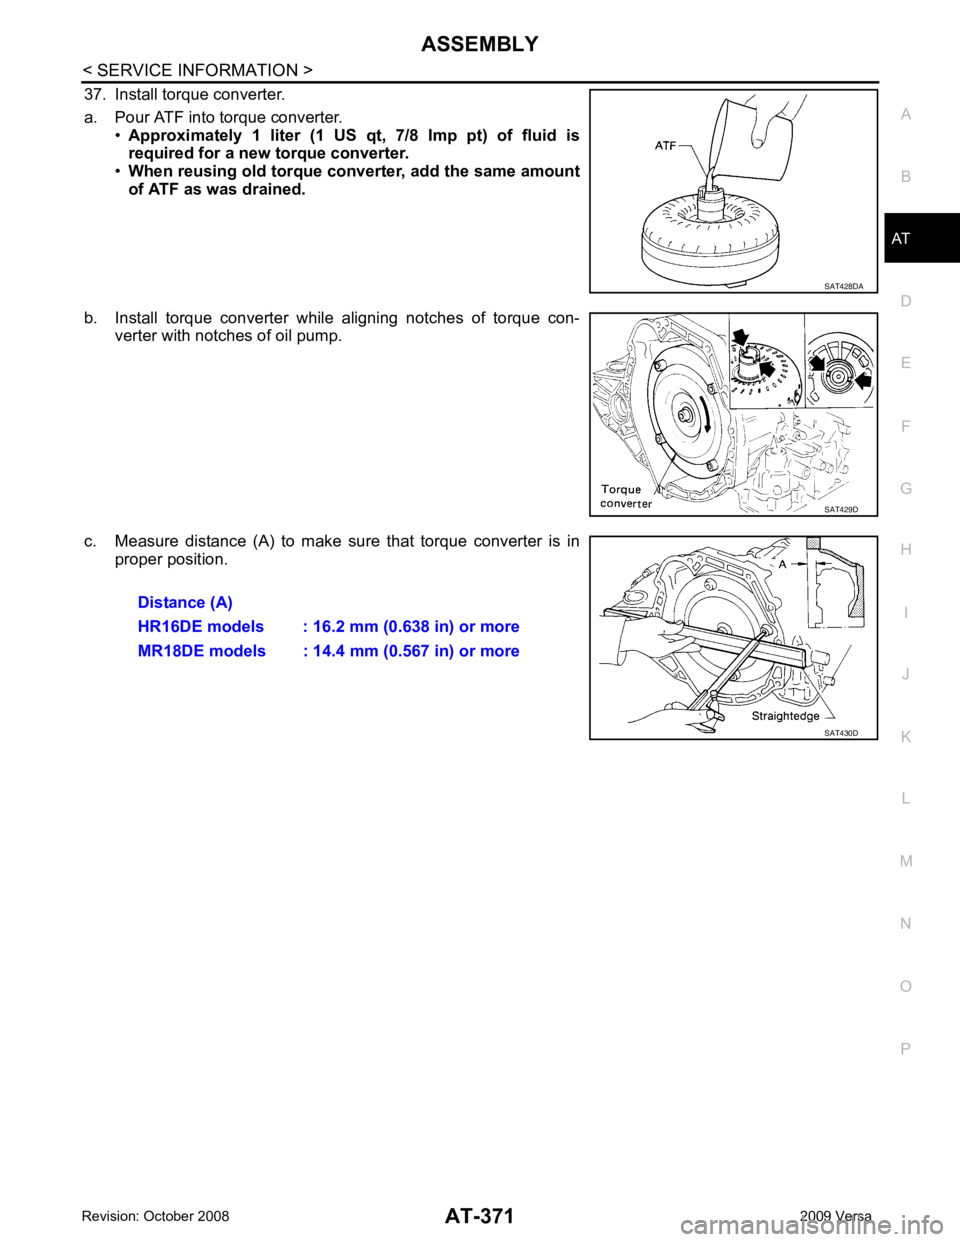
37. Install torque converter.
a. Pour ATF into torque converter. •Approximately 1 liter (1 US qt, 7/8 Imp pt) of fluid is
required for a new torque converter.
• When reusing old torque co nverter, add the same amount
of ATF as was drained.
b. Install torque converter while aligning notches of torque con- verter with notches of oil pump.
c. Measure distance (A) to make sure that torque converter is in proper position. SAT429D
Page 380 of 4331

AT
N
O P
Unit: mm (in)
Accumulator INFOID:0000000004305540
RETURN SPRINGS Unit: mm (in)
Unit: mm (in)
O-RINGS Unit: mm (in)
Clutches and Brakes INFOID:0000000004807940
REVERSE CLUTCH Location spring designation Free length (l) Outer diameter (D)
Upper body L14 Pilot valve spring 38.98 (1.5346) 8.9 (0.350)
L15 1–2 accumulator valve spring 20.5 (0.807) 6.95 (0.2736)
1–2 accumulator piston spring 55.66 (2.1913) 19.5 (0.768)
L16 1st reducing valve spring 27.0 (1.063) 7.0 (0.276)
L17 3–2 timing valve spring 23.0 (0.906) 6.65 (0.2618)
L18 Overrun clutch reducing valve spring 37.5 (1.476) 7.0 (0.276)
L19 Torque converter relief valve spring 33.3 (1.311) 9.0 (0.354)
L20 Torque converter clutch control valve spring 53.01 (2.0870) 6.5 (0.256)
L21 Cooler check valve spring 28.04 (1.1039) 7.15 (0.2815)
Lower body L3 Pressure regulator valve sp
ring 45.0 (1.772) 15.0 (0.591)
L4 Overrun clutch control valve spring 21.7 (0.854) 7.0 (0.276)
L5 Accumulator control valve spring 22.0 (0.866) 6.5 (0.256)
L6 Shift valve A spring 21.7 (0.854) 7.0 (0.276)
L7 Shuttle valve spring 51.0 (2.008) 5.65 (0.2224)
L12 Shift valve B spring 21.7 (0.854) 7.0 (0.276)
L13 Pressure modifier valve spring 32.0 (1.260) 6.9 (0.272)
Pressure modifier piston spring 30.5 (1.201) 9.8 (0.386)
— Line pressure relief valve spring 17.02 (0.6701) 8.0 (0.315)
— Torque converter pressure holding spring 9.0 (0.354) 7.3 (0.287) Location Free length (L
1)
Servo release accumulator 62.8 (2.472) Location Length (L
2)
N-D accumulator 46.5 (1.831)Location Inner diameter (Small) Inner diameter (Large)
Servo release accumulator 26.9 (1.059) 44.2 (1.740)
N-D accumulator 34.6 (1.362) 39.4 (1.551) Number of drive plates
2
Number of driven plates 2
Drive plate thickness [mm (in)] Standard 2.0 (0.079)
Allowable limit 1.8 (0.071)
Driven plate thickness [mm (in)] Standard 2.0 (0.079)
Clearance [mm (in)] Standard 0.5 - 0.8 (0.020 - 0.031)
Allowable limit 1.2 (0.047)
Page 381 of 4331
![NISSAN TIIDA 2009 Service Manual PDF Number of drive plates
5
Number of driven plates 5
Drive plate thickness [mm (in)] Standard 1.8 (0.071)
Allowable limit 1.6 (0.063)
Driven plate thickness [mm (in)] Standard 2.0 (0.079)
Clearance [mm NISSAN TIIDA 2009 Service Manual PDF Number of drive plates
5
Number of driven plates 5
Drive plate thickness [mm (in)] Standard 1.8 (0.071)
Allowable limit 1.6 (0.063)
Driven plate thickness [mm (in)] Standard 2.0 (0.079)
Clearance [mm](/img/5/57398/w960_57398-380.png)
Number of drive plates
5
Number of driven plates 5
Drive plate thickness [mm (in)] Standard 1.8 (0.071)
Allowable limit 1.6 (0.063)
Driven plate thickness [mm (in)] Standard 2.0 (0.079)
Clearance [mm (in)] Standard 0.45 - 0.85 (0.0177 - 0.0335)
Allowable limit 1.85 (0.0728) Number of drive plates
3
Number of driven plates 4
Drive plate thickness [mm (in)] Standard 1.6 (0.063)
Allowable limit 1.4 (0.055)
Driven plate thickness [mm (in)] Standard 2.0 (0.079)
Clearance [mm (in)] Standard 1.0 - 1.4 (0.039 - 0.055)
Allowable limit 2.0 (0.079) Applied model HR16DE engine MR18DE engine
Number of drive plates 4 5
Number of driven plates 4 5
Drive plate thickness [mm
(in)] Standard 2.0 (0.079) 2.0 (0.079)
Allowable limit 1.8 (0.071) 1.8 (0.071)
Driven plate thickness [mm
(in)] Standard 2.0 (0.079) 2.0 (0.079)
Clearance [mm (in)] Standard 1.4 - 1.8 (0.055 - 0.071) 1.4 - 1.8 (0.055 - 0.071)
Allowable limit 2.6 (0.102) 2.8 (0.110) Anchor end pin tightening torque [N·m (kg-m, in-lb)] 4.9 (0.50, 43)
Number of returning revolutions for anchor end pin 2.5
Lock nut tightening torque [N·m (kg-m, ft-lb)] 33.9 (3.5, 25)
Page 382 of 4331

AT
N
O P
Final Drive
INFOID:0000000004807941
DIFFERENTIAL SIDE GEAR CLEARANCE
DIFFERENTIAL SIDE BEARING END PL AY (FOR HR16DE ENGINE MODELS)
BEARING PRELOAD (FOR MR18DE ENGINE MODELS)
TURNING TORQUE (FOR MR18DE ENGINE MODELS)
Planetary Carrier INFOID:0000000004305543
Oil Pump INFOID:0000000004305544
Input Shaft INFOID:0000000004305545
SEAL RING CLEARANCE
SEAL RING Unit: mm (in)
Reduction Pinion Gear INFOID:0000000004305546
TURNING TORQUE
Band Servo INFOID:0000000004305547
RETURN SPRINGS Clearance between side gear and differential case with washer [mm (in)] 0.1 - 0.2 (0.004 - 0.008) Differential side bearing end play mm (in) 0 - 0.15 (0 - 0.0059)
Differential side bearing preload mm (in) 0.05 - 0.09 (0.0020 - 0.0035)
Turning torque of final drive assembly N-m (kg-cm, in-lb) 0.68 - 1.26 (7.0 - 13.0, 6.0 - 11.0)
Clearance between planetary carrier and pinion washer [mm (in)]
Standard 0.15 - 0.70 (0.0059 - 0.0276)
Allowable limit 0.80 (0.0315) Oil pump side clearance
0.02 - 0.04 (0.0008 - 0.0016)
Clearance between oil pump housing and outer gear [mm (in)] Standard 0.08 - 0.15 (0.0031 - 0.0059)
Allowable limit 0.15 (0.0059)
Oil pump cover seal ring clearance [mm (in)] Standard 0.10 - 0.25 (0.0039 - 0.0098)
Allowable limit 0.25 (0.0098) Input shaft seal ring clearance [mm (in)]
Standard 0.08 - 0.23 (0.0031 - 0.0091)
Allowable limit 0.23 (0.091) Outer diameter Inner diameter Width
24 (0.94) 20.4 (0.803) 1.97 (0.0776) Turning torque of reduction pinion gear [N·m (kg-m, in-lb)] 0.11 - 0.69 (0.01 - 0.07, 1 - 6)
Page 383 of 4331
![NISSAN TIIDA 2009 Service Manual PDF Output shaft seal ring clearance [mm (in)]
Standard 0.10 - 0.25 (0.0039 - 0.0098)
Allowable limit 0.25 (0.0098) Outer diameter Inner diameter Width
29.5 (1.161) 26.2 (1.031) 1.95 (0.0768) Turning torq NISSAN TIIDA 2009 Service Manual PDF Output shaft seal ring clearance [mm (in)]
Standard 0.10 - 0.25 (0.0039 - 0.0098)
Allowable limit 0.25 (0.0098) Outer diameter Inner diameter Width
29.5 (1.161) 26.2 (1.031) 1.95 (0.0768) Turning torq](/img/5/57398/w960_57398-382.png)
Output shaft seal ring clearance [mm (in)]
Standard 0.10 - 0.25 (0.0039 - 0.0098)
Allowable limit 0.25 (0.0098) Outer diameter Inner diameter Width
29.5 (1.161) 26.2 (1.031) 1.95 (0.0768) Turning torque of output shaft ·m (kg-m, in-lb) 0.25 - 0.88 (0.03 - 0.08, 3 - 7)
Output shaft end play mm (in) 0 - 0.5 (0 - 0.020)
Bearing retainer seal ring clearance [mm (in)]
Standard 0.10 - 0.27 (0.0039 - 0.0106)
Allowable limit 0.27 (0.0106) Total end play [mm (in)] 0.25 - 0.55 (0.0098 - 0.0217)
Reverse clutch end play [mm (in)] 0.65 - 1.0 (0.0256 - 0.039)
Engine
HR16DE MR18DE
Distance between end of converter housing and torque converter [mm (in)] 16.2 (0.638) 14.4 (0.567) Gear position 1 2 3 4
Shift solenoid valve A ON (Closed) OFF (Open) OFF (Open) ON (Closed)
Shift solenoid valve B ON (Closed) ON (Closed) OFF (Open) OFF (Open)
Page 384 of 4331

AT
N
O P
Solenoid Valves
INFOID:0000000004305554
A/T Fluid Temperature Sensor INFOID:0000000004305555
Remarks: Specification data are reference values.
Revolution Sensor INFOID:0000000004305556
Dropping Resistor INFOID:0000000004305557
Turbine Revolution Sensor (Power Train Revolution Sensor) INFOID:0000000004305558
Solenoid valve designation Resistance (Approx.) Terminal
Shift solenoid valve A 20 - 30 Ω2
Shift solenoid valve B 5 - 20 Ω1
Overrun clutch solenoid valve 20 - 30 Ω3
Line pressure solenoid valve 2.5 - 5.0 Ω4
Torque converter clutch solenoid valve 5 - 20 Ω5Condition Specification (Approx.)
Cold [20 °C (68 °F)]
↓
Hot [80 °C (176 °F)] 1.5V
↓
0.5V 2.5 k
Ω
↓
0.3 k Ω Resistance
12Ω (Approx.) Condition Judgment standard
When driving at 20 km/h (12 MPH) 360 Hz (Approx.)
Page 474 of 4331
BL
N
O P
HOOD
Fitting Adjustment INFOID:0000000004304980
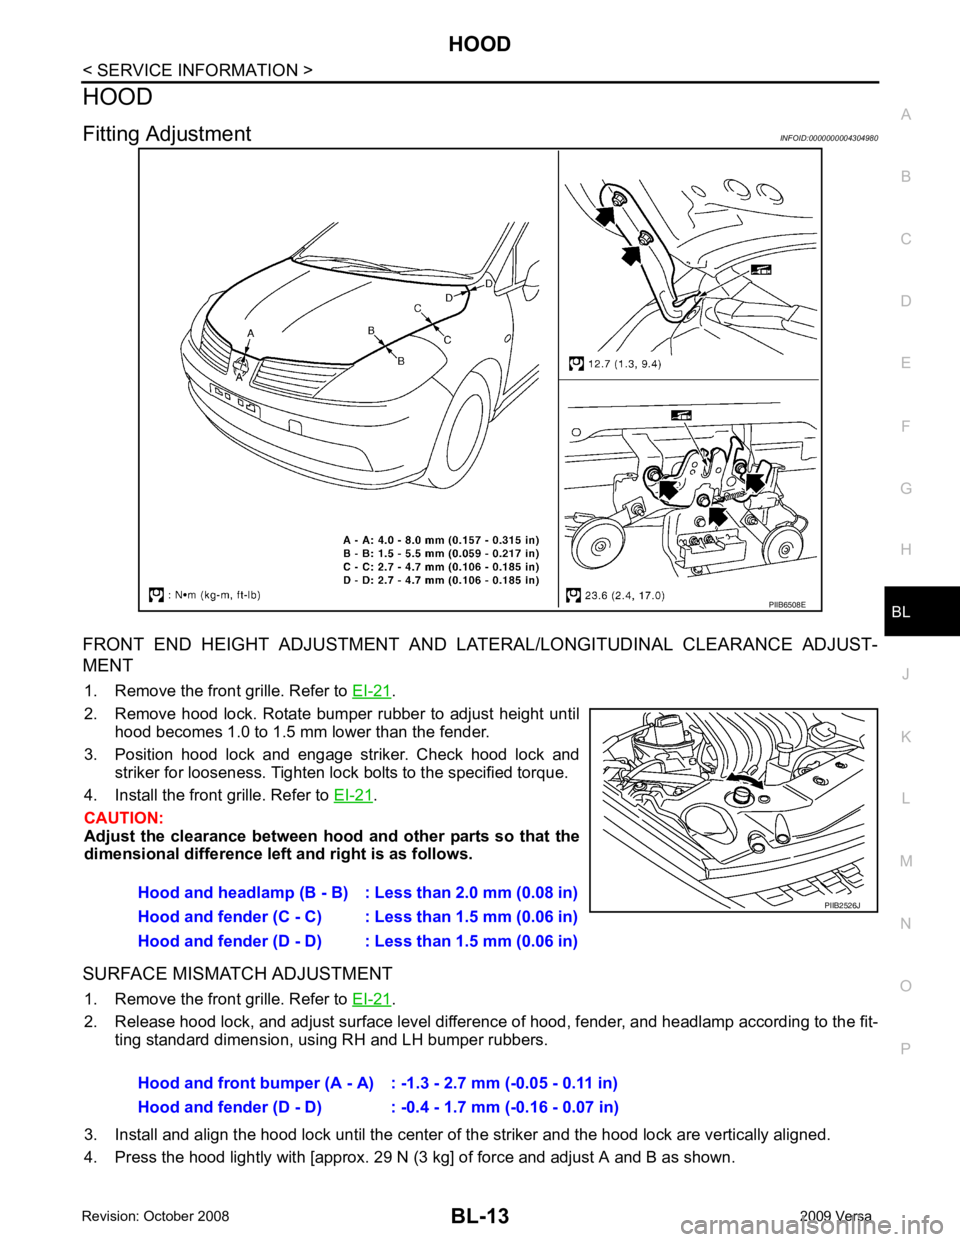
FRONT END HEIGHT ADJUSTMENT AND LA TERAL/LONGITUDINAL CLEARANCE ADJUST-
MENT
1. Remove the front grille. Refer to EI-21 .
2. Remove hood lock. Rotate bumper rubber to adjust height until hood becomes 1.0 to 1.5 mm lower than the fender.
3. Position hood lock and engage striker. Check hood lock and striker for looseness. Tighten lock bolts to the specified torque.
4. Install the front grille. Refer to EI-21 .
CAUTION:
Adjust the clearance between hood and other parts so that the
dimensional difference left and right is as follows.
SURFACE MISMATCH ADJUSTMENT 1. Remove the front grille. Refer to EI-21 .
2. Release hood lock, and adjust surface level difference of hood, fender, and headlamp according to the fit- ting standard dimension, using RH and LH bumper rubbers.
3. Install and align the hood lock until the center of the striker and the hood lock are vertically aligned.
4. Press the hood lightly with [approx. 29 N (3 kg] of force and adjust A and B as shown.
Page 770 of 4331
BL
N
O P
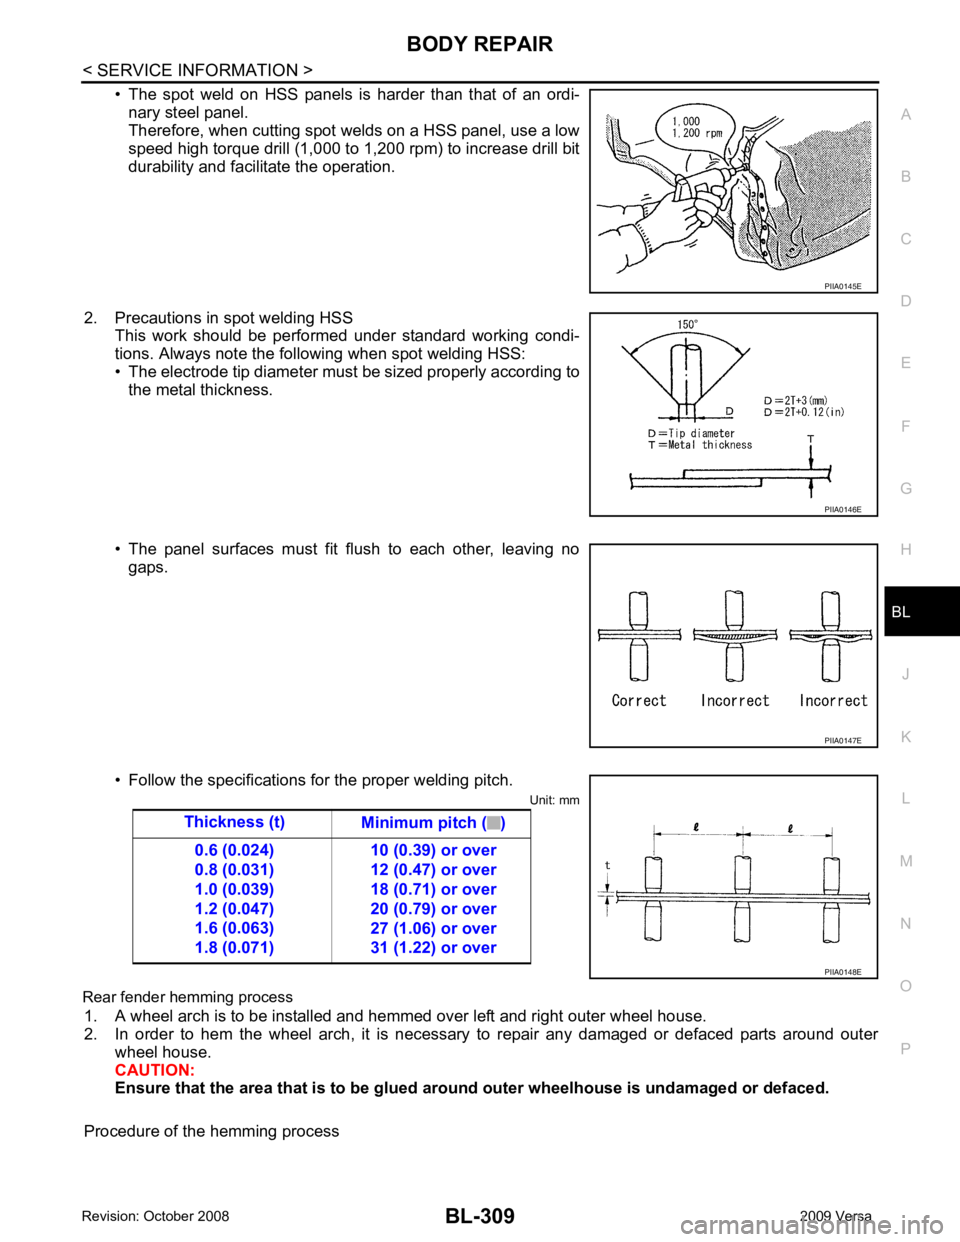
• The spot weld on HSS panels is harder than that of an ordi-
nary steel panel.
Therefore, when cutting spot welds on a HSS panel, use a low
speed high torque drill (1,000 to 1,200 rpm) to increase drill bit
durability and facilitate the operation.
2. Precautions in spot welding HSS This work should be performed under standard working condi-
tions. Always note the following when spot welding HSS:
• The electrode tip diameter must be sized properly according to the metal thickness.
• The panel surfaces must fit flush to each other, leaving no gaps.
• Follow the specifications for the proper welding pitch. Unit: mm
Rear fender hemming process 1. A wheel arch is to be installed and hemmed over left and right outer wheel house.
2. In order to hem the wheel arch, it is necessary to repair any damaged or defaced parts around outer
wheel house.
CAUTION:
Ensure that the area that is to be glued around outer wheelhouse is undamaged or defaced.
Procedure of the hemming process PIIA0146E
PIIA0147E