engine control system NISSAN TIIDA 2011 Service Manual PDF
[x] Cancel search | Manufacturer: NISSAN, Model Year: 2011, Model line: TIIDA, Model: NISSAN TIIDA 2011Pages: 3787, PDF Size: 78.35 MB
Page 957 of 3787

BRC-68
< SERVICE INFORMATION >[VDC/TCS/ABS]
TROUBLE DIAGNOSIS FOR
SELF-DIAGNOSTIC ITEMS
Check continuity between ABS actuator and electric unit (control unit) harness connector and wheel sensor
harness connector.
OK or NG
OK >> Replace the ABS actuator and electric unit (control unit). Refer to BRC-89, "Removal and Installa-
tion".
NG >> Repair the circuit.
Engine System InspectionINFOID:0000000005928485
INSPECTION PROCEDURE
1.SELF-DIAGNOSIS RESULT CHECK
Check self-diagnosis results.
Is the above displayed in the self-diagnosis display items?
YES >> GO TO 2.
NO >> Inspection End.
2.ENGINE SYSTEM INSPECTION
1. Perform ECM self-diagnosis and repair as necessary.
2. Perform ABS actuator and electric unit (control unit) self-diagnosis again.
OK or NG
OK >> Inspection End.
NG >> Repair as necessary.
ABS/TCS/VDC Control Unit InspectionINFOID:0000000005928486
INSPECTION PROCEDURE
1.SELF-DIAGNOSIS RESULT CHECK
Check self-diagnosis results.
Wheel sensor ABS actuator and
electric unit (control unit) Wheel sensor
Continuity
Connector Terminals Connector Terminals
Front LH
E335
E51 1
Ye s
16
2
Front RH 10
E52 1
92
Rear LH 17
B123 1
62
Rear RH 19
B124 1
82
Self-diagnosis results ENGINE SIGNAL 1
ENGINE SIGNAL 2
ENGINE SIGNAL 3
ENGINE SIGNAL 4
ENGINE SIGNAL 6
Self-diagnosis results
CONTROLLER FAILURE
Revision: May 2010 2011 Versa
Page 966 of 3787

TROUBLE DIAGNOSIS FOR SELF-DIAGNOSTIC ITEMS
BRC-77
< SERVICE INFORMATION > [VDC/TCS/ABS]
C
D
E
G H
I
J
K L
M A
B
BRC
N
O P
YES >> GO TO 5
NO >> Repair or replace malfunctioning components.
5.CHECK BRAKE FLUID LEVE L SWITCH GROUND CIRCUIT
Check continuity between brake fluid level switch connector E40 (B)
terminal 2 and ground.
Is the inspection result normal?
YES >> Inspection End.
NO >> • Repair or replace malfunctioning components. • Perform the self-diagnosis, and make sure that the
result shows ″NO DTC IS DETECTED ″.
Pressure Sensor System InspectionINFOID:0000000005928494
INSPECTION PROCEDURE
1.SELF-DIAGNOSIS RESULT CHECK
Check the self-diagnosis results.
Is the above displayed in the self-diagnosis display items?
YES >> GO TO 2.
NO >> Inspection End.
2.CONNECTOR INSPECTION
1. Turn ignition switch OFF.
2. Disconnect ABS actuator and elec tric unit (control unit) connector and stop lamp switch connector.
3. Check terminals for deformation, disconnection, looseness and damage. If any malfunction is found, repair or replace terminals.
4. Reconnect connectors securely.
5. Start engine.
6. Pump brake pedal carefully several times, and perform self-diagnosis.
Is the inspection result normal?
YES >> GO TO 3
NO >> Poor connection of connector terminal. Repair or replace connector.
3.CHECK STOP LAMP SWITCH 2 - Ground : Continuity should exist.
AWFIA0623ZZ
Self-diagnosis results
PRESS SEN CIRCUIT
Revision: May 2010 2011 Versa
Page 973 of 3787

BRC-84
< SERVICE INFORMATION >[VDC/TCS/ABS]
TROUBLE DIAGNOSES FOR SYMPTOMS
YES >> Refer to BRC-60, "CONSULT-III Function (ABS)".
NO >> Refer to DI-21, "
Schematic".
Vehicle Jerks During TCS/VDC ActivationINFOID:0000000005928505
1.ABS ACTUATOR AND ELECTRIC UNIT (CONTROL UNIT) SELF-DIAGNOSIS
Perform ABS actuator and electric unit (control unit) self-diagnosis.
Are self-diagnosis result items displayed?
YES >> After checking and repairing the applicable item , perform the ABS actuator and electric unit (con-
trol unit) self-diagnosis again.
NO >> GO TO 2.
2.ENGINE SPEED SIGNAL INSPECTION
Perform data monitor with CONSULT-III for the ABS actuator and electric unit (control unit).
Is the engine speed at idle 400 rpm or higher?
YES >> GO TO 4.
NO >> GO TO 3.
3.ECM SELF-DIAGNOSIS
Perform ECM self-diagnosis.
Are self-diagnosis result items displayed?
YES >> After checking and repairing the applicable item, perform the ECM self-diagnosis again.
NO >> GO TO 4.
4.TCM SELF-DIAGNOSIS
Perform TCM self-diagnosis.
Are self-diagnosis result items displayed?
YES >> After checking and repairing the applicable item, perform the TCM self-diagnosis again.
NO >> GO TO 5.
5.CONNECTOR INSPECTION
Disconnect the ABS actuator and electric unit (contro l unit) connector and the ECM connectors and check the
terminals for deformation, disconnection, looseness or damage.
OK or NG
OK >> GO TO 6.
NG >> Repair or replace the connector terminal.
6.CAN COMMUNICATION INSPECTION
Check the CAN communication system. Refer to BRC-79, "
CAN Communication System Inspection".
OK or NG
OK >> Inspection End.
NG >> Reconnect the connectors, and per form ABS actuator and electric unit (control unit) self-diagno-
sis.
Revision: May 2010 2011 Versa
Page 978 of 3787

ACTUATOR AND ELECTRIC UNIT (ASSEMBLY)BRC-89
< SERVICE INFORMATION > [VDC/TCS/ABS]
C
D
E
G H
I
J
K L
M A
B
BRC
N
O P
ACTUATOR AND ELECTRIC UNIT (ASSEMBLY)
Removal and InstallationINFOID:0000000005928509
CAUTION:
• Before servicing, disconnect battery negative terminal.
• To remove brake tube, use flare nut wrench to pr event flare nuts and brake tube from being dam-
aged. To install, use flare nut torque wrench, ti ghten flare nut to the specified torque. Refer to BR-11,
"Hydraulic Circuit".
• Do not apply excessive impact to ABS actuator and elect ric unit (control unit), such as dropping it.
• Do not remove and install actuator by holding harness.
• After work is completed, bleed the air from the brake hydraulic system. Refer to BR-9, "
Bleeding
Brake System".
REMOVAL
1. Disconnect the battery negative terminal.
2. Remove the cowl top. Refer to EI-24, "
Removal and Installation".
3. Disconnect ABS actuator and electric unit (control unit) connector.
4. Loosen brake tube flare nuts, then remove brake tubes from ABS actuator and electric unit (control unit).
5. Remove brake booster hose from engine. Refer to BR-23, "
Removal and Installation".
6. Remove ABS actuator and electric unit (control unit) bracket bolts.
7. Remove ABS actuator and electric unit (control unit).
1. To front right caliper 2. To rear left wheel cylinder 3. To rear right wheel cylinder
4. To front left caliper 5. From master cylinder primary side 6. From master cylinder secondary side
7. ABS actuator and electric unit (control unit) 8. Harness connector
Front
AWFIA0532GB
Revision: May 2010 2011 Versa
Page 983 of 3787
CL-2
< SERVICE INFORMATION >
PRECAUTIONS
SERVICE INFORMATION
PRECAUTIONS
Precaution for Supplemental Restraint System (SRS) "AIR BAG" and "SEAT BELT
PRE-TENSIONER"
INFOID:0000000005928987
The Supplemental Restraint System such as “A IR BAG” and “SEAT BELT PRE-TENSIONER”, used along
with a front seat belt, helps to reduce the risk or severity of injury to the driver and front passenger for certain
types of collision. This system includes seat belt switch inputs and dual stage front air bag modules. The SRS
system uses the seat belt switches to determine the front air bag deployment, and may only deploy one front
air bag, depending on the severity of a collision and w hether the front occupants are belted or unbelted.
Information necessary to service the system safely is included in the SRS and SB section of this Service Man-
ual.
WARNING:
• To avoid rendering the SRS inopera tive, which could increase the risk of personal injury or death in
the event of a collision which would result in air bag inflation, all maintenance must be performed by
an authorized NISSAN/INFINITI dealer.
• Improper maintenance, including incorrect removal and installation of the SRS can lead to personal
injury caused by unintent ional activation of the system. For re moval of Spiral Cable and Air Bag
Module, see the SRS section.
• Do not use electrical test equipmen t on any circuit related to the SRS unless instructed to in this
Service Manual. SRS wiring harn esses can be identified by yellow and/or orange harnesses or har-
ness connectors.
PRECAUTIONS WHEN USING POWER TOOLS (AIR OR ELECTRIC) AND HAMMERS
WARNING:
• When working near the Airbag Diagnosis Sensor Unit or other Airbag System sensors with the Igni-
tion ON or engine running, DO NOT use air or electri c power tools or strike near the sensor(s) with a
hammer. Heavy vibration could activate the sensor( s) and deploy the air bag(s), possibly causing
serious injury.
• When using air or electric power tools or hammers , always switch the Ignition OFF, disconnect the
battery, and wait at least 3 minu tes before performing any service.
Precaution Necessary for Steering W heel Rotation After Battery Disconnect
INFOID:0000000005928988
NOTE:
• This Procedure is applied only to models with Intelligent Key system and NATS (NISSAN ANTI-THEFT SYS-
TEM).
• Remove and install all control units after disconnecting both battery cables with the ignition knob in the
″LOCK ″ position.
• Always use CONSULT-III to perform self-diagnosis as a part of each function inspection after finishing work.
If DTC is detected, perform trouble diagnosis according to self-diagnostic results.
For models equipped with the Intelligent Key system and NATS, an electrically controlled steering lock mech-
anism is adopted on the key cylinder.
For this reason, if the battery is disconnected or if the battery is discharged, the steering wheel will lock and
steering wheel rotation will become impossible.
If steering wheel rotation is required when battery pow er is interrupted, follow the procedure below before
starting the repair operation.
OPERATION PROCEDURE
1. Connect both battery cables. NOTE:
Supply power using jumper cables if battery is discharged.
2. Use the Intelligent Key or mechanical key to turn the ignition switch to the ″ACC ″ position. At this time, the
steering lock will be released.
3. Disconnect both battery cables. The steering lock will remain released and the steering wheel can be rotated.
4. Perform the necessary repair operation.
Revision: May 2010 2011 Versa
Page 1000 of 3787
SERVICE DATA AND SPECIFICATIONS (SDS)CL-19
< SERVICE INFORMATION >
DE
F
G H
I
J
K L
M A
B
CL
N
O P
SERVICE DATA AND SPECIFICATIONS (SDS)
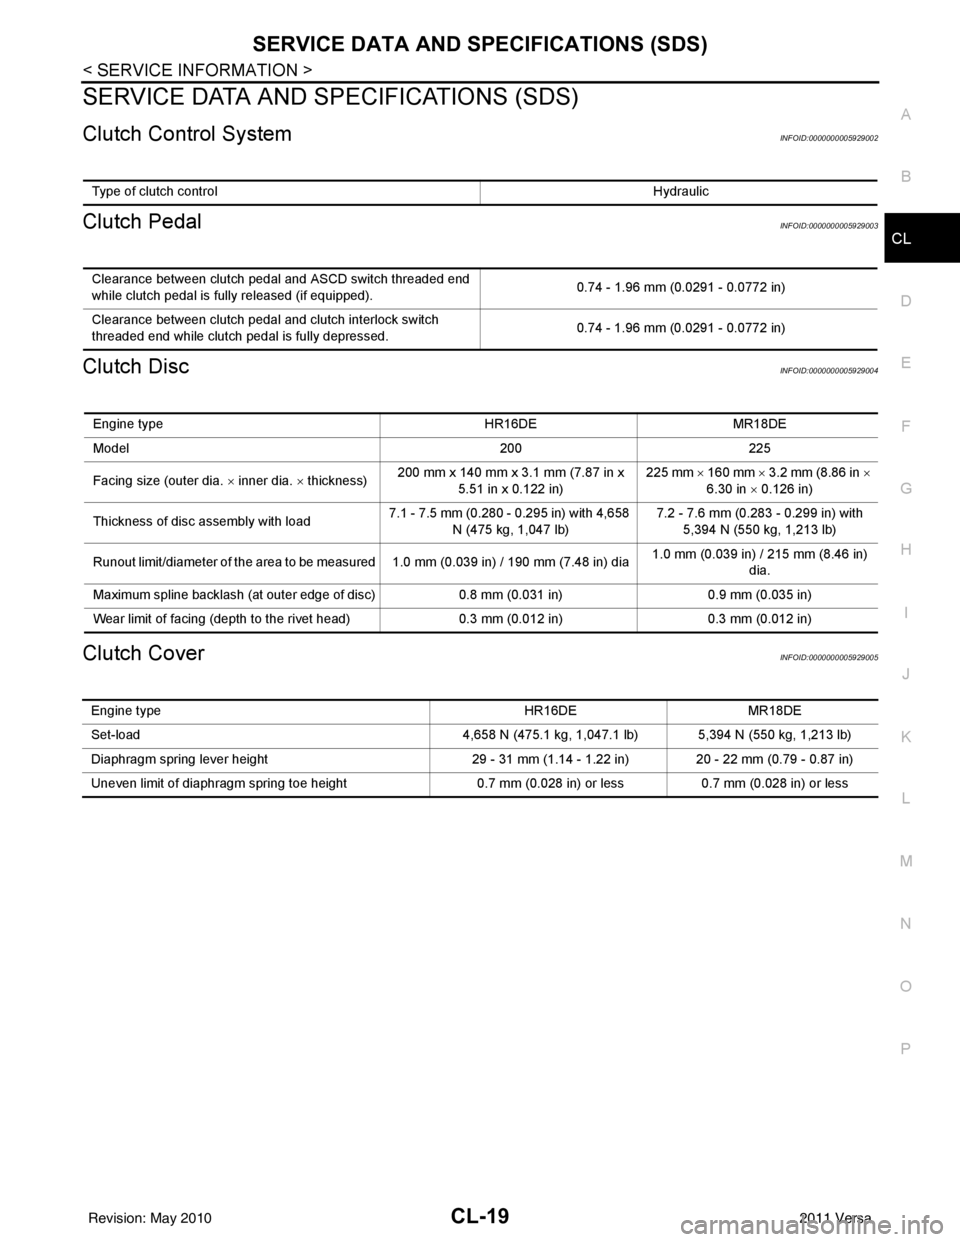
Clutch Control SystemINFOID:0000000005929002
Clutch PedalINFOID:0000000005929003
Clutch DiscINFOID:0000000005929004
Clutch CoverINFOID:0000000005929005
Type of clutch control Hydraulic
Clearance between clutch pedal and ASCD switch threaded end
while clutch pedal is fully released (if equipped). 0.74 - 1.96 mm (0.0291 - 0.0772 in)
Clearance between clutch pedal and clutch interlock switch
threaded end while clutch pedal is fully depressed. 0.74 - 1.96 mm (0.0291 - 0.0772 in)
Engine type
HR16DEMR18DE
Model 200225
Facing size (outer dia. × inner dia. × thickness) 200 mm x 140 mm x 3.1 mm (7.87 in x
5.51 in x 0.122 in) 225 mm ×
160 mm × 3.2 mm (8.86 in ×
6.30 in × 0.126 in)
Thickness of disc assembly with load 7.1 - 7.5 mm (0.280 - 0.295 in) with 4,658
N (475 kg, 1,047 lb) 7.2 - 7.6 mm (0.283 - 0.299 in) with
5,394 N (550 kg, 1,213 lb)
Runout limit/diameter of the area to be measured 1.0 mm (0.039 in) / 190 mm (7.48 in) dia 1.0 mm (0.039 in) / 215 mm (8.46 in)
dia.
Maximum spline backlash (at outer edge of disc) 0.8 mm (0.031 in)0.9 mm (0.035 in)
Wear limit of facing (depth to the rivet head) 0.3 mm (0.012 in)0.3 mm (0.012 in)
Engine type HR16DEMR18DE
Set-load 4,658 N (475.1 kg, 1,047.1 lb) 5,394 N (550 kg, 1,213 lb)
Diaphragm spring lever height 29 - 31 mm (1.14 - 1.22 in)20 - 22 mm (0.79 - 0.87 in)
Uneven limit of diaphragm spring toe height 0.7 mm (0.028 in) or less0.7 mm (0.028 in) or less
Revision: May 2010 2011 Versa
Page 1002 of 3787
CO-2
Special Service Tool ...............................................30
Commercial Service Tool .......................................30
OVERHEATING CAUSE ANALYSIS ................32
Troubleshooting Chart ......................................... ...32
COOLING SYSTEM ...........................................34
Cooling Circuit ..................................................... ...34
ENGINE COOLANT ...........................................36
Inspection ............................................................ ...36
Changing Engine Coolant .......................................36
RADIATOR ........................................................39
Checking Radiator Cap ....................................... ...39
Checking Radiator ..................................................39
Component .............................................................40
Removal and Installation ........................................40
Inspection ...............................................................41
COOLING FAN ..................................................43
Component (Models with A/C) ................................43
Component (Models without A/C) ...........................43
Removal and Installation .........................................44
Disassembly and Assembly ................................. ...44
WATER PUMP ...................................................45
Component .......................................................... ...45
Removal and Installation .........................................45
THERMOSTAT ............................................... ...47
Component .......................................................... ...47
Removal and Installation .........................................47
Inspection ............................................................. ...48
WATER OUTLET AND WATER CONTROL
VALVE ...............................................................
50
Component .......................................................... ...50
Removal and Installation .........................................51
Inspection ............................................................. ...53
SERVICE DATA AND SPECIFICATIONS
(SDS) .................................................................
55
Standard and Limit ............................................... ...55
Revision: May 2010 2011 Versa
Page 1009 of 3787

DESCRIPTIONCO-9
< FUNCTION DIAGNOSIS > [HR16DE]
C
D
E
F
G H
I
J
K L
M A
CO
NP
O
FUNCTION DIAGNOSIS
DESCRIPTION
Engine Cooling SystemINFOID:0000000005930775
AWBIA0155ZZ
1. Cylinder head
2. Cylinder block3. Water pump
4. Thermostat 5. Water inlet6. Water bypass
7. Water outlet A. From radiatorB. To radiator
C. From electric throttle control actuator D. From heater E. To heater
F. To electric throttle control actuator Thermostat openThermostat closed
Revision: May 2010 2011 Versa
Page 1010 of 3787

CO-10
< FUNCTION DIAGNOSIS >[HR16DE]
DESCRIPTION
Engine Cooling System Schematic
INFOID:0000000005930776
AWBIA0784ZZ
1. Reservoir tank 2. Radiator3. Water inlet
4. Thermostat 5. Water bypass6. Water jacket
7. Water pump 8. Cylinder block 9. Cylinder head
10. Water outlet 11. Electric throttle control actuator 12. Heater
A. Thermostat open B. Thermostat closed C. Constant
Revision: May 2010 2011 Versa
Page 1012 of 3787

CO-12
< ON-VEHICLE MAINTENANCE >[HR16DE]
ENGINE COOLANT
If contaminated, flush the engine cooling system.
REFILLING ENGINE COOLANT
1. Install the radiator drain plug. Install the reservoir
tank and cylinder block drain plug, if removed for a total
system drain or for engine removal or repair.
• The radiator must be complete ly empty of coolant and water.
• Apply sealant to the threads of the cylinder bl ock drain plugs. Use Genuine High Performance
Thread Sealant or equivalent. Refer to GI-42, "
Recommended Chemical Product and Sealant".
2. If disconnected, reattach the upper radiator hose at the engine side.
3. Set the vehicle heater controls to the full HOT and heat er ON position. Turn the vehicle ignition ON with
the engine OFF as necessary to activate the heater mode.
4. Install the Tool by installing the radiator cap adapter onto the radiator neck opening. Then attach the gauge body assembly
with the refill tube and the venturi assembly to the radiator cap
adapter.
5. Insert the refill hose into the coolant mixture container that is placed at floor level. Make sure the ball valve is in the closed
position.
•Use Genuine NISSAN Long Life Anti-freeze coolant or
equivalent, mixed with distil led water or demineralized
water.
Refer to MA-15, "
Anti-freeze Coolant Mixture Ratio".
6. Install an air hose to the venturi assembly, the air pressure must be within specification.
CAUTION:
The compressed air supply must be equipped with an air dryer.
7. The vacuum gauge will begin to rise and there will be an audible hissing noise. During this process open the ball valve on the refill hose slightly. Coolant will be vi sible rising in the refill hose. Once the refill hose is
full of coolant, close the ball valve. This will purge any air trapped in the refill hose.
8. Continue to draw the vacuum until the gauge reaches 28 inches of vacuum. The gauge may not reach 28 inches in high altitude
locations, use the vacuum specifications based on the altitude
above sea level.
9. When the vacuum gauge has reached the specifi ed amount, disconnect the air hose and wait 20 seconds
to see if the system loses any vacuum. If the vacuum level drops, perform any necessary repairs to the
system and repeat steps 6 - 8 to bring the vacuum to the specified amount. Recheck for any leaks.
Radiator drain plug : Refer to
CO-16, "
Component".
Cylinder block drain plug : 9.8 N·m (1.0 kg-m, 87 in-lb)
Tool number : KV991J0070 (J-45695)
Engine coolant capacity
(with reservoir tank) : Refer to
MA-14, "
Fluids
and Lubricants".
Compressed air
supply pressure : 549 - 824 kPa (5.6 - 8.4 kg/cm
2,
80 - 119 psi)
LLIA0058E
Altitude above sea level Vacuum gauge reading
0 - 100 m (328 ft) : 28 inches of vacuum
300 m (984 ft) : 27 inches of vacuum
500 m (1,641 ft) : 26 inches of vacuum
1,000 m (3,281 ft) : 24 - 25 inches of vacuum
LLIA0057E
Revision: May 2010 2011 Versa