turn signal Oldsmobile Achieva 1998 Owner's Manuals
[x] Cancel search | Manufacturer: OLDSMOBILE, Model Year: 1998, Model line: Achieva, Model: Oldsmobile Achieva 1998Pages: 356, PDF Size: 18.04 MB
Page 7 of 356
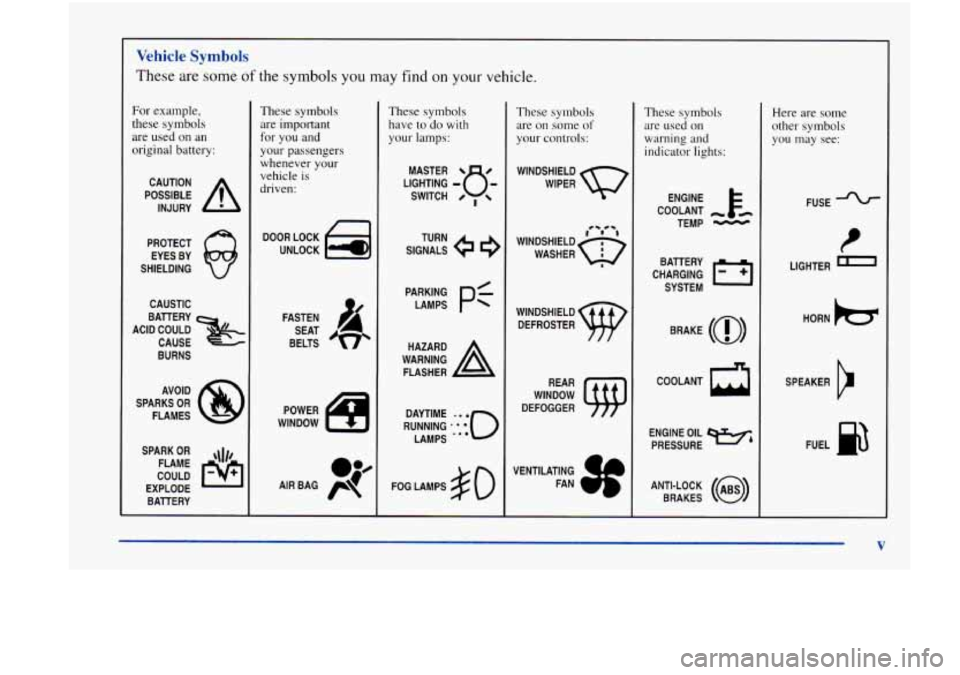
Vehicle Symbols
These are some of the symbols you may find on your vehicle.
For example,
these symbols are used on an
original battery:
POSSIBLE A
CAUTION
INJURY
PROTECT EYES BY
SHIELDING
CAUSTIC
BATTERY
CAUSE
BURNS
ACID COULD
&
AVOID
SPARKS
OR
FLAMES
SPARK
OR ,\I/,
COULD FLAME
EXPLODE BATTERY
These symbols are important
for you and
your passengers
whenever your
vehicle is
driven:
DOOR LOCK
UNLOCK
FASTEN SEAT
BELTS
POWER
WINDOW
These symbols have to
do with
your lamps:
SIGNALS e
TURN
PAEJN&
pf
WARNING A
HAZARD
FLASHER
RUNNING
.‘:**o
DAYTIME LAMPS
***
FOG LAMPS # 0
These symbols are. on some
of
your controls:
WINDSHIELD
WIPER
WINDSHIELD DEFROSTER
WINDOW
DEFOGGER
VENTILATING FAN
These symbols are used on
warning and
indicator lights:
COOLANT F-
TEMP -
CHARGING BAllERY
SYSTEM
BRAKE
(a)
COOLANT
ENGINE OIL
PRESSURE
Wb
ANTI-LOCK (@)
BRAKES
Here are some
other symbols
you may see:
FUSE
I
LIGHTER
HORN
)b.
SPEAKER
b
FUEL p3
V
Page 65 of 356
Section 2 2s and COI :- 11s
Here you can learn about the many standard and optional features on your vehicle, and information on starting,
shifting and braking. Also explained
are the instrument panel and the warning systems that tell you if everything is
working properly
-- and what to do if you have a problem.
2-2
2-4
2-6 2-10
2-11
2- 12
2-13
2-13
2- 14
2-
17
2-18
2-23
2-24 2-26 Keys
Door Locks
Remote
Lock Control
(If Equipped)
Trunk
Theft
Passlock@
New Vehicle “Break-In”
Ignition Positions”
Starting Your Engine
Engine Coolant Heater (If Equipped)
Automatic Transaxle Operation
Parking Brake
Shifting Into PARK (P)
Shifting Out of PARK (P) 2-26
2-27
2-27
2-28
2-29 2-29
2-30
2-37
2-39
2-42
2-43 2-45
2-46
2-50 Parking Over
Things That
Burn
Engine Exhaust
Running Your Engine While You’re Parked
Windows
Horn
Tilt Wheel
Turn Signal/Multifunction Lever
Exterior Lamps
Interior Lamps
Mirrors Storage Compartments
Accessory Power Outlet
Instrument Panel
Warning Lights, Gages and Indicators
2-1
Page 71 of 356
This device complies with Part 15 of the FCC Rules.
Operation is subject to the following two conditions:
(1) this device may not cause harmful interference,
and
(2) this device must accept any interference
received, including interference that may cause
undesired operation.
This device complies with
RSS-210 of Industry Canada.
Operation is subject to the following two conditions:
(1) this device may not cause interference, and (2) this
device must accept any interference received, including
interference that may cause undesired operation of
the device.
Changes or modifications to this system by other than
an authorized service facility could void authorization
to use this equipment.
This system has a range of about
3 feet (1 m) up to
30 feet (9 m). At times you may notice a decrease in
range, This
is normal for any remote keyless entry
system. If the transmitter does not work or if you have
to stand closer to your vehicle for
the transmitter to
work, try this:
Check to determine if battery replacement or
synchronization is necessary. See
the instructions
that follow.
Check the distance. You may be too far from your
vehicle. You may need to stand closer during rainy
or snowy weather.
Check the location. Other vehicles or objects may be
blocking the signal. Take a few steps to the left or
right, hold the transmitter higher, and try again.
If you’re still having trouble, see your retailer or a
qualified technician for service.
Operation
The following functions are available with the Remote
Lock Control system:
LOCK: All doors will automatically lock when
the
LOCK button on the transmitter is pressed. The interior
lamps stay on for a few seconds after all of the doors
are closed.
UNLOCK: The driver’s door will unlock automatically
when the UNLOCK button on the transmitter is pressed.
If the UNLOCK button
is pressed again within five
seconds, all remaining doors will unlock. The interior
lamps will stay on for
40 seconds or until the ignition is
turned
on.
2-7
Page 94 of 356
Turn SignaVMultifunction Lever Turn and Lane Change Signals
The turn signal has two upward (for right) and two
downward (for left) positions. These positions allow
you to signal a turn or a lane change.
To signal a turn, move the lever all the way up or
down. When the turn is finished, the lever will return
automatically.
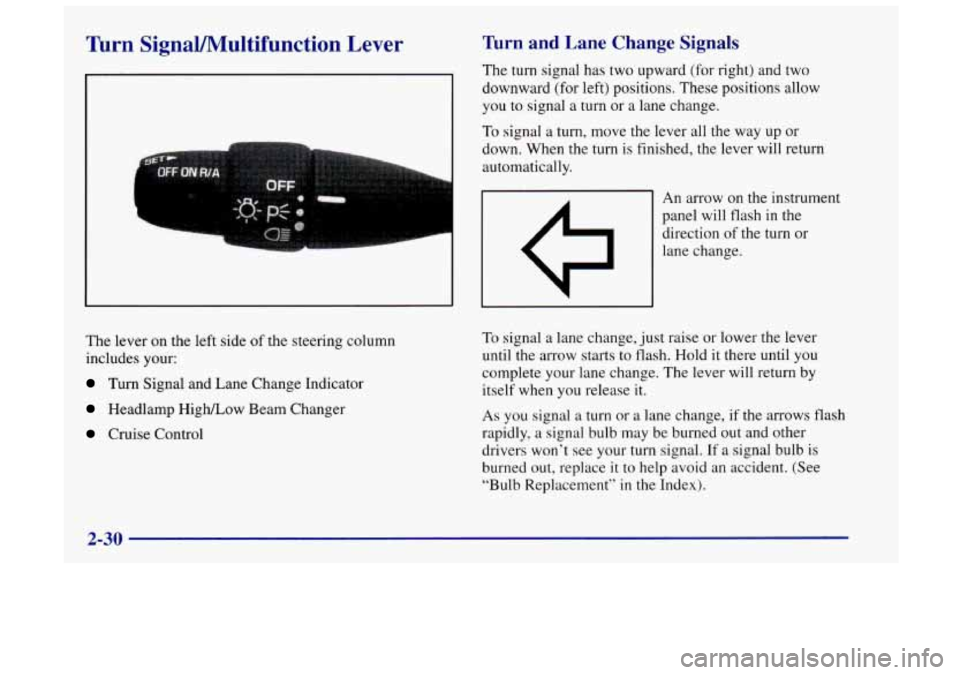
An arrow on the instrument
panel will flash in the
direction
of the turn or
lane change.
The lever
on the left side of the steering column
includes your:
Turn Signal and Lane Change Indicator
Headlamp High/Low Beam Changer
Cruise Control To
signal a lane change, just raise
or lower the lever
until the arrow starts to flash. Hold it there until you
complete your lane change. The lever will return by
itself when you release
it.
As you signal a turn or a lane change, if the arrows flash
rapidly, a signal bulb may be burned out and other
drivers won’t see your turn signal.
If a signal bulb is
burned out, replace it to help avoid an accident. (See
“Bulb Replacement”
in the Index).
2-30
Page 95 of 356
If the arrows don’t go on at all when you signal a
turn, check the fuse (see “Fuses and Circuit Breakers”
in the Index) or contact your Oldsmobile retailer
service department).
Turn Signal On Chime
A warning chime signal will come on if you have left
your turn signal
on for more than 3/4 mile (1 km).
Headlamp HighLow Beam
To change the headlamps
from low beam to high or
high to low, pull the turn
signal lever all the way
toward you. Then release it.
When the high beams are on, a light on the instrument
panel also will be on.
The headlamp high/low beam indicator may flash if the
Daytime Running Lamps
(DRL) system is experiencing
a problem or if a headlamp is malfunctioning.
Windshield Wipers
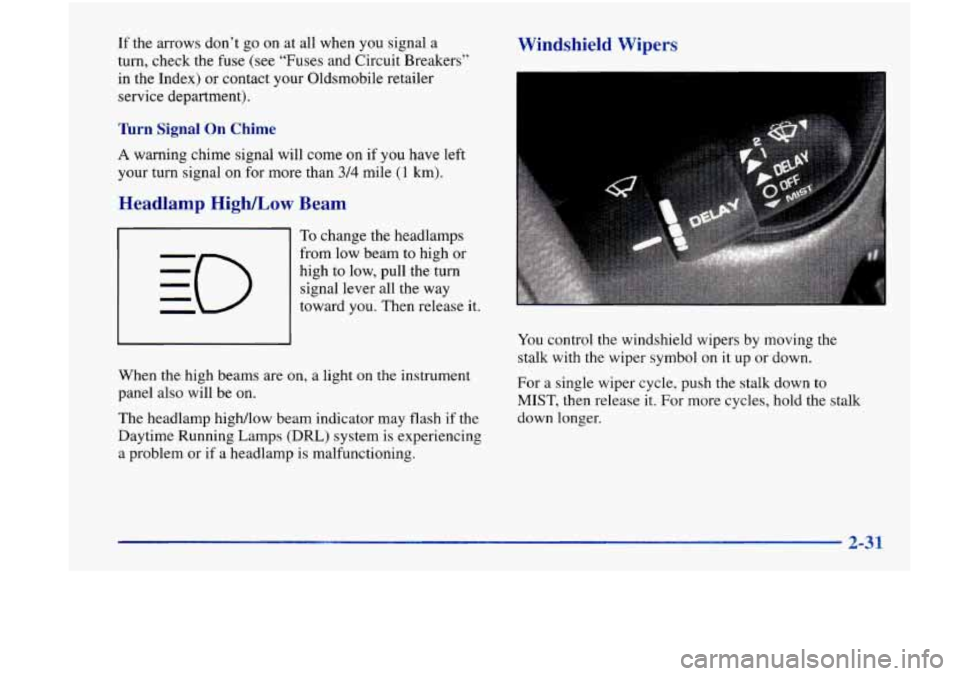
You control the windshield wipers by moving the
stalk with the wiper symbol on it up or down,
For a single wiper cycle, push the stalk down to
MIST, then release it. For more cycles, hold the stalk
down longer.
2-31
Page 101 of 356
Using Cruise Control on Hills
How well your cruise control will work on hills depends
upon your speed, load and the steepness of the hills.
When going up steep hills, you may have
to step on the
accelerator pedal to maintain your speed. When going
downhill, you may have to brake or shift to a lower gear
to keep your speed down. Of course, applying the brake
or clutch pedal takes you out of cruise control. Many
drivers find this to be too much trouble and don’t use
cruise control on steep hills.
Ending Out of Cruise Control
Exterior Lamps
There are two ways to turn off the cruise control:
Step lightly on the brake pedal or push the clutch
pedal,
if you have a manual transaxle; OR
Move the cruise switch to OFF.
Erasine the Cruise Speed Memory
When you turn off the cruise control or the ignition,
your cruise control set speed memory is erased.
I
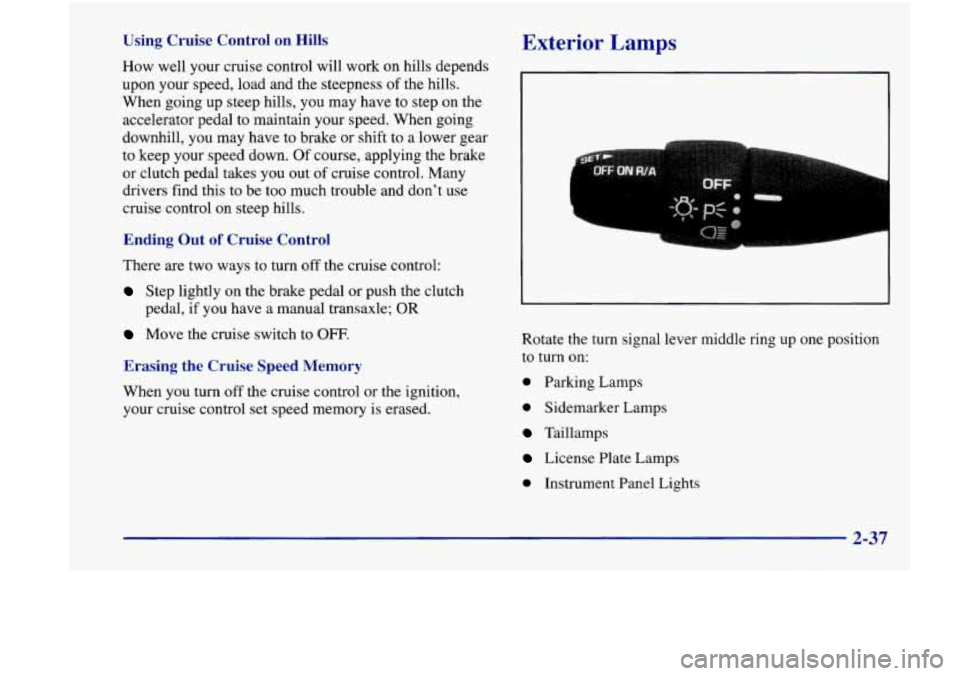
Rotate the turn signal lever middle ring up one position
to turn on:
0 Parking Lamps
0 Sidemarker Lamps
Taillamps
License Plate Lamps
0 Instrument Panel Lights
2-37
Page 102 of 356
Rotate the turn signal lever middle ring up two positions
to turn on: The
DRL system
will make your high-beam neadlamps
come
on at a reduced brightness when:
0 Headlamps
0 Parking Lamps
0 Sidemarker Lamps
0 Taillamps
0 License Plate Lamps
0 Instrument Panel Lights
Rotate the switch to
OFF to turn all of the lamps off.
Lamps On Reminder
If you open the driver’s door and turn off the
ignition while leaving the lamps on, you will hear
a warning chime.
Daytime Running Lamps
Daytime Running Lamps (DRL) can make it easier
for others to see the front
of your vehicle during the
day. DRL can be helpful in many different driving
conditions, but they can be especially helpful in the
short periods after dawn and before sunset.
0 The engine is running,
0 The headlamp switch is in the OFF position,
0 The light sensor detects daytime light,
0 The parking brake is released and
0 The shift lever is not in PARK (P).
When the DRL system is on, the taillamps, sidemarker,
park lamps and instrument panel lights will not
be illuminated.
The
DRL and the ALC systems will remain off any
time your vehicle is in
PARK (P) and the parking
brake is engaged.
As with any vehicle, you should turn on the regular
headlamp system when you need it.
2-38
Page 142 of 356
Disabling the Theft-Deterrent Feature
Enter your secret code as follows; pause no more than
15 seconds between steps:
1.
2.
3.
4.
5.
6.
7.
Turn the ignition to ACCESSORY or RUN.
Turn the radio off.
Press the
1 and 4 buttons together. Hold them down
until
SEC shows on the display.
Press
MN and 000 will appear on the display.
Press
MN again to make the last two digits agree
with your code.
Press
HR to make the first one or two digits agree
with your code.
Press AM-FM after you have confirmed that the
code matches the secret code you have written down
The display will show ---, indicating that the radio
is no longer secured.
If the code entered is incorrect,
SEC will appear on the
display. The radio will remain secured until the correct
code is entered.
When battery power is removed and later applied to a
secured radio, the radio won’t turn
on and LOC will
appear
on the display.
To unlock a secured radio, see “Unlocking the
Theft-Deterrent Feature After a Power
Loss”
earlier in this section.
Understanding Radio Reception
AM
The range for most AM stations is greater than for FM,
especially at night. The longer range, however, can
cause stations to interfere with each other. AM can pick
up noise from things like storms and power lines. Try
reducing the treble to reduce this noise
if you ever get it.
FM Stereo
FM stereo will give you the best sound, but FM signals
will reach only about
10 to 40 miles (1 6 to 65 km). Tall
buildings or hills can interfere with FM signals, causing
the sound to come and go.
Tips About Your Audio System
Hearing damage from loud noise is almost undetectable
until
it is too late. Your hearing can adapt to higher
volumes
of sound. Sound that seems normal can be
loud and harmful to your hearing. Take precautions by
adjusting the volume control on your radio to a safe
sound level before your hearing adapts to it.
3-18
Page 144 of 356
The recommended cleaning method for your cassette
tape player is the use
of a scrubbing action,
non-abrasive cleaning cassette with pads which scrub
the tape head as the hubs of the cleaner cassette turn.
The recommended cleaning cassette
is available through
your retail facility
(GM Part No. 12344789).
When using a scrubbing action, non-abrasive cleaning
cassette, it is normal for the cassette to eject because
your unit is equipped with a cut tape detection feature
and a cleaning cassette may appear as a broken tape. If
the cleaning cassette ejects, insert the cassette at least
three times to ensure thorough cleaning.
You may also choose a non-scrubbing action, wet-type
cleaner which uses a cassette with a fabric belt to clean
the tape head. This type of cleaning cassette will not
eject on its own. A non-scrubbing action cleaner may
not clean as thoroughly as the scrubbing type cleaner.
The use of a non-scrubbing action, dry-type cleaning
cassette is not recommended.
After you clean the player, press and hold EJECT for
five seconds to reset the CLN indicator. The radio
will display
--- to show the indicator was reset. Cassettes are subject to wear and
the sound quality
may degrade over time. Always make sure the cassette
tape is in good condition before you have your tape
player serviced.
Care of Your Compact Discs
Handle discs carefully. Store them in their original cases
or other protective cases and away from direct sunlight
and dust.
If the surface of a disc is soiled, dampen a
clean, soft cloth in a mild, neutral detergent solution and
clean it, wiping from the center to the edge.
Be sure never to touch the signal surface when handling
discs. Pick up discs by grasping the outer edges or the
edge
of the hole and the outer edge.
Care of Your Compact Disc Player
The use of CD lens cleaner discs is not advised, due to
the risk of contaminating the lens of the CD optics with
lubricants internal to the CD mechanism.
3-20
Page 162 of 356
a
a
a
a
Check your mirrors, glance over your shoulder, and
start your left lane change signal before moving out
of the right lane to pass. When you are far enough
ahead of the passed vehicle to see its front in your
inside mirror, activate your right lane change signal
and move back into the right lane. (Remember that
your right outside mirror is convex. The vehicle you
just passed may seem to be farther away from you
than it really is.)
Try not to pass more than one vehicle at a time
on two-lane roads. Reconsider before passing the
next vehicle.
Don’t overtake a slowly moving vehicle too rapidly.
Even though the brake lamps are not flashing, it may
be slowing down or starting to turn.
If you’re being passed, make it easy for the
following driver to get ahead of you. Perhaps you
can ease a little to the right.
Loss of Control
Let’s review what driving experts say about what
happens when the three control systems (brakes, steering
and acceleration) don’t have enough friction where the
tires meet the road to do what the driver has asked.
In any emergency, don’t give up. Keep trying to steer ana
constantly seek an escape route
or area of less danger.
Skidding
In a skid, a driver can lose control of the vehicle.
Defensive drivers avoid most skids by taking reasonable
care suited to existing conditions, and by not “overdriving”
those conditions. But skids are always possible.
The three types of skids correspond to your vehicle’s
three control systems. In the braking skid, your wheels
aren’t rolling. In the steering or cornering skid, too
much speed or steering in a curve causes tires to slip and
lose cornering force. And in the acceleration skid, too
much throttle causes the driving wheels to spin.
A cornering skid is best handled by easing your foot off
the accelerator pedal.
If you have the Enhanced Traction System, remember: It
helps avoid only the acceleration skid.
If you do not have the Enhanced Traction System, or if
the system is off, then an acceleration skid is also best
handled by easing your foot off the accelerator pedal.
4-14