cooling Oldsmobile Bravada 2003 Owner's Manuals
[x] Cancel search | Manufacturer: OLDSMOBILE, Model Year: 2003, Model line: Bravada, Model: Oldsmobile Bravada 2003Pages: 410, PDF Size: 20.1 MB
Page 78 of 410
Liftgate/Liftglass
It can be dangerous to drive with the liftgate or
liftglass open because carbon monoxide (CO)
gas can come into your vehicle. You can’t see
or smell CO.
It can cause unconsciousness
and even death. If you must drive with the
liftgate open or if electrical wiring or other
cable connections must pass through the seal between the body and the liftgate or liftglass:
Make sure all other windows are shut.
Turn the fan on your heating or cooling
system to its highest speed and select the
control setting that will force outside air into your vehicle. See “Climate Controls”
in the Index.
If you have air outlets on or under the
instrument panel, open them all the way.
See “Engine Exhaust” in the Index.
Liftgate Release
To unlock the liftgate, you may use the power door
locks or the keyless entry system described earlier.
On some vehicies the liftgiass wiii also uniock when the
liftgate is unlocked. Press the pushbutton on the
liftglass to open it.
To open the entire liftgate, lift the handle located in the
center of the liftgate.
If you open the liftgate, the
liftgate module will lock the liftglass after a one to two
second delay.
Emergency Release for Opening
Liftgate
1. Remove the trim plug to expose the access hole in
2. Use a tool to reach through the access hole in the
3. Pry the left release lever up to the unlock position.
4. Reattach the trim plug.
the trim panel.
trim panel.
Pry the right release lever up to unlatch the liftgate.
2-1 3
Page 134 of 410
Climate Controls
Dual Automatic Climate Control
System
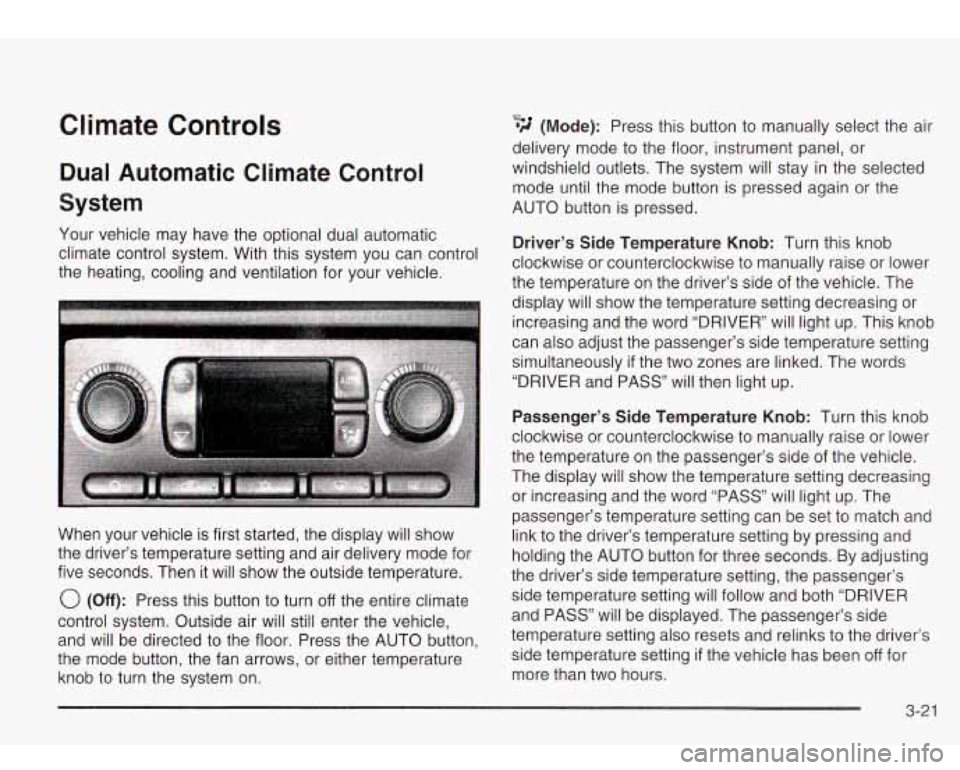
Your vehicle may have the optional dual automatic
climate control system. With this system you can control
the heating, cooling and ventilation for your vehicle.
When your vehicle is first started, the display will show
the driver’s temperature setting and air delivery mode for
five seconds. Then it will show the outside temperature.
0 (Off): Press this button to turn off the entire climate
control system. Outside air will still enter the vehicle,
and will be directed to the floor. Press the AUTO button,
the mode button, the fan arrows, or either temperature
knob to turn the system on.
Q., *d (Mode): Press this button to manually select the air
delivery mode to the floor, instrument panel, or
windshield outlets. The system will stay in the selected
mode until the mode button is pressed again or the
AUTO button is pressed.
Driver’s Side Temperature Knob: Turn this knob
clockwise or counterclockwise to manually raise or lower
the temperature on the driver’s side of the vehicle. The
display will show the temperature setting decreasing or
increasing and the word “DRIVER” will light up. This knob
can also adjust the passenger’s side temperature setting
simultaneously
if the two zones are linked. The words
“DRIVER and PASS” will then light up.
Passenger’s Side Temperature Knob: Turn this knob
clockwise or counterclockwise to manually raise or lower
the temperature on the passenger’s side of the vehicle.
The display will show the temperature setting decreasing
or increasing and the word “PASS” will light up. The
passenger’s temperature setting can be set to match and
link to the driver’s temperature setting by pressing and
holding the AUTO button for three seconds. By adjusting
the driver’s side temperature setting, the passenger’s
side temperature setting will follow and both “DRIVER
and PASS” will be displayed. The passenger’s side
temperature setting also resets and relinks to the driver’s
side temperature setting
if the vehicle has been off for
more than two hours.
3-21
Page 135 of 410
Automatic Operation Manual Operation
AUTO
(Automatic): When automatic operation is
active, the system will control the inside temperature,
the air delivery mode, and the fan speed.
Use the steps below to place the entire system in
automatic mode:
1. Press the AUTO button.
When AUTO is selected, the air conditioning
operation and air inlet will be automatically
controlled. The air conditioning compressor will run
when the outside temperature is over approximately
40°F (4°C). The air inlet will normally be set to
outside air. If it’s hot outside, the air inlet will
automatically switch to recirculate inside air to help
quickly cool down your vehicle.
2. Set the driver’s and passenger’s temperature.
To find your comfort setting, start with a 72°F (22°C)
temperature setting and allow about 20 minutes
for the system to regulate. Turn the driver’s or
passenger’s side temperature knob to adjust the
temperature setting as necessary. If you choose the
temperature setting
of 60°F (15”C), the system
will remain at the maximum cooling setting.
If you
choose the temperature setting of 90°F
(32”C),
the system will remain at the maximum heat setting.
Choosing either maximum setting may not cause
the vehicle to heat or cool any faster. To change
the current setting, select one of the
following:
v (Fan): This button allows you to manually
adjust the fan speed. Press the up arrow to increase fan
speed and the down arrow to decrease fan speed.
The display will change to show you the selected fan
speed and the driver’s side temperature setting for five
seconds.
@* *d (Mode): Press this button to manually change the
direction of the airflow in your vehicle. Keep pressing the
button until the desired mode appears on the display.
The display will change to show you the selected
air delivery mode and the driver’s temperature setting
for five seconds.
2 (Vent): This mode directs air to the instrument
panel outlets.
+2 (Bi-Level): This mode directs approximately half of
the air to the instrument panel outlets, then directs
the remaining air to the floor outlets. A little air is
directed toward the windshield and the side window
outlets. Cooler air is directed to the upper outlets and
warmer air to the floor outlets.
3-22
Page 137 of 410
Rear Window Defogger
The rear window defogger uses a warming grid to
remove fog from the rear window.
Press this button
to turn
the rear window defogger
on or
off
An indicator light in the button will come on to let you
know that the rear window defogger is activated.
The rear window defogger will turn
off approximately 10
minutes after the button is pressed. If you need
additional warming time, press the button again.
Notice: Don’t use a razor blade or something else
sharp on the inside
of the rear window. If you
do, you could cut or damage the defogger and the
repairs would not be covered by your warranty.
Do not attach a temporary vehicle license, tape, a
decal or anything similar to the defogger grid.
Do not attach a temporary vehicle license, tape, a decal
or anything similar
to the defogger grid.
Outlet Adjustment
Use the air outlets located in the center and on the side
of your instrument panel
to direct the airflow.
Ventilation System
For mild outside temperatures when little heating or
cooling is needed, use the vent setting
to direct outside
air through your vehicle.
Your vehicle’s ventilation system supplies outside air
to
the inside of your vehicle when it is moving. With the
side windows closed, air will flow into the front air inlet
grilles, through the vehicle and out the air exhaust
valves.
Outside air will also enter the vehicle when the heater
or the air conditioning compressor is running, unless you
have the recirculation button pushed in.
3-24
Page 139 of 410
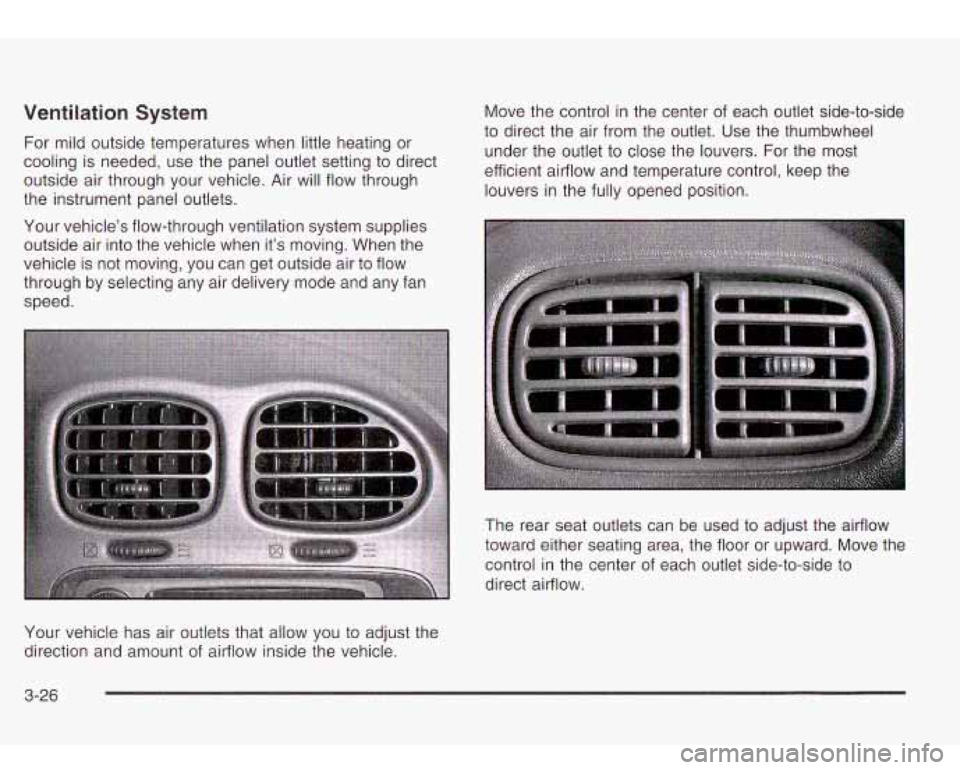
Ventilation System
For mild outside temperatures when little heating or
cooling is needed, use the panel outlet setting to direct
outside air through your vehicle. Air will flow through
the instrument panel outlets.
Your vehicle’s flow-through ventilation system supplies outside air into the vehicle when it’s moving. When the
vehicle is not moving, you can get outside air to flow
through by selecting any air delivery mode and any fan
speed. Move the control
in the center of each outlet side-to-side
to direct the air from the outlet. Use the thumbwheel
under the outlet to close the louvers. For the most
efficient airflow and temperature control, keep the
louvers in the fully opened position.
The rear seat outlets can be used to adjust the airflow
toward either seating area, the floor or upward. Move the
control in the center of each outlet side-to-side to
direct airflow.
Your vehicle has air outlets that allow you to adjust the
direction and amount
of airflow inside the vehicle.
3-26
Page 165 of 410
Display Language
To select your personalization for display language, press the select button while DISPLAY LANGUAGE is
displayed on the DIC. Pressing the select button
will scroll through the available languages:
Choosing a language will display all of the information
on the DIC in the desired language.
If you accidentally choose a language that you don’t
want or understand, press and hold the personalization
button and the trip information button at the same
time. The DIC will begin scrolling through the languages
in their particular language. English will be in English,
French will be in French and
so on. When you see
the language that you would like, release both buttons.
The DIC will then display the information in the language you chose.
Choose one of the options and press the personalization
button while it is displayed on the DIC to select it.
Select
The select button is used to reset certain functions and
turn
off or acknowledge messages on the DIC display.
The select button also toggles through the options
available in each personalization menu. For example, this
button will reset the trip odometers, turn
off the FUEL
LEVEL LOW message, and toggle through the languages
you can select the DIC to display information in.
DIC Warnings and Messages
Warning messages are displayed on the DIC to notify
the driver that the status of the vehicle has changed and
that some action may be needed by the driver to
correct the condition. More than one message may
appear at one time. They will appear one behind
the other. Some messages may not require immediate
action but you should press the select button to
acknowledge that you received the message and clear it
from the display. Some messages cannot be cleared
from the display because they are more urgent. These
messages require action before they can be removed
from the DIC display. The following are the possible
messages that can be displayed and some information
about them.
ENGINE COOLANT HOThDLE ENGINE
If the cooling system temperature gets hot, this
message will appear in the DIC and you will hear a
chime. Stop the vehicle and let the engine idle in
PARK (P) to allow the coolant to reach a safe
temperature. This message will clear when the coolant
temperature drops to a safe operating temperature.
3-52
Page 231 of 410
Driving in Water
Heavy rain can mean flash flooding, and flood waters
demand extreme caution.
Find out how deep the water is before you drive through
it.
If it’s deep enough to cover your wheel hubs, axles
or exhaust pipe, don’t try
it - you probably won’t
get through. Also, water that deep can damage your
axle and other vehicle parts.
If the water isn’t too deep, drive slowly through it. At
faster speeds, water splashes on your ignition system
and your vehicle can stall. Stalling can also occur
if you
get your tailpipe under water. And, as long as your
tailpipe
is under water, you’ll never be able to start your
engine. When you go through water, remember that
when your brakes get wet, it may take you longer
to stop.
Driving through rushing water can be
dangerous. Deep water can sweep your vehicle
downstream and you and your passengers
CAUTION: (Continued)
1
coula arowr r it’s y snallo‘ Mater, can
still wash away the ground from under your
tires, and you could lose traction and roll the
vehicle over. Don’t drive through rushing
water.
See Driving in Rain and on Wet Roads on page 4-28 for
more information on driving through water.
After Off-Road Driving
Remove any brush or debris that has collected on the
underbody, chassis or under the hood. These
accumulations can be a fire hazard.
After operation in mud or sand, have the brake linings
cleaned and checked. Theses substances can cause
glazing and uneven braking. Check the body structure,
steering, suspension, wheels, tires and exhaust
system for damage.
Also, check the fuel lines and
cooling system for any leakage.
Your vehicle will require more frequent service due
to
off-road use. Refer to the Maintenance Schedule
for additional information.
4-26
Page 240 of 410
If you drive regularly in steep country, or if you’re
planning to visit there, here are some tips that can make
your trips safer and more enjoyable. See
Operating
Your
All- Wheel-Drive Vehicle Off Paved Roads on
page 4-15 for information about driving off-road.
0 Keep your vehicle in good shape. Check all fluid
levels and also the brakes, tires, cooling system
and transmission. These parts can work hard
on mountain roads.
0 Know how to go down hills. The most important
thing to know is this: let your engine do some of
the slowing down. Shift to
a lower gear when you go
down a steep or long hill.
If you don’t shift down, your brakes could get
so hot that they wouldn’t work well. You would
then have poor braking or even none going down a hill. You could crash. Shift down to let
your engine assist your brakes on
a steep
downhill slope. Coasting downhill in
NEU ,‘RAL (N) or with the
ignition
off is dangerous. Your brakes will have
to do
all the work of slowing down. They could
get
so hot that they wouldn’t work well. You
would then have poor braking or even none going down a
hill. You could crash. Always
have your engine running and your vehicle
in
gear when you go downhill. ~
Know how to go uphill. You may want to shift down to
a lower gear. The lower gears help cool your engine
and transmission, and you can climb the hill better.
roads in hills or mountains. Don’t swing wide or cut
across the center of the road. Drive at speeds that let
you stay in your own lane.
0 As you go over the top of a hill, be alert. There could
be something in your lane, like a stalled car or an
accident.
You may see highway signs on mountains that warn
of special problems. Examples are long grades,
passing or no-passing zones, a falling rocks area or
winding roads. Be alert to these and take appropriate
action.
Stay in your own lane when driving on two-lane
4-35
Page 255 of 410
Driving with a ‘railer
I..
If you have a rear-most window open and you
pull a trailer with your vehicle, carbon
monoxide
(CO) could come into your vehicle.
You can’t see or smell CO.
It can cause
unconsciousness
or death. See “Engine
Exhaust” in the Index.
To maximize your safety
when towing a trailer:
Have your exhaust system inspected for
leaks, and make necessary repairs before
starting on your trip.
Keep the rear-most windows closed.
If exhaust does come into your vehicle
through a window
in the rear or another
opening, drive with your front, main heating
or cooling system on and with the
fan on any speed. This will bring fresh,
outside air into your vehicle.
Do not use
the climate control setting for maximum air because
it only recirculates the air inside
your vehicle. See “Climate Controls”
in the
Index. Towing a trailer requires a certain
amount of experience.
Before setting out for the open road, you’ll want to get
to know your rig. Acquaint yourself with the feel of
handling and braking with the added weight of the trailer.
And always keep in mind that the vehicle you are
driving is now a good deal longer and not nearly as
responsive as your vehicle is by itself.
Before you
start, check the trailer hitch and platform
(and attachments), safety chains, electrical connector,
lamps, tires and mirror adjustment.
If the trailer has
electric brakes,
start your vehicle and trailer moving and
then apply the trailer brake controller by hand
to be
sure the brakes are working. This lets you check your
electrical connection at the same time.
During your trip, check occasionally
to be sure that the
load is secure, and that the lamps and any trailer
brakes are still working.
Following Distance
Stay at least twice as far behind the vehicle ahead as
you would when driving your vehicle without a trailer.
This can help you avoid situations that require
heavy braking and sudden turns.
Passing
You’ll need more passing distance up ahead when
you’re towing a trailer. And, because you’re a good deal
longer, you’ll need
to go much farther beyond the
passed vehicle before you can return
to your lane.
4-50
Page 257 of 410
Par1 . on Hills
You really should not park your vehicle, with a
trailer attached,
on a hill. If something goes
wrong, your
rig could start to move. People
can be injured, and both your vehicle and the
trailer can be damaged.
When You Are Ready to Leave After
Parking on a
Hill
1. Apply your regular brakes and hold the pedal down
while you:
But
if you ever have to park your rig on a hill, here’s
how to do it:
1. Apply your regular brakes, but don’t shift into
PARK (P) yet. When parking uphill, turn your wheels
away from the curb. When parking downhill, turn
your wheels into the curb.
2. Have someone place chocks under the trailer
wheels.
3. When the wheel chocks are in place, release the
4. Reapply the regular brakes. Then apply your
regular brakes until
the chocks absorb the load.
parking brake, and then shift into PARK
(P).
5. Release the regular brakes.
start your engine,
shift into a gear, and
release the parking brake.
2. Let up on the brake pedal.
3. Drive slowly until the trailer is clear of the chocks.
4. Stop and have someone pick up and store the
chocks.
Maintenance When Trailer Towing
Your vehicle will need service more often when you’re
pulling a trailer. See the Maintenance Schedule for more
on this. Things that are especially important in trailer
operation are automatic transmission fluid (don’t overfill),
engine oil, axle lubricant, belt, cooling system and
brake system. Each
of these is covered in this manual,
and the Index will help you find them quickly.
If
you’re trailering, it’s a good idea to review these sections
before you start your trip.
Check periodically
to see that all hitch nuts and bolts
are tight.
4-52