radio controls Oldsmobile Bravada 2003 Owner's Manuals
[x] Cancel search | Manufacturer: OLDSMOBILE, Model Year: 2003, Model line: Bravada, Model: Oldsmobile Bravada 2003Pages: 410, PDF Size: 20.1 MB
Page 114 of 410
Section 3 Instrument Panel
Instrument Panel Overview ............................... 3.4
Hazard Warning Flashers
................................ 3.5
Other Warning Devices
................................... 3.6
Horn
............................................................. 3.6
Tilt Wheel
..................................................... 3.6
Turn SignaVMultifunction Lever
......................... 3.7
Exterior Lamps
............................................. 3.14
Interior Lamps
.............................................. 3.17
Accessory Power Outlets
............................... 3.19
Ashtrays and Cigarette Lighter
........................ 3.20
Climate Controls ......................................... 3.21
Dual Automatic Climate Control System
........ 3.21
Rear Climate Control System
......................... 3.25
Steering Wheel Climate Controls
..................... 3.27
Climate Controls Personalization
..................... 3.27
Warning Lights, Gages and Indicators ............. 3.28
Instrument Panel Cluster
................................ 3.29
Speedometer and Odometer
........................... 3.30
Tachometer
................................................. 3.30
Safety Belt Reminder Light
............................. 3.30
Air Bag Readiness Light
................................ 3-31
Charging System Light
.................................. 3.32 Voltmeter Gage
............................................ 3.32
Anti-Lock Brake System Warning Light
......... 3.34
Engine Coolant Temperature Gage
.............. 3.35
Malfunction Indicator Lamp
............................. 3.35
Oil Pressure Gage
........................................ 3.38
Change Engine Oil Light
................................ 3-39
Security Light
............................................... 3.39
Cruise Control Light
...................................... 3.40
Reduced Engine Power Light
......................... 3.40
Service All-Wheel Drive Light
......................... 3.41
Check Gages Warning Light
........................... 3.41
Gate Ajar Light
............................................. 3.42
Fuel Gage
................................................... 3.42
Low Fuel Warning Light
............................. 3.42
Driver information Center (DiC) .. .............. 3.43
DIC Operation and Displays
........................... 3.43
DIC Warnings and Messages
......................... 3.52
Audio System(s) ............................................. 3.56
Setting the Time
........................................... 3.56
Radio with Cassette and CD
.......................... 3.57
Radio with Six-Disc CD
................................. 3.66
Brake System Warning
Light
.......................... 3-33
3- 1
Page 115 of 410
Section 3 Instrument Panel
Rear Seat Entertainment System .................... 3.76
Rear Seat Audio (RSA)
................................. 3.87
Radio Personalization
.................................... 3.88
Theft-Deterrent Feature
.................................. 3.88
Audio Steering Wheel Controls
....................... 3.89
DVD Distortion
............................................. 3.89
Understanding Radio Reception
...................... 3.89 Care of
Your Cassette Tape Player
............. 3-90
Care
of Your CDs and DVDs ......................... 3-91
Care of Your CD and DVD Player
................... 3-91
Cleaning the Video Screen
............................. 3.91
Fixed Mast Antenna
.................................. 3.91
Chime Level Adjustment
........................ 3-91
3-2
Page 169 of 410
Audio System(s)
Notice: Before you add any sound equipment to
your vehicle
- like a tape player, CB radio, mobile
telephone or two-way radio
- be sure you can
add what you want. If you can,
it’s very important to
do
it properly. Added sound equipment may
interfere with the operation
of your vehicle’s engine,
Delphi Electronics radio or other systems, and
even damage them. Your vehicle’s systems may interfere with the operation
of sound equipment that
has been added improperly.
So, before adding sound equipment, check with
your dealer and be sure to check federal rules covering mobile radio and telephone units.
Your audio system has been designed
to operate easily
and
to give years of listening pleasure. You will get the
most enjoyment out of it
if you acquaint yourself with it
first. Find out what your audio system can do and how
to
operate all of its controls to be sure you’re getting the
most out of the advanced engineering that went into it.
Your vehicle has a feature called Retained Accessory
Power (RAP). With RAP, you can play your audio
system even after the ignition is turned
off. See
“Retained Accessory Power (RAP)” under
lgnition
Positions on page
2- 18.
Setting the Time
Your radio may have a button marked with an H or HR
to represent hours and an M or MIN to represent
minutes.
Press and hold the hour button until the correct hour
appears on the display. AM or PM will also appear
on the display. Press and hold the minute button until
the correct minute appears on the display. The time may
be set with the ignition on or
off.
To synchronize the time with an FM station broadcasting
Radio Data System
(RDS) information, press and
hold the hour and minute buttons at the same time for
two seconds until UPDATED and the clock symbol
appear on the display. If the time is not available from
the station,
NO UPDAT will appear on the display
instead.
RDS time is broadcast once a minute. Once you have
tuned
to an RDS broadcast station, it may take a
few minutes for your time
to update.
3-56
Page 175 of 410
TRAF (Traffic): TRAF will appear on the display if the
tuned station broadcasts traffic announcements.
To
receive the traffic announcement from the tuned station,
press this button. Brackets will be displayed around
TRAF and when a traffic announcement comes on the
tuned radio station you will hear it.
If the current tuned station does not broadcast traffic
announcements, press this button and the radio
will seek
to a station that does. When the radio finds a
station that broadcasts traffic announcements, it will
stop. Brackets will be displayed around TRAF and when
a traffic announcement comes on the tuned radio
station you will hear it.
If no station is found, NO TRAF
will appear on the display.
Traffic Interrupt Feature: Your radio can interrupt the
play of a cassette, or CD. Press the TRAF button.
The radio will seek
to a station that broadcasts traffic
announcements. When the radio finds a station
that broadcasts traffic announcements, it will stop.
Brackets around TRAF will appear on the display. When
a traffic announcement comes on the station that was
found, you will hear it. When the traffic announcement is
over, the radio will resume play of the cassette, or
CD.
If no station is found, NO TRAF will appear on the
display.
Playing a Cassette Tape
Your tape player is built to work best with tapes that are
up
to 30 to 45 minutes long on each side. Tapes
longer than that are
so thin they may not work well in
this player. The longer side with the tape visible should
face
to the right. If the ignition is on, but the radio is
off, the tape can be inserted and will begin playing. If
you hear nothing but a garbled sound, the tape may not
be in squarely. Press the eject button, located next
to
the cassette tape slot, to remove the tape and start over.
While the tape is playing, use the VOLUME, POWER,
AUDIO, AUTO EQ, and the
SEEK controls just as
you do for the radio. The display will show TAPE and
an arrow showing which side of the tape is playing. The
tape player automatically begins playing the other
side when it reaches the end of the tape.
Your tape bias is set automatically when a metal or
chrome tape is inserted. If you want
to insert a
tape while the ignition is off, first press the button with
the eject symbol on it or the RCL knob.
If an error appears on the radio display, the tape won’t
play because of an error. See “Cassette Tape
Messages” later in this section.
3-62
Page 181 of 410

Setting the Tone (BassTTreble)
AUDIO: Push the AUDIO knob until BASS, MID or
TREB appears on the display. Turn the knob to increase
or
to decrease. If a station is weak or noisy, you may
want to decrease the treble.
To adjust bass, midrange or treble
to the middle
position, select BASS, MID or TREB and push and hold
the AUDIO knob. The radio will produce one beep
and adjust the display level to zero.
To adjust all tone and speaker controls
to the middle
position, push and hold the AUDIO knob when no tone
or speaker control is displayed. The radio will produce
one beep and CENTERED will appear on the display.
AUTO EQ (Automatic Equalization): Press this button
to choose between bass, midrange and treble
equalization settings designed for country, jazz, talk,
pop, rock and classical program types.
To return
to the manual mode (CUSTOM), press the
AUTO EQ button until CUSTOM appears on the display
Then you will be able to manually adjust the bass,
midrange and treble using the AUDIO knob.
Adjusting the Speakers (Balance/Fade)
AUDIO: To adjust the balance between the right
and the left speakers, push the AUDIO knob until BAL
appears on the display. Turn the knob
to move the
sound toward the left or the right speakers.
To adjust the fade between the front and rear speakers,
push and hold the AUDIO knob until FAD appears on
the display. Turn the knob to move the sound toward the
front or the rear speakers.
To adjust the balance and the fade to the middle
position, select balance or fade and push and hold the
AUDIO knob. The radio will beep once and will
adjust the display level to the middle position.
To adjust all tone and speaker controls to the middle
position, push and hold the AUDIO knob when no tone
or speaker controls are displayed. The radio will
produce one beep and CENTERED will appear on the
display.
3-68
Page 200 of 410

Rear Seat Audio (RSA)
This feature allows rear seat passengers to listen to any
of the music sources: radio, cassette tapes or CDs
and to use automatic tone control. The rear seat
passengers can only control the music sources that the
front seat passengers are not listening
to. For
example, rear seat passengers may listen to a cassette
tape or
CD through headphones while the driver
listens
to the radio through the front speakers. The rear
seat passengers have control of the volume for each
set of headphones. The front seat audio controls always
override the rear seat audio controls.
PWR (Power): Press this button to turn the rear seat
audio system on or
off. The rear speakers will be muted
when the power is turned on unless you have a Bose@
equipped vehicle. You may operate the rear seat audio
functions even when the primary radio power is
off.
VOL (Volume): Turn the knob to increase or to
decrease volume. The left VOL knob controls the left
headphone and the right
VOL knob controls the
right headphone.
3-87
Page 202 of 410
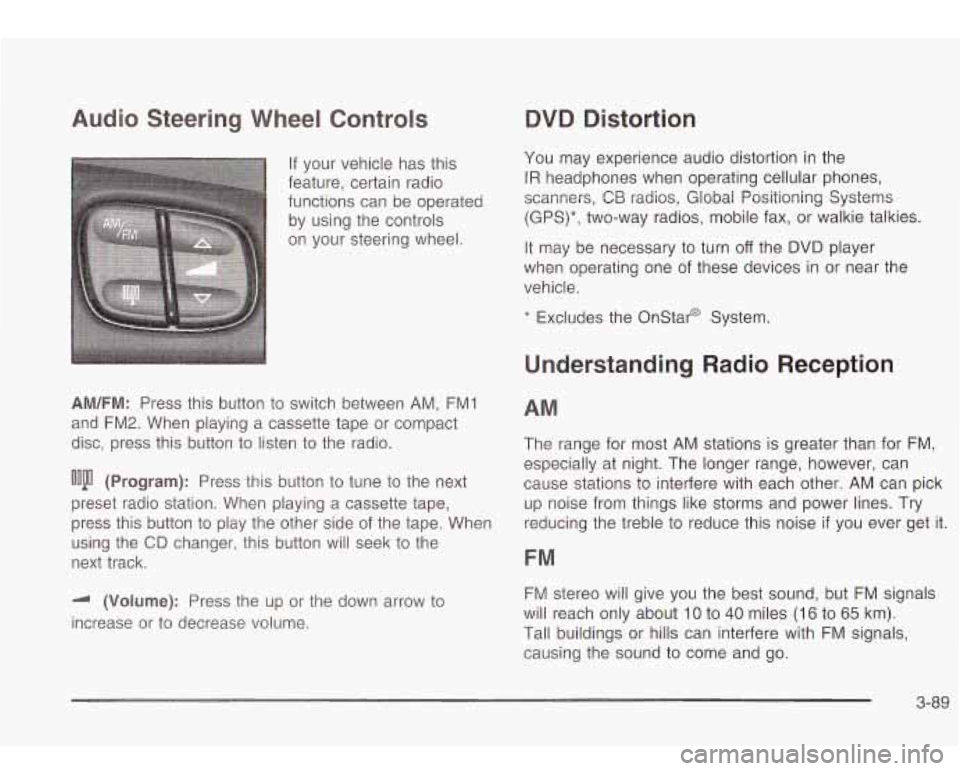
Audio Steering Wheel Controls
If your vehicle has this
feature, certain radio
functions can be operated
by using the controls
on your steering wheel.
AM/FM: Press this button to switch between AM, FMI
and FM2. When playing a cassette tape or compact
disc, press this button
to listen to the radio.
ooju (Program): Press this button to tune to the next
preset radio station. When playing a cassette tape,
press this button
to play the other side of the tape. When
using the
CD changer, this button will seek to the
next track.
-I (Volume): Press the up or the down arrow to
increase or to decrease volume.
QVQ Distortion
You may experience audio distortion in the
IR headphones when operating cellular phones,
scanners,
CB radios, Global Positioning Systems
(GPS)*, two-way radios, mobile fax, or walkie talkies.
It may be necessary to turn
off the DVD player
when operating one of these devices in or near the
vehicle.
* Excludes the Onstar@ System.
Understanding Radio Reception
AM
The range for most AM stations is greater than for FM,
especially at night. The longer range, however, can
cause stations
to interfere with each other. AM can pick
up noise from things like storms and power lines. Try
reducing the treble
to reduce this noise if you ever get it.
FM
FM stereo will give you the best sound, but FM signals
will reach only about
10 to 40 miles (16 to 65 km).
Tall buildings or hills can interfere with FM signals,
causing the sound to come and go.
3-89
Page 388 of 410
A
Accessory Inflator ........................................... 5-60
Accessory Power Outlets
................................. 3-19
Adding a Snow Plow or Similar Equipment
......... 4-44
Adding Washer Fluid
....................................... 5-34
Additional Program Information
........................... 7-8
Additives, Fuel
................................................. 5-6
Add-on Electrical Equipment
............................ 5-86
After Off-Road Driving
..................................... 4-26
Readiness Light
.......................................... 3-31
Air Bag Systems
............................................. 1-46
Adjusting the Speakers
(Balance/Fade)
...... 3-59, 3-68
Air Bag
How Does an Air Bag Restrain?
.................... 1-52
Servicing Your Air Bag-Equipped Vehicle
......... 1-55
What Makes an Air Bag Inflate?
.................... 1-52
What Will You See After an
Air Bag Inflates?
...................................... 1-53
When Should an Air Bag Inflate? ................... 1-51
Where Are the Air Bags?
.............................. 1-49
Air Cleaner/Filter, Engine
................................. 5-1 8
All Overseas Locations
...................................... 7-4
All-Wheel Drive
............................................... 5-44
All-Wheel Drive (AWD) System
......................... 2-24
All-Wheel-Drive Service Light
............................ 3-41
Aluminum Wheels
........................................... 5-82
AM ............................................................... 3-89
Antenna, Fixed Mast
....................................... 3-91
Anti-lock Brake System
..................................... 4-7
Anti-Lock Brake. System Warning Light .............. 3-34
Appearance Care
............................................ 5-77
Care
of Safety Belts .................................... 5-80
Chemical Paint Spotting
............................... 5-83
Gleaning the Inside of Your Vehicle
................ 5-77
Cleaning the Outside of Your Vehicle
.............. 5-80
Finish Damage
............................................ 5-82
GM Vehicle Care/Appearance Materials .......... 5-83
Sheet Metal Damage
................................... 5-82
Underbody Maintenance
............................... 5-83
Weatherstrips
.............................................. 5-80
Approaching a Hill
.......................................... 4-19
Ashtrays
........................................................ 3-20
Audio Speakers
.............................................. 3-78
Audio System(s)
............................................. 3-56
Audio Steering Wheel Controls
...................... 3-89
Care of Your Cassette Tape Player
................ 3-90
Care of Your CD and DVD Player
.................. 3-91
Care of Your CDs and DVDs
........................ 3-91
Chime Level Adjustment
............................... 3-91
Fixed Mast Antenna
..................................... 3-91
Radio Personalization
.......... .............. 3-88
Radio with Cassette and CD
......................... 3-57
Radio with Six-Disc CD
................................ 3-66
Audio Systems
Audio System(s)
Rear Seat Audio (RSA)
................................ 3-87
Setting the Time
.......................................... 3-56
Theft-Deterrent Feature
................................ 3-88
Understanding Radio Reception
..................... 3-89
1
Page 397 of 410
Odometer ...................................................... 3-30
Off-Road Recovery
.......................................... 4-1 2
Oil
Change Engine Oil Light
............................... 3-39
Engine
....................................................... 5-1 3
Pressure Gage
............................................ 3-38
OIL PRESSURE LOWETOP ENGINE ............... 3-53
Older Children, Restraints
................................ 1-27
Online Owner Center
........................................ 7-3
Onstar@ System
............................................ 2-35
Onstar@ Personal Calling
................................. 2-36
Onstar@ Services
............................................ 2-35
Onstar@ Virtual Advisor
.................................... 2-36
Operating Your All-Wheel-Drive Vehicle
Off
Paved Roads .............................................. 4-15
Other Warning Devices
...................................... 3-6
Outlet Adjustment
............................................ 3-24
Outside Automatic Dimming Mirror with
Curb View Assist
................ ........... 2-33
Convex Mirror
............................................. 2-33
Heated Mirrors
............................................ 2-33
Manual Mirrors
............................................ 2-32
Power Mirror
............................................... 2-32
Overhead Console
.......................................... 2-41
Owners, Canadian
............................................... ii
Owner’s Information ........................................ 7-1 0
P
Park (P)
Parking Shifting Out
of ............, .... ..... 2-27
Brake
................................................ 2-25
Over Things That Burn
............................. 2-28
Park (P) Mechanism Check
........................... 6-14
Parking Brake and
Automatic Transmission
Parking on Hills
.............................................. 4-52
Park( P)
Shifting Into
................................................ 2-25
Part A
- Scheduled Maintenance Services ............ 6-4
Part
B - Owner Checks and Services ................ 6-10
Part C
. Periodic Maintenance Inspections .......... 6-15
Part D
- Recommended Fluids and Lubricants .... 6-17
Part E
. Maintenance Record ........................... 6-19
PASSENGER DOOR AJAR
.. .................... 3-54
Passing
................................................. 4.13, 4-50
Passlock@
..................................................... 2-17
Personalization
............................................... 3-46
Personalization, Climate Controls
...................... 3-27
Plan Ahead When Possible
................................ 7-7
Playing a Cassette Tape
.................................. 3-62
Playing a Compact Disc
.......................... 3.64, 3-72
Playing a Specific Loaded
Compact Disc
............................................. 3-73
Playing the Radio
................................... 3.57, 3-66
Power
Accessory Outlets
........................................ 3-19
10
Page 398 of 410
Power (cont.) Door Locks
.................................................. 2-9
Electrical System
......................................... 5-86
Lumbar Controls
........................................... 1-2
Reclining Seatbacks
...................................... 1-4
Reduced Engine Light
.................................. 3-40
Seat
............................................................ 1-2
Steering Fluid
............................................. 5-33
Windows
.................................................... 2-1 5
Power Steering ............................................... 4-10
Programmable Automatic Door Locks
.... ..... 2-10
Programmable Unlocking Feature
.................. 2-1 1
Programmable Locking Feature ..................... 2-1 0
Programming the HomeLink Transmitter ............. 2-37
Questions and Answers About Safety Belts 1-12
Radiator Pressure Cap
.................................... 5-24
Radios
.......................................................... 3-56
Care of Your Cassette Tape Player
................ 3-90
Care
of Your CD and DVD Player .................. 3-91
Care
of Your CDs and DVDs ........................ 3-91
Radio Personalization
................................... 3-88
Radio with Cassette and CD
......................... 3-57
Radio with Six-Disc CD
................................ 3-66
Rear Seat Audio
.......................................... 3-87 Radios (cont.)
Setting the Time
...................................... 3-56
Theft-Deterrent
............................................ 3-88
Understanding Reception
.............................. 3-89
RainsenseTM Wipers
.......................................... 3-9
RDS Messages
...................................... 3-61, 3-71
Reading Lamps
.............................................. 3-18
REAR ACCESS OPEN
.................................... 3-53
Rear Axle
...................................................... 5-46
Lockina
...................................................... 4-10
Rear
Rear
Rear
Rear
Rear
Reat
Rear
Rear Reat
Rear
Rear Climate Control System 3-25
v
............................
Door Security Locks ................................ 2-12
Floor Storage Lid
.................................... 2-43
Seat Audio (RSA)
.................................... 3-87
Seat Entertainment System
....................... 3-76
Seat Operation
......................................... 1-6
Seat Passenger Positions
......................... 1-21
Seat Passengers, Safety Belts
.................. 1-21
Underseat Fuse Block
.............................. 5-90
Window Defogger
.................................... 3-24
Safety
Belt Comfort Guides
...................... 1-24
Rearview Mirror. Automatic Dimming with
Onstar@ and Compass
................................. 2-30
Reclining Seatbacks. Power
............................... 1-4
Recreational Vehicle Towing
............................. 4-41
Reduced Engine Power Light
............................ 3-40
Remote Control
.............................................. 3-81
Remote Keyless Entry System
............................ 2-4
Remote Keyless Entry System, Operation
............ 2-5
11