setting the Oldsmobile Cutlass Supreme 1994 Owner's Manuals
[x] Cancel search | Manufacturer: OLDSMOBILE, Model Year: 1994, Model line: Cutlass Supreme, Model: Oldsmobile Cutlass Supreme 1994Pages: 276, PDF Size: 14.73 MB
Page 102 of 276
Features & Controls
100
~.*.,. :.. ~~.,,~..~.,.~. ;,~,!~~. ~~~~....,...... :.~:~........:.*,:~
.r..,..,~.~...:.1/2~~:1~.~.,~::,:.-..~~.':,lr'\..:.'..,,iC.~..;.~'...;:\
...::..:.: ...., 4; ...,., :*-&
2. Adjust the seat, if necessary, before
setting the height control.
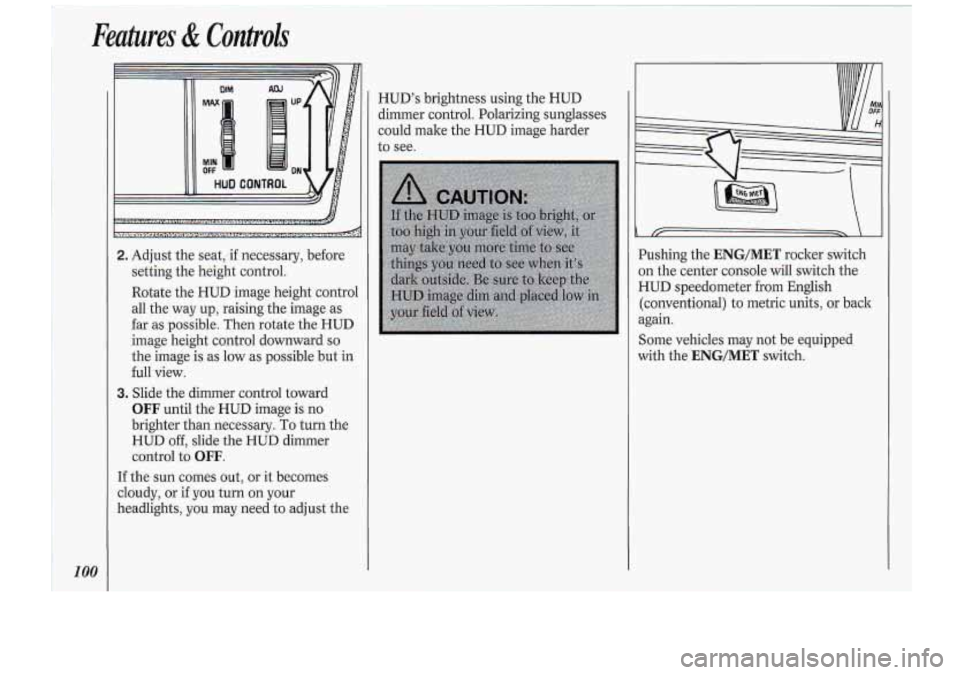
Rotate the HUD image height control
all the way
up, raising the image as
far as possible. Then rotate the HUD
image height control downward
so
the image is as low as possible but in
full view.
3. Slide the dimmer control toward
OFF until the HUD image is no
brighter than necessary.
To turn the
HUD
off, slide the HUD dimmer
control to
OFF.
If the sun comes out, or it becomes
cloudy, or
if you turn on your
headlights. vou mav need to adiust the HUD's
brightness using the HUD
dimmer control. Polarizing sunglasses
could make the HUD image harder
to see.
Irr .
Pushing the ENG/MET rocker switch
on the center console will switch the
HUD speedometer from English
(conventional) to metric units, or back
again.
Some vehicles may not be equipped
with the
ENG/MET switch.
Page 106 of 276
Comfort Controls &Audio Systems
104
I. I
I/ * /I CLIMATE CONTROL
[El
I Climate Control
The air conditioner and heater work
)est if you keep your windows closed
vhile using them. Your vehicle also has
:he flow-through ventilation system
iescribed later in this section.
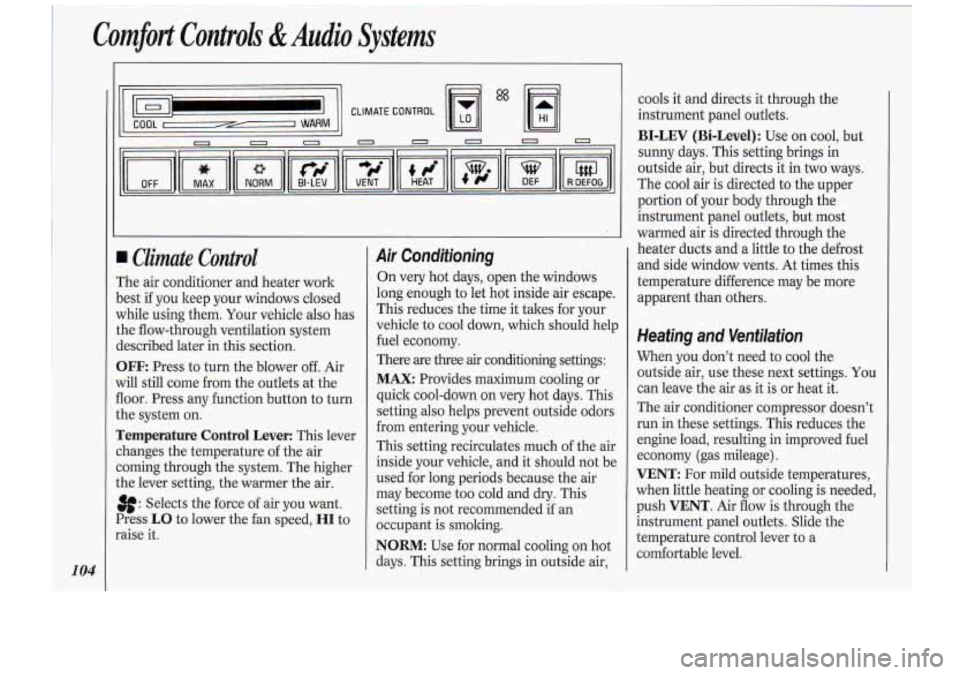
3FF: Press to turn the blower off. Air
vi11 still come from the outlets at the
loor. Press any function button to turn
.he system on.
remperature Control Lever: This lever
:hanges the temperature of the air
:oming through the system. The higher
.he lever setting, the warmer the air.
8: Selects the force of air you want.
Press
LO to lower the fan speed, HI to
raise it.
Air Conditioning
On very hot days, open the windows
long enough to let hot inside air escape.
This reduces the time it takes for your
vehicle to cool down, which should help
fuel economy.
There are three
air conditioning settings:
MAX: Provides maximum cooling or
quick cool-down on very hot days. This
setting also helps prevent outside odors
from entering your vehicle.
This setting recirculates much of the air
inside your vehicle, and it should not be
used for long periods because the air
may become too cold and dry. This
setting is not recommended if an
occupant is smoking.
NORM: Use for normal cooling on hot
days. This setting brings in outside air, cools
it and directs it through the
instrument panel outlets.
BI-LEV (Bi-Level): Use on cool, but
sunny days. This setting brings in
outside air, but directs it in two ways.
The cool air is directed to the upper
portion of your body through the
instrument panel outlets, but most
warmed air is directed through the
heater ducts and a little to the defrost
and side window vents. At times this
temperature difference may be more
apparent than others.
Heating and Ventilation
When you don’t need to cool the
outside air, use these next settings. You
can leave the air as it is or heat it.
The air conditioner compressor doesn’t
run in these settings. This reduces the
engine load, resulting in improved fuel
economy (gas mileage).
VENT: For mild outside temperatures,
when little heating or cooling is needed,
push
VENT. Air flow is through the
instrument panel outlets. Slide the
temperature control lever to a
comfortable level.
Page 107 of 276
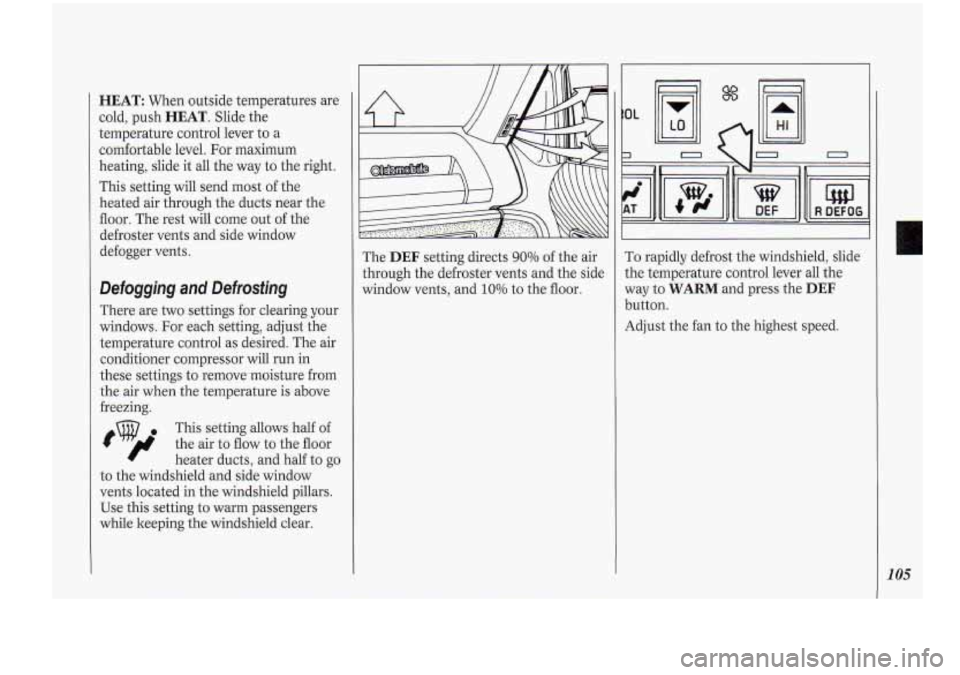
HEAT: When outside temperatures are
cold, push
HEAT. Slide the
temperature control lever to a
comfortable level. For maximum
heating, slide it all the way to the right.
This setting will send
most of the
heated air through the ducts near the
floor. The rest will come out of the
defroster vents and side window
defogger vents.
There are two settings for clearing your
windows. For each setting, adjust-the
temperature control as desired. The air
conditioner compressor will run in
these settings to remove,moisture
from-
the air when the temperature is above
freezing.
This setting allows half of
the air to flow to the floor
heater ducts, and half to go
8Qjfl
to the~windshield and side window
vents located in the windshield pillars.
Use this setting to warm passengers
while keeping the windshield clear. The
DEF setting directs 90% of the
air
through the defroster vents and the side
window vents, and
10% to the floor. To
rapidly defrost the windshield, slide
the temperature control .lever all the
way to WARM and press the DEF
button.
Adjust the fan to the highest speed.
105
Page 109 of 276
CLIMATE CONTROL
ELECTRONIC
0 n 0 0 0
1 Electronic Climate Control
(OPTION)
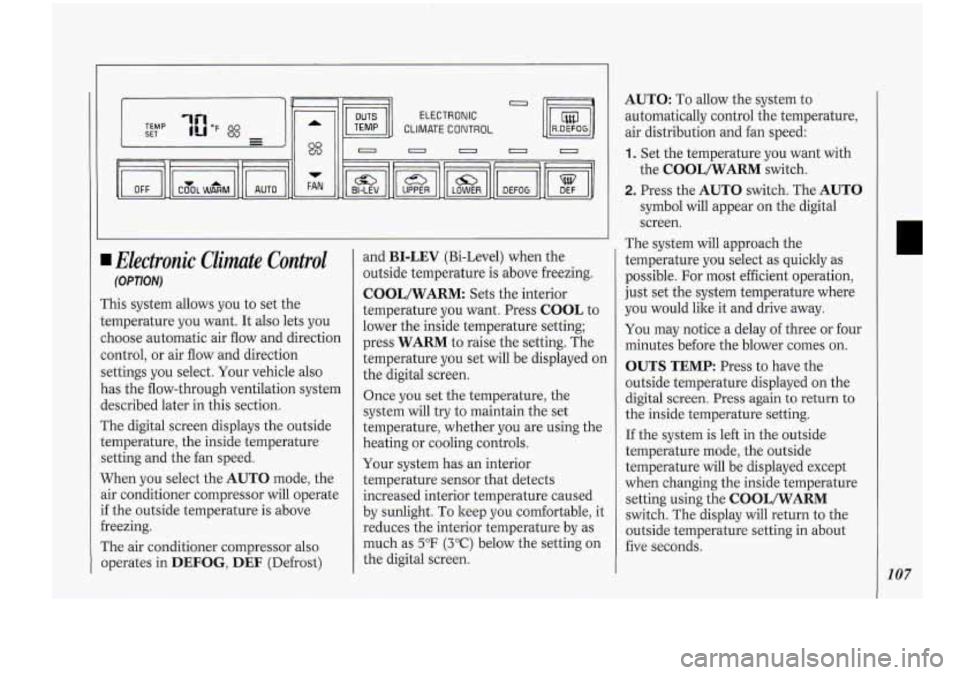
This system allows you to set the
temperature
you want. It also lets you
choose automatic air flow and direction
control, or air flow and direction
settings you select. Your vehicle also
has the flow-through ventilation system
described later in this section.
The digital screen displays the outside
temperature, the inside temperature
setting and the fan speed.
When you select the
AUTO mode, the
air conditioner compressor
will operate
if the outside temperature is above
freezing.
The air conditioner compressor also
operates in
DEFOG, DEF (Defrost) and
BI-LEV (Bi-Level)
when the
outside temperature is above freezing.
COOL/WARM: Sets the interior
temperature you want. Press
COOL to
lower the inside temperature setting;
press
WARM to raise the setting. The
temperature you set will be displayed on
the digital screen.
Once you set the temperature, the
system will try to maintain the set
temperature, whether. you are using the
heating or cooling controls.
Your system has an interior
temperature sensor that dete.cts
increased interior temperature caused
by sunlight. To keep you comfortable, it
reduces the interior temperature by as
much as
5°F (3°C) below the setting on
the digital screen.
AUTO: To allow the system to
automatically control the temperature,
air distribution and fan speed:
1. Set the temperature you want with
the
COOL/WARM switch.
2. Press the AUTO switch. The AUTO
symbol will appear on the digital
screen.
The system will approach the
temperature you select as quickly as
possible.
For most efficient operation,
just set the system temperature where
you would like it and drive away.
You may notice a delay of three or four
minutes before the blower comes on.
OUTS TEMP: Press to have the
outside temperature displayed
on the
digital screen. Press
again to return to
the inside temperature setting.
If the system is left in the outside
temperature mode, the outside
temperature will be displayed except
when changing the inside temperature
setting using the
COOL/WARM
switch. The display will return to the
outside temperature setting in about
five seconds.
107
Page 110 of 276
Comfort Controls &Audio Systems
108
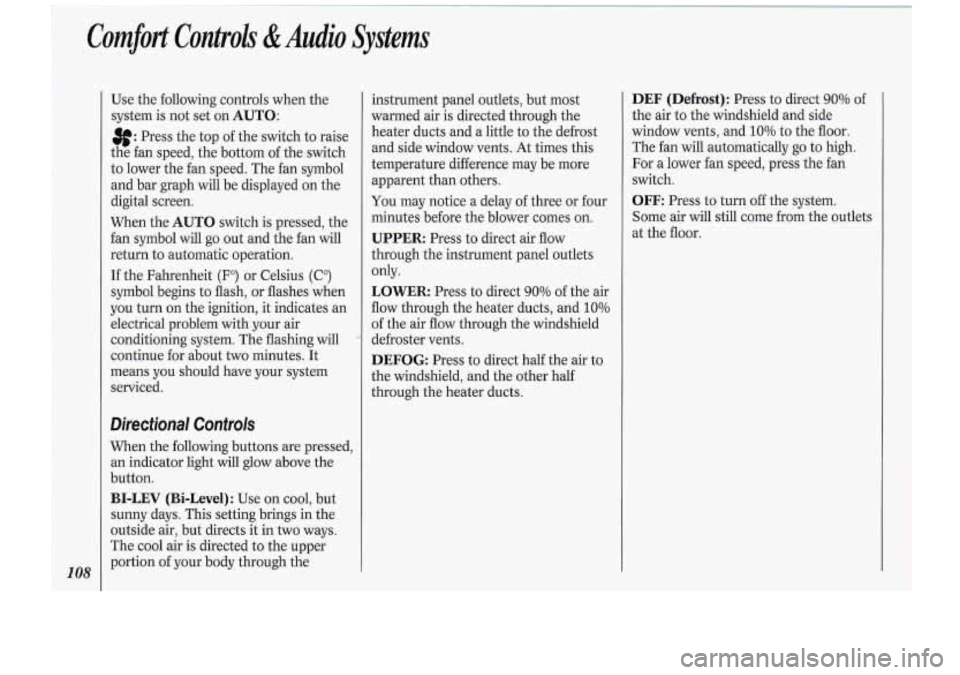
Use the following controls when the
system is not set on
AUTO:
8: Press.the top of the switch to raise
the fan speed, the bottom of the switch
to lower the fan speed. The fan symbol
and bar graph will be displayed on the
digital screen.
When the
AUTO switch is pressed, the
fan symbol will go out and the fan will
return to automatic operation.
If the Fahrenheit (F") or Celsius (C")
symbol begins to flash, or flashes when
you turn on the ignition, it indicates an
electrical problem with your air
conditioning system. The flashing will
continue for about two minutes. It
means you should have your system
serviced.
Directional Controls
When the following buttons are pressed,
an indicator light will glow above the
button.
BI-LEV (Bi-Level): Use on cool, but
sunny days. This setting brings in the
outside air, but directs it in
two ways.
The cool air is directed to the upper
portion of your body through the instrument
panel outlets, but most
warmed air is directed through the
heater ducts and a little to the defrost
and side window vents. At times this
temperature difference may be more
apparent than others.
You may notice a delay of three or four
minutes before the blower comes on.
UPPER: Press to direct air flow
through the instrument panel outlets
only.
LOWER Press to direct 90% of the air
flow through the heater ducts, and
10%
of the air flow through the windshield
defroster vents.
DEFOG: Press to direct half the air to
the windshield, and the other half
through the heater ducts.
DEF (Defrost): Press to direct 90% of
the air to the windshield and side
window vents, and
10% to the floor.
The fan will automatically go to high.
For a lower fan speed, press the fan
switch.
OFF: Press to turn off the system.
Some air will still come from the outlets
at the floor.
I
Page 111 of 276
Steering Wheel Touch Controls
for Climate Control
(OPTION)
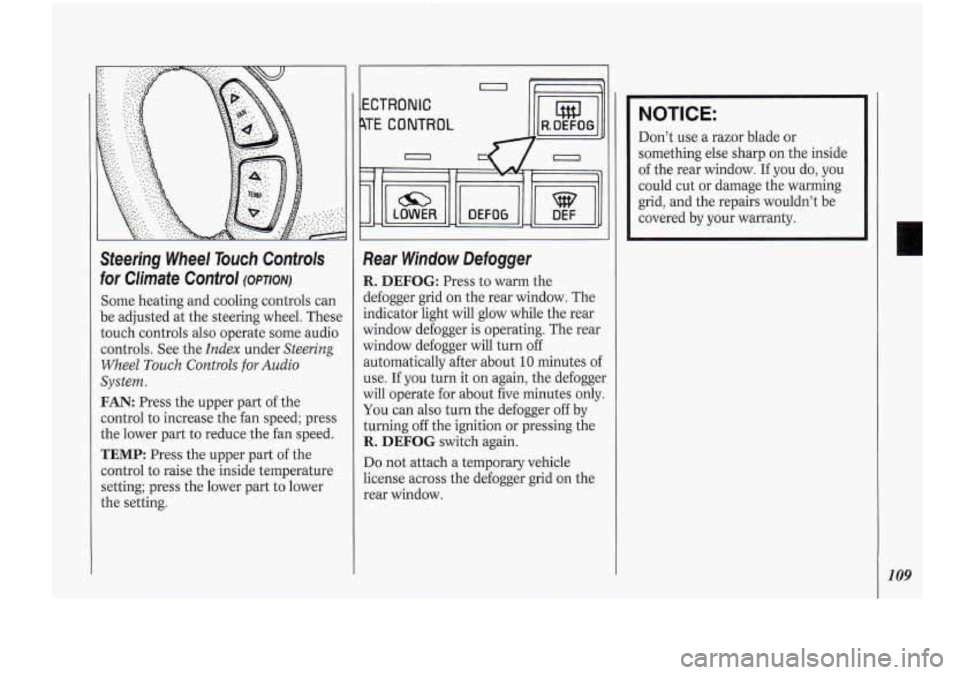
Some heating and cooling controls can
be adjusted at the steering wheel. These
touch controls also operate some audio
controls. See the
Index under Steering
Wheel
Touch Controls for Audio
System.
FAN: Press the upper part of the
control to increase the fan speed; press
the lower part to reduce the fan speed.
TEMP: Press the upper part of the
control to raise the inside temperature
setting; press the lower part to lower
the setting.
b
ECTRONIC
TE CONTROL I lW1,
Rear Window Defogger
R. DEFOG: Press to warm the
defogger grid on the rear window. The
indicator light will glow while the rear
window defogger is operating. The rear
window defogger will turn
off
automatically after about 10 minutes of
use. If you turn it on again, the defogger
will operate for about five minutes only.
You can also turn the defogger off by
turning off the ignition or pressing the
R. DEFOG switch again.
Do not attach a temporary vehicle
license across the defogger grid on the
rear window.
NOTICE:
Don’t use a razor blade or
something else sharp on the inside
of the rear window.
If you do, you
could cut or damage the warming
grid, and the repairs wouldn’t be
covered by your warranty.
109
Page 113 of 276
NOTICE:
Before you add any sound
equipment
to your vehicle - like a
tape player, CB radio, mobile
telephone or two-way radio
- be
sure you can add what
you want. If
you can, it's very important to do it
properly. Added sound equipment
may interfere with the operation of
your vehicle's engine, Delco@ radio or other systems, and even damage
them. And, your vehicle's systems
may interfere with the operation of
sound equipment that has been
added improperly.
So, before
adding sound equipment, check
with your dealer and be sure to
check Federal rules covering mobile
radio and telephone units.
I I I OBlCD I
AUTO REVERSE
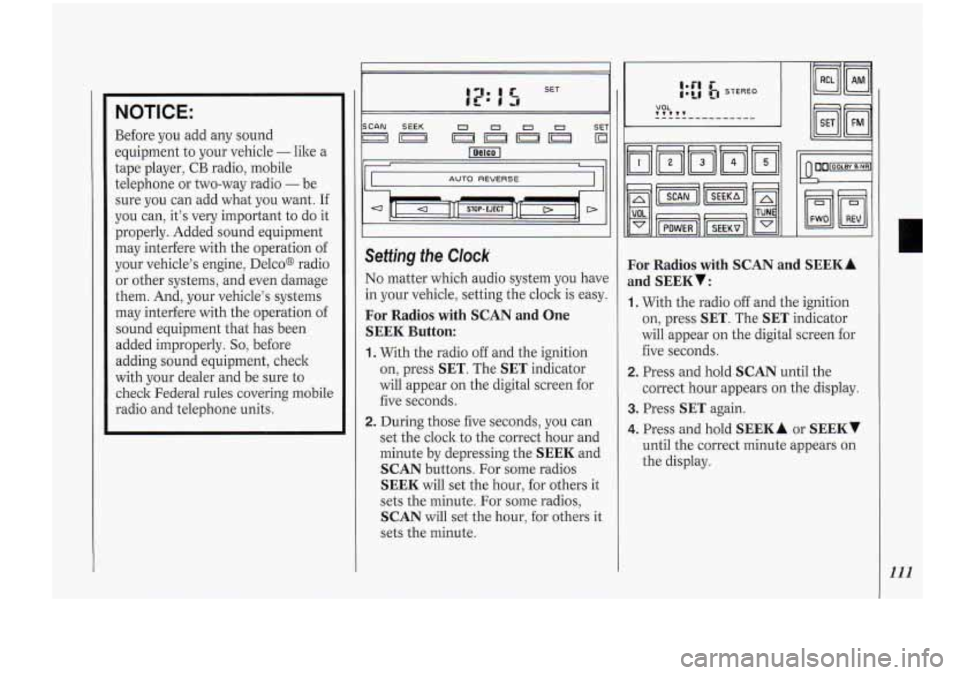
Setting the Clock
No matter which audio system you have
in your vehicle, setting the clock
is easy.
For Radios with SCAN and One
SEEK Button:
1. With the radio off and the ignition
on, press
SET. The SET indicator
will appear on the digital screen for
five seconds.
2. During those five seconds, you can
set the clock to the correct hour and
minute by depressing the
SEEK and
SCAN buttons. For some radios
SEEK will set the hour, for others it
sets the minute. For some radios,
SCAN will set the hour, for others it
sets the minute.
For Radios with SCAN and
and
SEEKY:
~
SEEKA
1. With the radio off and the ignition
on, press
SET. The SET indicator
will appear on the digital screen for
five seconds.
2. Press and hold SCAN until the
correct hour appears on the display.
3. Press SET again.
4. Press and hold SEEK A or SEEKv
until the correct minute appears on
the display.
111
Page 117 of 276
ll
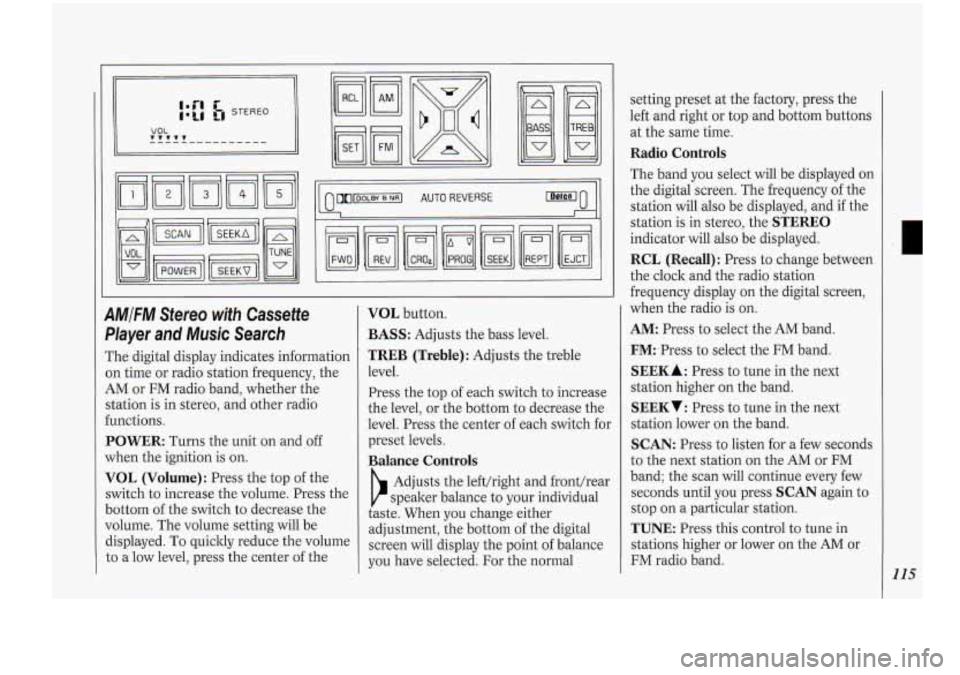
9MlFM Stereo with Cassette
Dlayer
and Music Search
The digital display indicates information
In time or radio station frequency, the
4M or FM radio band, whether the
;tation is in stereo, and other radio
:unctions.
POWER: Turns the unit on and off
when the ignition
is on.
VOL (Volume): Press the top of the
;witch to increase the volume. Press the
Jottom of the switch to decrease the
Jolume. The volume setting will be
%splayed. To quickly reduce the volume
;o a low level, press the center of the
VOL button.
BASS: Adjusts the bass level.
TREB (Treble): Adjusts the treble
level.
Press the top of each switch to increase
the level,
or the bottom to decrease the
level. Press the center of each switch for
preset levels.
Balance Controls
b
Adjusts the lefthight and fronthear
speaker balance to your individual
taste. When you change either
adjustment, the bottom of the digital
screen will display the point
of balance
you have selected.
For the normal setting preset
at the factory, press the
left and right or top and bottom buttons
at the same time.
Radio Controls
The band you select will be displayed on
the digital screen. The frequency of the
station will also be displayed, and
if the
station is in stereo, the
STEREO
indicator. will also be displayed.
RCL (Recall): Press to change between
the clock and the radio station
frequency display on the digital screen,
when the radio is on.
AM:. Press to select, the AM band.
FM:-Press to select the FM band.
SEEK A : Press to tune in the next
station higher on the band.
SEEKT: Press to tune in the next
station lower on the band.
SCAN: Press to listen for a few seconds
to the next station on the AM or FM
band; the scan will continue every few
seconds until you press
SCAN again to
stop on a particular station.
TUNE: Press this control to tune in
stations higher or lower on the AM or
FM radio band.
115
Page 119 of 276
250Hz 3.5KHz
60Hz lKHz lOKHr
AMIFM Stereo with Cassette
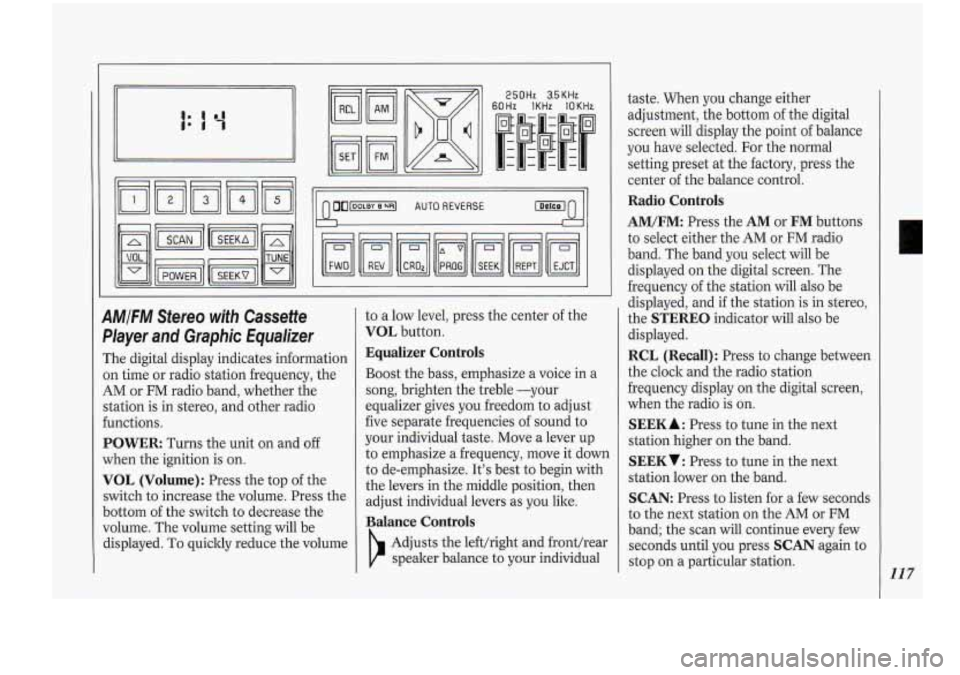
Player
and Graphic Equalizer
The digital display indicates information
on time or radio station frequency, the
AM or FM radio band, whether the
station is in stereo, and other radio
€unctions.
POWER Turns the unit on and off
when the ignition is
on.
VOL (Volume): Press the top of the
switch to increase the volume. Press the
bottom
of the switch to decrease the
volume. The volume setting will be
displayed.
To quickly reduce the volume to
a low level,
press the center of the
VOL button.
Equalizer Controls
Boost the bass, emphasize a voice in a
song, brighten the treble -your
equalizer gives you freedom to adjust
five separate frequencies of sound to
your individual taste. Move a lever up
to emphasize a frequency, move
it down
to de-emphasize. It's best to begin with
the levers in the middle position, then
adjust individual levers as you like.
Balance Controls
Adjusts the lefthight and fronthear
speaker b.alance to your individual taste.
When you change either
adjustment, the bottom of the digital
screen will display the point of balance
you have selected. For the normal
setting preset at the factory, press the
center of the balance control.
Radio Controls
AM/FM: Press the AM or FM buttons
to select either the AM or
FM radio
band. The band you select will be
displayed on the digital screen. The
frequency of the station will also be
displayed, and
if the station is in stereo,
the
STEREO indicator will also be
displayed.
RCL (Recall): Press to change between
the clock and the radio station
frequency display
on the digital screen,
when the radio is on.
SEEK A : Press to tune in the next
station higher on the band.
SEEKV: Press to tune in the next
station lower on the band.
SCAN: Press to listen for a few seconds
to the next station on the
AM or FM
band; the scan will continue every few
seconds until you press
SCAN again to
stop on a particular station.
117
Page 121 of 276
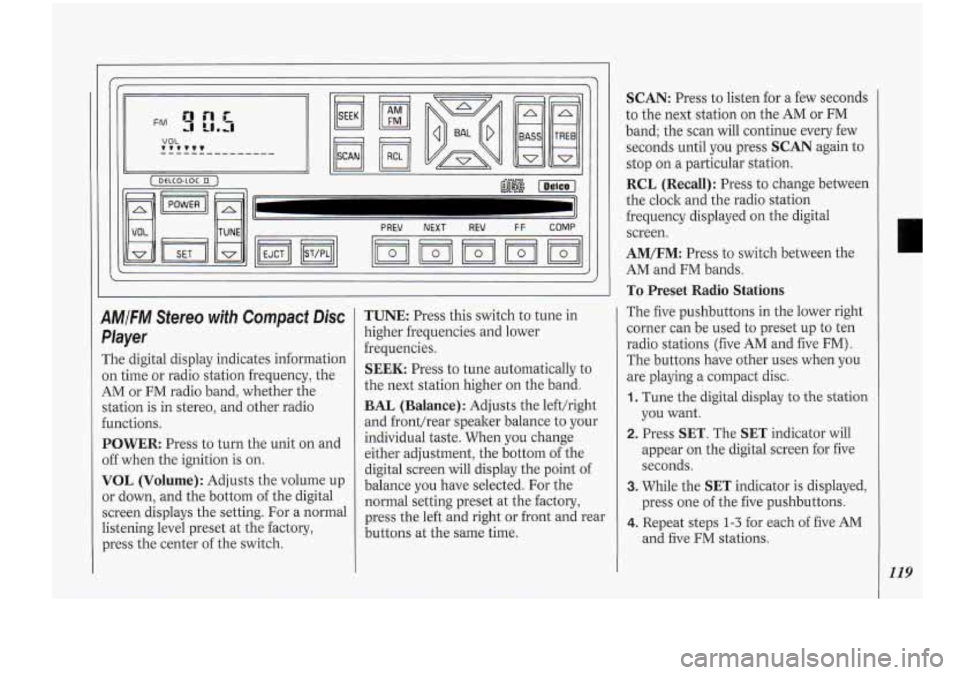
9M/FM Stereo with Compact Disc
Player
The digital display indicates information
on time or radio station frequency, the
AM or FM radio band, whether the
station is in stereo, and other radio
functions.
POWER:-Press to turn the unit on and
off when the ignition is on.
VOL (Volume): Adjusts the volume up
or down, and the bottom of the digital
screen displays the setting. For a normal
listening level preset at the factory,
press the center of the switch.
TUNE: Press this switch to tune in
higher frequencies and lower
frequencies.
SEEK: Press to tune automatically to
the next station higher on the band.
BAL (Balance): Adjusts the lefthight
and fronthear speaker balance to your
individual taste. When you change
either adjustment, the bottom of the
digital screen will display the point of
balance
you have selected. For the
normal setting preset at the factory,
press the left and right or front and rear
buttons at the same time.
SCAN: Press to listen for a few seconds
to the next station on the AM
or FM
band; the scan will continue every few
seconds until you press
SCAN again to
stop on a particular station.
RCL (Recall): Press to change between
the clock and the radio station
frequency displayed on the digital
screen.
AM/FM: Press to switch between the
AM and FM bands.
To Preset Radio Stations
The five pushbuttons in the lower right
corner can be used to preset up to ten
radio stations (five AM and five
FM) .
The buttons have other uses when you
are playing a compact disc.
1. Tune the digital display to the station
you want.
2. Press SET. The SET indicator will
appear on the digital screen for five
seconds.
3. While the SET indicator is displayed,
press one
of the five pushbuttons.
4. Repeat steps 1-3 for each of five AM
and five FM stations.
119