ECU OLDSMOBILE SILHOUETTE 1997 Owners Manual
[x] Cancel search | Manufacturer: OLDSMOBILE, Model Year: 1997, Model line: SILHOUETTE, Model: OLDSMOBILE SILHOUETTE 1997Pages: 436, PDF Size: 21.87 MB
Page 15 of 436

Second Row Safety Belt Stowage
If your vehicle has seats in the third row, there is a
sleeve on the second row outside safety belt to store the
safety belt while entering and exiting the third row of
the vehicle.
If your vehicle has a bench seat
in the second row,
follow this procedure:
Pull the belt out and slide the sleeve along the belt
until it reaches the patch of Velcro@ on the roof.
Simply press the sleeve against the Velcro patch to
secure it in place.
Do not have the second row outside safety belt stored if
someone
is sitting in the second row outside position. The
safety belt would not protect
the passenger correctly.
To release the second row outside safety belt, just pull
the sleeve away from the Velcro patch and use the safety
belt as usual. The sleeve should slide freely when not
in use.
~nere is
also a clip on the safety belt used to secure the
belt after it is disconnected from the mini-buckle. When
removing the second row bench seat, secure the loose end of the safety belt
in this clip. This will keep the safety belt
from dangling and possible striking something.
Dump and Stow Feature
The rear seats in your vehicle, except the Captain’s
chairs, can be folded forward. Use this feature for
exiting and entering third row seats.
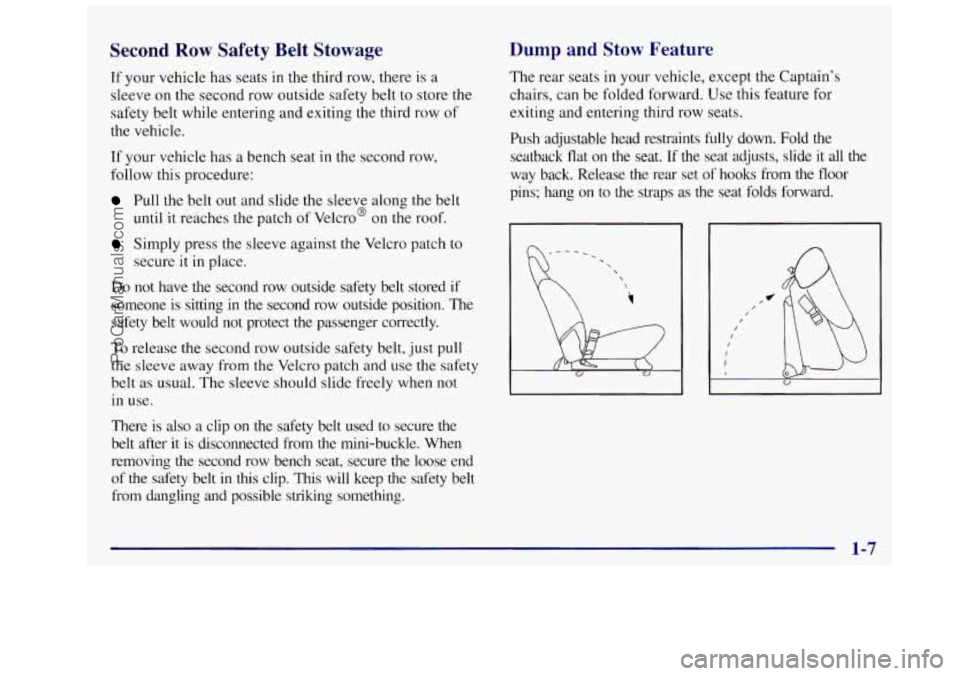
Push adjustable head restraints
fully down. Fold the
seatback
flat on the seat. If the seat adjusts, slide it all the
way back. Release the rear set of hooks from the floor
pins; hang on to the straps as the seat folds forward.
1-7
ProCarManuals.com
Page 43 of 436

4. Push the latch plate into the buckle until it clicks.
Pull
up on the latch plate to make sure it is secure. If
the belt isn’t long enough, see “Safety Belt
Extender” at the end
of this section.
Make sure
the release button on the buckle is
positioned so you would be able to unbuckle the
safety belt quickly
if you ever had to.
5. To make the lap part tight, pull down on the buckle
end
of the belt as you pull up on the shoulder belt. The
lap part of the belt should be worn low and snug on
the hips, just touching the thighs. In a crash, this applies
force to the strong pelvic bones. And you’d be less likely
to slide under the lap belt. If you slid under it, the belt
would apply force at your abdomen. This could cause
serious or even fatal injuries. The shoulder belt should go
over the shoulder and across the chest. These parts
of the
body are best able to take belt restraining forces.
The safety belt locks
if there’s a sudden stop or crash, or
if you pull the belt very quickly out of the retractor.
1-35
ProCarManuals.com
Page 52 of 436

/I CAUTION:
Air bags inflate with great force, faster than the
blink of an eye.
If you’re too close to an inflating
air bag, it could seriously injure you. Safety belts
help keep you in position before and during a
crash. Always wear your safety belt, even with air
bags. The driver should sit
as far back as possible
while still maintaining control of the vehicle.
A CAUTION:
An inflating air bag can seriously injure small
children. Always secure children properly in your
vehicle.
To read how, see the part of this manual
called “Children” and the caution label on the
right front passenger’s safety belt.
There is an air bag readiness
light on the instrument
panel, which shows
a
The system checks the air bag electrical system for
malfunctions.
The light tells you if there is an electrical
problem. See “Air
Bag Readiness Light” in the Index
for
more information.
1-44
ProCarManuals.com
Page 58 of 436

Lap-Shoulder Belt
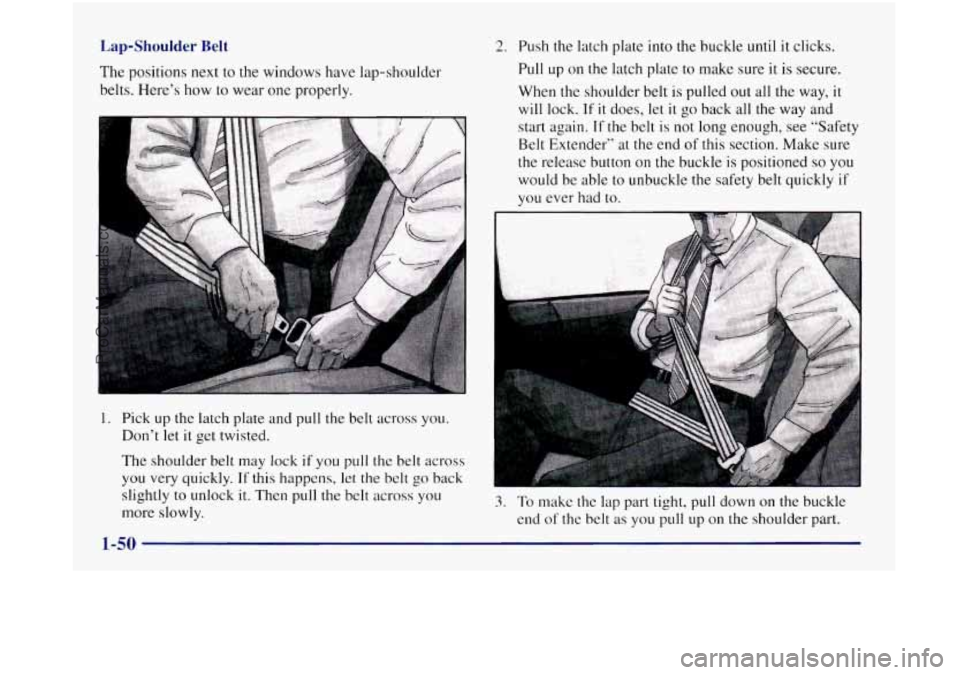
The positions next to the windows have lap-shoulder
belts. Here’s how to wear one properly.
1. Pick up the latch plate and pull the belt across you.
Don’t let it get twisted.
The shoulder belt may lock
if you pull the belt across
you very quickly.
If this happens, let the belt go back
slightly to unlock
it. Then pull the belt across you
more slowly.
2. Push the latch plate into the buckle until it clicks.
Pull
up on the latch plate to make sure it is secure.
When the shoulder belt
is pulled out all the way, it
will lock. If it does, let it go back all the way and
start again.
If the belt is not long enough, see “Safety
Belt Extender” at
the end of this section. Make sure
the release button
on the buckle is positioned so you
would be able to unbuckle the safety belt quickly if
you ever had to.
3. To make the lap part tight, pull down on the buckle
end of the belt as you pull up on the shoulder part.
1-50
ProCarManuals.com
Page 65 of 436

t
Never hold a baby in your arms while riding in a
vehicle. A baby doesn’t weigh much -- until a
crash. During a crash a
baby will become so
CAUTION: (Continued) heavy
you can’t hold
it. For example, in a crash
at only 25 mph
(40 km/h), a 12-1b. (5.5 kg) baby
will suddenly become a 240-1b.
(110 kg) force on
your arms. The baby would be almost impossible
to hold.
Secure the baby in an infant restraint.
1-57
ProCarManuals.com
Page 67 of 436

Q: What if the top of my child’s shoulders is above
the shoulder belt slots for the five-point child
restraint harness system?
A: A child whose shoulders are above the shoulder
belt slots for the five-point child restraint harness
system shouldn’t use
this child restraint. Instead,
the child should sit on the vehicle’s regular seat
cushion and use the vehicle’s adult safety belts.
BEFORE YOU USE THIS CHILD RESTRAINT,
BE SURE THE TOP OF THE CHILD’S
SHOULDERS IS BELOW THE SLOTS THAT
THE HARNESS GOES THROUGH.
A CHILD
WHOSE SHOULDERS ARE ABOVE THOSE
SLOTS COULD BE INJURED DURING
A
SUDDEN STOP OR CRASH. IF THE TOP OF
THE CHILD’S SHOULDERS IS ABOVE THE
SLOTS, DON’T USE THIS CHILD
RESTRAINT WHILE THE VEHICLE IS
IN MOTION.
Securing a Child in the Built-In
Child Restraint
1. Raise the head restraint until the lower edge of the
head restraint is even with the top of the seatback.
1-59
ProCarManuals.com
Page 69 of 436

You’ll be using the child restraint’s harness (A) to
secure your child. Don’t use the vehicle’s safety belts.
/A CAUTION:
Using the vehicle’s regular safety belts on a child
seated on the child restraint cushion
can cause
serious injury to the child in a sudden stop
or
crash. If a child is the proper size for the built-in
child restraint, secure the child using the child
restraint’s harness. But children who are too
large
for the built-in child restraint should sit on
the vehicle’s regular seat and use the vehicle’s
adult safety belts.
WARNING! FAILURE TO FOLLOW THE
MANUFACTURER’S INSTRUCTIONS ON THE
USE OF THIS CHILD RESTRAINT
SYSTEM
CAN RESULT IN YOUR CHILD STRIKING THE
VEHICLE’S INTERIOR DURING
A SUDDEN
STOP OR CRASH. SNUGLY ADJUST THE
BELTS PROVIDED WITH THIS CHILD
RESTRAINT AROUND YOUR CHILD.
ProCarManuals.com
Page 70 of 436

4. Before placing the child in the child restraint, add
slack to the shoulder harness. Pull the black shoulder
harness release strap firmly. At the same time pull
both shoulder harness straps through the slots in the
seatback as shown.
5. Place the child on the child restraint cushion.
6. Select only one side of the harness. Place the harness
over the child’s shoulder.
7. Push the latch plate (B) into the buckle until it clicks.
Be sure the buckle
is free of any foreign objects that
may prevent you from securing the latch plates.
If
you can’t secure a latch plate, see your Oldsmobile
retailer for service before using the child restraint.
1-62
ProCarManuals.com
Page 71 of 436

8. Place the other side of the harness over the
child’s shoulder.
9. Push the latch plate into the buckle until it clicks.
10. Pull up on both latch plates to make sure they
are secure. 11.
Now fasten the left and right halves
of the
shoulder harness clip together. The purpose
of this
clip is to help keep the harness positioned on the
child’s shoulders.
1-63
ProCarManuals.com
Page 75 of 436

2. Fold the child restraint cushion and leg rest up into
the seatback.
3. Press the child restraint cushion firmly into
the seatback.
4. Then press the leg rest firmly into the seatback, and
secure it by pressing the upper corners against the
fastener strips
on the seatback.
1-67
ProCarManuals.com