tow OLDSMOBILE SILHOUETTE 2003 Owners Manual
[x] Cancel search | Manufacturer: OLDSMOBILE, Model Year: 2003, Model line: SILHOUETTE, Model: OLDSMOBILE SILHOUETTE 2003Pages: 466, PDF Size: 21.55 MB
Page 2 of 466
.
The 2003 Oldsmobile Silhouette Owner Manual
Seats and Restraint Systems ........................... 1-1
Front Seats
............................................... 1-2
Rear Seats
............................................... 1-7
Safety Belts
............................................. 1-22
Child Restraints
....................................... 1-45
Air Bag Systems
...................................... 1-69
Restraint System Check
............................ 1-77
Features and Controls
..................................... 2-1
Keys
........................................................ 2-3
Doors and Locks
....................................... 2-9
Windows
................................................. 2-24
Theft-Deterrent Systems
............................ 2-27
Starting and Operating Your Vehicle
........... 2-32
Mirrors
.................................................... 2-45
Onstar@ System
...................................... 2-47
HomeLink@ Transmitter
......................... 2-49
Storage Areas
......................................... 2-54
Vehicle Personalization
............................. 2-62
Instrument Panel Overview
.......................... 3-4
Climate Controls
...................................... 3-25
Warning Lights, Gages and Indicators
......... 3-39
Driver Information Center (DIC)
.................. 3-60
Instrument Panel
............................................. 3-1
Messaye Center 5-3L n r~ .......................................
Audio
System(s) ....................................... 3-63
Your Driving, the Road, and Your Vehicle
..... 4-2
Towing
................................................... 4-32
Service
..................................................... 5-3
Fuel
......................................................... 5-5
Checking Things Under the Hood
............... 5-10
All-Wheel Drive
........................................ 5-50
Bulb Replacement
.................................... 5-52
Windshield Wiper Blade Replacement
......... 5-58
Tires
...................................................... 5-60
Appearance Care
..................................... 5-87
Vehicle Identification
................................. 5-95
Electrical System
...................................... 5-96
Capacities and Specifications
................... 5-1 03
Normal Maintenance Replacement Parts
...... 5-1 05
Maintenance Schedule
................................ 6-2
Customer Assistance Information
.................... 7-1
Customer Assistance Information
.................. 7-2
Reporting Safety Defects
............................ 7-9
Driving Your Vehicle
....................................... 4-1
Service and Appearance Care
.......................... 5-1
Maintenance Schedule
..................................... 6-1
Index
................................................................ 1
Page 8 of 466
1 Seats and Restraint Systems
Front Seats ............................... ......... 1.2
Manual Seats
............................ ............. 1 -2
Six-Way Power Seats
..................................... 1-3
Eight-Way Power Seats
................................... 1-3
Heated Seats
................................................. 1-4
Reclining Seatbacks
........................................ 1-4
Head Restraints
............................................. 1-6
Rear Seats
....................................................... 1-7
Flip and Fold Feature ..................................... 1-7
Split Bench Seats
........................................... 1-8
Captain Chairs
............................................. 1-1 3
Stowable Seat ............................................. -1 -1 8
Safety Belts: They Are for Everyone
................ 1-22
Questions and Answers About Safety Belts
...... 1-26
How
to Wear Safety Belts Properly ................. 1-27
Driver Position
.............................................. 1-28
Satety Beit use During Pregnancy
.................. 1-36
Rear Seat Operation ....................................... 1-7
Safety Belts
................................................... 1-22
Right Front Passenger Position
....................... 1-37
Center Passenger Position
............................. 1-37
Rear Seat Passengers
.................................. 1-39
Rear Safety Belt Comfort Guides for
Children and Small Adults
.......................... 1-42
Safety Belt Extender
..................................... 1-44
Safety Belt Pretensioners
..... ................... 1 -44 Child Restraints
............................................. 1-45
Older Children
.............................................. 1-45
Infants and Young Children
............................ 1-48
Child Restraint Systems
................................. 1-51
Where to Put the Restraint ............................. 1-54
Top Strap
.................................................... 1-55
Top Strap Anchor Location ............................. 1-56
Lower Anchorages and Top Tethers for
Securing a Child Restraint Designed for the
Securing a Child Restraint in a
Securing a Child Restraint in a Center
Securing a Child Restraint in the Right
Children (LATCH
System)
........................... 1-58
LATCH System
......................................... 1-60
Rear Outside Seat Position
......................... 1-60
Seat Position
............................................ 1-64
Front Seat Position
.................................... 1-66
Air
Bag Systems ............................................ 1-69
When Should an Air Bag Inflate? ................ 1-73
What Makes an Air Bag Inflate?
..................... 1-74
How Does an Air Bag Restrain?
..................... 1-74
What Will You See After an Air Bag Inflates?
....... 1-74
Servicing Your Air Bag-Equipped Vehicle
......... 1-76
Restraint System Check
.................................. 1-77
Where Are
the Air Bags?
........................... 1-71
Checking
Your Restraint Systems 1 -I 1 477 ...................
Replacing Restraint System Parts
After a Crash
............................................ 1-77
1-1
Page 10 of 466
Six-Way Power Seats
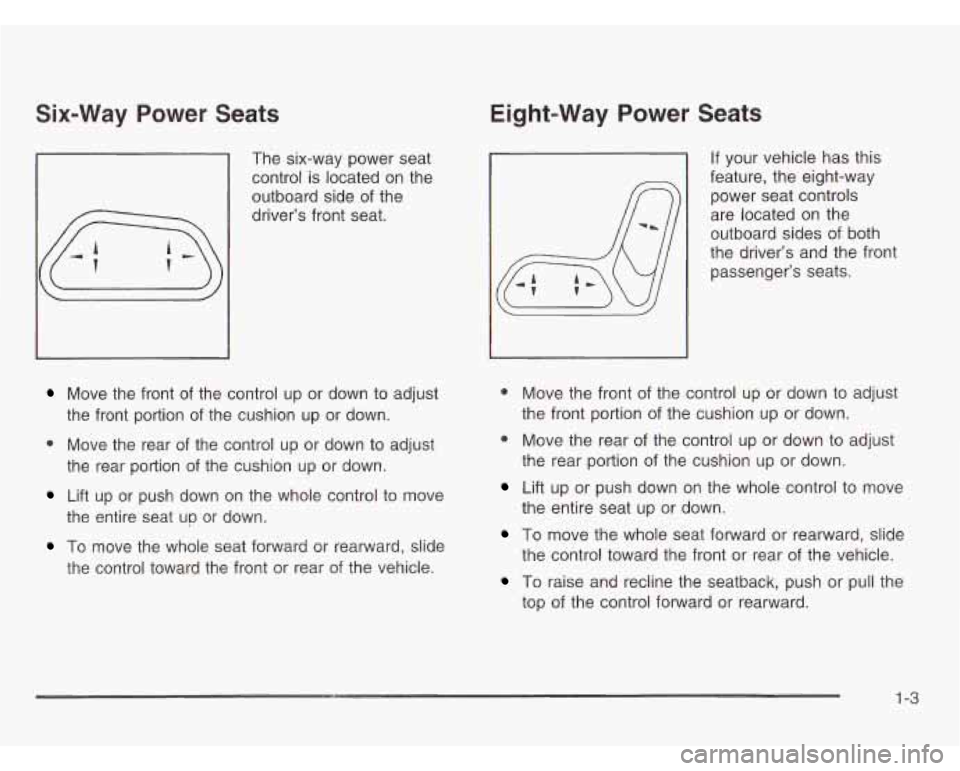
The six-way power seat control
is located on the
outboard side of the
Move the front of the control up or down to adjust
the front portion of the cushion up or down.
0 Move the rear of the control up or down to adjust
the rear portion of the cushion up or down.
Lift up or push down on the whole control to move
the entire seat up or down.
To move the whole seat forward or rearward, slide
the control toward the front or rear of the vehicle.
Eight-Way Power Seats
If your vehicle has this
feature, the eight-way
power seat controls
are located on the
outboard sides of both
the driver’s and the front passenger’s seats.
0 Move the front of the control up or down to adjust
the front portion of the cushion up or down.
0 Move the rear of the control up or down to adjust
the rear portion of the cushion up or down.
Lift up or push down on the whole control to move
the entire seat up or down.
To move the whole seat forward or rearward, slide
the control toward the front or rear of the vehicle.
To raise and recline the seatback, push or pull the
top
of the control forward or rearward.
1 -3
Page 17 of 466
Removing the Split Bench Seat
Make sure the seatback is in the upright position.
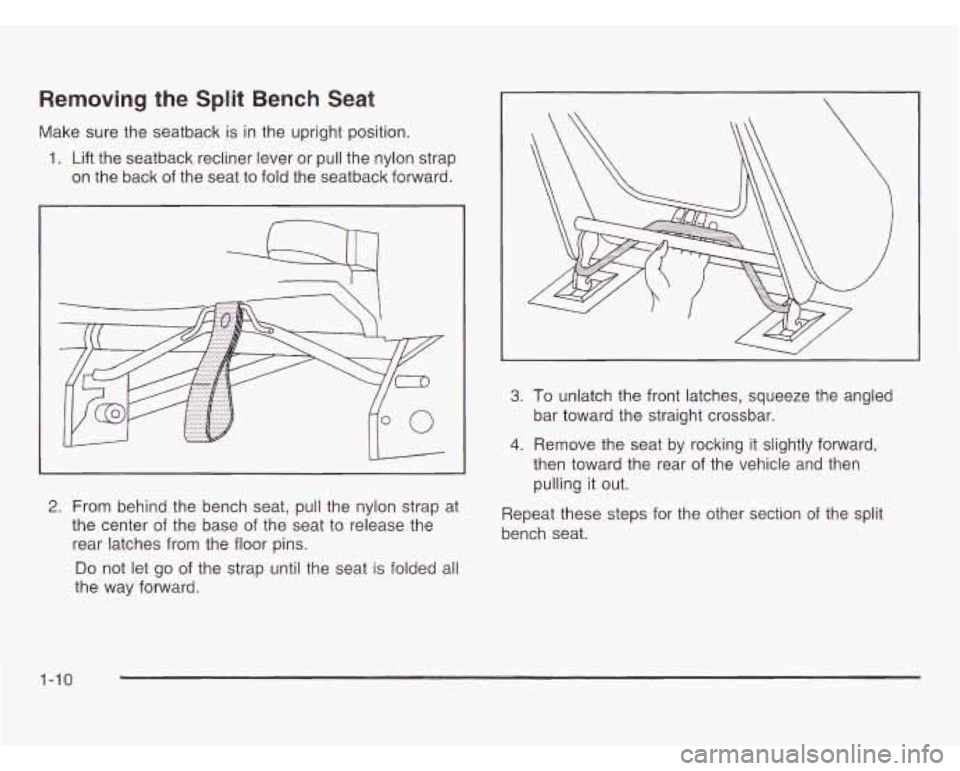
1. Lift the seatback recliner lever or pull the nylon strap
on the back of the seat to fold the seatback forward.
2. From behind the bench seat, pull the nylon strap at
the center of the base of the seat to release the
rear latches from the floor pins.
Do not let go of the strap until the seat is folded all
the way forward.
3. To unlatch the front latches, squeeze the angled
bar toward the straight crossbar.
4. Remove the seat by rocking it slightly forward,
then toward the rear of the vehicle and then
pulling it out.
Repeat these steps for the other section of the split
bench seat.
1-10
Page 19 of 466
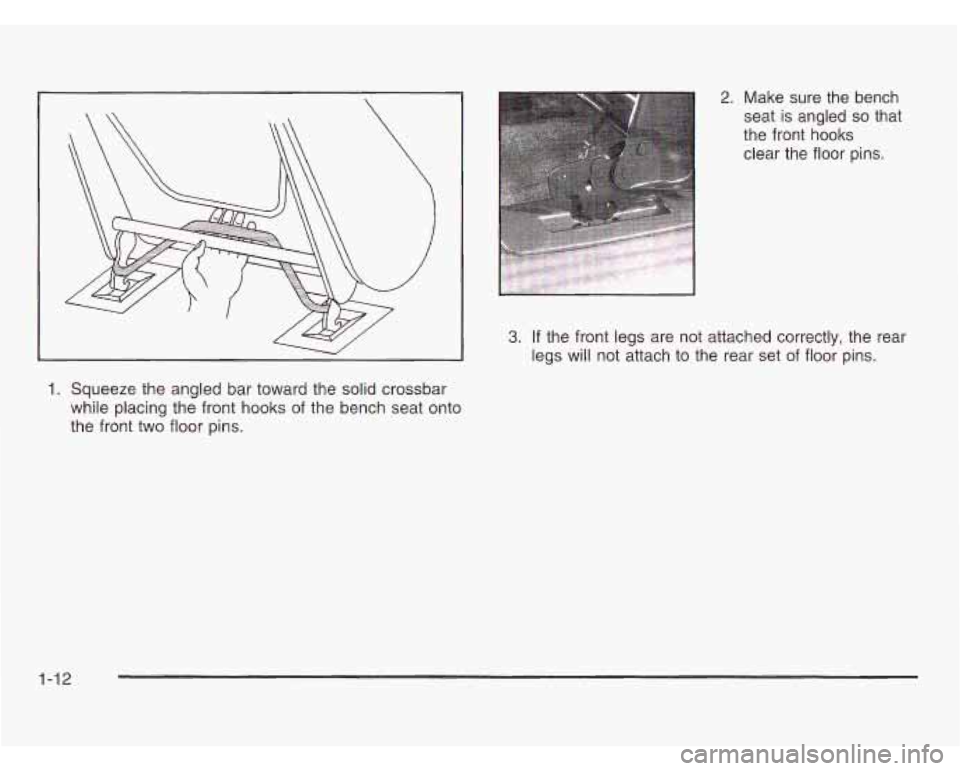
1. Squeeze the angled bar toward the solid crossbar
while placing the front hooks of the bench seat onto
the front two floor pins.
3. If the front legs are not attached correctly, the rear
legs will not attach to the rear set of floor pins.
1-12
Page 25 of 466
Stowable Seat
Your vehicle may have a stowable seat. The stowable
seat is a full bench seat and comes with the convenience
center. See
Convenience Center on page 2-60 for more
information. The stowable seat can be removed and
replaced, or with the seatback folded, it can lie flush with
the convenience center.
Folding the Seatback
If the seatback isn’t locked, it could move
forward in a sudden stop or crash. That could
cause injury to the person sitting there. Always
press rearward on the seatback
to be sure it
is locked. To
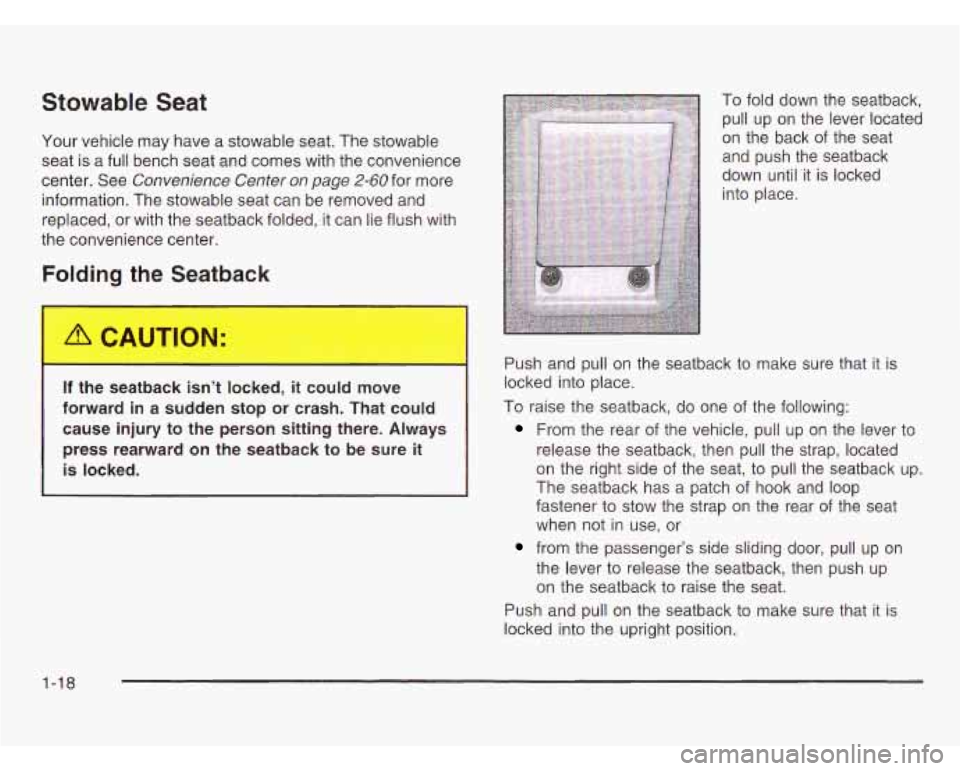
fold down the seatback,
pull up on the lever located
on the back of the seat
and push the seatback
down until
it is locked
into place.
Push and pull on the seatback to make sure that it is
locked into place.
To raise the seatback, do one of the following:
From the rear of the vehicle, pull up on the lever to
release the seatback, then pull the strap, located
on the right side of the seat, to pull the seatback up.
The seatback has a patch of hook and loop
fastener to stow the strap on the rear of the seat
when not in use, or
from the passenger’s side sliding door, pull up on
the lever to release the seatback, then push up
on the seatback to raise the seat.
Push and pull on the seatback to make sure that it is
locked into the upright position.
1-18
Page 26 of 466
Removing the Stowable Seat
1. Remove the convenience center, if it is in the
vehicle. See
Convenience Center on page 2-60
for more information.
2. Make sure all items are off of the stowable seat.
3. If the seatback is down, put the seatback in
its upright position before removing the seat.
See “Folding the Seatback previously.
U U
5. While holding onto the crossbar at the bottom of the
seat, remove the seat by rocking it slightly toward
the rear of the vehicle and then pulling it out.
This should be done in one motion.
Notice: Do not use the release handles to pull the
seat out. The handles could break during removal.
This will not be covered by your warranty. Use
the crossbar at the bottom
of the seat when pulling
the seat out.
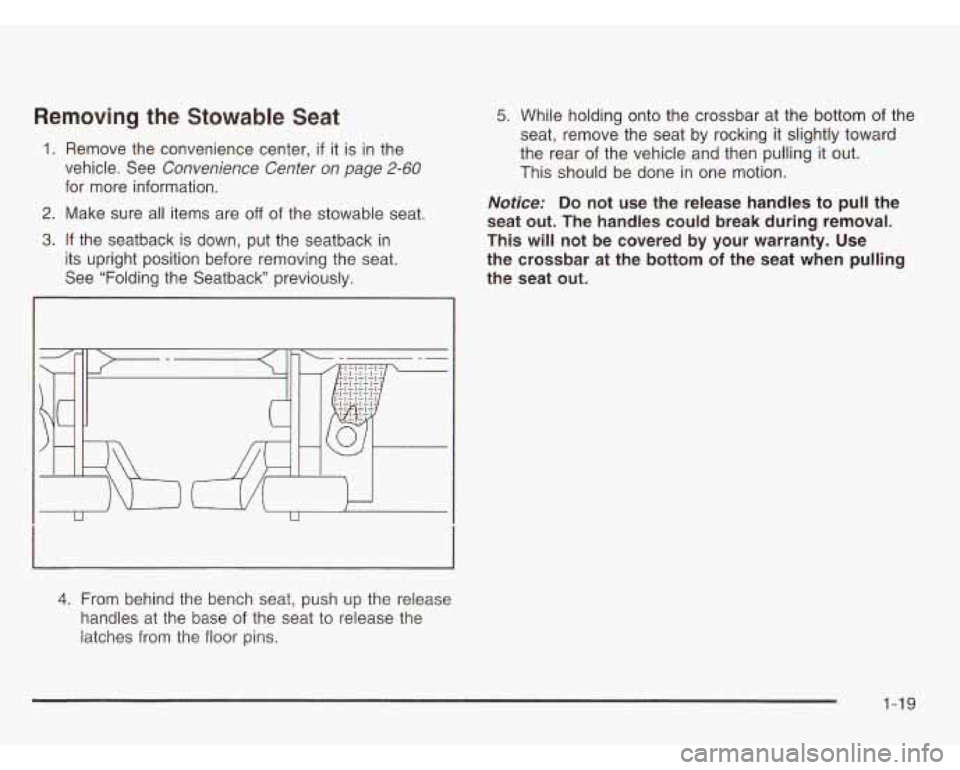
4. From behind the bench seat, push up the release
handles at the base of the seat to release the
iatches from the fioor pins.
1-19
Page 27 of 466
Replacing +he Stowable Seat
If the seatback isn’t locked, it could move
forward
in a sudden stop or crash. That could
cause injury to the person
sitting there. Always
press rearward on the seatback to be sure
it
is locked.
A seat that isn’t ~_cked into place properly can
move around in a collision or sudden stop.
People in the vehicle could be injured. Be sure
to lock the seat into place properly when
installing
it.
A safety belt that is improperly routed, not
properly attached, or twisted won’t provide
the protection needed in a crash. The person
wearing the belt could be seriously injured.
After installing the seat, always check to be
sure that the safety belts are properly routed
and attached, and are not twisted.
Do not put the stowable seat in so it faces rearward
because
it will not latch that way. The stowable seat has
to
go in before the convenience center. See Convenience
Center
on page 2-60 for more information.
1-20
Page 28 of 466
The stowable seat has seat position labels, located on
the back of the seat, showing where the seat must go.
Follow the floor pin diagram. Use the front floor pins of
the floor cups and the rear floor cups in the third row.
The seat must be placed in the proper location for the
legs to attach correctly.
Make sure the seat is in its upright position before
beginning this procedure. 1. Place the front hooks of the seat onto the front floor
pins in the third row.
To do this, the seat will need to
be angled
so the front hooks clear the floor pins.
If the front legs are not attached correctly, the rear
legs will not attach to the rear set of floor pins.
2. Firmly push the rear hooks into the rear floor pins
by pushing down on the rear of the seat.
3. Try to raise the seat to make sure that it is
locked down.
4. Push and pull on the seatback to make sure that
it is locked into place.
1-21
Page 53 of 466
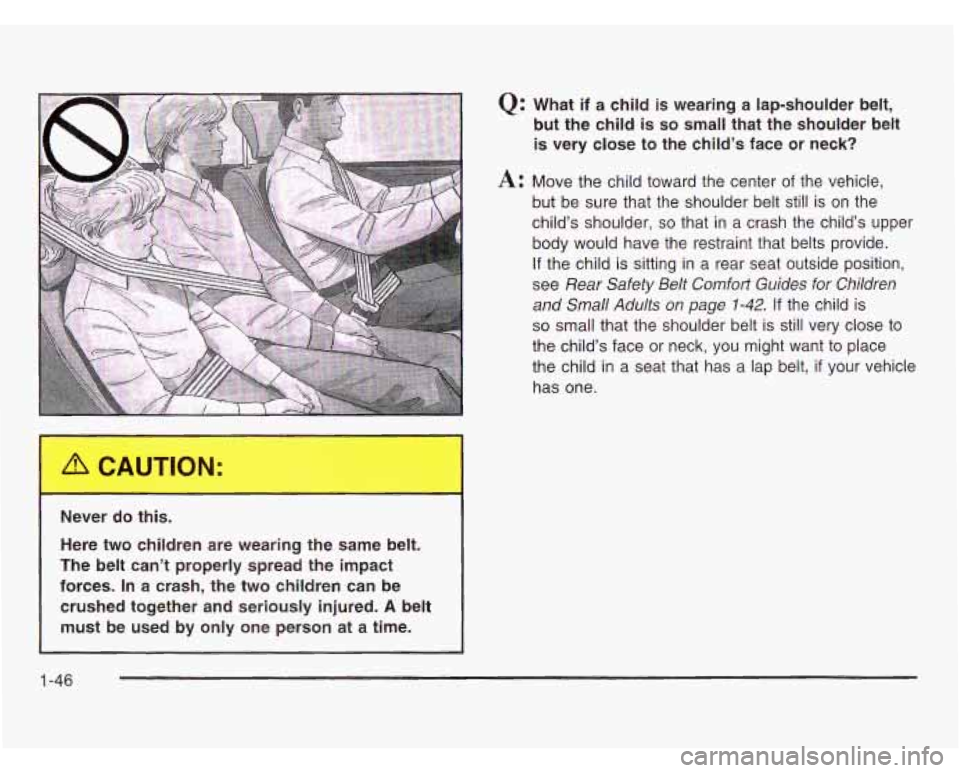
Never do this. Here two children are wearing the same belt.
The belt can’t properly spread the impact
forces.
In a crash, the two children can be
crushed together and seriously injured.
A belt
must be used by only one person at a time.
Q: What if a child is wearing a lap-shoulder belt,
but the child is so small that the shoulder belt
is very close to the child’s face or neck?
A: Move the child toward the center of the vehicle,
but be sure that the shoulder belt still is
on the
child’s shoulder,
so that in a crash the child’s upper
body would have the restraint that belts provide.
If the child is sitting in a rear seat outside position,
see
Rear Safety Belt Comfort Guides for Children
and Small Adults on page
1-42. If the child is
so small that the shoulder belt is still very close to
the child’s face or neck, you might want to place
the child in a seat that has a lap belt,
if your vehicle
has one.
1 -46