light OPEL AMPERA E 2017.5 Manual user
[x] Cancel search | Manufacturer: OPEL, Model Year: 2017.5, Model line: AMPERA E, Model: OPEL AMPERA E 2017.5Pages: 265, PDF Size: 6.24 MB
Page 34 of 265

32Keys, doors and windowsFolding mirrors
For pedestrian safety, the exterior
mirrors will swing out of their normal
mounting position if they are struck
with sufficient force. Reposition the mirror by applying slight pressure tothe mirror housing.
Electric folding
Press n to fold both exterior mirrors.
Press n again - both exterior mirrors
to return to their original position.
If an electrically folded mirror is
manually extended, pressing n will
only electrically extend the other
mirror.
Heated mirrors
Operated by pressing Ü.
The LED in the button indicates
activation.
Heating works after the vehicle has
been started and is switched off
automatically after a short time.
Page 35 of 265

Keys, doors and windows33Interior mirrors
Automatic anti-dazzle
Dazzle from following vehicles at
night is automatically reduced.
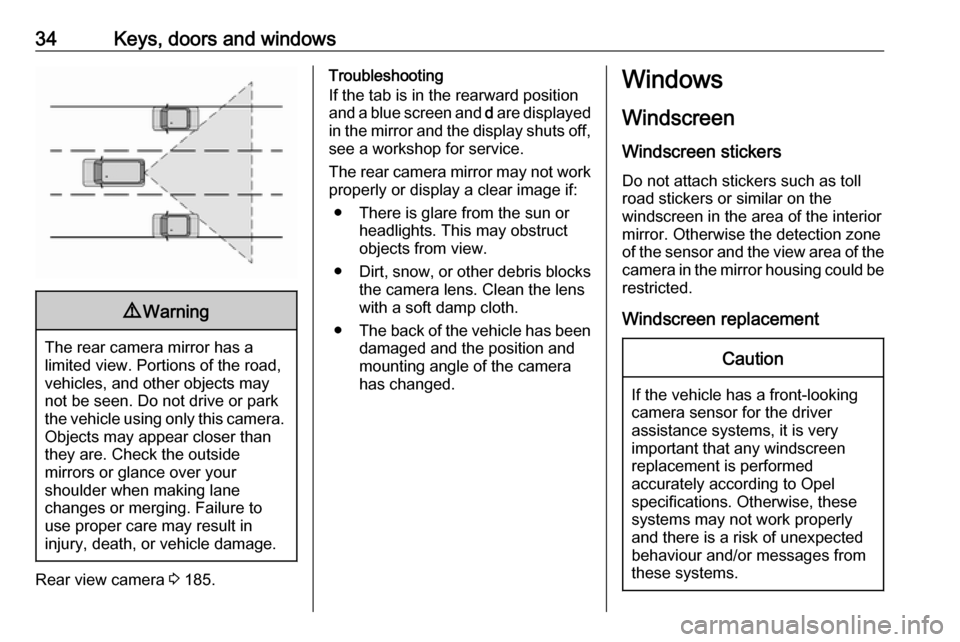
Rear camera mirror
This automatic dimming mirror
provides a wide angle camera view of
the area behind the vehicle.
Pull the tab rearward to turn on the
display. Push the tab forward to turn
it off. When off, the mirror is automatic dimming. Adjust the mirror for a clear
view of the area behind the vehicle
while the display is off.To adjust the brightness, press the
button (1) on the back of the rear view mirror without covering the light
sensor (2).
Each button press cycles the
brightness between five settings.
Page 36 of 265
34Keys, doors and windows9Warning
The rear camera mirror has a
limited view. Portions of the road,
vehicles, and other objects may
not be seen. Do not drive or park
the vehicle using only this camera. Objects may appear closer thanthey are. Check the outside
mirrors or glance over your
shoulder when making lane
changes or merging. Failure to
use proper care may result in
injury, death, or vehicle damage.
Rear view camera 3 185.
Troubleshooting
If the tab is in the rearward position and a blue screen and d are displayed
in the mirror and the display shuts off, see a workshop for service.
The rear camera mirror may not work properly or display a clear image if:
● There is glare from the sun or headlights. This may obstruct
objects from view.
● Dirt, snow, or other debris blocks
the camera lens. Clean the lens
with a soft damp cloth.
● The back of the vehicle has been
damaged and the position and
mounting angle of the camera
has changed.Windows
Windscreen Windscreen stickers
Do not attach stickers such as toll
road stickers or similar on the
windscreen in the area of the interior
mirror. Otherwise the detection zone
of the sensor and the view area of the camera in the mirror housing could be
restricted.
Windscreen replacementCaution
If the vehicle has a front-looking
camera sensor for the driver
assistance systems, it is very
important that any windscreen
replacement is performed
accurately according to Opel
specifications. Otherwise, these
systems may not work properly
and there is a risk of unexpected
behaviour and/or messages from
these systems.
Page 41 of 265
Seats, restraints39Head restraints on rear seats
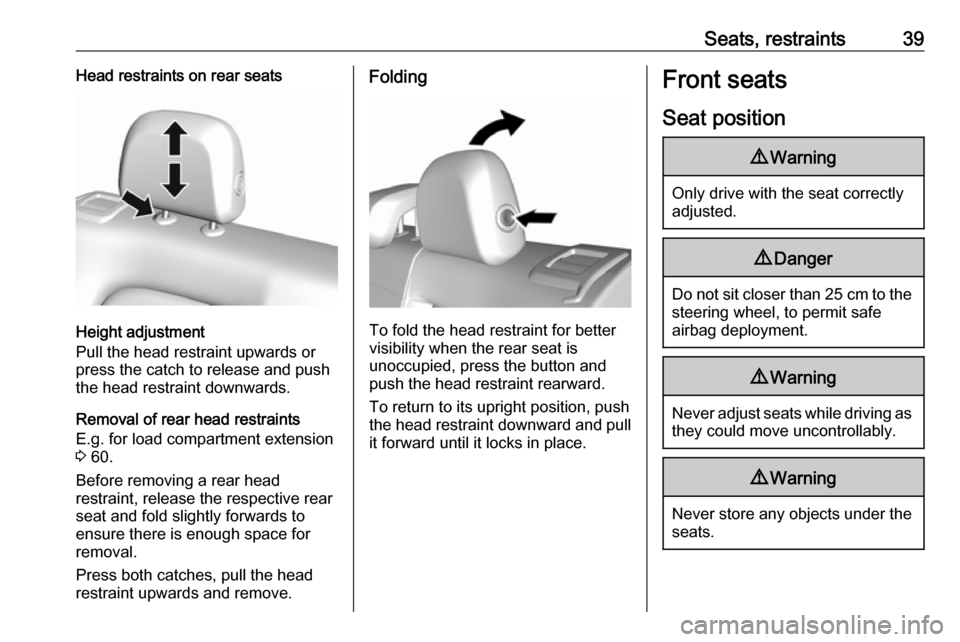
Height adjustment
Pull the head restraint upwards or
press the catch to release and push the head restraint downwards.
Removal of rear head restraints
E.g. for load compartment extension
3 60.
Before removing a rear head
restraint, release the respective rear
seat and fold slightly forwards to
ensure there is enough space for
removal.
Press both catches, pull the head restraint upwards and remove.
Folding
To fold the head restraint for better
visibility when the rear seat is
unoccupied, press the button and
push the head restraint rearward.
To return to its upright position, pushthe head restraint downward and pull
it forward until it locks in place.
Front seats
Seat position9 Warning
Only drive with the seat correctly
adjusted.
9 Danger
Do not sit closer than 25 cm to the
steering wheel, to permit safe
airbag deployment.
9 Warning
Never adjust seats while driving as
they could move uncontrollably.
9 Warning
Never store any objects under the
seats.
Page 42 of 265
40Seats, restraints
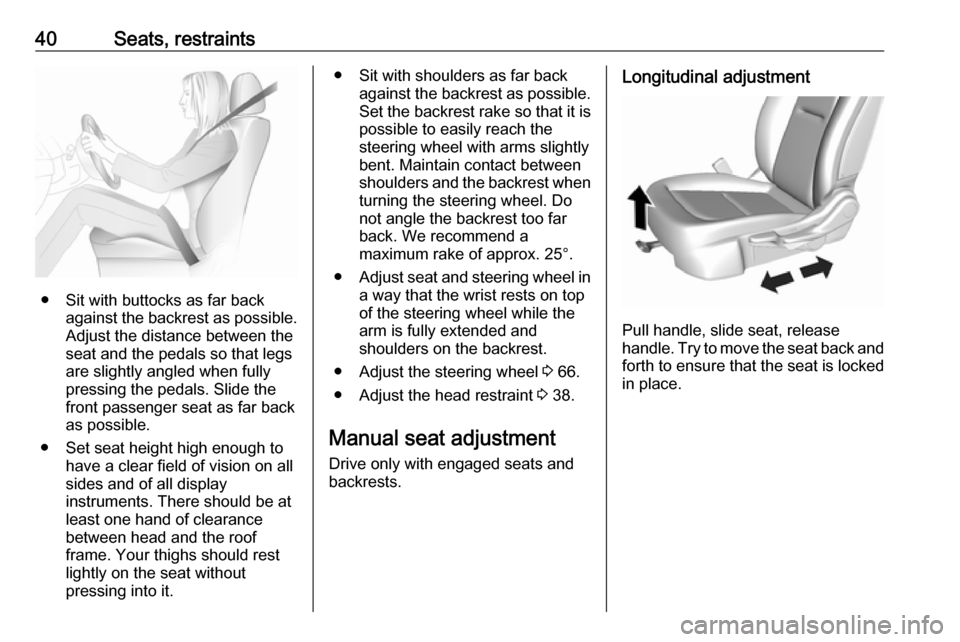
● Sit with buttocks as far backagainst the backrest as possible.
Adjust the distance between the
seat and the pedals so that legs
are slightly angled when fully
pressing the pedals. Slide the
front passenger seat as far back
as possible.
● Set seat height high enough to have a clear field of vision on all
sides and of all display
instruments. There should be at
least one hand of clearance
between head and the roof
frame. Your thighs should rest
lightly on the seat without
pressing into it.
● Sit with shoulders as far back against the backrest as possible.
Set the backrest rake so that it is possible to easily reach the
steering wheel with arms slightly
bent. Maintain contact between
shoulders and the backrest when
turning the steering wheel. Do
not angle the backrest too far
back. We recommend a
maximum rake of approx. 25°.
● Adjust seat and steering wheel in
a way that the wrist rests on top
of the steering wheel while the
arm is fully extended and
shoulders on the backrest.
● Adjust the steering wheel 3 66.
● Adjust the head restraint 3 38.
Manual seat adjustment Drive only with engaged seats and
backrests.Longitudinal adjustment
Pull handle, slide seat, release
handle. Try to move the seat back and forth to ensure that the seat is locked
in place.
Page 52 of 265
50Seats, restraintsThe inflated airbags cushion the
impact, thereby reducing the risk of
injury to the upper body and pelvis in
the event of a side-on collision
considerably.9 Warning
Keep the area in which the airbag
inflates clear of obstructions.
Note
Only use protective seat covers that have been approved for the vehicle.Be careful not to cover the airbags.
Curtain airbag system
The curtain airbag system consists of an airbag in the roof frame on each
side. This can be identified by the
word AIRBAG on the roof pillars.
The curtain airbag system is triggered
in the event of a side-on impact of a
certain severity. The vehicle must be
switched on.
The inflated airbags cushion the
impact, thereby reducing the risk of
injury to the head in the event of a
side-on impact considerably.
9 Warning
Keep the area in which the airbag
inflates clear of obstructions.
The hooks on the handles in the
roof frame are only suitable for
hanging up light articles of
clothing, without coat hangers. Do not keep any items in these
clothes.
Airbag deactivation
The front passenger airbag system must be deactivated for child restraint
system on the passenger seat
according to the instructions in the
table 3 54. The side airbag and
curtain airbag systems, the belt
pretensioners and all driver airbag
systems will remain active.
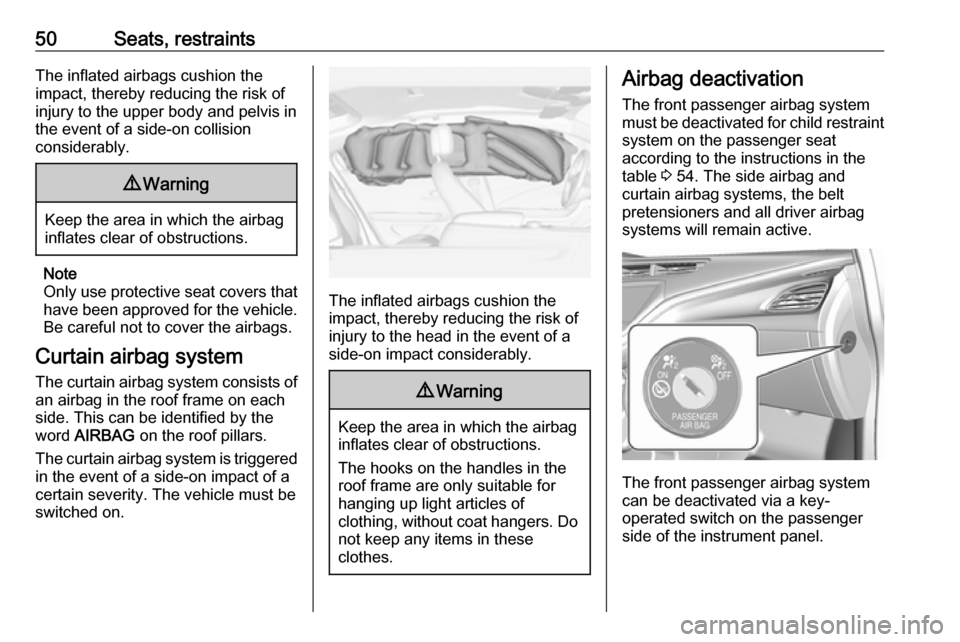
The front passenger airbag system
can be deactivated via a key-
operated switch on the passenger side of the instrument panel.
Page 67 of 265

Instruments and controls65Instruments and
controlsControls ....................................... 66
Steering wheel adjustment ........66
Steering wheel controls .............66
Heated steering wheel ...............66
Horn ........................................... 67
Pedestrian safety alert ...............67
Windscreen wiper/washer .........67
Rear window wiper/washer .......68
Outside temperature ..................69
Clock ......................................... 69
Power outlets ............................. 70
Inductive charging .....................71
Warning lights, gauges and indi‐ cators ........................................... 73
Instrument cluster ......................73
Speedometer ............................. 75
Odometer .................................. 75
Battery gauge ............................ 75
Driving efficiency gauge ............75
Power indicator gauge ...............77
Regenerative braking ................77
Total vehicle range ....................78
Service display .......................... 78
Control indicators ......................78Turn signal................................. 78
Seat belt reminder .....................78
Airbag and belt tensioners .........79
Airbag deactivation ....................79
Charging system .......................79
Service vehicle soon .................80
Brake system ............................. 80
Electric parking brake ................80
Electric parking brake fault ........80
Antilock brake system (ABS) .....80
Sport mode ................................ 81
Lane keep assist .......................81
Electronic Stability Control off ...81
Electronic Stability Control and Traction Control system ...........81
Traction Control system off .......81
Tyre pressure monitoring system ...................................... 81
Immobiliser ................................ 81
Vehicle ready ............................. 82
Exterior light .............................. 82
High beam ................................. 82
High beam assist .......................82
Rear fog light ............................. 82
Cruise control ............................ 82
Vehicle detected ahead .............82
Pedestrian detection ..................82
Speed limiter ............................. 82
Traffic sign assistant ..................82
Door open .................................. 83Information displays.....................83
Driver Information Centre ..........83
Info display ................................ 86
Vehicle messages ........................90
Warning chimes .........................91
Battery voltage .......................... 91
Vehicle personalisation ................92
Telematics service .......................95
OnStar ....................................... 95
Page 75 of 265
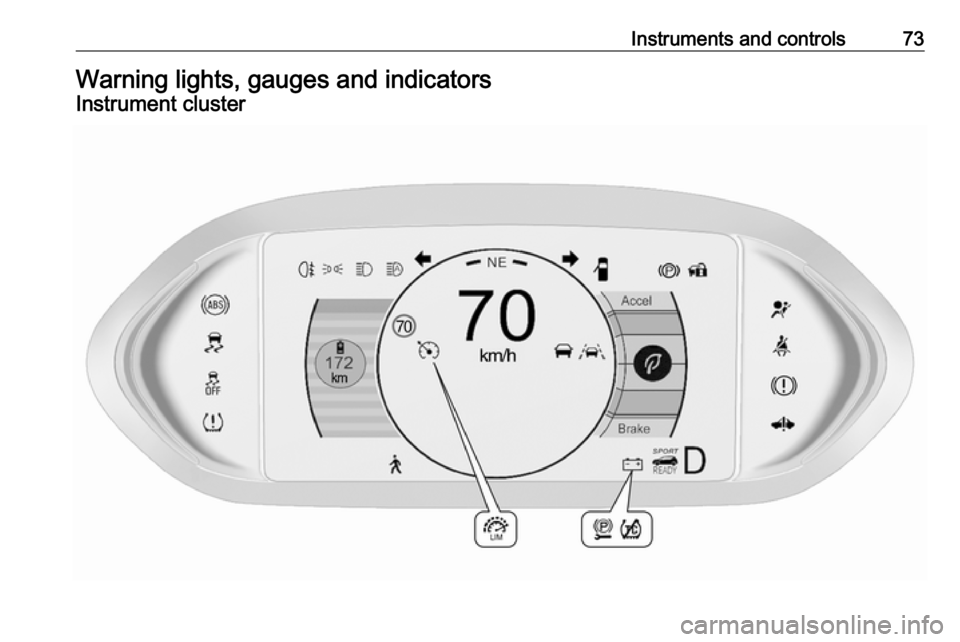
Instruments and controls73Warning lights, gauges and indicatorsInstrument cluster
Page 76 of 265

74Instruments and controlsOverviewOTurn signal 3 78XSeat belt reminder 3 78vAirbag and belt tensioners
3 79VAirbag deactivation 3 79pCharging system 3 796Service vehicle soonRBrake system 3 80mElectric parking brake
3 80jElectric parking brake fault
3 80uAntilock brake system
(ABS) 3 803Sport mode 3 154aLane keep assist 3 81aElectronic Stability Control
off 3 81bElectronic Stability Control
and Traction Control
system 3 81kTraction Control system off
3 81wTyre pressure monitoring
system 3 81dImmobiliser 3 814Vehicle ready 3 828Exterior light 3 82CHigh beam 3 82fHigh beam assist 3 82øRear fog light 3 82mCruise control 3 82AVehicle detected ahead
3 827Pedestrian detected aheadLSpeed limiter 3 82LTraffic sign assistant
3 82hDoor open 3 83
Reconfigurable instrument cluster
The cluster layout can be changed.
Use the steering wheel control to
move between the different display
zones and scroll through the different displays.
There are three display
configurations to choose from:
● Basic configuration displays the
speedometer with a simplified
high voltage battery gauge and
efficiency light.
● Standard configuration displays
the speedometer with a high
voltage battery gauge and
efficiency gauge.
● Enhanced configuration displays
the speedometer with high
voltage battery gauge, efficiency
ring, and power gauge.
Driver Information Centre 3 83.
Page 79 of 265
Instruments and controls77Power indicator gauge
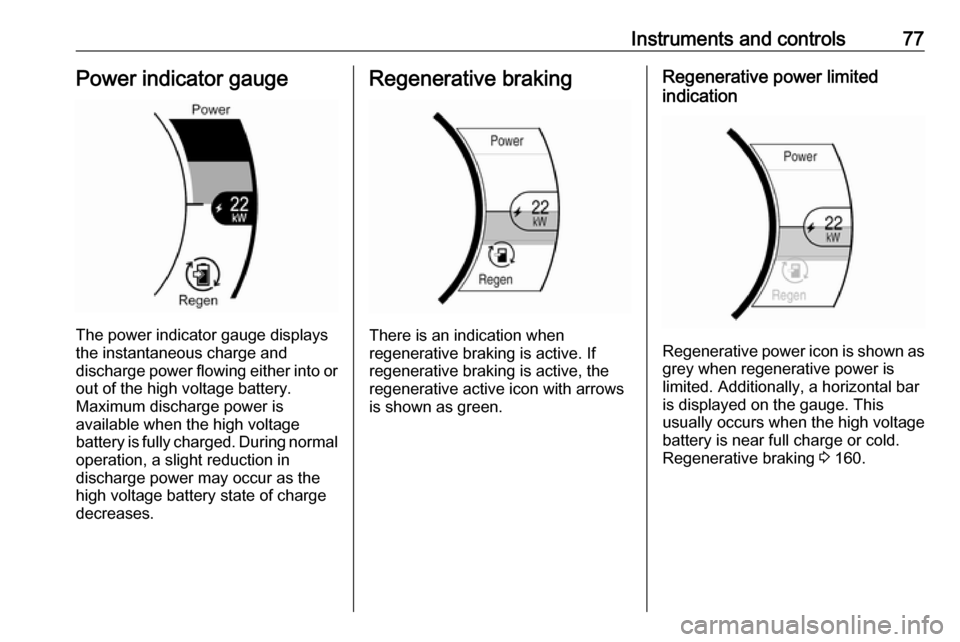
The power indicator gauge displays
the instantaneous charge and
discharge power flowing either into or out of the high voltage battery.
Maximum discharge power is
available when the high voltage
battery is fully charged. During normal
operation, a slight reduction in
discharge power may occur as the
high voltage battery state of charge
decreases.
Regenerative braking
There is an indication when
regenerative braking is active. If
regenerative braking is active, the regenerative active icon with arrowsis shown as green.
Regenerative power limited
indication
Regenerative power icon is shown as grey when regenerative power is
limited. Additionally, a horizontal bar
is displayed on the gauge. This
usually occurs when the high voltage
battery is near full charge or cold.
Regenerative braking 3 160.