wheel OPEL ASTRA SALOON 2014 Owner's Guide
[x] Cancel search | Manufacturer: OPEL, Model Year: 2014, Model line: ASTRA SALOON, Model: OPEL ASTRA SALOON 2014Pages: 245, PDF Size: 7.12 MB
Page 148 of 245
146Driving and operatingCaution
Towing the vehicle and starting
the engine is not permitted when
the clutch has been disengaged in this way, although the vehicle can
be moved a short distance.
Seek the immediate assistance of a
workshop.
Brakes
The brake system comprises two
independent brake circuits.
If a brake circuit fails, the vehicle can
still be braked using the other brake
circuit. However, braking effect is
achieved only when you depress the
brake pedal firmly. Considerably
more force is needed for this. The
braking distance is extended. Seek the assistance of a workshop beforecontinuing your journey.
When the engine is not running, the
support of the brake servo unit
disappears once the brake pedal has
been depressed once or twice.
Braking effect is not reduced, but
braking requires significantly greater
force. It is especially important to bear this in mind when being towed.
Control indicator R 3 98.
Antilock brake system Antilock brake system (ABS)
prevents the wheels from locking.ABS starts to regulate brake pressure as soon as a wheel shows a tendency
to lock. The vehicle remains
steerable, even during hard braking.
ABS control is made apparent
through a pulse in the brake pedal
and the noise of the regulation
process.
For optimum braking, keep the brake
pedal fully depressed throughout the
braking process, despite the fact that
the pedal is pulsating. Do not reduce
the pressure on the pedal.
After starting off the system performs a self-test which may be audible.
Control indicator u 3 98.
Adaptive brake lamp During full braking, all three brake
lamps flash for the duration of ABS
control.
Page 149 of 245
Driving and operating147
Fault9Warning
If there is a fault in the ABS, the
wheels may be liable to lock due
to braking that is heavier than
normal. The advantages of ABS are no longer available. During
hard braking, the vehicle can no longer be steered and may
swerve.
Have the cause of the fault remedied
by a workshop.
Parking brake Always apply parking brake firmly
without operating the release button,
and apply as firmly as possible on a
downhill or uphill slope.
To release the parking brake, pull the lever up slightly, press the release
button and fully lower the lever.
To reduce the operating forces of the
parking brake, depress the foot brake
at the same time.
Control indicator R 3 98.
Brake assist
If the brake pedal is depressed quickly and forcefully, maximum
brake force is automatically applied
(full braking).
Maintain steady pressure on the brake pedal for as long as full braking
is required. Maximum brake force is
automatically reduced when the
brake pedal is released.
Hill start assist The system helps prevent unintendedmovement when driving away on
inclines.
When releasing the foot brake after
stopping on an incline, the brakes
remain on for a further two seconds.
The brakes release automatically as
soon as the vehicle begins to
accelerate.Ride control systems
Electronic stability
program
Electronic stability program
(ESP® Plus
) improves driving stability
when necessary, regardless of the
type of road surface or tyre grip. It also prevents the drive wheels from
spinning.
As soon as the vehicle starts to
swerve (understeer/oversteer),
engine output is reduced and the
wheels are braked individually. This
considerably improves the driving
stability of the vehicle on slippery road
surfaces.
ESP® Plus
is operational as soon as
control indicator v extinguishes.
When ESP® Plus
comes into action v
flashes.
Page 158 of 245
156Driving and operating
Stowage of coupling ball bar
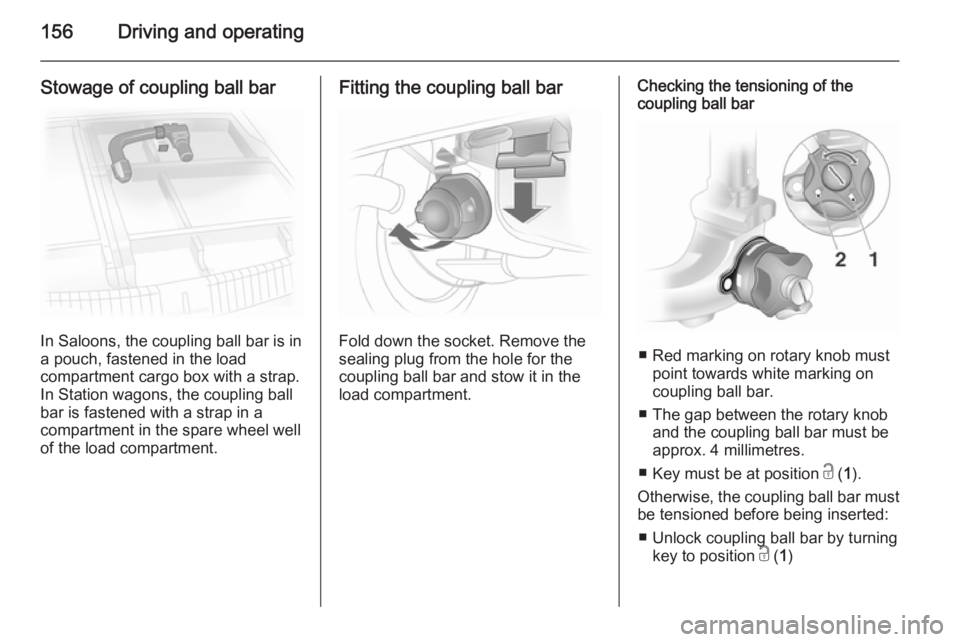
In Saloons, the coupling ball bar is in
a pouch, fastened in the load
compartment cargo box with a strap.
In Station wagons, the coupling ball
bar is fastened with a strap in a
compartment in the spare wheel well
of the load compartment.
Fitting the coupling ball bar
Fold down the socket. Remove the
sealing plug from the hole for the
coupling ball bar and stow it in the
load compartment.
Checking the tensioning of the
coupling ball bar
■ Red marking on rotary knob must
point towards white marking on
coupling ball bar.
■ The gap between the rotary knob and the coupling ball bar must beapprox. 4 millimetres.
■ Key must be at position c ( 1).
Otherwise, the coupling ball bar must be tensioned before being inserted:
■ Unlock coupling ball bar by turning key to position c ( 1)
Page 161 of 245
Vehicle care159Vehicle careGeneral Information...................159
Vehicle checks ........................... 160
Bulb replacement .......................166
Electrical system ........................181
Vehicle tools .............................. 187
Wheels and tyres .......................188
Jump starting ............................. 200
Towing ....................................... 201
Appearance care .......................203General Information
Accessories and vehicle
modifications
We recommend using genuine parts and accessories and factory
approved parts specific for your
vehicle type. We cannot assess or guarantee reliability of other products
- even if they have a regulatory or
otherwise granted approval.
Do not make any modifications to the electrical system, e.g. changes of
electronic control units (chip tuning).Caution
When transporting the vehicle on
a train or on a recovery vehicle, the
mud flaps might be damaged.
Vehicle storage
Storage for a long period of time
The following must be done if the
vehicle should be stored for several months:
■ Wash and wax the vehicle.
■ Have the wax in the engine compartment and underbody
checked.
■ Clean and preserve rubber seals.
■ Fill up fuel tank completely.
■ Change engine oil.
■ Drain washer fluid reservoir.
■ Check coolant antifreeze.
■ Adjust tyre pressure to the value specified for full load.
■ Park vehicle in dry, well ventilated place. Engage first or reverse gear
or set selector lever to P. Prevent
the vehicle from rolling.
■ Do not apply parking brake.
Page 168 of 245
166Vehicle care
Wiper blade on the rear window
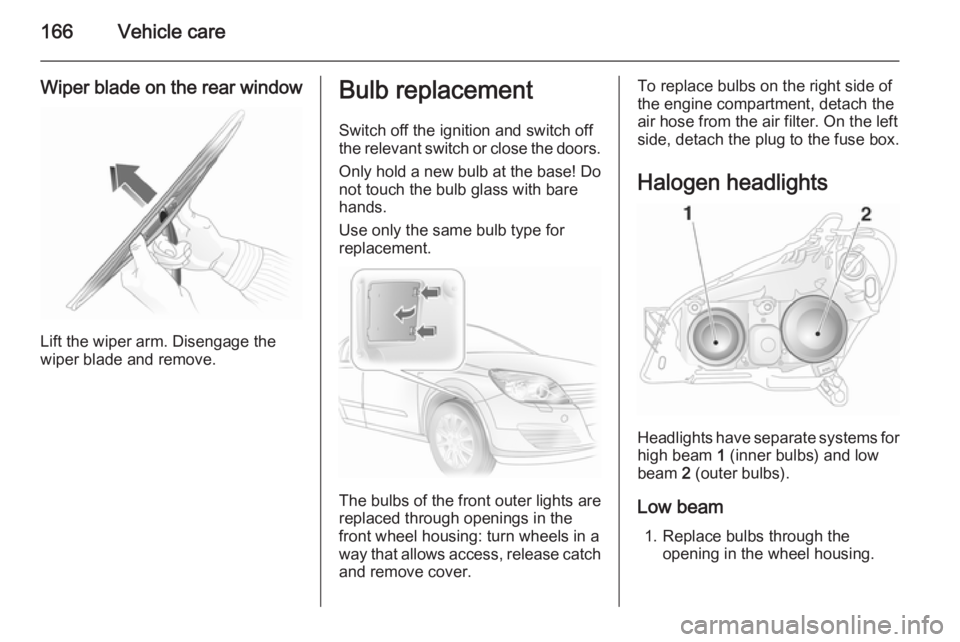
Lift the wiper arm. Disengage the
wiper blade and remove.
Bulb replacement
Switch off the ignition and switch off
the relevant switch or close the doors.
Only hold a new bulb at the base! Do
not touch the bulb glass with bare
hands.
Use only the same bulb type for
replacement.
The bulbs of the front outer lights are
replaced through openings in the
front wheel housing: turn wheels in away that allows access, release catch
and remove cover.
To replace bulbs on the right side of
the engine compartment, detach the
air hose from the air filter. On the left
side, detach the plug to the fuse box.
Halogen headlights
Headlights have separate systems forhigh beam 1 (inner bulbs) and low
beam 2 (outer bulbs).
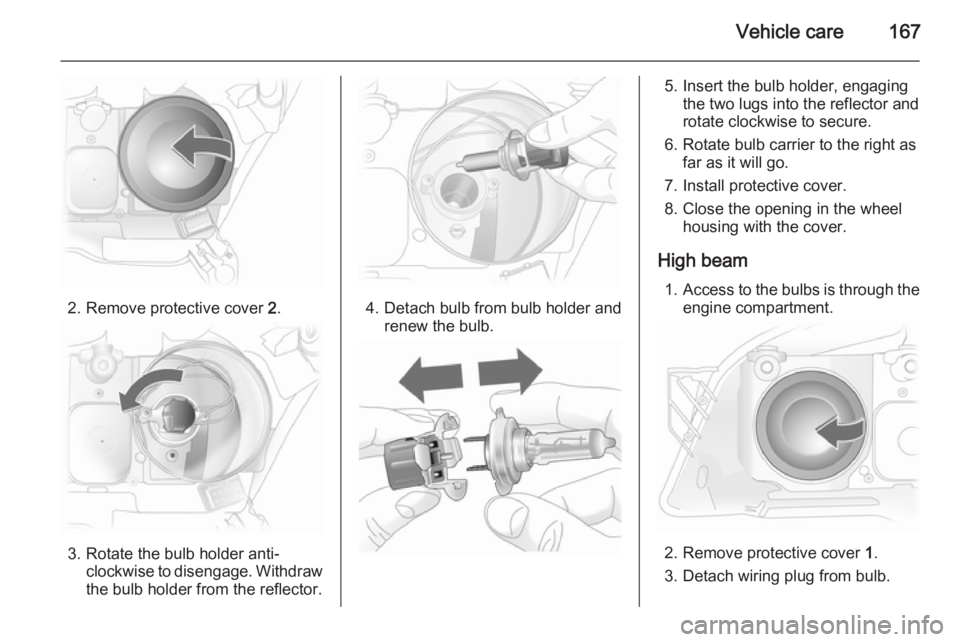
Low beam 1. Replace bulbs through the opening in the wheel housing.
Page 169 of 245
Vehicle care167
2. Remove protective cover 2.
3. Rotate the bulb holder anti-
clockwise to disengage. Withdrawthe bulb holder from the reflector.
4. Detach bulb from bulb holder and renew the bulb.
5. Insert the bulb holder, engagingthe two lugs into the reflector androtate clockwise to secure.
6. Rotate bulb carrier to the right as far as it will go.
7. Install protective cover.
8. Close the opening in the wheel housing with the cover.
High beam 1. Access to the bulbs is through the
engine compartment.
2. Remove protective cover 1.
3. Detach wiring plug from bulb.
Page 171 of 245
Vehicle care169Xenon headlights
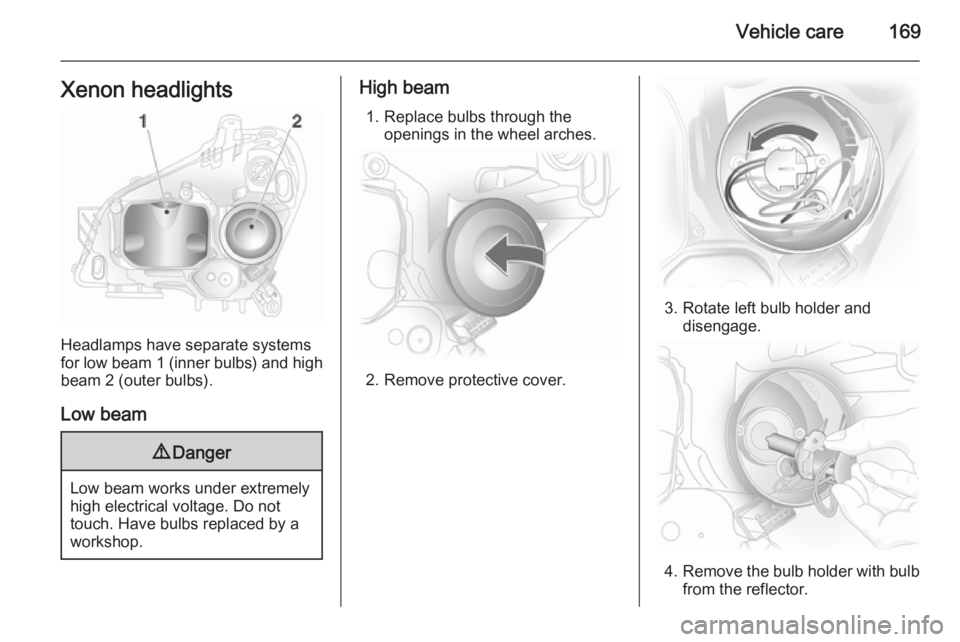
Headlamps have separate systems
for low beam 1 (inner bulbs) and high
beam 2 (outer bulbs).
Low beam
9 Danger
Low beam works under extremely
high electrical voltage. Do not
touch. Have bulbs replaced by a
workshop.
High beam
1. Replace bulbs through the openings in the wheel arches.
2. Remove protective cover.
3. Rotate left bulb holder anddisengage.
4.Remove the bulb holder with bulb
from the reflector.
Page 172 of 245
170Vehicle care
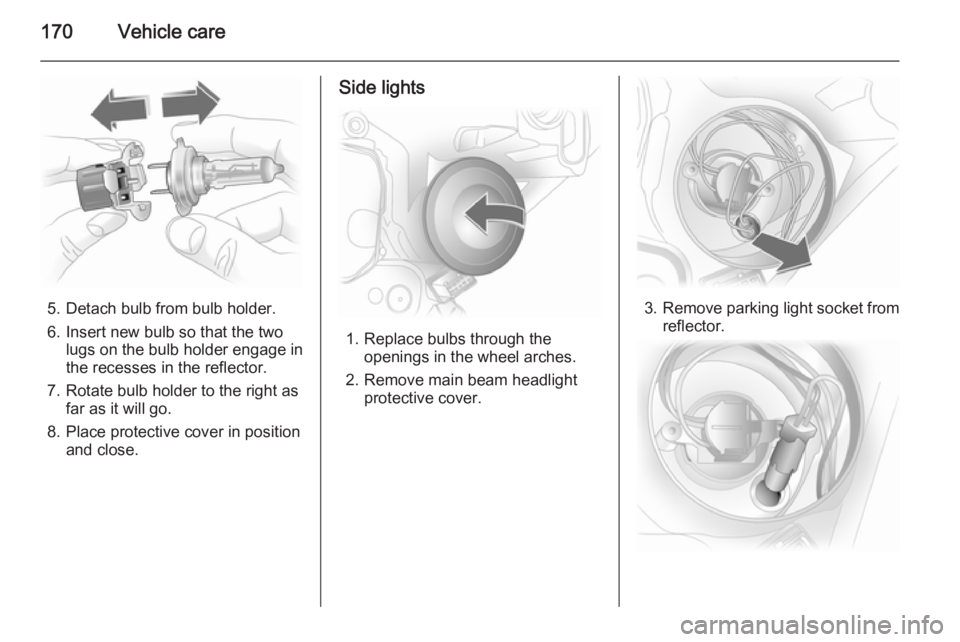
5. Detach bulb from bulb holder.
6. Insert new bulb so that the two lugs on the bulb holder engage in
the recesses in the reflector.
7. Rotate bulb holder to the right as far as it will go.
8. Place protective cover in position and close.
Side lights
1. Replace bulbs through the openings in the wheel arches.
2. Remove main beam headlight protective cover.
3.Remove parking light socket from
reflector.
Page 173 of 245
Vehicle care171
4. Remove bulb from socket andrenew bulb.
5. Insert holder in reflector. Place protective cap in position and
close.
Fog lights Have bulbs replaced by a workshop.
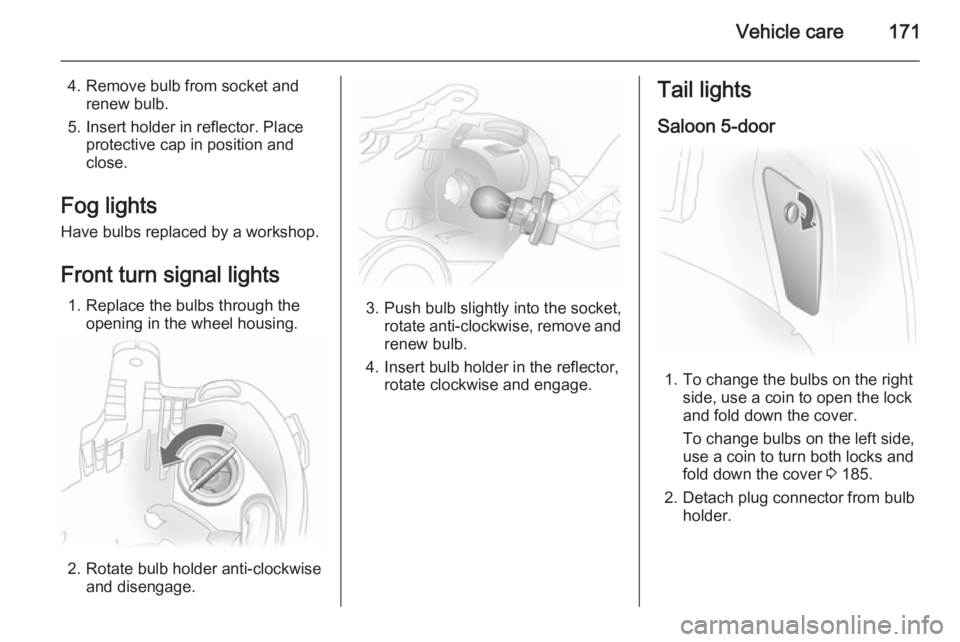
Front turn signal lights 1. Replace the bulbs through the opening in the wheel housing.
2. Rotate bulb holder anti-clockwise and disengage.
3. Push bulb slightly into the socket,rotate anti-clockwise, remove and
renew bulb.
4. Insert bulb holder in the reflector, rotate clockwise and engage.
Tail lights
Saloon 5-door
1. To change the bulbs on the right side, use a coin to open the lock
and fold down the cover.
To change bulbs on the left side,
use a coin to turn both locks and
fold down the cover 3 185.
2. Detach plug connector from bulb holder.
Page 174 of 245
172Vehicle care
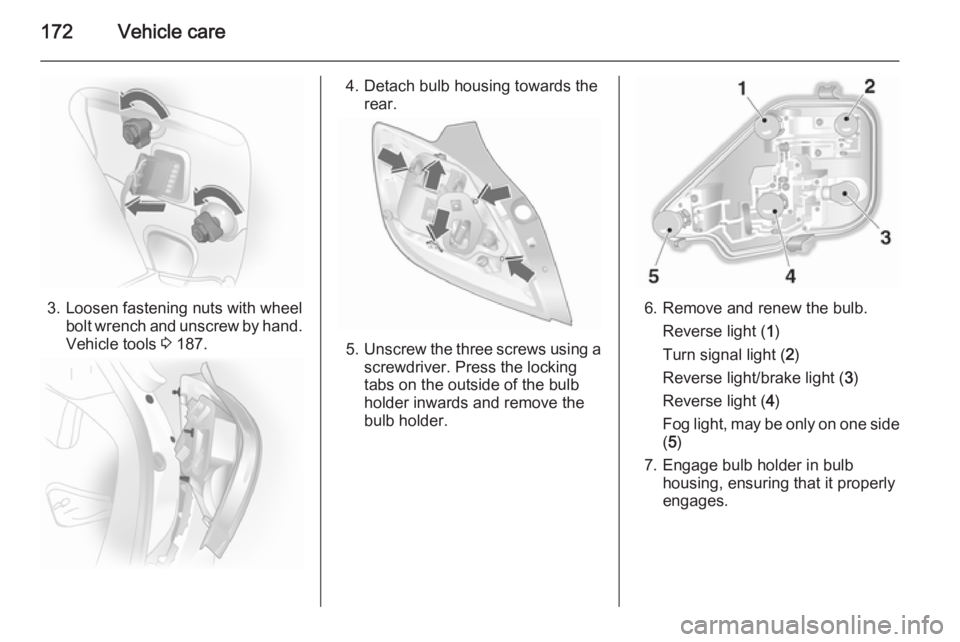
3. Loosen fastening nuts with wheelbolt wrench and unscrew by hand.
Vehicle tools 3 187.
4. Detach bulb housing towards the
rear.
5.Unscrew the three screws using a
screwdriver. Press the locking
tabs on the outside of the bulb
holder inwards and remove the
bulb holder.
6. Remove and renew the bulb.
Reverse light ( 1)
Turn signal light ( 2)
Reverse light/brake light ( 3)
Reverse light ( 4)
Fog light, may be only on one side
( 5 )
7. Engage bulb holder in bulb housing, ensuring that it properly
engages.