wheel OPEL FRONTERA 1998 Workshop Manual
[x] Cancel search | Manufacturer: OPEL, Model Year: 1998, Model line: FRONTERA, Model: OPEL FRONTERA 1998Pages: 6000, PDF Size: 97 MB
Page 3318 of 6000

8G–6SEATS
Disassembled View (Short Wheel Base)
750RX018
Legend
(1) Head Rest
(2) Seat Back Assembly
(3) Back Board Assembly
(4) Pad & Frame Assembly
(5) Trim Cover
(6) Guide Holder
(7) Reclining Device
(8) Slide Cover
(9) Reclining Knob
(10) Frame Assembly(11) Pad Assembly
(12) Trim Cover
(13) Walk–in Cover
(14) Walk–in Assembly
(15) Seat Adjuster/Seat Adjuster (W/Pretensioner)
(16) Release Wire
(17) Seat Belt Buckle Assembly
(18) Spacer
(19) Seat Cushion Assembly
(20) Hinge Cover
Disassembly
1. Remove the head rest.
2. Remove the reclining knob.
3. Remove the side cover.
4. Remove the hinge cover.5. Remove the back board assembly.Pull out the back board while prying the clip of the
back board free from the seat back assembly.
Page 3331 of 6000

SEATS8G–19
Disassembled View (Short Wheel Base)
755RW036
Legend
(1) Back Board
(2) Release Knob
(3) Release Rod
(4) Device Cover
(5) Reclining Device
(6) Linkage Bush
(7) Pillow Assembly
(8) Pad & Frame Assembly
(9) Armrest Board
(10) Clip
(11) Band Hook Cover
(12) Trim Cover(13) Armrest Set Bracket
(14) Bush
(15) Armrest Assembly
(16) Trim Cover
(17) Mounting Bracket
(18) Frame Assembly
(19) Stopper Rubber
(20) Pad Assembly
(21) Seat Lock Cover
(22) Rear seat Belt Bukle and Lock Assembly
(23) Seat Cushion Assembly
(24) Free Hinge Cover
(25) Seat Back Assembly
Disassembly
1. Remove the back board.
Remove the clips and the back board.2. Remove the device cover.
3. Remove the release knob.Turn the knob counterclockwise to remove it.
Page 3380 of 6000

EXTERIOR/INTERIOR TRIM8J–1
BODY AND ACCESSORIES
EXTERIOR / INTERIOR TRIM
CONTENTS
Service Precaution 8J–2. . . . . . . . . . . . . . . . . . . . . .
Dash Side Trim Panel 8J–3. . . . . . . . . . . . . . . . . . . .
Removal 8J–3. . . . . . . . . . . . . . . . . . . . . . . . . . . . .
Installation 8J–3. . . . . . . . . . . . . . . . . . . . . . . . . . . .
Assist Grip 8J–3. . . . . . . . . . . . . . . . . . . . . . . . . . . . .
Parts Location 8J–3. . . . . . . . . . . . . . . . . . . . . . . .
Removal and Installation 8J–3. . . . . . . . . . . . . . .
Consoles 8J–4. . . . . . . . . . . . . . . . . . . . . . . . . . . . . . .
Consoles and Associated Parts 8J–4. . . . . . . . .
Removal 8J–4. . . . . . . . . . . . . . . . . . . . . . . . . . . . .
Installation 8J–5. . . . . . . . . . . . . . . . . . . . . . . . . . . .
Front Door Trim Panel 8J–6. . . . . . . . . . . . . . . . . . .
Front Door Trim Panel and Associated
Parts 8J–6. . . . . . . . . . . . . . . . . . . . . . . . . . . . . . . .
Removal 8J–6. . . . . . . . . . . . . . . . . . . . . . . . . . . . .
Installation 8J–9. . . . . . . . . . . . . . . . . . . . . . . . . . . .
Rear Door Trim Panel 8J–10. . . . . . . . . . . . . . . . . . . .
Rear Door Trim Panel and Associated
Parts 8J–10. . . . . . . . . . . . . . . . . . . . . . . . . . . . . . . .
Removal 8J–10. . . . . . . . . . . . . . . . . . . . . . . . . . . . .
Installation 8J–11. . . . . . . . . . . . . . . . . . . . . . . . . . . .
Door Mirror 8J–13. . . . . . . . . . . . . . . . . . . . . . . . . . . . .
Door Mirror and Associated Parts 8J–13. . . . . . . .
Removal 8J–13. . . . . . . . . . . . . . . . . . . . . . . . . . . . .
Installation 8J–13. . . . . . . . . . . . . . . . . . . . . . . . . . . .
Luggage Side and Quarter Upper Trim Cover
(Long Wheel Base) 8J–14. . . . . . . . . . . . . . . . . . . . .
Luggage Side, Quarter Upper Trim Cover
and Associated Parts 8J–14. . . . . . . . . . . . . . . . . .
Removal 8J–14. . . . . . . . . . . . . . . . . . . . . . . . . . . . .
Installation 8J–16. . . . . . . . . . . . . . . . . . . . . . . . . . . .
Luggage Side and Quarter Upper Trim Cover
(Short Wheel Base) 8J–17. . . . . . . . . . . . . . . . . . . . .
Luggage Side, Quarter Upper Trim Cover
and Associated
Parts 8J–17. . . . . . . . . . . . . . . . . . . . . . . . . . . . . . . .
Removal 8J–17. . . . . . . . . . . . . . . . . . . . . . . . . . . . .
Installation 8J–19. . . . . . . . . . . . . . . . . . . . . . . . . . . .
Center Pillar and Roof Side Trim Cover
(Long Wheel Base) 8J–20. . . . . . . . . . . . . . . . . . . . .
Center Pillar, Roof Side Trim Cover and
Associated Parts 8J–20. . . . . . . . . . . . . . . . . . . . . .
Removal 8J–20. . . . . . . . . . . . . . . . . . . . . . . . . . . . .
Installation 8J–21. . . . . . . . . . . . . . . . . . . . . . . . . . . .
Roof Side Trim Cover (Short Wheel Base) 8J–22. . Roof Side Trim Cover and Associated
Parts 8J–22. . . . . . . . . . . . . . . . . . . . . . . . . . . . . . . .
Removal 8J–22. . . . . . . . . . . . . . . . . . . . . . . . . . . . .
Installation 8J–22. . . . . . . . . . . . . . . . . . . . . . . . . . . .
Front Pillar Trim Cover 8J–23. . . . . . . . . . . . . . . . . . .
Front Pillar Trim Cover and Associated
Parts 8J–23. . . . . . . . . . . . . . . . . . . . . . . . . . . . . . . .
Removal 8J–23
. . . . . . . . . . . . . . . . . . . . . . . . . . . . .
Installation 8J–23. . . . . . . . . . . . . . . . . . . . . . . . . . . .
Center Pillar Assist Grip 8J–24. . . . . . . . . . . . . . . . . .
Parts Location 8J–24. . . . . . . . . . . . . . . . . . . . . . . .
Removal and Installation 8J–24. . . . . . . . . . . . . . .
Assist Grip 8J–24. . . . . . . . . . . . . . . . . . . . . . . . . . . . .
Parts Location 8J–24. . . . . . . . . . . . . . . . . . . . . . . .
Removal and Installation 8J–24. . . . . . . . . . . . . . .
Fuel Filler Lid Opener Cable 8J–25. . . . . . . . . . . . . .
Fuel Filler Lid Opener Cable
and Associated Parts 8J–25. . . . . . . . . . . . . . . . . .
Removal 8J–25. . . . . . . . . . . . . . . . . . . . . . . . . . . . .
Installation 8J–26. . . . . . . . . . . . . . . . . . . . . . . . . . . .
Fuel Filler Door 8J–26. . . . . . . . . . . . . . . . . . . . . . . . .
Parts Location 8J–26. . . . . . . . . . . . . . . . . . . . . . . .
Removal 8J–26. . . . . . . . . . . . . . . . . . . . . . . . . . . . .
Installation 8J–26. . . . . . . . . . . . . . . . . . . . . . . . . . . .
Rocker Protector (Without Wheel
Opening Extension) 8J–27. . . . . . . . . . . . . . . . . . . . .
Rocker Protector (Without Wheel
Opening Extension) and Associated Parts 8J–27
Removal 8J–27. . . . . . . . . . . . . . . . . . . . . . . . . . . . .
Installation 8J–27. . . . . . . . . . . . . . . . . . . . . . . . . . . .
Wheel Opening Extension and Rocker
Protector Assembly 8J–28. . . . . . . . . . . . . . . . . . . . .
Wheel Opening Extension, Rocker Protector
Assembly and Associated Parts 8J–28. . . . . . . . .
Removal 8J–28. . . . . . . . . . . . . . . . . . . . . . . . . . . . .
Installation 8J–29. . . . . . . . . . . . . . . . . . . . . . . . . . . .
Mud Flaps (With Wheel Opening Extension) 8J–31
Mud Flaps (With Wheel Opening Extension)
and Associated Parts 8J–31. . . . . . . . . . . . . . . . . .
Removal 8J–31. . . . . . . . . . . . . . . . . . . . . . . . . . . . .
Installation 8J–31. . . . . . . . . . . . . . . . . . . . . . . . . . . .
Ventilation Assembly 8J–32. . . . . . . . . . . . . . . . . . . . .
Ventilation Assembly and Associated Parts 8J–32
Removal 8J–32. . . . . . . . . . . . . . . . . . . . . . . . . . . . .
Installation 8J–32. . . . . . . . . . . . . . . . . . . . . . . . . . . .
Page 3393 of 6000

8J–14EXTERIOR/INTERIOR TRIM
Luggage Side and Quarter Upper Trim Cover (Long Wheel Base)
Luggage Side, Quarter Upper Trim Cover and Associated Parts
760RW017
Legend
(1) Assist Grip
(2) Rear Seat Belt Anchor Bolt Cover and Anchor
Bolt
(3) Quarter Upper Trim Cover
(4) Anchor Bolt
(5) Luggage Side Trim Cover
(6) Luggage Side Lower Cover
(7) Third Seat Assembly and seat Bracket(8) Third Seat Belt Anchor Bolt Cover and Anchor
Bolt
(9) Rear End Floor Trim Cover
(10) Luggage Side Cap
(11) Speaker Grille
(12) Rear Speaker
(13) Luggage Room Light
(14) Rear Roof Trim Cover
Removal
1. Disconnect the battery ground cable.
2. Remove the third seat assembly and seat bracket.
3. Remove the rear end floor trim cover.
4. Remove the luggage side cap.
Page 3396 of 6000

EXTERIOR/INTERIOR TRIM8J–17
Luggage Side and Quarter Upper Trim Cover (Short Wheel Base)
Luggage Side, Quarter Upper Trim Cover and Associated Parts
760RW021
Legend
(1) Rear Assist Grip
(2) Quater Upper Trim Cover
(3) Seat belt adjust Shoulder Anchor Plate
(4) Front Seat Belt Anchor Bolt Cover and Anchor
Bolt
(5) Luggage Side Trim Cover
(6) Rear Seat Belt Anchor Bolt Cover and Anchor
Bolt(7) Rear End Floor Trim Cover
(8) Luggage Side Cap
(9) Speaker Grill
(10) Rear Speaker
(11) Luggage Room Light
(12) Rear Roof Trim Cover
Removal
1. Disconnect the battery ground cable.2. Remove the rear end floor trim cover.
3. Remove the luggage side cap.
Page 3399 of 6000

8J–20EXTERIOR/INTERIOR TRIM
Center Pillar and Roof Side Trim Cover (Long Wheel Base)
Center Pillar, Roof Side Trim Cover and Associated Parts
643RW007
Legend
(1) Roof Side Trim Cover
(2) Front Pillar Trim Cover
(3) Assist Grip (Passenger Seat Side)
(4) Adjust Shoulder Anchor Assembly/Seat Belt
Anchor Plate
(5) Center Pillar Upper Trim Plate(6) Door Sill Plate (Front and Rear)
(7) Center Pillar Lower Trim Cover
(8) Front Seat Anchor Bolt Cover and Anchor Bolt
(9) Center Pillar Assist Grip
(10) Assist Grip
(11) Rear Quarter Upper Trim Cover
Removal
1. Disconnect the battery ground cable.
2. Remove the door sill plate (front and rear).
3. Remove the center pillar lower trim cover (2).
Turn up the finisher (1) and pry the trim cover
retainers free from the body panel, then slide the
trim cover downward.
643RS003
Page 3401 of 6000

8J–22EXTERIOR/INTERIOR TRIM
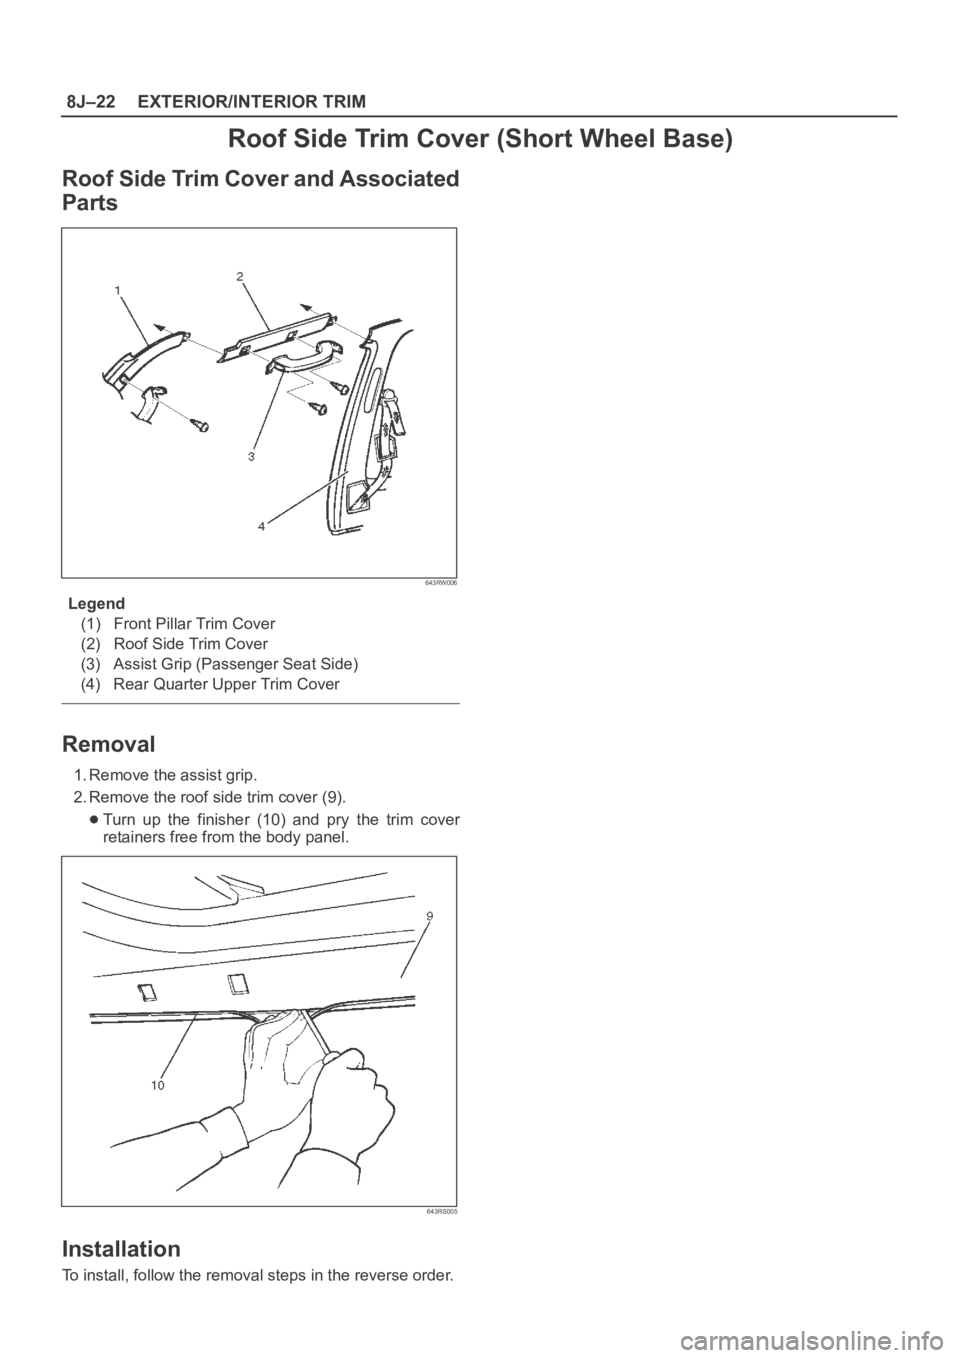
Roof Side Trim Cover (Short Wheel Base)
Roof Side Trim Cover and Associated
Parts
643RW006
Legend
(1) Front Pillar Trim Cover
(2) Roof Side Trim Cover
(3) Assist Grip (Passenger Seat Side)
(4) Rear Quarter Upper Trim Cover
Removal
1. Remove the assist grip.
2. Remove the roof side trim cover (9).
Turn up the finisher (10) and pry the trim cover
retainers free from the body panel.
643RS005
Installation
To install, follow the removal steps in the reverse order.
Page 3406 of 6000

EXTERIOR/INTERIOR TRIM8J–27
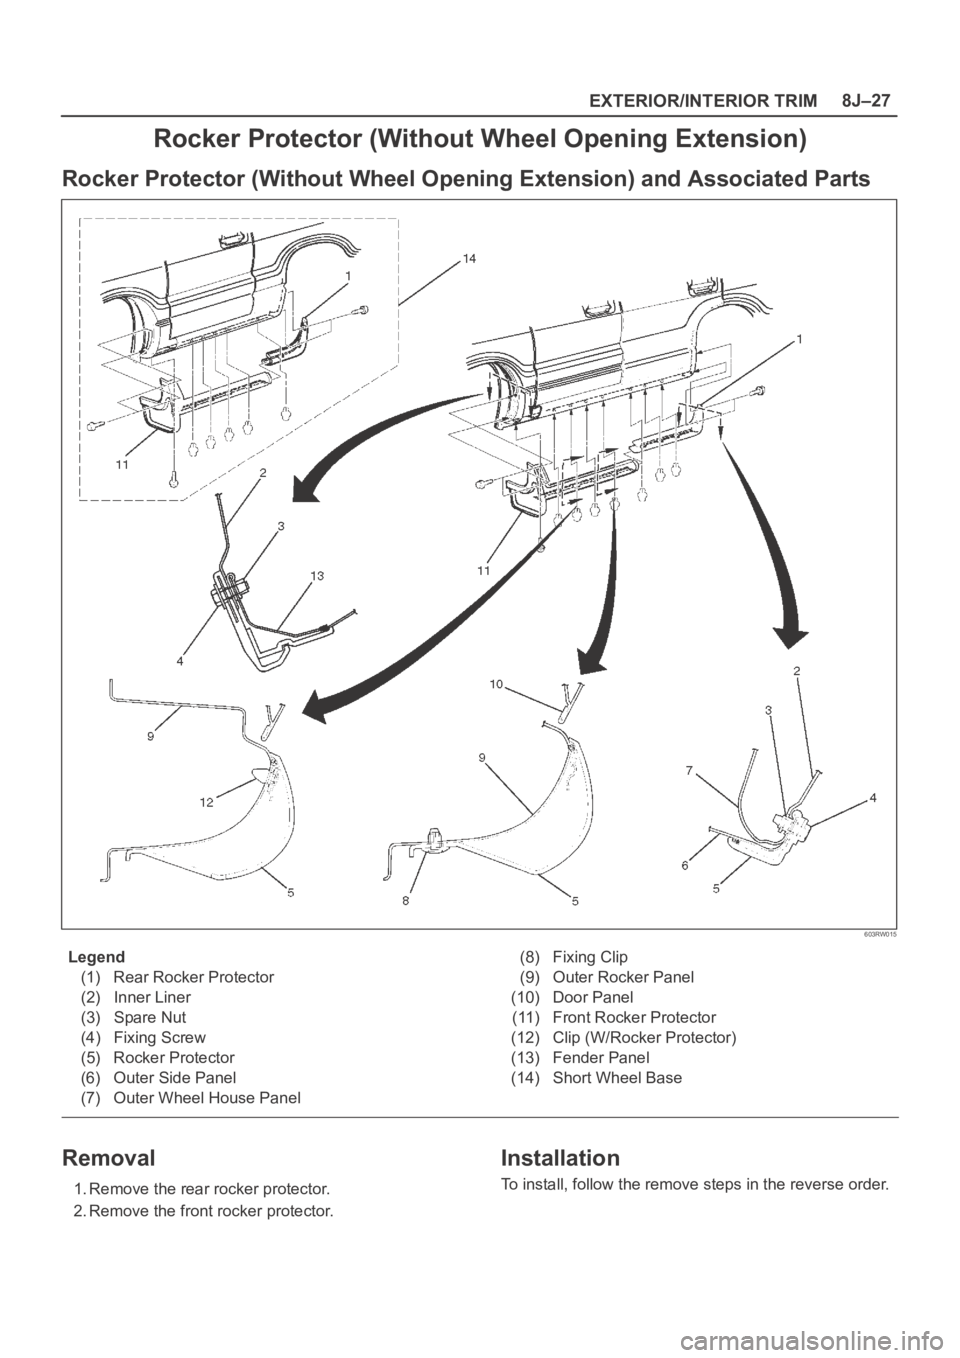
Rocker Protector (Without Wheel Opening Extension)
Rocker Protector (Without Wheel Opening Extension) and Associated Parts
603RW015
Legend
(1) Rear Rocker Protector
(2) Inner Liner
(3) Spare Nut
(4) Fixing Screw
(5) Rocker Protector
(6) Outer Side Panel
(7) Outer Wheel House Panel(8) Fixing Clip
(9) Outer Rocker Panel
(10) Door Panel
(11) Front Rocker Protector
(12) Clip (W/Rocker Protector)
(13) Fender Panel
(14) Short Wheel Base
Removal
1. Remove the rear rocker protector.
2. Remove the front rocker protector.
Installation
To install, follow the remove steps in the reverse order.
Page 3407 of 6000

8J–28EXTERIOR/INTERIOR TRIM
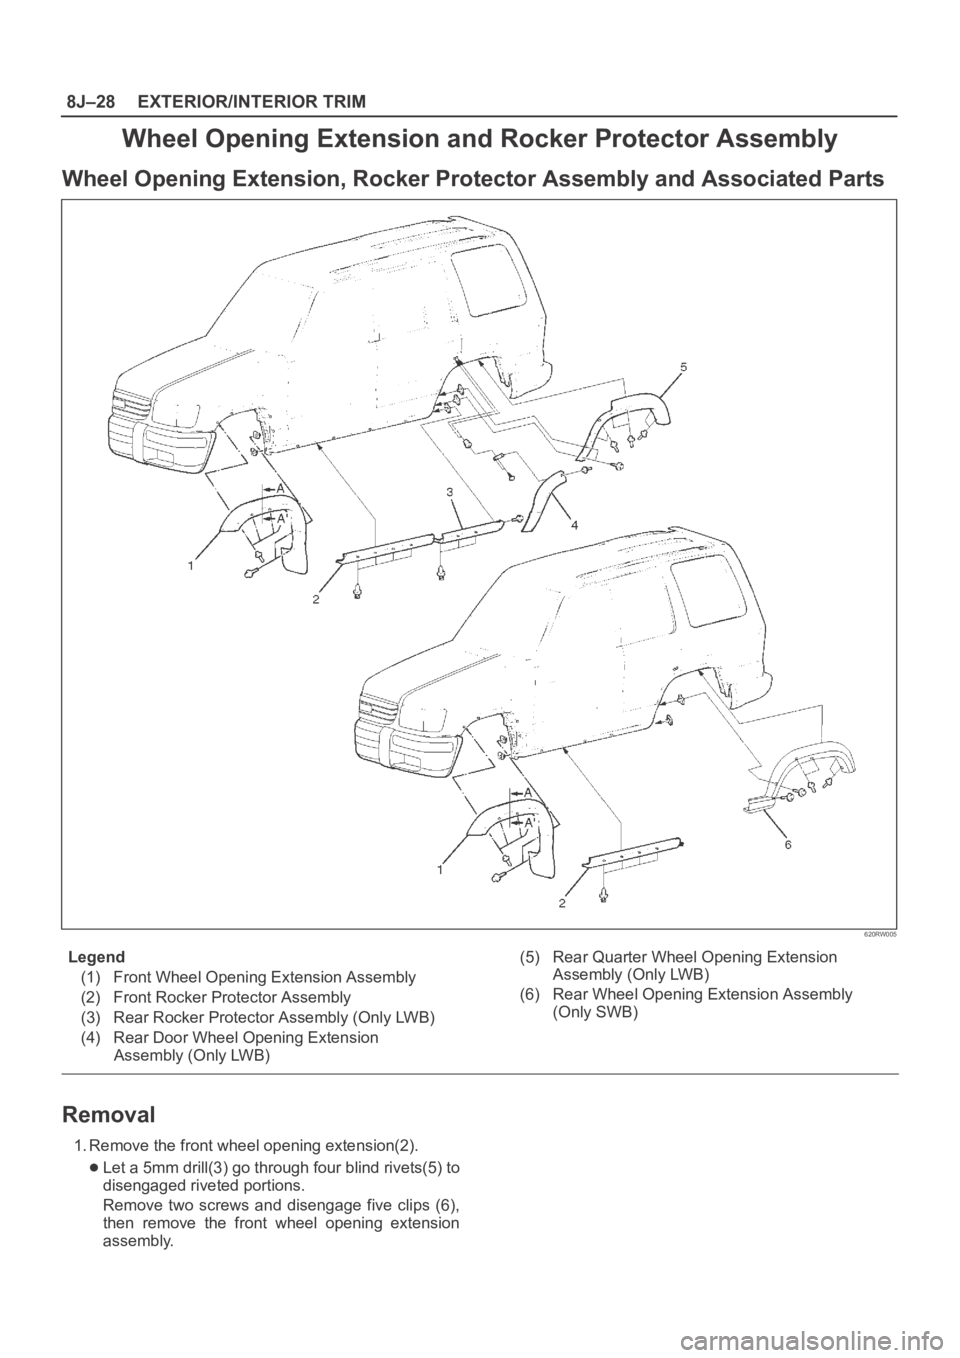
Wheel Opening Extension and Rocker Protector Assembly
Wheel Opening Extension, Rocker Protector Assembly and Associated Parts
620RW005
Legend
(1) Front Wheel Opening Extension Assembly
(2) Front Rocker Protector Assembly
(3) Rear Rocker Protector Assembly (Only LWB)
(4) Rear Door Wheel Opening Extension
Assembly (Only LWB)(5) Rear Quarter Wheel Opening Extension
Assembly (Only LWB)
(6) Rear Wheel Opening Extension Assembly
(Only SWB)
Removal
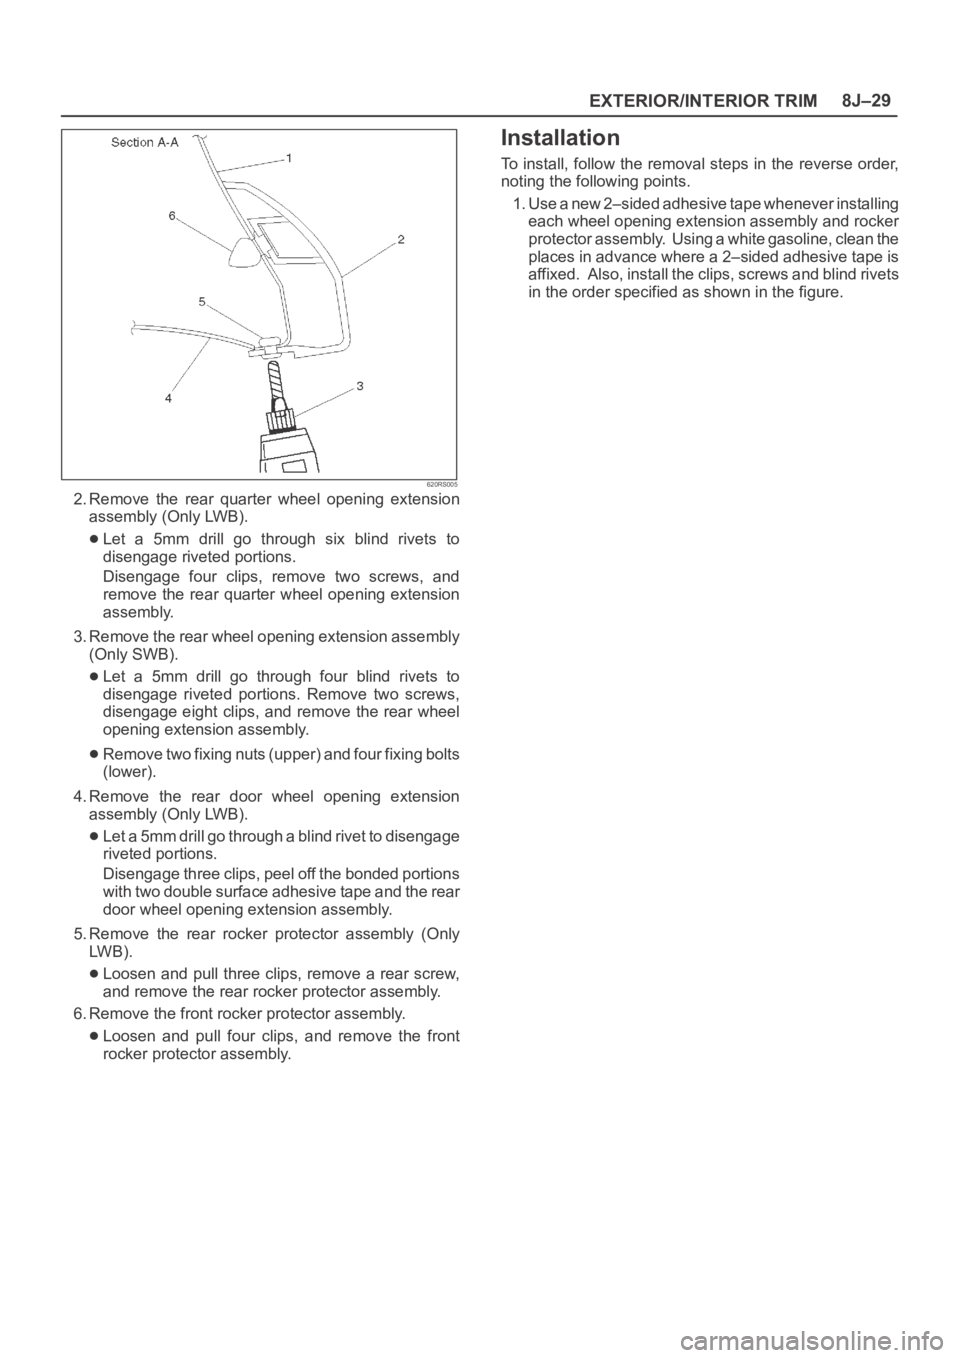
1. Remove the front wheel opening extension(2).
Let a 5mm drill(3) go through four blind rivets(5) to
disengaged riveted portions.
Remove two screws and disengage five clips (6),
then remove the front wheel opening extension
assembly.
Page 3408 of 6000

EXTERIOR/INTERIOR TRIM8J–29
620RS005
2. Remove the rear quarter wheel opening extension
assembly (Only LWB).
Let a 5mm drill go through six blind rivets to
disengage riveted portions.
Disengage four clips, remove two screws, and
remove the rear quarter wheel opening extension
assembly.
3. Remove the rear wheel opening extension assembly
(Only SWB).
Let a 5mm drill go through four blind rivets to
disengage riveted portions. Remove two screws,
disengage eight clips, and remove the rear wheel
opening extension assembly.
Remove two fixing nuts (upper) and four fixing bolts
(lower).
4. Remove the rear door wheel opening extension
assembly (Only LWB).
Let a 5mm drill go through a blind rivet to disengage
riveted portions.
Disengage three clips, peel off the bonded portions
with two double surface adhesive tape and the rear
door wheel opening extension assembly.
5. Remove the rear rocker protector assembly (Only
LW B ) .
Loosen and pull three clips, remove a rear screw,
and remove the rear rocker protector assembly.
6. Remove the front rocker protector assembly.
Loosen and pull four clips, and remove the front
rocker protector assembly.
Installation
To install, follow the removal steps in the reverse order,
noting the following points.
1. Use a new 2–sided adhesive tape whenever installing
each wheel opening extension assembly and rocker
protector assembly. Using a white gasoline, clean the
places in advance where a 2–sided adhesive tape is
affixed. Also, install the clips, screws and blind rivets
in the order specified as shown in the figure.