wheel OPEL FRONTERA 1998 Workshop Manual
[x] Cancel search | Manufacturer: OPEL, Model Year: 1998, Model line: FRONTERA, Model: OPEL FRONTERA 1998Pages: 6000, PDF Size: 97 MB
Page 3410 of 6000

EXTERIOR/INTERIOR TRIM8J–31
Mud Flaps (With Wheel Opening Extension)
Mud Flaps (With Wheel Opening Extension) and Associated Parts
620RW003
Legend
(1) Front Bumper Assembly
(2) Front Bumper Slider(3) Front Mud Flap
(4) Bumper Side Cover
(5) Rear Mud Flap
Removal
Front Side
1. Remove the front bumper assembly.
Disconnect the front fog light connector and remove
two bolts from both sides of the front bumper.
2. Remove the front bumper slider(1).
Remove two clips(4) and two nuts(3), release the
claw from the washer(2).
601RW009
3. Remove the front mud flap.
Remove four nuts and a clip.
601RW013
Rear Side
1. Remove the bumper side cover.
2. Remove the rear mud flap.
Remove four bolts and two nuts.
Installation
To install, follow the removal steps in the reverse order.
Page 3421 of 6000

SEAT BELT SYSTEM 9A–1
RESTRAINTS
CONTENTS
SEAT BELT SYSTEM
CONTENTS
Seat Belt System . . . . . . . . . . . . . . . . . . . . . . 9A–1
Supplemental Restraint System (SRS) . . . . . 9J–1Restraint Control System . . . . . . . . . . . . . . . . 9J1–1
Service Precaution . . . . . . . . . . . . . . . . . . . . . 9A–1
Seat Belt . . . . . . . . . . . . . . . . . . . . . . . . . . . . . 9A–2
Front Seat Belt and Associated Parts
(Long Wheel Base) . . . . . . . . . . . . . . . . . . 9A–2
Removal . . . . . . . . . . . . . . . . . . . . . . . . . . . . 9A–2
Inspection . . . . . . . . . . . . . . . . . . . . . . . . . . . 9A–2
Installation . . . . . . . . . . . . . . . . . . . . . . . . . . 9A–3
Front Seat Belt and Associated Parts
(Short Wheel Base) . . . . . . . . . . . . . . . . . . 9A–4
Removal . . . . . . . . . . . . . . . . . . . . . . . . . . . . 9A–4
Inspection . . . . . . . . . . . . . . . . . . . . . . . . . . . 9A–4
Installation . . . . . . . . . . . . . . . . . . . . . . . . . . 9A–5
Rear Seat Belt and Associated Parts
(Long Wheel Base) . . . . . . . . . . . . . . . . . . 9A–6
Removal . . . . . . . . . . . . . . . . . . . . . . . . . . . . 9A–6
Inspection . . . . . . . . . . . . . . . . . . . . . . . . . . . 9A–6
Installation . . . . . . . . . . . . . . . . . . . . . . . . . . 9A–7
Rear Seat Belt and Associated Parts
(Short Wheel Base) . . . . . . . . . . . . . . . . . . 9A–8
Removal . . . . . . . . . . . . . . . . . . . . . . . . . . . . 9A–8
Inspection . . . . . . . . . . . . . . . . . . . . . . . . . . . 9A–9
Installation . . . . . . . . . . . . . . . . . . . . . . . . . . 9A–9
Third Seat Belt and Associated Parts
(Long Wheel Base) . . . . . . . . . . . . . . . . . . 9A–10
Removal . . . . . . . . . . . . . . . . . . . . . . . . . . . . 9A–10
Inspection . . . . . . . . . . . . . . . . . . . . . . . . . . . 9A–11
Installation . . . . . . . . . . . . . . . . . . . . . . . . . . 9A–11Front Seat Buckle Assembly . . . . . . . . . . . . . 9A–12
Removal . . . . . . . . . . . . . . . . . . . . . . . . . . . . 9A–12
Installation . . . . . . . . . . . . . . . . . . . . . . . . . . 9A–12
Front Seat Buckle Assembly (W/Pretensioner) 9A–12
Removal . . . . . . . . . . . . . . . . . . . . . . . . . . . . 9A–12
Installation . . . . . . . . . . . . . . . . . . . . . . . . . . 9A–12
Rear Center Seat Belt Buckle Assembly . . . 9A–13
Rear Center Seat Belt Buckle Assembly
and Associated Parts . . . . . . . . . . . . . . . . . 9A–13
Removal . . . . . . . . . . . . . . . . . . . . . . . . . . . . 9A–13
Installation . . . . . . . . . . . . . . . . . . . . . . . . . . 9A–13
Third Seat Belt Buckle and Lock Assembly . 9A–14
Third Seat Belt Buckle and Lock Assembly
and Associated Parts . . . . . . . . . . . . . . . . . 9A–14
Removal . . . . . . . . . . . . . . . . . . . . . . . . . . . . 9A–14
Installation . . . . . . . . . . . . . . . . . . . . . . . . . . 9A–14
Rear Seat Lock Assembly . . . . . . . . . . . . . . . 9A–15
Removal . . . . . . . . . . . . . . . . . . . . . . . . . . . . 9A–15
Installation . . . . . . . . . . . . . . . . . . . . . . . . . . 9A–15
Rear Seat Lock Assembly (Bench Type) . . . 9A–15
Removal . . . . . . . . . . . . . . . . . . . . . . . . . . . . 9A–15
Installation . . . . . . . . . . . . . . . . . . . . . . . . . . 9A–15
Rear Seat Strikers . . . . . . . . . . . . . . . . . . . . . 9A–16
Removal . . . . . . . . . . . . . . . . . . . . . . . . . . . . 9A–16
Installation . . . . . . . . . . . . . . . . . . . . . . . . . . 9A–16
Third Seat Striker . . . . . . . . . . . . . . . . . . . . . . 9A–16
Removal . . . . . . . . . . . . . . . . . . . . . . . . . . . . 9A–16
Installation . . . . . . . . . . . . . . . . . . . . . . . . . . 9A–16
Main Data and Specifications . . . . . . . . . . . . 9A–17
Service Precaution
WARNING: THIS VEHICLE HAS A SUPPLEMENTAL
RESTRAINT SYSTEM (SRS). REFER TO THE SRS
COMPONENT AND WIRING LOCATION VIEW IN
ORDER TO DETERMINE WHETHER YOU ARE
PERFORMING SERVICE ON OR NEAR THE SRS
COMPONENTS OR THE SRS WIRING. WHEN YOU
ARE PERFORMING SERVICE ON OR NEAR THE SRS
COMPONENTS OR THE SRS WIRING, REFER TO
THE SRS SERVICE INFORMATION. FAILURE TO
FOLLOW WARNINGS COULD RESULT IN POSSIBLE
AIR BAG DEPLOYMENT, PERSONAL INJURY, OR
OTHERWISE UNNEEDED SRS SYSTEM REPAIRS.CAUTION: Always use the correct fastener in the
proper location. When you replace a fastener, use
ONLY the exact part number for that application.
ISUZU will call out those fasteners that require a
replacement after removal. ISUZU will also call out
the fasteners that require thread lockers or thread
sealant. UNLESS OTHERWISE SPECIFIED, do not
use supplemental coatings (Paints, greases, or other
corrosion inhibitors) on threaded fasteners or
fasteners joint interfaces. Generally, such coatings
adversely affect the fastener torque and the joint
clamping force, and may damage the fasteners.
When you install fasteners, use the correct tightening
sequence and specifications. Following these
instructions can help you avoid damage to parts and
systems.
Page 3422 of 6000

9A–2 SEAT BELT SYSTEM
Legend
(1) Center Pillar Upper Trim Cover
(2) Adjust Shoulder Anchor Assembly/Seat Belt
Anchor Plate
(3) Center Pillar
(4) Dust Cover
(5) Retractor(6) Anchor Bolt (Lower)
(7) Door Sill Plate (Front & Rear)
(8) Center Pillar Lower Trim Cover
(9) Front Seat Belt Assembly
(10) Front Seat Belt Anchor Bolt Cover and Anchor
Bolt
Seat Belt
Front Seat Belt and Associated Parts (Long Wheel Base)
73
4
5
6 1
2
10
8
9
760RW022
Removal
1. Disconnect the battery ground cable.
2. Remove the door sill plate (Front & Rear).
3. Remove the center pillar lower trim cover.
4. Remove the front seat belt anchor bolt cover and
anchor bolt (Upper Side).
Refer to Center Pillar and Roof Side Trim Cover in
Exterior/Interior Trim section.
5. Remove the seat belt lower anchor bolt and screw,
and then remove the front seat belt.
6. Remove the adjust shoulder anchor assembly/seat
belt anchor plate.
Refer to Center Pillar and Roof Side Trim Cover in
Exterior/Interior Trim section.
Inspection
If any of the following abnormalities is found, replace on
an assembly basis;
Deform and malfunction of adjustable shoulder
anchor/seat belt anchor plate.
No smooth move of upper/lower anchors in the
circumferential direction.
Damaged and/or deformed through ring.
Damaged and/or deformed tongue.
Damaged and/or frayed of webbing.
Deformed retractor bracket.
Seat belt not rewound up.
Resistance or abnormal sound when seat belt is
wound out and rewound.
Retractor abnormality.
Page 3424 of 6000

9A–4 SEAT BELT SYSTEM
760RW024
Legend
(1) Quarter Upper Trim Cover
(2) Front Seat Belt Anchor Bolt Cover and Anchor
Bolt (Upper Side)
(3) Adjust Shoulder Anchor Assembly/Seat Belt
Anchor Plate(4) Front Seat Belt Assembly
(5) Retractor
(6) Dust Cover
(7) Anchor Bolt (Lower)
(8) Luggage Side Trim Cover
(9) Rear End Floor Trim Cover
Front Seat Belt and Associated Parts (Short Wheel Base)
3
4
5
6
7
8
912
Removal
1. Disconnect the battery ground cable.
2. Remove the rear end floor trim cover.
3. Remove the luggage side trim cover.
Refer to Luggage Side and Quarter Upper Trim
Panel removal steps in Exterior/Interior Trim
section.
4. Remove the front seat belt anchor bolt cover and
anchor bolt (Upper Side).
5. Remove the seat belt lower anchor bolt and the
retractor and then remove the front seat belt.
6. Remove the adjust shoulder anchor assembly/seat
belt anchor plate.
Refer to Luggage Side and Quarter Upper Trim
Cover remove steps in Exterior/Interior Trim
section.
Inspection
If any of the following abnormalities is found, replace on
an assembly basis;
Deform and malfunction of adjustable shoulder
anchor/seat belt anchor plate.
No smooth move of upper/lower anchors in the
circumferential direction.
Damaged and/or deformed through ring.
Damaged and/or deformed tongue.
Damaged and/or frayed of webbing.
Deformed retractor bracket.
Seat belt not rewound up.
Resistance or abnormal sound when seat belt is
wound out and rewound.
Retractor abnormality.
Page 3426 of 6000

9A–6 SEAT BELT SYSTEM
760RS006
Legend
(1) Rear Seat Belt Anchor Bolt Cover and Anchor
Bolt (Upper Side)
(2) Quarter Upper Trim Cover
(3) Rear Seat Belt Assembly(4) Dust Cover
(5) Retractor
(6) Anchor Bolt (Lower Side)
(7) Luggage Side Trim Cover
(8) Rear End Floor Trim Cover
Rear Seat Belt and Associated Parts (Long Wheel Base)
12
3
4
5
6 7
8
Removal
1. Disconnect the battery ground cable.
2. Remove the rear end floor trim cover.
3. Remove the luggage side trim cover.
Refer to Luggage Side and Quarter Upper Trim
Panel removal steps in Exterior/Interior Trim
section.
4. Remove the rear seat belt anchor bolt cover and
anchor bolt (Upper Side).
5. Remove the seat belt lower anchor bolt and remove
the retractor from dust cover slit to remove the rear
seat belt.
Inspection
If any of the following abnormalities is found, replace on
an assembly basis;
No smooth move of upper/lower anchors in the
circumferential direction.
Damaged and/or deformed through ring.
Damaged and/or deformed tongue.
Damaged and/or frayed of webbing.
Deformed retractor bracket.
Seat belt not rewound up.
Resistance or abnormal sound when seat belt is
wound out and rewound.
Retractor abnormality.
Page 3428 of 6000

9A–8 SEAT BELT SYSTEM
760RW025
Legend
(1) Rear Seat Belt Upper Anchor Bolt Cover and
Anchor Bolt
(2) Quarter Upper Trim Cover
(3) Dust Cover
(4) Retractor(5) Rear Seat Belt Lower Anchor Bolt Cover and
Anchor Bolt
(6) Luggage Side Trim Cover
(7) Rear End Floor Trim Cover
(8) Rear Seat Belt Assembly
Rear Seat Belt and Associated Parts (Short Wheel Base)
1
82
34
56
7
Removal
1. Disconnect the battery ground cable.
2. Remove the rear seat belt lower anchor bolt cover (1)
and anchor bolt (2).1
2
755RW038
Page 3430 of 6000

9A–10 SEAT BELT SYSTEM
Third Seat Belt and Associated Parts (Long Wheel Base)
65 1
2
3
4
7
760RW027
Legend
(1) Third Seat Belt Upper Anchor Bolt Cover and
Anchor Bolt
(2) Third Seat Belt Assembly
(3) Dust Cover(4) Retractor
(5) Luggage Side Trim Cover
(6) Third Seat Belt Lower Anchor Bolt Cover and
Anchor Bolt
(7) Rear End Floor Trim Cover
Removal
1. Disconnect the battery ground cable.
2. Remove the rear end floor trim cover.
3. Remove the luggage side trim cover.
Refer to Luggage Side and Quarter Upper Trim
Panel removal steps in Exterior/Interior Trim
section.
4. Remove the third seat belt anchor bolt cover and
anchor bolt (Upper Side).
5. Remove the seat belt lower anchor bolt and remove
the retractor from dust cover slit to remove the third
seat belt.
1
755RW043
Page 3433 of 6000
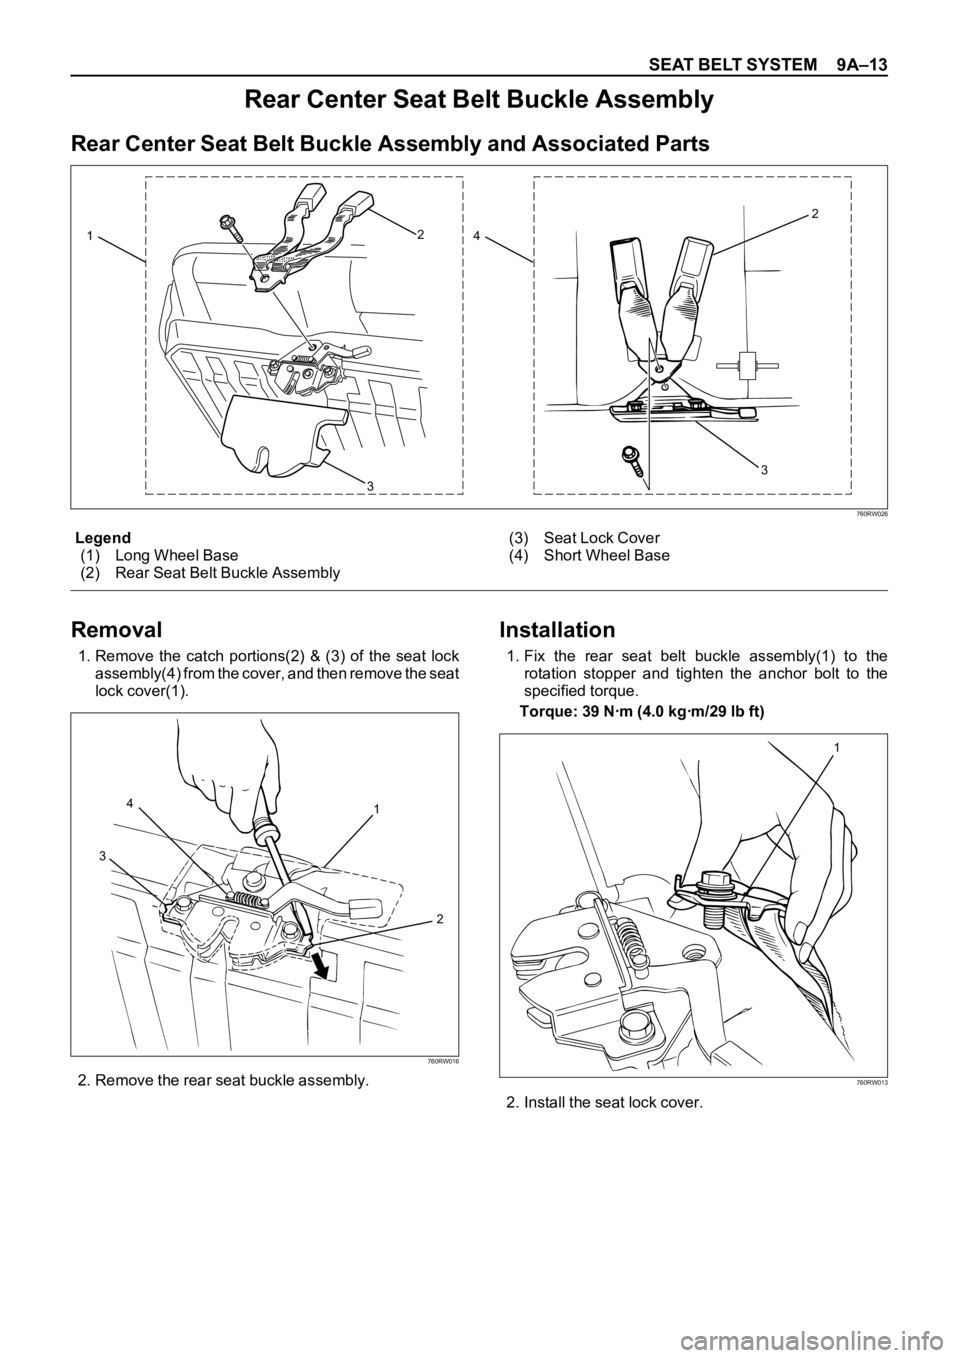
SEAT BELT SYSTEM 9A–13
Rear Center Seat Belt Buckle Assembly
Rear Center Seat Belt Buckle Assembly and Associated Parts
2
2
1
4
3
3
760RW026
Legend
(1) Long Wheel Base
(2) Rear Seat Belt Buckle Assembly(3) Seat Lock Cover
(4) Short Wheel Base
Removal
1. Remove the catch portions(2) & (3) of the seat lock
assembly(4) from the cover, and then remove the seat
lock cover(1).
2. Remove the rear seat buckle assembly.
Installation
1. Fix the rear seat belt buckle assembly(1) to the
rotation stopper and tighten the anchor bolt to the
specified torque.
Torque: 39 Nꞏm (4.0 kgꞏm/29 lb ft)
2. Install the seat lock cover.
1
2 4
3
760RW016
1
760RW013
Page 3438 of 6000

SUPPLEMENTAL RESTRAINT SYSTEM9J–1
RESTRAINTS
SUPPLEMENTAL RESTRAINT SYSTEM (SRS)
CONTENTS
Service Precaution 9J–1. . . . . . . . . . . . . . . . . . . . . .
General Description 9J–2. . . . . . . . . . . . . . . . . . . . .
SRS Component And Wiring Location View 9J–4.
Component Description 9J–4. . . . . . . . . . . . . . . . . .
Definitions 9J–7. . . . . . . . . . . . . . . . . . . . . . . . . . . . . .
Diagnosis 9J–8. . . . . . . . . . . . . . . . . . . . . . . . . . . . . .
SRS Connector Body Face Views 9J–9. . . . . . . . .
Repairs And Inspections Required After
An Accident 9J–9. . . . . . . . . . . . . . . . . . . . . . . . . . . .
On–Vehicle Service 9J–10. . . . . . . . . . . . . . . . . . . . . .
Air Bag Assembly Handling / Shipping
/ Scrapping 9J–11. . . . . . . . . . . . . . . . . . . . . . . . . . . .
Pretensioner Seat Belt Handling / Shipping
/ Scrapping. 9J–11. . . . . . . . . . . . . . . . . . . . . . . . . . . .
Special Tools 9J–26. . . . . . . . . . . . . . . . . . . . . . . . . . .
Service Precautions for SRS Component
Service 9J–30. . . . . . . . . . . . . . . . . . . . . . . . . . . . . . . .
SRS Connectors 9J–31. . . . . . . . . . . . . . . . . . . . . . . .
Sensing And Diagnostic Module (SDM) 9J–33. . . .
Service Precautions 9J–33. . . . . . . . . . . . . . . . . . .
Removal 9J–33. . . . . . . . . . . . . . . . . . . . . . . . . . . . .
Installation 9J–33. . . . . . . . . . . . . . . . . . . . . . . . . . . .
Driver Air Bag Assembly 9J–35. . . . . . . . . . . . . . . . .
Service Precautions 9J–35. . . . . . . . . . . . . . . . . . .
Removal 9J–35. . . . . . . . . . . . . . . . . . . . . . . . . . . . .
Installation 9J–36. . . . . . . . . . . . . . . . . . . . . . . . . . . .
Steering Wheel 9J–37. . . . . . . . . . . . . . . . . . . . . . . . . Service Precautions 9J–37. . . . . . . . . . . . . . . . . . .
Removal 9J–37. . . . . . . . . . . . . . . . . . . . . . . . . . . . .
Installation 9J–38. . . . . . . . . . . . . . . . . . . . . . . . . . . .
SRS Coil Assembly 9J–39. . . . . . . . . . . . . . . . . . . . . .
Service Precautions 9J–39. . . . . . . . . . . . . . . . . . .
Removal 9J–39. . . . . . . . . . . . . . . . . . . . . . . . . . . . .
Installation 9J–41. . . . . . . . . . . . . . . . . . . . . . . . . . . .
SRS Coil Replacement Procedure 9J–42. . . . . . . . .
Removal 9J–42. . . . . . . . . . . . . . . . . . . . . . . . . . . . .
How to Disconnect the horn terminal 9J–43. . . . .
How to Connect Horn Terminal 9J–43. . . . . . . . . .
Installation 9J–44. . . . . . . . . . . . . . . . . . . . . . . . . . . .
Steering Column 9J–44. . . . . . . . . . . . . . . . . . . . . . . .
Service Precautions 9J–44. . . . . . . . . . . . . . . . . . .
Removal 9J–44. . . . . . . . . . . . . . . . . . . . . . . . . . . . .
Installation 9J–46. . . . . . . . . . . . . . . . . . . . . . . . . . . .
Passenger Air Bag Assembly 9J–48. . . . . . . . . . . . .
Service Precautions 9J–48. . . . . . . . . . . . . . . . . . .
Removal 9J–48. . . . . . . . . . . . . . . . . . . . . . . . . . . . .
Installation 9J–48. . . . . . . . . . . . . . . . . . . . . . . . . . . .
Pretensioner Seat Belt (If so equipped) 9J–49. . . .
Service Precaution 9J–49. . . . . . . . . . . . . . . . . . . .
Parts Location 9J–49. . . . . . . . . . . . . . . . . . . . . . . .
Removal 9J–49. . . . . . . . . . . . . . . . . . . . . . . . . . . . .
Installation 9J–49. . . . . . . . . . . . . . . . . . . . . . . . . . . .
Main Data and Specifications 9J–50. . . . . . . . . . . . .
Service Precaution
WARNING: IF SO EQUIPPED WITH A
SUPPLEMENTAL RESTRAINT SYSTEM (SRS),
REFER TO THE SRS COMPONENT AND WIRING
LOCATION VIEW IN ORDER TO DETERMINE
WHETHER YOU ARE PERFORMING SERVICE ON OR
NEAR THE SRS COMPONENTS OR THE SRS
WIRING. WHEN YOU ARE PERFORMING SERVICE
ON OR NEAR THE SRS COMPONENTS OR THE SRS
WIRING, REFER TO THE SRS SERVICE
INFORMATION. FAILURE TO FOLLOW WARNINGS
COULD RESULT IN POSSIBLE AIR BAG
DEPLOYMENT, PERSONAL INJURY, OR
OTHERWISE UNNEEDED SRS SYSTEM REPAIRS.CAUTION: Always use the correct fastener in the
proper location. When you replace a fastener, use
ONLY the exact part number for that application.
ISUZU will call out those fasteners that require a
replacement after removal. ISUZU will also call out
the fasteners that require thread lockers or thread
sealant. UNLESS OTHERWISE SPECIFIED, do not
use supplemental coatings (Paints, greases, or other
corrosion inhibitors) on threaded fasteners or
fastener joint interfaces. Generally, such coatings
adversely affect the fastener torque and the joint
clamping force, and may damage the fastener. When
you install fasteners, use the correct tightening
sequence and specifications. Following these
instructions can help you avoid damage to parts and
systems.
Page 3439 of 6000

SUPPLEMENTAL RESTRAINT SYSTEM 9J–2
General Description
CAUTION: When fasteners are removed, always
reinstall them at the same location from which they
were removed. If a fastener needs to be replaced, use
the correct part number fastener for that application.
If the correct part number fastener is not available, a
fastener of equal size and strength (or stronger) may
be used. Fasteners that are not reused, and those
requiring thread locking compound will be called
out. The correct torque value must be used when
installing fasteners that require it. If the above
conditions are not followed, parts or system damage
could result.
Restraint Devices
827RW006
Legend
(1) Deployed Air Bag
(2) Knee Bolster
(3) Seat Belt
The Supplemental Restraint System (SRS) helps
supplement the protection offered by the driver and front
passenger seat belts by deploying an air bag from the
center of the steering wheel and from the top of the right
side of the instrument panel.
The air bag deploys when the vehicle is involved in a
frontal crash of sufficient force up to 30 degrees off the
centerline of the vehicle. To further absorb the crash
energy there is a knee bolster located beneath the
instrument panel for both the driver and passenger, and
the steering column is collapsible.
827RW005