tow OPEL GT-R 1973 Workshop Manual
[x] Cancel search | Manufacturer: OPEL, Model Year: 1973, Model line: GT-R, Model: OPEL GT-R 1973Pages: 625, PDF Size: 17.22 MB
Page 387 of 625
78.261973 OPEL SERVICE MANUAL
4. Remove both first and second speed shifter yoke
and shifter shaft cam.
Removing Main Drive Gear and Mainshaft
Assembly
1. From front of transmission, pull main drive gear
and needle bearing out of transmission. (May be
necessary to rock main drive gear.)
2. From rear of transmission, pull mainshaft assem-
bly and transmission case extension housing out of
transmission. Gear shifter sleeve will be pulled off
gear shifter sleeve carrier by the third and fourth
speed shifter yoke. Remove sleeve from yoke and
keep sleeve with mainshaft assembly. (Make sure
third and fourth speed shoes are not lost.)
Removing Third and Fourth Gear Shifter Shaft.
1. With main shaft assembly out of transmission
case, drive third and fourth gear shifter shaft out
through hole in front of case with brass drift from
rear of transmission through mainshaft assembly
hole in case.
2. Remove third and fourth speed yoke.
Removing Reverse Gear Shifter Shaft and Reverse
Idler Gear
1. Using a brass drift and from the front of the trans-
mission, drive out reverse gear shifter shaft and plug.
See Figure
7B-28. The reverse speed shifter yoke will
remain in transmission case.
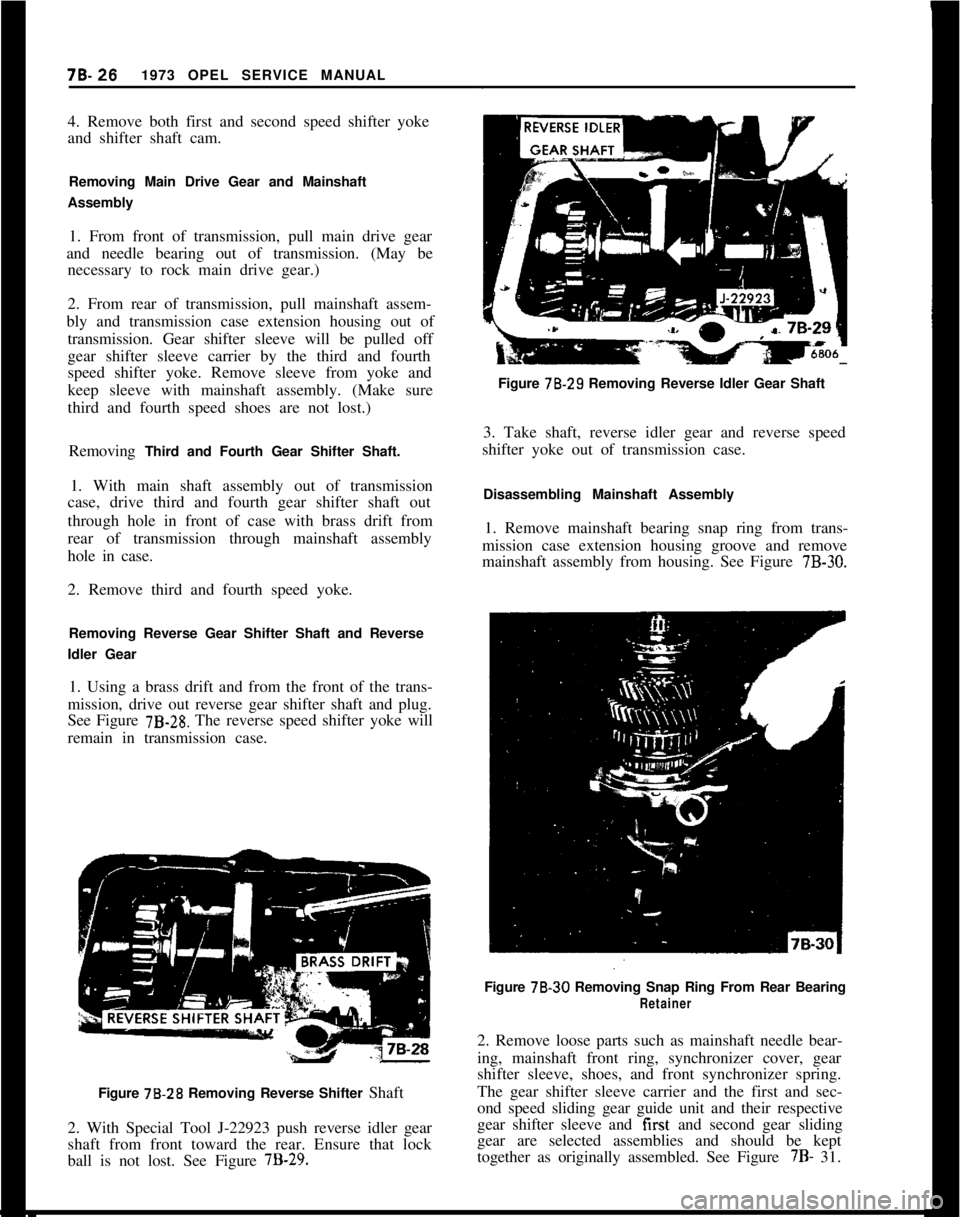
Figure 78.28 Removing Reverse Shifter Shaft
2. With Special Tool J-22923 push reverse idler gear
shaft from front toward the rear. Ensure that lock
ball is not lost. See Figure
7B-29.Figure 78.29 Removing Reverse Idler Gear Shaft
3. Take shaft, reverse idler gear and reverse speed
shifter yoke out of transmission case.
Disassembling Mainshaft Assembly
1. Remove mainshaft bearing snap ring from trans-
mission case extension housing groove and remove
mainshaft assembly from housing. See Figure
7B-30.Figure 78-30 Removing Snap Ring From Rear Bearing
Retainer2. Remove loose parts such as mainshaft needle bear-
ing, mainshaft front ring, synchronizer cover, gear
shifter sleeve, shoes, and front synchronizer spring.
The gear shifter sleeve carrier and the first and sec-
ond speed sliding gear guide unit and their respective
gear shifter sleeve and first and second gear sliding
gear are selected assemblies and should be kept
together as originally assembled. See Figure 7B- 31.
Page 389 of 625

iB- 281973 OPEL SERVICE MANUAL
1 ST SPEED
GINEEDLE BEARING-/CLUTCH
SLEEc?iE,-.
SNAP RING_.. ..~~ ~-KEY SPRING,a-37Figure 70-37Figure 7B-39 Pressing Off Small Clutch Hub
7. With Special Tool J-21684, Press Plate, located
below third speed gear, press out gear shifter sleeve
carrier. See Figure
7B-38.2. Install third speed synchronizer cover onto third
speed gear cone.
J-21604
\
2ND SPEED
GE,ARFigure 78.38 Pressing Off Large Clutch Hub and
Needle Bearing Inner Sleeve8. With Special Tool J-21684, Press Plate, located
below second speed gear, press out gear shifter sleevecarrier. See Figure
7B-39.
TRANSMISSION REASSEMBLY
A. Assembling Mainshaft1. From front of the mainshaft install third speedf;cz&mto mainshaft. Gear must turn freely on main-3. Install rear synchronizer spring into rear side of
gear shifter sleeve carrier so that hooked spring end
rests in one of the slots.
4. Using Press Plate J-21684, press gear shifter sleeve
carrier onto mainshaft so that original tooth contact
is obtained. The rear side of gear shifter sleeve carrier
with installed spring should be toward third speed
gear. This rear side of carrier is recessed more than
front side to allow carrier to be pressed almost flush
with synchronizer cover. See Figure
7B-40.3rd
8 4th
Figure 78.40 Securing Third and Fourth Speed Clutch
Hub on Mainshaft With Snap Ring
Page 390 of 625

MANUAL TRANSMISSION78.29
5. Using external snap ring pliers, secure gear shifter
sleeve carrier on mainshaft with snap ring. See Fig-
ure
7B-40.6. From rear of mainshaft, slide second speed gear
onto mainshaft. Gear must turn freely on mainshaft.
See Figure
7B-41.
2ND SPEED
GEAR CONE\
3RD SPEED
GEAR
MAIN
L; SYNCHRONIZER
VER2ND SPEED
GEAR
7B.41Figure
7B-41 Second Speed Gear and Synchronizer
Ring Installed
7. Place second speed synchronizer cover onto sec-
ond speed gear cone. See Figure
7B-41.
8. Install both synchronizer springs into first and
second speed sliding gear guide unit so that hooks of
both springs rest in the same guide unit shoe slot and
the other spring ends are positioned opposite to each
other. See Figure 78-42.
9. Press first and second speed sliding gear guide unit
onto mainshaft so that the original tooth contact is
obtained.
10. Using Tool J-22913, press first speed gear needle
bearing inner sleeve onto mainshaft.
11. Using Tool J-22913, install tirst and second speed
shoes (long style) and install first and second gear
sliding gear (forked groove to rear) onto first and
second speed sliding gear guide unit.
12. Slide first speed gear needle bearing, synchro-
nizer cover, first speed gear, mainshaft washer
(chamfer toward rear), and mainshaft bearing snap
ring onto mainshaft.
13. Press on mainshaft inner bearing using Tool
J-22913. See Figure
7B-43.GUIDE UNIT
SYNCHRONWER SPRING
Figure 78.42 Both Clutch Key Springs Installed
RI
d-J-22913 MAINSHAFT
ASSEMBLY TOOL
---- .
~.
7B.uFigure 78.43 Pressing on Rear Bearing Using Tool
J-22913
14. Insert lock ball in place in mainshaft and place
speedo drive worm gear and speed0 drive gear spring
washer on mainshaft. Secure with speedo drive gear
snap ring.
15. Place mainshaft assembly into transmission case
extension housing up to its stop. Secure with main-
shaft bearing snap ring. See Figure 7%44.
Page 391 of 625

78.301973 OPEL SERVICE MANUAL
SHOULDER OR
SHIFTE
.44Figure 78-46 Installing Reverse Shifter Fork
Figure 78.44 Mainshaft Assembly Secured Into Rear
Bearing Retainer by Snap Ring
16. Place front synchronizer spring in the gear shifter
sleeve carrier. Install (3) third and fourth speed shoes
(short design) and gear shifter sleeve over gear shifter
sleeve carrier along with synchronizer cover. Arrows
on shoes point toward rear of mainshaft. Gear shifter
sleeve yoke groove should be toward front.
17. With sealer, install new gasket onto transmission
case extension housing.
Installing Reverse Idler Gear and Reverse Gear
Shifter Shaft1. Inspect shafts carefully for burrs, and remove with
emery cloth. Burrs on shifter shaft will prevent easy
installation of shifter yoke. Lightly oil with transmis-
sion oil prior to installation. Place lock ball into
reverse idler gear shaft and push shaft through hole
in rear of case and on through reverse idler gear
which should have groove end toward front. See Fig-
ure
7B-46.Continue to drive reverse idler gear shaft forward
with plastic hammer until rear end of shaft is flush
with rear case face.
2. Position reverse speed shifter yoke in groove of
reverse idler gear and install reverse gear shifter shaft
from rear of case with notches up, pushing it through
reverse speed shifter yoke. See Figure
7B-47.3. Install spiral pin to secure yoke to shifter shaft and
drive plug into hole in rear of case.Figure 78.47 Third and Fourth Speed Shifter Shaft
Installed
Installing Mainshaft Assembly and Main Drive
Gear1. Slide mainshaft assembly into transmission case
from rear.
2. From the’front, slide mainshaft front ring and the
mainshaft needle bearing onto the mainshaft. See
Figure
7B-48.3. Install main drive gear through front of transmis-
sion case until main drive (standard part) snap ring
is flush with case.
Installing Third and Fourth Gear Shifter Shaft1. Position third and fourth speed yoke onto gear
shifter sleeve. See Figure
7B-47.2. Insert third and fourth gear shifter shaft through
hole in front of case with notches down, pushing it
through third and fourth speed yoke. Third and
Page 392 of 625

MANUAL TRANSMISSION70.31COUNTER SHAFT GEAR
THRUST WASHER\Figure 76.48 Installing Spacer Ring and Needle
Bearing Onto Mainshaft
fourth speed yoke should be positioned with rounded
notch at shaft hole portion of yoke toward rear. See
Figure 78. 47.
3. Install spiral pin, allowing
i/16” to 5/64” of pin
to protrude.
Installing First and Second Gear Shifter Shaft
1. Inspect shifter shaft carefully for burrs, and
remove with emery cloth. Burrs on shifter shaft will
prevent easy installation of shifter yoke and cam.
Lightly oil with transmission oil prior to installation.
Insert first and second gear shifter shaft through hole
in rear of case with three notches down and toward
rear of transmission, pushing shaft tirst through
firstand second gear shifter yoke, which should be posi-
tioned on first and second gear sliding gear with
shoulder toward front of case. To position first and
second gear shifter yoke on first and second gear
sliding gear, push reverse idler gear forward, engag-
ing the idler gear with the first and second gear
sliding gear. This will make room for positioningfirst and second gear shifter yoke. See Figure
7B-49.2. Continue to drive first and second gear shifter
shaft through shifter shaft cam, which should be
positioned as shown in Figure
7B-50.3. Install spiral pins to secure shifter yoke and shifter
shaft cam to first and second gear shifter shaft.
Installing Selector Shaft
1. Inspect selector shaft carefully for burrs, andFigure
78.49 Countergear Thrust Washers Installed
Figure
78-50 Position of “L” Shaped Selector Dog
remove with emery cloth. Burrs on shaft will prevent
easy installation of intermediate levers. Lightly oil
with transmission oil prior to installation. Insert new
selector shaft oil seals in holes on both sides of trans-
mission case and insert selector shaft into case and
through third, fourth, and reverse intermediate lever.
Third, fourth, and reverse intermediate lever should
be positioned on selector shaft, as shown in Figure
7B-51.2. Continue to push selector shaft through first and
second intermediate lever and through other side of
case. First and second intermediate lever should be
positioned on selector shaft, as shown in Figure 7B-
52. Selector shaft is rotated counterclockwise (when
looking from lever end of selector shaft) from work-
ing position to have spiral pin holes in shaft vertical
and in line with pin holes in intermediate levers. To
rotate selector shaft in this manner, the reverse gear
shifter shaft and its reverse speed shifter yoke must
be pushed rearward so that the reverse idler gear is
against rear of case.
Page 399 of 625
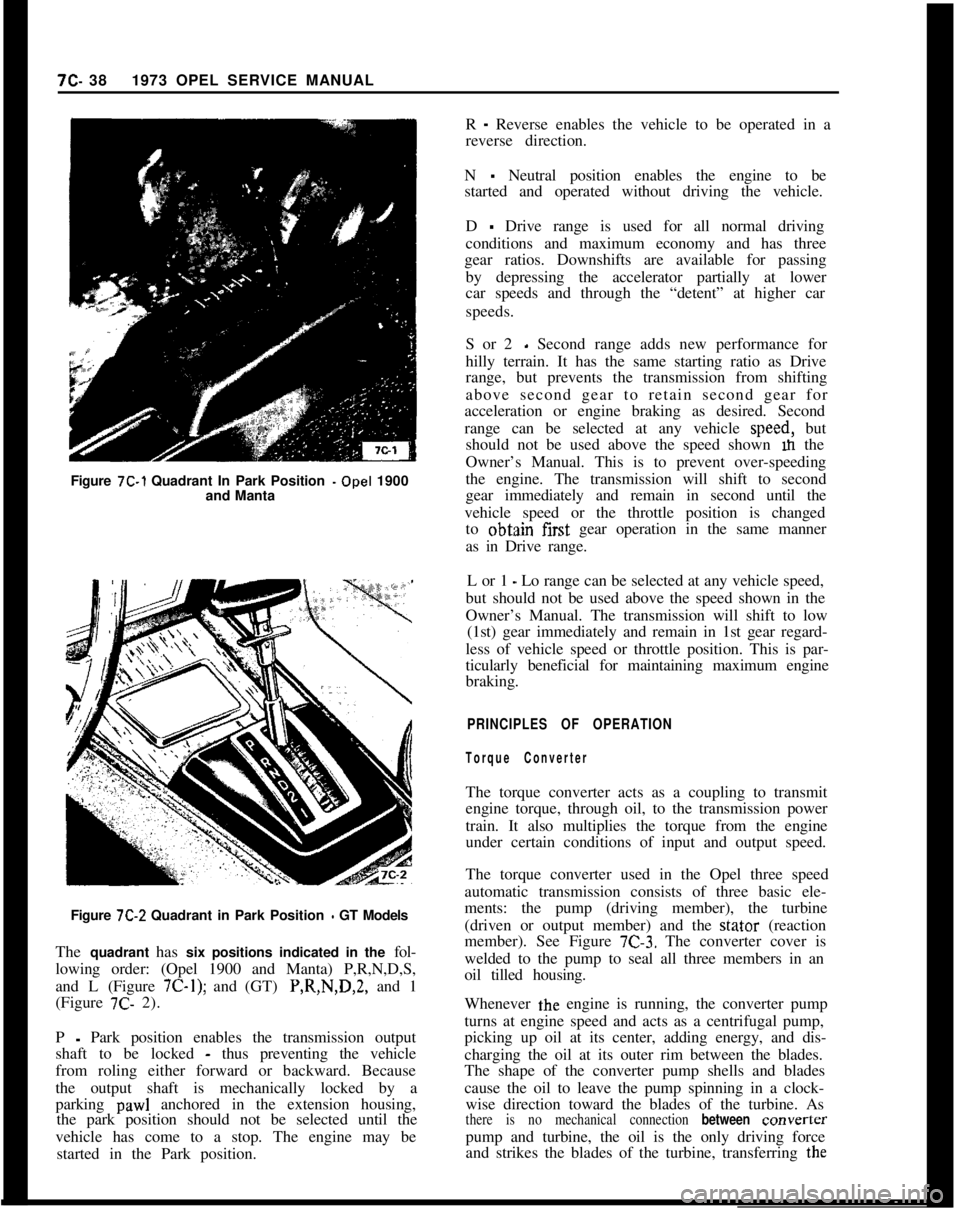
Figure 7C-1 Quadrant In Park Position -Opel 1900
and Manta7C- 381973 OPEL SERVICE MANUAL
R
- Reverse enables the vehicle to be operated in a
reverse direction.
N
- Neutral position enables the engine to be
started and operated without driving the vehicle.
D
- Drive range is used for all normal driving
conditions and maximum economy and has three
gear ratios. Downshifts are available for passing
by depressing the accelerator partially at lower
car speeds and through the “detent” at higher car
speeds.
S or 2
- Second range adds new performance for
hilly terrain. It has the same starting ratio as Drive
range, but prevents the transmission from shifting
above second gear to retain second gear for
acceleration or engine braking as desired. Second
range can be selected at any vehicle speed, but
should not be used above the speed shown m the
Owner’s Manual. This is to prevent over-speeding
the engine. The transmission will shift to second
gear immediately and remain in second until the
vehicle speed or the throttle position is changed
to obtajn first gear operation in the same manner
as in Drive range.
L or 1
- Lo range can be selected at any vehicle speed,
but should not be used above the speed shown in the
Owner’s Manual. The transmission will shift to low
(1st) gear immediately and remain in 1st gear regard-
less of vehicle speed or throttle position. This is par-
ticularly beneficial for maintaining maximum engine
braking.
PRINCIPLES OF OPERATION
Torque ConverterThe torque converter acts as a coupling to transmit
engine torque, through oil, to the transmission power
train. It also multiplies the torque from the engine
under certain conditions of input and output speed.
Figure
7C-2 Quadrant in Park Position - GT Models
The quadrant has six positions indicated in the fol-
lowing order: (Opel 1900 and Manta) P,R,N,D,S,
and L (Figure
7C-1); and (GT) P,R,N,D,2, and 1
(Figure 7C- 2).The torque converter used in the Opel three speed
automatic transmission consists of three basic ele-
ments: the pump (driving member), the turbine
(driven or output member) and the stator (reaction
member). See Figure
7C-3. The converter cover is
welded to the pump to seal all three members in an
oil tilled housing.
P
- Park position enables the transmission output
shaft to be locked
- thus preventing the vehicle
from roling either forward or backward. Because
the output shaft is mechanically locked by a
parking
paw1 anchored in the extension housing,
the park position should not be selected until the
vehicle has come to a stop. The engine may be
started in the Park position.Whenever the engine is running, the converter pump
turns at engine speed and acts as a centrifugal pump,
picking up oil at its center, adding energy, and dis-
charging the oil at its outer rim between the blades.
The shape of the converter pump shells and blades
cause the oil to leave the pump spinning in a clock-
wise direction toward the blades of the turbine. Asthere is no mechanical connection between converterpump and turbine, the oil is the only driving force
and strikes the blades of the turbine, transferring the
Page 409 of 625
7C- 481973 OPEL SERVICE MANUAL
INPUT SUNRING
GEAR ASSY.GEARPLANETARY
CARRIERASSY.REACTION SUNtow
GEAR 8 DRUMBAND
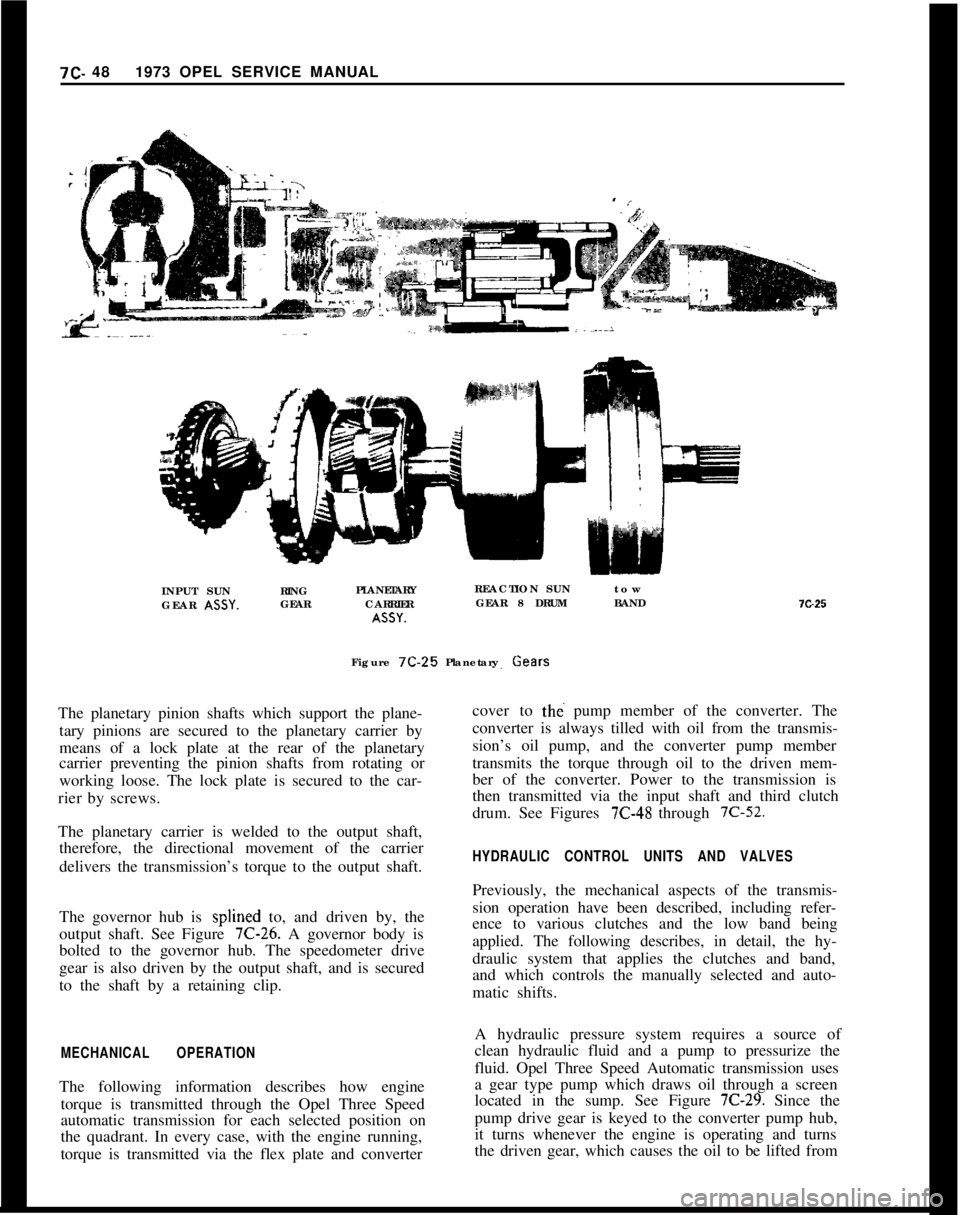
Figure 7C-25Planetary Gears
The planetary pinion shafts which support the plane-
tary pinions are secured to the planetary carrier by
means of a lock plate at the rear of the planetary
carrier preventing the pinion shafts from rotating or
working loose. The lock plate is secured to the car-
rier by screws.
The planetary carrier is welded to the output shaft,
therefore, the directional movement of the carrier
delivers the transmission’s torque to the output shaft.
The governor hub is splined to, and driven by, the
output shaft. See Figure 7C-26. A governor body is
bolted to the governor hub. The speedometer drive
gear is also driven by the output shaft, and is secured
to the shaft by a retaining clip.
MECHANICAL OPERATIONThe following information describes how engine
torque is transmitted through the Opel Three Speed
automatic transmission for each selected position on
the quadrant. In every case, with the engine running,
torque is transmitted via the flex plate and converter7G25
cover to
tht? pump member of the converter. The
converter is always tilled with oil from the transmis-
sion’s oil pump, and the converter pump member
transmits the torque through oil to the driven mem-
ber of the converter. Power to the transmission is
then transmitted via the input shaft and third clutch
drum. See Figures
7C-48 through 7C-52.
HYDRAULIC CONTROL UNITS AND VALVESPreviously, the mechanical aspects of the transmis-
sion operation have been described, including refer-
ence to various clutches and the low band being
applied. The following describes, in detail, the hy-
draulic system that applies the clutches and band,
and which controls the manually selected and auto-
matic shifts.
A hydraulic pressure system requires a source of
clean hydraulic fluid and a pump to pressurize the
fluid. Opel Three Speed Automatic transmission uses
a gear type pump which draws oil through a screen
located in the sump. See Figure
7C-29. Since the
pump drive gear is keyed to the converter pump hub,
it turns whenever the engine is operating and turns
the driven gear, which causes the oil to be lifted from
Page 412 of 625
AUTOMATIC TRANSMISSION7c-51VACUUM MODULATOR7c31
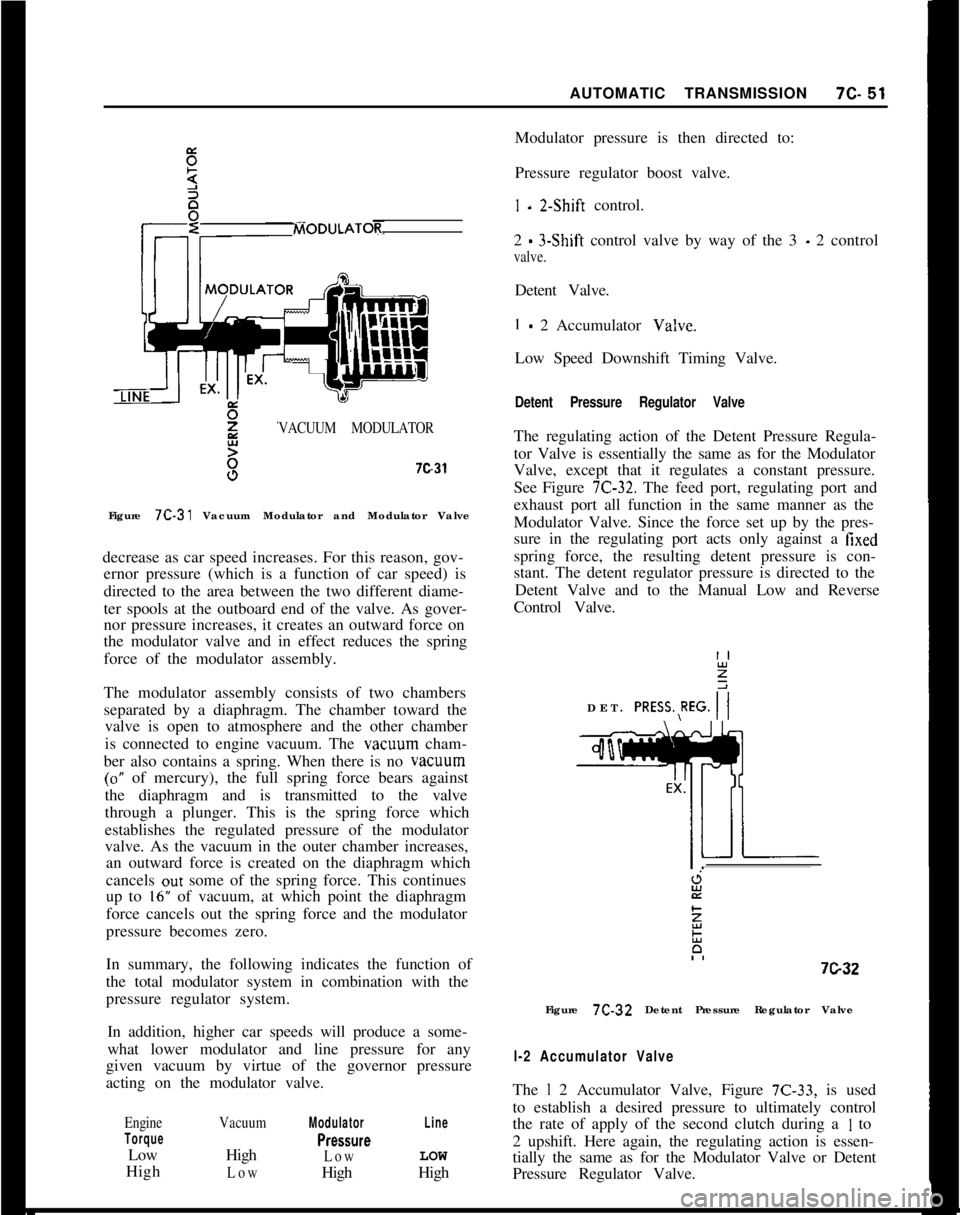
Figure 7C-31 Vacuum Modulator and Modulator Valve
decrease as car speed increases. For this reason, gov-
ernor pressure (which is a function of car speed) is
directed to the area between the two different diame-
ter spools at the outboard end of the valve. As gover-
nor pressure increases, it creates an outward force on
the modulator valve and in effect reduces the spring
force of the modulator assembly.
The modulator assembly consists of two chambers
separated by a diaphragm. The chamber toward the
valve is open to atmosphere and the other chamber
is connected to engine vacuum. The vacwm cham-
ber also contains a spring. When there is no vacuum
(0” of mercury), the full spring force bears against
the diaphragm and is transmitted to the valve
through a plunger. This is the spring force which
establishes the regulated pressure of the modulator
valve. As the vacuum in the outer chamber increases,
an outward force is created on the diaphragm which
cancels out some of the spring force. This continues
up to
16” of vacuum, at which point the diaphragm
force cancels out the spring force and the modulator
pressure becomes zero.
In summary, the following indicates the function of
the total modulator system in combination with the
pressure regulator system.
In addition, higher car speeds will produce a some-
what lower modulator and line pressure for any
given vacuum by virtue of the governor pressure
acting on the modulator valve.
Engine
TorqueLow
High
VacuumHigh
Low
Modulator
PreSSWe
LowHigh
LineLOW
HighModulator pressure is then directed to:
Pressure regulator boost valve.
I - 2.Shift control.
2
- 3-Shift control valve by way of the 3 - 2 control
valve.Detent Valve.
I - 2 Accumulator Va!ve.
Low Speed Downshift Timing Valve.
Detent Pressure Regulator ValveThe regulating action of the Detent Pressure Regula-
tor Valve is essentially the same as for the Modulator
Valve, except that it regulates a constant pressure.
See Figure
7C-32. The feed port, regulating port and
exhaust port all function in the same manner as the
Modulator Valve. Since the force set up by the pres-
sure in the regulating port acts only against a
fixedspring force, the resulting detent pressure is con-
stant. The detent regulator pressure is directed to the
Detent Valve and to the Manual Low and Reverse
Control Valve.
DET. PRESS.,REG.
i7G3-2
Figure 7C-32 Detent Pressure Regulator Valve
l-2 Accumulator ValveThe
I 2 Accumulator Valve, Figure 7C-33, is used
to establish a desired pressure to ultimately control
the rate of apply of the second clutch during a
I to
2 upshift. Here again, the regulating action is essen-
tially the same as for the Modulator Valve or Detent
Pressure Regulator Valve.
Page 442 of 625
DIAGNOSIS
SEQUENCE
1. Check and correct oil level. Refer to Specifications
for checking and refill procedures.
2. Check and correct vacuum line and fittings.
3. Check and correct manual linkage.
4. Road test car using all selective ranges, noting
when discrepancies in operation occur.
5. If engine performances indicates an engine tuneup
is required, this should be performed before road
testing is completed or transmission correction at-
tempted. Poor engine performance can result in
rough shifting or other malfunctions.
CHECKING PROCEDURESBefore diagnosis of any transmission complaint is
attempted, there must be an understanding of oil
checking procedure and what appearance the oil
should have. Many times a transmission malfunction
can be traced to low oil level, improper reading of
dipstick, or oil appearances; therefore, a careful anal-
ysis of the condition of oil and the level may elimi-
nate needless repairs.
When checking oil level in the Opel Three Speed
Automatic Transmission, the procedure outlined in
Specifications should be followed to obtain the most
accurate reading.
Also when the dipstick is removed, it should be noted
whether the oil is devoid of air bubbles or not. Oil
with air bubbles gives an indication of an air leak in
the suction lines, which can cause erractic operation
and slippage. Water in the oil imparts a milky, pink
cast to the oil and can cause spewing.
EXTERNAL OIL LEAKS
Determining source of oil leakBefore attempting to correct an oil leak, the actual
source of the leak must be determined. In many
cases, the source of the leak can be deceiving due to
“wind flow” around the engine and transmission.
The suspected area should be wiped clear of all oil
before inspecting for the source of the leak. Red dyeAUTOMATIC TRANSMISSION 7C- 81
is used in the transmission oil at the assembly plant
and will indicate if the oil leak is from the transmis-
sion.The use of a “Black Light” to locate the point at
which the oil is leaking is helpful. Comparing the oil
from the leak to that on the engine or transmission
dipstick, when viewed by Black Light, will determine
the source of the leak-engine or transmission.
Oil leaks around the engine and transmission are
generally carried toward the rear of the car by air
stream. For example, a transmission oil filler tube to
case leak will sometimes appear as a leak at the rear
of the transmission. In determining the source of a
leak, proceed as follows:
1. Degrease underside of transmission.
2. Road test to get unit at operating temperature.
3. Inspect for leak with engine running.
4. With engine off, check for oil leaks due to the
raised oil level caused by drain back.
Case Porosity RepairOpel Three-Speed Automatic Transmission external
oil leaks caused by case porosity can be successfully
repaired with the transmission in the car by using the
following recommended procedures:
1. Road test and bring the transmission to operating
temperature, approximately 180 degrees F.
2. Raise car on a hoist or jack stand, engine running,
and locate source of oil leak. Check for oil leaks in
low, drive, and reverse.
3. Shut engine off and thoroughly clean area to be
repaired with a suitable cleaning solvent and a
brush- air dry. A clean, dry soldering acid brush can
be used to clean the area and also to apply the epoxy
cement.
4. Using instructions of the manufacturer, mix a suf-
ficient amount of epoxy, BUICK Group 0.423, Part
No. 1360016, or equivalent, to make the repair. Ob-
serve cautions of manufacturer in handling.
5. While the transmission case is still HOT, apply the
epoxy to the area to be repaired. Make certain the
area to be repaired is fully covered.
6. Allow cement to cure for 3 hours before starting
engine.
7. Road test and check for leaks.
Page 478 of 625

AUTOMATIC TRANSMISSION 7C-117WIRE CRIMPED
INTO COPPERTUBING
Figure 7C-178
19. Inspect condition of the third clutch composition
and steel plates. Do not diagnose a composition
drive plate by color,A. Dry composition plates with compressed air and
inspect the composition surface for:
1. Pitting and flaking
2. Wear
3. Glazing
4. Cracking
5. Charring
6. Chips or metal particles imbedded in lining
If a composition drive plate exhibits any of the above
conditions, replacement is required.
B. Wipe steel plates dry and check for heat discolora-
tion. If the surface is smooth and an even color smear
is indicated, the plates should be reused. If severe
heat spot discoloration or surface
scutXng is in-
dicated, the plates must be replaced.
20. Install third clutch plates into third clutch drum
beginning with a steel plate, composition plate, steel
plate, composition plate, etc. Use a liberal amount of
transmission fluid.
21. Inspect thrust washer and needle thrust bearing
for damage. Replace if necessary.
22. Install thrust washer and bearing onto input
shaft. Secure with petroleum jelly (unmedicated).23. Inspect sprag assembly for wear, damage orsprags that freely fall out of cage. Inspect input sun
gear for chipped or nicked teeth or abnormal wear.
Replace part if necessary.
24. Install sprag onto third clutch hub with groove
on sprag cage outer diameter toward input sun gear.
See Figure
7C-179.Figure 7C-179
25. Install sprag race and retainer assembly over
sprag assembly. Holding input sun gear with left
hand, sprag race and retainer assembly should “lock
up” when turned with right hand in a clockwise
direction and should rotate freely when turned coun-
terclockwise. See Figure
7C-180.Figure 7C-180