light OPEL GT-R 1973 Repair Manual
[x] Cancel search | Manufacturer: OPEL, Model Year: 1973, Model line: GT-R, Model: OPEL GT-R 1973Pages: 625, PDF Size: 17.22 MB
Page 183 of 625

3A- 161973 OPEL SERVICE MANUAL
INNER RUBBERSTUD.1 /2”\E
/
PLASTIC COVER
DAMPENING RING
RETAINERRUBBER DAMPENING RING-
-zSELF-LOCKING NUT
UPPER RUBBER
GROMMET RETAINERLOWER
RUBIGROMMET RETAINER
WHEEL HOUSE
SHOCK ABSORBER
SHOCK ABSORBERSA-25Figure
3A-25 Shock Absorber Upper Attachment
7. Remove lower ball joint stud nuts. Slightly lower
jack so that the spring and lower control arm assem-
bly is removed from the front cross member and
steering knuckle.
8. Lower jack, spring compressor, and front spring
and control arm assembly. Remove lower control
arm to spring nuts.
9. Relieve tension on spring compressor and remove
control arm attaching bolts and control arms.
Removal (Opel 1900 - Manta)1. Prior to raising car, install upper control arm
hooks J-23697.
2. Raise car and stipport with stands. Hoist should
be left in the raised position to maintain pressure on
lower control arm.
3. Remove front wheel.
4. Detach both stabilizer supports from cross mem-
ber to body support.5. Remove shock absorber.
6. At lower control arm ball joint, remove castle nut
cotter pin and remove nut.
7. With suitable drift, detach lower control arm ball
joint from steering knuckle.
8. Loosen nut that retains lower control to front
cross member.
9. Slowly lower hoist to release spring tension.
10. Swing lower control arm downwards and remove
front spring.
Installation (GT)
CAUTION:
Fasteners are important attachingparts in
that they could at&t
the performance of vital com-
ponents and systems, and/or could result in major
repair expense. They must be replaced with one of
the same part number or with an equivalent part if
replacement becomes necessary. Do not use a
re-
placement part oflesser quality or substitute design.
Page 185 of 625

3A- 161973 OPEL SERVICE MANUAL
SPECIFICATIONS
Torque Specifications
Use a reliable torque wrench to tighten all parts listed to insure proper
tightness without straining or distorting parts. These specifications are for
clean and lightly-lubricated threads only; dry or dirty threads produce in-
creased friction which prevents accurate maasurement of tightness.
LocationFront Suspension Crossmember to Front Frame
Clamp, Steering Mast to Steering Mast Flange
(GT)
........................................................................................
Clamp, Steering Mast to Steering Mast Flange(1900
-Manta)..................................................................
Clamp,UpperUniversalJoint(GT)..................................Clamp, Lower Universal Joint (GT)
..................................
WheelNuts............................................................................Lower Control Arm Shaft to Lower Control Arm
..........Lower Control Arm Ball Joint to Steering Knuckle
......Upper Control Arm Ball Joint to Steering Knuckle
(GT)........................................................................................Upper Control Arm Ball Joint to Steering Knuckle
(1 900 Manta)
..................................................................Upper Control Arm Ball Joint to Upper Control Arm
ShockAbsorbertoLowerControlArm..........................Steering Arm to Steering Knuckle (1900
- Manta)......
Brake Backing Plate or Brake Disc Shield andSteering Arm to Steering Knuckle
(GTJ
Hex Head Bolt M 10......Hex Head Bolt M 8
......
Brake Backing Plate to Steering Knuckle(1900 Manta)
..................................................................
Brake Caliper to Steering Knuckle.................................
Lower Control Arm to Front Spring Eye (GT)................
Brake Disc to Front Wheel Hub........................................Upper Control Arm to Crossmember (1900
- MantajLower Control Arm to Crossmember (1900
- Manta)
Steering Gear Housing to Front Suspension
Crossmember (GT)
............................................................
Steering Gear Housing to Front SuspensionCrossmember (1900
- Manta)........................................Stabilizer Bar to Lower Control Arm
(Opel 1900
- Manta)........................................................Tie Rod Clamp Bolts
(GTJ....................................................
CastleNut,TieRodtoSteeringArm..............................Upper Control Arm Shaft to Shock Absorber Support
and Upper Control Arm (GT)
..........................................
CrossMember to
BodySupport Attachment................
FrontSuspensionAssemblytoFrame............................Front End Alignment Specifications
Torque
Lb.Ft.36
1522
14
22
6540
5429
ii30
5847
18
58
72
1836
40
43
1830
87
:i33
58
47ModelCaster’
Camber”1900‘3
l/2-6 l/2GT
3+1-:%+*Permissible deviation from left to right wheel
- Max. 1’.
Toe-In”Min.-Max.
l/8-3/ 16
l/32-1/8Outer Wheel
When Inner
Wheel at 20
19
l/418
l/2
Page 202 of 625

OPEL 1900 AND MANTA STEERING COLUMN ASSEMBLY 3E.35
II
OPEL 1900 AND MANTA STEERING COLUMN
ASSEMBLY
CONTENTS
SubjectPage No.
DESCRIPTION AND OPERATION:
Description and Operation of Directional Signal
Lever. . . . . . . . . . . . . . . . . . . . . . . . . . . . . . . . . . . . . . . . . . . . . . . . . . . . . . . . . . . . . . . . . . . . . . . . . . . . . . . . . .Description
andOperationofHorn. . . . . . . . . . . . . . . . . . . . . . . . . . . . . .Description of Steering Column Assembly
. . . . . . . . . . . . . .DIAGNOSIS: (Not Applicable)
MAINTENANCE AND ADJUSTMENTS: (Not
Applicable)
MAJOR REPAIR:
3E-353E-363E-36
Removal and Installation of Steering Column
Assembly
. . . . . . . . . . . . . . . . . . . . . . . . . . . . . . . . . . . . . . . . . . . . . . . . . . . . . . . . . . . . . . . . . . . . . . . . . .
RemovalandInstallationofSteeringWheel. . . . . . . . . . . .Disassembly and Reassembly of Direction Signal
Switch
. . . . . . . . . . . . . . . . . . . . . . . . . . . . . . . . . . . . . . . . . . . . . . . . . . . . . . . . . . . . . . . . . . . . . . . . . . . . . . . .Disassembly and Reassembly of Steering and
Ignition Lock Cylinder, and Electrical Switch
from Mast Jacket Assembly
. . . . . . . . . . . . . . . . . . . . . . . . . . . . . . . . . . . . .SPECIFICATIONS:
Steering
ColumnSpecifications. . . . . . . . . . . . . . . . . . . . . . . . . . . . . . . . . . . .3E-363E-383E-393E-403E-41
DESCRIPTION AND OPERATIONDESCRIPTION AND OPERATION OF
DIRECTIONAL SIGNAL LEVERhigh to low beam or vice versa. On all
19M) Rallye
cars, when switching from low to high beam posi-
tion, with the fog lamp instrument panel switch ON
The direction signal switch lever is a multi- purpose
lever controlling direction signals, passing signal and
headlight high and low beams. See Figure
3E-2.The dire&M signal lever is provided with a two-
step mechanism for operation of headlight high and
low beams, and passing signal (not in N.J.). With
headlights off, moving the lever repeatedly towards
steering wheel flashes headlights as a passing signal.
With headlights on, moving the lever repeatedly to-
wards steering wheel up to first stop also flashes
passing signal regardless whether or not the direction
signals are switched on. When the lever is moved up
to the second stop, the headlights are changed from
SE.2Figure
3E-2 Directional Signal Lever Position for
Headlamp Operation
Page 203 of 625
3E- 361973 OPEL SERVICE MANUAL
and ignition switch in RUN position, the fog lights
are automatically switched off. Direction signals
work in the normal manner; pushing the lever up for
right turn signal and pulling the lever down for left
turn signal.
DESCRIPTION AND OPERATION OF HORN
The horn button is located in the center part of the
steering wheel. The horn is actuated by pushing on
the ends of the spokes for the Opel 1900 - Manta and
by pushing on the center horn button on 57R, 57L,
and GT. The button is provided with a plug connec-
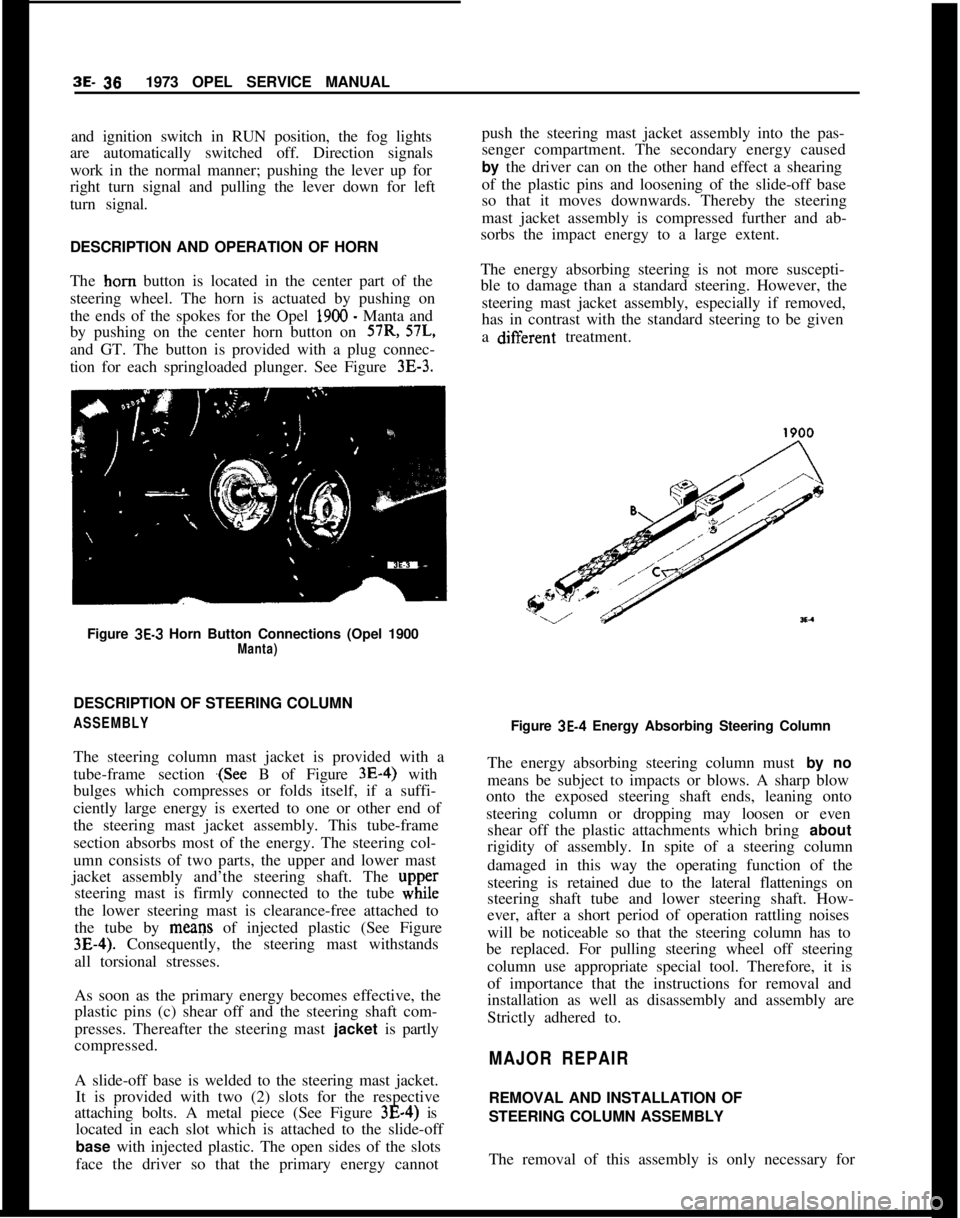
tion for each springloaded plunger. See Figure
3E-3.Figure
3E-3 Horn Button Connections (Opel 1900Manta)DESCRIPTION OF STEERING COLUMN
ASSEMBLYThe steering column mast jacket is provided with a
tube-frame section
.(See B of Figure 3E-4) with
bulges which compresses or folds itself, if a suffi-
ciently large energy is exerted to one or other end of
the steering mast jacket assembly. This tube-frame
section absorbs most of the energy. The steering col-
umn consists of two parts, the upper and lower mast
jacket assembly and’the steering shaft. The
upp,ersteering mast is firmly connected to the tube while
the lower steering mast is clearance-free attached to
the tube by means of injected plastic (See Figure
3E-4). Consequently, the steering mast withstands
all torsional stresses.
As soon as the primary energy becomes effective, the
plastic pins (c) shear off and the steering shaft com-
presses. Thereafter the steering mast jacket is partly
compressed.
A slide-off base is welded to the steering mast jacket.
It is provided with two (2) slots for the respective
attaching bolts. A metal piece (See Figure 3E-4) is
located in each slot which is attached to the slide-off
base with injected plastic. The open sides of the slots
face the driver so that the primary energy cannotpush the steering mast jacket assembly into the pas-
senger compartment. The secondary energy caused
by the driver can on the other hand effect a shearing
of the plastic pins and loosening of the slide-off base
so that it moves downwards. Thereby the steering
mast jacket assembly is compressed further and ab-
sorbs the impact energy to a large extent.
The energy absorbing steering is not more suscepti-
ble to damage than a standard steering. However, the
steering mast jacket assembly, especially if removed,
has in contrast with the standard steering to be given
a difierent treatment.
Figure
3E-4 Energy Absorbing Steering Column
The energy absorbing steering column must by no
means be subject to impacts or blows. A sharp blow
onto the exposed steering shaft ends, leaning onto
steering column or dropping may loosen or even
shear off the plastic attachments which bring about
rigidity of assembly. In spite of a steering column
damaged in this way the operating function of the
steering is retained due to the lateral flattenings on
steering shaft tube and lower steering shaft. How-
ever, after a short period of operation rattling noises
will be noticeable so that the steering column has to
be replaced. For pulling steering wheel off steering
column use appropriate special tool. Therefore, it is
of importance that the instructions for removal and
installation as well as disassembly and assembly are
Strictly adhered to.
MAJOR REPAIRREMOVAL AND INSTALLATION OF
STEERING COLUMN ASSEMBLY
The removal of this assembly is only necessary for
Page 214 of 625

GT STEERING COLUMN ASSEMBLY3E- 47
2. Disconnect ignition (white) wire set plug.
3. Remove steering lock retaining screw. See Figure3E-20.Figure 3E-20 Steering Lock Retaining Screw
4. Remove direction signal switch lever.
5. Remove three screws securing signal switch cover
to housing.
6. To remove housing cover, (a) pull cover toward
direction signal switch and move it slightly to the
right. See Figure
3E-21. (b) Turn cover toward the
left and move it further to the right so that the left
retaining screw ear is positioned under the left signal
switch return cam. See Figure
3E-22. (c) Insert direc-
Figure 3E-2 1tion signal switch lever into oblong opening in cover
and push steering lock into housing and remove
cover. See Figure
3E-37.Figure
3E-22Figure 3E.23
7. Remove ignition switch electrical unit. See Figure3B24.
8. Remove wires from connector plug making certain
to note location of each.
9. Tape wire ends together and remove electrical unit
and wire harness.
Installation1. Position electrical unit wire harness through col-
umn and reconnect to connector plug.
Page 220 of 625

REAR SUSPENSION3F- 53
7. Remove jack stands.
LOWER CONTROL ARM REPLACEMENTRemovalThis operation can be performed with the vehicle
standing at curb height or elevated.
1. Disconnect parking brake cable from support
bracket on control arm.
2. Loosen and remove front and rear control arm
attaching bolts and remove control arm.
installation1. On
1900’s and Manta’s place a load of approxi-
mately 350 lbs. in luggage compartment or on the
GT, place a load of approximately 150
Ibs. on dri-
ver’s seat. Torque control arm attaching nut and
bolts to 18 lb.ft on
GT’s and 23 Ib.ft. on the 1900 -Manta.
2. Connect parking brake cable to support bracket on
control
ranI.
STABILIZER ROD REPLACEMENT
Removal1. Raise and support rear of vehicle.
2. Disconnect stabilizer rod to shackle bolts.
3. Disconnect stabilizer rod to underbody retainers
and work stabilizer rod out from under vehicle.
SPECIFICATIONS
REAR SUSPENSION SPECIFICATIONS
Tightening SpecificationsInstallation1. Work stabilizer rod into position and loosely at-
tach stabilizer to underbody retainers.
2. Connect stabilizer rod to shackles.
3. With the vehicle standing on its wheels or the rear
axle assembly lifted, tighten stabilizer rod to under-
body bracket bolts to 15 lb. ft.
4. Remove jack stands and lower vehicle.
TRACK ROD REPLACEMENT
Removal1. Lift rear of car and suitably support.
2. Disconnect track rod from rear axle and frame
side member.
Installation
1. Loosely connect track rod first to side member and
then to the rear axle.
2. On the
1900 - Manta, load luggage compartment
of vehicle with approximately 350 lbs. or on the GT,
place a load of approximately 150 lbs. on driver’s
seat and tighten track rod attaching bolts to specified
torque.
3. Remove supports (jack stands) and lower vehicle.
Use a reliable torque wrench. Specifications are for clean and lightly-oiled
threads.
Part
Nut
Nut
Nut
Bolt
Nut
Nut
Nut
BoltName
WheelNuts.
.._.._......._........................................................
Control Arm Attaching (GT) .._.._.,,,........,,.,,.......,,......,,,,......
Control Arm Attaching (1 900 - Manta) .,,...._...,,,,_.....,,.,...
Stabilizer Rod to Underbody Retainers ,....._.,.,,.,.....,,,....
Shock Absorber Lower Attachment (GT) . .._.....,._.._.,,,...
Shock Absorber Lower Attachment (1900 Manta) ,,.,
Shock Absorber Upper Attachment. .._.....................
Stabilizer Shackle to Axle Bracket .._._.._,...._..,,.,,.......,,,...
Torque
Lb.Ft.
65
16
23
15
1,5
47
1025
Page 225 of 625
3G- 581873 OPEL SERVICE MANUALTire Wear IrregularitiesAn additional cause of vibrations may sometimes be
tire wear irregularities. These can also produce noise
disturbances, and can be generally corrected by
rotating the tires, Figure
3G-6. Before proceeding
further, locate and correct the cause of the irregular
tire wear. See Figure
3G-7.Use the criss-cross method of rotation of tires only
when all four tires are equally worn. In some in-
stances, it may be necessary to put the truest running
assemblies (those with the lowest tolerances) on the
front of the car.
Wheel Nut Torque end Tightening SpecificationsDuring all wheel installations, it is important to use
the correct procedures for installing wheel nuts and
torquing them uniformly and in proper sequence.
This is important in order to avoid possible distor-
tion of the brake drum or disc, and to minimize
damage to lug and nut threads and wheel stud holes.
To assure uniform tightening of wheel lug nuts, the
following procedure is recommended:
1. Install wheel lug nuts in a criss-cross pattern and
tighten just enough to seat wheel against hub. This
assures proper piloting of the wheel on its hub.
2. Tighten lug nuts uniformly to proper torque of 65
Ib.ft. using criss-cross pattern.
An impact wrench should not be used, as uniform
torque control cannot be maintained.
Summary of Diagnosis end Correction of Tire and
Wheel Vibration1. Inflate all tires to recommended pressure and
road-test car with owner to define problem.
2. Spin front tire/wheel assemblies with wheel driv-
ing equipment. Rear wheels may be spun with tires
off the ground and with one wheel held at a time. The
offending tire may cause vibration that may be felt
by touching the bumper or fender. By process of
elimination, determine offending tire/wheel assem-
bly.
3. Check for tire/wheel unbalance. Balance, if neces-
sary.4. Check each tire/wheel assembly on the car for
radial runout on the tire tread. Wheel and tire assem-
blies exceeding
.050 inches may be considered as
offending assemblies. Offending tire/wheel assemblyshould be deflated and the tire repositioned (indexed)
180 degrees from original location.
5. After repositioning, rebalance tire/wheel assembly
(static and dynamic preferred).
6. Test drive and evaluate correction.
The following procedure should be used to determine
cause of roughness or vibration with car in operation
at various speeds:
I. Jack up all wheels having jack support rear end of
car at center of rear axle housing.
2. With transmission in “Drive”, run engine at vari-
ous car speeds to note speeds at which vibration or
roughness occurs.
3. Remove rear wheels and run engine again at the
critical speeds noted in step 2. If roughness is gone,
the condition is caused by unbalanced wheel and tire
assemblies.
4. If roughness still exists with rear wheels removed,
remove rear brake drums and repeat the running
test. Elimination of the roughness indicates out of
balance brake drums.
5. If roughness still exists with brake drums
removed, run engine with transmission in “Neutral”.
Elimination of the roughness indicates that propeller
shaft is out of balance. Continued roughness indi-
cates an out-of- balance engine.
ABNORMAL TIRE WEAR
General Operating ConditionsAssuming that there is no misalignment condition to
cause abnormal wear, the life of tires depends largely
upon car operation conditions and driving habits.
Tires wear at a much faster rate in some localities
than in others because of road and operating condi-
tions. Some types of roads are much more abrasive
than others. Tire wear is also dependent upon the
number of hills and mountains which the car must
go up and down, the severity of grades, the number
of starts and stops, driging speeds, the amount of rain
and snow, and prevailing temperatures. Tire
wear
increases rapidly with speed, temperature, and loadon tire. Tires used at low speeds, in cool climates, or
with light loads will have longer life than tires used
for high-speed driving in hot climates with heavy
loads.
Driving habits have a very important hearing on tire
life. A careful driver may obtain much greater mile-
age from a set of tires than would be obtained by a
Page 228 of 625
WHEELS AND TIRES3G- 61Cornering Tread WearThe modern independently-sprung automobile al-
lows the driver to negotiate turns at a high rate of
speed with a greater feeling of safety. This fact is
responsible for a comparatively new type of tread
wear that can easily be mistaken for toe or camber
wear.When a car is making a turn, the tires are supposed
to be rolling in a circle. When the turn is made at
high speed, however, centrifugal force acting on the
car causes the tires to be distorted sideways and to
slip or skid on the road surface. This produces a
diagonal cross type of wear, which in severe cases
will result in a fine or sharp edge on each rib of the
tire treads.
Cornering wear can be distinguished from toe or
camber wear by the rounding of the outside shoulder
of the tire and by the roughening of tread surface in
this section denoting severe abrasion. See Figure
3G-7.No alignment or tire pressure cahnge can be made
that will relieve cornering wear. Only the driver can
effect a cure and that is by slowing down on curves.
Heel and Toe Tread WearHeel and toe wear is a saw-tooth effect with one end
of each tread block worn more than the other.
The end which wears is the one that first grips the
road when the brakes are applied. High-speed driv-
ing and excessive “se of the brakes will cause this
type of irregular tire wear. This type of wear will
occur on any type of block tread design. See Figure3G-7.
Heel and toe wear is not so prevalent on the rear tires
because of the propelling action which creates a
counteracting force which wears the opposite end of
the tread block. These two stresses on the rear tires
wear the tread blocks in opposite directions and re-
sult in more even wear while on the front tires, the
braking stress is the only one which is effective. This
may be counteracted by interchanging tires.
A small amount of irregular wear, slightly
saw-toothed in appearance, at the outer segments of tires
is a normal condition and is due to the difference in
circumference between the center and the outer
edges of the tire tread. This saw-toothed appearance,
however, will be exaggerated by underinflation, im-
proper toe-in, or both.Cupped or Scalloped Type Tire Wear
Cupping or scalloping is associated with wear on acar driven mostly at highway speeds without recom-
mended tire rotation. Factors which promote cup-
ping include underinflation, incorrect toe-in setting
or camber setting, and steady highway speeds on
smooth, paved surfaces as opposed to gravel or
rough asphalt.
The following recommendations suggest action that
may be taken to help prevent cupping.
1. Rotate tires as recommended in Figure
3G-6.2. Frequently inspect front tires for irregular wear
due to underinflation, improper toe-in setting, or
camber setting. Regardless of the original cause of
cupped tread wear on either front tire, no alignment
or balance job, however perfect, can prevent future
excessive wear of the spots. Once a front tire acquires
flat or cupped spots, additional wear will continue at
a rapid rate. At the time of correction, however, the
cupped tire should be interchanged with a rear tire
on which the tread runs true. The cupped tire will,
to a certain degree, true itself on a rear wheel.
Although not normally the cause of cupping, the
following factors can contribute to the problem.
Looseness of parts in the suspension system, such as
worn steering knuckle ball joints, loose wheel bear-
ings, inoperative shock absorbers, and any excessive
looseness throughout the steering system all tend to
allow the front wheels to kick around and, if any of
the wheel alignment factors are incorrect, irregular
spotty tire tread wear of one type or another may
result.
Wobble or runout of a tire, either front or rear, due
to bent wheel or to tire being improperly mounted
will cause uneven wear.
MAINTENANCE AND ADJUSTMENTSDEMOUNTING AND MOUNTING
TUBELESS TIRESDue to “se of symmetrical rims, tires must be
mounted over the narrow rim shoulder i.e., over out-
side rim flange.
When demounting a tubeless tire “se care to avoid
damaging the rim-seal ridges on tire beads DO NOT
USE TIRE IRONS TO FORCE BEADS A WA Y
FROM WHEEL RIM FLANGES.
When tire is removed, inspect it carefully to deter-
mine whether loss of air was caused by puncture or
by improper
tit of beads against rim flanges. If im-
proper fit is indicated, check wheel as follows: Do
not reuse dented rims.
Page 234 of 625
PROPELLER SHAFT AND CENTRAL JOINT4A- 3MAJOR REPAIR
PROPELLER SHAFT REMOVAL AND
INSTALLATION
Removal
1. Raise rear of car and support on jack stands at rear
jack brackets.
2. Disconnect parking brake cable equalizer from
rod.3. On the Opel
1900 and Manta, unhook parking
brake cable from floor panel.
4. On the Opel 1900 and Manta, unhook exhaust
system and let it down.
5. Mark the mating parts of the U-joint and the drive
pinion extension shaft flange.
6. Loosen bolt locks and remove bolts or nuts.
7. Work propeller shaft slightly forward, lower rear
end of shaft and slide assembly rearward. Remove
thrust spring from front of propeller shaft.
S. Install plug in transmission extension housing to
prevent loss of lubricant.
installation
CAUTION:
Fasteners in the foJlowing steps are impor-
tant attaching parts in that they could affect the
performance of
vital components and systems, and-
/or could
result in major repair expense. They must
be replaced with one of the
samepart number or with
an equivalent part
ifreplacement becomes oecessary.
Do not use a replacement part of lesser quality or
substitute design. Torque values must be used as
specirid during reassembly to assure proper reten-
tion of these parts.1. Remove plug from rear of transmission.
2. Slide thrust spring onto transmission output shaft
and slide propeller shaft through the oil seal and onto
the transmission output shaft. Make certain trans-
mission rear seal is not damaged.
3. Align rear universal joint and pinion flange locat-
ing marks and secure with respective bolts and lock
plates. Torque bolts to 11
lb.ft. Bend lock plate tangs
to secure bolts or nuts.
4. Connect parking brake cable equalizer to brake
rod and adjust to specifications.
5. On the Opel 1900 and Manta connect parking
brake cable to floor panel.DISASSEMBLY AND ASSEMBLY OF THE
CENTRAL JOINT
Disassembly of Central Joint1. Raise and support rear of car under axle tubes.
2. Release brake line bracket from rear of torque
tube.3. Disconnect parking brake cable equalizer and re-
turn spring from brake rod.
4. On the Opel 1900 and Manta, unhook exhaust
system and let it down.
5. Mark universal joint and flange. Disconnect pro-
peller shaft from flange and support it out of the way.
6. Support torque tube with floor jack using mini-
mum pressure.
7. Remove the central joint bracket to underbody
attaching bolts.
8. Allow floor jack to lower the torque tube.
9. Disconnect torque tube from differential carrier by
removing the attaching bolts.
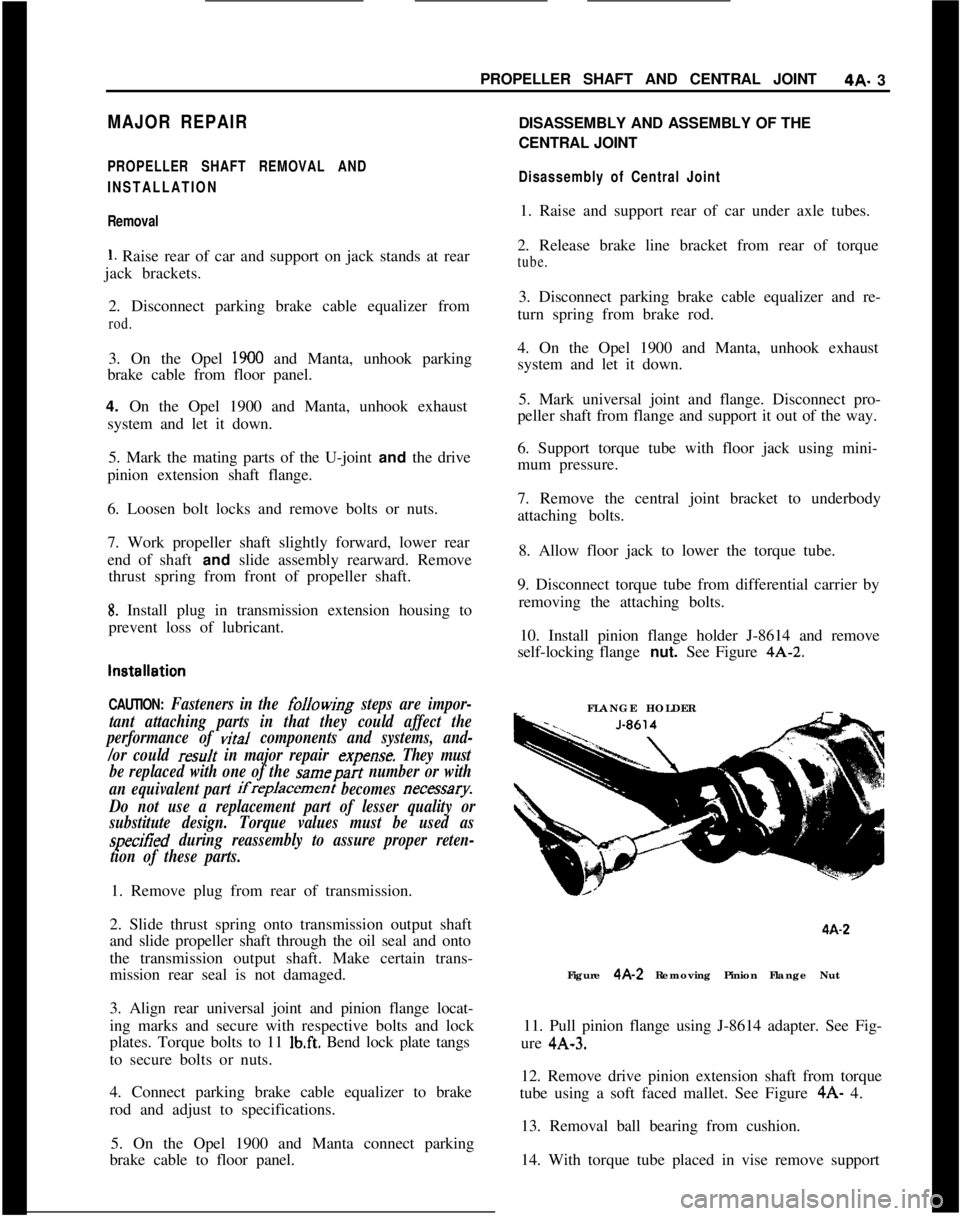
10. Install pinion flange holder J-8614 and remove
self-locking flange nut. See Figure 4A-2.
FLANGE HOLDER4A-2
Figure 4A-2 Removing Pinion Flange Nut
11. Pull pinion flange using J-8614 adapter. See Fig-
ure 4A-3.
12. Remove drive pinion extension shaft from torque
tube using a soft faced mallet. See Figure 4A- 4.
13. Removal ball bearing from cushion.
14. With torque tube placed in vise remove support
Page 237 of 625
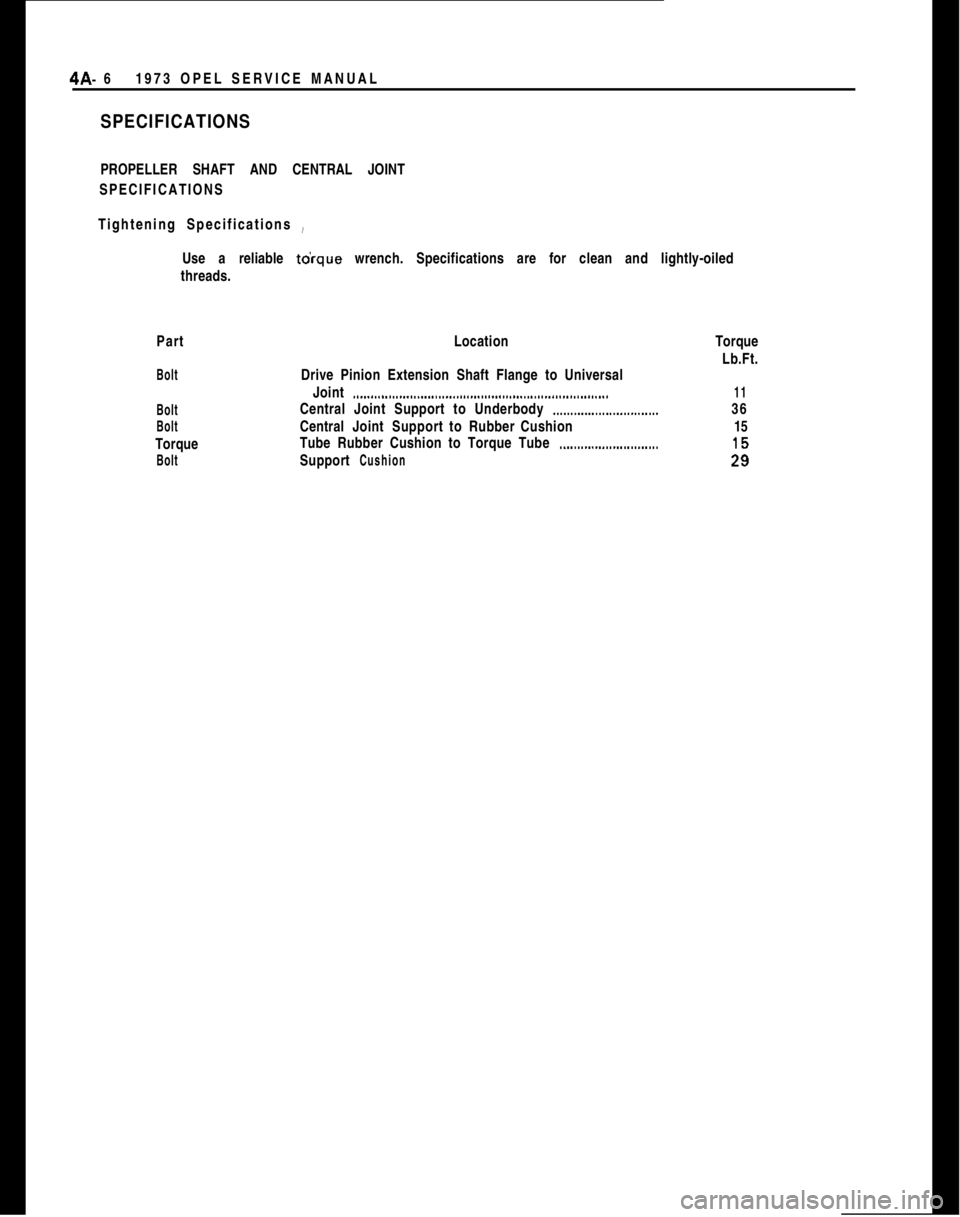
4A- 61973 OPEL SERVICE MANUAL
SPECIFICATIONSPROPELLER SHAFT AND CENTRAL JOINT
SPECIFICATIONS
Tightening Specifications ~
Use a reliable to’rque wrench. Specifications are for clean and lightly-oiled
threads.
Part
Bolt
Bolt
BoltTorque
BoltLocation
Drive Pinion Extension Shaft Flange to Universal
Joint
.._.....................................................................Central Joint Support to Underbody
_.._....._........._..........CentralJointSupport toRubber Cushion
Tube Rubber Cushion to Torque Tube
._.........._...............Support
CushionTorque
Lb.Ft.
1136
15