seat adjustment OPEL GT-R 1973 Service Manual
[x] Cancel search | Manufacturer: OPEL, Model Year: 1973, Model line: GT-R, Model: OPEL GT-R 1973Pages: 625, PDF Size: 17.22 MB
Page 19 of 625
CC-10 1973 OPEL SERVICE MANUAL
wiper blades. Check amount and direction of fluid
sprayed by washers during use.,
E. Defrosters - Check performance by moving con-
trols to “DEF” and noting
am$nmt of air directed
against the windshield.
I
F. Wheel Alignment and
Balabce - In addition to
abnormal tire wear, the need fbr wheel alignment
service may be indicated by a pull to the right or
!eftwhen driving on a straight and level road. The need
for wheel balancing is usually
iddicated by a vibra-
tion of the steering wheel or
se;+ tihile driving at
normal highway speeds.I
IG. Brakes
- Be alert to illumiriation of the brake
warning light or changes in braking action,
SUCK as
repeated pulling to one side, unusual sounds when
braking or increased brake pedal travel. Any of thesecould indicate the need for
brakk system inspection
and/or service.
H. Parking Brake and Transmission “PARK”
Mechanism
- Check parking brake holding ability by
parking on a fairly steep hill and restraining the vehi-
cle with the parking brake only.
eon cars with auto-
matic transmissions, check the holding ability of the
“PARK” mechanism by releasing all brakes after
the transmission selector lever hak been placed in the“P” position.
I. Glass
- Check for broken, scrritched, dirty or da-
maged glass on vehicle that
coulld obscure vision’or
become an injury hazard.
J. Lights and Buzzers
- Check all instrument panel
illuminating and warning lights,’ seat belt reminder
light and buzzer, ignition key
b&er, interior lights,
license plate lights, side marker! lights, headlamps,
parking lamps, tail lamps, brake lights, turn signals,
backup lamps, and hazard warding flashers. Have
someone observe operation of
&ach exterior light
while you activate the controls: The operation of
instrument panel warning lights is covered in the
“Starting and Operating“ section of your
Own&%
Manual.K. Transmission Shift Indicator
‘- Check to be sure
automatic transmission shift
indiCator accurately i”-
dicates the shift position selected.
I
CAUTION: Before making thk check below,I
be sure to have a clear dist&e ahead and:
behind the car, set the parking brake and
firmly apply the foot brake.
Do not depress
accelerator pedal. Be prepared to
turn off ’
ignition switch
immediat+y if engine
should start.L. Starter Safety Switch (Automatic Transmissibn
Cars)
- Check starter safety switch by placing the
transmission in each of the driving gears while
at-tempting to start the engine. The starter should oper-ate only in the Park (“P”) or Neutral (“N”)
positions.
M. Horn
- Blow the horn occasionally to be sure thatit works. (Ignition switch must be in the “ON” posi-
tion.)
N. Seat Back Latches
- Check to see that seat back
latches are holding by pulling forward on the top of
each folding seat back.
0. Rearview Mirrors and Sun Visors
- Check that
friction joints are properly adjusted so mirrors and
sun visors stay in the selected position.
P. Door Latches
- Check for positive closing, latch-
ing and locking.
Q. Hood Latches - Check to make sure hood closesfirmly by pressing on the hood at the latching point
after each closing. Check also for broken, damaged
or missing parts which might prevent secure latch-
ing.R. Fluid Leaks
- Check for fuel, water, oil or other
fluid leaks by observing the ground beneath the vehi-cle after it has been parked for a while. If gasoline
fumes or fluid are noticed at any time, the cause
should be determined and corrected without delay
because of the possibility of fire.
S. Exhaust System
- Be alert to any change in the
sound of the exhaust system or a smell of fumes
which may indicate a leak.
Head Restraints
- Check that no head restraint
components are missing, damaged or loose. (Does
not apply to GT Models).
Disc BrakesCheck brake pads and condition of rotors while
wheels are removed during tire rotation. (Note belowregarding more frequent checks also applies to disc
brakes.)
Parking and Drum BrakesCheck drum
brake linings and other internal brake
components at each wheel (drums, wheel cylinders,
etc.). Parking brake adjustment also should be
checked whenever drum brake linings are checked.
NOTE: More frequent checks should be
made if driving conditions a.nd habits result
in frequent brake application. When brakes
require relining, it is recommended thatyou use those genuine General Motors
parts specified for your car,and Delco fluid
as required.
Page 41 of 625
I
ilC- 201973 OPEL SERVICE MANUAL
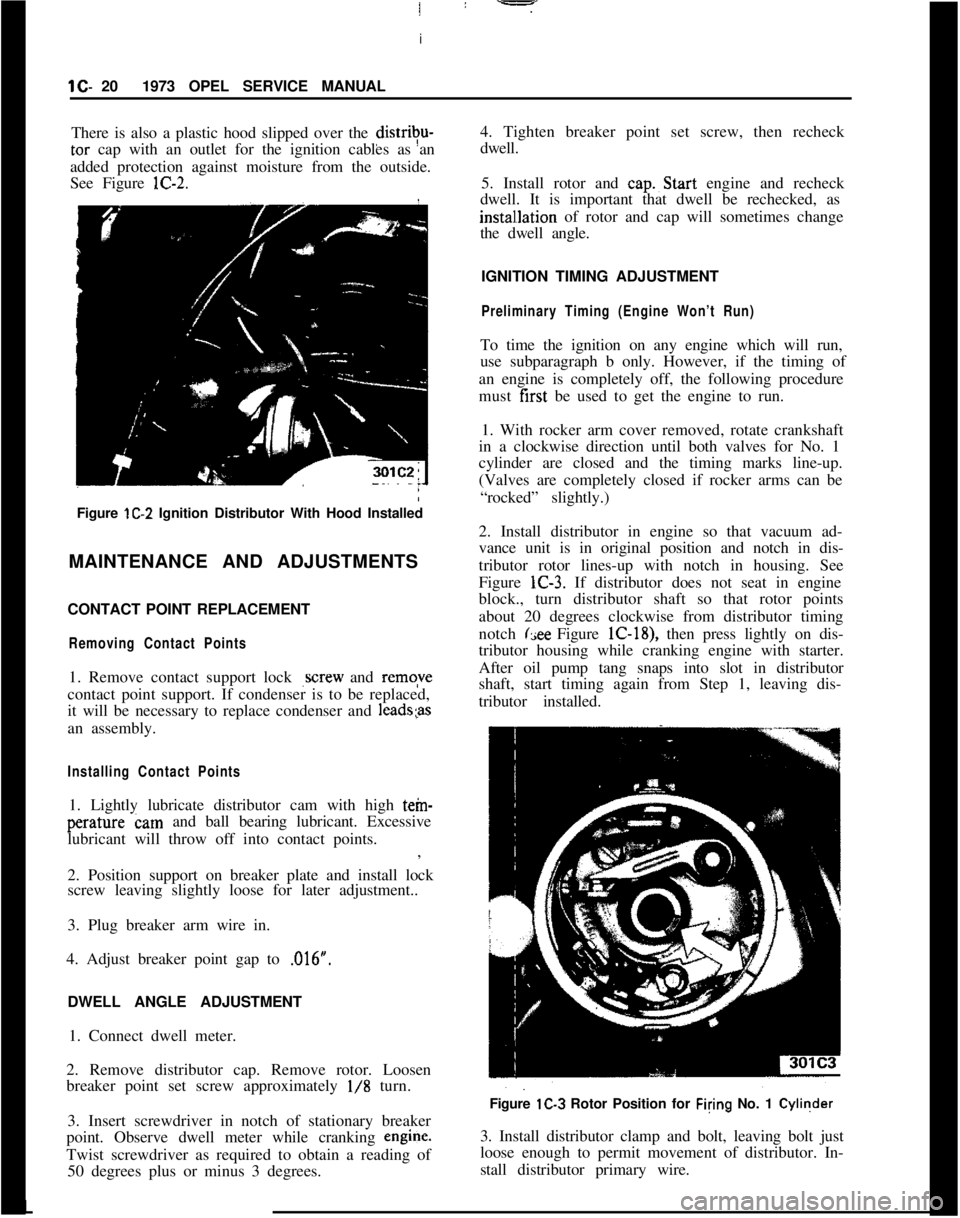
There is also a plastic hood slipped over the distrivu-tar cap with an outlet for the ignition cables as an
added protection against moisture from the outside.
See Figure lC-2.
Figure lC-2 Ignition Distributor With Hood Installed
MAINTENANCE AND ADJUSTMENTS
CONTACT POINT REPLACEMENT
Removing Contact Points1. Remove contact support lock
,screw and remqve
contact point support. If condenser is to be replaced,
it will be necessary to replace condenser and
1eads;asan assembly.
Installing Contact Points1. Lightly lubricate distributor cam with high tein-perature cam and ball bearing lubricant. Excessive
lubricant will throw off into contact points.
:
,
2. Position support on breaker plate and install lock
screw leaving slightly loose for later adjustment..
3. Plug breaker arm wire in.
4. Adjust breaker point gap to ,016”.
/
DWELL ANGLE ADJUSTMENT
1. Connect dwell meter.
2. Remove distributor cap. Remove rotor. Loosen
breaker point set screw approximately
l/8 turn.
3. Insert screwdriver in notch of stationary breaker
point. Observe dwell meter while cranking engine.
Twist screwdriver as required to obtain a reading of
50 degrees plus or minus 3 degrees.4. Tighten breaker point set screw, then recheck
dwell.
5. Install rotor and cap.~Start engine and recheck
dwell. It is important that dwell be rechecked, as
instal~lation of rotor and cap will sometimes change
the dwell angle.
IGNITION TIMING ADJUSTMENT
Preliminary Timing (Engine Won’t Run)To time the ignition on any engine which will run,
use subparagraph b only. However, if the timing of
an engine is completely off, the following procedure
must first be used to get the engine to run.
1. With rocker arm cover removed, rotate crankshaft
in a clockwise direction until both valves for No. 1
cylinder are closed and the timing marks line-up.
(Valves are completely closed if rocker arms can be
“rocked” slightly.)
2. Install distributor in engine so that vacuum ad-
vance unit is in original position and notch in dis-
tributor rotor lines-up with notch in housing. See
Figure lC-3. If distributor does not seat in engine
block., turn distributor shaft so that rotor points
about 20 degrees clockwise from distributor timing
notch
(see Figure lC-18), then press lightly on dis-
tributor housing while cranking engine with starter.
After oil pump tang snaps into slot in distributor
shaft, start timing again from Step 1, leaving dis-
tributor installed.
Figure lC-3 Rotor Position for Filing No. 1 Cyliqder
3. Install distributor clamp and bolt, leaving bolt just
loose enough to permit movement of distributor. In-
stall distributor primary wire.L
Page 156 of 625

SEATS, INTERIOR TRIM AND HEADLINING26-33SEATS, INTERIOR TRIM AND HEADLINING
CONTENTS
SubjectPage No.
DESCRIPTION AND OPERATION: (Not Applicable)
DIAGNOSIS: (Not Applicable)
MAINTENANCE AND ADJUSTMENTS: (Not
Applicable)
MAJOR REPAIR:
Removal and Installation
FrontSeat
. . . . . . . . . . . . . . . . . . . . . . . . . . . . . . . . . . . . . . . . . . . . . . . . . . . . . . . . . . . . . . . . . . . . . . . .RearSeat
. . . . . . . . . . . . . . . . . . . . . . . . . . . . . . . . . . . . . . . . . . . . . . . . . . . . . . . . . . . . . . . . . . . . . . . . . .Glove Compartment Lock ..,.........................................
Front
SidePanelTrimPad. . . . . . . . . . . . . . . . . . . . . . . . . . . . . . . . . . . . . . . . . .Headlining
. . . . . . . . . . . . . . . . . . . . . . . . . . . . . . . . . . . . . . . . . . . . . . . . . . . . . . . . . . . . . . . . . . . . . . . .
RearSidePanelTrimPad. . . . . . . . . . . . . . . . . . . . . . . . . . . . . . . . . . . . . . . . . .SPECIFICATIONS: (Not Applicable)26-33
26-33
26-3426-34
26-3526-37
MAJOR REPAIRREMOVAL AND INSTALLATION OF FRONT SEAT
1. Pull hook out of seat lock. See Figure 2G-2.
2.TZ.Gy3at towards the front and unscrew. See Fig
Figure
2G-2 Pulling Hook Out of Seat LockFigure
2G-3 Seat To Underbody Attachment
REMOVAL AND INSTALLATION OF REAR SEAT
BACK1. Push seat towards seat back and unhook it to-
wards the top. See Figure
2G-4.
2. Unscrew safety belt on left and right side and bendup metal tabs below seat back. See Figure
2~3-5.
Page 193 of 625
3C-26 1973 OPEL SERVICE MANUAL
1. Loosen lock nut of left and right tie rod and
slacken back nut.
2. Remove hose clamp for rubber bellows attach-
ment from respective axial joint and adjust toe-in by
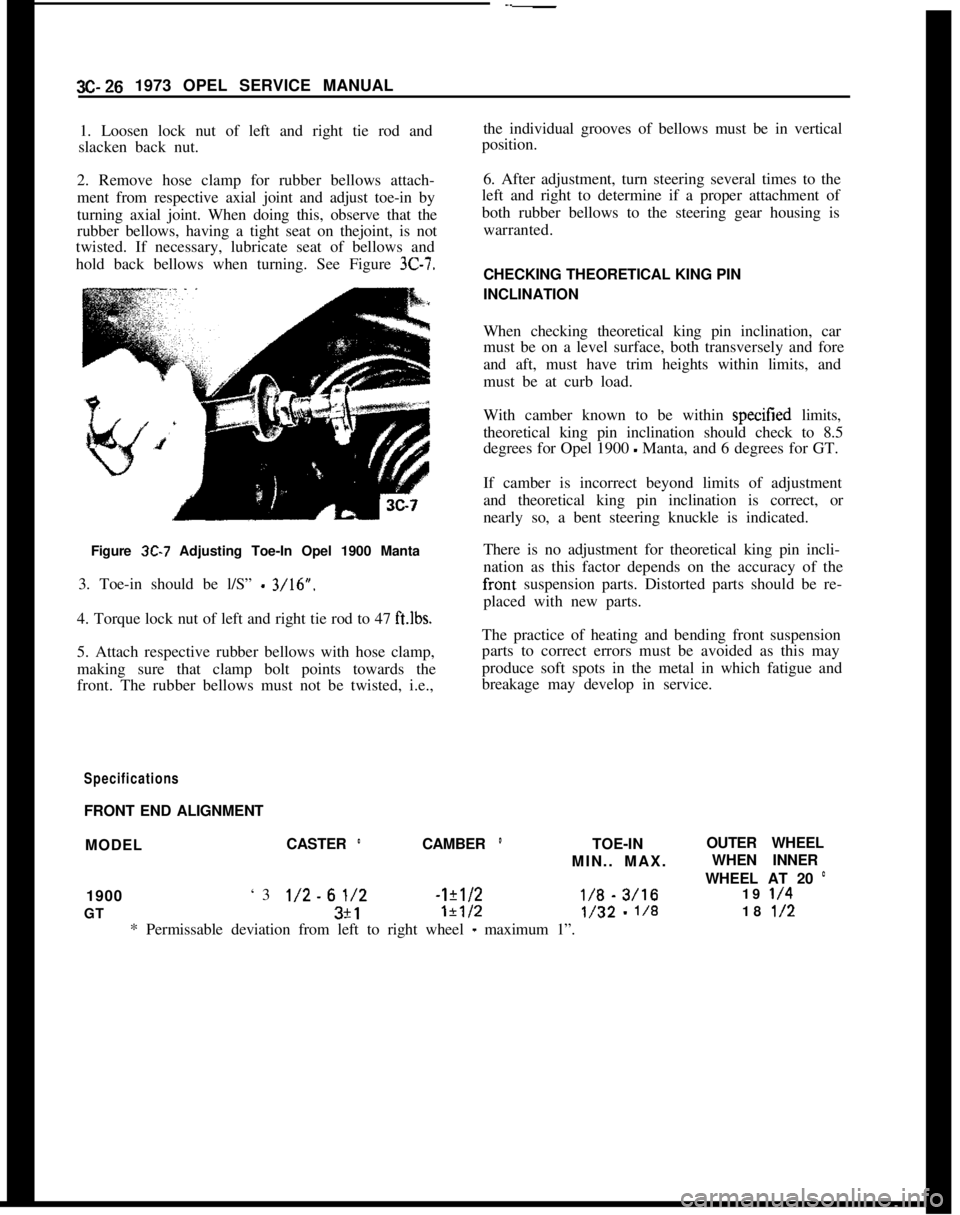
turning axial joint. When doing this, observe that the
rubber bellows, having a tight seat on thejoint, is not
twisted. If necessary, lubricate seat of bellows and
hold back bellows when turning. See Figure 3C-7.Figure
3C-7 Adjusting Toe-In Opel 1900 Manta
3. Toe-in should be l/S”
- 3/16”.
4. Torque lock nut of left and right tie rod to 47
ft.lbs.5. Attach respective rubber bellows with hose clamp,
making sure that clamp bolt points towards the
front. The rubber bellows must not be twisted, i.e.,
SpecificationsFRONT END ALIGNMENTthe individual grooves of bellows must be in vertical
position.
6. After adjustment, turn steering several times to the
left and right to determine if a proper attachment of
both rubber bellows to the steering gear housing is
warranted.
CHECKING THEORETICAL KING PIN
INCLINATION
When checking theoretical king pin inclination, car
must be on a level surface, both transversely and fore
and aft, must have trim heights within limits, and
must be at curb load.
With camber known to be within specitied limits,
theoretical king pin inclination should check to 8.5
degrees for Opel 1900
- Manta, and 6 degrees for GT.
If camber is incorrect beyond limits of adjustment
and theoretical king pin inclination is correct, or
nearly so, a bent steering knuckle is indicated.
There is no adjustment for theoretical king pin incli-
nation as this factor depends on the accuracy of the
fronts suspension parts. Distorted parts should be re-
placed with new parts.
The practice of heating and bending front suspension
parts to correct errors must be avoided as this may
produce soft spots in the metal in which fatigue and
breakage may develop in service.
MODELCASTER
’CAMBER ’TOE-INOUTER WHEEL
MIN.. MAX.WHEN INNER
WHEEL AT 20
’1900‘3
l/2-61/2-1?1/2I/% - 3/1619 l/4GT3+1
1+1/2l/32 - l/818 l/2* Permissable deviation from left to right wheel
- maximum 1”.
Page 194 of 625

STEERING GEAR ASSEMBLY3D. 27
STEERING GEAR ASSEMBLY
CONTENTS
Subject
DESCRIPTION AND OPERATION:
Description and Operation of Steering Gear. . . . . . . . . . . .DIAGNOSIS: (Not Applicable)
MAINTENANCE AND ADJUSTMENTS:
AdjustmentofSteeringGear
. . . . . . . . . . . . . . . . . . . . . . . . . . . . . . . . . . . . . . . .MAJOR REPAIR:
Removal and Installation of Steering Gear
Assembly
andTieRods. . . . . . . . . . . . . . . . . . . . . . . . . . . . . . . . . . . . . . . . . . . . . . . .Disassembly and Reassembly of Steering Gear
Assembly With Tie Rods
. . . . . . . . . . . . . . . . . . . . . . . . . . . . . . . . . . . . . . . . . . . .SPECIFICATIONS:
TighteningSpecifications
. . . . . . . . . . . . . . . . . . . . . . . . . . . . . . . . . . . . . . . . . . . . . . . .
Page No.
3D-27
3D-273D-28
3D-303D-33
DESCRIPTION AND OPERATIONDESCRIPTION AND OPERATION OF
STEERING GEAR ASSEMBLYThe Opel 1900
- Manta and GT steering gear is the
rack and pinion type. The steering gear pinion shaft,
connected to the lower end of the steering column,
moves the rack to the left or right thereby transmit-
ting the turning motion of the steering wheel to the
tie rods and steering arms.
The steering gear housing is held to the cross mem-
ber by rubber bushings and clamps. The bushings
serve to prevent driving noises and vibrations from
being transmitted into the passenger compartment.
A pinion shaft is seated in the upper portion of the
steering gear housing and is supported by a needle
bearing in the upper housing, and a bushing in the
lower housing. The pinion is not adjustable.
A rubber “0” ring seal is provided for sealing needle
bearing, and a second “0” ring for sealing pinion
bushing. The rack and pinion shaft are held in mesh
by a thrust spring and shell. See Figure
3D-2.The pressure of the thrust spring may be varied by
means of an adjusting screw. The spring forces the
sintered bronze shell against the rack, which in turn
is held against the pinion shaft. Backlash in the steer-ing gear is avoided, and road shocks are effectively
absorbed.
The rack is seated in the long neck of the steering
gear housing in a self-lubricating sintered metal
bushing. It is laterally guided by the sintered bronze
shell in the adjusting screw opening, and in the short
gear housing neck by the rack guide bushing. See
Figure
3D-3.MAINTENANCE
AND ADJUSTMENTS
ADJUSTMENTS OF STEERING GEAR
Adjustment of Steering GearAdjustment of the steering gear assembly is accom-
plished by turning the adjusting screw in or out. See
Figure
3D-2.Positioning of the adjusting screw exerts a pressure
on the rack, thereby varying the backlash between
the pinion and rack.
1. Set steering gear to high point by positioning front
wheels straight ahead with steering wheel centered.
Flexible coupling bolt hole will be positioned hori-
zontal (or parallel) to the rack.
2. Thread adjusting screw into steering gear housing
Page 218 of 625

REAR SUSPENSION3F- 51
REAR SUSPENSION
CONTENTS
Subject
DESCRIPTION AND OPERATION:
Description and Operation of Rear Suspension. . . . . .DIAGNOSIS: (Not Applicable)
MAINTENANCE AND ADJUSTMENTS: (Not
Applicable)
MAJOR REPAIR:
Rear Shock Absorber Removal and Replacement . .
Rear
SpringRemovalandInstallation. . . . . . . . . . . . . . . . . . . . . . . .LowerControlArmReplacement
. . . . . . . . . . . . . . . . . . . . . . . . . . . . . . . .Stabilizer
RodReplacement. . . . . . . . . . . ~ . . . . . . . . . . . . . . . . . . . . . ..-....Track Rod Replacement
. . . . . . . . . . . . . . . . . . . . . . . . . . . . . . . . . . . . . . . . . . . . . . . .SPECIFICATIONS:
Rear
SuspensionSpecifications. . . . . . . . . . . . . . . . . . . . . . . . . . . . . . . . . . . .Page No.3F-5
13F-513F-523F-533F-533F-533F-53
DESCRIPTION AND OPERATIONDESCRIPTION AND OPERATION OF REAR
SUSPENSIONAll Opels utilize the three link rear suspension ar-
rangement. This rear suspension consists of coil
springs, track rod, shock absorbers and lower control
arms.The coil springs set between two seats which arc
situated ahead of the rear axle housing.
The track rod is utilized on all models to control the
lateral stability of the rear axle assembly. It is of
tubular design. A stabilizer rod is used on all Wagons
as well as Fast Backs and Sedans. The GT is not
equipped with a stabilizer rod.
The lower control arms are of tubular design and
function as two links of the three link suspension
system. They are attached to the underbody through
brackets welded to the side rails and to the rear axle
assembly through the front portion of the spring seat
bracket. The lower control arms control the fore and
aft movement of the rear axle assembly.
The third link in this suspension system is the torque
tube which is connected to the differential carrier
and also to the underbody through rubber bushings
in the central joint support bracket.The torque tube in conjunction with the lower con-
trol arms absorb all acceleration and braking torque.
MAJOR REPAIR
REAR SHOCK ABSORBER REMOVALAND INSTALLATION
RemovalNOTE: The trim panel under the spare tire must be
removed on the GT to gain access to attaching nuts.
1. Remove upper attaching nut, retainer and rubber
grommet.
2. Remove lower attaching nut and rubber grommet
retainer, compress shock absorber and remove from
lower mounting pin.
Installation1. Replace upper and lower rubber grommets, if
necessary, before installing shock absorber.
2. Extend shock absorber and position in car. Attach
at lower end first, torque nut to 15 lb.ft. on the GT,
and torque to 47 lb.ft. on the Opel 1900
- Manta.
Page 222 of 625
WHEELS AND TIRES3G- 55
WHEELS AND TIRES
CONTENTS
Subject
DESCRIPTION AND OPERATION: (Not Applicable)
DIAGNOSIS:
Car
RoughnessandVibration. . . . . . . . . . . . . . . . . . . . . . . . . . . . . . . . . . . . . . . .AbnormalTireWear
. . . . . . . . . . . . . . . . . . . . . . . . . . . . . . . . . . . . . . . . . . . . . . . . . . . . . . . . . .MAINTENANCE AND ADJUSTMENTS:
Demounting and Mounting Tubeless Tires
. . . . . . . . . . . . . .Wheel
andTireBalance. . . . . . . . . . . . . . . . . . . . . . . . . . . . . . . . . . . . . . . . . . . . . . . . . .MAJOR REPAIR: (Not Applicable)
SPECIFICATIONS:
Specifications
. . . . . . . . . . . . . . . . . . . . . . . . . . . . . . . . . . . . . . . . . . . . . . . . . . . . . . . . . . . . . . . . . . . . . .Page No.
3G-55
3G-58
3G-6136-6236-62
DIAGNOSIS
CAR ROUGHNESS AND VIBRATIONinflation pressures and perform tire inspection, in-
cluding removal of any foreign material on tire tread
or wheel large enough to upset balance.
Possible Causes
To assist in the diagnosis and correction of some of
the more stubborn cases of tire vibration and rough-
ness conditions that may be encountered, the follow-
ing information is offered:Tire inflation pressure recommendations are very
important at all times and particularly so on all ride
complaints. Raising or lowering tire pressures to
“improve” mileage or traction should not be at-
tempted.
VIBRATION, or a quivering motion condition, no-
ticeable by feel through the steering column, steering
wheel, floor
p&n, or by hood and fender shake, usu-
ally originates from the front wheels and tires. Front
end vibration, when caused by unbalanced front
wheels, can be generally felt as steering wheel “nib-ble”.Next, road-test the car with the owner, if possible,
and have the owner explain the specific ride disturb-
ance.After road-testing, raise car on hoist and proceed to
isolate the offending tire/wheel assembly.
Reproducing the Disturbance
A vibration felt through the seats as a side-to-side
disturbance can usually be attributed to the rearIn an attempt to reproduce the disturbance ex-
wheels and tires.perienced in the ride, a wheel spinner can be used on
the front wheels of the car.
Both front and rear vibration can be noticed mainly
at highway speeds, usually over 60 mph.The rear wheels may be spun by placing car in
“Drive” with engine running.
ROUGHNESS, noticeable primarily at speeds be-
tween 40 and 65 mph, can be felt (and occasionally
heard), and is due to certain irregularities in the tire.
Roughness usually sets up a “trembling” feel or a
shuddering effect.When spinning rear wheels, never exceed a speedom-
eter speed of 35 mph with a standard rear axle assem-
bly, or 75 mph on one with a positive traction rear
axle. Excessive speeds may cause damage to the rear
axle assembly.
Road-Test With Owner
When a ride complaint is encountered, first checkJack up both rear wheels by placing the jack under
the differential housing. Spin one wheel and tire with
the opposite wheel held from rotating by holding the
Page 229 of 625

3G- 621973 OPEL SERVICE MANUAL
1. Clean rims thoroughly, using No. 3 coarse steel
wool to remove all oxidized rubber, soap solution,
etc. Remove rust with wire brush.2. Inspect butt weld and other areas of rim contactedby tire beads to make certain there is no groove or
high spot. Remove any groove or high spot by tiling
smooth.
3. Inspect valve stem and replace it if damaged.
Make certain that valve stem is properly installed to
provide an air tight joint.
4. Before mounting a tubeless tire on a wheel, mois-
ten a cloth with mounting compound or soap solu-
tion and wipe rim-seal ridges of both beads to remove
all foreign substances.
5. Moisten base of both beads with mounting com-
pound or soap solution to help beads snap into place
when tire is inflated. Start tire over rim flange at
point opposite valve stem.
6. Inflate tire until both beads are firmly seated
against rim flanges and temporarily over inflate.
Leak test wheel and tire assembly and if satisfactory,
reduce to recommended pressure.
SPECIFICATIONSWHEEL AND TIRE BALANCE
Wheel and tire balance is the equal distribution of the
weight of the wheel and tire assembly around the axis
of rotation. Wheel unbalance is the principal cause of
tramp and general car shake and roughness and con-
tributes somewhat to steering troubles.
The original balance of the tire and wheel assembly
may change as the tire wears. Severe acceleration,
severe brake applications, fast cornering and side slip
wear the tires out in spots and often upset the origi-
nal balance condition and make it desirable to rebal-
ance the tire and wheel as an assembly. Tire and
wheel assemblies should be rebalanced after punc-
tures are repaired.
Because of the speed at which cars are driven, it is
necessary to test the wheel and tire assembly for
dynamic balance. Dynamic balancing of a wheel and
tire assembly must be done on a machine designed to
indicate out-of-balance conditions while the wheel is
rotating on the car. Since procedures differ with dif-
ferent machines, the instructions of the equipment
manufacturer must be carefully followed.
General SpecificationsWheels
Opel 1900
- Manta and GT ,._......,,,._.................,...,,..............................~,,,.................... 5.J x 13
Tires
1900 - Manta __.......,,___.,...,,..,.....,,....,,...........,...,,.,,...,.........,,..................,....................... 165-13
GT . . . . . . . ..__........_..............,...,,........,,,...,,..........,....,..,,...,,........,..................,,,.....................165-13
Tire Size and Pressures (Pounds Per Square Inch
Cold)
ModelTire Size51.53.54.57
165-1357R.57L165-13
77
165-13Recommended(Standard
PressureInflation)
FrontRear24
PSI32PSI23
PSI26PSI
19PSI23
PSI
NOTE:
1.Tire inflation pressures may increase as much as 6 pounds per square inch
when hot.
2.For continuous high-speed operation (over 75 MPH), increase tire inflation
pressures 4 pounds per square inch over the recommended pressures up to a
maximum of 30 pounds per square inch cool for 4 ply rating tires. When the
4 psi pressure adjustment for sustained high speed with maximum vehicle load
Page 238 of 625
REAR AXLE
CONTENTS
SubjectPage No.
DESCRIPTION AND OPERATION:
Rear Axle Description. . . . . . . . . . . . . . . . . . . . . . . . . . . . . . . . . . . . . . . . . . . . . . . . . . . . . .4B- 7
DIAGNOSIS:
RearAxleTroubleDiagnosis. . . . . . . . . . . . . . . . . . . . . . . . . . . . . . . . . . . . . . . . . .4B- 8
MAINTENANCE AND ADJUSTMENTS: (Not Applicale)
MAJOR REPAIR:
Removal and Installation of Rear Axle Assembly
Removal and Installation of Axle Shaft Assembly
Disassembly and Assembly of Differential
.* . . . . . . . . . . . .SPECIFICATIONS:
DifferentialSpecifications
. . . . . . . . . . . . . . . . . . . . . . . . . . . . . . . . . . . . . . . . . . . . . .4B- 94B-10
48-l 1
4B-22
DESCRIPTION AND OPERATION
REAR AXLE DESCRIPTIONThe Opel rear axle is a semi-floating type that carries
car weight through the axle shafts by way of ball
bearings which are located on the outer ends of each
axle shaft. The rear axle assembly is attached to the
under body by way of the shock absorbers, track rod,
central joint support, and lower control arms. A sta-
bilizer rod is used on all Wagons, as well as Fast
Backs and Sedans. The GT is not equipped with a
stabilizer rod. The rear springs have a progressive
spring rate which is attained by a gradual reduction
of coil thickness. The springs are arranged between
the spring seats welded onto the rear axle tubes and
the under body side members. The upper and lower
ends are seated in profiled rubber dampening rings.
The differential housing is a malleable iron casting
with tubular axle housings pressed into the sides to
form a complete assembly. An oil feed passage to the
pinion bearings and an oil return hole are provided
to allow lubricant to circulate. A removable steel
cover is bolted on the rear of the differential housing
to permit service of the differential without removing
the rear axle assembly from the vehicle. A breather
fitting is located on top of the right axle tube.Within the differential carrier, the differential case is
supported by two tapered roller side bearings. These
side bearings are preloaded by shims located between
the bearing inner races and differential case. During
installation, varying the shim thickness from side to
side also determines the ring gear to pinion backlash.
The differential case houses two side gears meshed
with two pinions. The pinions and side gears are
backed by thrust washers. The pinion gears are held
in place by a pinion shaft which is anchored in the
differential case by a lock pin.
The inner end of the axle shafts engage and extend
through the splines of the side gears with a floating
tit.
The axle shafts have an enlarged diameter from mid-
shaft to the flange end.
A ball bearing and oil seal are used on all models, and
are pressed onto the outer end of the axle shaft as an
assembly.The drive pinion is mounted in two roller bearings in
the rear axle housing. Pinion setting is established by
shims located between the differential carrier and therear’pinion bearing outer race.
Page 293 of 625
6A- 21973 OPEL SERVICE MANUAL
ENGINE
CONTENTS
Subject
DESCRIPTION AND OPERATION:
EngineConstruction..........................................................
LubricationSystem............................................................
DIAGNOSIS:
Excessive Oil Consumption............................................NoisyValvesandLifters..................................................
MAINTENANCE AND ADJUSTMENTS:
Valve
LifterAdjustment..................................................
MAJOR REPAIR:
Engine Removal and Installation..................................
Engine
OilPanRemoval
andInstallation..................
Manifold, Cylinder Head, Valve Train and
Lifters................................................................................
Connecting Rod Bearings................................................
Crankshaft Bearings and Seals....................................
Piston, Rings and Connecting Rods............................
TimingChainCoverandTimingChain......................
Camshaft..............................................................................
Oil Pump Cover and Gears............................................
SPECIFICATIONS:
BoltTorque.Specifications
..............................................General Specifications......................................................
Engine Dimension and Fits............................................Page No.
6A- 2
6A- 4
6A- 6
6A- 6
6A- 7
6A- 86A-106A-126A-156A-166A-196A-236A-256A-266A-276A-286A-29
DESCRIPTION AND OPERATION
ENGINE CONSTRUCTION
Engine UsageThe 1.9 liter engine is standard equipment on all 1973
Opel
1900, Manta and GT models. This engine has
a compression ratio of
7.6:1 and operates on“regular” low lead grade fuel.
Engine ConstructionThe
cyfinderhead is made of high-grade chromium
grey cast iron. The valve guides are cast intergal with
the head. The overhead camshaft is supported in four
bearings in the cylinder head.Location of the
vzllve seats in combustion chamber
is above the center of cylinder bore. The spark plug
is positioned in the center and near the highest point
of combustion chamber. This arrangement provides
for short flame travel, uniform combustion and good
cold start prop&ties. Exhaust valves have seat in-serts of highly heat and water resisting material. The
head surface is alumetized and so are the seats of the
inlet v&es Alumetizing makes the valve heads
non- scaling and promotes long life. All engines have“rota-caps”.
The forged, five main bearing crankshaft has large-
diameter main and connecting rod bearing journals
with considerable overlap for vibration-free operat-
ion. T&metal bearing shells are used for main and
connecting rod bearings. The crankshaft end play is
controlled by the rear main bearing.