OPEL ZAFIRA C 2014 Manual user
Manufacturer: OPEL, Model Year: 2014, Model line: ZAFIRA C, Model: OPEL ZAFIRA C 2014Pages: 299, PDF Size: 9.03 MB
Page 171 of 299

Driving and operating169
8. Unscrew the hose from the fillerneck.
9. Mount the protective cap and turn
clockwise until it engages.
Note
Dispose AdBlue canister and hose
according to environmental
requirements.
After restart, let the engine run in
neutral for approx. 10 seconds before
starting-off.
Exchanging AdBlue
Have AdBlue in the tank exchanged
completely after two years at the latest when driving mainly in warm
areas and with low mileage.Caution
Disregard could lead to damage to
the engine.
Automatic transmission
The automatic transmission permits
automatic gearshifting (automatic
mode) or manual gearshifting
(manual mode).
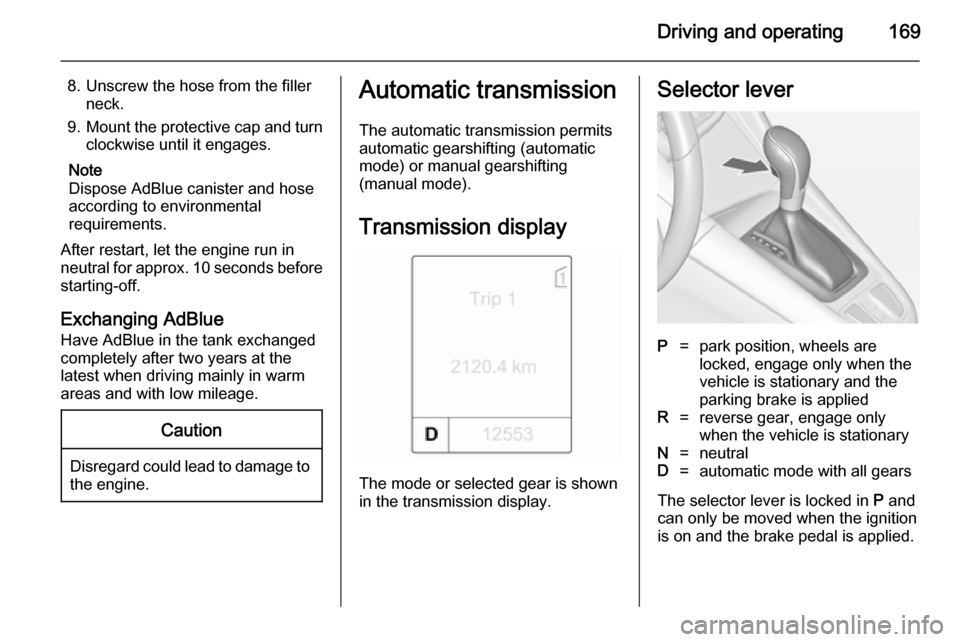
Transmission display
The mode or selected gear is shown
in the transmission display.
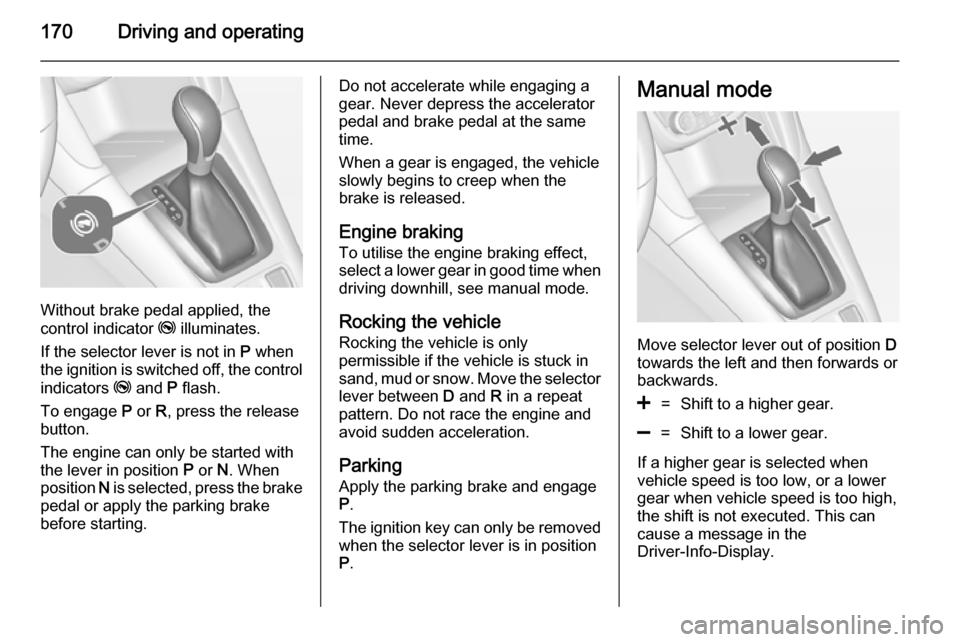
Selector leverP=park position, wheels are
locked, engage only when the
vehicle is stationary and the
parking brake is appliedR=reverse gear, engage only
when the vehicle is stationaryN=neutralD=automatic mode with all gears
The selector lever is locked in P and
can only be moved when the ignition
is on and the brake pedal is applied.
Page 172 of 299

170Driving and operating
Without brake pedal applied, the
control indicator j illuminates.
If the selector lever is not in P when
the ignition is switched off, the control
indicators j and P flash.
To engage P or R, press the release
button.
The engine can only be started with the lever in position P or N. When
position N is selected, press the brake
pedal or apply the parking brake
before starting.
Do not accelerate while engaging a
gear. Never depress the accelerator
pedal and brake pedal at the same
time.
When a gear is engaged, the vehicle
slowly begins to creep when the
brake is released.
Engine braking To utilise the engine braking effect,select a lower gear in good time when
driving downhill, see manual mode.
Rocking the vehicle
Rocking the vehicle is only
permissible if the vehicle is stuck in
sand, mud or snow. Move the selector
lever between D and R in a repeat
pattern. Do not race the engine and
avoid sudden acceleration.
Parking
Apply the parking brake and engage P .
The ignition key can only be removed
when the selector lever is in position
P .Manual mode
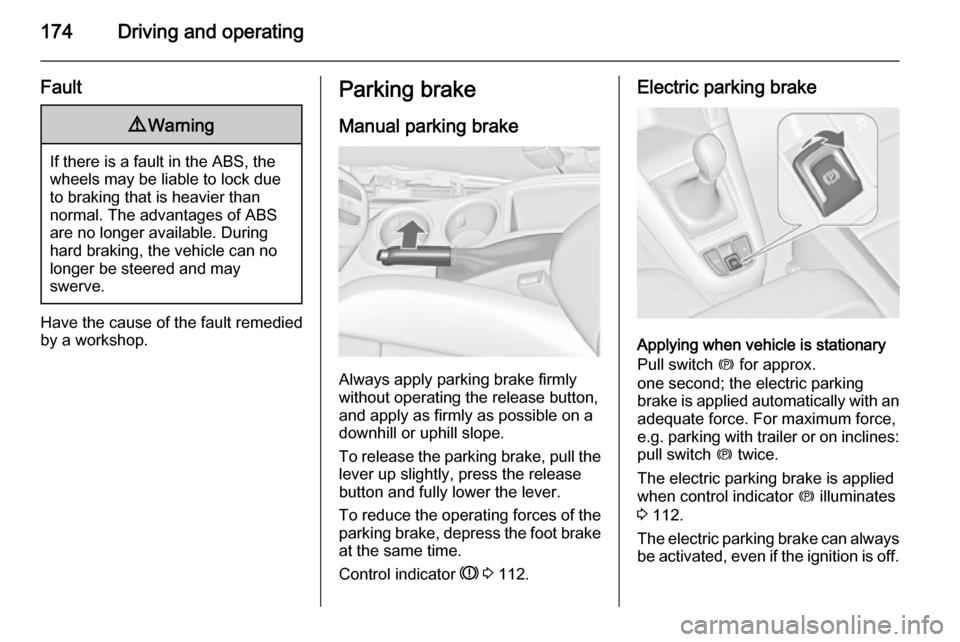
Move selector lever out of position D
towards the left and then forwards or backwards.
<=Shift to a higher gear.]=Shift to a lower gear.
If a higher gear is selected when
vehicle speed is too low, or a lower
gear when vehicle speed is too high,
the shift is not executed. This can
cause a message in the
Driver-Info-Display.
Page 173 of 299

Driving and operating171
In manual mode no automatic shiftingto a higher gear takes place at high
engine revolutions.
Electronic driving
programmes ■ Following a cold start, the operating
temperature programme increasesengine speed to quickly bring the
catalytic converter to the required
temperature.
■ The automatic neutral shift function
automatically shifts gear to idling
when the vehicle is stopped with a
forward gear engaged and the
brake pedal is pressed.
■ When SPORT mode is engaged, the vehicle shifts at higher engine
speeds (unless cruise control is
on). SPORT mode 3 177.■ Special programmes automatically
adapt the gearshift points when
driving up inclines or down hills.
■ When starting-off in snowy or icy conditions or on other slippery
surfaces, the electronic
transmission control selects a
higher gear automatically.
Kickdown If the accelerator pedal is pressed
down completely in automatic mode, the transmission shifts to a lower gear depending on engine speed.
Fault In the event of a fault, g illuminates.
Additionally a code number or a
vehicle message is displayed in the
Driver Information Centre. Vehicle
messages 3 123.
The transmission no longer shifts
automatically. Continued travel is
possible with manual shifting.Only the highest gear is available.
Depending on the fault, 2nd gear may also be available in manual mode.
Shift only when vehicle is at a
standstill.
Have the cause of the fault remedied by a workshop.
Interruption of power
supply In the event of an interruption of
power supply, the selector lever
cannot be moved out of the P
position. The ignition key cannot be
removed from the ignition switch.
If the vehicle battery is discharged,
start the vehicle using jump leads
3 261.
If the vehicle battery is not the cause
of the fault, release the selector lever.
1. Apply the parking brake.
Page 174 of 299

172Driving and operating
2. Release the selector lever trimfrom the centre console at the
front, fold it upwards and rotate it
to the left.
3. Insert a screwdriver into the opening as far as it will go and
move the selector lever out of P or
N . If P or N is engaged again, the
selector lever will be locked in
position again. Have the cause of
the power supply interruption
remedied by a workshop.
4. Mount the selector lever trim onto
the centre console and refit.Manual transmission
To engage reverse, with the vehicle
stationary wait 3 seconds after
depressing the clutch pedal and then
press the release button on the
selector lever and engage the gear.
If the gear does not engage, set the
lever to neutral, release the clutch
pedal and depress again; then repeat
gear selection.
Do not grind the clutch unnecessarily. When operating, depress the clutchpedal completely. Do not use the
pedal as a foot rest.
Page 175 of 299

Driving and operating173Caution
It is not advisable to drive with thehand resting on the selector lever.
Brakes
The brake system comprises two independent brake circuits.
If a brake circuit fails, the vehicle can
still be braked using the other brake
circuit. However, braking effect is
achieved only when the brake pedal
is depressed firmly. Considerably
more force is needed for this. The
braking distance is extended. Seek the assistance of a workshop before
continuing your journey.
When the engine is not running, the
support of the brake servo unit
disappears once the brake pedal has been depressed once or twice.
Braking effect is not reduced, but
braking requires significantly greater
force. It is especially important to bear
this in mind when being towed.
Control indicator R 3 112.
Antilock brake system
Antilock brake system (ABS)
prevents the wheels from locking.ABS starts to regulate brake pressure as soon as a wheel shows a tendency to lock. The vehicle remains
steerable, even during hard braking.
ABS control is made apparent
through a pulse in the brake pedal
and the noise of the regulation
process.
For optimum braking, keep the brake
pedal fully depressed throughout the
braking process, despite the fact that
the pedal is pulsating. Do not reduce
the pressure on the pedal.
After starting off the system performs
a self-test which may be audible.
Control indicator u 3 113.
Adaptive brake light During full braking, all three brake
lights flash for the duration of ABS
control.
Page 176 of 299

174Driving and operating
Fault9Warning
If there is a fault in the ABS, the
wheels may be liable to lock due
to braking that is heavier than
normal. The advantages of ABS are no longer available. During
hard braking, the vehicle can no longer be steered and may
swerve.
Have the cause of the fault remedied
by a workshop.
Parking brake
Manual parking brake
Always apply parking brake firmly
without operating the release button,
and apply as firmly as possible on a
downhill or uphill slope.
To release the parking brake, pull the lever up slightly, press the release
button and fully lower the lever.
To reduce the operating forces of the
parking brake, depress the foot brake
at the same time.
Control indicator R 3 112.
Electric parking brake
Applying when vehicle is stationary
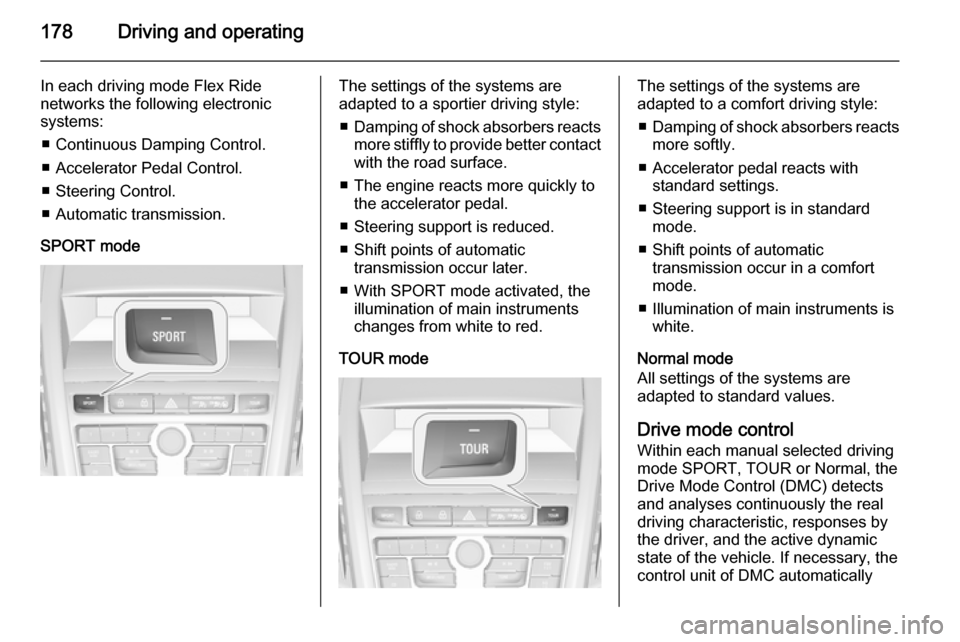
Pull switch m for approx.
one second; the electric parking
brake is applied automatically with an adequate force. For maximum force,
e.g. parking with trailer or on inclines:
pull switch m twice.
The electric parking brake is applied
when control indicator m illuminates
3 112.
The electric parking brake can always
be activated, even if the ignition is off.
Page 177 of 299

Driving and operating175
Do not operate electric parking brake
system too often with engine not
running, as this will discharge the
vehicle battery.
Before leaving the vehicle, check the electric parking brake status. Control
indicator m 3 112.
Releasing
Switch on ignition. Keep brake pedal
depressed and then press switch m.
Drive away function
Depressing clutch pedal (manual
transmission) or engaging drive gear
(automatic transmission) and then
depressing the accelerator pedal
releases the electric parking brake
automatically. This is not possible
when the switch is pulled at the same time.
This function also helps driving away
on inclines.
Aggressive drive-away may reduce
lifetime of wear parts.Dynamic braking when vehicle is
moving
When the vehicle is moving and the
switch m is kept pulled, the electric
parking brake system will decelerate the vehicle, but will not apply
statically.
As soon as the switch m is released,
dynamic braking will be stopped.
Fault
Failure mode of electric parking brake
is indicated by control indicator j and
by a code number or a vehicle
message which is displayed in the
Driver Information Centre (DIC).
Vehicle messages 3 123.
Apply electric parking brake: pull and hold switch m for more than
5 seconds. If control indicator m
illuminates, electric parking brake is
applied.
Release electric parking brake: press and hold switch m for more than
2 seconds. If control indicator m
extinguishes, electric parking brake is
released.Control indicator m flashes: electric
parking brake is not fully applied or
released. When continuously
flashing, release electric parking
brake and retry applying.
Brake assist If the brake pedal is depressed
quickly and forcefully, maximum
brake force is automatically applied
(full braking).
Maintain steady pressure on the brake pedal for as long as full braking
is required. Maximum brake force is
automatically reduced when the
brake pedal is released.
Hill start assist The system helps prevent unintendedmovement when driving away on
inclines.
When releasing the foot brake after
stopping on an incline, the brakes
remain on for a further two seconds.
The brakes release automatically as
soon as the vehicle begins to
accelerate.
Page 178 of 299

176Driving and operating
The hill start assist is not active during
an Autostop.Ride control systems
Traction Control system
The Traction Control system (TC) is a
component of the Electronic Stability
Control.
TC improves driving stability when
necessary, regardless of the type of
road surface or tyre grip, by
preventing the drive wheels from
spinning.
As soon as the drive wheels starts to
spin, engine output is reduced and
the wheel spinning the most is braked
individually. This considerably
improves the driving stability of the
vehicle on slippery road surfaces.
TC is operational as soon as the
control indicator b extinguishes.
When TC is active b flashes.9 Warning
Do not let this special safety
feature tempt you into taking risks
when driving.
Adapt speed to the road
conditions.
Control indicator b 3 114.
Deactivation
TC can be switched off when spinning of drive wheels is required: pressbutton b briefly.
Control indicator k illuminates.
Page 179 of 299

Driving and operating177
TC is reactivated by pressing the b
button again.
TC is also reactivated the next time
the ignition is switched on.
Electronic Stability Control Electronic Stability Control (ESC)
improves driving stability when
necessary, regardless of the type of
road surface or tyre grip. It also
prevents the drive wheels from
spinning.
As soon as the vehicle starts to
swerve (understeer/oversteer),
engine output is reduced and the wheels are braked individually. This
considerably improves the driving
stability of the vehicle on slippery road
surfaces.
ESC is operational as soon as the
control indicator b extinguishes.
When ESC is active b flashes.9 Warning
Do not let this special safety
feature tempt you into taking risks
when driving.
Adapt speed to the road
conditions.
Control indicator b 3 114.
Deactivation
For very high-performance driving
ESC can be deactivated: hold button
b depressed for approx. 5 seconds.
Control indicator n illuminates.
ESC is reactivated by pressing the
b button again. If the TC system was
previously disabled, both TC and
ESC are reactivated.
ESC is also reactivated the next time
the ignition is switched on.
Interactive driving system
Flex Ride Flex Ride driving system allows the
driver to select between three driving
modes:
■ SPORT mode: press button SPORT , LED illuminates.
■ TOUR mode: press button TOUR,
LED illuminates.
■ Normal mode: both buttons SPORT and TOUR are not
pressed, no LED illuminates.
Deactivate SPORT mode and TOUR
mode by pressing corresponding
button once more.
Page 180 of 299

178Driving and operating
In each driving mode Flex Ride
networks the following electronic systems:
■ Continuous Damping Control.
■ Accelerator Pedal Control.
■ Steering Control.
■ Automatic transmission.
SPORT modeThe settings of the systems are
adapted to a sportier driving style:
■ Damping of shock absorbers reacts
more stiffly to provide better contact with the road surface.
■ The engine reacts more quickly to the accelerator pedal.
■ Steering support is reduced.
■ Shift points of automatic transmission occur later.
■ With SPORT mode activated, the illumination of main instruments
changes from white to red.
TOUR modeThe settings of the systems are
adapted to a comfort driving style:
■ Damping of shock absorbers reacts
more softly.
■ Accelerator pedal reacts with standard settings.
■ Steering support is in standard mode.
■ Shift points of automatic transmission occur in a comfort
mode.
■ Illumination of main instruments is white.
Normal mode
All settings of the systems are
adapted to standard values.
Drive mode control Within each manual selected driving
mode SPORT, TOUR or Normal, the
Drive Mode Control (DMC) detects
and analyses continuously the real
driving characteristic, responses by
the driver, and the active dynamic
state of the vehicle. If necessary, the
control unit of DMC automatically