engine PEUGEOT 108 2016 Workshop Manual
[x] Cancel search | Manufacturer: PEUGEOT, Model Year: 2016, Model line: 108, Model: PEUGEOT 108 2016Pages: 268, PDF Size: 6.17 MB
Page 148 of 268
146
108_en_Chap07_info-pratiques_ed01-2016
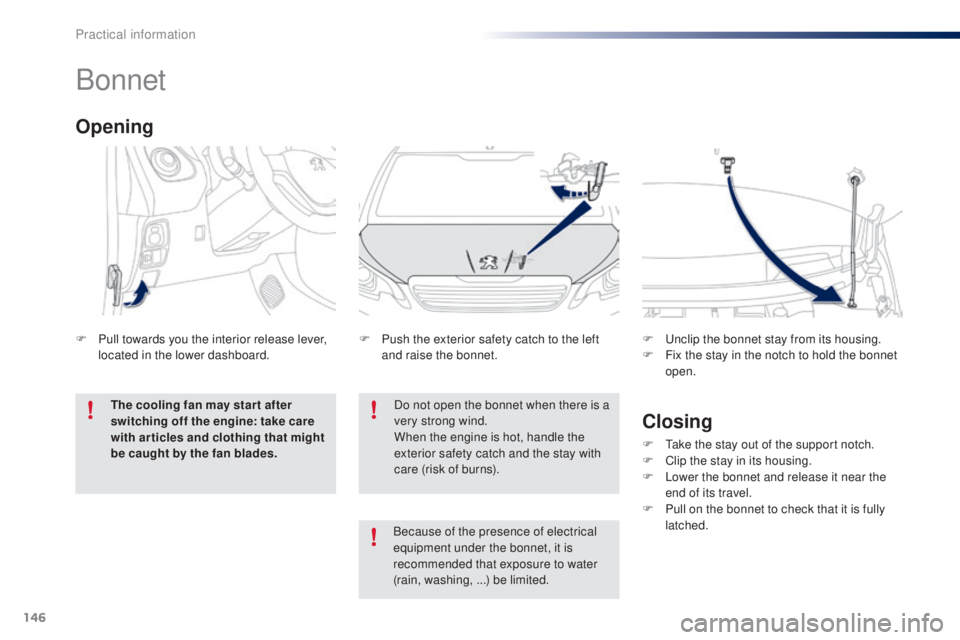
Bonnet
Do not open the bonnet when there is a
very strong wind.
When the engine is hot, handle the
exterior safety catch and the stay with
care (risk of burns).
F
P
ush the exterior safety catch to the left
and raise the bonnet. F u
n
clip the bonnet stay from its housing.
F
F
ix the stay in the notch to hold the bonnet
open.
opening
F Pull towards you the interior release lever, located in the lower dashboard.
th
e cooling fan may star t after
switching off the engine: take care
with articles and clothing that might
be caught by the fan blades.
Closing
F take the stay out of the support notch.
F C lip the stay in its housing.
F
L
ower the bonnet and release it near the
end of its travel.
F
P
ull on the bonnet to check that it is fully
latched.
Because of the presence of electrical
equipment under the bonnet, it is
recommended that exposure to water
(rain, washing, ...) be limited.
Practical information
Page 149 of 268
147
108_en_Chap07_info-pratiques_ed01-2016
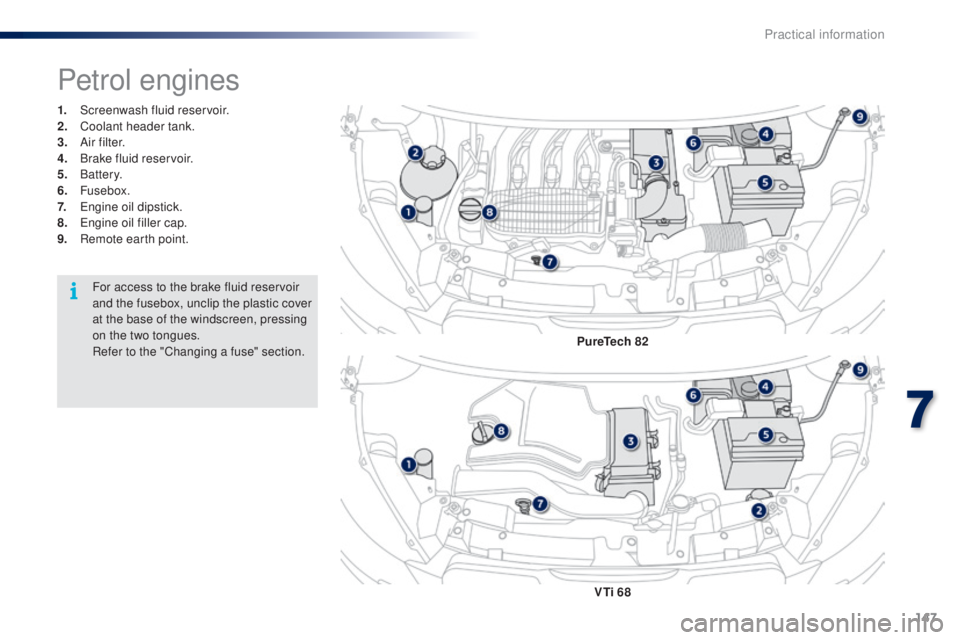
1. Screenwash fluid reservoir.
2. Coolant header tank.
3.
A
i r f i l t e r.
4.
B
rake fluid reservoir.
5.
Battery.
6.
Fusebox.
7.
e
n
gine oil dipstick.
8.
e
n
gine oil filler cap.
9.
R
emote earth point.
Petrol engines
Puretech 82
V
ti 6
8
For access to the brake fluid reservoir
and the fusebox, unclip the plastic cover
at the base of the windscreen, pressing
on the two tongues.
Refer to the "Changing a fuse" section.
7
Practical information
Page 150 of 268
148
108_en_Chap07_info-pratiques_ed01-2016
Checking levels
take care when working under the
bonnet, as certain areas of the engine
may be extremely hot (risk of burns) and
the cooling fan could start at any time
(even with the ignition off).
engine oil level
the check of the oil level is carried
out with the dipstick, located under
the bonnet. For the position of the
dipstick, refer to the under-bonnet
view on a previous page.
Checking with dipstick
Check all of these levels regularly, in line with the manufacturer's service schedule. top them up if necessary, unless other wise indicated.
If a level drops significantly, have the corresponding system checked by a Pe ugeOt dealer or a qualified workshop.
to e
nsure the accuracy of the reading,
your vehicle must be on a level
sur face, with the engine off for at least
30
minutes.
It is normal to top up the oil level between
two services (or oil changes). P
e
uge
Ot
recommends that you check the level, and top
up if necessary, every 3 000 miles (5 000 km). If you find that the oil level is above the A mark
or below the B mark, do not star t the engine
.
-
I
f the level is above the MAX mark (risk
of engine damage), contact a P
e
uge
Ot
dealer or a qualified workshop.
-
I
f the level is below the MIN mark, you
must top-up the engine oil.
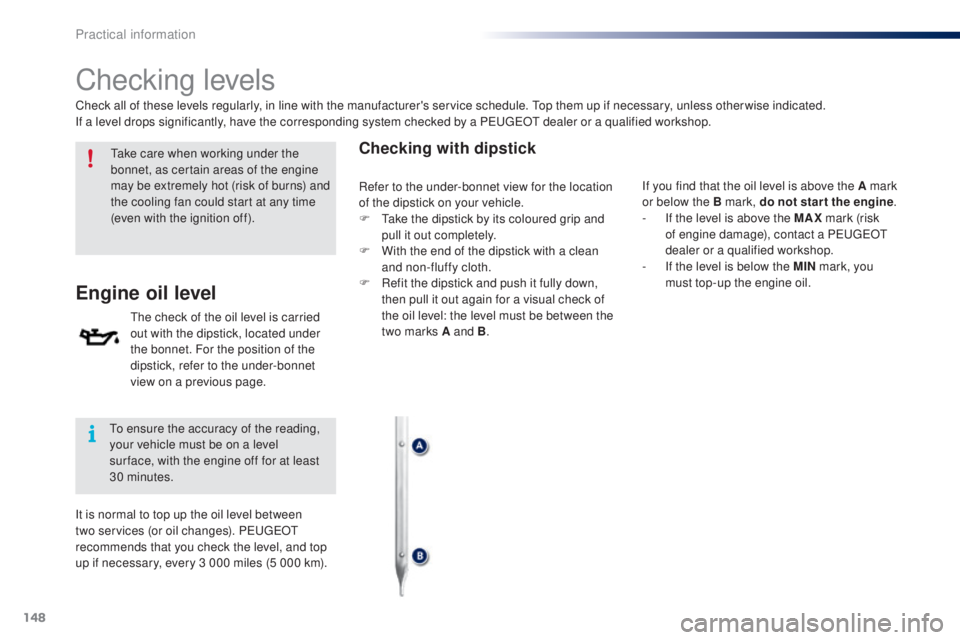
Refer to the under-bonnet view for the location
of the dipstick on your vehicle.
F
t
a
ke the dipstick by its coloured grip and
pull it out completely.
F
W
ith the end of the dipstick with a clean
and non-fluffy cloth.
F
R
efit the dipstick and push it fully down,
then pull it out again for a visual check of
the oil level: the level must be between the
two marks A and B .
Practical information
Page 151 of 268
149
108_en_Chap07_info-pratiques_ed01-2016
the brake fluid level should be close
to the "MA X" mark. If it is not, check
the brake pad wear.
Brake fluid level
Changing the fluid
Refer to the manufacturer's service schedule
for details of the interval for this operation.
Fluid specification
the brake fluid must conform to the
manufacturer's recommendations.
topping-up the engine oil
oil gradethe oil must be the correct grade for your
engine and conform to the manufacturer's
recommendations.
Refer to the under-bonnet view for the location
of the oil filler cap on your vehicle.
F
u
n
screw the filler cap for access to the
filler orifice.
F
P
our in the oil in small quantities, avoiding
spills onto the engine (risk of fire).
F
W
ait a few minutes before checking the
level again using the dipstick.
F
t
o
p-up again if necessary.
F
A
fter checking and topping up, carefully
refit the oil filler cap and the dipstick to its
housing.
engine oil change
Refer to the manufacturer's service schedule
for details of the interval for this operation.
In order to maintain the reliability of the engine
and emissions control system, never use
additives in the engine oil.
7
Practical information
Page 152 of 268
150
108_en_Chap07_info-pratiques_ed01-2016
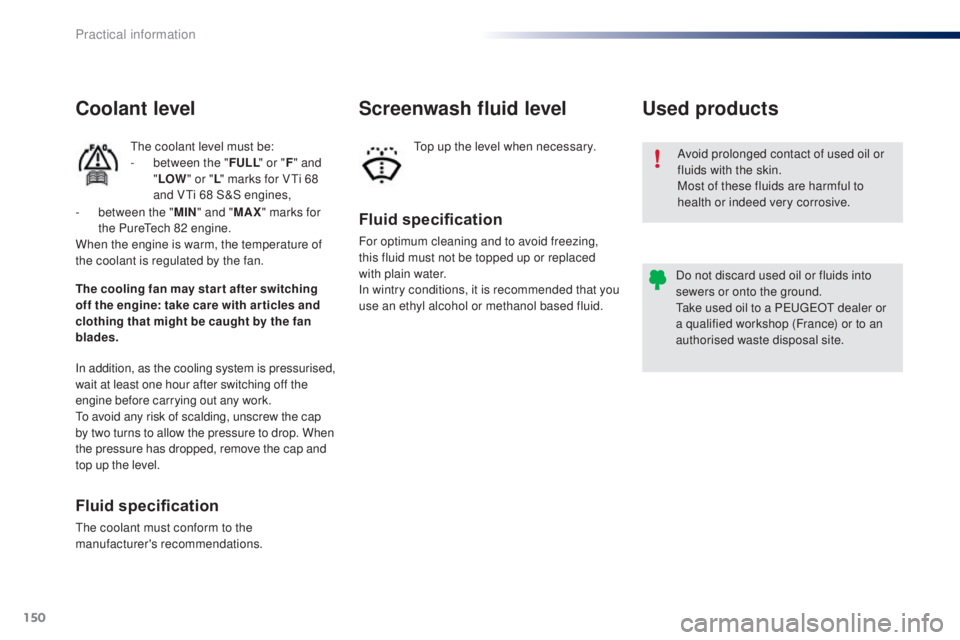
Avoid prolonged contact of used oil or
fluids with the skin.
Most of these fluids are harmful to
health or indeed very corrosive.
Do not discard used oil or fluids into
sewers or onto the ground.
ta
ke used oil to a P
e
uge
Ot
dealer or
a qualified workshop (France) or to an
authorised waste disposal site.
used products
Fluid specification
For optimum cleaning and to avoid freezing,
this fluid must not be topped up or replaced
with plain water.
In wintry conditions, it is recommended that you
use an ethyl alcohol or methanol based fluid.
Screenwash fluid level
top up the level when necessary.
Coolant level
the coolant level must be:
- b etween the " F
uL L" or " F" and
" L
o
W" o
r "L" marks for V
ti 6
8
and V
ti 6
8 S&S engines,
In addition, as the cooling system is pressurised,
wait at least one hour after switching off the
engine before carrying out any work.
to a
void any risk of scalding, unscrew the cap
by two turns to allow the pressure to drop. When
the pressure has dropped, remove the cap and
top up the level.
Fluid specification
the coolant must conform to the
manufacturer's recommendations.
th
e cooling fan may star t after switching
off the engine: take care with ar ticles and
clothing that might be caught by the fan
blades. -
b
etween the "
MIN" and " MAX" marks for
the Pure
te
ch 82 engine.
When the engine is warm, the temperature of
the coolant is regulated by the fan.
Practical information
Page 153 of 268
151
108_en_Chap07_info-pratiques_ed01-2016
Checks
12 V battery
the battery does not require any maintenance.
However, check regularly that the terminals
are correctly tightened (versions without quick
release terminals) and that the connections
are clean.Refer to the manufacturer's
service schedule for details of the
replacement intervals for these
components.
Air filter and passenger compartment filter
Replace the oil filter each time the
engine oil is changed.
Refer to the manufacturer's
service schedule for details of
the replacement interval for this
component.
oil filter
unless otherwise indicated, check these components in accordance with the manufacturer's service schedule and according to your engine.
Other wise, have them checked by a PeugeOt dealer or a qualified workshop.
Depending on the environment (e.g. dusty
atmosphere) and the use of the vehicle
(e.g. city driving), replace them twice as often
if necessary .
A clogged passenger compartment filter may
have an adverse effect on the per formance
of the air conditioning system and generate
undesirable odours.
When carrying out any operation on the 12 V
battery, refer to the corresponding section for
details of the precautions to be taken before
starting work.
Manual gearbox
the gearbox does not require any
maintenance (no oil change).
Refer to the manufacturer's service
schedule for the checking interval for
this component.
Clutch
the clutch is operated mechanically and
requires regular adjustment.
Refer to the manufacturer's service schedule
for information on when the adjustment should
be checked.
In the event of an operating fault
(difficulty moving off, for example),
contact a P
e
uge
Ot
dealer or a
qualified workshop.
Versions equipped with Stop & Start are
fitted with a 12 V lead-acid battery of
specific technology and specification.
Its replacement should be carried
out only by a P
e
uge
Ot
dealer or a
qualified workshop.
7
Practical information
Page 154 of 268
152
108_en_Chap07_info-pratiques_ed01-2016
etg gearbox
the etg gearbox does not require
any maintenance (no oil change).
Refer to the manufacturer's service
schedule for information on when this
unit should be checked.
Brake wear depends on the style
of driving, particularly in the case
of vehicles used in town, over short
distances. It may be necessary to
Brake pads
For information on checking brake
disc wear, contact a Pe ugeOt
dealer or a qualified workshop.
Brake disc wearOnly use products recommended by
Pe ugeOt or products of equivalent
quality and specification.
In order to optimise the operation of
units as important as those in the
braking system, P
e
uge
Ot
selects and
offers very specific products.
After washing the vehicle, dampness,
or in wintry conditions, ice can form
on the brake discs and pads: braking
efficiency may be reduced. Make light
brake applications to dry and defrost
the brakes.
Parking brake
If excessive travel or a loss of
effectiveness of this system is
noticed, the parking brake must
be checked, even between two
services.
Checking this system must be done by a
P
e
uge
Ot
dealer or a qualified workshop.
have the condition of the brakes checked, even
between vehicle services.
un
less there is a leak in the circuit, a drop in
the brake fluid level indicates that the brake
pads are worn.
to a
void damaging the electrical units,
never use a high pressure jet wash in
the engine compartment.
Practical information
Page 173 of 268
171
108_en_Chap08_en-cas-pannes_ed01-2016
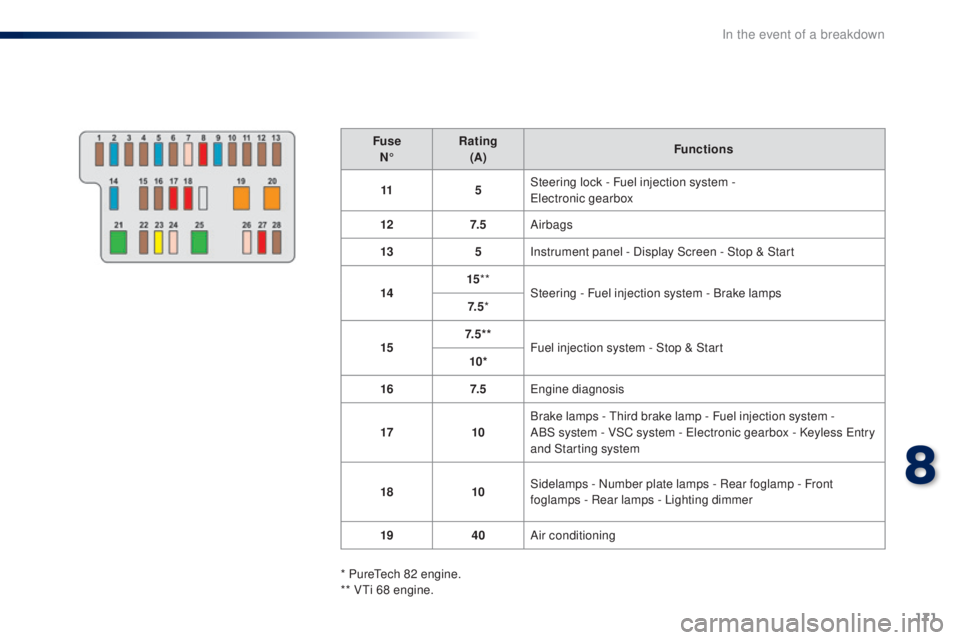
FuseN° Rating
(A) Functions
11 5Steering lock - Fuel injection system -
ele
ctronic gearbox
12 7. 5Airbags
13 5Instrument panel - Display Screen - Stop & Start
14 15
**
Steering - Fuel injection system - Brake lamps
7. 5 *
15 7. 5 * *
Fuel injection system - Stop & Start
10*
16 7. 5
en
gine diagnosis
17 10Brake lamps -
t
h
ird brake lamp - Fuel injection system -
ABS
system - VSC system - e
l
ectronic gearbox - Keyless e
n
try
and Starting system
18 10Sidelamps - Number plate lamps - Rear foglamp - Front
foglamps - Rear lamps - Lighting dimmer
19 40Air conditioning
* Pure
te
ch 82 engine.
** V
ti 6
8 engine.
8
In the event of a breakdown
Page 174 of 268
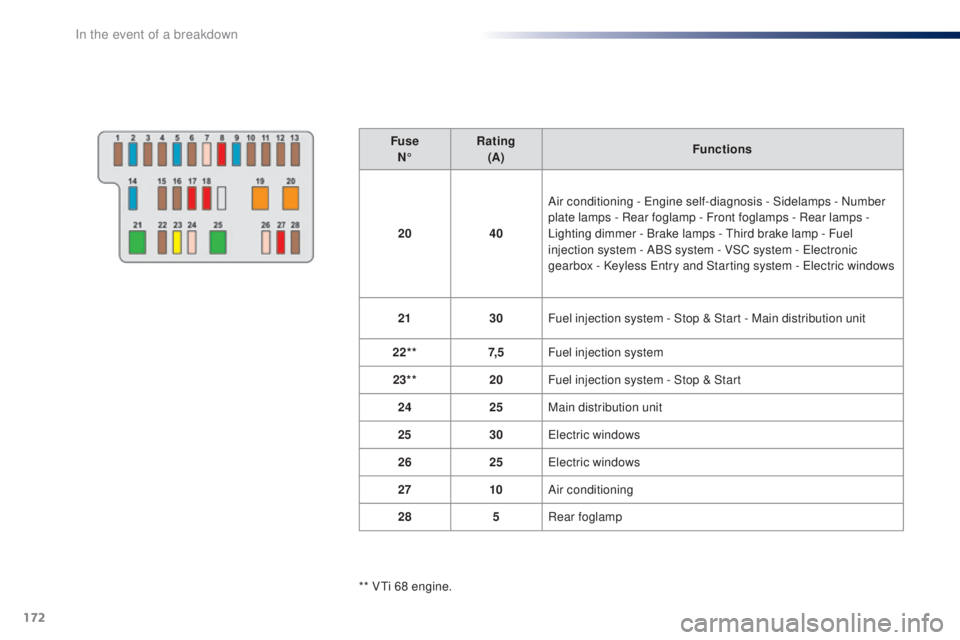
172
108_en_Chap08_en-cas-pannes_ed01-2016
FuseN° Rating
(A) Functions
20 40Air conditioning -
e
n
gine self-diagnosis - Sidelamps - Number
plate lamps - Rear foglamp - Front foglamps - Rear lamps
-
Lighting dimmer - Brake lamps -
t
h
ird brake lamp - Fuel
injection system - ABS system - VSC system -
e
l
ectronic
gearbox - Keyless
e
n
try and Starting system - e
l
ectric windows
21 30Fuel injection system - Stop & Start - Main distribution unit
22** 7, 5Fuel injection system
23** 20Fuel injection system - Stop & Start
24 25Main distribution unit
25 30
el
ectric windows
26 25
el
ectric windows
27 10Air conditioning
28 5Rear foglamp
** V
ti 6
8 engine.
In the event of a breakdown
Page 175 of 268
173
108_en_Chap08_en-cas-pannes_ed01-2016
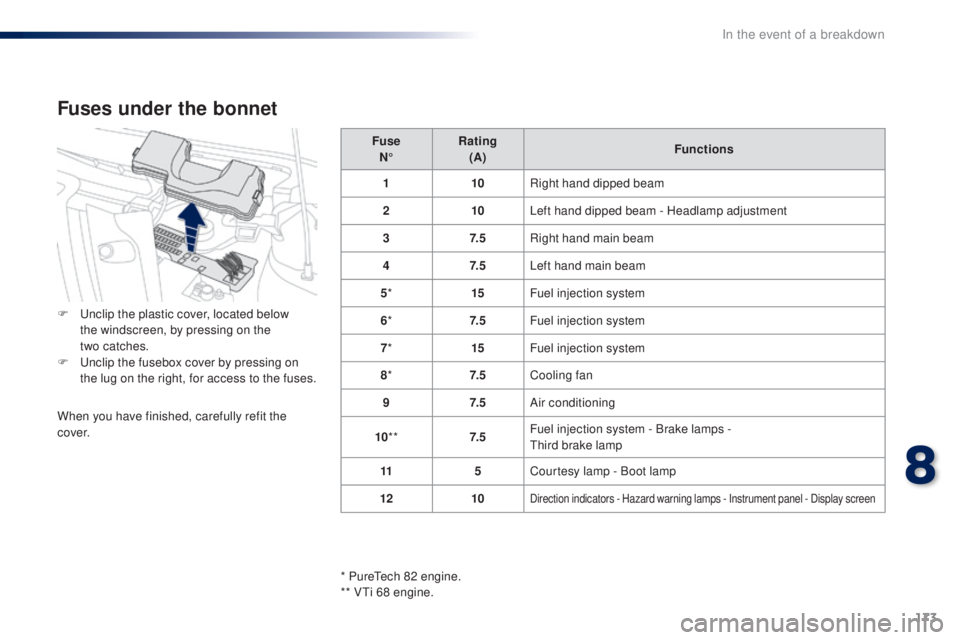
Fuse
N° Rating
(A) Functions
1 10Right hand dipped beam
2 10Left hand dipped beam - Headlamp adjustment
3 7. 5Right hand main beam
4 7. 5Left hand main beam
5 * 15Fuel injection system
6 * 7. 5Fuel injection system
7 * 15Fuel injection system
8 * 7. 5Cooling fan
9 7. 5Air conditioning
10 ** 7. 5Fuel injection system - Brake lamps -
th
ird brake lamp
11 5Courtesy lamp - Boot lamp
12 10
Direction indicators - Hazard warning lamps - Instrument panel - Display screen
Fuses under the bonnet
F unclip the plastic cover, located below
the windscreen, by pressing on the
two
catches.
F
u
n
clip the fusebox cover by pressing on
the lug on the right, for access to the fuses.
When you have finished, carefully refit the
c ove r.
* Pure
te
ch 82 engine.
** V
ti 6
8 engine.
8
In the event of a breakdown