PEUGEOT 108 2018 Owners Manual
Manufacturer: PEUGEOT, Model Year: 2018, Model line: 108, Model: PEUGEOT 108 2018Pages: 180, PDF Size: 7.14 MB
Page 121 of 180
119
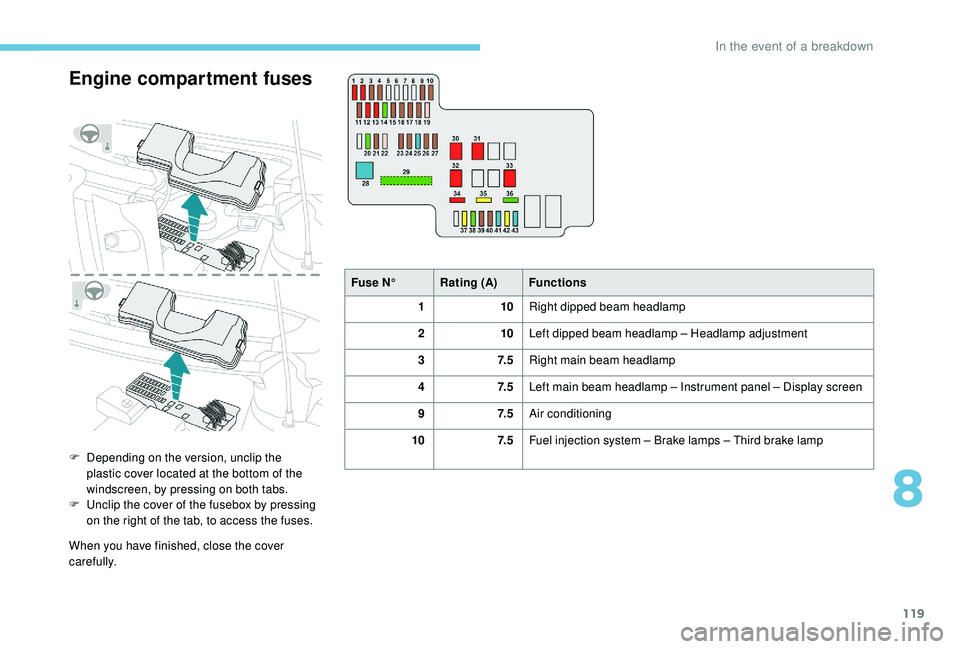
Engine compartment fuses
F Depending on the version, unclip the plastic cover located at the bottom of the
windscreen, by pressing on both tabs.
F
U
nclip the cover of the fusebox by pressing
on the right of the tab, to access the fuses.
When you have finished, close the cover
carefully. Fuse N°
Rating (A) Functions
1 10Right dipped beam headlamp
2 10Left dipped beam headlamp – Headlamp adjustment
3 7. 5Right main beam headlamp
4 7. 5Left main beam headlamp – Instrument panel – Display screen
9 7. 5Air conditioning
10 7. 5Fuel injection system – Brake lamps – Third brake lamp
8
In the event of a breakdown
Page 122 of 180
120
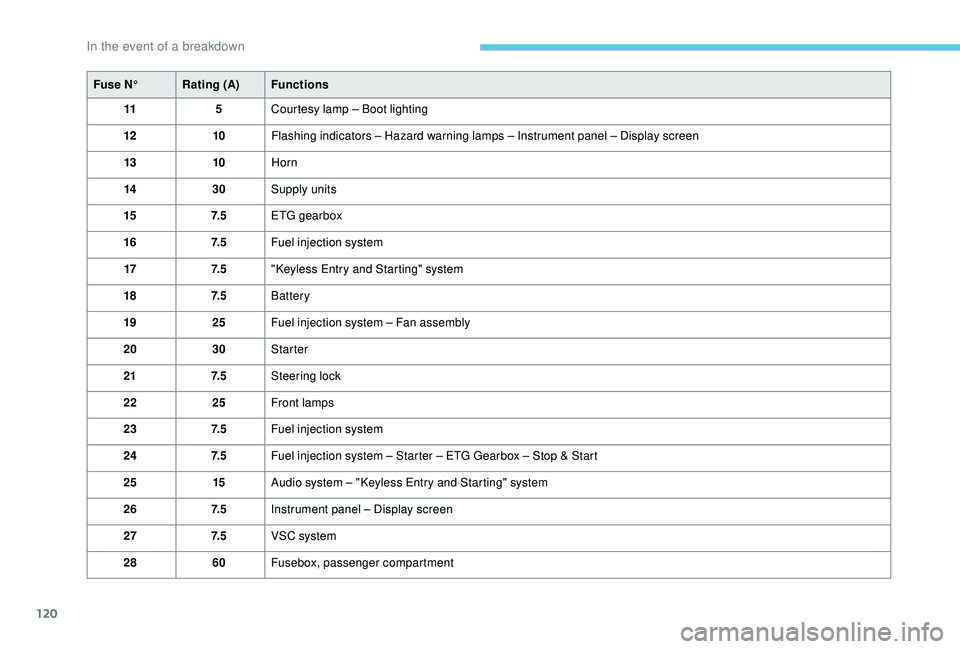
Fuse N°Rating (A) Functions
11 5Courtesy lamp – Boot lighting
12 10Flashing indicators – Hazard warning lamps – Instrument panel – Display screen
13 10Horn
14 30Supply units
15 7. 5ETG gearbox
16 7. 5Fuel injection system
17 7. 5"Keyless Entry and Starting" system
18 7. 5Battery
19 25Fuel injection system – Fan assembly
20 30Starter
21 7. 5Steering lock
22 25Front lamps
23 7. 5Fuel injection system
24 7. 5Fuel injection system – Starter – ETG Gearbox – Stop & Start
25 15Audio system – "Keyless Entry and Starting" system
26 7. 5Instrument panel – Display screen
27 7. 5VSC system
28 60Fusebox, passenger compartment
In the event of a breakdown
Page 123 of 180
121
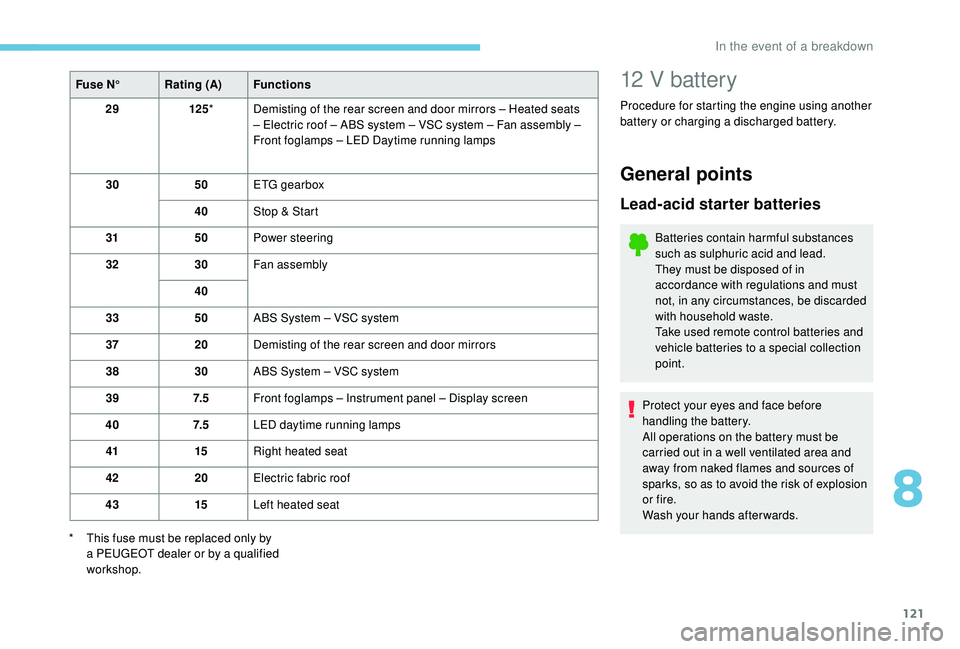
Fuse N°Rating (A) Functions
29 125* Demisting of the rear screen and door mirrors – Heated seats
– Electric roof – ABS system – VSC system – Fan assembly –
Front foglamps – LED Daytime running lamps
30 50ETG gearbox
40 Stop & Start
31 50Power steering
32 30Fan assembly
40
33 50ABS System – VSC system
37 20Demisting of the rear screen and door mirrors
38 30ABS System – VSC system
39 7. 5Front foglamps – Instrument panel – Display screen
40 7. 5LED daytime running lamps
41 15Right heated seat
42 20Electric fabric roof
43 15Left heated seat
*
T
his fuse must be replaced only by
a
PEUGEOT dealer or by a qualified
workshop.12 V battery
Procedure for starting the engine using another
battery or charging a
discharged battery.
General points
Lead-acid starter batteries
Batteries contain harmful substances
such as sulphuric acid and lead.
They must be disposed of in
accordance with regulations and must
not, in any circumstances, be discarded
with household waste.
Take used remote control batteries and
vehicle batteries to a
special collection
point.
Protect your eyes and face before
handling the battery.
All operations on the battery must be
carried out in a
well ventilated area and
away from naked flames and sources of
sparks, so as to avoid the risk of explosion
or fire.
Wash your hands afterwards.
8
In the event of a breakdown
Page 124 of 180
122
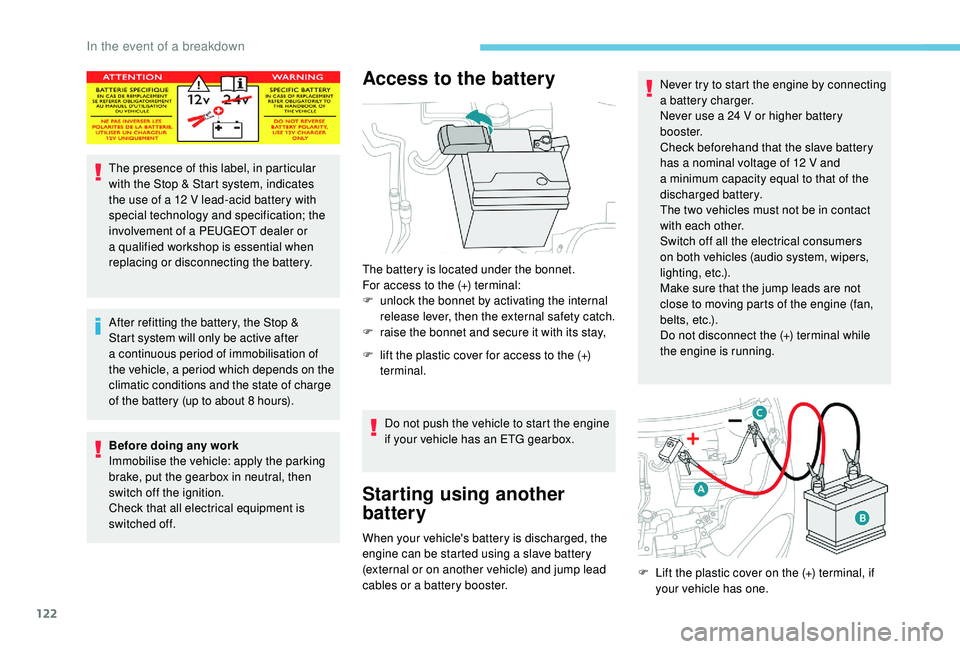
The presence of this label, in particular
with the Stop & Start system, indicates
the use of a 12 V lead-acid battery with
special technology and specification; the
involvement of a
PEUGEOT dealer or
a
qualified workshop is essential when
replacing or disconnecting the battery.
After refitting the battery, the Stop &
Start system will only be active after
a
continuous period of immobilisation of
the vehicle, a period which depends on the
climatic conditions and the state of charge
of the battery (up to about 8
hours).
Before doing any work
Immobilise the vehicle: apply the parking
brake, put the gearbox in neutral, then
switch off the ignition.
Check that all electrical equipment is
switched off.
Access to the battery
The battery is located under the bonnet.
For access to the (+) terminal:
F
u
nlock the bonnet by activating the internal
release lever, then the external safety catch.
F
r
aise the bonnet and secure it with its stay,
F
l
ift the plastic cover for access to the (+)
terminal.
Do not push the vehicle to start the engine
if your vehicle has an ETG gearbox.
Starting using another
battery
When your vehicle's battery is discharged, the
engine can be started using a slave battery
(external or on another vehicle) and jump lead
cables or a
battery booster. Never try to start the engine by connecting
a
battery charger.
Never use a 24 V or higher battery
b o o s t e r.
Check beforehand that the slave battery
has a nominal voltage of 12 V and
a
minimum capacity equal to that of the
discharged battery.
The two vehicles must not be in contact
with each other.
Switch off all the electrical consumers
on both vehicles (audio system, wipers,
lighting, etc.).
Make sure that the jump leads are not
close to moving parts of the engine (fan,
belts, etc.).
Do not disconnect the (+) terminal while
the engine is running.
F
L
ift the plastic cover on the (+) terminal, if
your vehicle has one.
In the event of a breakdown
Page 125 of 180
123
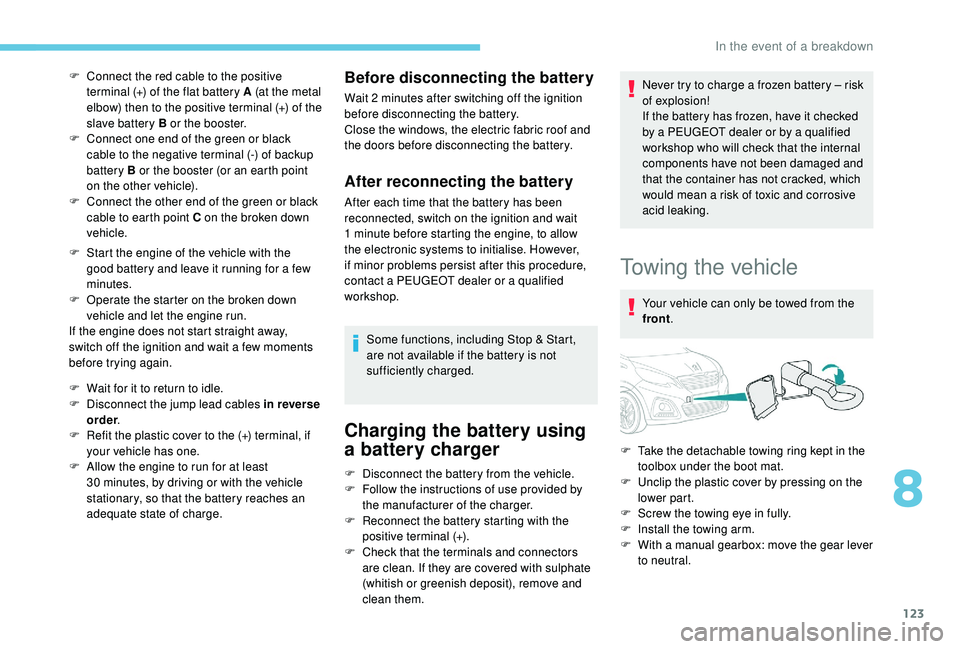
F Connect the red cable to the positive terminal (+) of the flat battery A (at the metal
elbow) then to the positive terminal (+) of the
slave battery B or the booster.
F
C
onnect one end of the green or black
cable to the negative terminal (-) of backup
battery B or the booster (or an earth point
on the other vehicle).
F
C
onnect the other end of the green or black
cable to earth point C on the broken down
vehicle.
F
S
tart the engine of the vehicle with the
good battery and leave it running for a
few
minutes.
F
O
perate the starter on the broken down
vehicle and let the engine run.
If the engine does not start straight away,
switch off the ignition and wait a
few moments
before trying again.
F
W
ait for it to return to idle.
F
D
isconnect the jump lead cables in reverse
order .
F
R
efit the plastic cover to the (+) terminal, if
your vehicle has one.
F
A
llow the engine to run for at least
30
minutes, by driving or with the vehicle
stationary, so that the battery reaches an
adequate state of charge.Before disconnecting the battery
Wait 2 minutes after switching off the ignition
b efore disconnecting the battery.
Close the windows, the electric fabric roof and
the doors before disconnecting the battery.
After reconnecting the battery
After each time that the battery has been
reconnected, switch on the ignition and wait
1
minute before starting the engine, to allow
the electronic systems to initialise. However,
if minor problems persist after this procedure,
contact a
PEUGEOT dealer or a qualified
workshop.
Some functions, including Stop & Start,
are not available if the battery is not
sufficiently charged.
Charging the battery using
a battery charger
Never try to charge a frozen battery – risk
o f explosion!
If the battery has frozen, have it checked
by a
PEUGEOT dealer or by a qualified
workshop who will check that the internal
components have not been damaged and
that the container has not cracked, which
would mean a
risk of toxic and corrosive
acid leaking.
Towing the vehicle
Your vehicle can only be towed from the
front .
F
D
isconnect the battery from the vehicle.
F
F
ollow the instructions of use provided by
the manufacturer of the charger.
F
R
econnect the battery starting with the
positive terminal (+).
F
C
heck that the terminals and connectors
are clean. If they are covered with sulphate
(whitish or greenish deposit), remove and
clean them. F
T
ake the detachable towing ring kept in the
toolbox under the boot mat.
F
U
nclip the plastic cover by pressing on the
lower part.
F
S
crew the towing eye in fully.
F
I
nstall the towing arm.
F
W
ith a manual gearbox: move the gear lever
to neutral.
8
In the event of a breakdown
Page 126 of 180
124
Failure to follow this instruction may cause
damage to some components (braking,
transmission, etc.) and the absence of
braking assistance when the engine is
restarted.
F
U
nlock the steering and release the parking
brake.
F
S
witch on the hazard warning lamps on
both vehicles.
Never use the radiator crossmember.
When towing, the speed limiter must be
deactivated, as well as the "Active City
Brake" system if so equipped. General recommendations
Obser ve the legislation in force in the
country where you are driving.
Ensure that the weight of the towing
vehicle is higher than that of the towed
vehicle.
The driver must remain at the wheel of
the towed vehicle and must have a
valid
driving licence.
When towing a
vehicle with all four
wheels on the ground, always use an
approved towing arm; rope and straps are
prohibited.
The towing vehicle must move off gently.
When the vehicle is towed with its engine
off, there is no longer braking and steering
assistance.
In the following cases, you must always
call on a
professional recovery ser vice:
-
v
ehicle broken down on a motor way or
fast road,
-
w
hen it is not possible to put the
gearbox into neutral, unlock the
steering, or release the parking brake,
-
t
owing with only two wheels on the
ground,
-
w
here there is no approved towbar
available.
F
W
ith an ETG gearbox: move the selector to
position N .
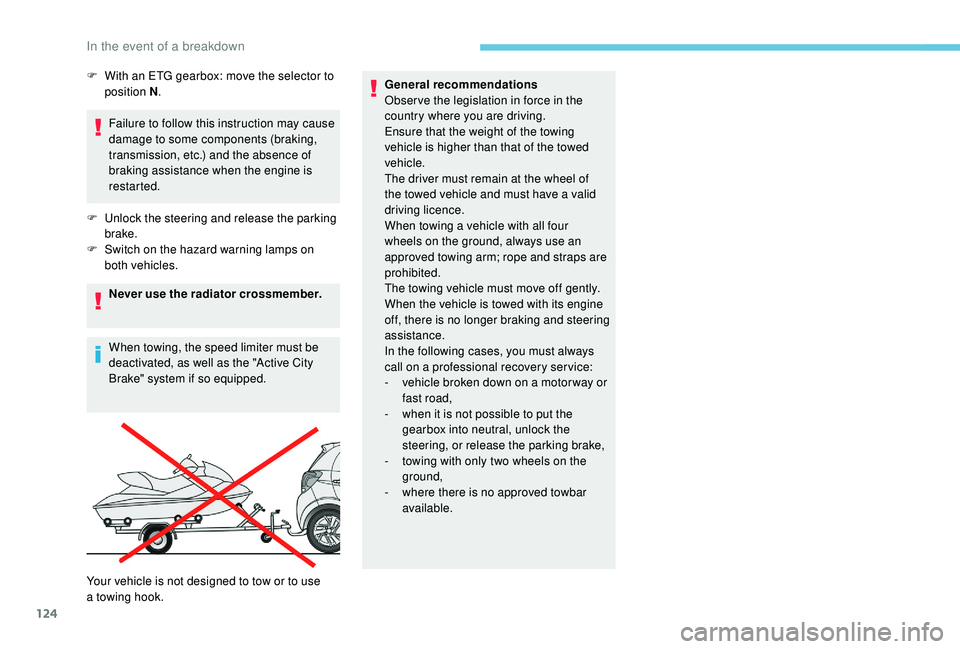
Your vehicle is not designed to tow or to use
a
towing hook.
In the event of a breakdown
Page 127 of 180
125
Engine specifications
The engine specifications are given in the
vehicle's registration document, as well as in
sales brochures.The maximum power corresponds to the
value type-approved on a
test bed, under
conditions defined in European legislation
(Directive 1999/99/EC).
For more information, contact a
PEUGEOT
dealer or a
qualified workshop.
Engines
Petrol engines VTi 72VTi 72 S&S
Gearboxes BVM (Manual
5-speed) ETG (Electronic
5-speed) BVM (Manual
5-speed)
Code 1KR1KR
Model codes:
P… SCFBD…B1A
…H1A …P1A
…W1A SCFBD …B1C
…H1C …P1C
…W1C SCFB4 …B1B
…H1B …P1B
…W1B
Cubic capacity (cm
3) 998 998998
EU standard max.
power (kW) 53
5353
Fuel Unleaded
…B1: 3-door version
…H1: 5-door version
…P1: 3-door convertible version
…W1: 5-door convertible version
The design of your vehicle does not permit
mounting of a
towbar.
9
Technical data
Page 128 of 180
126
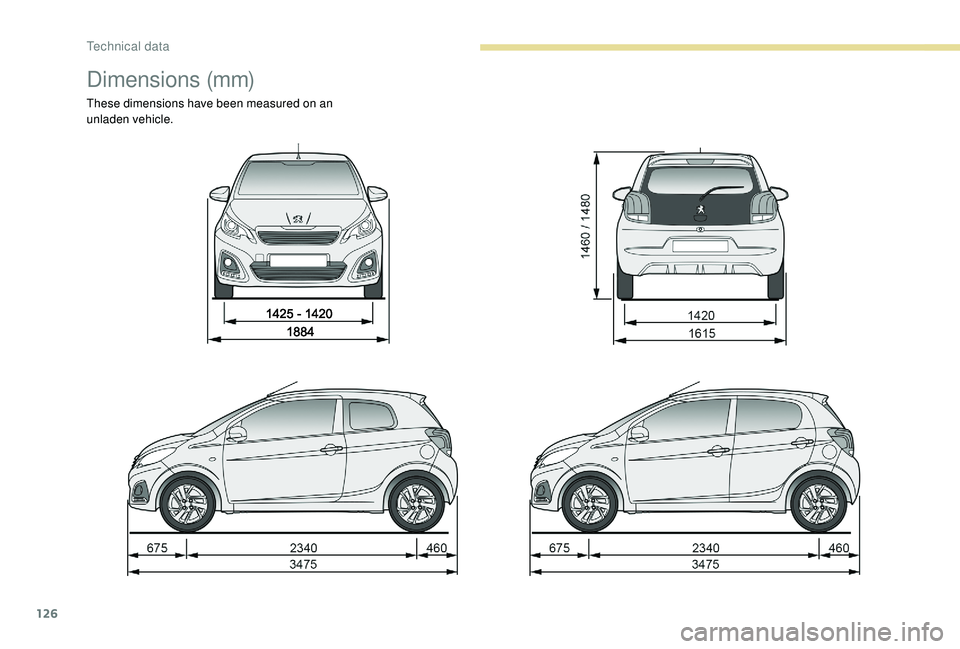
Dimensions (mm)
These dimensions have been measured on an
unladen vehicle.
Technical data
Page 129 of 180
127
Identification markings
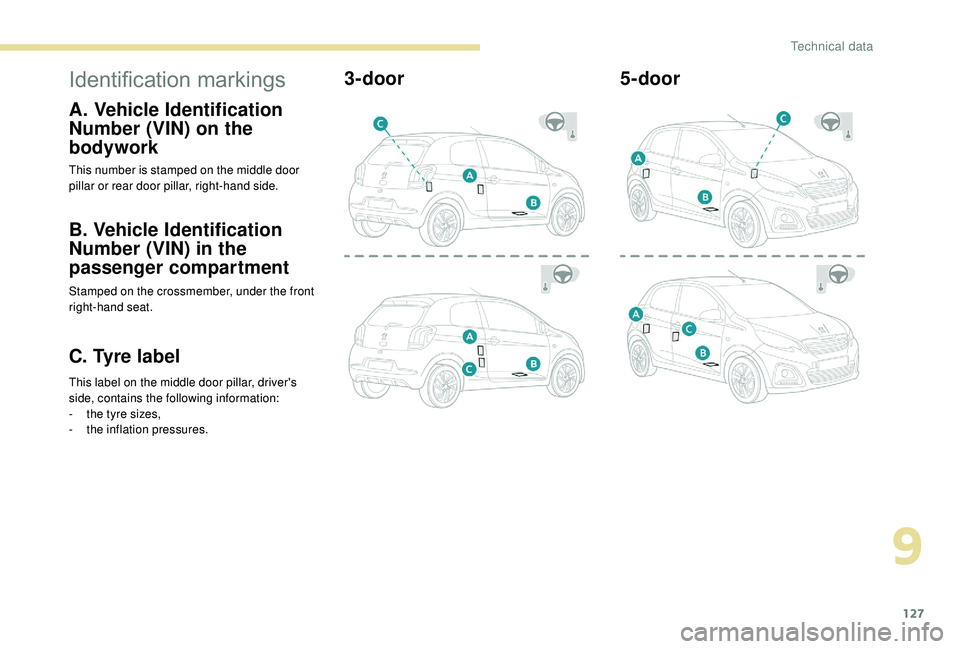
A. Vehicle Identification
Number (VIN) on the
bodywork
This number is stamped on the middle door
pillar or rear door pillar, right-hand side.
B. Vehicle Identification
Number (VIN) in the
passenger compartment
Stamped on the crossmember, under the front
right-hand seat.
C. Tyre label
This label on the middle door pillar, driver's
side, contains the following information:
-
t
he tyre sizes,
-
th
e inflation pressures.
3-door 5-door
9
Technical data
Page 130 of 180
128
T