PEUGEOT 108 2018 Owners Manual
Manufacturer: PEUGEOT, Model Year: 2018, Model line: 108, Model: PEUGEOT 108 2018Pages: 180, PDF Size: 7.14 MB
Page 151 of 180
3
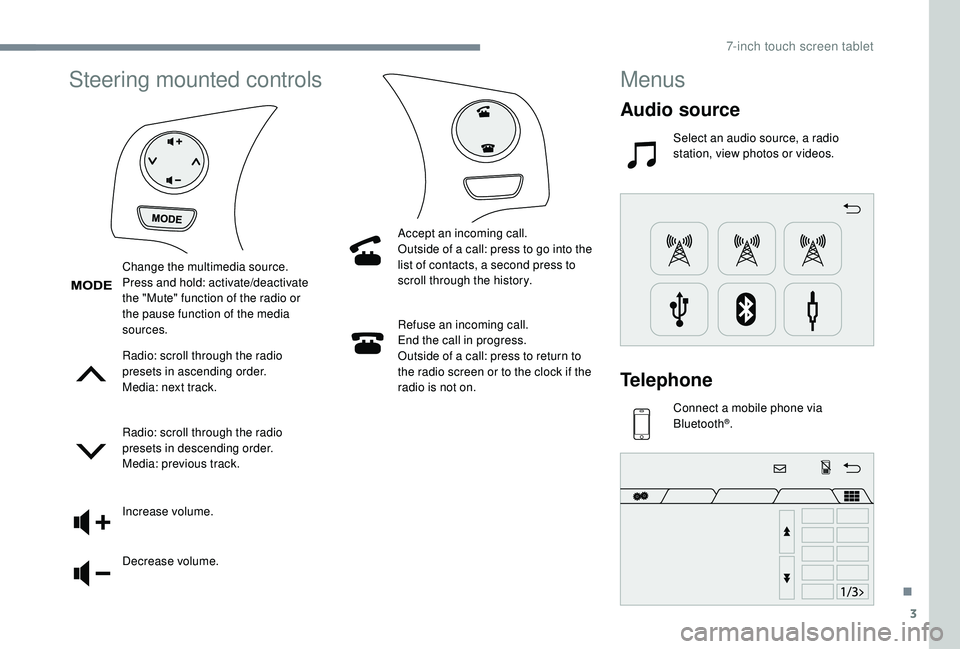
Steering mounted controls
Radio: scroll through the radio
presets in ascending order.
Media: next track.
Radio: scroll through the radio
presets in descending order.
Media: previous track.
Increase volume.
Decrease volume.Refuse an incoming call.
End the call in progress.
Outside of a call: press to return to
the radio screen or to the clock if the
radio is not on.
Change the multimedia source.
Press and hold: activate/deactivate
the "Mute" function of the radio or
the pause function of the media
sources.
Accept an incoming call.
Outside of a call: press to go into the
list of contacts, a second press to
scroll through the history.
Menus
Audio source
Select an audio source, a radio
station, view photos or videos.
Telephone
Connect a mobile phone via
Bl uetooth®.
.
7-inch touch screen tablet
Page 152 of 180
4
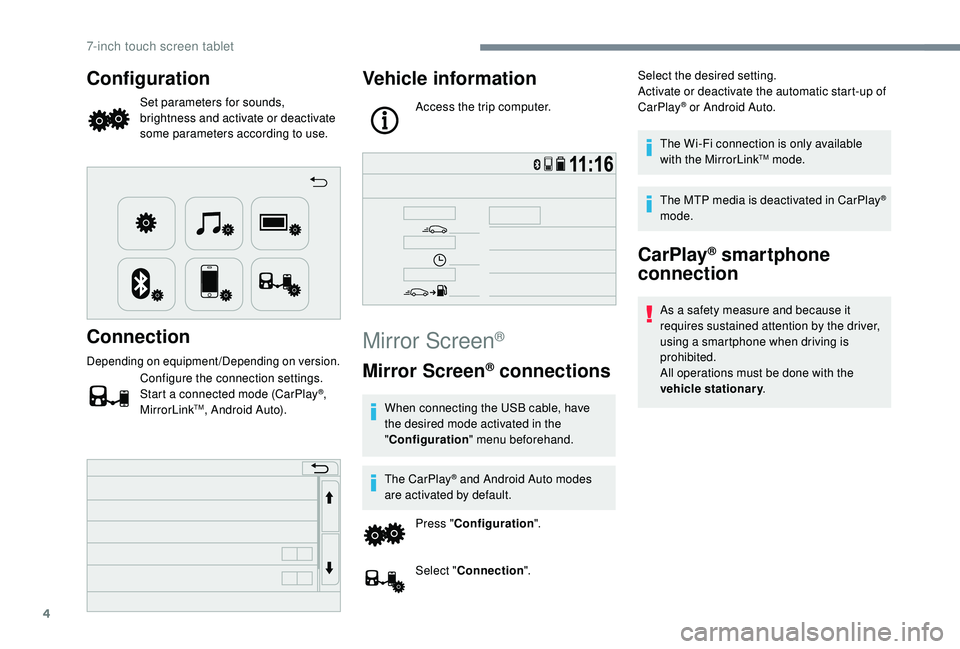
Configuration
Set parameters for sounds,
brightness and activate or deactivate
some parameters according to use.
Connection
Depending on equipment/Depending on version.
Configure the connection settings.
Start a connected mode (CarPlay®,
MirrorLinkTM, Android Auto).
Vehicle information
Access the trip computer.
Mirror Screen®
Mirror Screen® connections
When connecting the USB cable, have
the desired mode activated in the
" Configuration " menu beforehand.
The CarPlay
® and Android Auto modes
are activated by default.
Press " Configuration ".
Select " Connection ". Select the desired setting.
Activate or deactivate the automatic start-up of
CarPlay
® or Android Auto.
The Wi-Fi connection is only available
with the MirrorLink
TM mode.
The MTP media is deactivated in CarPlay
®
mode.
CarPlay® smartphone
connection
As a safety measure and because it
r equires sustained attention by the driver,
using a
smartphone when driving is
prohibited.
All operations must be done with the
vehicle stationary .
7-inch touch screen tablet
Page 153 of 180
5
The synchronisation of the smartphone
allows users to display smartphone
applications, which are compatible with
the CarPlay
® technology, on the vehicle's
screen when the smartphone's CarPlay®
function has been previously activated.
As the processes and standards are
constantly changing, it is recommended
that you keep your smar tphone's
operating system updated .
For the list of eligible smartphones, go
to the Brand's internet website in your
c o u nt r y.
Connect the USB cable. The
smartphone charges when
connected by the USB cable.
Press " CarPlay " to display the
CarPlay
® inter face.
When the CarPlay
® inter face is displayed on
the system screen, the menu bar is displayed
by default on the left-hand side of the screen.
Depending on the driver's side, you can change
the position of the menu bar, to the left-hand or
right-hand side.
Press "Configuration ".
Select " Connection ". Select "
Steering wheel position ", then select
the desired position.
For this modification to be taken into account,
disconnect and then reconnect the smartphone.
On connecting the USB cable, the
CarPlay® function deactivates the
system's Bluetooth® mode.
MirrorLinkTM smartphone
connection
Available depending on country of sale.
As a safety measure and because it
requires sustained attention by the driver,
using a
smartphone when driving is
prohibited.
All operations must be done with the
vehicle stationary . The synchronisation of the smartphone
allows users to display smartphone
applications, which are compatible with
the MirrorLink
TM technology, on the
vehicle's screen.
As the processes and standards
are constantly changing, for the
communication process between the
smartphone and the system to operate,
it is essential that the smartphone be
unlocked; update the operating system
of the smar tphone as well as the date
and time of the smar tphone and the
system .
For the list of eligible smartphones, go
to the Brand's internet website in your
c o u nt r y.
As a
safety measure, applications can
only be viewed with the vehicle stationary;
display is interrupted once the vehicle is
moving.
The " MirrorLink
TM" function requires
the use of a
compatible smartphone and
compatible applications.
You have two connection options in
MirrorLink
TM mode.
.
7-inch touch screen tablet
Page 154 of 180
6
When connecting a smartphone
t o the system, it is recommended
that Bluetooth
® be started on the
smartphone.
Connect the USB cable. The
smartphone charges when
connected by the USB cable.
2
nd option:
Have a telephone compatible with the
MirrorLinkTM Wi-Fi connection.
Activate the " Connect MirrorLink
TM Wi-Fi"
option in the system.
Activate Wi-Fi connection sharing on the
smartphone.
Press "MirrorLink
TM" to start the
system's application.
Depending on the smartphone, it may be
necessary to activate the " MirrorLinkTM" function.
During the procedure, several
screen pages relating to the
association of certain functions are
displayed.
Accept to start and complete the
connection. Once the connection is established, a page
is displayed with the applications already
downloaded to your smartphone and
compatible with the MirrorLink
TM technology.
Access to the different audio sources remains
accessible in the margin of the MirrorLink
TM
display, using the touch buttons located in the
u p p e r b a r.
Access to the menus for the system is possible
at any time using the dedicated buttons.
There may be a
wait for the availability of
applications, depending on the quality of
your network.
Android Auto smartphone
connection
As a safety measure and because it
r equires sustained attention by the driver,
using a
smartphone when driving is
prohibited.
All operations must be done with the
vehicle stationary . The synchronisation of a
personal
smartphone allows users to display
applications adapted for the smartphone's
Android Auto technology on the vehicle
screen.
The processes and standards
are constantly changing. For the
communication process between the
smartphone and the system to operate,
it is essential that the smartphone be
unlocked; update the operating system
of the smar tphone as well as the date
and time of the smar tphone and the
system .
For the list of eligible smartphones, go
to the Brand's internet website in your
c o u nt r y.
1
st option:
As a safety measure, applications can
only be viewed with the vehicle stationary;
display is interrupted once the vehicle is
moving.
The " Android Auto " function requires the
use of a
compatible smartphone and
compatible applications.
Connect a
USB cable. The
smartphone charges when
connected by a
USB cable.
7-inch touch screen tablet
Page 155 of 180
7
Press "Android Auto " to start the
application in the system.
During the procedure, several
screen pages relating to certain
functions are displayed.
Accept to start and complete the
connection.
Different audio sources remain accessible in
the margin of the Android Auto display, using
touch buttons in the upper bar.
Access to the menus for the system is possible
at any time using the dedicated buttons.
There may be a
wait for the availability of
applications, depending on the quality of
your network.
Radio
Selecting a station
Press " Audio source " to show the
rolling display of audio sources.
Select " FM". Select the "
Station" tab then
select a station among the stations
received.
Select " FM radio configuration "
then " Update the list of stations "
to refresh the list.
If necessary, select a change of
source by pressing the short cut
" Audio source " in the upper bar.
Select " AM" or " DAB" (depending on
equipment).
The external environment (hills, buildings,
tunnels, multi-storey or basement car
parks, etc.) may block reception, including
RDS tracking. This behaviour is normal
in the propagation of radio waves and
does not indicate any failure of the audio
system.
Changing a frequency
Press "Audio source " to show the
rolling display of audio sources. Select "
FM".
Select the " Manual" tab to search
for a
station.
Press the buttons step by step to
per form a frequency search up or
down.
OR Press the automatic buttons to
per form a frequency search up or
down.
OR Turn the button at the bottom right of
the screen to search for a lower or
higher frequency.
Presetting a station
Select a station or frequency (refer
t o the "Changing a frequency"
section).
Select the " Presets" tab, then make
a
long press on one of the numbered
locations.
.
7-inch touch screen tablet
Page 156 of 180
8
12
3
45
6
8
9
107
Activating/Deactivating RDS
Press "Audio source " to show the
rolling display of audio sources.
Select " FM".
Select the " FM radio
configuration " tab.
Activate/deactivate " Change
regional code ".
RDS, if activated, allows you to continue
listening to the same station by automatically
retuning to alternative frequencies. However, in
certain conditions, coverage of an RDS station
may not be assured throughout the entire
country as radio stations do not cover 100% of
the territory. This explains the loss of reception
of a
station that can occur during a journey.
DAB (Digital Audio
Broadcasting) radio
Digital radio
Digital radio provides higher quality
reception and also the display of additional
information (album sleeve, etc.) about the
station being listened to. Select "DAB" on
the rolling display of audio sources.
The different "multiplex/ensemble"
ser vices offer a choice of radio stations
arranged in alphabetical order.
Press " Audio source " to show the
rolling display of audio sources.
Select " DAB".
Select the " DAB radio configuration "
tab
Activate " L- Band".
Select the " Station" tab then
select a
station among the stations
received.
Select the " Manual" tab to search
for a
station. If the "DAB" station being listened to is not
available, the "FM" band display appears
on the screen.
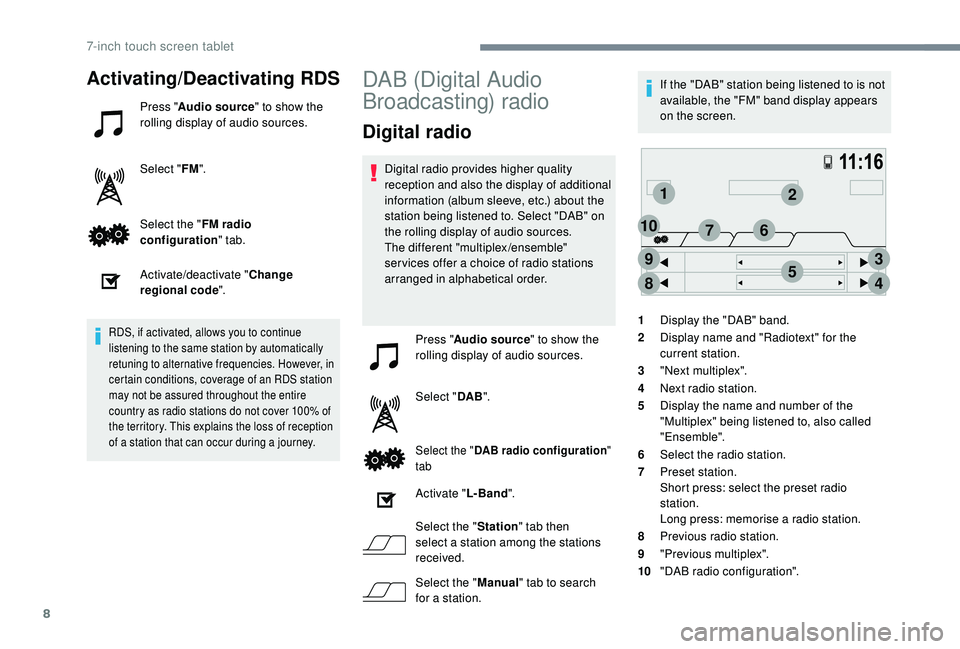
1 Display the "DAB" band.
2 Display name and "Radiotext" for the
current station.
3 "Next multiplex".
4 Next radio station.
5 Display the name and number of the
"Multiplex" being listened to, also called
"Ensemble".
6 Select the radio station.
7 Preset station.
Short press: select the preset radio
station.
Long press: memorise a
radio station.
8 Previous radio station.
9 "Previous multiplex".
10 "DAB radio configuration".
7-inch touch screen tablet
Page 157 of 180
9
DAB/FM tracking
Digital radio does not cover 100% of the
c o u nt r y.
When the quality of the digital signal is
poor, the "Alternative DAB frequency "
option allows you to continue listening
to the same station by automatically
switching to the corresponding FM
analogue radio station (if it exists).
Press " Audio source " to show the
rolling display of audio sources.
Select " DAB".
Select the " DAB radio configuration "
tab.
Activate " Alternative DAB
frequency ".
If " Alternative DAB frequency " tracking
is enabled, there is a
lag of a few seconds
while the system switches to analogue
radio, sometimes with a
change in volume.
Once the digital signal quality becomes
good again, the system automatically
changes back to "DAB". If the "DAB" station being listened to is not
available, or if "
L- Band" is not enabled,
the sound cuts out when the quality of the
digital signal becomes too weak.
Media
USB port
Insert the USB memory stick in the USB port or
connect the USB device to the USB port using
a
suitable cable (not supplied). The system builds playlists (in temporary
memory), an operation which can take
from a
few seconds to several minutes at
the first connection.
Reduce the number of non-music files
and the number of folders to reduce the
waiting time.
The playlists are updated every time the
ignition is switched off or a USB stick is
connected. However, the audio system
saves these lists and loading time will be
reduced if they have not been changed.
Auxiliary socket (A/V),
audio and video
Audio player
Connect the portable device (MP3 player, etc.)
to the JACK socket using an audio cable.
Video player
.
7-inch touch screen tablet
Page 158 of 180
10
Select the "A/V" auxiliary source.
The next time the ignition is switched on,
the system remembers the last audio or
media source used. The steering mounted "
MODE" button can
be used to go directly to the next media
source, available if the source is active.
Watching a video
For safety reasons and because of the
required sustained attention of the driver,
viewing a
video is only possible when the
vehicle is stationary and the ignition
is switched on; as soon as movement
resumes, the video stops.
The " Miracast " function requires
a
compatible smartphone and compatible
applications.
Activate the " MiracastWi-Fi" option in the
system.
Activate sharing of the Wi-Fi connection
on the smartphone.
It is recommended to prioritise the USB
connection when using the " Miracast"
video function.
Insert a peripheral device into the USB port or
an audio/video cable into the auxiliary socket,
suitable for playing back files recorded in the
PAL or NTSC standard. Press "Configuration ". Select "
Connection " in the system.
Select " Connect Miracast "
During the procedure, several screen pages
relating to certain functions are displayed.
Accept to start and complete the connection.
To remove the peripheral device,
press the pause button to stop the
video, then remove the peripheral
device from the USB port or the
auxiliary socket.
Information and advice
The audio system reads files with the following
extensions:
".wma," Ver7 and Ver8 types with a flow rate
between 48
and 192 Kbps and Ver9 with a rate
between 48
and 320 Kbps.
".aac," with a
flow rate between 16 Kbps and
320
Kbps.
".mp3 - MPEG1" with a
flow rate between
32
and 320 Kbps and ".mp3 - MPEG2" with
a
rate between 8 to 160 Kbps.
Sampling frequencies supported are 11, 22,
44
and 48 kHz.
Use only USB memory sticks in FAT32
format
(File Allocation Table).
Selecting the source
Press " Audio source " to show the
rolling display of audio sources (FM,
AM, DAB, USB, Bluetooth, A / V.
Select the " USB" source.
OR
Then use the play settings at the bottom of the
screen. Connect the portable device using an audio/
video cable suitable for playing back files
recorded in PAL or NTSC standard.
7-inch touch screen tablet
Page 159 of 180
11
To avoid any playback or display issues, it is
advisable to create file names that have less
than 20
characters and without using any
special characters ((e.g. : " " ?.; ù).
The system supports mobile USB Mass
Storage players or Apple
® players at
the USB ports. An adapter cable is not
supplied.
Device management is done by the audio
system controls.
Other devices not recognised by the
system during connection must be
connected to the auxiliary socket using
a
Jack cable (not supplied).
The system can play audio files alternately
via the Bluetooth
® system and the USB
port.
It is recommended that the USB cable for
the mobile device is used.
Audio streaming
Streaming allows music files on the
telephone to be played via the vehicle's
loudspeakers. Connect the telephone: see the "
Telephone"
section, then " Bluetooth".
Choose the profile " Connect all" or "Connect
as audio player ".
If playback does not start automatically, it may
be necessary to start the audio playback from
the telephone.
Control is from the portable device or by using
the audio system's buttons.
Once connected in streaming mode, the
telephone is considered to be a media
source.
It is recommended that you activate
" Repeat " on the Bluetooth portable device.
Connecting Apple® players
Control is via the audio system. Connect the Apple
® player to the USB port
using a
suitable cable (not supplied).
Play starts automatically. The classifications available are those of
the portable device connected (artists/
albums/genres/tracks/playlists/audio
books/podcasts).
The default classification used is by artist.
To modify the classification used, return
to the first level of the menu then select
the desired classification (playlists for
example) and confirm to go down through
the menu to the desired track.
The version of software in the audio
system may not be compatible with the
generation of your Apple
® p l aye r.
Telephone
Pairing a
Bluetooth® telephone
As a safety measure and because it
r equires sustained attention by the
driver, the pairing of a
Bluetooth mobile
telephone with the hands-free kit of your
audio system must be done with the
vehicle stationary .
.
7-inch touch screen tablet
Page 160 of 180
12
Activate the Bluetooth function on the
telephone and ensure that it is "visible to all"
(telephone configuration).Press "Audio source " to show the
rolling display of audio sources.
Select " Bluetooth audio ".
Select "configuration-Bluetooth"
Select the " Add" tab on the system.
A standby screen is displayed with the system's
Bluetooth settings and a
default Bluetooth PIN.
Once detected, select the system name on
your telephone.
If the pairing procedure fails, it is recommended
that you deactivate and then reactivate the
Bluetooth function in your telephone.
Enter the PIN on the telephone and accept the
connection (depending on telephone).
The system displays that the ser vices to use
on the device are: " Telephone" and "Audio
player ". The system offers to connect the telephone:
-
a
s "
Connect all",
-
a
s "
Connect as telephone " (hands-free kit,
telephone only)
-
a
s "
Connect as audio player " (streaming:
wireless playing of the telephone's audio
f i l e s).
To change the connection choice,
select " Telephone ".
Select the " Telephone/message
configuration " tab.
Select " Connect the telephone ".
Select the telephone in the list.
Select your choice. Press "OK" to confirm.
In the Bluetooth configuration, the system
allows you to connect two devices in
telephone mode at the same time.
It also allows you to connect multiple
devices in audio mode, but with only one
device playing. The services available depend on
the network, the SIM card and the
compatibility of the Bluetooth devices
used. Check the instructions for your
telephone and with your service provider
for the ser vices to which you have access.
The profiles compatible with the system
are: HFP, OPP, PBAP, A 2DP, AVRCP,
M A P.
Automatic reconnection
When the ignition is switched on, the telephone
connected when the ignition was last switched
off reconnects automatically, if this connection
mode had been set during the pairing
procedure (see previous pages).
The connection is confirmed by the display of
a
message and the name of the telephone.
Managing paired
telephones
This function allows the connection or
disconnection of a peripheral device as
well as the deletion of a
pairing.
Press " Telephone ".
7-inch touch screen tablet