PEUGEOT 108 2018 Service Manual
Manufacturer: PEUGEOT, Model Year: 2018, Model line: 108, Model: PEUGEOT 108 2018Pages: 180, PDF Size: 7.14 MB
Page 41 of 180
39
passenger compartment temperature, air flow
and air distribution.
This system is designed to operate effectively
in all seasons, with the windows and the
electric fabric roof closed.
For your convenience the settings are retained
between vehicle starts.
When the engine is cold, the air flow will only
reach its optimum level gradually to prevent too
much cold air being distributed.
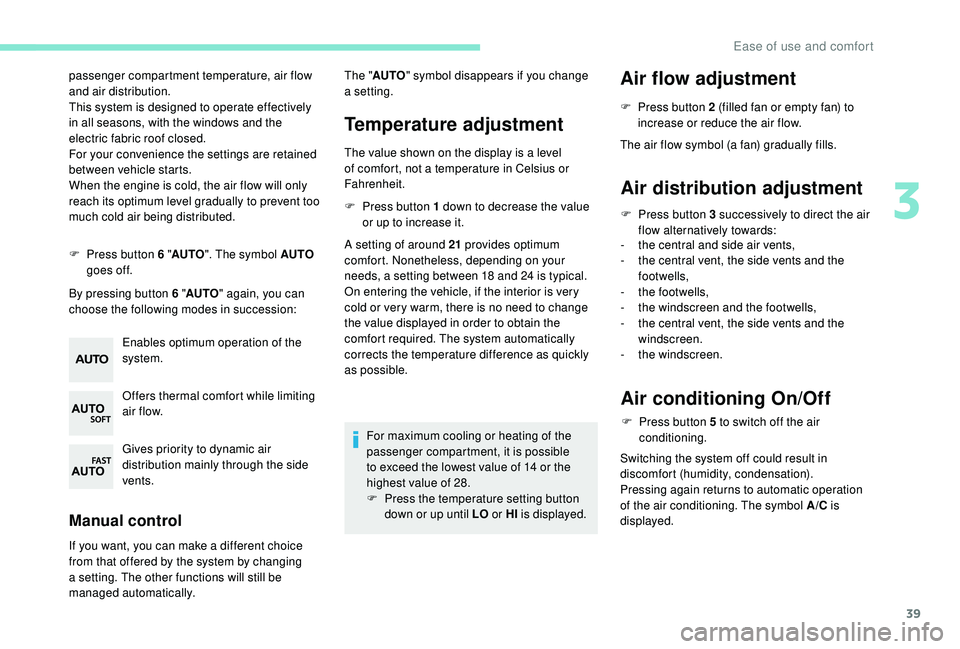
F
P
ress button 6 " AUTO". The symbol AUTO
goes off.
By pressing button 6 " AUTO" again, you can
choose the following modes in succession:
Enables optimum operation of the
system.
Offers thermal comfort while limiting
air f low.
Gives priority to dynamic air
distribution mainly through the side
vents.
Manual control
If you want, you can make a different choice
f rom that offered by the system by changing
a
setting. The other functions will still be
managed automatically.
Temperature adjustment
The value shown on the display is a level
o f comfort, not a temperature in Celsius or
Fahrenheit.
F
P
ress button 1 down to decrease the value
or up to increase it.
A setting of around 21
provides optimum
comfort. Nonetheless, depending on your
needs, a setting between 18
and 24 is typical.
On entering the vehicle, if the interior is very
cold or very warm, there is no need to change
the value displayed in order to obtain the
comfort required. The system automatically
corrects the temperature difference as quickly
as possible.
For maximum cooling or heating of the
passenger compartment, it is possible
to exceed the lowest value of 14
or the
highest value of 28.
F
P
ress the temperature setting button
down or up until LO or HI is displayed.
Air flow adjustment
F Press button 2 (filled fan or empty fan) to
increase or reduce the air flow.
The air flow symbol (a fan) gradually fills.
Air distribution adjustment
F Press button 3 successively to direct the air
flow alternatively towards:
-
t
he central and side air vents,
-
t
he central vent, the side vents and the
footwells,
-
t
he footwells,
-
t
he windscreen and the footwells,
-
t
he central vent, the side vents and the
windscreen.
-
t
he windscreen.
Air conditioning On/Off
F Press button 5 to switch off the air
conditioning.
Switching the system off could result in
discomfort (humidity, condensation).
Pressing again returns to automatic operation
of the air conditioning. The symbol A/C is
displayed.
The "
AUTO " symbol disappears if you change
a
setting.
3
Ease of use and comfort
Page 42 of 180
40
Deactivating the system
F Press air flow button 2 (empty fan) until the fan symbol disappears.
This action deactivates all functions of the air
conditioning system.
Temperature is no longer regulated. A slight air
flow can still be felt however, resulting from the
for ward movement of the vehicle.
Pressing the 6 " AUTO" button again reactivates
the system with the values in use at the time it
was switched off.
Avoid driving for long periods with the
system deactivated (risk of misting and
deterioration of air quality).
Recirculation of interior air
Recirculation of interior air isolates the
passenger compartment from exterior odours
and fumes.
Return to exterior air intake as soon as possible
to avoid deterioration of the air quality and the
formation of mist.Avoid using recirculation of interior air for
prolonged periods – Risk of misting and
deterioration of the air quality!
With a manual air conditioning
system
F Move the manual control 4 to the left to be
in the "Recirculation of interior air" position
or to the right to return to the "Exterior air
intake" position.
With an automatic air
conditioning system
F Press button 4 to recirculate the interior air
or to allow the intake of exterior air.
Pressing button 4
again or the "AUTO" button
6
returns to automatic management of the
intake of air. The air recirculation symbol goes
of f.
Front demist – defrost
These markings on the control
panels indicate the control positions
for rapid demisting or defrosting of
the windscreen and side windows.
During the winter period, direct
the side air vents towards the side
windows to optimise their demisting
and defrosting. With Stop & Start, when demisting –
defrosting has been activated, STOP
mode is not available.
With the heating/ventilation
system
F Put the temperature and air flow controls to
the dedicated marked position.
F
S
et the air distribution control to the
"Windscreen" position.
With the manual air
conditioning system
F Put the temperature and air flow controls to the dedicated marked position.
F
P
ut the air intake control to the "Exterior air
intake" position (manual control moved to
the right).
F
S
et the air distribution control to the
"Windscreen" position.
F
S
witch on the air conditioning by pressing
the A /C button; the indicator lamp for the
button comes on.
Ease of use and comfort
Page 43 of 180
41
With the automatic air
conditioning system
F Press the dedicated button, its indicator lamp comes on.
F
T
o switch it off, press this button again; its
indicator lamp goes off.
The other settings (air flow, air distribution,
etc.) are controlled automatically.
Rear screen demist –
defrost
The control button is located
on the heating/ventilation or air
conditioning system control panel.
Switching on
The rear screen demist – defrost can only
operate when the engine is running.
F
P
ress this button to demist /defrost the rear
screen and, depending on version, the door
mirrors. The indicator lamp associated with
the button comes on.
Switching off
F Press this button again to switch off the demisting/defrosting. The indicator lamp
associated with the button goes off.
Switch off the demisting/defrosting of
the rear screen and door mirrors, if
fitted, as soon as appropriate, as lower
current consumption results in reduced
fuel consumption.
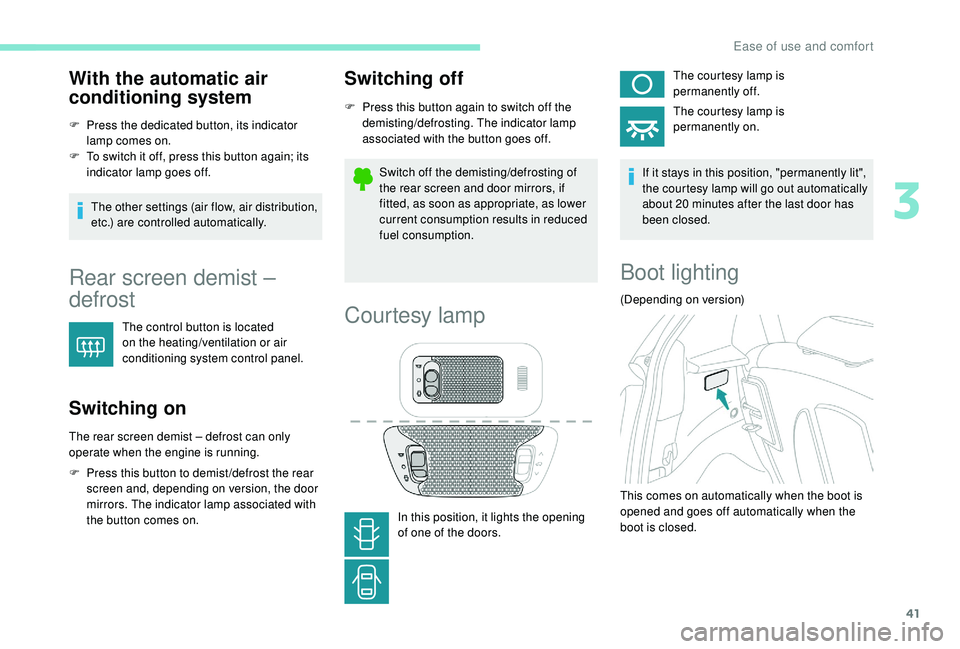
Courtesy lamp
In this position, it lights the opening
of one of the doors. The courtesy lamp is
permanently off.
The courtesy lamp is
permanently on.
If it stays in this position, "permanently lit",
the courtesy lamp will go out automatically
about 20 minutes after the last door has
been closed.
Boot lighting
(Depending on version)
This comes on automatically when the boot is
opened and goes off automatically when the
boot is closed.
3
Ease of use and comfort
Page 44 of 180
42
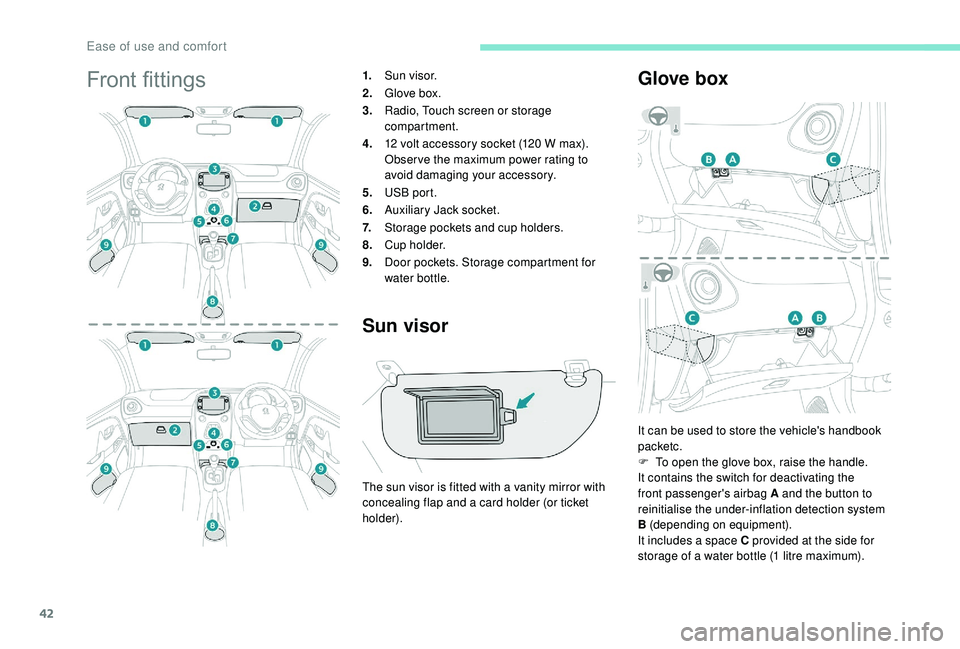
Front fittings1.Sun visor.
2. Glove box.
3. Radio, Touch screen or storage
compartment.
4. 12
volt accessory socket (120 W max).
Obser ve the maximum power rating to
avoid damaging your accessory.
5. USB port.
6. Auxiliary Jack socket.
7. Storage pockets and cup holders.
8. C u p h o l d e r.
9. Door pockets. Storage compartment for
water bottle.
Sun visor
The sun visor is fitted with a vanity mirror with
c oncealing flap and a card holder (or ticket
holder).
Glove box
It can be used to store the vehicle's handbook
packetc.
F
T
o open the glove box, raise the handle.
It contains the switch for deactivating the
front passenger's airbag A and the button to
reinitialise the under-inflation detection system
B (depending on equipment).
It includes a
space C provided at the side for
storage of a
water bottle (1 litre maximum).
Ease of use and comfort
Page 45 of 180
43
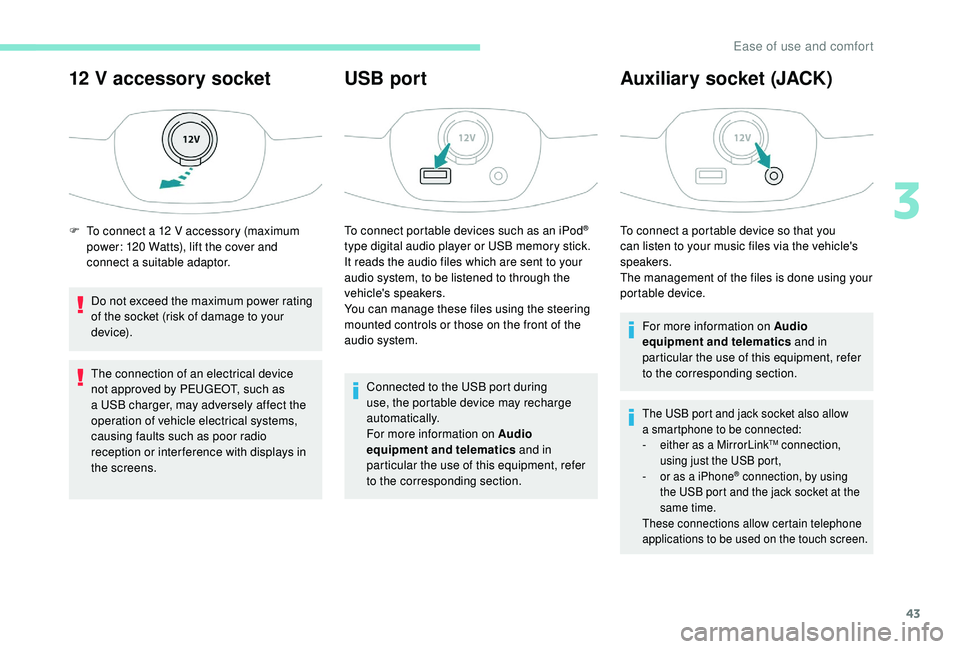
12 V accessory socket
Do not exceed the maximum power rating
of the socket (risk of damage to your
device).
The connection of an electrical device
not approved by PEUGEOT, such as
a
USB charger, may adversely affect the
operation of vehicle electrical systems,
causing faults such as poor radio
reception or inter ference with displays in
the screens.
USB port
To connect portable devices such as an iPod®
type digital audio player or USB memory stick.
It reads the audio files which are sent to your
audio system, to be listened to through the
vehicle's speakers.
You can manage these files using the steering
mounted controls or those on the front of the
audio system.
Connected to the USB port during
use, the portable device may recharge
automatically.
For more information on Audio
equipment and telematics and in
particular the use of this equipment, refer
to the corresponding section.
Auxiliary socket (JACK)
To connect a portable device so that you
c an listen to your music files via the vehicle's
speakers.
The management of the files is done using your
portable device.
For more information on Audio
equipment and telematics and in
particular the use of this equipment, refer
to the corresponding section.
The USB port and jack socket also allow
a smartphone to be connected:
-
e
ither as a MirrorLink
TM connection,
using just the USB port,
-
o
r as a
iPhone
® connection, by using
the USB port and the jack socket at the
same time.
These connections allow certain telephone
applications to be used on the touch screen.
F To connect a 12 V accessory (maximum
power: 120 Watts), lift the cover and
connect a
suitable adaptor.
3
Ease of use and comfort
Page 46 of 180
44
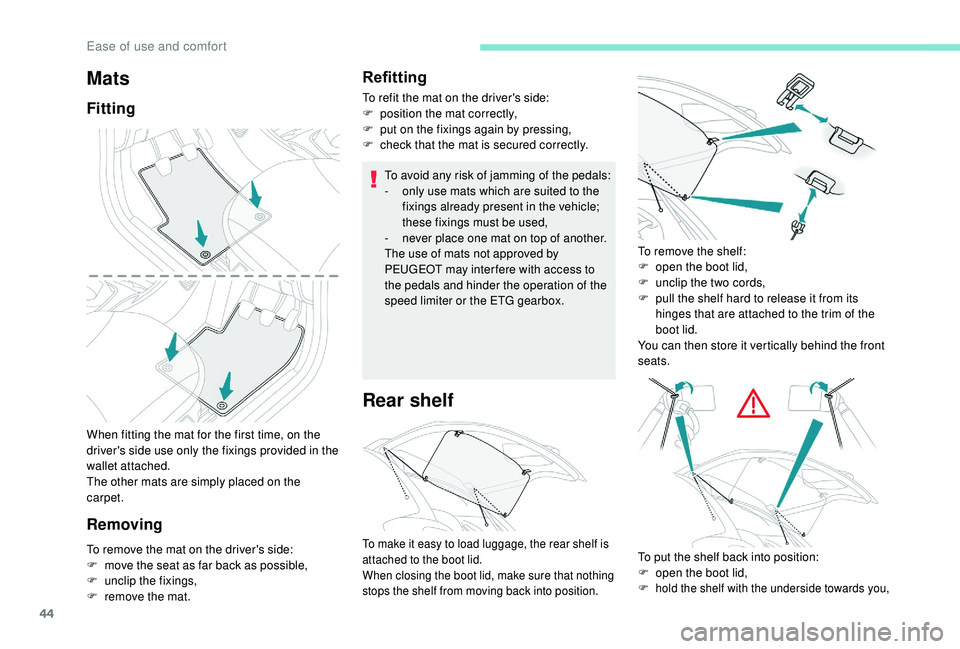
When fitting the mat for the first time, on the
driver's side use only the fixings provided in the
wallet attached.
The other mats are simply placed on the
carpet.
RemovingRefitting
To refit the mat on the driver's side:
F
p osition the mat correctly,
F
p
ut on the fixings again by pressing,
F
c
heck that the mat is secured correctly.
To avoid any risk of jamming of the pedals:
-
o
nly use mats which are suited to the
fixings already present in the vehicle;
these fixings must be used,
-
n
ever place one mat on top of another.
The use of mats not approved by
PEUGEOT may inter fere with access to
the pedals and hinder the operation of the
speed limiter or the ETG gearbox.
Rear shelf
Mats
Fitting
To remove the mat on the driver's side:
F
m ove the seat as far back as possible,
F
un
clip the fixings,
F
r
emove the mat. To remove the shelf:
F
o
pen the boot lid,
F
u
nclip the two cords,
F
p
ull the shelf hard to release it from its
hinges that are attached to the trim of the
boot lid.
You can then store it vertically behind the front
seats.To make it easy to load luggage, the rear shelf is
attached to the boot lid.
When closing the boot lid, make sure that nothing
stops the shelf from moving back into position.To put the shelf back into position:
F o pen the boot lid,
F
hold the shelf with the underside towards you,
Ease of use and comfort
Page 47 of 180
45
Do not place heavy objects on the shelf,
this may cause it to become unclipped.
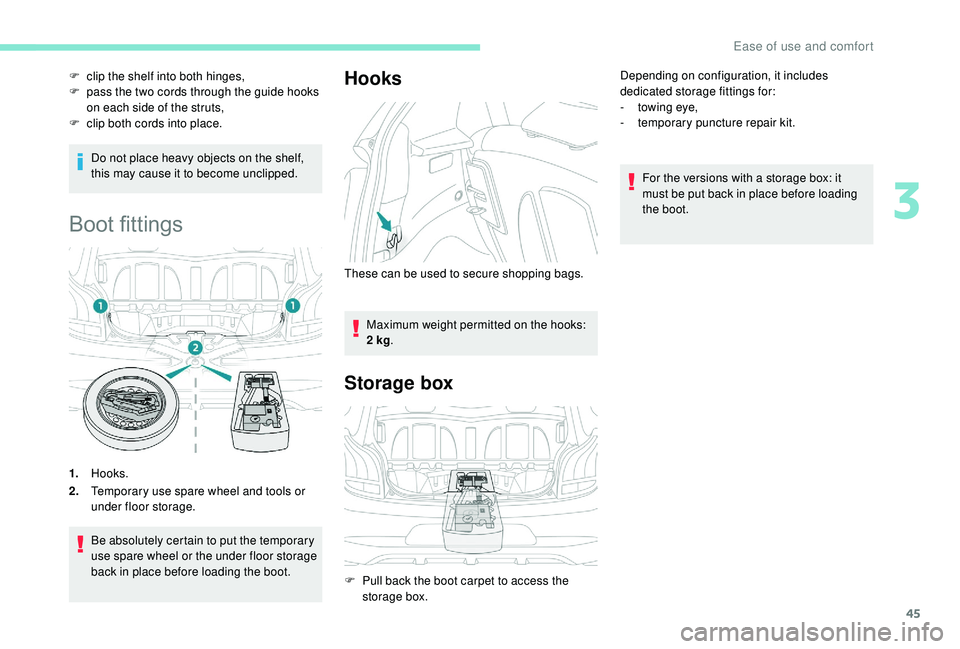
Boot fittings
1.Hooks.
2. Temporary use spare wheel and tools or
under floor storage.
Be absolutely certain to put the temporary
use spare wheel or the under floor storage
back in place before loading the boot.
Hooks
Maximum weight permitted on the hooks:
2
kg .
Storage box
Depending on configuration, it includes
dedicated storage fittings for:
-
t
owing eye,
-
t
emporary puncture repair kit.
For the versions with a
storage box: it
must be put back in place before loading
the boot.
F
c
lip the shelf into both hinges,
F
p
ass the two cords through the guide hooks
on each side of the struts,
F
c
lip both cords into place.
These can be used to secure shopping bags.
F
P
ull back the boot carpet to access the
storage box.
3
Ease of use and comfort
Page 48 of 180
46
Lighting control stalk
Main lighting
The various front and rear lamps of the vehicle
are designed to adapt the driver's visibility
progressively according to the climatic
conditions:
-
s
idelamps, to be seen,
-
d
ipped beam headlamps to see without
dazzling other drivers,
-
m
ain beam headlamps to see clearly when
the road is clear.
Additional lighting
Other lamps are provided to meet the
requirements of particular driving conditions:
-
a
rear foglamp,
-
f
ront foglamps,
-
d
aytime running lamps to be more visible
during the day.
In some weather conditions (e.g. low
temperature or humidity), the presence
of misting on the internal sur face of the
glass of the headlamps and rear lamps is
normal; it disappears after the lamps have
been on for a
few minutes. Travelling abroad
If planning to use your vehicle in a
country
that drives on the other side of the road,
the headlamp dipped beams must be
adjusted to avoid dazzling oncoming
drivers.
Contact a PEUGEOT dealer or a qualified
workshop.
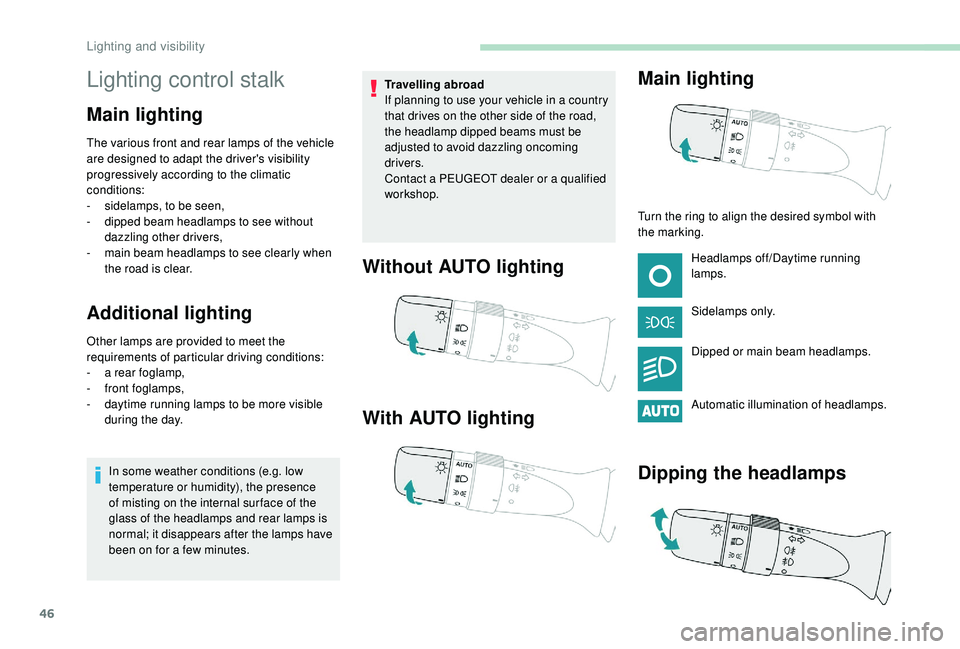
Without AUTO lighting
With AUTO lighting Main lighting
Turn the ring to align the desired symbol with
the marking.
Headlamps off/Daytime running
lamps.
Sidelamps only.
Dipped or main beam headlamps.
Automatic illumination of headlamps.
Dipping the headlamps
Lighting and visibility
Page 49 of 180
47
In the lighting off and sidelamps modes, the
driver can switch on the main beam headlamps
temporarily ("headlamp flash"), for as long as
the stalk is kept pulled.
Displays
Illumination of the corresponding indicator
lamp in the instrument panel confirms that the
lighting selected is switched on.
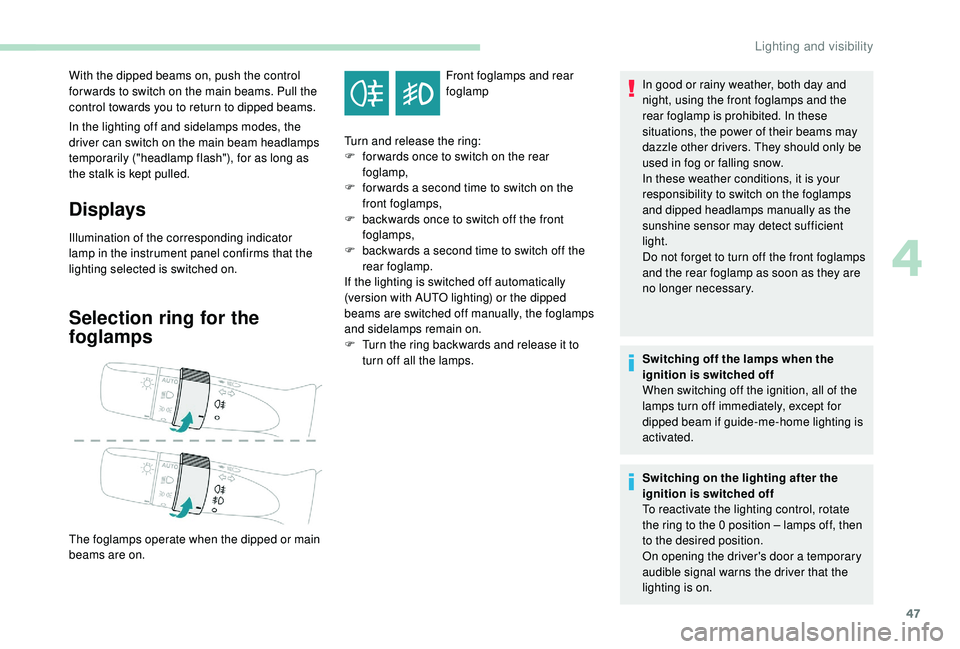
Selection ring for the
foglamps
Front foglamps and rear
foglamp
With the dipped beams on, push the control
for wards to switch on the main beams. Pull the
control towards you to return to dipped beams.
The foglamps operate when the dipped or main
beams are on. Turn and release the ring:
F
f
or wards once to switch on the rear
foglamp,
F
f
or wards a
second time to switch on the
front foglamps,
F
b
ackwards once to switch off the front
foglamps,
F
b
ackwards a
second time to switch off the
rear foglamp.
If the lighting is switched off automatically
(version with AUTO lighting) or the dipped
beams are switched off manually, the foglamps
and sidelamps remain on.
F
T
urn the ring backwards and release it to
turn off all the lamps. In good or rainy weather, both day and
night, using the front foglamps and the
rear foglamp is prohibited. In these
situations, the power of their beams may
dazzle other drivers. They should only be
used in fog or falling snow.
In these weather conditions, it is your
responsibility to switch on the foglamps
and dipped headlamps manually as the
sunshine sensor may detect sufficient
light.
Do not forget to turn off the front foglamps
and the rear foglamp as soon as they are
no longer necessary.
Switching off the lamps when the
ignition is switched off
When switching off the ignition, all of the
lamps turn off immediately, except for
dipped beam if guide-me-home lighting is
activated.
Switching on the lighting after the
ignition is switched off
To reactivate the lighting control, rotate
the ring to the 0
position – lamps off, then
to the desired position.
On opening the driver's door a
temporary
audible signal warns the driver that the
lighting is on.
4
Lighting and visibility
Page 50 of 180
48
Automatic headlamp
illumination
Switching on
F Turn the ring to the "AUTO" position.
Switching off
F Turn the ring to another position.
In fog or snow, the sunshine sensor may
detect sufficient light. The lamps will not
come on automatically.
Do not cover the light sensor, the
associated functions would no longer be
controlled.
Manual guide-me-home
lighting
Switching on
F Set the lighting control stalk to the "Lights off " or "Auto" position.
F
W
ith the ignition off, flash the headlamps
using the lighting stalk.
The headlamps come on for a
duration of about
30
seconds.
Switching off
The manual guide-me-home lighting stops
immediately if:
-
y
ou "flash the headlamps" again,
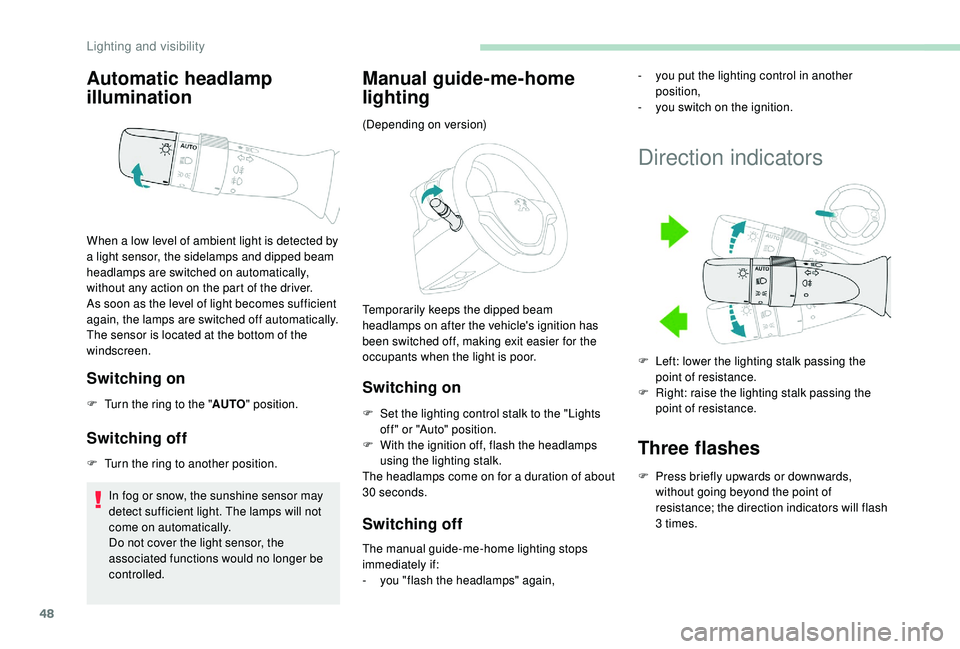
When a
low level of ambient light is detected by
a
light sensor, the sidelamps and dipped beam
headlamps are switched on automatically,
without any action on the part of the driver.
As soon as the level of light becomes sufficient
again, the lamps are switched off automatically.
The sensor is located at the bottom of the
windscreen. (Depending on version)
Temporarily keeps the dipped beam
headlamps on after the vehicle's ignition has
been switched off, making exit easier for the
occupants when the light is poor.
Direction indicators
Three flashes
F Press briefly upwards or downwards,
without going beyond the point of
resistance; the direction indicators will flash
3
times.
-
y
ou put the lighting control in another
position,
-
y
ou switch on the ignition.
F
L
eft: lower the lighting stalk passing the
point of resistance.
F
R
ight: raise the lighting stalk passing the
point of resistance.
Lighting and visibility