PEUGEOT 2008 2014 Owners Manual
2008 2014
PEUGEOT
PEUGEOT
https://www.carmanualsonline.info/img/29/76301/w960_76301-0.png
PEUGEOT 2008 2014 Owners Manual
Trending: roof, Dash, fog light bulb, service schedule, fuel filter, seat adjustment, set clock
Page 171 of 336
169
7
Practical information
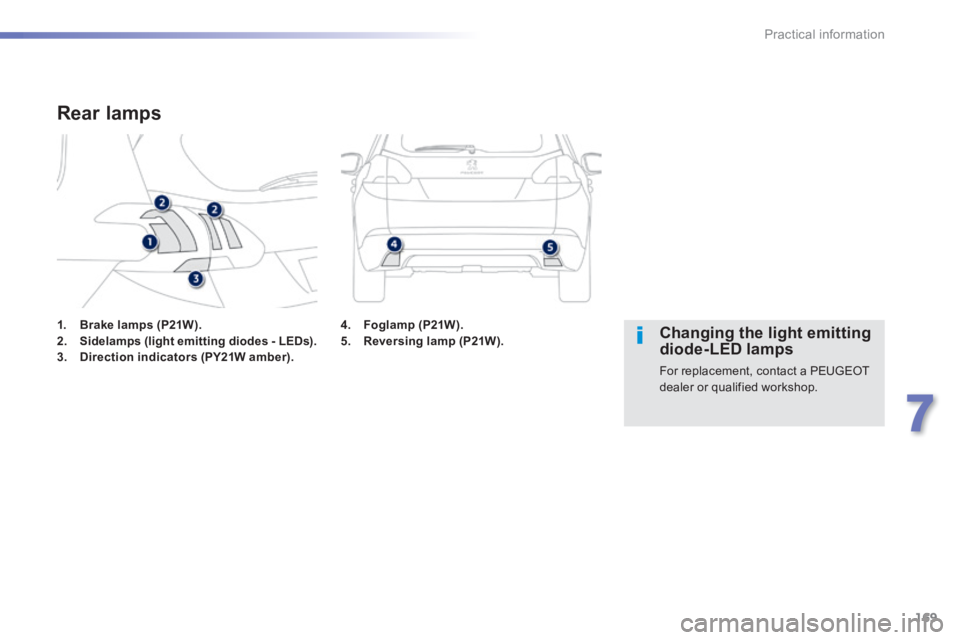
1. Brake lamps (P21W).2. Sidelamps (light emitting diodes - LEDs).3. Direction indicators (PY21W amber).
Rear lamps
Changing the light emitting diode-LED lamps
For replacement, contact a PEUGEOT dealer or qualified workshop.
4. Foglamp (P21W).5. Reversing lamp (P21W).
Page 172 of 336
170
Practical information
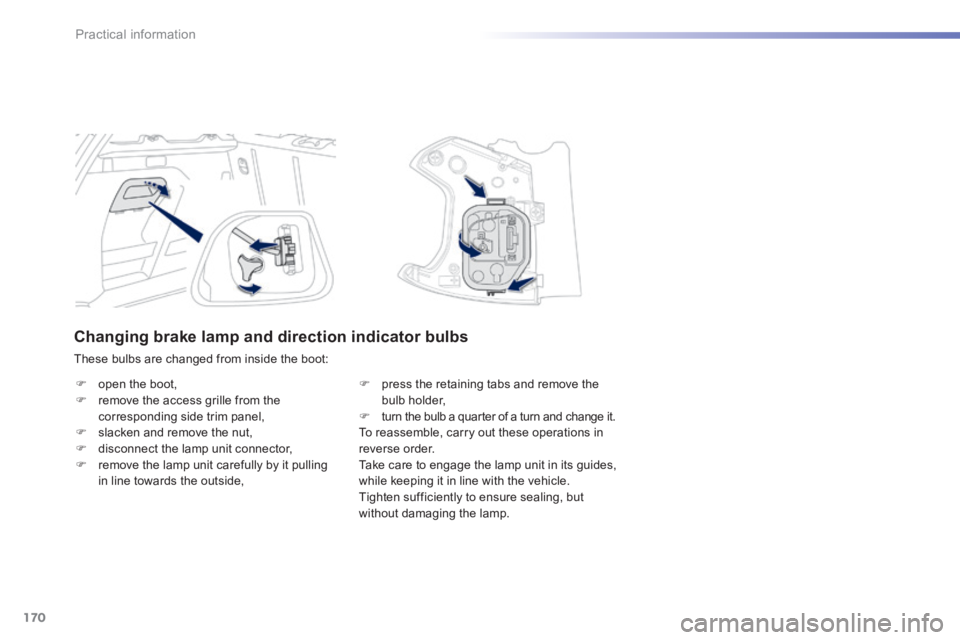
Changing brake lamp and direction indicator bulbs
These bulbs are changed from inside the boot:
open the boot, remove the access grille from the corresponding side trim panel, slacken and remove the nut, disconnect the lamp unit connector, remove the lamp unit carefully by it pulling in line towards the outside,
press the retaining tabs and remove the bulb holder, turn the bulb a quarter of a turn and change it. To reassemble, carry out these operations in reverse order. Take care to engage the lamp unit in its guides, while keeping it in line with the vehicle. Tighten sufficiently to ensure sealing, but without damaging the lamp.
Page 173 of 336
171
7
Practical information
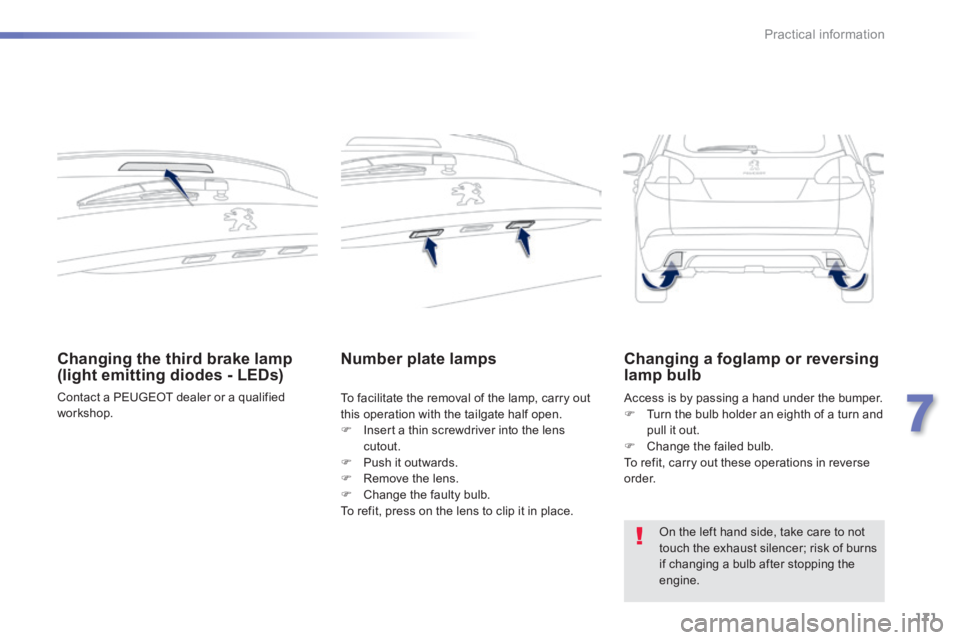
Changing the third brake lamp (light emitting diodes - LEDs)
Contact a PEUGEOT dealer or a qualified workshop.
Number plate lamps
To facilitate the removal of the lamp, carry out this operation with the tailgate half open.
Insert a thin screwdriver into the lens cutout. Push it outwards. Remove the lens. Change the faulty bulb. To refit, press on the lens to clip it in place.
Access is by passing a hand under the bumper. Turn the bulb holder an eighth of a turn and pull it out. Change the failed bulb. To refit, carry out these operations in reverse o r d e r.
Changing a foglamp or reversing lamp bulb
On the left hand side, take care to not touch the exhaust silencer; risk of burns if changing a bulb after stopping the engine.
Page 174 of 336
172
Practical information
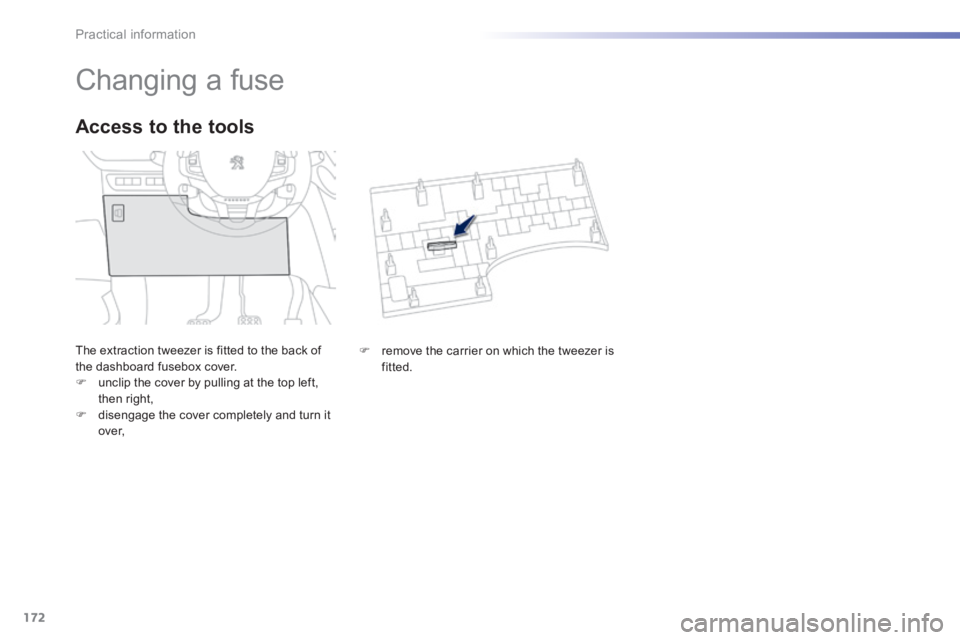
Changing a fuse
The extraction tweezer is fitted to the back of the dashboard fusebox cover. unclip the cover by pulling at the top left, then right, disengage the cover completely and turn it over,
Access to the tools
remove the carrier on which the tweezer is fitted.
Page 175 of 336
173
7
Practical information
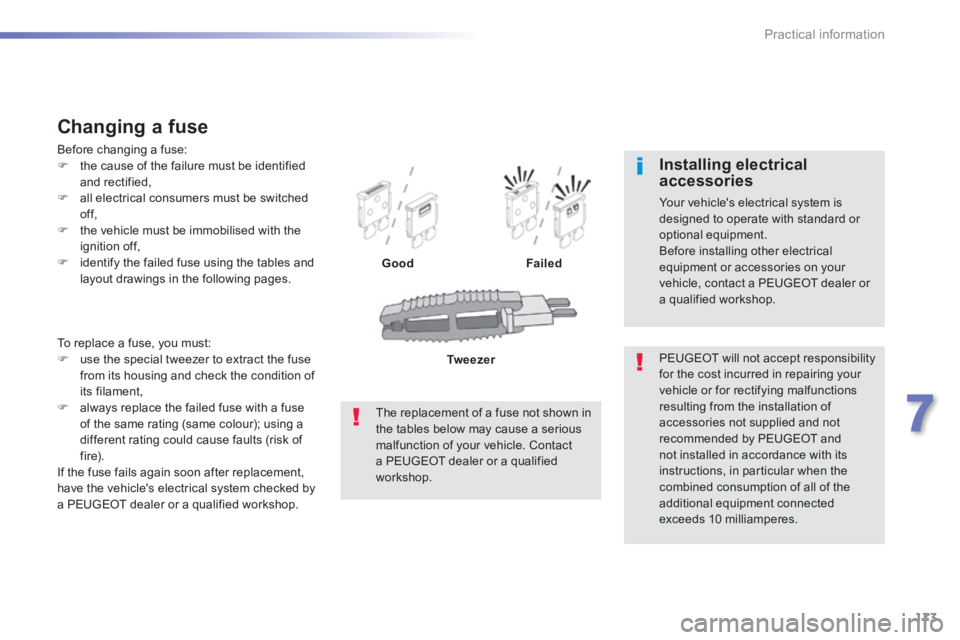
To replace a fuse, you must: use the special tweezer to extract the fuse from its housing and check the condition of its filament, always replace the failed fuse with a fuse of the same rating (same colour); using a different rating could cause faults (risk of f i r e). If the fuse fails again soon after replacement, have the vehicle's electrical system checked by a PEUGEOT dealer or a qualified workshop.
Changing a fuse
Before changing a fuse: the cause of the failure must be identified and rectified, all electrical consumers must be switched of f, the vehicle must be immobilised with the ignition off, identify the failed fuse using the tables and layout drawings in the following pages. GoodFailed
PEUGEOT will not accept responsibility for the cost incurred in repairing your vehicle or for rectifying malfunctions resulting from the installation of accessories not supplied and not
recommended by PEUGEOT and not installed in accordance with its instructions, in particular when the combined consumption of all of the additional equipment connected exceeds 10 milliamperes.
Installing electrical accessories
Your vehicle's electrical system is designed to operate with standard or optional equipment. Before installing other electrical equipment or accessories on your vehicle, contact a PEUGEOT dealer or a qualified workshop.
The replacement of a fuse not shown in the tables below may cause a serious malfunction of your vehicle. Contact a PEUGEOT dealer or a qualified workshop.
Tw e e z e r
Page 176 of 336
174
Practical information
Dashboard fuses
The fusebox is placed in the lower dashboard (left-hand side).
Access to the fuses
Refer to the paragraph "Access to the to o ls".
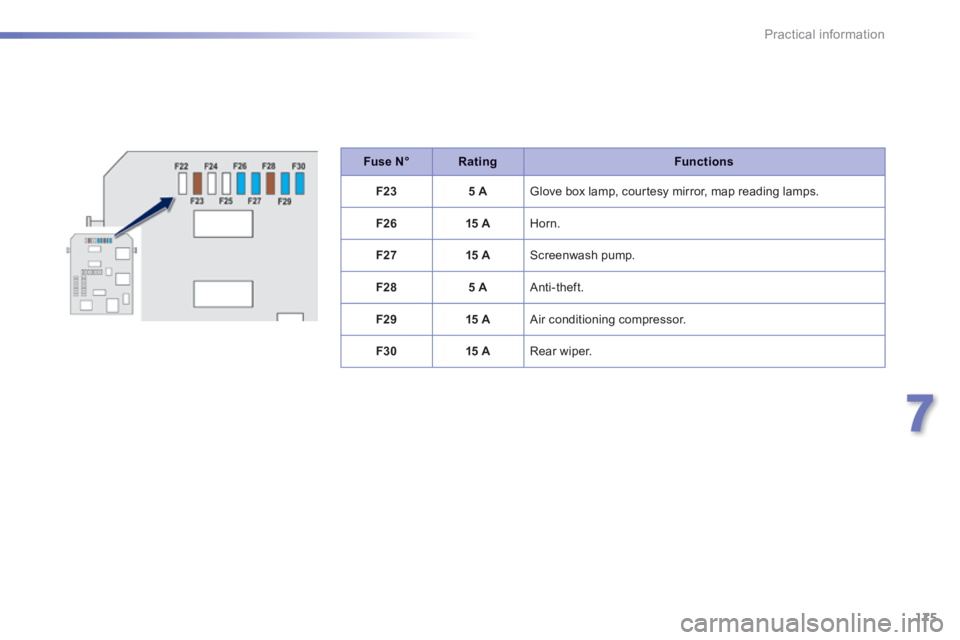
Fuse N°RatingFunctions
F25 A Door mirrors, headlamps, diagnostic socket.
F95 A Alarm.
F105 A Independent telematic unit, trailer interface.
F115 A Electrochrome rear view mirror, additional heating.
F135 A Hi-Fi amplifier, parking sensors
F1615 A Front 12 V socket.
F1715 A Audio system, audio system (accessory).
F1820 A Touch screen.
Fuse tables
Page 177 of 336
175
7
Practical information
Fuse N°RatingFunctions
F235 A Glove box lamp, courtesy mirror, map reading lamps.
F2615 A Horn.
F2715 A Screenwash pump.
F285 A Anti-theft.
F2915 A Air conditioning compressor.
F3015 A Rear wiper.
Page 178 of 336
176
Practical information
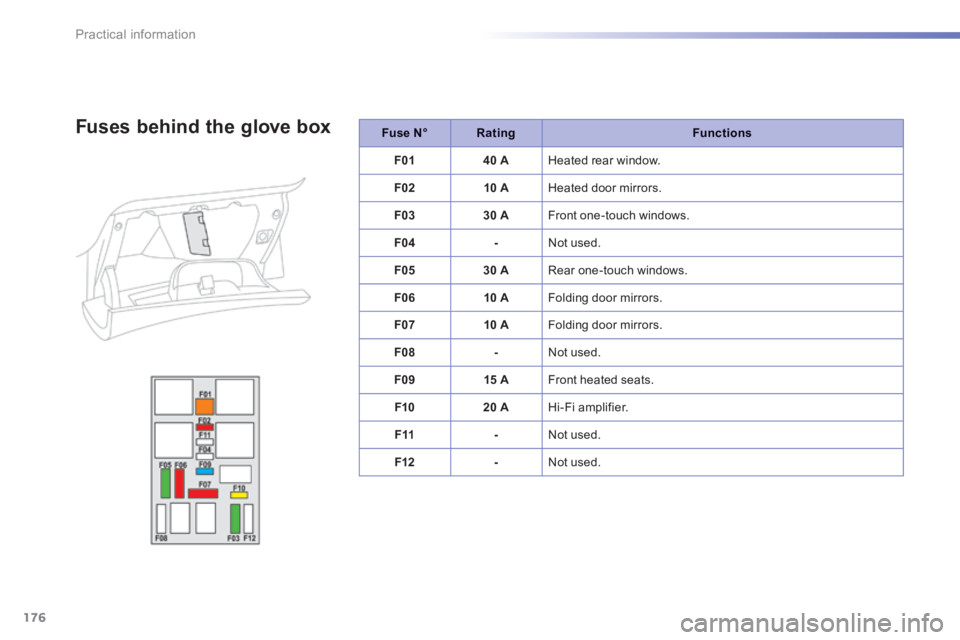
Fuse N°RatingFunctions
F0140 A Heated rear window.
F0210 A Heated door mirrors.
F0330 A Front one-touch windows.
F04- Not used.
F0530 A Rear one-touch windows.
F0610 A Folding door mirrors.
F0710 A Folding door mirrors.
F08- Not used.
F0915 A Front heated seats.
F1020 A Hi-Fi amplifier.
F11- Not used.
F12- Not used.
Fuses behind the glove box
Page 179 of 336
177
7
Practical information
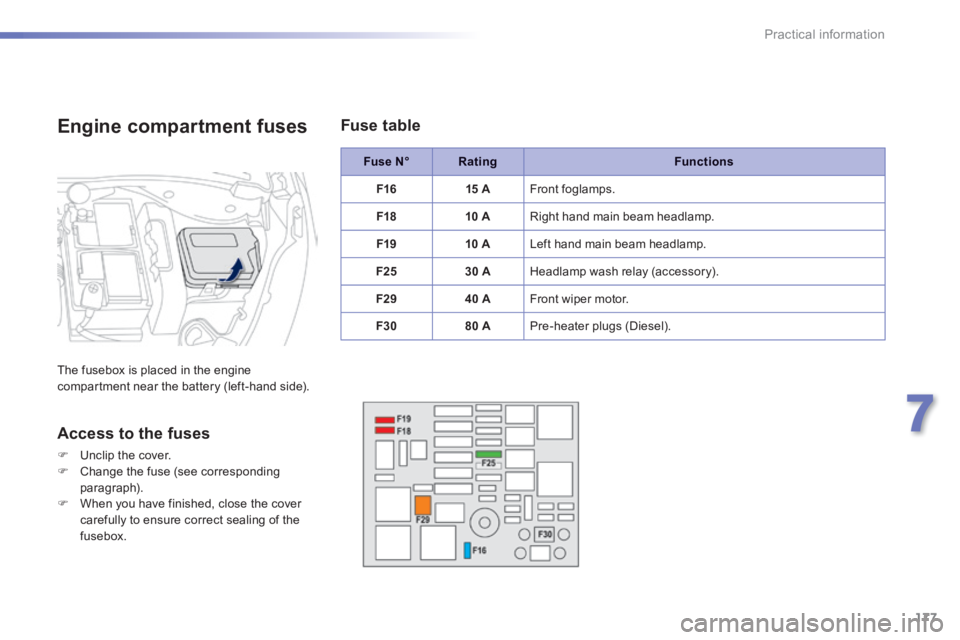
Fuse N°RatingFunctions
F1615 A Front foglamps.
F1810 A Right hand main beam headlamp.
F1910 A Left hand main beam headlamp.
F2530 A Headlamp wash relay (accessory).
F2940 A Front wiper motor.
F3080 A Pre-heater plugs (Diesel).
Engine compartment fuses
The fusebox is placed in the engine compartment near the battery (left-hand side).
Access to the fuses
Unclip the cover. Change the fuse (see corresponding paragraph). When you have finished, close the cover carefully to ensure correct sealing of the fusebox.
Fuse table
Page 180 of 336
178
Practical information
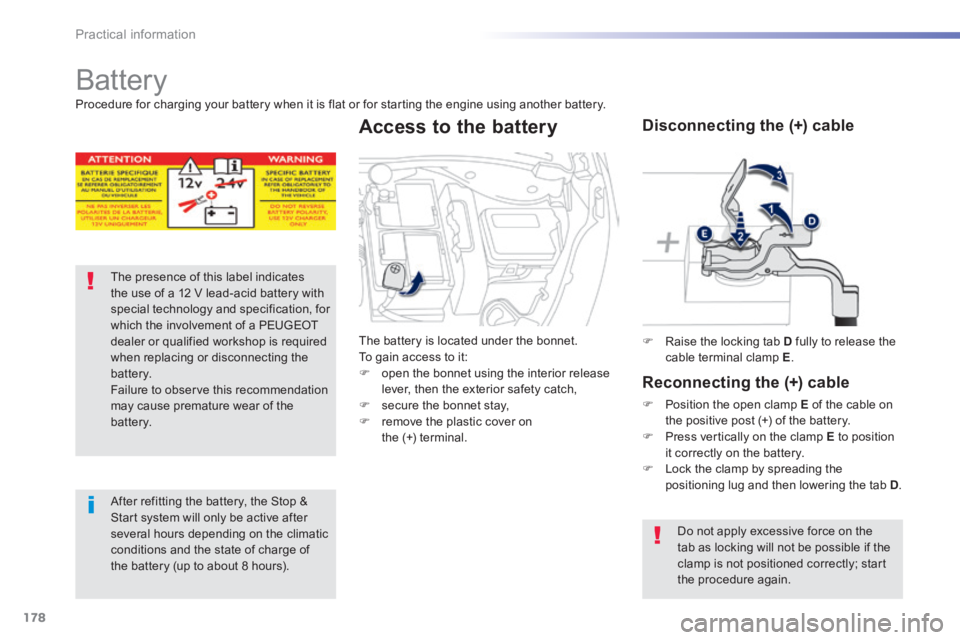
Battery
The presence of this label indicates the use of a 12 V lead-acid battery with special technology and specification, for which the involvement of a PEUGEOT dealer or qualified workshop is required when replacing or disconnecting the battery. Failure to observe this recommendation may cause premature wear of the battery.
After refitting the battery, the Stop & Start system will only be active after several hours depending on the climatic conditions and the state of charge of the battery (up to about 8 hours).
Raise the locking tab D fully to release the cable terminal clamp E .
Disconnecting the (+) cable
Reconnecting the (+) cable
Position the open clamp E of the cable on the positive post (+) of the battery.
Press vertically on the clamp E to position it correctly on the battery. Lock the clamp by spreading the positioning lug and then lowering the tab D .
Do not apply excessive force on the tab as locking will not be possible if the clamp is not positioned correctly; start the procedure again.
Procedure for charging your battery when it is flat or for starting the engine using another battery.
The battery is located under the bonnet. To gain access to it: open the bonnet using the interior release lever, then the exterior safety catch, secure the bonnet stay, remove the plastic cover on
the (+) terminal.
Access to the battery
Trending: AUX, fuse box, STOP light, low oil pressure, park assist, alarm, key battery
